Halloween Rocky Road Slices
Servings: 25 slices
Calories: 200kcal
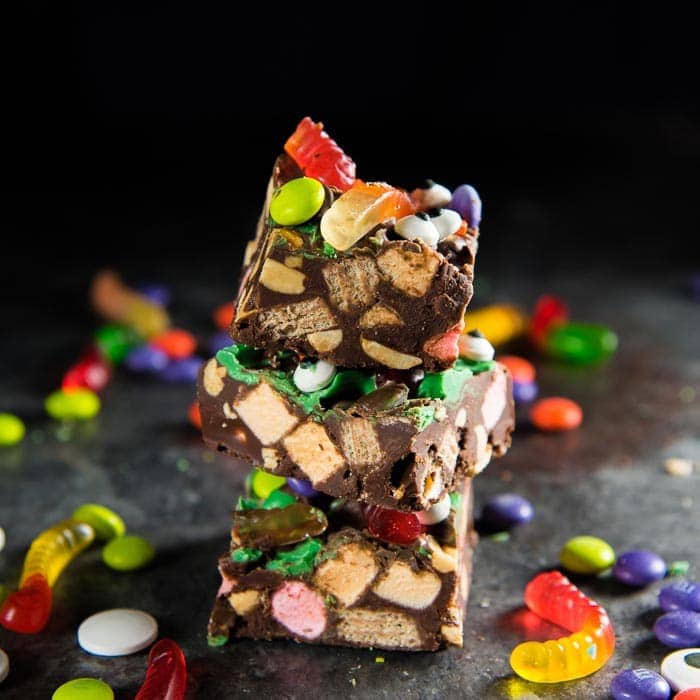
These delicious Halloween Rocky Road Slices are chock-full of crunchy, soft, chewy, gooey sweet goodies that make them the perfect cute Halloween treat for trick-or-treaters. They also double up as easy, no bake Halloween desserts to enjoy at home.Makes 25 slices
Print Recipe
Ingredients
Chocolate Base
- 340 g semi-sweet chocolate chips 2¼ cups
- 170 g of butter ¾ cup, 1½ sticks
- Generous pinch of salt
Additions to the Rocky Road Slices
- 150 g roasted peanuts about 1¼ cups
- 75 g mini marshmallows about 1½ cups. I used mini pink and orange marshmallows, but vanilla is fine too.
- 10 mini kit kat bars or 5 regular kit kat bars, you can use other candy bars too.
- 115 g candy melts, in each color about 1 cup each. in purple or green or orange - don’t use more than 2 colors.
To decorate Rocky Road Slices, use as much or as little as you like
- Gummy worms regular or sour
- M&M candy Ghoul mix
- Candy eyes a mix of small and large eyes
- Halloween sprinkles
- Extra melted semi-sweet chocolate
Instructions
Chocolate Base
- Line an 8 inch or 9 inch square pan with parchment paper. (8 inch pan for thicker slices, and 9 inch for thinner slices). Set aside.
- In a large bowl, place the butter, chocolate chips and salt.340 g semi-sweet chocolate chips, 170 g of butter, Generous pinch of salt
- Microwave in 30 second intervals, while stirring in between, until the chocolate chips have completely melted.
Additions to the Rocky Road Slices
- Melt the candy melts in the microwave in separate bowls (if you’re using different colors), in 20 - 30 second intervals, while stirring in between, until completely melted and smooth. Set aside.115 g candy melts, in each color
- Cut the kit kat bars into pieces (I cut each wafer in half), and set aside. Cut other candy bars you use into similar sized pieces as well.10 mini kit kat bars
- Wait for the chocolate base to cool down slightly. Add the peanuts and chocolate candy bars and stir them through. The chocolate coating of the candy bars will melt, and that’s OK.150 g roasted peanuts, 10 mini kit kat bars
- Add the marshmallows last, to prevent them from melting in the warm chocolate. Mix the marshmallows into the chocolate.75 g mini marshmallows
- Scrape the rocky road mix into the prepared pan, along with dollops of the melted candy melts. Swirl and distribute the rocky road base evenly in the pan. Gently press in the mixture with an offset spatula to make sure it fills evenly and spreads to the edges of the pan.115 g candy melts, in each color
- Decorating the Halloween rocky road slices (see below) should be done while the chocolate mixture is still wet, so that the candies stick to the surface.
Decorating Rocky Road Slices
- Before decorating the surface, I recommend that you use the tip of a knife to mark where you'll be cutting the slices. You can cut this into 5 x 5 (25) pieces, or 4 x 4 (16) pieces. This is so that you know where NOT to place M&Ms and candy eyes (the gummy worms cut through easily).
- Place gummy worms wherever you like on the surface. Gently press them in to make sure that they stick to the surface.Gummy worms
- Next, place the Ghoul M&Ms and candy eyes between the gummy worms. Make sure to avoid the cut lines that you've marked, so that you don't have to cut through these when serving these slices. Use Halloween sprinkles to further decorate the surface.M&M candy, Halloween sprinkles, Candy eyes
- You can use a little bit of melted chocolate to help stick all the candy to the surface if you like.Extra melted semi-sweet chocolate
- Refrigerate the pan until the chocolate is completely set (I refrigerate it overnight).
- Next day, remove the rocky road from the pan and cut with a sharp knife along the cut lines that you have already marked. (Warm the knife in hot water to help with cutting, if needed).
- Store rocky road slices in the fridge in an airtight container. Serve as needed.
Nutrition
Serving: 1slice | Calories: 200kcal | Carbohydrates: 13g | Protein: 3g | Fat: 15g | Saturated Fat: 8g | Cholesterol: 15mg | Sodium: 88mg | Potassium: 135mg | Fiber: 1g | Sugar: 9g | Vitamin A: 175IU | Calcium: 17mg | Iron: 1mg