Mixed Berry Pie Recipe
Servings: 10 servings
Calories: 528kcal
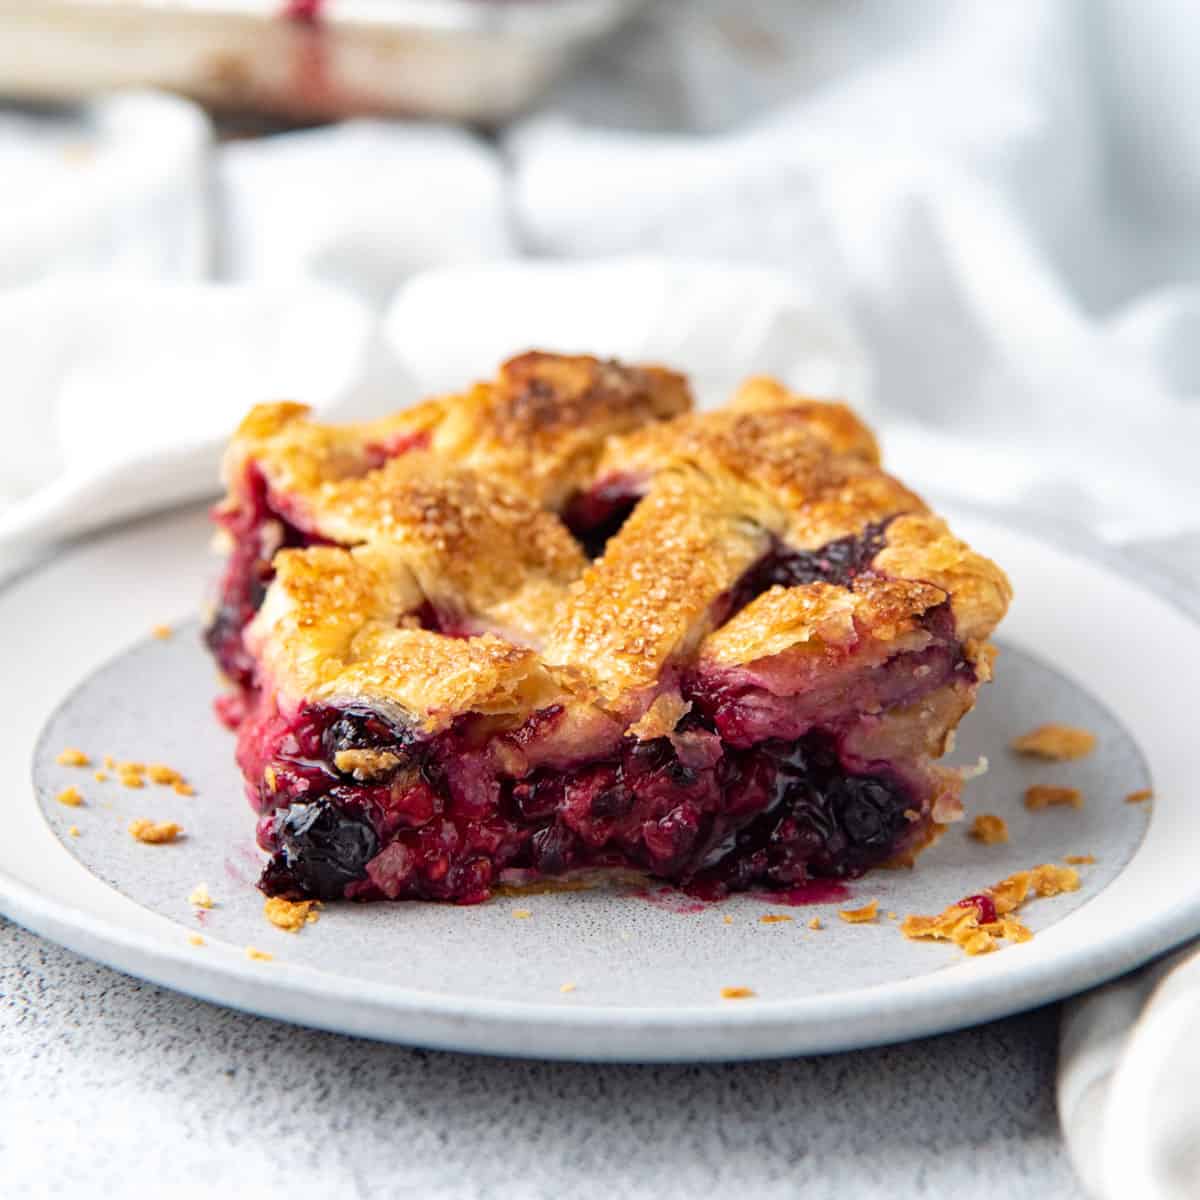
The ultimate mixed berry pie! Buttery and flaky pie crust with a juicy and perfectly sweet berry filling. A very versatile recipe that you can make as a classic pie or a slab pie. And use fresh or frozen berries, so you can make this any time of the year!INTERMEDIATE - The filling for this pie is very easy to make. The pie crust could be a little challenging for beginners. However, with my pie crust guide, this recipe should be very accessible for beginners as well. I highly recommend reading that post if you'd like to make the pie crust from scratch.US based cup, teaspoon, tablespoon measurements. Common Measurement Conversions. Weight measurements are recommended for accurate results. You can switch between the measurement types using the toggle button below the ingredients list.
Print Recipe
Ingredients
Pie crust
For a 9 x 13 inch slab pie
- 525 g unsalted butter preferably chilled
- 212 g iced water
- 50 g chilled vodka or use the same amount of iced water (for a total of 262 g / 1.1 cups)
- 700 g all purpose flour spoon and level when using cup measurements
- 52 g sugar
- 1 ¼ tsp fine sea salt
For a 9 - 9.5 inch pie plate
- 300 g unsalted butter preferably chilled
- 120 mL iced water
- 30 mL chilled vodka or use the same amount of iced water (for a total of 150 mL / ⅔ cups)
- 400 g all purpose flour spoon and level when using cup measurements
- 30 g sugar
- ¾ tsp fine sea salt
Mixed berry filling
- 1.6 kg mixed berries a combination of blueberries, raspberries, blackberries and strawberries
- 150 g white sugar
- 1 tbsp lemon zest
- 3 tbsp lemon juice
- 40 g cornstarch 4 packed tbsp
- ¼ tsp salt
Baking the pie
- 1 egg beaten egg for the egg wash
- raw sugar to sprinkle on top
Makes: 9 x 13inch rectangle
Instructions
Pie crust
- Follow the recipe instructions given here to make the pie crust dough.
- Make the recipe with 700 g of flour for a slab pie.525 g unsalted butter, 212 g iced water, 50 g chilled vodka, 700 g all purpose flour, 52 g sugar, 1 ¼ tsp fine sea salt
- OR follow the recipe with 400 g of flour for a 9.5 inch pie plate.300 g unsalted butter, 120 mL iced water, 30 mL chilled vodka, 400 g all purpose flour, 30 g sugar, ¾ tsp fine sea salt
- Once the pie dough is formed, divide the dough into two portions and wrap each portion and store in the fridge for at least 2 hours, or overnight.
The next day
- Place one portion of the dough on a lightly floured work surface. For the slab pie, roll out the dough into a rectangle shape that is about 3 mm in thickness and will easily fit in the quarter sheet pan.
- For the round pie, roll out the dough into a circle that is about 3 mm thick. Make sure to keep the dough moving and flip it over to prevent the dough from sticking to your work surface.
- If the dough starts to shrink, and is harder to roll out, gently fold over the dough into quarters, cover with plastic wrap, and refrigerate for at least 15 minutes, to relax the gluten.
- Now transfer the dough onto the pie dish (round dish or quarter sheet pan). You can do this by rolling up the dough onto a rolling pin and then carefully unrolling it over the pie dish.
- DO NOT stretch the dough to fit it inside the pie dish. This is crucial and a common beginner's mistake. Instead, carefully lift the pie crust and let it gently fall onto the pie dish. Use the back of your fingers to gently press the dough into the bottom of the pie dish, so that it fits neatly in the dish.
- There should be an overhang over the pie dish rim. Using scissors or a sharp knife, cut the excess pie crust, leaving at least a 0.5 – 1 inch overhang.
- Cover and refrigerate the pie dish until needed.
- Roll out the second portion the same way as the first portion to a 3 mm thickness. Lightly dust the dough, and either roll it up or fold it into quarters. Then cover with plastic wrap and store in the fridge until needed.
Making the mixed berry filling
- Wash and dry the berries with a paper towel. Cut the strawberries into halves or quarters if they are too big.
- In a large bowl, place about ⅔ of the mixed berries. Put the rest of the berries in another medium sized bowl.1.6 kg mixed berries
- Using a fork or masher, gently mash the ⅓ portion of the berries.
- Divide the sugar in half (roughly), and add each portion to each of the two bowls. Gently fold in the sugar in both bowls and let it sit for about 15 minutes.150 g white sugar
- After 15 minutes, add the lemon zest, juice, salt, and cornstarch into the bowl with the mashed berries. Combine well. Make sure there are no cornstarch lumps.1 tbsp lemon zest, 3 tbsp lemon juice, 40 g cornstarch, ¼ tsp salt
- Add this mix into the big bowl with the whole berries and gently fold to combine.
Assembling the pie
- Preheat the oven to 425°F / 218°C. Place the oven rack in the lower third of your oven, along with a baking dish (like a half sheet pan). The oven should preheat for at least 30 minutes.
- Scrape all the berry filling into the pie dough lined pie dish (either a 9 x 13 inch pie plate OR a 9 inch deep pie plate).
- Cover the pie with the second dough that has been rolled out. You can choose to either cover the whole surface OR cut the dough into strips and create a lattice crust (as I have done in the pictures in this post).
- Brush the edge of the bottom crust with some water and press the top crust down so that it sticks to the bottom crust dough well. Trim the excess dough along the edge so that you have a 0.5 - 1 inch overhang.
- Roll the overhang UNDER the pie crust to create a thick pie crust edge. Crimp the edge with a fork or create a patterned edge with your fingers (my favorite is to create a fluted edge. Check my pie crust troubleshooting post to see how to do this).
- If the crust gets soft at any stage, return the pie to the fridge to let the crust harden a little.
- Once you have assembled the pie, let it chill in the fridge for at least 30 minutes before baking.
- When the oven has preheated AND the pie has chilled, the pie is ready to be baked.
Baking the pie
- Remove the pie from the fridge and brush an egg wash all over the surface of the pie.1 egg
- Sprinkle some raw sugar over the egg wash brushed pie crust.raw sugar
- Place the pie plate on the preheated baking tray that is in the lower third of the oven (in my oven, this is the rack just above the bottom-most rack).
- Lower the oven heat to 350°F / 180°C and bake the pie for 45 - 60 minutes, or until the crust is a lovely golden brown in color. The baking time should be a minimum of 45 minutes for a pie slab, and a minimum of 50 minutes for a 9 inch pie dish. If the crust is browning too fast, use a foil or silicone crust shield to cover the crust.
- When the pie has baked through, remove it from the oven and let it rest at room temperature until it has completely cooled down, BEFORE cutting into it.
- This pie can be left to cool at room temperature overnight as well.
- Serve the pie at room temperature or slightly warm, with a scoop of ice cream or dollop of whipped cream.
Notes
Tips for making this easy berry pie
Double the pie crust and filling to make a HUGE berry slab pie in a 13 x 9 inch baking tray (half sheet pie). Keep the pie dough nice and cold throughout the whole process to ensure the pie crust is flaky. Make this with 3 types of berries for a triple berry pie so that you get all the flavors of those delicious berries. But you can absolutely use just 1 or 2 berry types as well. If using frozen berries, let the berries thaw out in the fridge on a paper towel (or cloth napkin, but this will stain). This will remove the excess water in the berries. Smush some of the berries to get a mixture of jammy and whole berries. Bake in the lower third of the oven, WITH a preheated baking tray to prevent a soggy pie bottom. In my oven, this is the rack that is above the bottom-most rack, but your oven could be a little different.Storage instructions
This pie tastes best within the first 24 hours, at room temperature. You can also keep it at room temperature for up to 2 days, in an air-tight container. If you want to store the pie for longer, I recommend storing the pie in the fridge for up to 5 days. The crust will get soggier and won’t taste as good over time, so I like to warm it in the oven for a little bit before eating after storing it in the fridge. You can also freeze the baked pie as well. To freeze this pie, bake and completely cool the pie to room temperature. Then wrap the pie with plastic wrap and place it in a freezer bag. Store in the freezer for up to 3 months. Let the pie thaw to room temperature before eating.Nutrition
Serving: 1slice | Calories: 528kcal | Carbohydrates: 72g | Protein: 5g | Fat: 26g | Saturated Fat: 16g | Polyunsaturated Fat: 2g | Monounsaturated Fat: 6g | Trans Fat: 1g | Cholesterol: 65mg | Sodium: 239mg | Potassium: 143mg | Fiber: 6g | Sugar: 32g | Vitamin A: 824IU | Vitamin C: 7mg | Calcium: 27mg | Iron: 2mg