
Pain au chocolat (chocolate croissants)
Servings: 6 croissants
Calories: 376kcal
Detailed, step by step recipe to make failproof, authentic pain au chocolat (chocolatine / chocolate croissants) with buttery homemade croissant dough. ADVANCED - Great for advanced bakers, or even intermediate and beginner-level bakers looking for a challenge. The active time for this recipe is about 90 minutes, inactive time is about 5 hours. Additionally, there are1 - 2 nights of resting which stretches the whole recipe to 2 to 3 days (depending on your workflow). The total recipe time indicated below includes TWO overnight resting periods. I prefer to make these croissants over 3 days so that I can bake these in the morning, but it can be made in two days as well (Total time - 14 hours).Use of gram measurements for accurate, consistent results is highly recommended. US based cup, teaspoon, tablespoon measurements are also provided, but may yield inconsistent results. Common Measurement Conversions.
Print Recipe
Equipment
- 1 large parchment paper, about 14 x 10 inches, folded in half to form a 7 x 10 inch paper for the dough
- 1 large parchment paper, enough to cover a 5 x 6 inch butter block
- Plastic wrap
- Heavy rolling pin
- 1 quarter sheet pan
- 1 Half Sheet pan
- A ruler with cm and inch markings. I like to use a heavy steel ruler with clean, precise edges.
- A sharp paring knife
- A sharp straight edged knife or pizza cutter
- Pastry brush (preferably one large and one small)
Ingredients
Détrempe
- 85 g milk ⅓ cup, lukewarm
- 60 g water ¼ cup, lukewarm
- 5 g active dry yeast about 1½ tsp
- 5 g honey 1 tsp. (OR malt syrup, OR use sugar if you have neither)
- 25 g butter 1 ½ tbsp, melted and cooled, or softened
- 20 g white sugar generous 1 ½ tbsp
- 250 g AP flour 2 cups, spooned and leveled
- 5 g salt about 1 tsp
Tourrage and filling
- 140 g butter 10 tbsp
- 12 chocolate batons
Egg wash (whisk these ingredients until very smooth)
- 1 egg yolk
- 2 tbsp milk and / or cream
Instructions
Détrempe (the dough)
- Dissolve the honey in the milk in a mixing bowl, and then whisk in the yeast. Set it aside for the yeast to activate for about 10 - 20 minutes.85 g milk, 5 g honey, 5 g active dry yeast
- Add the rest of the ingredients into the bowl in the order listed in the ingredients list. Stir with a spatula or spoon to mix it into a scraggly dough.60 g water, 25 g butter , 20 g white sugar , 250 g AP flour , 5 g salt
- Using your hands, knead the dough for about 1 - 2 minutes until a scraggly dough is formed. You can also use a stand mixer, but the dough amount might be too little for a mixer to knead.
- Take the dough out of the bowl and knead it on a work surface until smooth and fairly elastic; about 4 - 5 minutes. You shouldn’t have to put too much effort into kneading here because it isn’t a very stiff dough. Place the dough back in the mixing bowl and cover with plastic wrap. You can also do this step in the mixer (depending on your mixer).
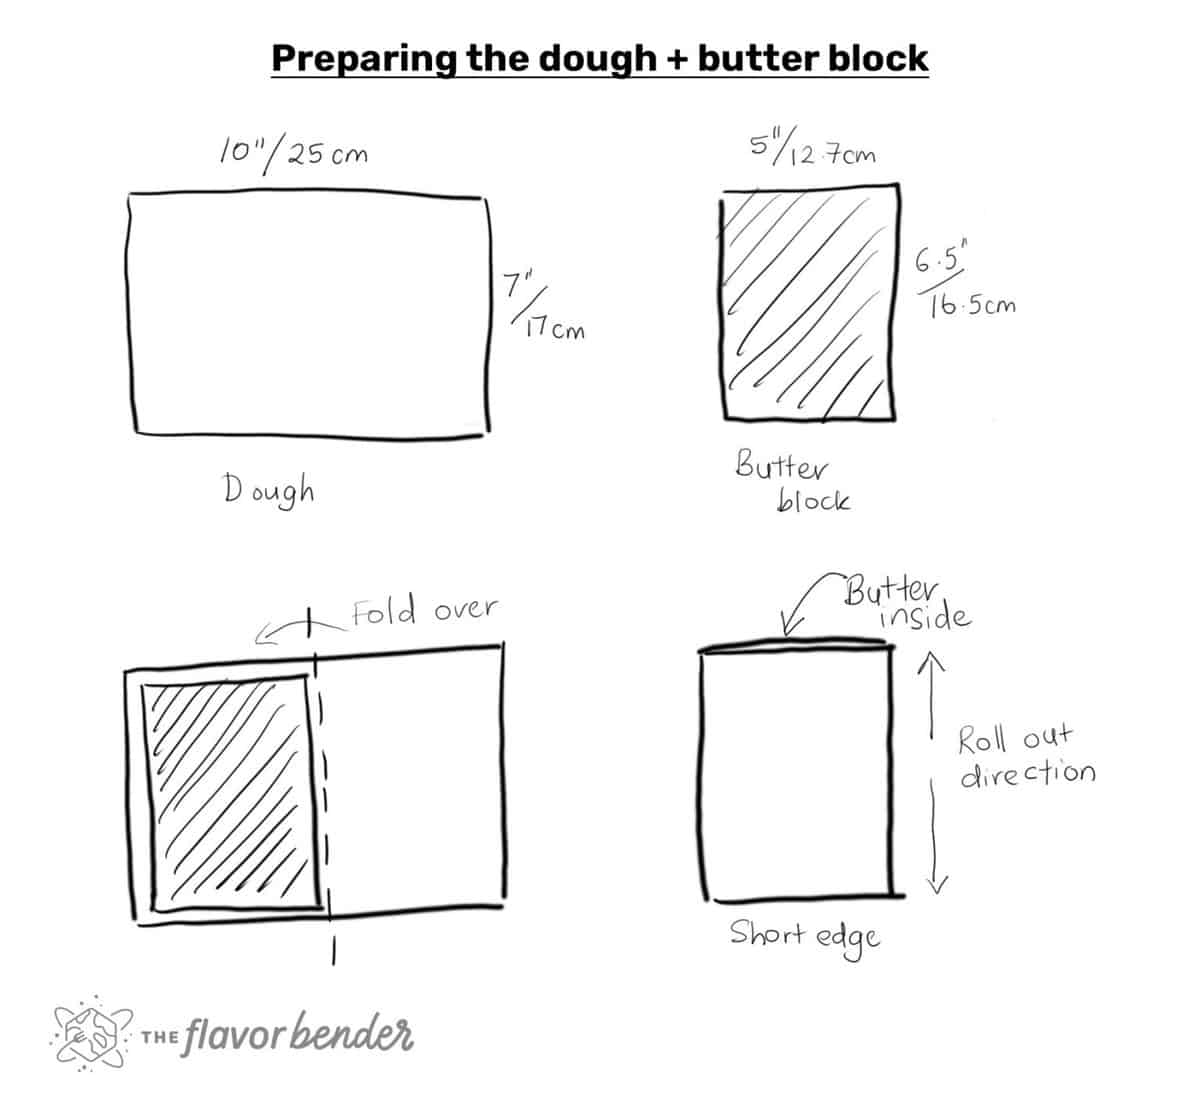
- Place the dough on a very lightly floured surface, and form it into a rectangle shape. It doesn't have to be precise, but the rectangle should be about 6 inches wide and about 10 inches long (6 x 10 inches, OR smaller).
- Fold the 14 x 10 parchment paper in half. Place the dough in the middle of the folded parchment paper and wrap with plastic wrap well.
- Place the dough in a quarter sheet pan and chill in the refridgerator overnight. See recipe notes below.
Tourrage (butter block)
- The butter block can be prepared in different ways. You can either cut the cold butter into smaller pieces and roll them out to form a block (as in my croissant recipe post), OR you can also use the rolling pin to smash and roll the butter into the desired shape and thickness.140 g butter
- Place the cold butter inside folded parchment paper or wax paper. Use the rolling pin to hit the butter until it's flattened to about an inch or less thick.
- Fold the parchment paper to form a pocket that is about 5 x 6 inches. Place the butter within the folded pocket and fold the parchment paper to enclose the butter.
- Using a rolling pin again, hit the butter to make it thinner and more pliable to fill the pocket. Then, using the rolling pin, roll out / spread the butter to fill the inside of the parchment paper pocket, all the way to the corners. Use the rolling pin and roll it over the butter block to make sure the butter block is evenly thick.
- Transfer this butter block into the fridge until chilled.
Enclosing the butter
- IMPORTANT - when laminating the butter and dough, it’s REALLY crucial that they both have similar pliability and are cold. The dough and butter can be kept at room temperature to reach the ideal temperature of 10 - 15°C / 50 - 60°F. See recipe notes below for more tips.
- Place the chilled dough on a clean or very lightly floured work surface. Measure the dough, and if needed, roll out the dough to make it about 6 (or 6.5) x 10 inches with even thickness.
- While the butter is still cold, use a rolling pin to hit the butter and roll on it, while it's still wrapped in parchment paper. This is to condition the butter and make it pliable WHILE still cold. Do not do this if the butter is warm and too soft.
- Unwrap the parchment paper from the butter block, but keep the butter still attached to the parchment paper.
- Place the butter block on the dough with the parchment paper still on top of the butter. You can place the butter on half of the dough at one end, or right in the middle of the dough as well. Either way works. The width of the dough should be similar to the height of the butter block, or very slightly larger.
- Now pat the butter over the parchment paper to let it “bind” to the dough below. Then carefully peel off the parchment paper. Scrape off any excess butter on the parchment paper and smear it on the butter block as well.
- Fold the dough over the butter to completely enclose the butter. Press the seams of the dough together to seal the butter inside the dough. Pat the dough again to help the butter “bind” to it. If the butter was placed in the middle, the seam will be in the middle of the butter block. If the butter was placed at one end of the dough, the seam will be on the side.
- The dough should still be very cold (ideally about 10 - 13°C / 50 - 55°F) . If it isn’t, wrap it and put it back in the fridge for about 30 - 60 minutes to chill the dough.
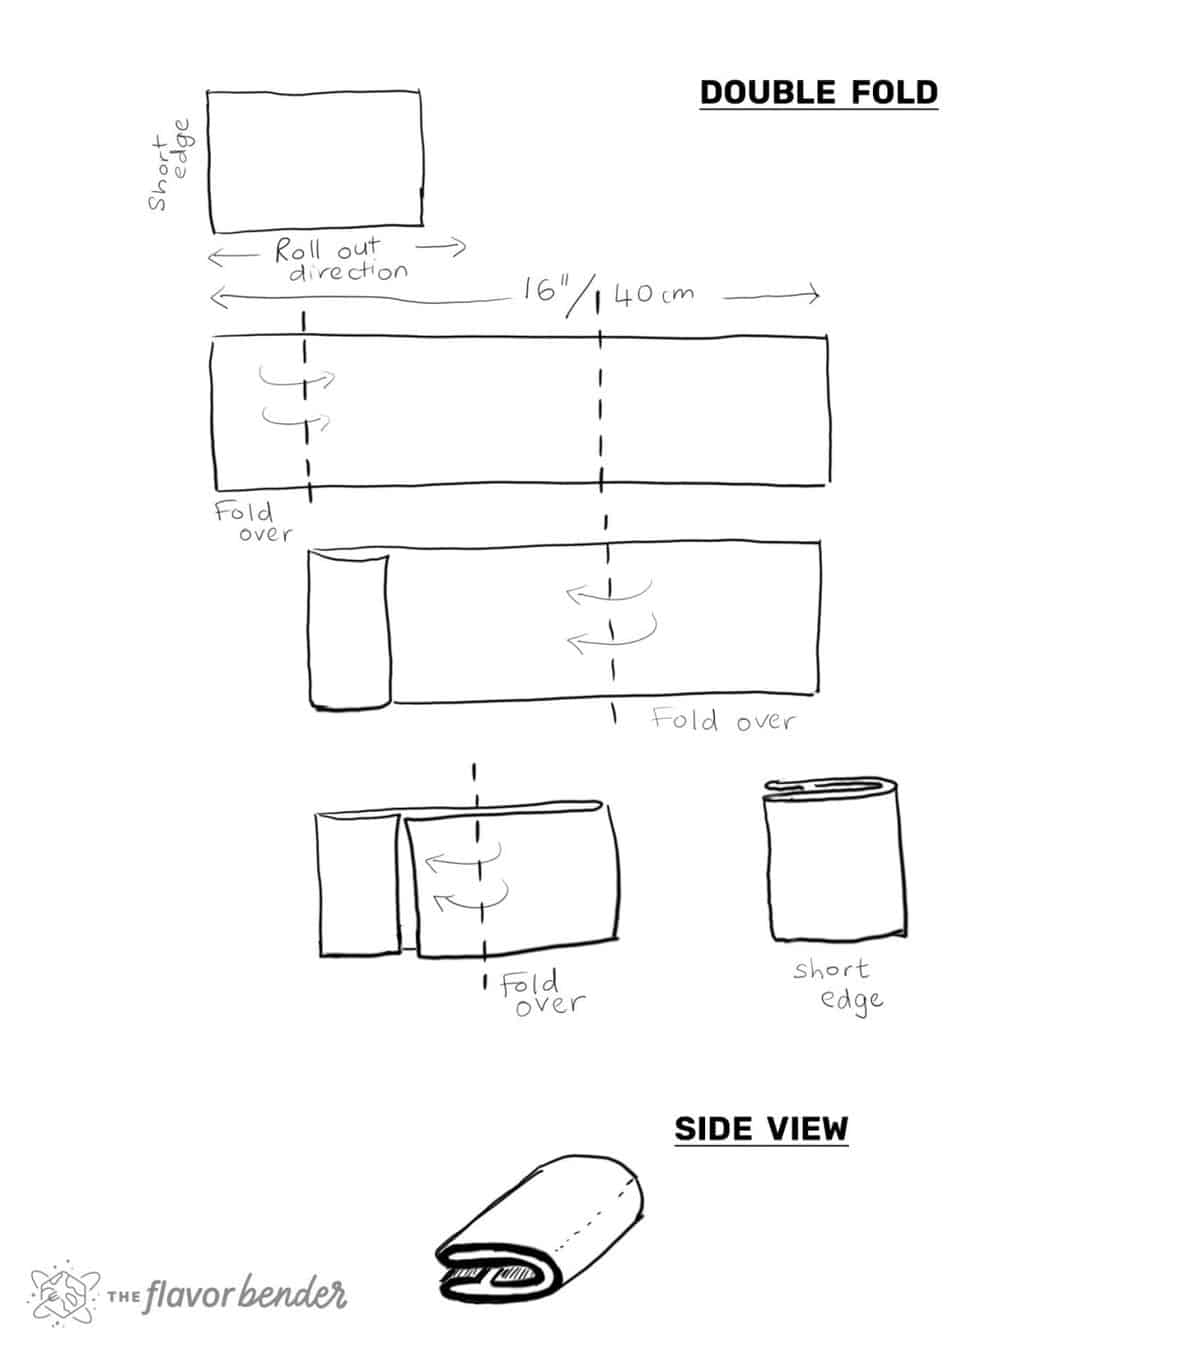
First lamination - double fold (click here to see image)
- Flour your work surface and dough, fairly well. Place the dough on the work surface and using the rolling pin, gently press along the length of the dough to make sure the butter is pliable.
- While maintaining the 5 - 5.5 inch (12.7 - 14 cm) width (short end), roll out the dough to a length of approximately 16 - 20 inches (40 - 55 cm), while the dough is approximately 1 cm / ½ inch thick throughout.
- While rolling out the dough, gently lift the dough and flip it over to ensure that it's not sticking to the work surface. Use flour as needed to make sure the dough doesn’t stick to the counter. Also use your hands to keep the width even and keep the edges straight to maintain a rectangle shape.
- Work quickly to keep the dough and butter cold. If the butter softens too much, return the dough to the fridge or freezer.
- Brush off excess flour on the work surface using a large pastry brush. Trim just a little piece of dough along the shorter edges to make those two edges straight.
- Fold in about ⅙ to ⅛th of the dough towards the middle (about 2 - 3 inches). Bring the other end to meet the folded end. Make sure the two ends are as close together as possible with no gaps. Using a paring knife, make small cuts at the four corners of the folds to release the tension.
- Brush off excess flour on the surface of the dough. Now, fold the dough in half. Firmly tap the dough on top to maintain the shape. Again, make cuts at the corners of the fold (2 cuts).
- Wrap the dough in plastic wrap and refrigerate for at least 30 - 60 minutes.
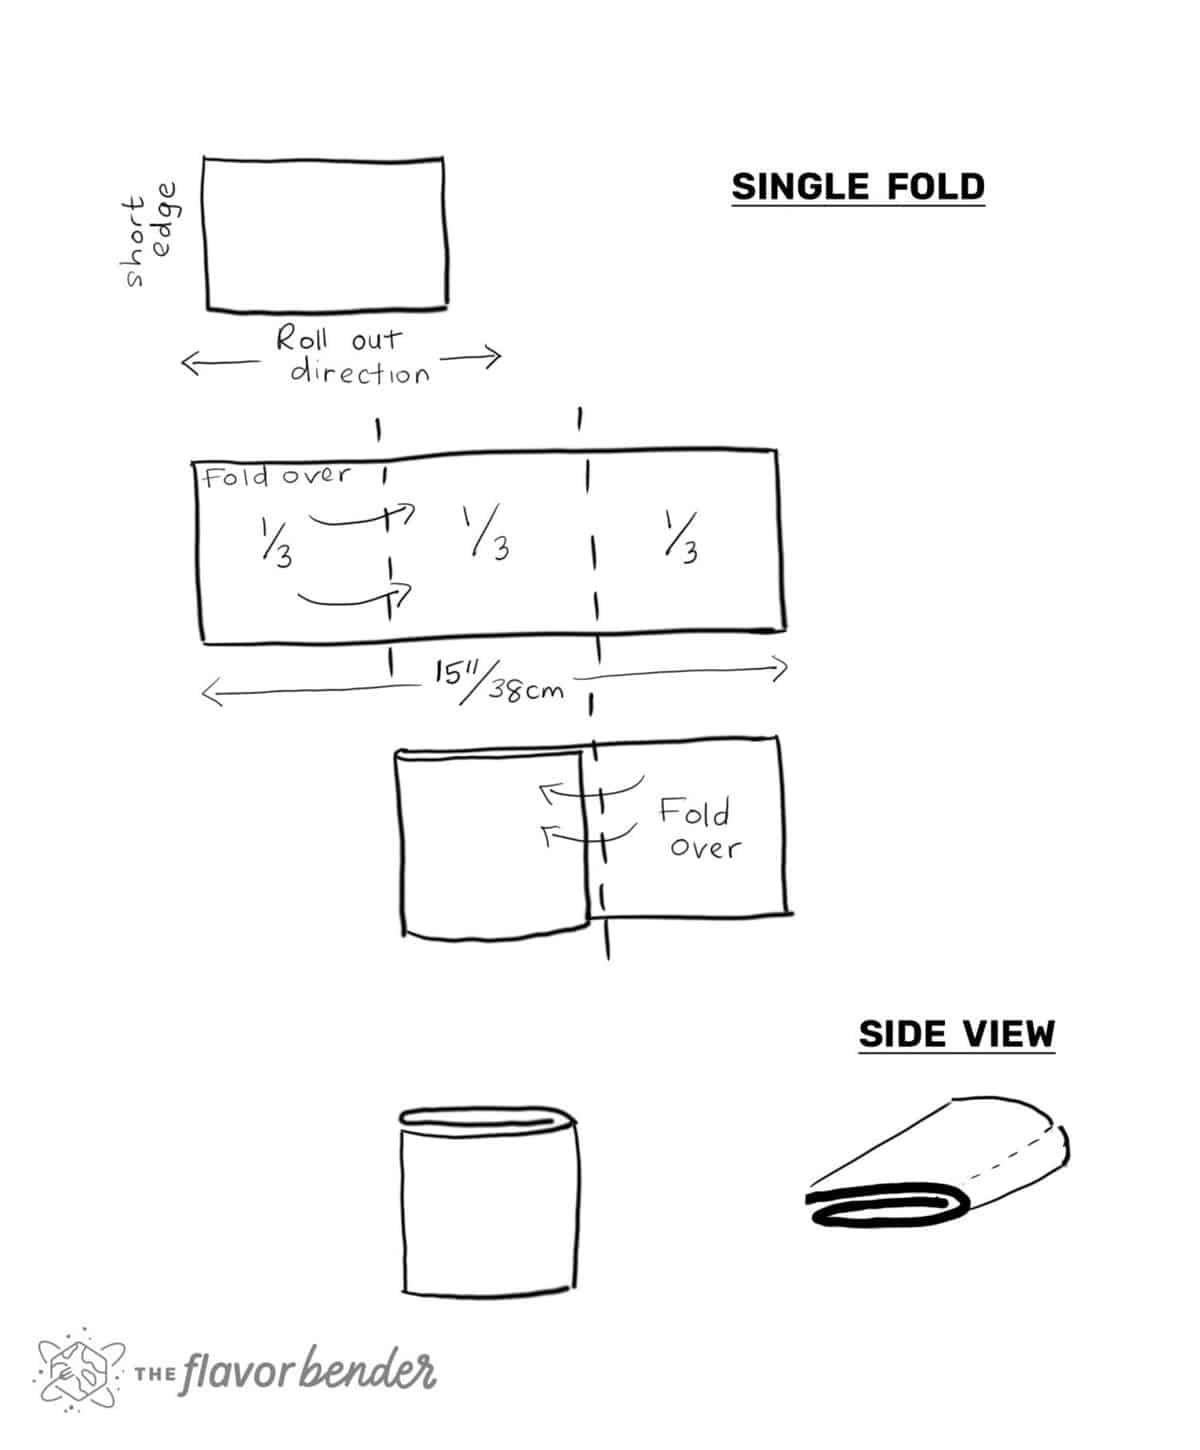
Second lamination - single fold (click here to see the image)
- Make sure the dough is within the optimum temperature for proper lamination. If needed, keep the dough outside to warm it up slightly if it's too cold.
- Flour the work surface and place the dough on it. Gently press into the dough with a rolling pin along the length of it to make sure the butter inside is pliable.
- Keep the dough with the end with visible folds, facing you. Maintaining this width (about 5 inches / 12 cm), roll out the dough to 15 inches (38 cm). As you roll out the dough, make sure the final width is kept to about 5 - 5.5 inches. Also make sure the dough isn’t sticking to the work surface, and the width is straight and even.
- Brush off excess flour from the surface of the dough using a pastry brush.
- Fold in ⅓ of the dough towards the center (about 5 inches / 12.7 cm). As before, cut the corners of the fold with a paring knife to release tension.
- Brush off excess flour again, and fold the other edge of the dough OVER the first fold. Cut the folded corners with a paring knife to release tension.
- Wrap the dough in plastic wrap and refrigerate for another 30 minutes (preferably 60 minutes).
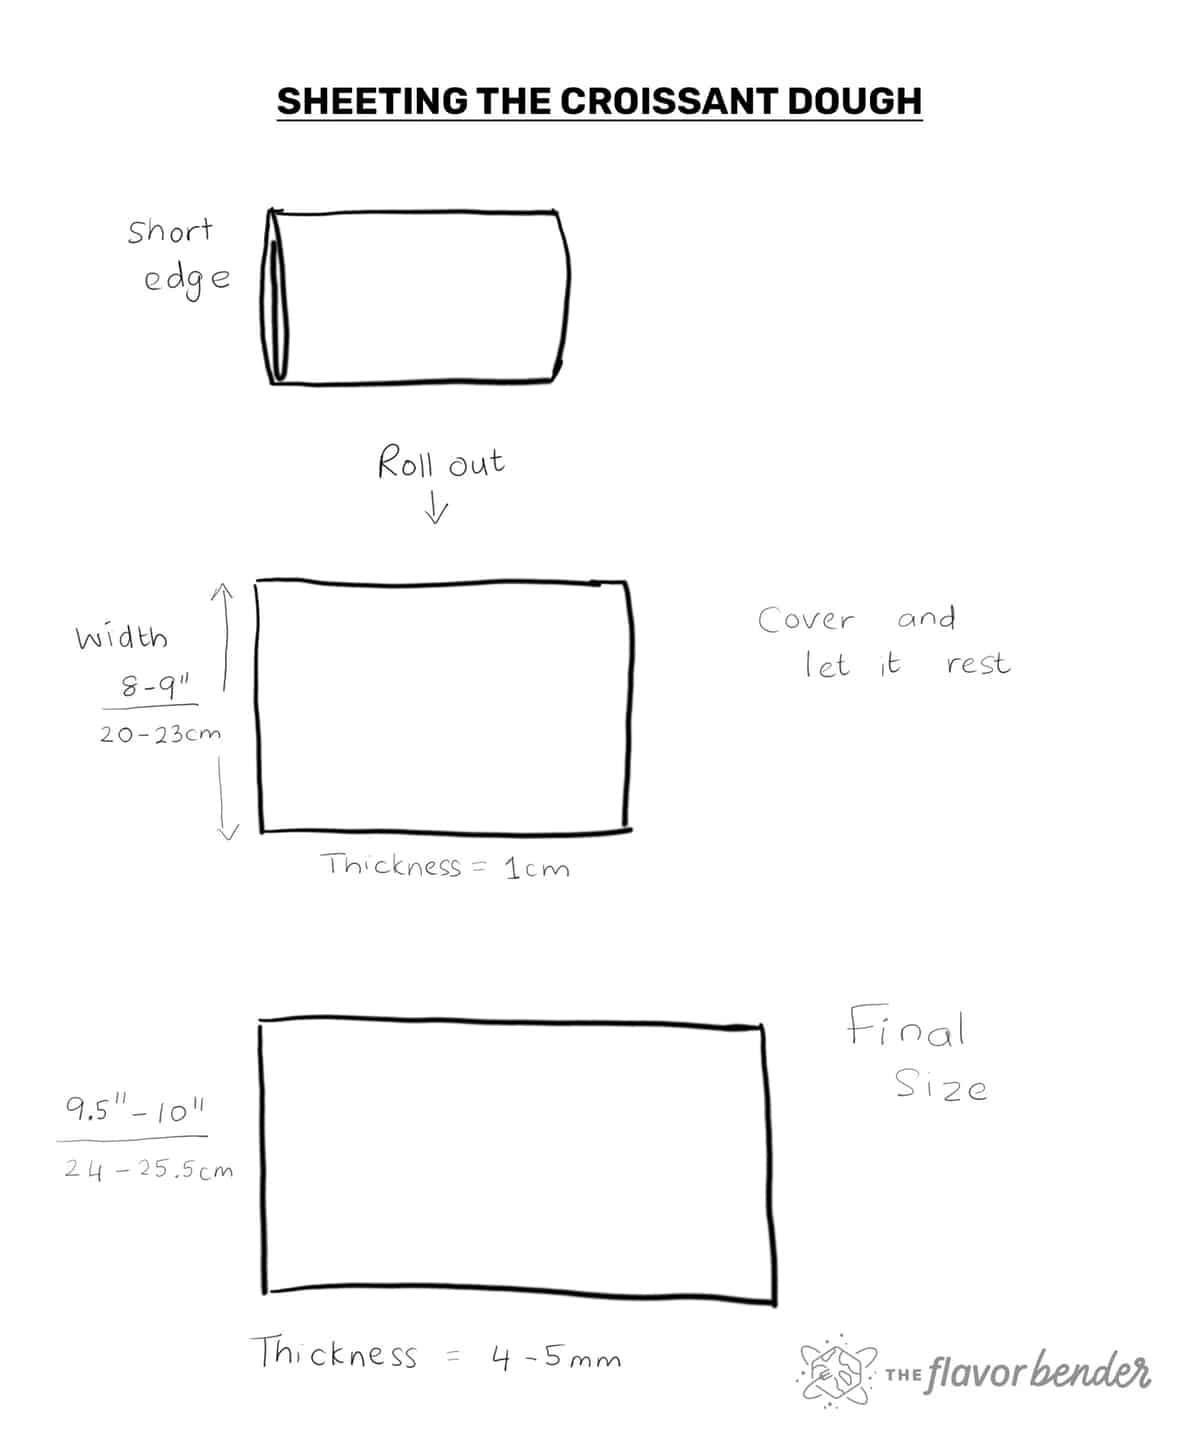
Sheeting the dough (click here to see image)
- As before, make sure the dough is at the optimal temperature range. Place the dough on a floured surface - the end where you can see all the folds should be facing you.
- Gently press the dough with a rolling pin along the length of it to make the dough and butter pliable.
- Roll out the dough to about a 1 cm thickness (with an 7 - 8 inch / 18 - 20 cm width at the edge facing you). If at any point the dough becomes elastic and hard to roll out, wrap the dough and keep it in the fridge to rest.
- Wrap the dough and refrigerate for about 30 - 60 minutes to allow the gluten to rest.
- Once the dough is rested, roll it out again until it reaches 4 - 5 mm thickness, with an 8 inch width. Lightly flour the surface to make sure the dough doesn’t stick to the surface.
- During this process, the dough should not be elastic, and should not be sticking to the work surface. If the dough is elastic, the dough will shrink as you cut the dough into smaller portions. If, at any point, the dough becomes too soft or starts to shrink / become elastic, wrap it and return it to the fridge for at least 30 minutes.
- The final dough should have a width of about 8 inches / 20 cm, and a thickness of about 4 - 5 mm. Ensure that the dough is not sticking to the work top, and not shrinking before cutting it in the next step.
Cutting the dough (click here to see image)
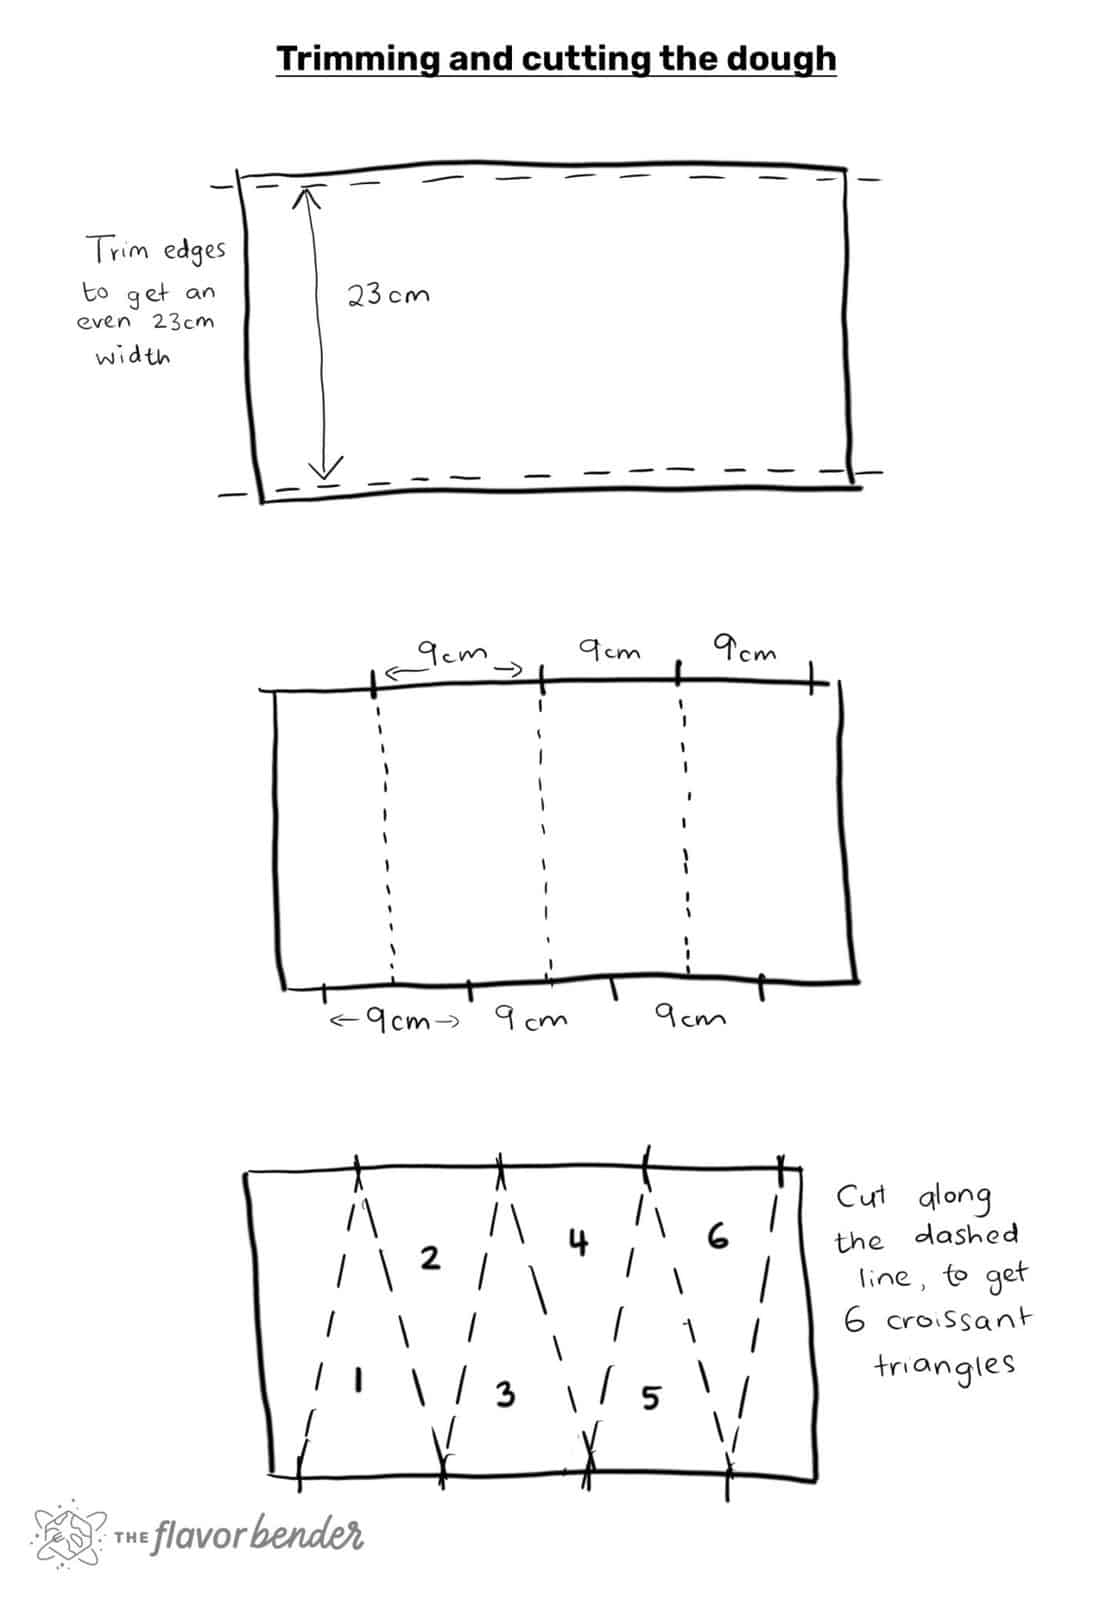
- Cut a very thin strip along the long edges of the dough to have a width of about 7.5 - 7.75 inches / 17.5 - 19 cm . Make sure the edges are straight and even. Use a pizza cutter or a sharp knife. Avoid dragging the knife along the dough as you cut it, as this can distort the dough. Simply press the knife straight down to cut.
- Along one of the long edges, make 3 inch / 7.5 cm markings. Next, make 3 inch / 7.5 cm markings on the opposite edge as well.
- Use the ruler and a small sharp knife to connect the markings on the two sides with straight lines.
- Using the marked lines as a guide, cut the dough with a pizza cutter or a sharp, long knife. You should end up with about 5 - 6 rectangles, per batch.
Rolling up the croissant + proofing
- If you're using chocolate batons, use 2 batons per chocolate croissant. If you're using a chocolate bar, cut the chocolate bar with a sharp knife. The pieces should have a width of about 1 cm, but can be long.12 chocolate batons
- Brush off excess flour from both sides of the dough rectangle and keep it on the work surface.
- On one edge, place 1 chocolate baton, or a cut piece of chocolate (that is roughly 1 cm thick) along the width of the dough. Roll the dough to encase the chocolate once.
- Place a second chocolate baton / chocolate piece at the edge of the seam, and roll up the croissant the rest of the way. Make sure the spiral is fairly tight with no gaps, without squeezing the dough too much.
- Place the rolled up pain au chocolat on a parchment paper-lined half sheet pan. The seam of the chocolate croissant should be placed at the bottom, so that the croissant is sitting on top of the seam. Gently press down to seal.
- Repeat with the remaining portions of dough. Make sure there is plenty of space between the croissants on the pan, so that proofed croissants don’t stick to each other; about 5 - 6 croissants per pan.
- Cover with plastic wrap loosely, but well. You can also place another half sheet pan on top (as a lid) or a half sheet pan cover. There should be plenty of space so that the proofed croissants don’t stick to the half sheet pan on top.
- Proof the chocolate croissants (somewhere that's at about 25°C / 77°F) until doubled in size. The time can vary depending on the ambient weather. I proof mine inside an oven with just the light turned on, and it still takes me between 2 - 3 hours. The proofing setting on the oven is too warm however, and it could melt the butter.
- The croissants have proofed if they have doubled in size, look very pillowy, and will jiggle a little when you give the sheet pan a light shake.
- Preheat the oven to 375°F / 190°C (conventional oven setting), at least 30 minutes before baking the croissants.
Baking the chocolate croissants
- Mix the egg yolk and milk together to make the egg wash.1 egg yolk, 2 tbsp milk and / or cream
- Brush with an egg wash (use a soft, small pastry brush, because the croissants are very delicate at this stage). Bake at 375°F / 190°C (conventional oven) for about 20 - 30 minutes until golden brown. Turn the tray once halfway through the baking time, if needed.
- Remove from the oven and let them cool for a few minutes before transferring the croissants onto a cooling wire rack. Then let them cool down further to allow the insides to set (otherwise the croissants will be too soft).
Notes
Please read the recipe carefully. Note that both inches and cm have been provided for your convenience. Choose the right measurements when proceeding with recipe.
Preparing the dough
In my croissant recipe, I proof the dough at room temperature first, and then shape and freeze the dough overnight before enclosing the butter. This can be done here as well. The method I've shared in this post shapes the kneaded dough and then allows the dough to proof slowly in the fridge overnight instead. Both of these methods work.Notes about enclosing the dough
There are different methods for enclosing the dough. This is the French method. The butter block is enclosed with two layers of dough on either side. The butter block can be kept at one end of the dough, and the other end can be folded over like a book (with a side seam). OR the butter block is placed in the middle and both ends of the dough are folded on top of the butter, so that the seams meet in the middle of the butter block.Optimal temperature for the dough
The ideal working range for the dough is about 10 - 15°C / 50 - 60°F. However, there is some flexibility with this temperature (depending on the ambient temperature). If it's winter and the room temperature is cold (about 18°C / 64°F or less), then the dough and butter can be around 15 C or even slightly more, as long as the butter is not melting. If it's summer and the room temperature is warm (over 18°C / 64°F), then the dough and butter should be colder. This is because rolling the dough will warm up the dough and butter faster, and you risk losing the lamination layers.Other tips for perfecting this recipe
- If the dough gets too soft at any point, wrap it and put it back in the fridge to chill.
- If the dough resists when you're rolling it out, wrap it and put it back in the fridge to rest.
Tips for doubling the recipe
Yes, you can double this recipe. But, make sure you have enough room on your work surface to roll out the door. The size of the butter block that I like to make is about 6 - 7 x 8 inches. The dough should have a width of about 8 inches, and the length should be about 12 - 14 inches (double the butter block). The finale sheeting of the chocolate croissant dough should be about 15 - 16 inches wide, and 0.2 inches / 4 - 5 mm thick. Then the dough can be cut in half (to get TWO 7.5 - 8 inch width dough pieces). Alternatively, keep the dough at 8 inches width and roll it out to get a very long dough portion. Essentially, you either double the length of the dough, OR double the width of the dough and keep the thickness the same.Quick timeline for making chocolate croissants
The faster timeline (2 days)
Day 1 – Make the dough and prepare the butter block. Day 2 - Encase the butter and create lamination layers. Sheet the dough and shape the chocolate croissants. Proof and bake. (Day two will be the busiest day.)My preferred timeline (3 days)
Day 1 – Make the dough the prepare the butter block. Day 2 - Encase the butter and create lamination layers. Sheet the dough and shape the chocolate croissants. Store the croissants in the fridge. (Still the busiest day.) Day 3 – Let the croissants proof (very early in the morning if you like). Then bake.A note about using parchment paper and plastic wrap
I reuse the plastic wrap throughout the entire recipe to make the most of it. I have tried using more eco-friendly options, but it's hard to keep the dough from drying out without using plastic wrap. Reusing them will reduce wastage. The parchment paper is also reused. I do not throw away any parchment paper used to store butter and flour, and use them to bake the croissants later.Nutrition
Serving: 1croissant | Calories: 376kcal | Carbohydrates: 37g | Protein: 5g | Fat: 23g | Saturated Fat: 14g | Cholesterol: 61mg | Sodium: 527mg | Potassium: 73mg | Fiber: 1g | Sugar: 5g | Vitamin A: 710IU | Calcium: 28mg | Iron: 2mg