

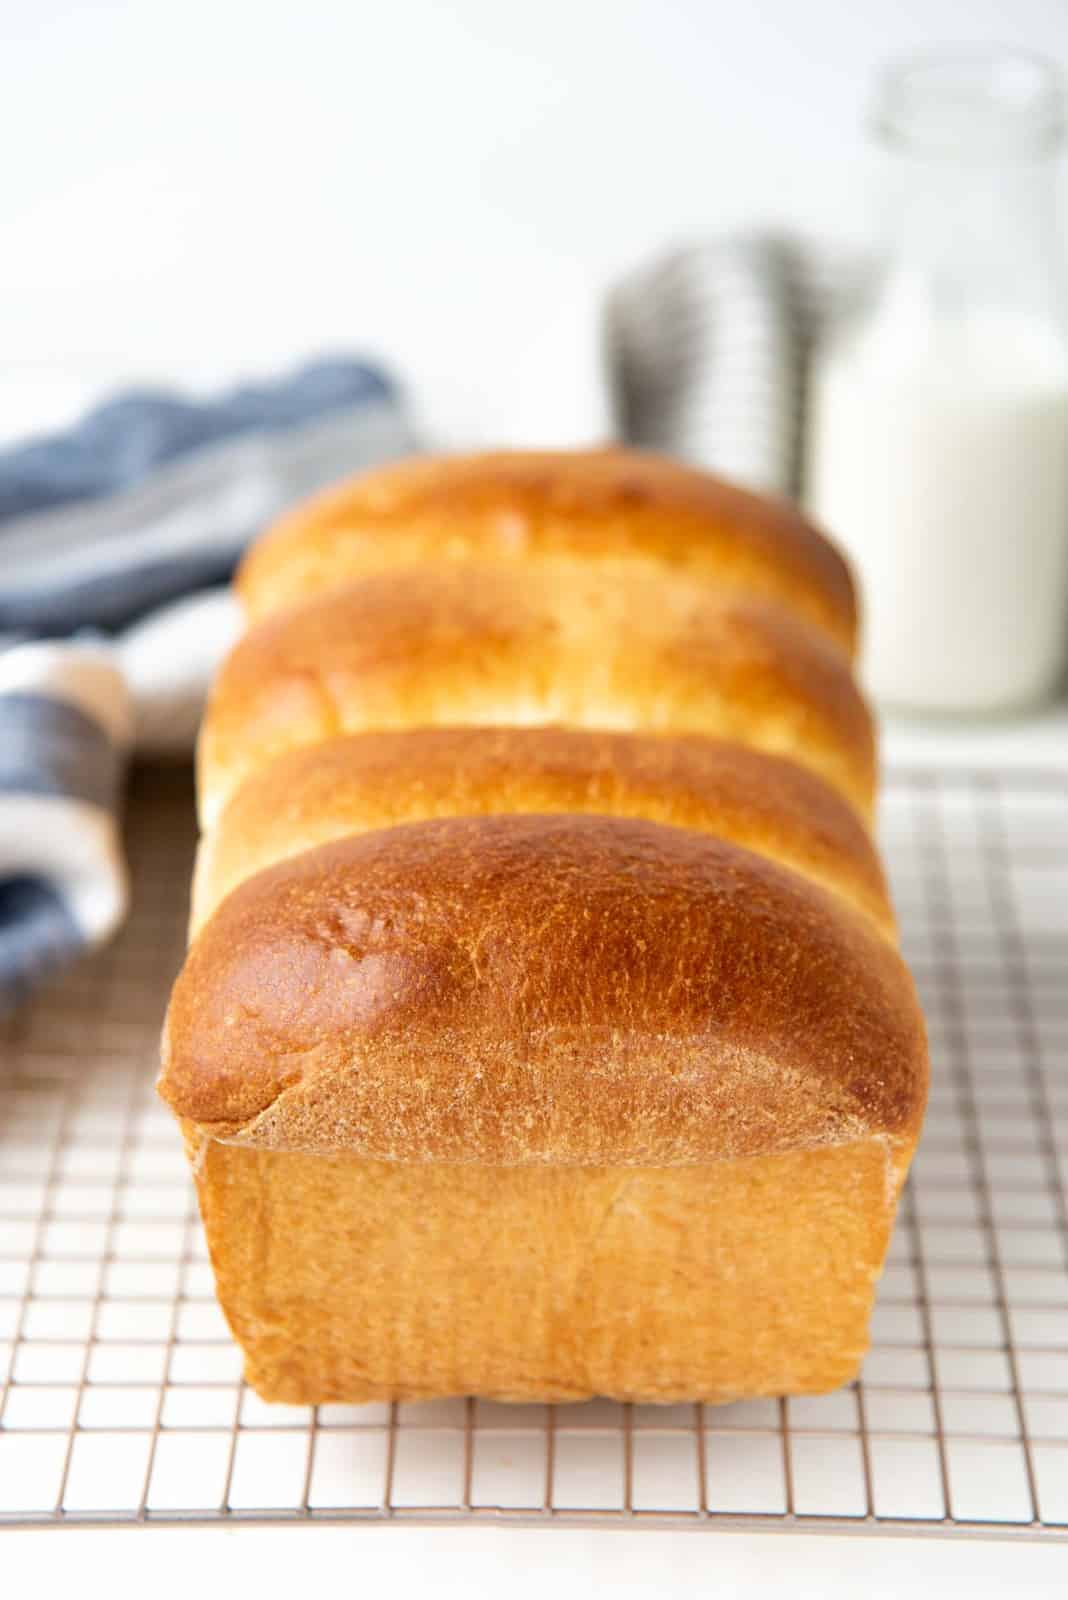
Soft and incredibly fluffy Japanese Milk Bread is world famous! It’s also really easy to make at home. Get the step by step recipe to make this flavorful sandwich bread right here.
This bread will pretty much ruin all other kinds of sandwich bread for you! And it makes the best sandwiches or dinner rolls too.

Why this recipe works

- This is by far the softest, fluffiest, tastiest bread I’ve ever made and eaten in my life! Yet, it’s somehow a little chewy too.
- Step by step, reader-favorite recipe!
- Very milky in taste thanks to an extra ingredient.
- This recipe is easy to follow and to adapt.
- I show you how to make loaves, as well as dinner rolls with this dough.
What is Japanese milk bread?
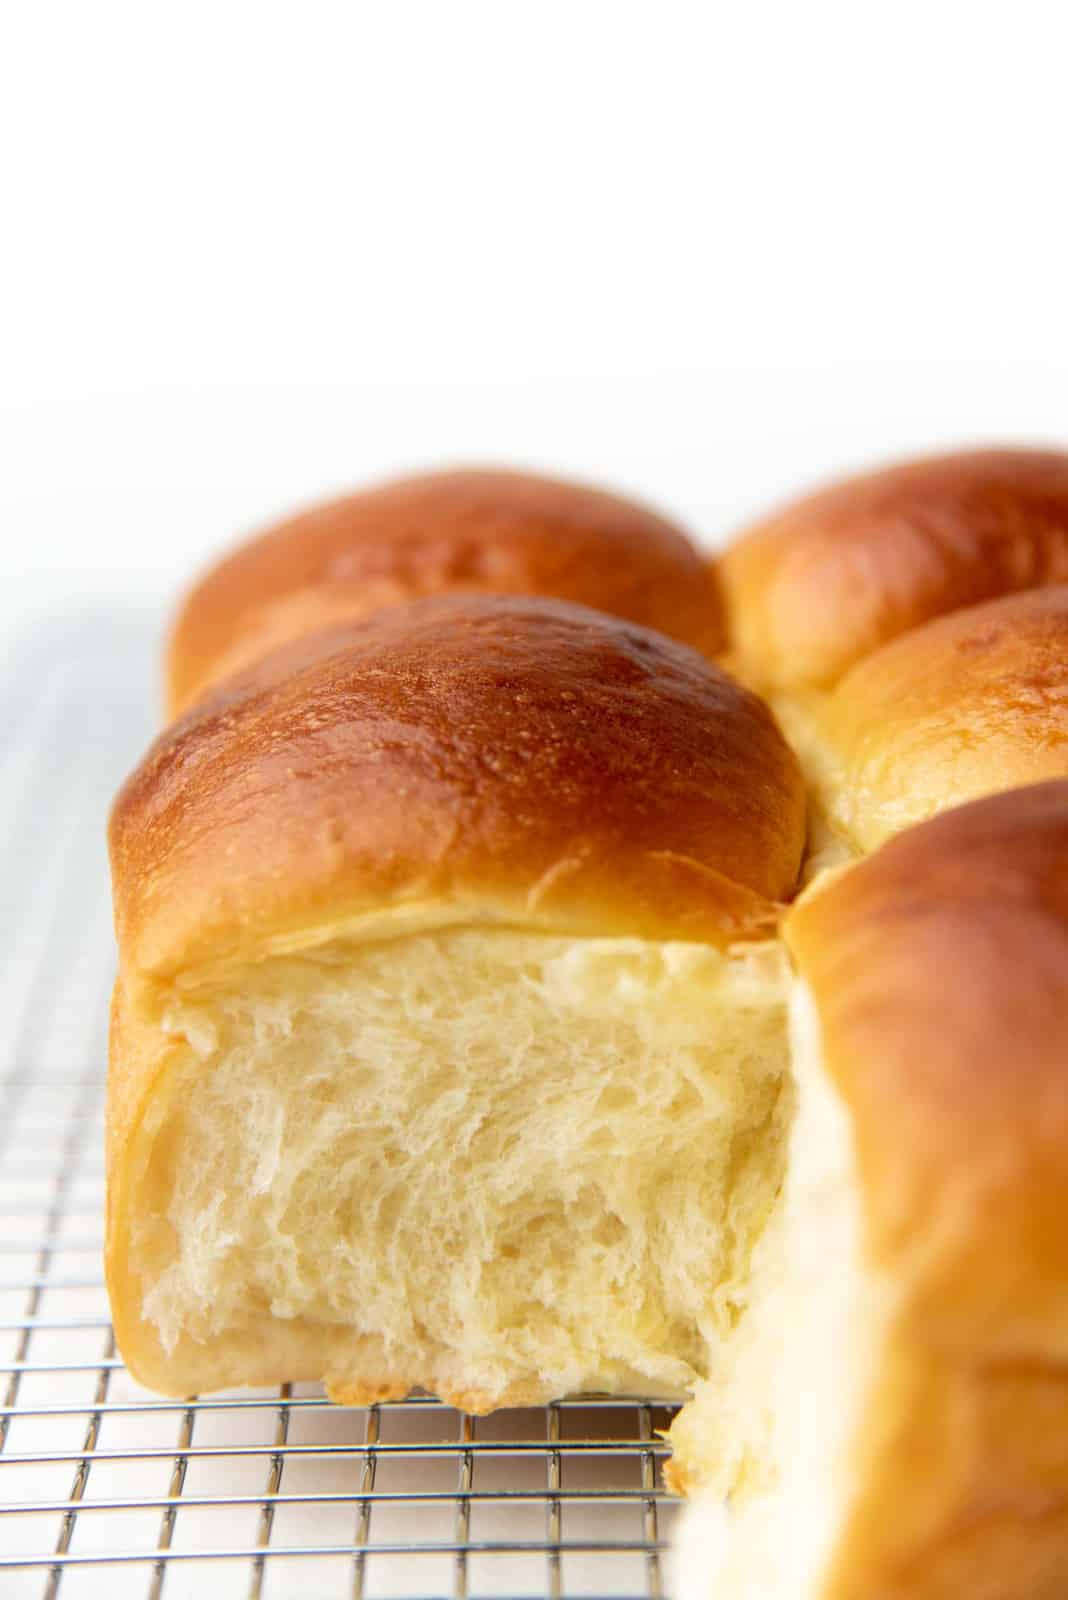
Also known as Hokkaido milk bread or shokupan, this is a one-of-a-kind of bread. It’s really soft, and still slightly chewy. It tastes exceptionally milky, with a soft, cloud-like mouthfeel (if one could taste cloud that is). It’s the best sandwich bread I’ve made and eaten.
As the name suggests, this bread originates from Japan. The technique for making Hokkaido milk bread involves a water roux (or tangzhong) which is the secret to a soft, springy, delicious bread.


What is tangzhong?
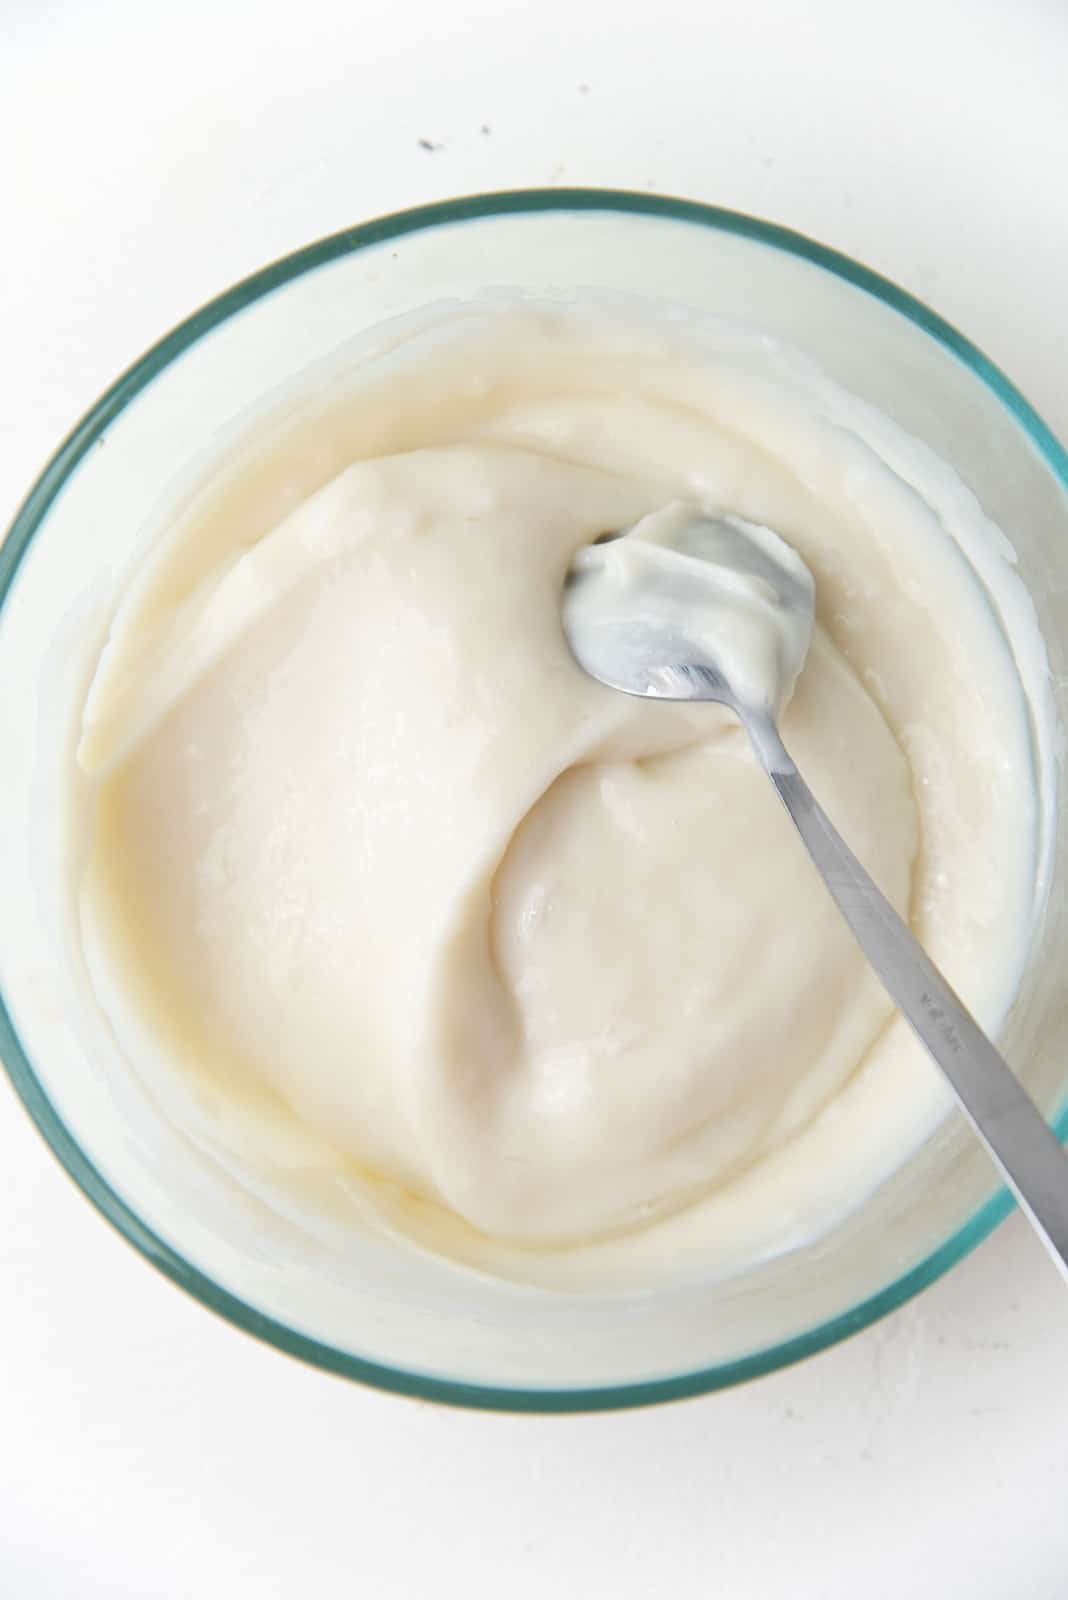
Tangzhong is a roux made with water (and sometimes milk) and flour. It’s cooked to make a thick pudding-like paste, and then cooled down to room temperature and added to the flour mix when kneading the dough.
It’s also called a water roux since it’s traditionally made with water.
The starch is gelatinized at high temperatures by absorbing the liquid, WITHOUT forming any gluten in its structure. The starch molecules in tangzhong absorb far more liquid than it would at room temperature.
When you add this to the bread dough, the tangzhong adds MORE water to the dough, and a stable, soft matrix that creates a cushion-like, spongy texture in the final baked product.
You can add tangzhong to ANY bread recipe and make it softer than it would otherwise be. I make these classic hot cross buns, chocolate chip hot cross buns, and even my childhood favorite bread snack (Sri Lankan banis) with a tangzhong base to replicate that pillowly softness!
It’s a popular technique for making Asian breads, which are known to be super soft and sweet.
How do you make a tangzhong?
It’s very important to have the right ratio of liquid to flour to make tangzhong. If too little liquid is added, then you risk developing gluten in the flour as you stir it.
The magic ratio is 5 parts liquid to 1 part flour. You can use all water, all milk or half milk and half water too. I prefer to have a mixture of the two.
I add the flour into a saucepan, then add half the amount of water. Then I whisk it to mix the flour well and to make sure there are no lumps. Next, I add the rest of the liquid (water and/or milk), and stir to combine.
Then I cook the mixture until I get a nice, thick pudding-like roux.
Once the tangzhong is cooked, I transfer it to a bowl and cover the surface with plastic wrap. This will prevent a skin from forming on the tangzhong. Let the paste cool to room temperature, and then it’s ready to be used.
I personally like to make double the amount of tangzhong at a time, because it lets me control the temperature and the consistency better. But you can make enough for 1 loaf, but make sure to use a small saucepan to make sure that the tangzhong won’t cook too quickly.
However, it is possible to make a good tangzhong with a small amount of liquid and flour. Just make sure to use a smaller saucepan. Or you may risk over-evaporation and end up with a tangzhong that is too thick.
The tangzhong can be stored in the fridge for later as well. But make sure to bring it back to room temperature before using.


How to make milk bread (step by step overview)
Making milk bread is pretty much like making regular white sandwich bread, but with the addition of the tangzhong.
The process is really simple. However, because the dough can be really soft, I highly recommend letting the dough chill for a few hours if you can, to make shaping the dough much easier.
Here I’ll be showing you how to make a traditional milk bread loaf, as well as milk bread rolls with the same base recipe.
Step 1 – Get all the ingredients ready
All the ingredients, except for the milk, should be at room temperature. The milk should be slightly warmer as you will be activating the yeast in the milk.
I prefer to use bread flour for milk bread, because you want to aid gluten development for a sturdy structure in the bread. The high protein bread flour is better at developing gluten.
To make the hokkaido milk bread taste even more delicious and soft, I add another ingredient – dry milk powder! This ingredient is often used to make bread taste milkier and softer.
If you don’t have dry milk powder, you can leave that out and still get soft and delicious bread. You can also substitute the milk with an equal amount of evaporated milk to get a milkier tasting milk bread loaf.
Step 2 – Activate the yeast
Activating the yeast is another optional but recommended step.
If you’re using active dry yeast, the consensus is that you do need to activate it first. I use Bob’s red mill active dry yeast which has very small granules. I do find that I don’t always need to activate this because it dissolves in the dough very easily even without activation.

That being said, I still tend to activate it first. WHY?
- To make sure the yeast is “alive”. Sometimes the yeast can be less active after a couple of months (even if it’s not past the expiration date).
- This will ensure that the yeast dissolves and spreads evenly throughout the dough, ESPECIALLY for active dry yeast with larger granules.
Step 3 – Add all other ingredients
Once the yeast is activated, all the other ingredients (except butter) can be added to make the Japanese milk bread.
You can add all the ingredients to the bowl, while making sure that SALT is the LAST TO BE ADDED. This will ensure that the yeast will stay active. (Direct contact between salt and yeast can cause the yeast to “die”).

This is the order I add the ingredients to make the milk bread,
- Sugar
- Tangzhong
- Egg
- Milk powder (if using)
- Bread flour
- Salt

Step 4 – Kneading and proofing the dough
Once the dough is kneaded (with a dough hook in your mixer) for a few minutes, the gluten will start to form. Add the butter halfway through the kneading process. The butter will add flavor and also contribute to the soft texture of the bread.


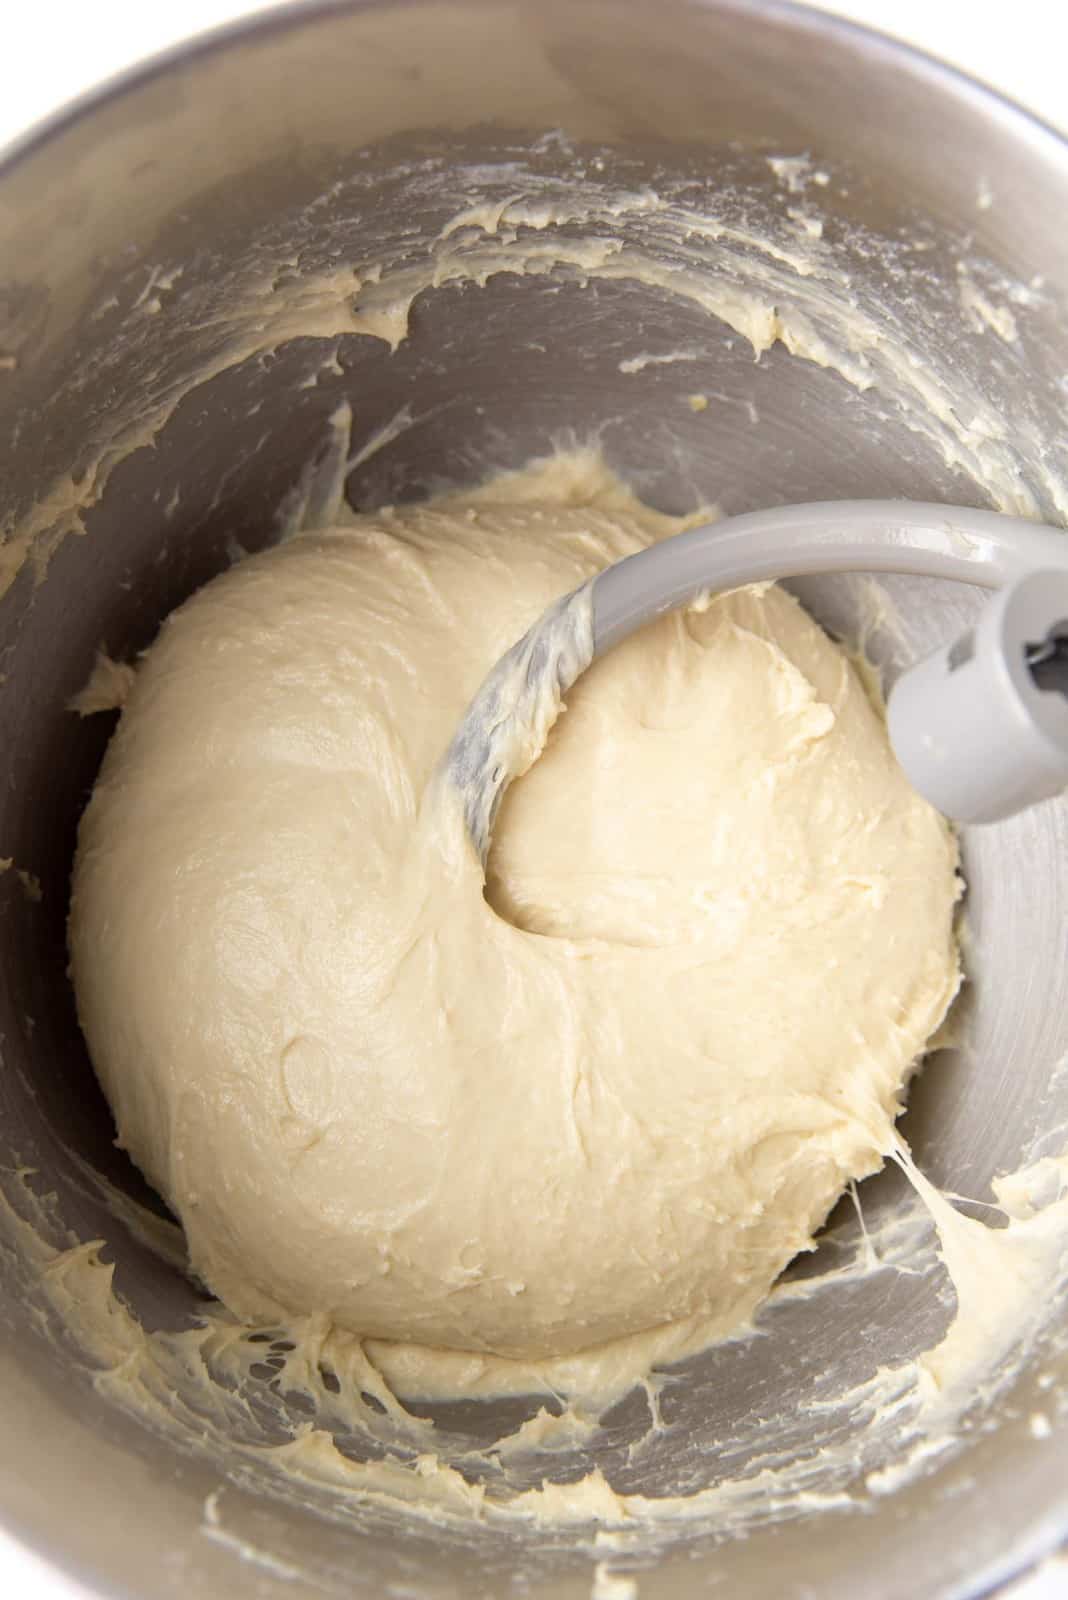
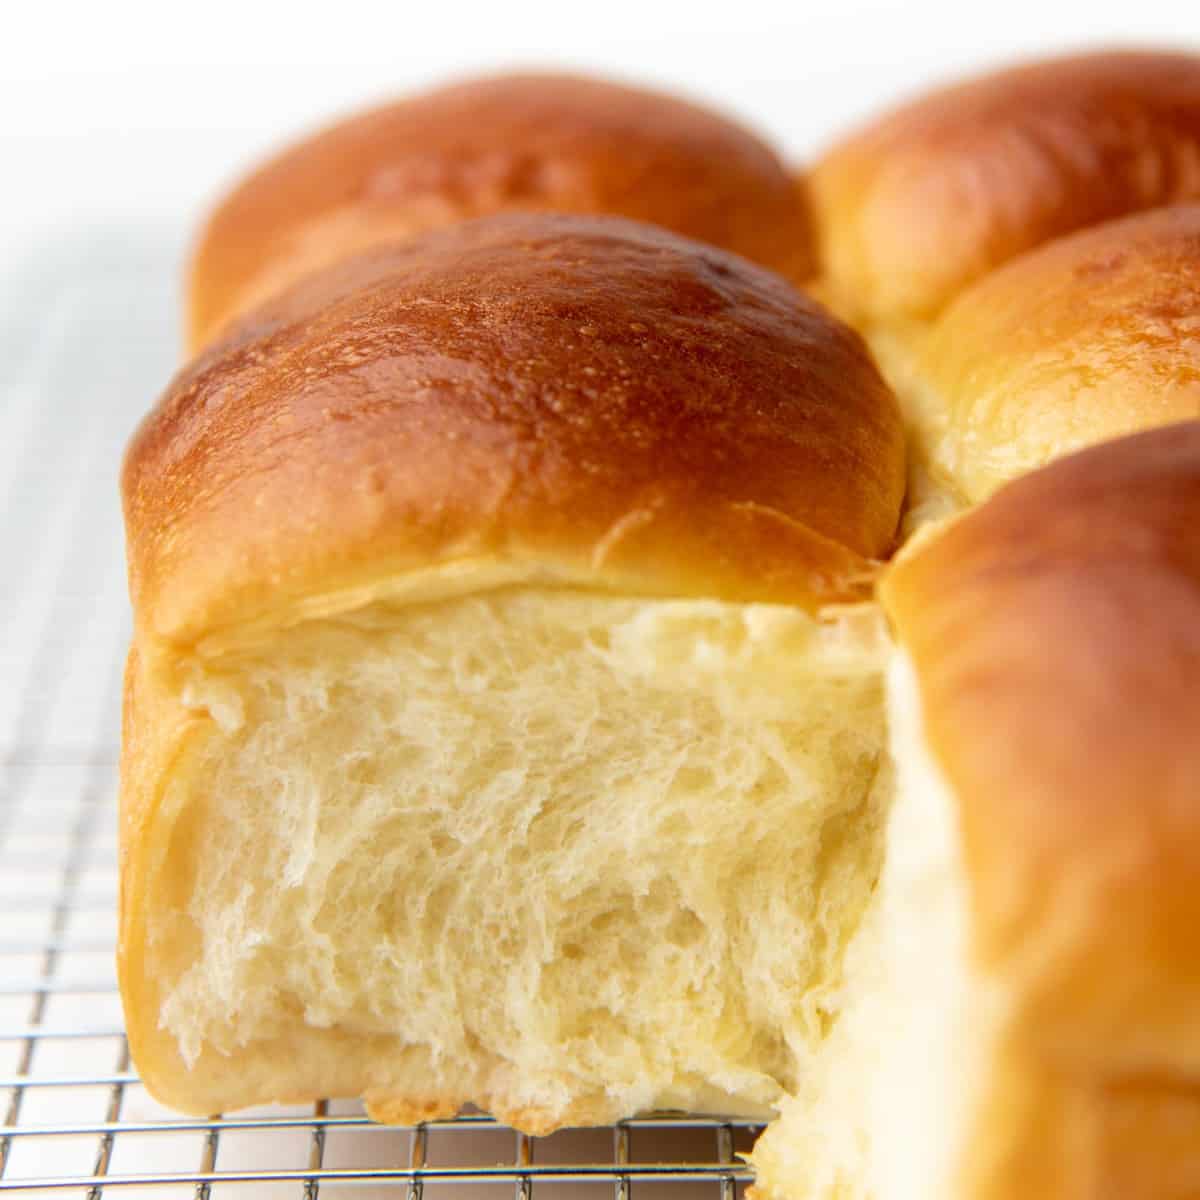
This bread is REALLY SOFT AND STICKY. So don’t be tempted to add more flour! If you keep kneading, you will end up with a dough that is soft, shiny and tacky (but not too sticky). The dough will come off the sides of the bowl when you’re kneading it too.
This transformation from a scraggly, sticky dough to a smooth, shiny tacky dough is a thing of beauty! It’s one of my favorite parts of the bread making process.

The next step is the initial proofing. You can skip this step if you want to do an overnight proofing instead.
I prefer to do an overnight proofing because a chilled dough is much easier to handle than the soft, room temperature dough.


Step 5 – Shaping the dough
Once the dough is proofed, it’s time to shape the dough. You can either make a Japanese milk bread loaf OR you can make Japanese milk bread rolls that are perfect as dinner rolls.

Japanese milk bread loaf shaping
Method #1
Lightly flour your hands and your work surface to prevent the dough from sticking.
Divide the dough into four equal portions. I like to weigh the dough first and then weigh each sectioned dough to make sure I get equal pieces.
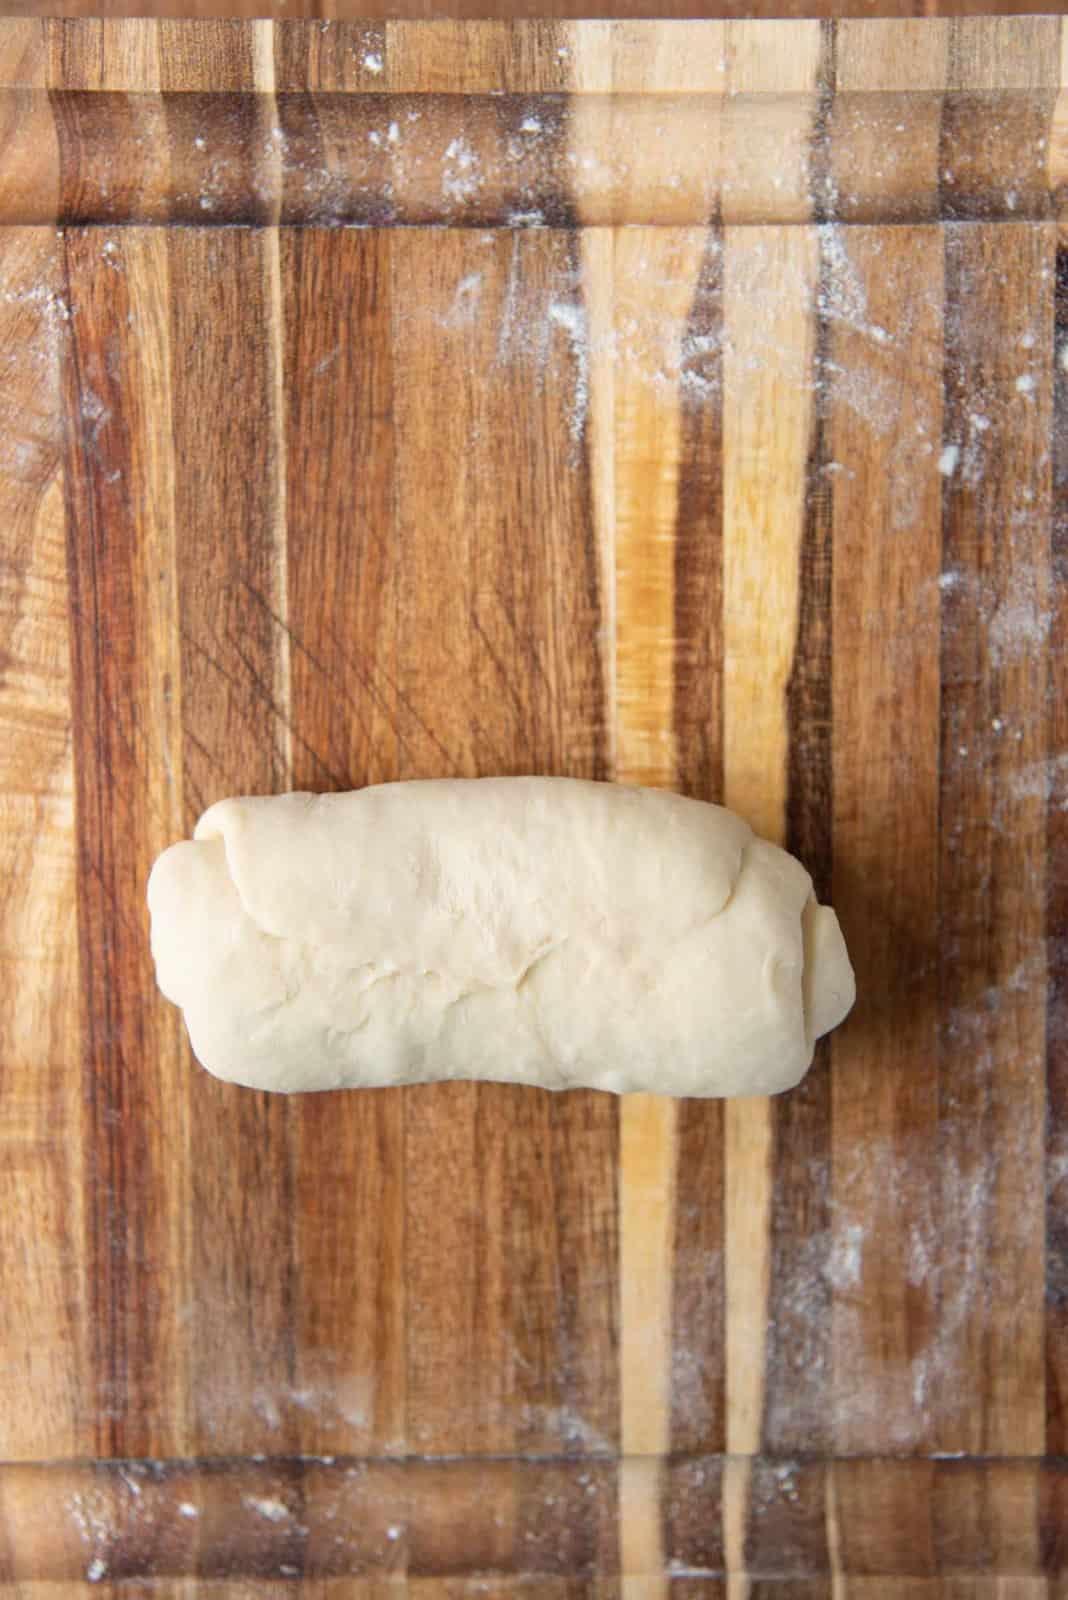
Flatten each dough portion and roll it out to a square / rectangle that is about the same width as your loaf pan. Tightly roll up the dough, while sealing the dough as you roll it up. Pinch the seam to seal.
The bread dough roll should now be slightly longer than the width of the pan. Tuck in those edges towards the seam and pinch to seal.
When you turn the dough roll over, you should end up with a smooth tube of dough with the seam at the bottom. It should be the same width as your loaf pan.
Place this inside the prepared loaf pan. Repeat with the remaining dough portions.

Method #2
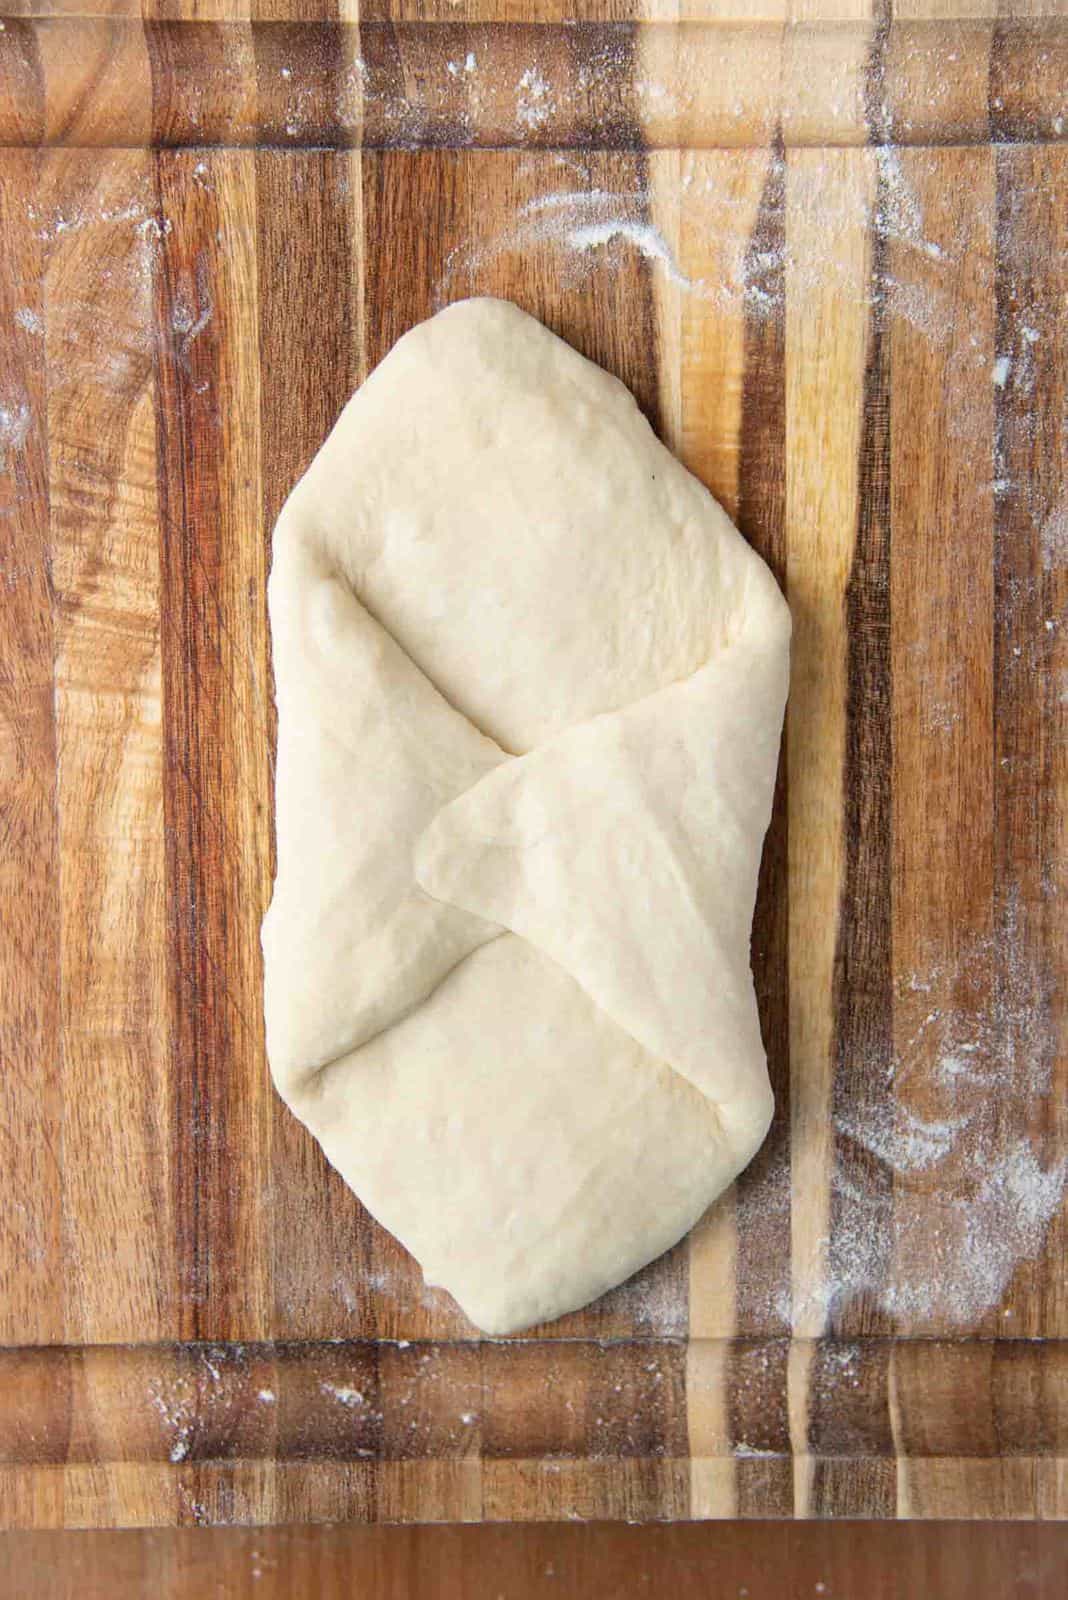
The other way to shape the dough is to form a 6 inch square with each piece of dough.
Fold the opposite corners of the square in towards the middle. Again, the width should be about the same width as the loaf pan.
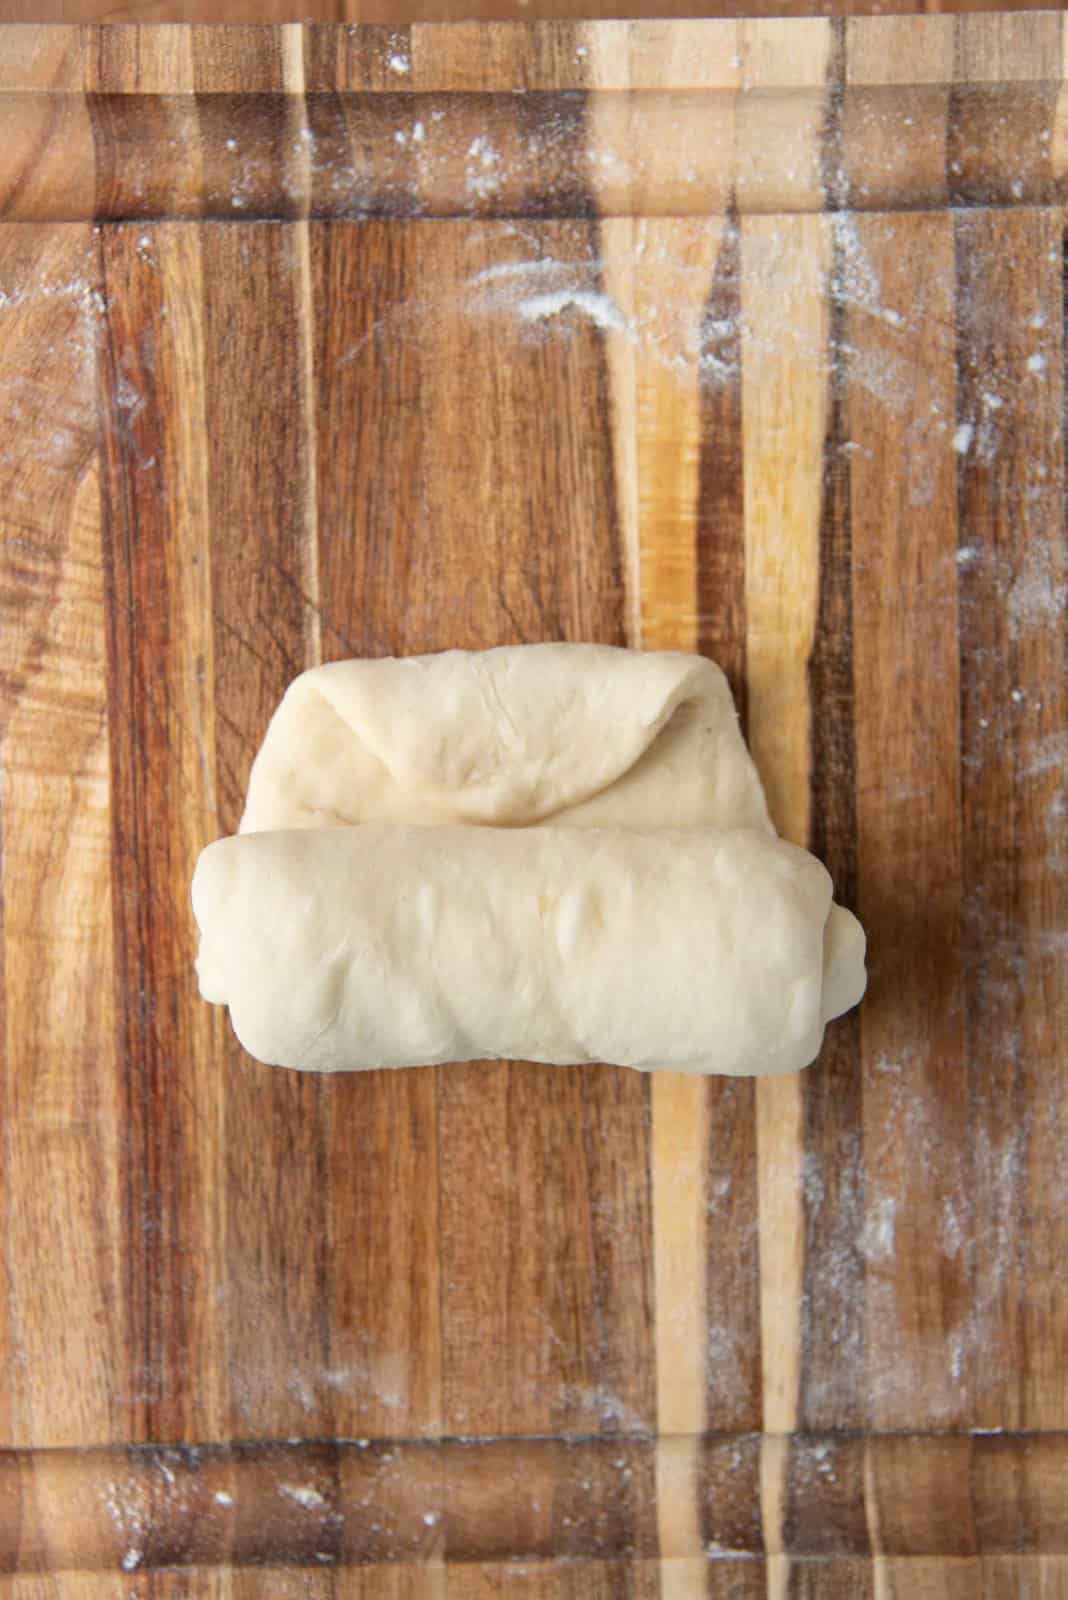
Roll up the dough tightly and firmly to form a spiraled dough. Fold over the corners and seal the edges by pinching the dough.
Place this in the loaf pan, seam side down. Repeat with all the dough portions.


Shaping dinner rolls
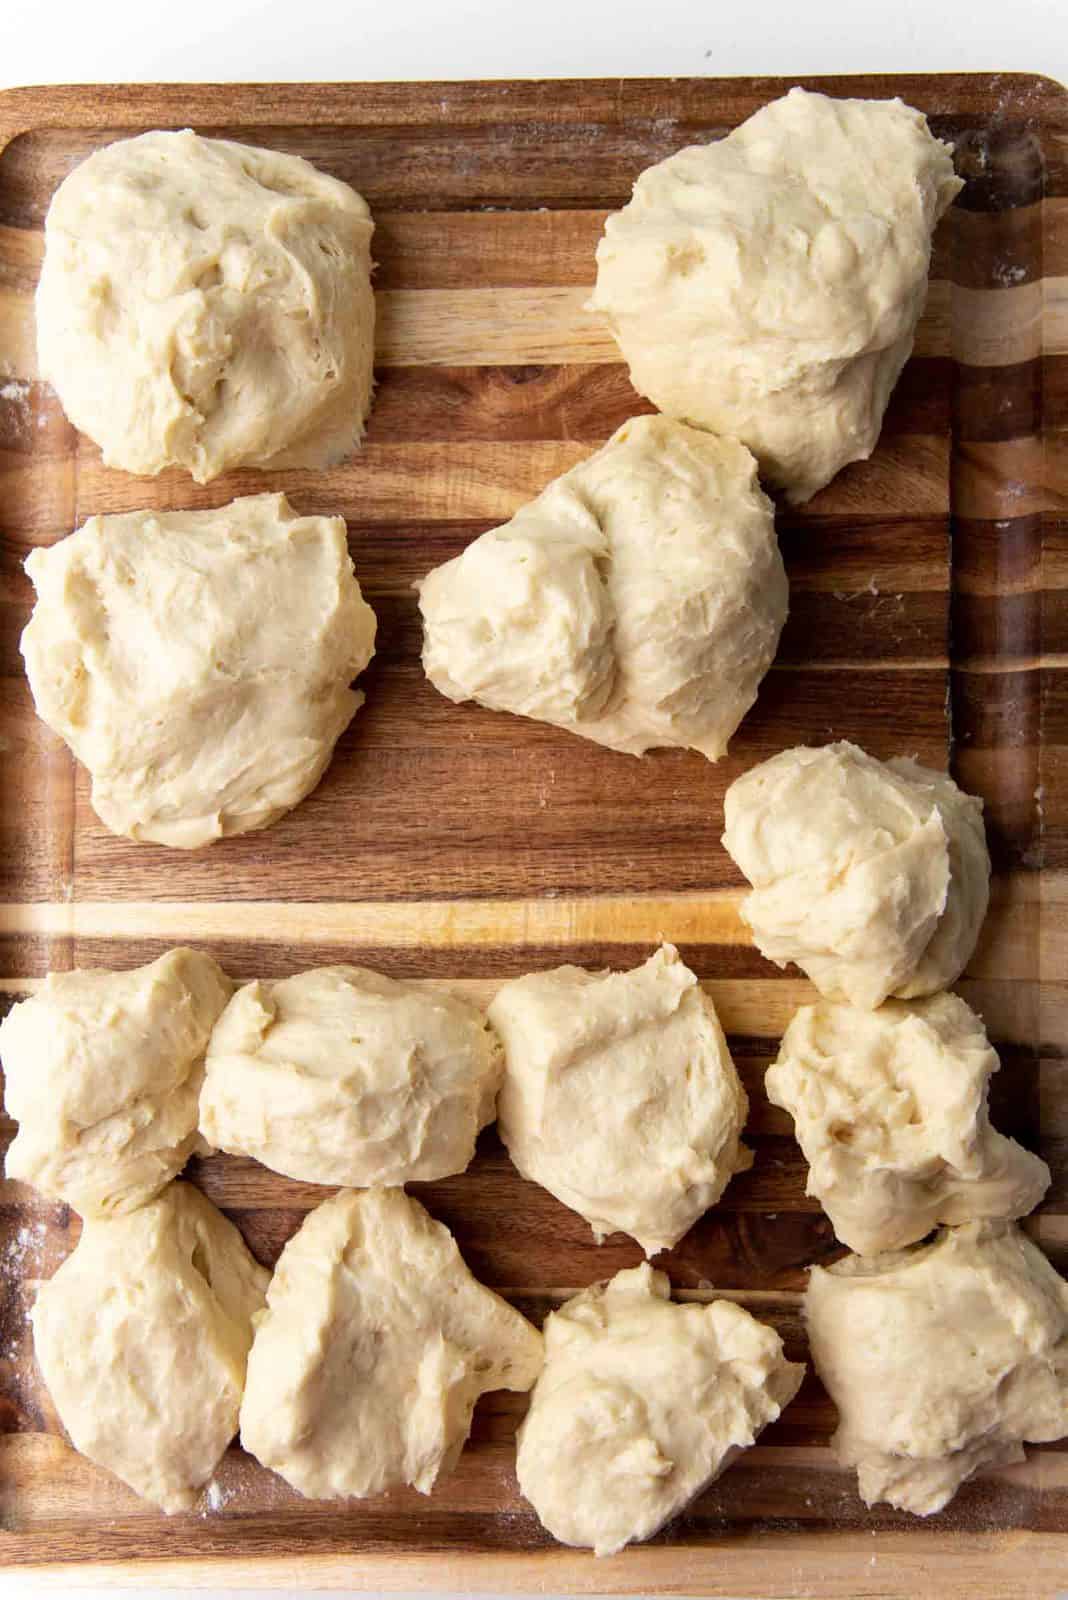
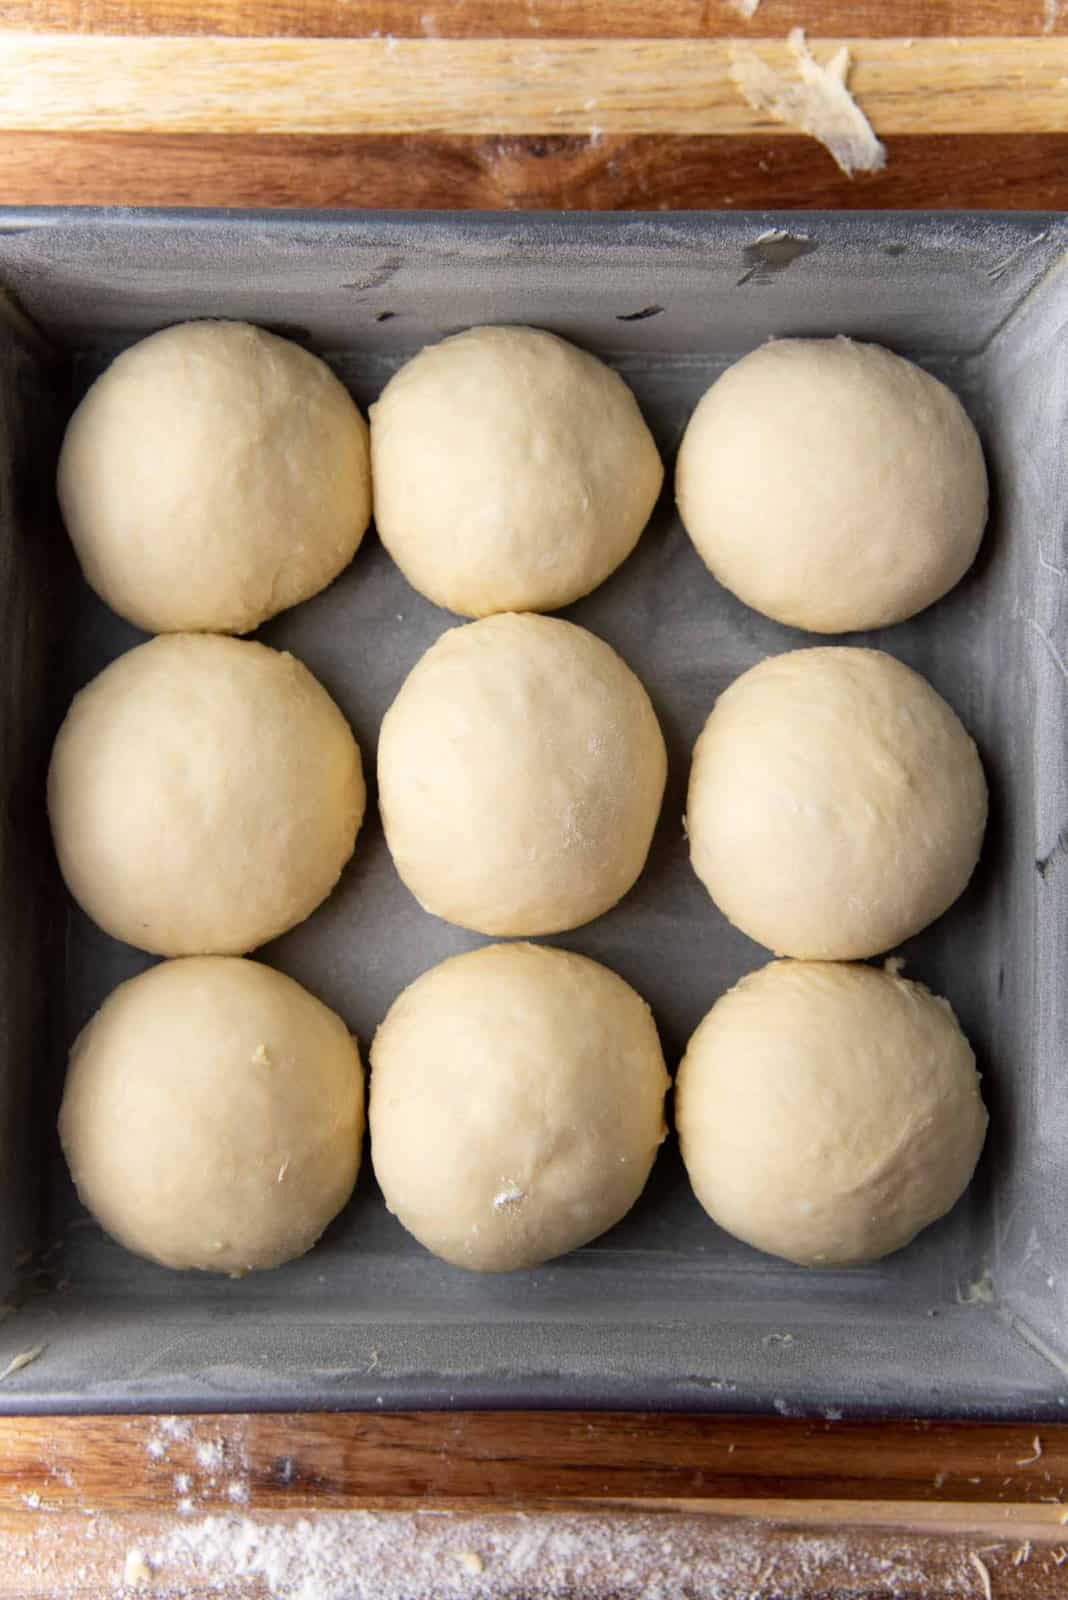
Divide the dough into 9 equal dough portions.
Take the corners of each dough portion, and press them in towards the middle of the dough. Lightly dust the smooth side and place the seam side down on the work surface.
Then cup your hands around the dough, and roll it around on your work surface to form a smooth, round dough ball.
Place the dough ball in an 8 or 9 inch square pan. Repeat with the remaining 8 pieces for a total of 9 dinner rolls.

Step 6 – Final proof and baking
Cover the loaf pan or square pan with plastic wrap and let this dough proof in a warm place until doubled in size. Once proofed, brush the top with an egg wash (egg yolk + water) or a milk wash (milk or cream).


Pre-heat oven to 350°F / 180°C. When the oven is preheated, place the pans in the oven to bake.
With bread rolls, it would only take about 20 – 25 minutes. But bread loaves can take longer (up to 35 minutes).
If you need to bake further after the bread has turned a golden brown color, just place a piece of foil over the bread to prevent the crust from burning. A dark brown crust is really delicious, but make sure to prevent it from burning!
I like to bake the bread until it reaches an internal temperature of about 190°F / 88°C.
Once baked, remove the bread from the oven and let it rest just for a few minutes.
Then turn it out on to a wire rack to cool down.

How to enjoy this bread
This Japanese milk bread is easier to cut through when it’s at room temperature because of how soft it is. But you’re more than welcome to tear right into it while still warm! 🙂
My husband has declared this to be the best “regular” bread he’s ever had (because croissants still come first!), and constantly requests for it.
Enjoy it any way you do any other type of bread. Butter, jam, Nutella… any spread will be perfect with it.
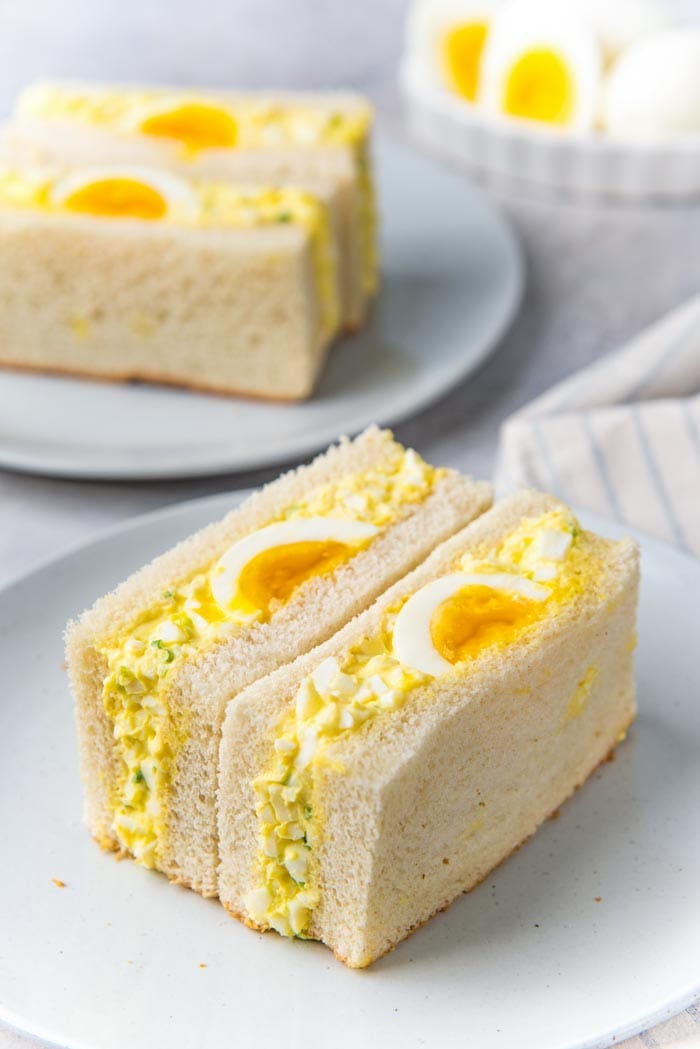
I also make these Japanese egg salad sandwiches with this bread as well. And this scallion and sesame milk bread is another flavorful variation of this dough.

Once you give this recipe a go, you’ll soon realize why this Japanese milk bread (aka Hokkaido milk bread or Shokupan) is so popular all over the world.
And you’ll be inspired to make lots of different flavors as well.

Can I make this recipe by hand?
Yes! Since it’s a sticky dough, you have to patient with it.
Follow the recipe to mix the dough. Use a wooden spoon or a danish dough whisk to mix all the ingredients (except butter). You will end up with a really scraggly looking, sticky dough.
At this point, cover the bowl with plastic wrap and let it rest for 20 – 30 minutes. This resting time will help with gluten development.
After about 30 minutes, the dough should have transformed into a sticky but stretchy dough.
At this point, add melted, but cooled butter. Coat your hand with a little of the butter as well, and start to stretch the edges of the dough towards the middle. Slap the dough in the bowl to incorporate the butter into the dough and to knead it at the same time. You will have to knead by hand like this for about 5 – 7 minutes, until the dough surface begins to look smooth.
Proof the dough in the fridge overnight, OR in a warm place until doubled in size, and then proceed with the rest of the recipe.

Can I make this in a bread machine?
I haven’t tried that because I don’t own a bread machine, but you should be able to.
Remember this is a sticky dough, so don’t be tempted to add extra flour to rectify this. The kneading will bring the dough together.
My best recipe tips
- Get the consistency of the tangzhong correct. It should be like a thick paste when at room temperature. This ensures that it adds the right amount of moisture to the bread loaf.
- Make sure the tangzhong is at room temperature when it’s added to the dough.
- Activate the active dry yeast to make sure the yeast is still active, and to make sure it dissolves well.
- Make sure to not let the salt come in direct contact with the yeast.
- Use bread flour to get the chewy texture and for better gluten development.
- Add a little dry milk powder to get a milky taste and an even softer texture.
- The dough will be very sticky. Knead the dough until the gluten develops properly. The dough will turn from a sticky, scraggly dough to a shiny, smooth, tacky dough.
- Prep your loaf pan (or square pan for dinner rolls) by brushing them with butter. You can additionally coat it with flour too.
- Do not allow the bread loaf to cool down to room temperature while still in the loaf pan. The condensation can cause the bread to become soggy.

Recipe
Japanese Milk Bread
US based cup, teaspoon, tablespoon measurements. Weight measurements are recommended for accurate results whenever available.
Common Measurement ConversionsIngredients:
Tangzhong
- 60 mL water ¼ cup
- 60 mL milk ¼ cup
- 23 g bread flour 2 tbsp
Japanese Milk Bread
- Tangzhong room temperature (above)
- 120 mL milk ½ cup, lukewarm
- 7 g active dry yeast 2 – 2 ¼ tsp
- 50 g sugar ¼ cup
- 15 g dry milk powder 2 tbsp
- 1 egg
- 350 g bread flour about 2 ⅔ cups, spoon and leveled
- 1 tsp sea salt
- 58 g unsalted butter softened, 4 tbsp / ½ stick
Instructions:
Tangzhong
- Place the water in a small saucepan. Add the bread flour and whisk until you have a smooth mix with no lumps. Add the rest of the milk and whisk to combine.60 mL water, 60 mL milk, 23 g bread flour
- Heat over medium heat while whisking constantly until the mixture thickens. The resulting mixture should have a thick, pudding-like consistency.
- Scrape the mixture into a bowl and then cover with plastic wrap. Make sure the plastic wrap is touching the surface of the tangzhong to prevent a skin from forming on top.
- Allow the tangzhong to cool to room temperature.
Japanese milk bread dough
- In your mixing bowl, place the lukewarm milk and dissolve about 1 tsp of the sugar in the liquid. Sprinkle the yeast over the milk and stir gently to mix. Allow the milk + yeast mixture to stand for about 10 – 20 minutes until the yeast is activated. The mixture should become bubbly and frothy on the surface.120 mL milk, 50 g sugar, 7 g active dry yeast
- Once the yeast is activated, add the milk powder (if using), the rest of the sugar, tangzhong, the egg, flour, and finally the salt.Tangzhong, 50 g sugar, 15 g dry milk powder, 1 egg, 350 g bread flour, 1 tsp sea salt
- Using a spatula, mix the dough to combine the ingredients and to help form a scraggly dough.
- With the dough hook attached to your mixer, knead the dough for about 5 minutes on a low speed (speed 2 or 3). The dough will be very sticky and stick to the sides, but continue mixing and the dough will start to come together.
- After 5 minutes of kneading, add the butter in 3 – 4 additions, mixing for about 20 seconds in between. Scrape down the sides and the bottom of the bowl to make sure the dough mixes well.58 g unsalted butter
- Once all the butter is incorporated into the dough, turn up the speed to 4 – 5 (medium speed) and knead for a further 5 – 7 minutes. Scrape the bowl once or twice while kneading.
- The dough should become smooth, satiny and pull off cleanly from the sides of the bowl.
- Place the dough on a lightly floured surface and shape the dough into a ball. Then place the dough back in the mixing bowl and cover with plastic wrap.
- Keep the bowl in a warm place and allow the dough to double in size (about 1 – 2 hours, depending on the weather/ambient room temperature).
- When the dough has proofed in a warm place, you can transfer it to the fridge for a couple of hours just to make it a little easier to handle. THIS IS AN OPTIONAL STEP.
- Alternatively, place the bowl in the fridge and let it slow proof for about 12 hours. The dough will also be easy to handle when chilled.
- Once the dough is proofed and you’re ready to shape the dough, prepare the loaf pan. Butter 1 – 4.5 x 8.5 inch loaf pan and dust the pan with flour. If making dinner rolls, butter a 9 or 8 inch square cake pan, and dust the sides with flour. Set aside until needed.
- Turn the dough out onto a lightly floured surface and press all the excess air out of the dough.
Japanese milk bread loaf
- Weigh the dough, and divide it into 4 equal portions.
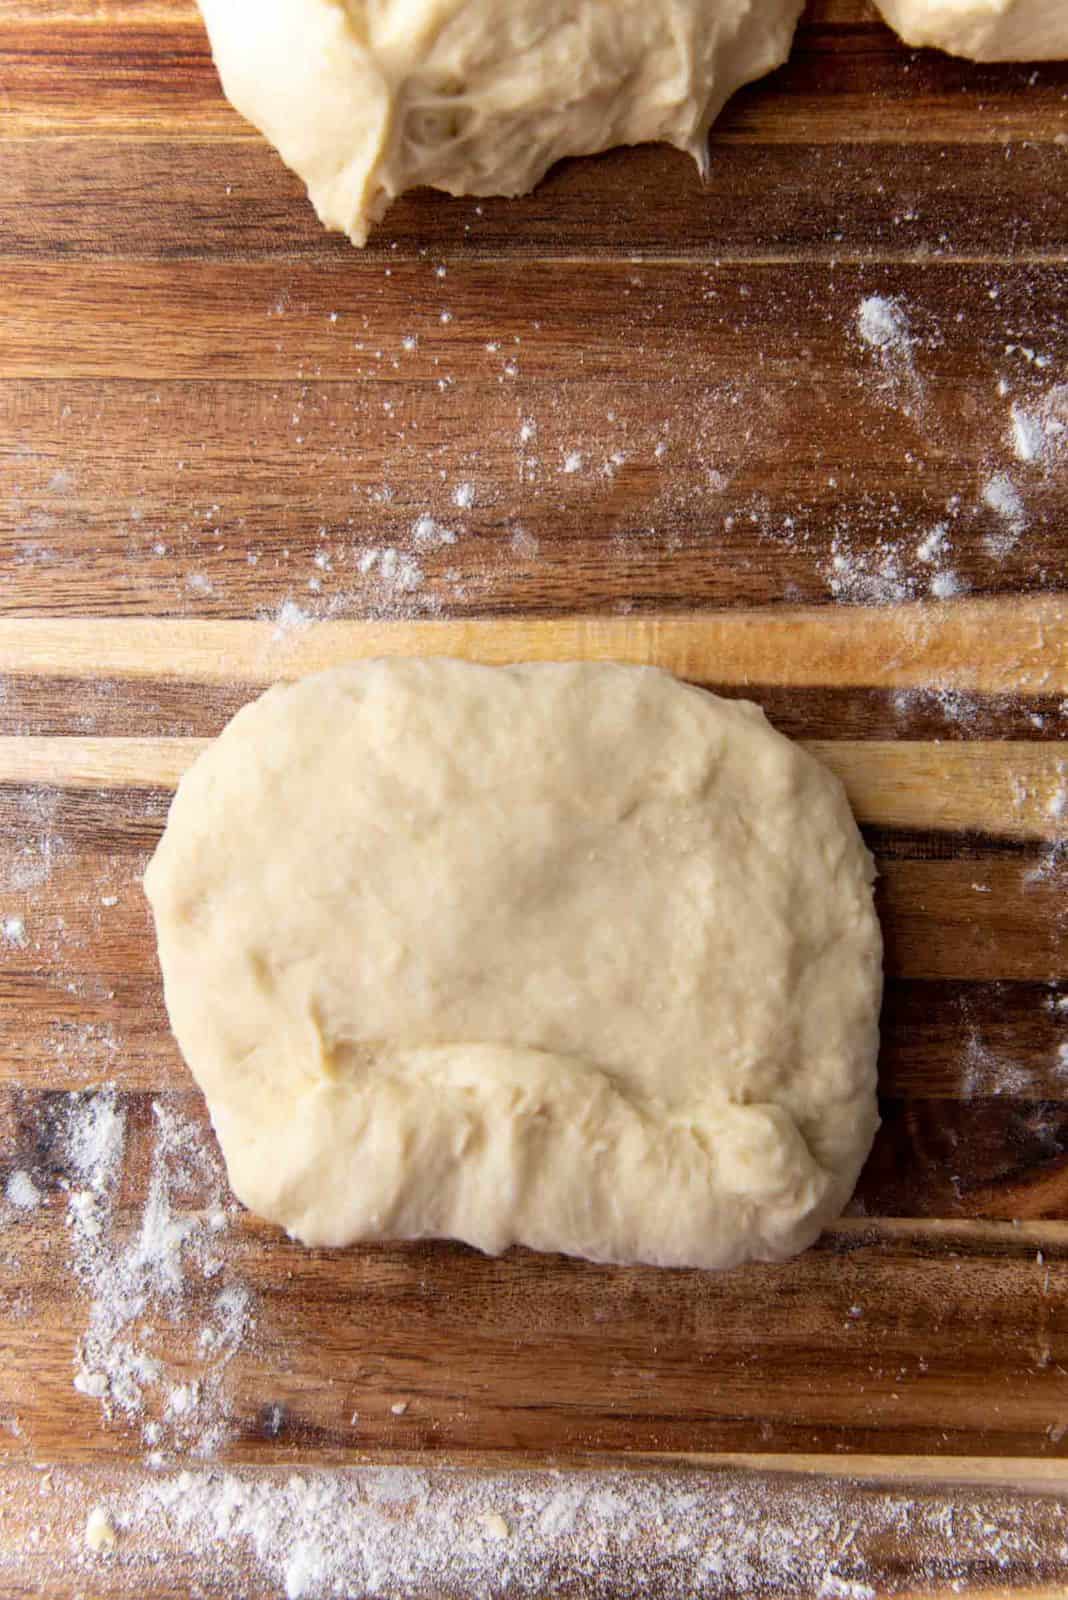
- Roll out each dough portion into a six inch (approximately) square.
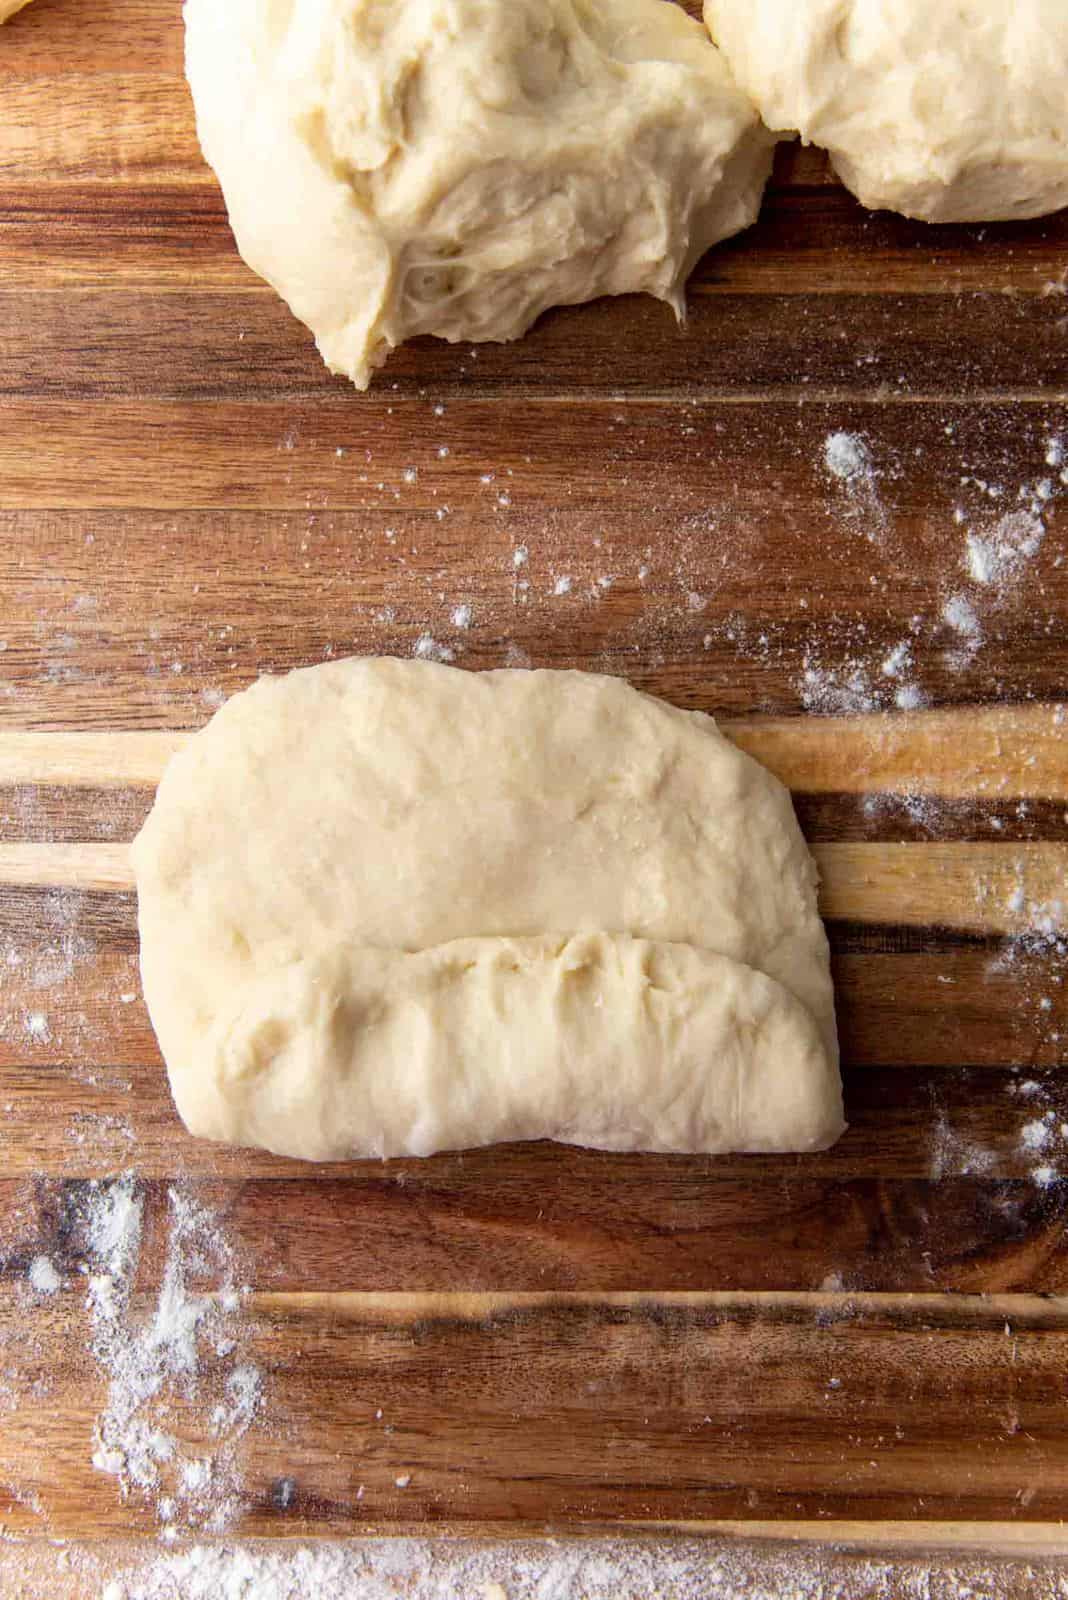
- Fold the opposite corners of the square in towards the middle.
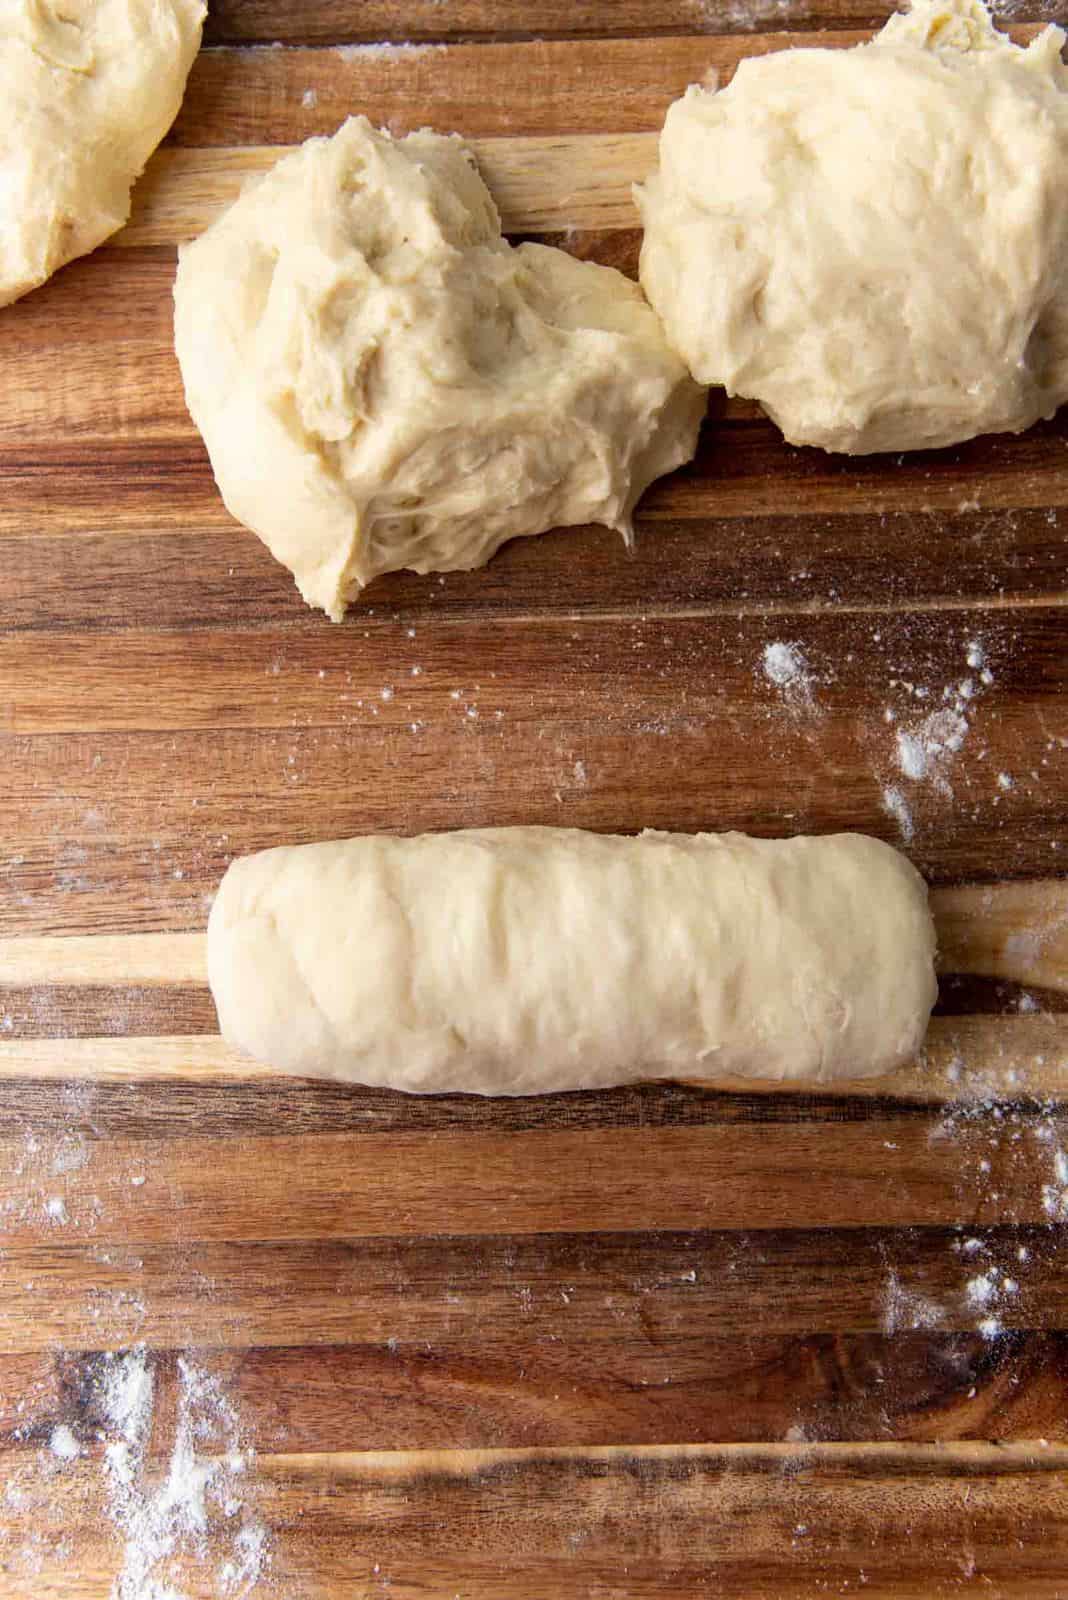
- Roll up this piece of dough, starting from the pointed end. Make sure you roll up the dough firmly, and a little tightly. If it’s too loose, you may end up with large holes in the baked bread.
- Once you’ve rolled up the dough to the top, fold the pointed edge in and pinch the seam to seal.
- Place the rolled up dough in the dough pan, seam side down. There will be 4 rolls per loaf pan.
- Repeat with all the dough portions and place them in the loaf pan.
- Cover the loaf pan with plastic wrap and let the dough proof in a warm place, until doubled in size. This can take about 1 – 2 hours depending on the ambient room temperature. The dough should rise to just below the top of the loaf pan.
Japanese milk bread rolls
- Divide the dough into 9 equal pieces.
- Roll each piece into smooth, round dough balls and place them in the square baking pan, with about ¼ – ½ inch of space between each ball. Each square baking pan should have 9 rolls each.
- Cover the baking pan with plastic wrap and let the dough proof in a warm place, until doubled in size. This can take about 1 – 2 hours, depending on the ambient room temperature.
Baking the bread
- Preheat oven to 350°F / 180°C. Once preheated, AND the bread is proofed, brush the top of the bread dough with a milk wash (for a more matte crust), or an egg wash (for a glossy crust). Bake in the preheated oven for 30 – 35 minutes (for the loaf), or 20 – 30 minutes (for the bread rolls). If the bread starts to caramelize too much in the oven, place a piece of foil over the surface of the bread to prevent it from burning.
- If you have a thermometer, bake until the internal temperature is about 190 – 205°F (88 – 96°C).
- Remove the loaf pan / baking pan from the oven and let it cool for a few minutes.
- Turn the dough out onto a wire rack and let it cool down further.
- This bread is easier to slice when at room temperature, but can be enjoyed warm too.
Recipe Notes
Notes on proofing
In winter, or if you don’t have a warm place to proof the dough in your house, turn on the oven light, and keep the bowl inside the oven. The heat from the light will warm the oven sufficiently to help with the proofing. You can use a metal bowl to make this proofing process go faster. Proofing times will vary depending on the temperature of the dough, environment and the type of yeast you use. So rather than going by time, go by sight and feel.Proofing test (finger indentation test)
- If you make a small indent on the dough with your finger tip and it bounces back slightly, then it’s ready to be baked.
- If the indentation stays, it’s starting to over-proof, so bake it as quickly as possible.
- If the bread deflates when poked with a finger, then it has definitely over-proofed and may need to be re-done.
Recipe variations and other homemade bread dough
Scallion and sesame milk bread, Brioche bread dough, Brioche buns, Hawaiian dinner rolls, Focaccia bread, White bread (sandwich bread), Hot dog buns, Chocolate babka, Cinnamon babkaNutrition Information:
“This website provides approximate nutrition information for convenience and as a courtesy only. Nutrition data is gathered primarily from the USDA Food Composition Database, whenever available, or otherwise other online calculators.”


Leave a Reply