


These fun, colorful and eerily adorable Mini Monster Cakes (Halloween Themed Cakes) are so easy to make and super fun to decorate.
The cake itself is incredibly fudgy, moist, dense and delicious. These mini monster cakes are perfect for a kids’ Halloween party!

I LOVE October! For one – I love the weather. Two – it’s Halloween! Three – it’s the month of my husband’s birthday! We had a low-key celebration this weekend, with his favorite meal, but no cake.
A birthday without cake is an abomination to me. Since he’s so busy these days, we decided to postpone the cake for another couple of months when he will hopefully have some breathing space. That’s two whole months for me to plan his cake! That couldn’t possibly end well, could it? I guess we’ll find out.
BUT, that doesn’t mean our house was cake-free this weekend though. 🙂

Halloween themed cakes
I’ve got some adorable (and scary?) mini monster cakes (Halloween cakes) for you guys today, which I think are PERFECT as Halloween party treats, or any type of fun kids’ event even.
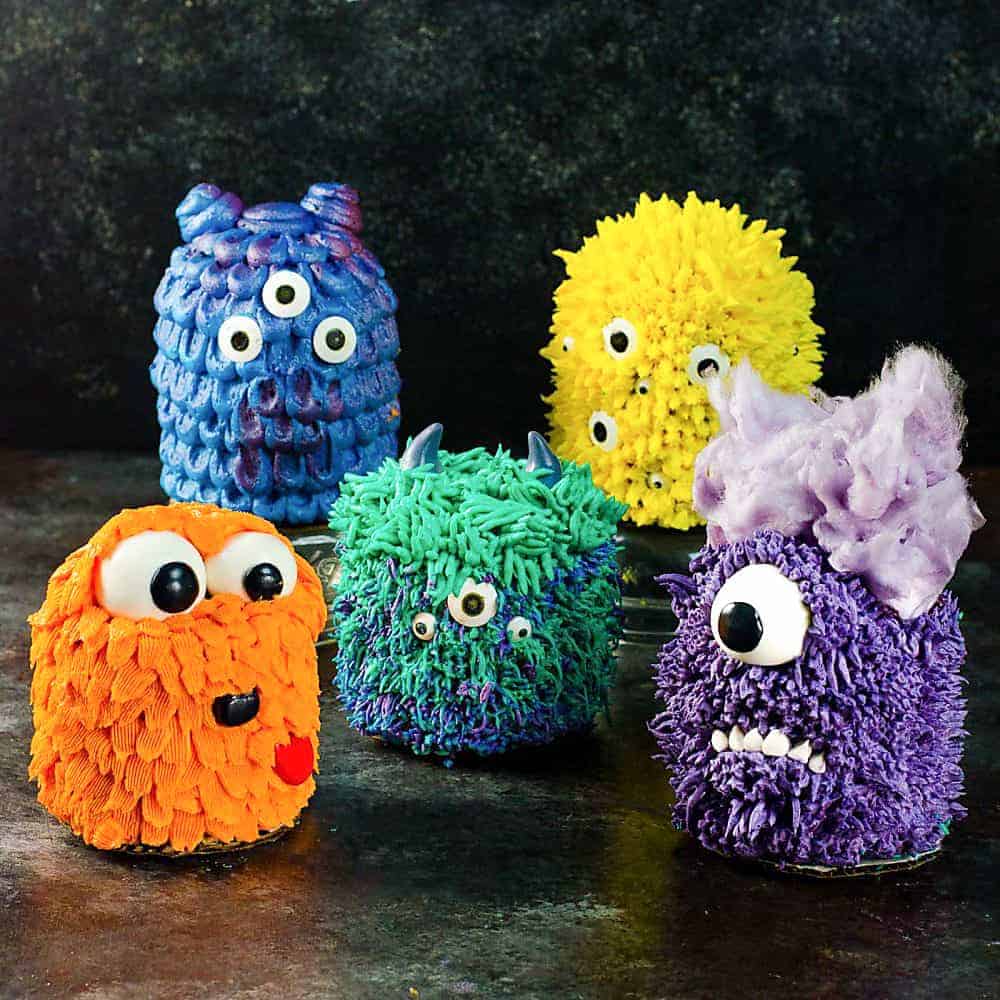
There are 5 monster cake ideas here. Each one has variations in color, shape, piping patterns and decorations. So please feel free to mix and match these styles to create your own version of fun and colorful monster cakes!
So you only want to make multiple cakes of the design? No problem. Want to make different designs? Go for it! These are basic cake recipes and recipe ideas, so go ahead and have some fun with ’em. 🙂

The monster cake recipe
I’m using my chocolate sheet cake recipe here. These cakes were made with black cocoa to color them naturally in black (like I do with these Halloween cupcakes).
BUT you can also use dutch cocoa for the cakes and then use a little black coloring to color them darker. These mini monster cakes (Halloween cakes) are dense, fudgy, super moist and insanely delicious.
You could try making monster cupcakes instead, but I wanted to make something larger, plus I wanted to use the cake scraps to create “cake pop dough” to mold the dome-shaped surfaces on top.

Yellow spiked mini monster cake with buttercream “spikes”
The frosting
This is my favorite fluffy vanilla buttercream frosting. I add a little extra powdered sugar because I wanted the frosting to keep the piped shape.
The frosting was divided into 5 and then brightly colored with orange, yellow, blue, purple and teal. You can use any color or color combinations you like, but make sure to use GEL COLORS.
You need quite a bit of coloring to get these deep colors, so if you use regular food coloring, you may need more of it, which would end up softening the frosting further. But with gel coloring, you use far less, and you end up with a more vibrant color as well.
I especially like the purple monster as it was inspired by the evil minions from the Despicable Me movies, complete with purple candy floss (cotton candy) for his wild unruly hair! 🙂
My frosting recipe here yield roughly about 1.5 – 2 cups of frosting per color (that’s 7.5 – 8 cups total yield). You can create the monsters with single colors OR place two colors in each piping bag to create a dual color effect (see the teal mini monster and the blue dragon mini monster cakes).

Teal furry mini monster inspired by Sully from Monsters Inc.
Monster cake decorations
Cake tips & tools I use
I used the following tips to get the fur or scaly look on these mini monster cakes (Halloween cakes).
- Russian grass tip (identical to tip 234, just with more holes), for the fur and hair
- Popsicle stick to create the “scales”
- Open star tip 18 for the long “spikes”
- Basket weave tip 48 for the raggedy fur
How to do the decorations
- Eyes – I got the small and medium-sized eyes from a cake decorating store (they are actually medium and large sized candy eyes – the same ones I use for these Halloween monster cookies). But you can make your own by melting white and black candy wafers and piping out the eyes. The large eyes that were used were made with white gum paste (or fondant) with black gum paste stuck to the middle. These were attached to toothpicks (for extra stability), and dried for a day before being used.
- The tongue, nose and horns – it’s easier to make the nose with black gum paste. The horns were made with grey gum paste and the tongue with red gum paste. Rather than buying colored gum paste, I usually use white gum paste and then color it.
- Teeth – The teeth were made with gum paste as well, but fondant will also do. Make sure to make them thick so that they’ll still be visible after piping the “fur” buttercream.
- Purple monster hair – I used the grass tip to create hair for one of the monsters, but wanted the purple monster to have finer hair, so that it would look more like the purple minion. Cotton Candy was PERFECT! The wispy cotton candy can be shaped and piled on top of the cakes to create unruly monster hair. Just be mindful that cotton candy is 100% sugar, and it melts quickly. So I would recommend keeping the cakes in the fridge, without the cotton candy, until you’re ready to serve them. Then just before serving, you can add the cotton candy on top.
- Optional effect – I used my air brush gun to spray the “dragon” monster with some silver luster paint plus purple color to give it some luster/shine.

Purple minion monster cake with purple candy floss hair

Dragon inspired blue scaled mini monster
Serving suggestions
These aren’t necessarily meant to be spooky, but more fun and adorable for a kids’ Halloween party (or even a birthday party!).

Ragged furry pet mini monster!
If you’d like to have your kids involved in the decorating, you could simply present them the crumb coated cakes, and then let them decorate them however they like.
You can serve the cakes with an assortment of frosting colors and tips, plus decorations, fondant and gum paste to make their own mini monster cakes (Halloween cakes)! 🙂 Just make sure you don’t let them handle toothpicks, unless they are old enough to do so.
The mini monster cakes are super delicious and fudgy and I’m sure will be an absolute hit with kids!
Step by step recipe video
Recipe
Mini Monster Cakes (Halloween Cakes)
US based cup, teaspoon, tablespoon measurements. Weight measurements are recommended for accurate results whenever available.
Common Measurement ConversionsEquipment:
- 1 basket weave tip 48
- 1 big grass tip 234 or Russian grass tip.
- 1 small grass tip 233
- 1 2A or 1A round tip
- 1 open star tip 18
Ingredients:
Black chocolate sheet cake
- 455 g unsalted butter 4 sticks / 2 cups (Melted)
- 52 g oil ¼ cup
- 680 g white sugar 3 ⅓ cups
- 8 large eggs
- 240 mL milk 1 cup
- 2 tsp vanilla extract
- 1 tsp sea salt
- drops black food coloring optional
- 150 g black cocoa (or dutch cocoa) 1 ⅛ cup (spoon and leveled. If you use dutch cocoa, add some black coloring to darken the color)
- 400 g AP flour about 3 ¼ cups
- 4 tsp baking powder
Vanilla buttercream (yields about 8 cups)
- 1.02 kg unsalted butter 4.5 cups / 9 sticks (softened)
- 1.36 kg confectioner's sugar 12 cups (spoon and leveled, and sifted)
- 1 tsp sea salt
- 1.5 tbsp vanilla extract
- ¼ cup chilled heavy whipping cream 35% fat
For decorating
- Gel colors I used Orange, Yellow, Teal, Blue, Purple
- Medium candy eyes
- Large candy eyes
- White gum paste / fondant
- Black gum paste / fondant
- Grey gum paste / fondant
- Red gum paste / fondant
- Silver and purple airbrush paint optional
- Popsicle stick
Instructions:
Black chocolate sheet cake
- Preheat the oven to 325°F/163°C. Line the bottom of a 18 x 13 inch tray or two 9 x 13 inch pans with parchment paper. Butter the sides and dust with some cocoa powder.
- Mix the melted butter, oil, sugar in a bowl until well combined.455 g unsalted butter, 52 g oil, 680 g white sugar
- Add in the eggs, followed by the milk, vanilla and salt. Whisk until well combined. If you aren't using black cocoa powder, then you can also add some black food coloring to darken the batter.8 large eggs, 240 mL milk, 2 tsp vanilla extract, 1 tsp sea salt, drops black food coloring
- In a separate bowl, sift the flour, cocoa and baking powder together.150 g black cocoa (or dutch cocoa), 400 g AP flour, 4 tsp baking powder
- Add the dry ingredients to the wet ingredients in 2 – 3 additions, and fold in the ingredients to mix well. Do not over-mix.
- Pour the batter into the prepared half sheet tray until ¾ full.
- Bake in the preheated oven for 20 – 30 minutes until the cake is springy to the touch and an inserted toothpick comes out clean.
- Remove from the oven and let the cake cool down. Once cooled down, cover and refrigerate for a few hours to make it easier to cut the cake layers.
- Using a 3.5 inch pastry cutter, cut 12 rounds from the sheet cake. Remove the cake rounds and place them on a tray. Keep them covered and refrigerated until needed.
- Crush the rest of the cake scraps to crumbs and add about ½ cup of frosting. Using a spatula or your hands (easier with your hands), mix in the buttercream with the cake crumbs to form a cake pop dough that you can mold.
Cake half-spheres
- Divide the cake pop dough into 3 portions. Form a ball with each portion that is 3.5 inches in diameter.
- Cut each sphere in half and form the half spheres. Cover and leave in the fridge until needed.
Vanilla buttercream
- Place the softened butter and salt in a cake mixer bowl. Using the whisk attachment, whisk the butter until very light and fluffy. This can take up to 10 minutes. Add the vanilla and whisk to mix.1.02 kg unsalted butter, 1 tsp sea salt, 1.5 tbsp vanilla extract
- Add the confectioner's sugar (one cup at a time) and whisk together until it’s all mixed in. Scrape down the sides from time to time. Whisk for a few minutes until you have a light and fluffy frosting.1.36 kg confectioner's sugar
- If needed, add up to ¼ cup of heavy cream to make the frosting fluffier. But keep in mind that food coloring will be added later too (so you don't want to add too much liquid).¼ cup chilled heavy whipping cream
- Divide the frosting into 5 portions and color each with a bright color of your choice.Gel colors
- Place the colored frosting in piping bags and set aside until needed.
All cakes (base shape)
- Place 1 cake layer on the decorating tray. Spread a thin layer of frosting and top with a second cake layer. Add a layer of crumb coating frosting (to trap the cake crumbs). If you want your cake to have a domed top, place a half sphere on top and crumb coat the surface.
- Repeat with the rest of the cake layers with different buttercream colors.
- Chill the cakes for a few hours until the frosting is set.
Gum paste decorations for facial features (can use fondant instead too)
- Eyes – form 2 x 1.5 inch and 1 x 1 inch diameter white gum paste balls (if you want uneven eye balls, like in Monster 5). Make smaller black fondant discs, and stick them on the white gum paste balls using a little water. You can make as many eyes as you want, in any size. Attach the eye balls to toothpicks and let them dry for about a day.White gum paste / fondant, Black gum paste / fondant
- Teeth – form little triangular white gum paste pieces for teeth. Make sure the teeth are thick so that they stick out from the monster.White gum paste / fondant
- Horns – form 2 x 1 inch grey gum paste balls. Form 2 horn shapes with a flat bottom. Attach toothpicks to the bottoms of the horns. Let them dry for about a day.Grey gum paste / fondant
- Tongue – using red gum paste, form a tongue shape that is about 1 inch long.455 g unsalted butter, Red gum paste / fondant
- Nose – form a little ½ inch black gum paste oval ball for the nose.Black gum paste / fondant
Monster #1 (inspired by purple evil minions!)
- Take a chilled cake without the domed top. Add one large eye ball on top of the cake (towards the top end).
- Pipe some purple buttercream behind the eye to secure it to the cake surface. Using a small spatula, smoothen the buttercream.
- Pipe a little frosting where the mouth will be to create a “ledge” for the teeth. I shaped the ledge to be a frown and then stuck the teeth on top.
- Using the big grass tip 234, squeeze purple buttercream onto the cake to create the fur look. Pipe the fur all over the cake as shown in the recipe video. Just leave a gap on top for the purple candy floss hair.
- Refrigerate the cake until needed. Top the cake with candy floss just before serving.
Monster #2 (yellow monster with domed head)
- This monster will be made with a mini cake with a domed top. Using a little buttercream, stick medium and large eyes all over the monster.Medium candy eyes, Large candy eyes
- Using the open star tip 18 with yellow buttercream, pipe spikes all over the cake. To create long spikes, squeeze the buttercream onto the cake and gently pull back while releasing pressure.
- Pipe shorter spikes around the eyes, and alternate the sizes of the eyes on the body. Pipe longer spikes on the top if you prefer.
- Refrigerate until needed.
Monster #3 (blue scaly monster – dragon inspired)
- For this cake, you can use just blue colored buttercream, OR create a dual color effect by adding blue and purple frosting in a piping bag, with the 2A or 1A round tip attached.
- Starting from the bottom, pipe dollops of buttercream along the bottom edge of the cake. Using a popsicle stick, spread the buttercream upwards as shown in the recipe video.Popsicle stick
- Second row, pipe dollops of buttercream between the buttercream scales in the first layer. Repeat with the popsicle stick as before. Repeat until you get to the top of the cake. Pipe a big swirl right on top and flatten it with a spatula or popsicle stick.
- Stick on 3 large candy eyes and pipe 2 big “ears” on top of the cake.Large candy eyes
- Let the cake set in the fridge for a few hours.
- Air brush the cakes lightly with silver airbrush paint and purple airbrush paint mixed together.Silver and purple airbrush paint
- Let it dry.
Monster #4 (teal monster – inspired by Sully from Monsters Inc.)
- Two different tips were used for this cake – the larger grass tips (big grass tip 234 or Russian grass tip for the hair, and the small grass tip 233 for the body).
- Teal buttercream and purple buttercream are placed in a pastry bag with the small grass tip 233 attached for the dual colored fur. Pipe the fur to cover the entire body of the cake. Don’t worry about it being messy.
- Pipe teal colored hair on top of the cake using the big grass tip 234 or Russian grass tip.
- Stick on the candy eyes for the face and horns on top. Refrigerate until needed.Large candy eyes
Monster #5 (orange pet monster with ragged fur)
- Stick two uneven fondant eyes on top of the cake surface (in the center). Pipe frosting behind the eyes to secure them on to the cake surface. Smoothen the buttercream using a spatula.
- Pipe the raggedy fur using the basket weave tip 48. Starting from the bottom of the cake, make short vertical strokes as shown in the video. To create more dimension, vary the piping angles slightly. Pipe the second layer of buttercream overlapping the bottom layer slightly. Repeat until you get to the top. You should end up with very scraggly looking fur. Along the edges of the cake at the top, pipe the buttercream so that it droops over the edge. Continue until you get to the eyes (see photo for details).
- Add a black nose and the red tongue. Pipe a few short strokes of the buttercream over the tongue and nose to blend them in. Refrigerate until needed.
Recipe Notes
Timeline
Day one
Make the cake base. Cool down and chill for a few hours. Cut cake rounds, cover and chill them. Crush the remaining cake into crumbs and store in an airtight container.Day two
Make the buttercream. Divide and color. Keep the buttercream in separate containers. Cover and set aside at room temperature after you’re done using it. Make cake pop dough with some of the buttercream to form spheres. Take the cake layers and sandwich the cakes. Make the cake bases, crumb coat, cover and chill cakes overnight. Make the gum paste / fondant decorations and let them dry overnight. Day one and day two can be done on the same day IF you like.Day three
Re-whisk the buttercream and place them in pastry bags. Decorate the cakes as you like. This can be done as a fun activity with kids or friends. Refrigerate (optional) until you’re ready to serve.Nutrition Information:
“This website provides approximate nutrition information for convenience and as a courtesy only. Nutrition data is gathered primarily from the USDA Food Composition Database, whenever available, or otherwise other online calculators.”
More photos of the cakes, so you can see the some of the finer details.


Leave a Reply