


This classic apple pie with a decadent butterscotch twist is for all your autumn-worthy celebrations! If you’re looking to upgrade your classic apple pie recipe with bigger and bolder flavors, this butterscotch apple pie recipe is all you need!
A flaky all butter pie crust, filled with tender slices of apple, mixed in a spiced and salted butterscotch sauce! Foolproof recipe for an apple pie unlike any other!

Apple pie is pretty much the herald of Fall, and there are very few things that hit the spot like a warm spiced apple cider or delicious apple pie or apple pie bars when the weather turns a little chilly.
An old fashioned apple pie is always a classic. However, my apple pie recipe is an incredible upgrade on an old fashioned butterscotch apple pie recipe!
Why this recipe works

- The butterscotch apple pie filling here has so much more flavor than your old fashioned butterscotch apple pie.
- Optional addition of brown butter and brandy (or bourbon) introduces even more depth of flavor.
- The pie filling is cooked slightly to prevent a soggy pie crust when baked.
- The recipe is foolproof and can be made by beginners, thanks to the detailed recipe instructions!
- While this is a foolproof recipe, I would still advice you to take your time when making it. The inactive time is just as important as the active time to get deliciously saucy and buttery results!

Ingredient notes
Pie crust
This butterscotch apple pie will need two pie crusts – one for the bottom and one as the top crust. I like making my own pie crust for the best flavor, but you can absolutely use store-bought if you prefer.
My homemade pie crust recipe and double pie crust recipe guide are tailor-made for making this kind of pie. The pie crust dough is super buttery, flaky, and tender, and I share detailed instructions and tips to make it super easy for beginners to follow. Plus, that recipe makes two pie crusts as well.
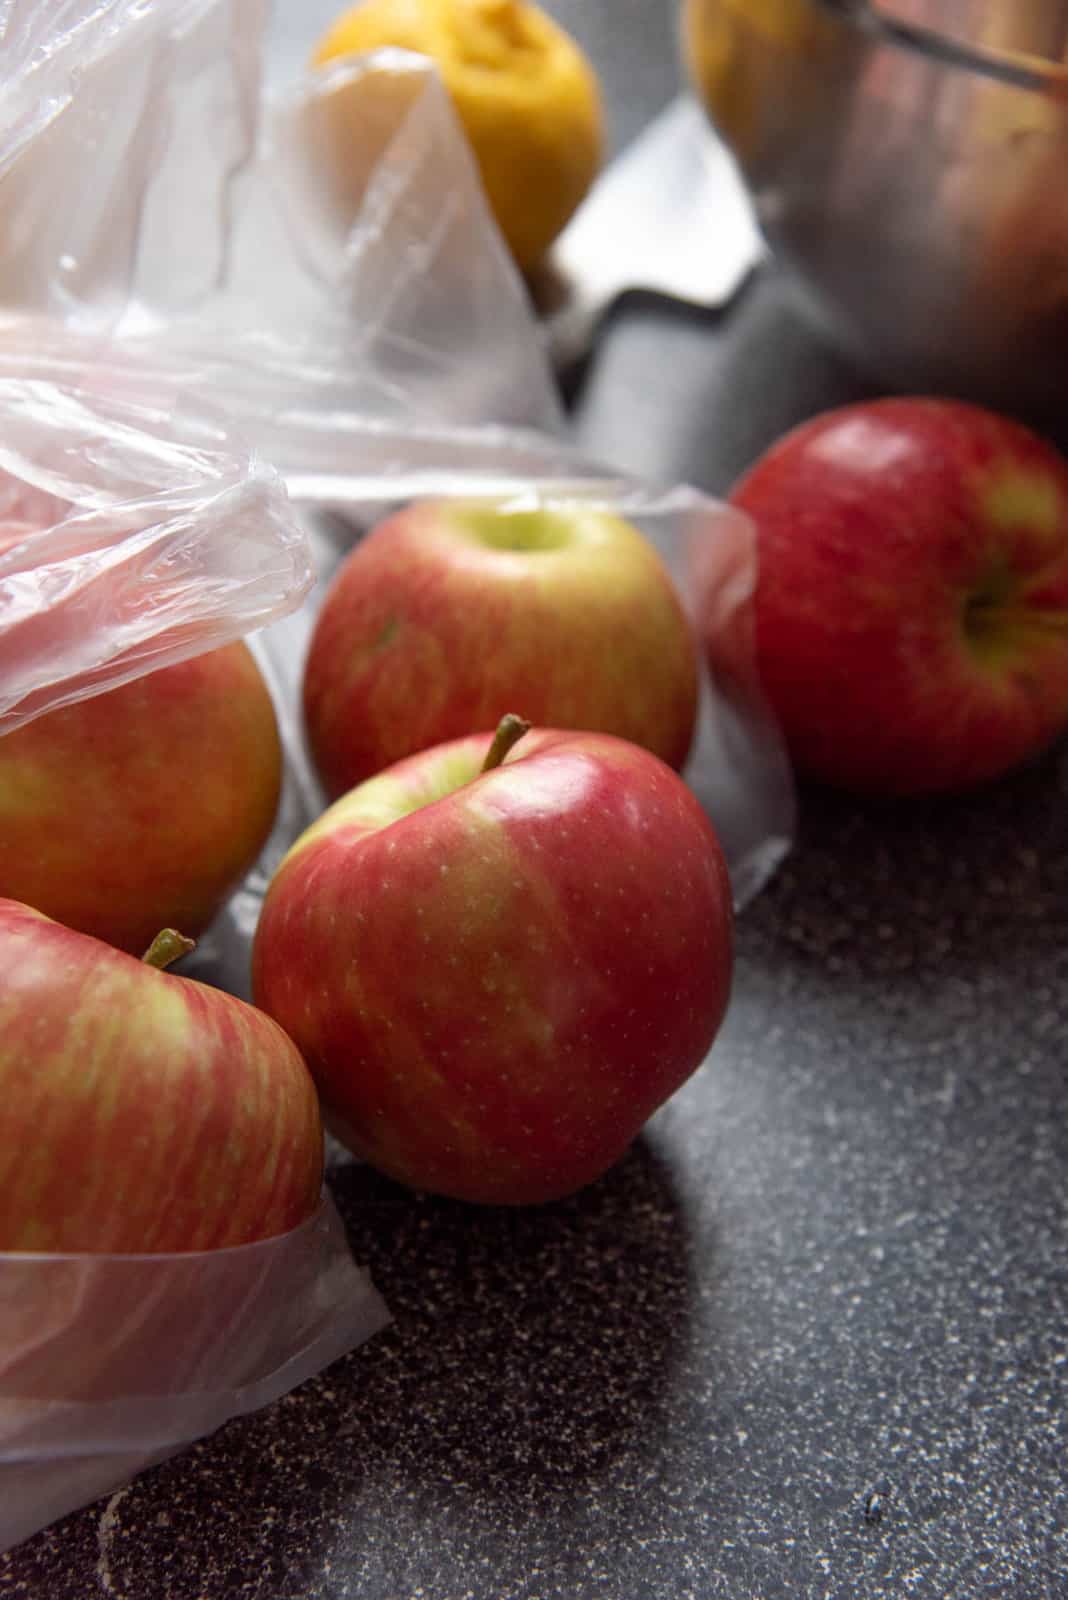
Apples
There are of course lots of different types of apple out there. But there are a few apples that are great for pie making.
- Braeburn
- Granny smith
- Honey crisp
- Golden delicious
- Pink lady
My favorite to use is honey crisp apples (which are great for making apple lemonade too). But I also like to add some granny smith for a tart flavor contrast to the sweet honey crisp. My ideal ratio is 80:20 (or 4:1) honey crisp to granny smith apples.
Unsalted butter
Can’t make butterscotch apple pie without butter amirite? For this recipe, I brown the butter first to give it even more flavor. This is an optional step, but I do highly recommend it! The brown butter adds richness and a lovely nutty flavor profile (thanks to the caramelization).
Dark brown sugar
To get the best molassey, butterscotch flavor, I recommend using dark brown sugar for this classic apple pie. If you only have light brown sugar, that is fine too, but add about 1 tbsp molasses for extra flavor (IF you have some at home).
White sugar
This additional amount of white sugar is primarily for sweetness, but it’s also to help reduce clumping of the flour. Flour is mixed with the sugar to remove clumps, so that it mixes in more evenly with the filling.
Flour
All purpose flour is added to thicken the filling. Thickening the liquid in the filling also prevents the bottom crust from getting soggy.
Spices, flavor, and salt
A combination of cinnamon and nutmeg adds a lovely layer of spice to the apple pie. These warming spices make this pie recipe even more Fall-worthy! Alternatively, you can also add premade apple pie spice.
Salt is absolutely necessary for any dessert. A little salt helps balance the sweetness and gives your pies more depth of flavor. I personally do add more salt because I LOVE the salted butterscotch apple pie twist to this classic apple pie. You can add just a little to balance the sweetness, or add more for a salty sweetness.
Vanilla is not entirely necessary, but it does enhance the flavor of this apple filling.
Adding bourbon or brandy introduces so much flavor to the butterscotch in the filling! Not only is it just added flavor, but it also makes the flavor profile more complex and delicious.
How to make butterscotch apple pie
The first step is to prepare the pie crust
Here’s my step by step guide for making perfect pie crust! The recipe and post are tailor-made for beginners, who haven’t attempted pie dough before, but it’s also designed for those bakers who want to make consistently perfect pie crusts.
However, if you’re making this apple pie with pre-made dough, then you certainly don’t need to worry about that step. Just make sure the pie crust is not frozen, and it’s thawed, but still chilled.
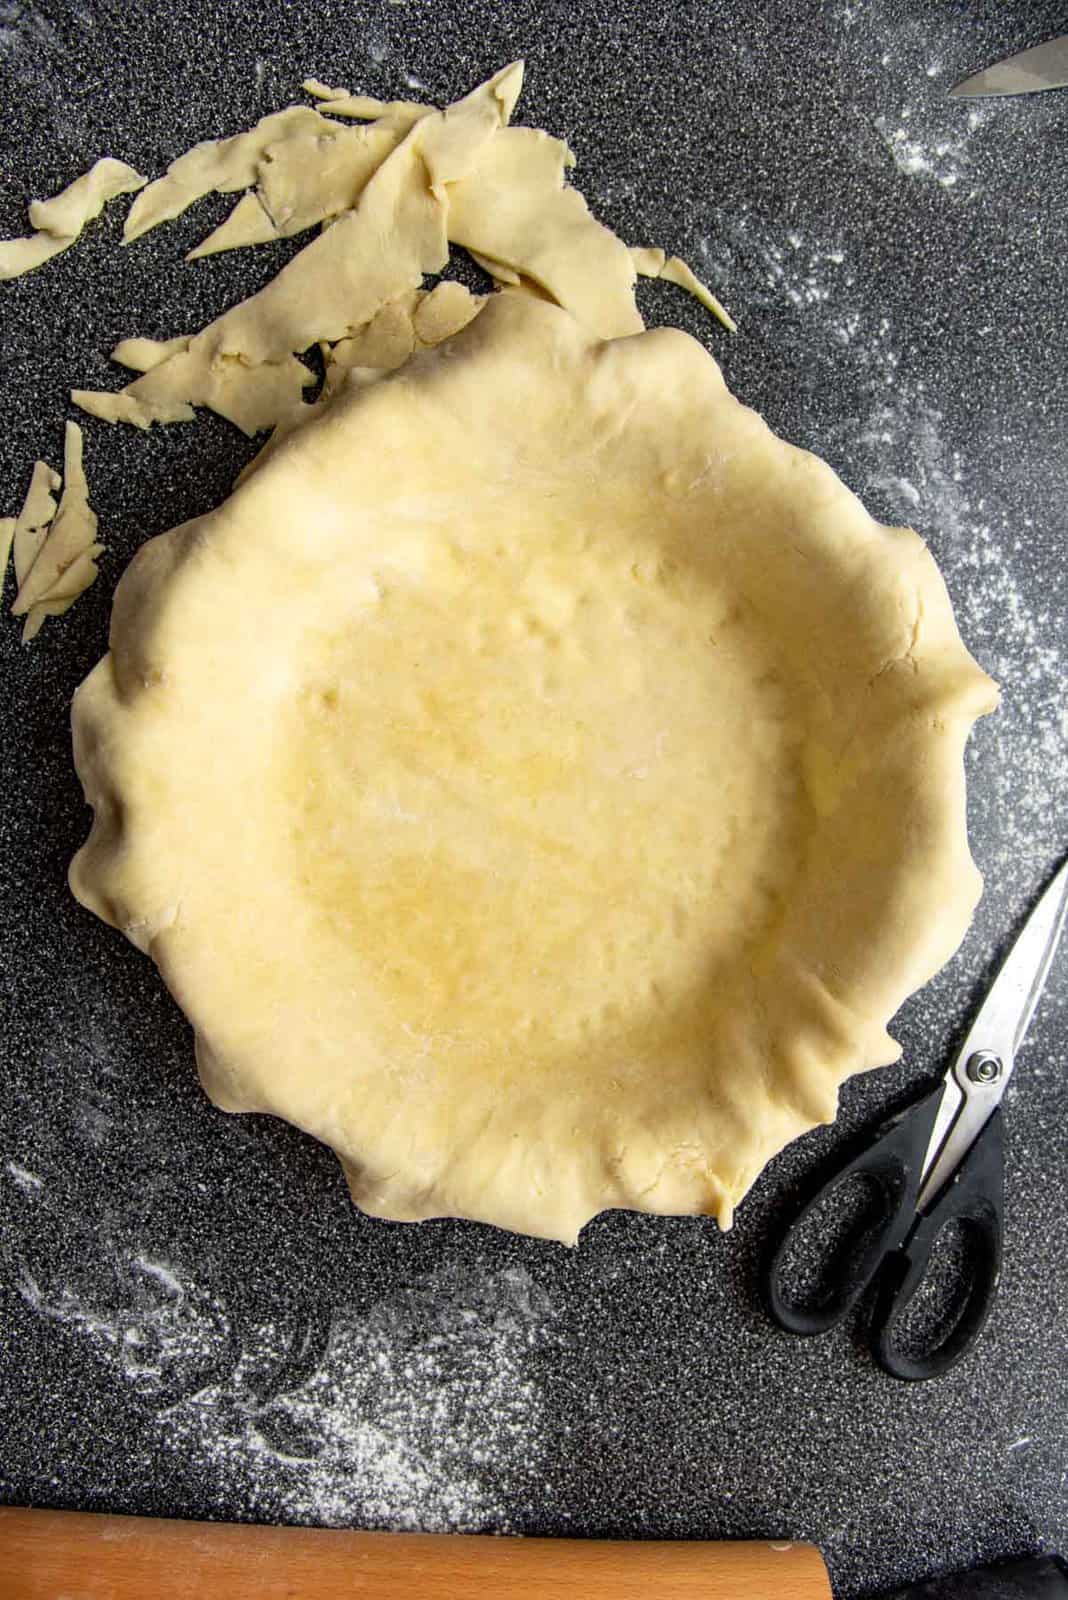
Line a deep pie dish (9 – 9.5 inches diameter, and about 2 inches deep) with the rolled out pie crust.
To prevent any shrinking, make sure to let the pie crust gently fit inside the dish. Do NOT stretch the dough in any way to fit it in the pie pan. Stretching will cause shrinkage as the pie bakes. Next, cut out the excess pie dough, leaving a 0.5 inch overhang over the edge of the pie plate. Use plastic wrap to cover the pie dish and refrigerate until the pie filling is ready.
Roll out the top crust as well, and then fold it into quarters. Wrap this with plastic wrap and refrigerate until needed.

Prepare the apples
The next step is to prepare the apples for the filling. You could either peel or not peel the apples, this depends entirely on your preference. Since the apple skin doesn’t break down as it bakes, make sure to peel the apples if you prefer a smoother apple pie filling.
You can also choose to slice the apples OR cut them into cubes. Both options work very well in this butterscotch apple pie. So go ahead with whichever cut feels more classic or nostalgic to you for this apple pie! 🙂
Cut the peeled (or unpeeled) apples in half, and remove the core. I use a melon baller to do this.
Next, cut the apples into slices that are roughly about 3 mm thick. You can use a mandolin or a knife for this. You can also cut the apple halves into cubes that are about 1 x 1 cm in size.
Prepare the apple filling
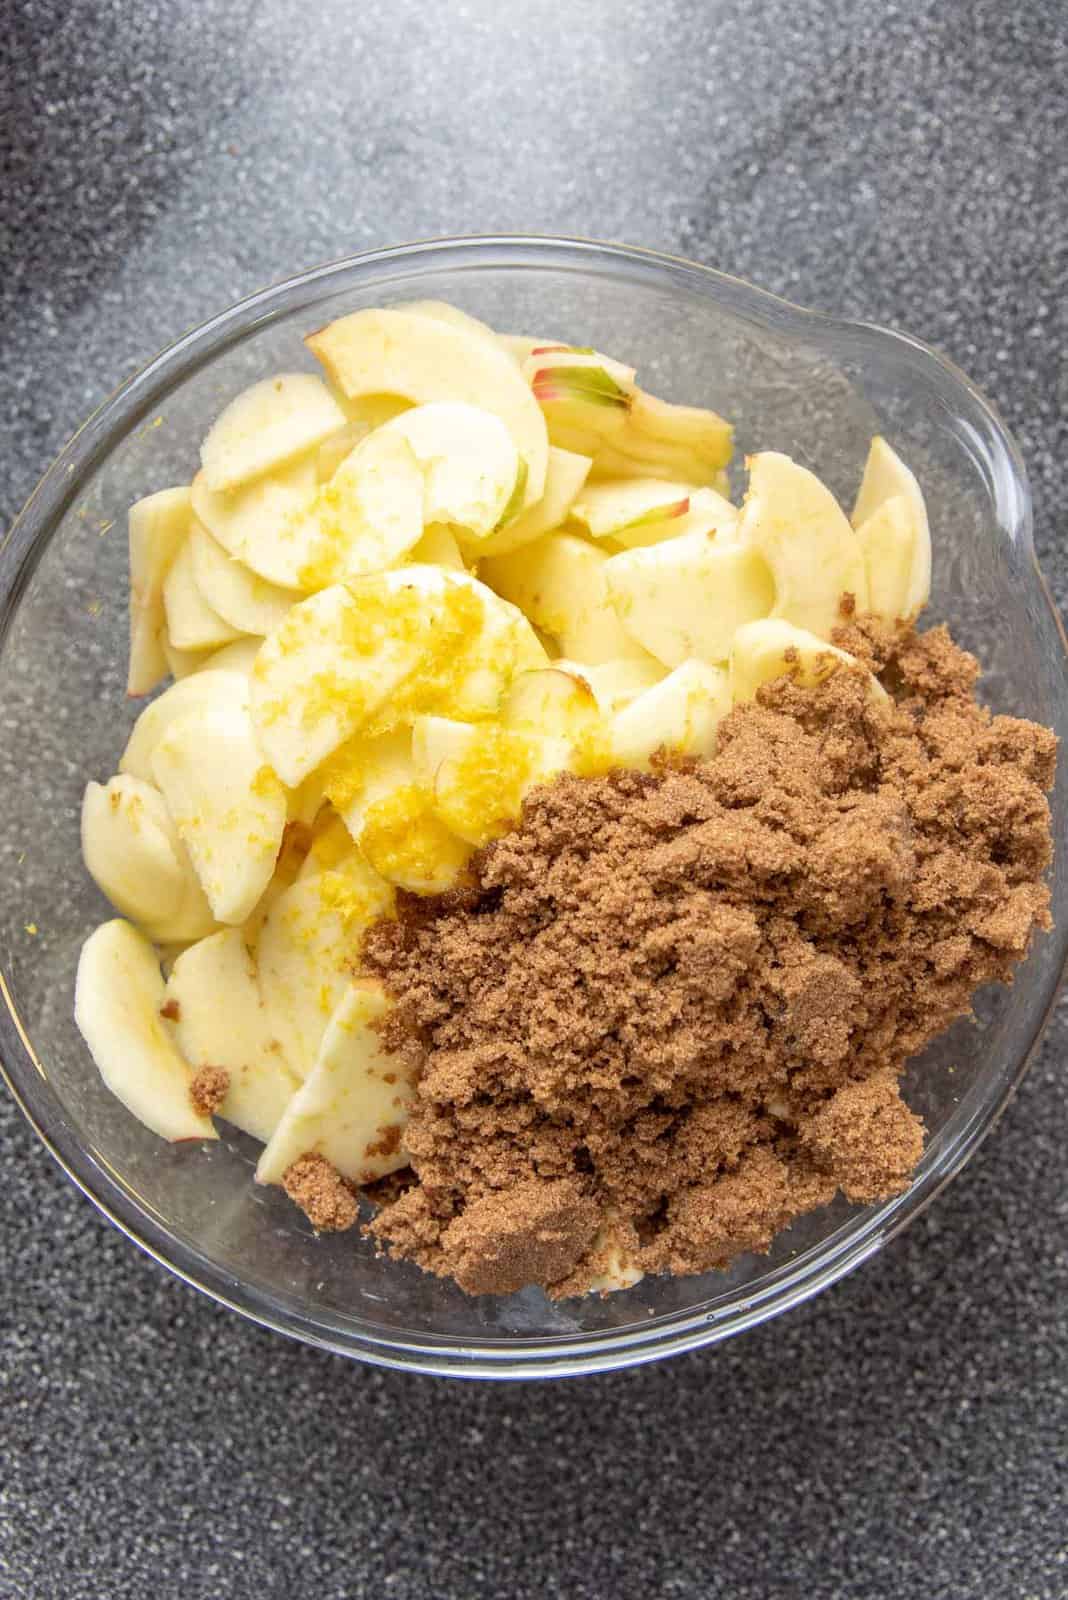
Place the sliced apples in a large bowl and immediately add the lemon juice. Toss to coat well. The lemon juice will prevent the apples from discoloring too quickly.
Add the brown sugar and salt and toss with the apples to combine. Let the apples sit for about 20 – 30 minutes.
Letting the apples sit in this way will draw out moisture from the apples. This liquid will become the base of the butterscotch sauce for the apple pie filling. This liquid drawn from the apples will create a more flavorful base!
If you choose to skip this step, you will have to cook the apples a little longer, and you may not have as much “sauce” in the apple filling.


Cook the apple filling for the butterscotch apple pie
Old fashioned apple pies do not cook the apples for the filling. However, I find that a cooked apple pie filling makes my classic apple pie even better! It prevents a soggy crust, and you end up with a classic apple pie that has the most amazing texture AND flavor because the cooking process develops more flavor in the filling.
To cook the apple pie filling, heat a large pot (5 qts) over medium heat. Add the butter and let it melt. After the butter has melted, keep coking the butter while stirring, to separate and caramelize the milk solids. Caramelize the butter until the milk solids are a dark amber color. This is BROWN BUTTER. You can read my article on how to make brown butter for more information if you like.
Once you’ve made the brown butter, Take the apple pie mix and pour in as much of the liquid to the pot as you can. Stir and bring the mixture to a boil.
Add the apples, and cook for about 3 – 5 minutes until the apples start to soften. While the apples are cooking, mix the white sugar, flour and spices together and make sure there are no lumps.
Sprinkle this sugar and flour mix over the apples and stir thoroughly to combine. There should be no flour lumps.
Bring the mixture to a boil while stirring, and let the filling cook for a further 3 – 5 minutes to thicken the butterscotch sauce. The total cook time should not exceed 10 minutes. Finally, add the vanilla and bourbon and stir to mix. Taste and add more salt if you like.
When the filling has thickened, transfer the apples to a baking sheet so that it can cool down faster. You can also make the apple filling the day before and let it cool down in the fridge if you prefer.

Filling and preparing butterscotch apple pie (classic and lattice methods)
When the apple pie filling has cooled down, and the pie crust has chilled in the fridge, it’s time to assemble the pie.
Take your pie plate from the fridge and place the cooled down butterscotch apple filling on the pie crust.
Now you have two options for the top crust of your classic apple pie; fully covered, or a lattice crust.
Fully covered – I talk about how to make a solid top crust in my double pie crust recipe post. Briefly, brush the top border of the pie crust with water. Carefully place the top crust over the filling, on top of the pie. Press down along the border to seal the bottom and top crusts together. Cut the excess pie dough to match the bottom dough.
Roll the dough overhang under the pie crust to create a thick border on your pie crust. Crimp the edge of the pie. You can either crimp with a fork, or create a fluted edge.
Cut a few slits on the top crust so that the pie is well vented (about 4 – 5 vents). Alternatively, you can cut out shapes from the top crust BEFORE placing it on top of the pie, so that the vents are already pre-cut.
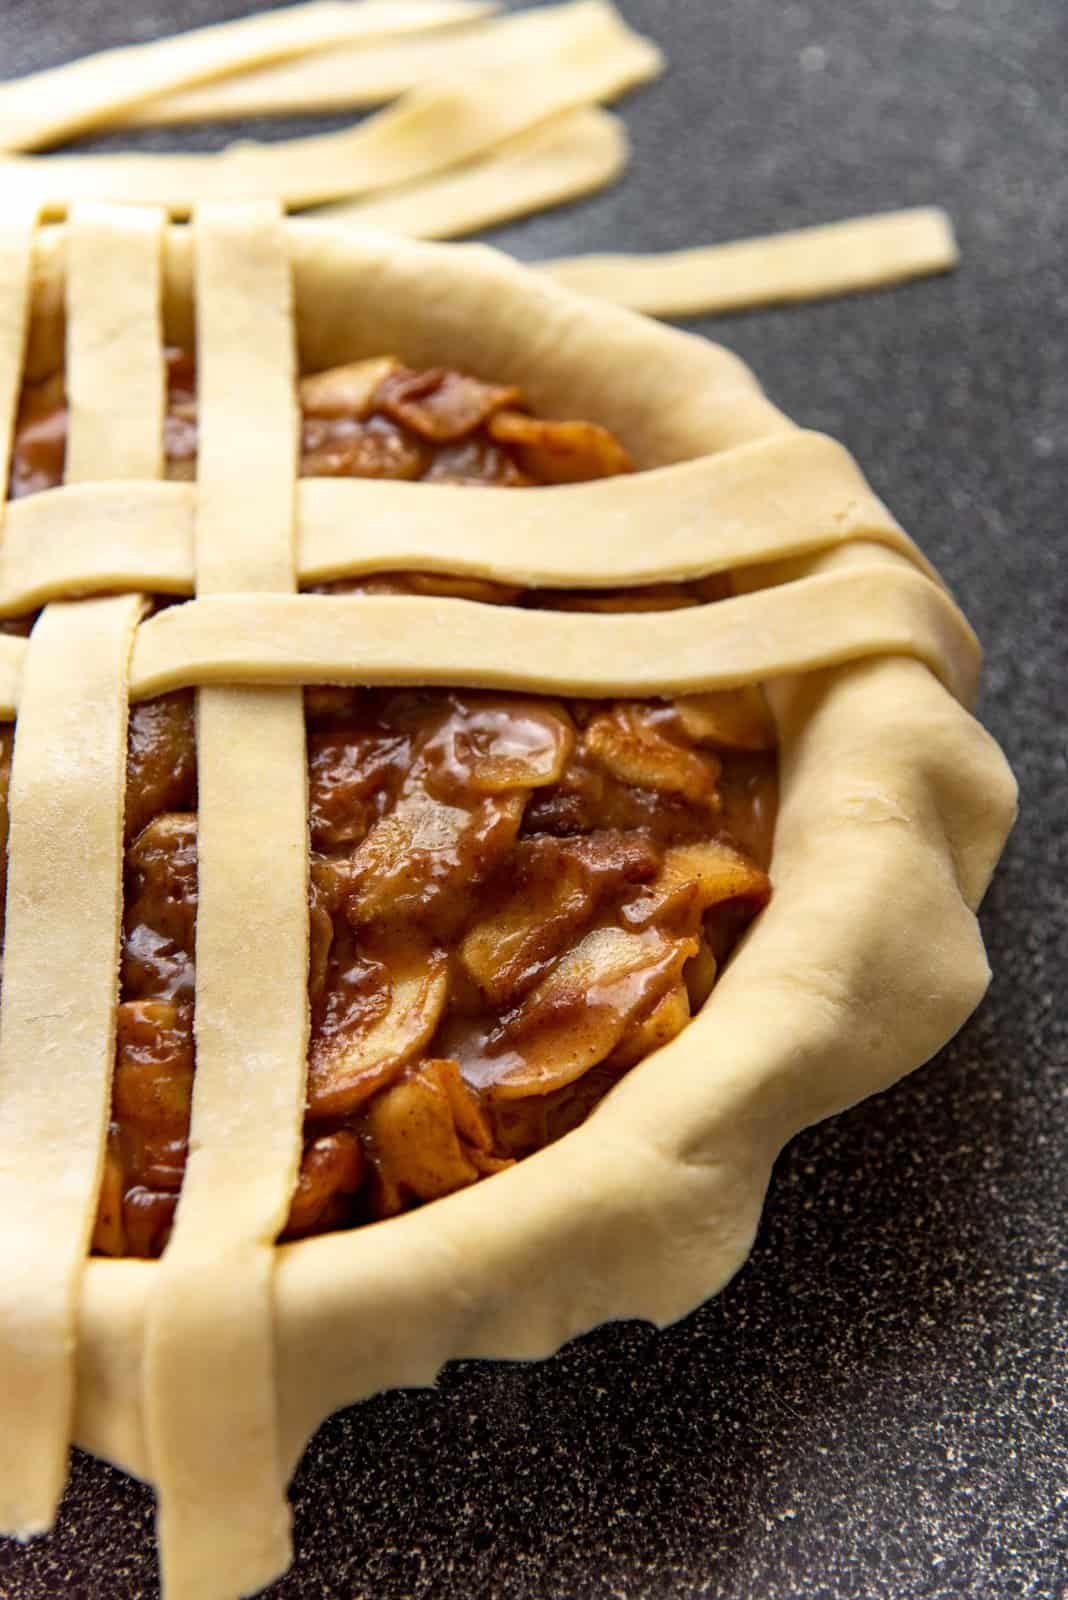
Lattice top – Cut the pie crust into 1/2 – 1 inch thick strips. You can use a pastry cutter or a regular knife to do this. Place the strips on top of the pie to create a weaved lattice, as you can see in the images in the post.
Refrigerate the pie for at least 30 minutes before baking. Preheat the oven while the pie is in the refrigerator.

Baking the pie
Preheat the oven to 425 F while the pie is resting in the fridge. It’s important that the oven preheats for at least 30 minutes before you bake the pie.
The oven rack should also be placed in the lower third of the oven. This could be the lowest rack, or the one above the lowest rack in your oven. Place a pizza stone or a baking tray in the oven, so that the tray has a chance to preheat properly for 30 minutes as well.
Why preheat the oven for at least 30 minutes?
Ovens usually take a while to come to the desired temperature. Even when the oven indicates that it is pre-heated, there can still be fluctuations in the oven temperature.
This is ESPECIALLY important in this recipe, because you need to make sure the baking tray or pizza stone is also properly preheated. The heated tray will have direct contact with the pie pan and help cook the bottom of the pie faster and more evenly. A pizza stone usually needs at least 45 minutes to be preheated properly, while the baking tray will take less time.
When the oven AND baking tray are preheated, remove the pie from the fridge and get it ready to bake it.
For this butterscotch apple pie, I like to brush it with a classic egg wash and sugar sprinkling. The egg wash gives the crust a golden brown color and makes it look shiny. The sugar gives the crust a nice little sweet crunch. In addition to this, I also love to sprinkle the crust with a small amount of salt flakes. But this is optional.

Place the apple pie in the oven, on top of the baking tray. Bake the pie at 425 F for about 10 minutes, and then lower the heat to 350 F and bake for about 50 – 65 minutes, or until the crust is a beautiful golden color throughout. If the crust browns too quickly, you can use a pie crust shield or foil to cover the edges.
The butterscotch in the apple pie will start to bubble through the top crust, and that is absolutely OK.
When the crust has achieved that perfect shade of golden brown, and the apple pie mixture is bubbling through, the pie is ready. Carefully remove the pie plate from the oven, and place it on your kitchen counter (take care as it will be very hot!).
Next comes the hard part…
You have to wait until the pie cools down and “sets” properly.
If you cut the pie too soon, the filling will come pouring out. However, if you let it properly cool down to room temperature, the filling will have set, and the flavors will be perfectly intermingled. I like to cool down my apple pie at room temperature overnight.

Serving suggestions
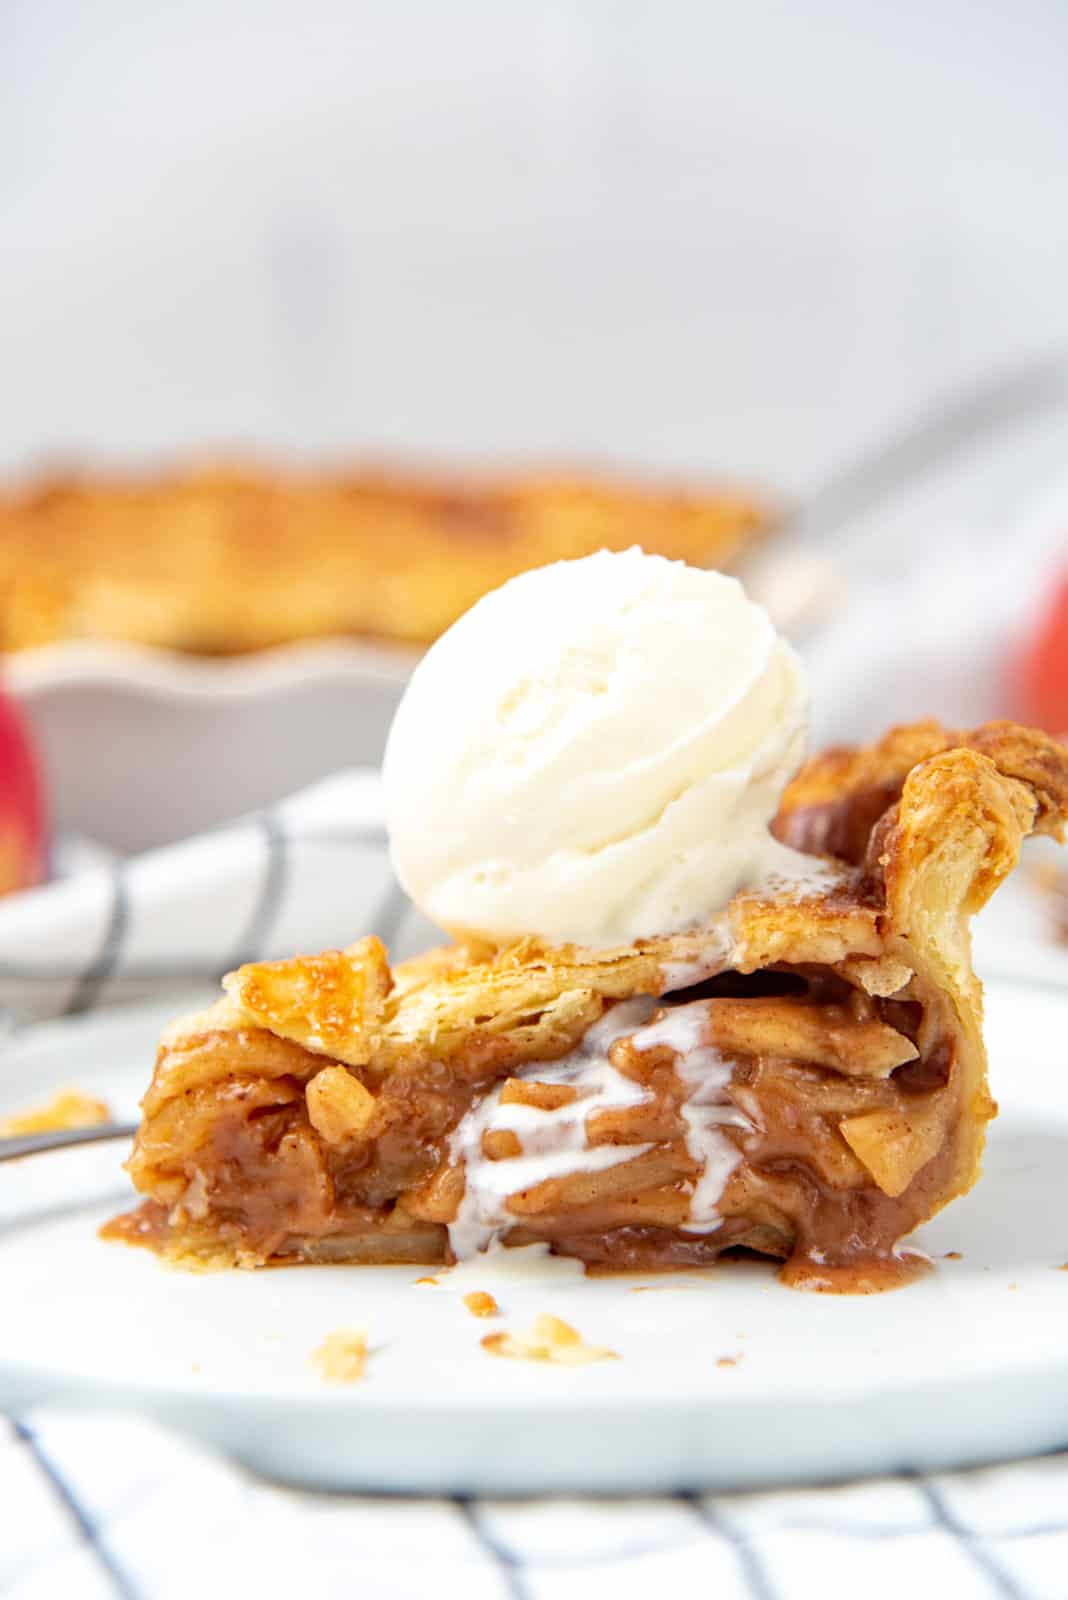
This spectacular classic apple pie with rich and delicious butterscotch flavor honestly doesn’t need anything else on the side.
But if you do insist, a dollop of whipped cream or a scoop of vanilla ice cream will take this undeniably irresistible dessert straight over the top! This apple pie truly is the quintessential Fall or Thanksgiving dessert!

My best recipe tips
- Make sure to keep the pie crust chilled at all times. Especially if you make the pie crust yourself, keep the butter nice and cold.
- Don’t stretch the dough over the pie pan. Carefully lift the crust and gently lay it down over the pan to fit it into the pan. Stretching will cause the crust to shrink when it bakes.
- Use the appropriate apples to make the pie filling. I’ve provided a list of apples to choose from for best results. These apples will hold up nicely in a baked pie. A mix of apples will give you a balance of flavor too.
- Be patient! The inactive time plays an important role in developing all the flavors.
- While brown butter and brandy are optional steps, I do recommend taking the time to add them to the recipe so that they truly elevate this recipe well beyond a classic or old fashioned apple pie.
- Preheat the oven with the baking tray for at least 30 minutes.
- Bake the pie on a baking tray in the lower third of your oven.

Recipe

Classic Butterscotch Apple Pie
US based cup, teaspoon, tablespoon measurements. Weight measurements are recommended for accurate results whenever available.
Common Measurement ConversionsIngredients:
- 1 recipe flaky pie crust recipe OR 2 rounds of pre-made pie crust for the bottom and top
- 1.5 kg cored apples I usually do a 4:1 mix of Honey Crisp and Granny Smith. About 7 – 9 apples
- 45 mL lemon juice
- 1 lemon zest (from 1 lemon) optional
- 200 g dark brown sugar
- 2 tsp ground cinnamon
- ½ tsp ground nutmeg
- ½ tsp fine sea salt or use 1 tsp for a sweet and salty flavor
- 57 g unsalted butter
- 60 g AP flour (for cup measurements – please use spoon and level method for measurement)
- 75 g white sugar
- 30 mL brandy or bourbon
- 15 mL vanilla extract
For the top of the pie
- 1 egg for egg wash
- 2 tbsp milk or water for egg wash
- Raw sugar and flaky salt (to sprinkle) optional
Instructions:
Preparing the pie plate
- Follow my all butter pie crust recipe to make enough dough for a double crust apple pie, and divide the dough into two for the bottom and upper crusts.1 recipe flaky pie crust recipe
- Roll out the crusts until they are 3 mm in thickness, and then use one to line the bottom of a 9 or 9.5 inch pie plate (about 2 inches deep), and cut a ½ inch overhang. Cover and refrigerate until needed.
- Cover and keep the other rolled out pie crust in the fridge until needed as well.
- If you’re making this pie with pre-made and pre-rolled pie dough, butter the pie plate before lining with the pie crust as described in the above step. This is to make sure the dough doesn't stick to the dish. The homemade pie dough will NOT need this step.
- Refrigerate until needed.
Apple pie filling (this can be made the day before, if you like)
- Optional – peel the apples if you prefer a smoother apple pie filling. Keep the peeled apples submerged in water to prevent discoloration.1.5 kg cored apples
- Halve the apples, and remove the core with a spoon or melon baller. Slice the apples into slightly thick slices (about 3 mm thick). Alternatively, you can cut the apples into 1 cm cubes.
- Place the sliced apples in a large bowl and add the lemon juice, lemon zest (if using), brown sugar, and salt. Mix gently to coat as evenly as possible.45 mL lemon juice, 1 lemon zest, 200 g dark brown sugar, ½ tsp fine sea salt
- Cover the bowl and let it sit at room temperature for 20 – 30 minutes.
- After 20 – 30 minutes, you will notice liquid accumulating at the bottom of the bowl. Place this liquid in a smaller bowl.
- In another small bowl, whisk together the white sugar, cinnamon, nutmeg, and flour, and make sure there are no lumps.2 tsp ground cinnamon, 60 g AP flour, 75 g white sugar, ½ tsp ground nutmeg
- In a large saucepan, place the unsalted butter, and heat over medium-high heat to melt the butter.57 g unsalted butter
- After the butter has melted, keep cooking the butter while stirring. The milk solids in the butter will separate and start to brown / caramelize. Cook until the milk solids turn amber in color.
- Add the liquid from the apple mix into the brown butter, and bring it to a boil.
- Add the apples, and cook for about 2 – 3 minutes until the apples JUST START to soften.
- Sprinkle the flour and sugar mixture over the apples and stir to mix in the flour well. Make sure there are no lumps.
- Lower the heat to medium, and cook for about 6 – 8 minutes, until the mixture thickens well. Stir frequently to prevent the apples from sticking to the bottom of the pan.
- When the filling has thickened, remove from the heat, and stir in the brandy and vanilla.30 mL brandy or bourbon, 15 mL vanilla extract
- Scrape the mix out into a dish, and let it cool to room temperature. If you want the filling to cool down faster, spread the filling on a baking sheet. You can also let it cool overnight in the fridge.
Assembling the pie
- Remove the top pie crust from the fridge and place it on a lightly floured work surface.
- If you prefer, you can use a small round cutter (1 inch diameter) or cookie cutter and cut out shapes on the pie crust. This can be a pattern, OR just a few random shapes that act as vents. Alternatively, you can skip this step and cut slits on the top crust as vents.
- Another option is to cut the top crust into strips of dough (between 0.5 – 2 inches in width). These can be used to create a woven lattice pattern on the top crust.
- Remove the pie pan lined with a pie crust from the fridge. Fill this with the cooled down butterscotch apple pie filling. The filling can be at room temperature OR cold (straight from the fridge).
- Covering the entire pie with the top crust – Brush the border of the bottom crust with a little water and place the top crust over the bottom crust. Make sure any patterns that have been cut are neatly placed and organized to your liking.
- Use your finger OR a fork to press down on the top crust to seal it along the border with the bottom crust. Cut the same 0.5 inch overhang on the top crust.
- Roll this overhang under the bottom crust to create a thick border that is flush against the edge of the pie plate.
- Refrigerate the pie for at least 30 minutes before baking.
- Lattice top – For the lattice top, place several strips of pie crust over the surface of the pie in one direction. Then place the other strips at a 90 degree angle, creating a woven pattern. See pictures in the post for reference.
- Once this is done, press the ends into the bottom crust to seal, and cut the excess. Roll the overhang under the bottom crust to create a thick border that is flush against the edge of the pie plate.
- For both styles of pie – Crimp the border however you like. I prefer a fluted border. If the border is too soft, let it harden in the fridge for a few minutes before crimping. You can see my how to make pie crust post for guidance on crimping.
- Preheat the oven to 425°F / 218°C. Place the oven rack in the bottom ⅓ of your oven (this is either the lowest rack, or the one above, depending on your oven).
- Then place a pizza stone or baking tray on this rack, and let it preheat with the oven for at least 30 minutes (45 minutes for a pizza stone).
- When the oven is preheated, and the pie was refrigerated for 30 minutes, go ahead and bake the pie.
Baking the pie
- Whisk 1 egg yolk with 2 tbsp of water or milk. This will be your egg wash. You can also use a whole egg if you like, but I prefer the shine that an egg yolk wash provides.1 egg, 2 tbsp milk or water
- Remove the chilled pie from the fridge, and brush the egg wash over the surface of the pie.
- Optional – Sprinkle some raw sugar over the surface of the pie. You can also sprinkle a little sea salt flakes over the surface. (This gives the pie crust a nice sweet and/or salty crunch).Raw sugar and flaky salt
- Place the pie on the preheated baking tray in the oven (in the lower third of the oven) and bake for 10 minutes at 425°F / 218°C.
- After 10 minutes, lower the temperature to 350°F / 180°C and bake for a further 50 – 60 minutes, until the top crust has become golden and flaky all over. If the edges start to brown too quickly, you can place a piece of foil or a crust shield to cover the border.
- When the pie is baked through, remove from the oven and let it rest at room temperature until completely cooled down BEFORE cutting into it.
- This pie can be left to cool at room temperature overnight.
- Apple pie is best served at room temperature, or SLIGHTLY warmed in the oven. Serve with a scoop of vanilla ice cream or whipped cream if you prefer.
Recipe Notes
Tips for perfecting this classic apple pie
- Make sure to keep the pie crust chilled at all times.
- Don’t stretch the dough over the pie pan. Carefully lift the crust and gently lay it down over the pan to fit it into the pan. Stretching will cause the crust to shrink when it bakes.
- Use the right kind of apples to make the pie filling.
- Braeburn
- Granny smith
- Honey crisp
- Golden delicious
- Pink lady
- Preheat the oven with the baking tray for at least 30 minutes.
- Bake the pie on a pre heated baking tray in the lower third of your oven.
Storage instructions
Fruit pies are best eaten within the first 24 hours. Leftovers can be stored in the fridge for about 5 days. But the pie crust will get soggy. You can reheat it in the oven for a few minutes if you like. The baked and cooled down pie can be wrapped in foil and frozen for about 2 months or so. Let the pie thaw in the fridge and reheat in the oven before serving.Nutrition Information:
“This website provides approximate nutrition information for convenience and as a courtesy only. Nutrition data is gathered primarily from the USDA Food Composition Database, whenever available, or otherwise other online calculators.”


Leave a Reply