


Here’s ALL you’ll need to know about making perfect, flaky all butter pie crust! With step by step instructions and all the troubleshooting tips and tricks I’ve learned after making 100s and 100s of pies to help even beginner bakers make foolproof pie crust dough, shape it, and blind bake pie crust too.
This recipe makes two pie crusts, enough for one double crusted pie or two single crust pies. I also show how to make flaky pie crust (perfect for fruit pies and savory pies), as well as mealy or crumbly pie crust (great for custard pies).

Learning how to make pie crust for the first time can be confusing and daunting. The saying “as easy as pie” makes ZERO sense when you’re just starting out and when you’re the one making it!
But not to worry. I wrote this tutorial on buttery, flaky pie crust just for you! I break down every step of making pie crust dough, and the basics of making pie in detail.
Why this recipe works

This pie crust tutorial is for you if,
- You’ve never made pie crust before and need detailed instructions, recipe, and tips.
- You want to understand the basics of making pie dough.
- You’re not a beginner, but are having some trouble with your pie crusts.
- You’re not a beginner, and you have your family recipe, but need some help understanding what to look for at each step.
- While I share lots of tips for beginner bakers, I also share shortcuts and foolproof tips for those familiar with pie crust, as well.
Key pie crust variations
There are several different types of homemade pie crust you can make. This includes pie crust for fruit pies (such as apple pie and mixed berry pie), meat pies (like bacon and egg pie), shortcrust pies, and even puff pastry as well.

Secret to making very tender pie crust
The simple secret to a very tender pie crust is to have very little gluten develop in the flour. Less gluten = more tender.
Every tip for making pie crusts will contribute to making sure you don’t overwork and develop gluten in your dough.
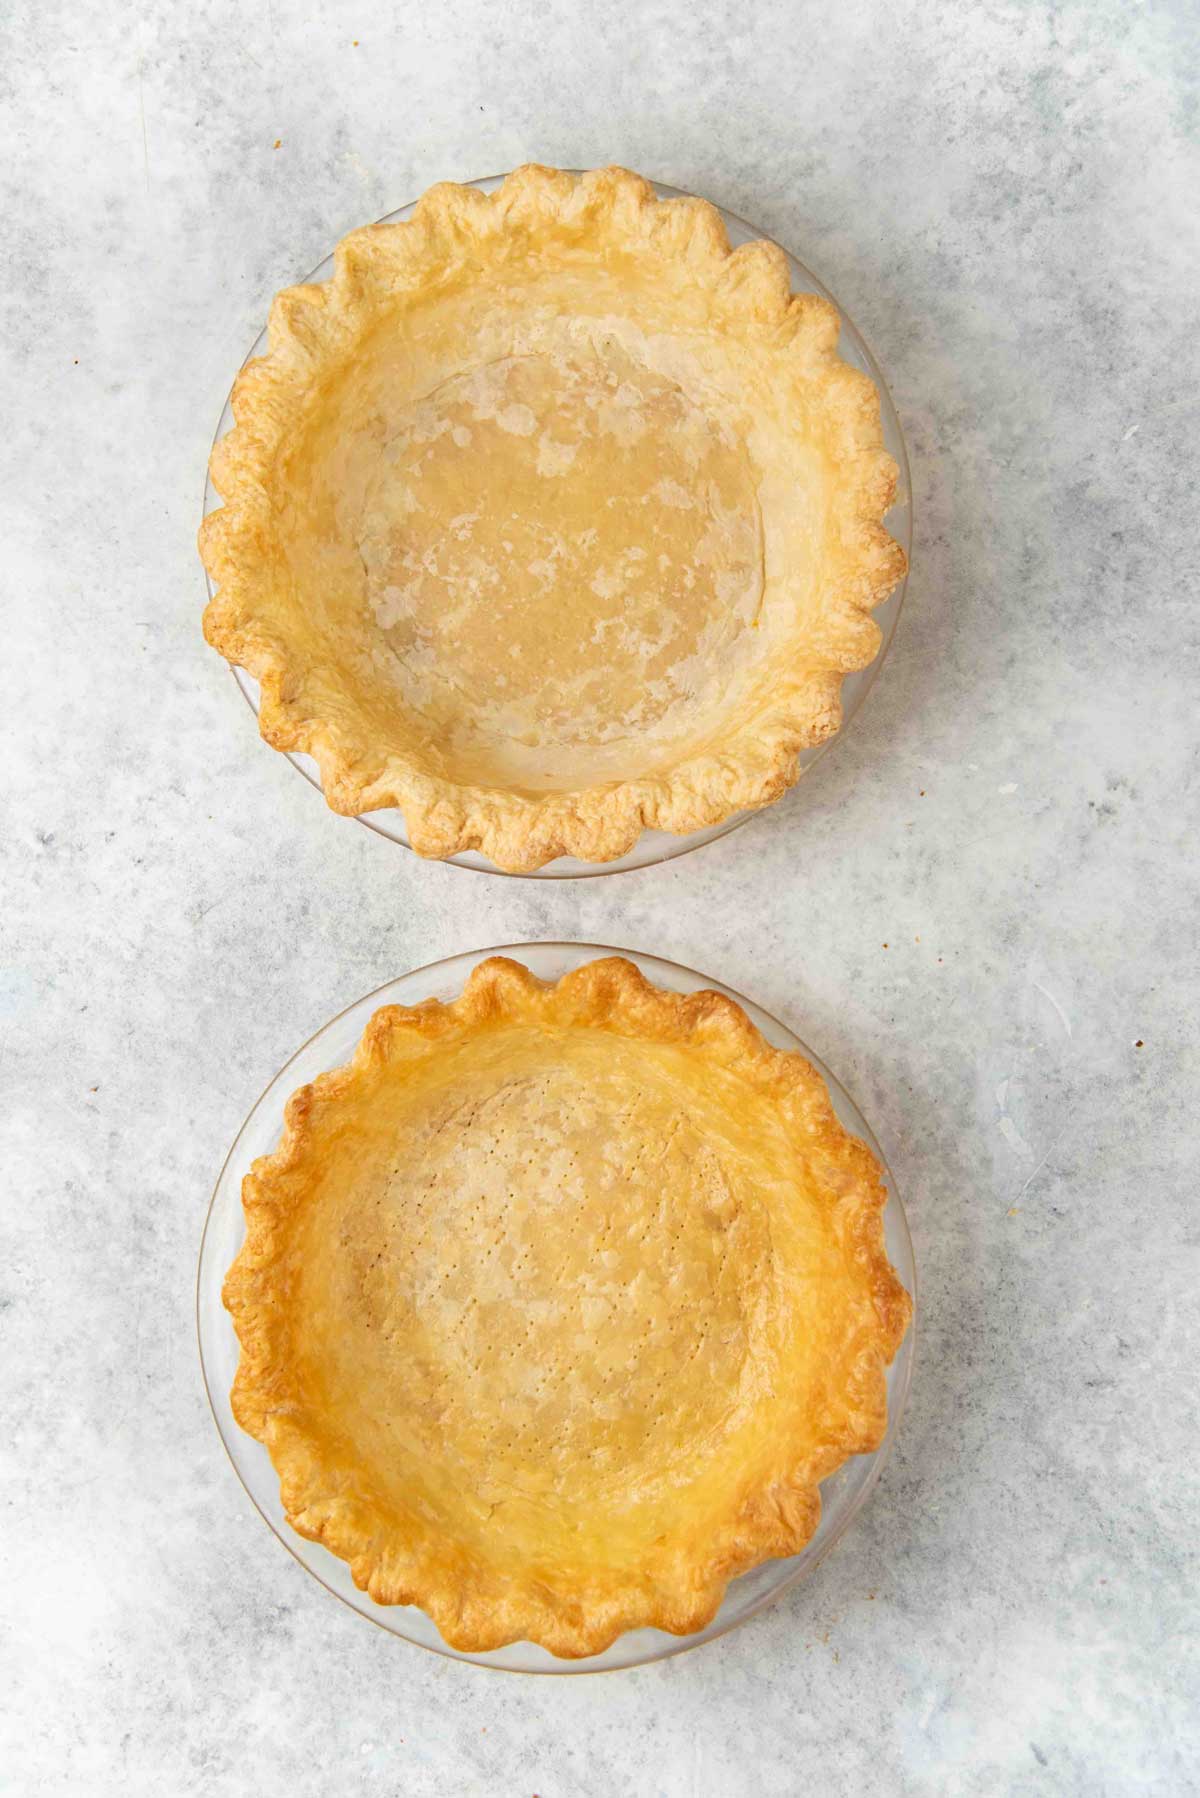
Flaky pie crust vs mealy pie crust
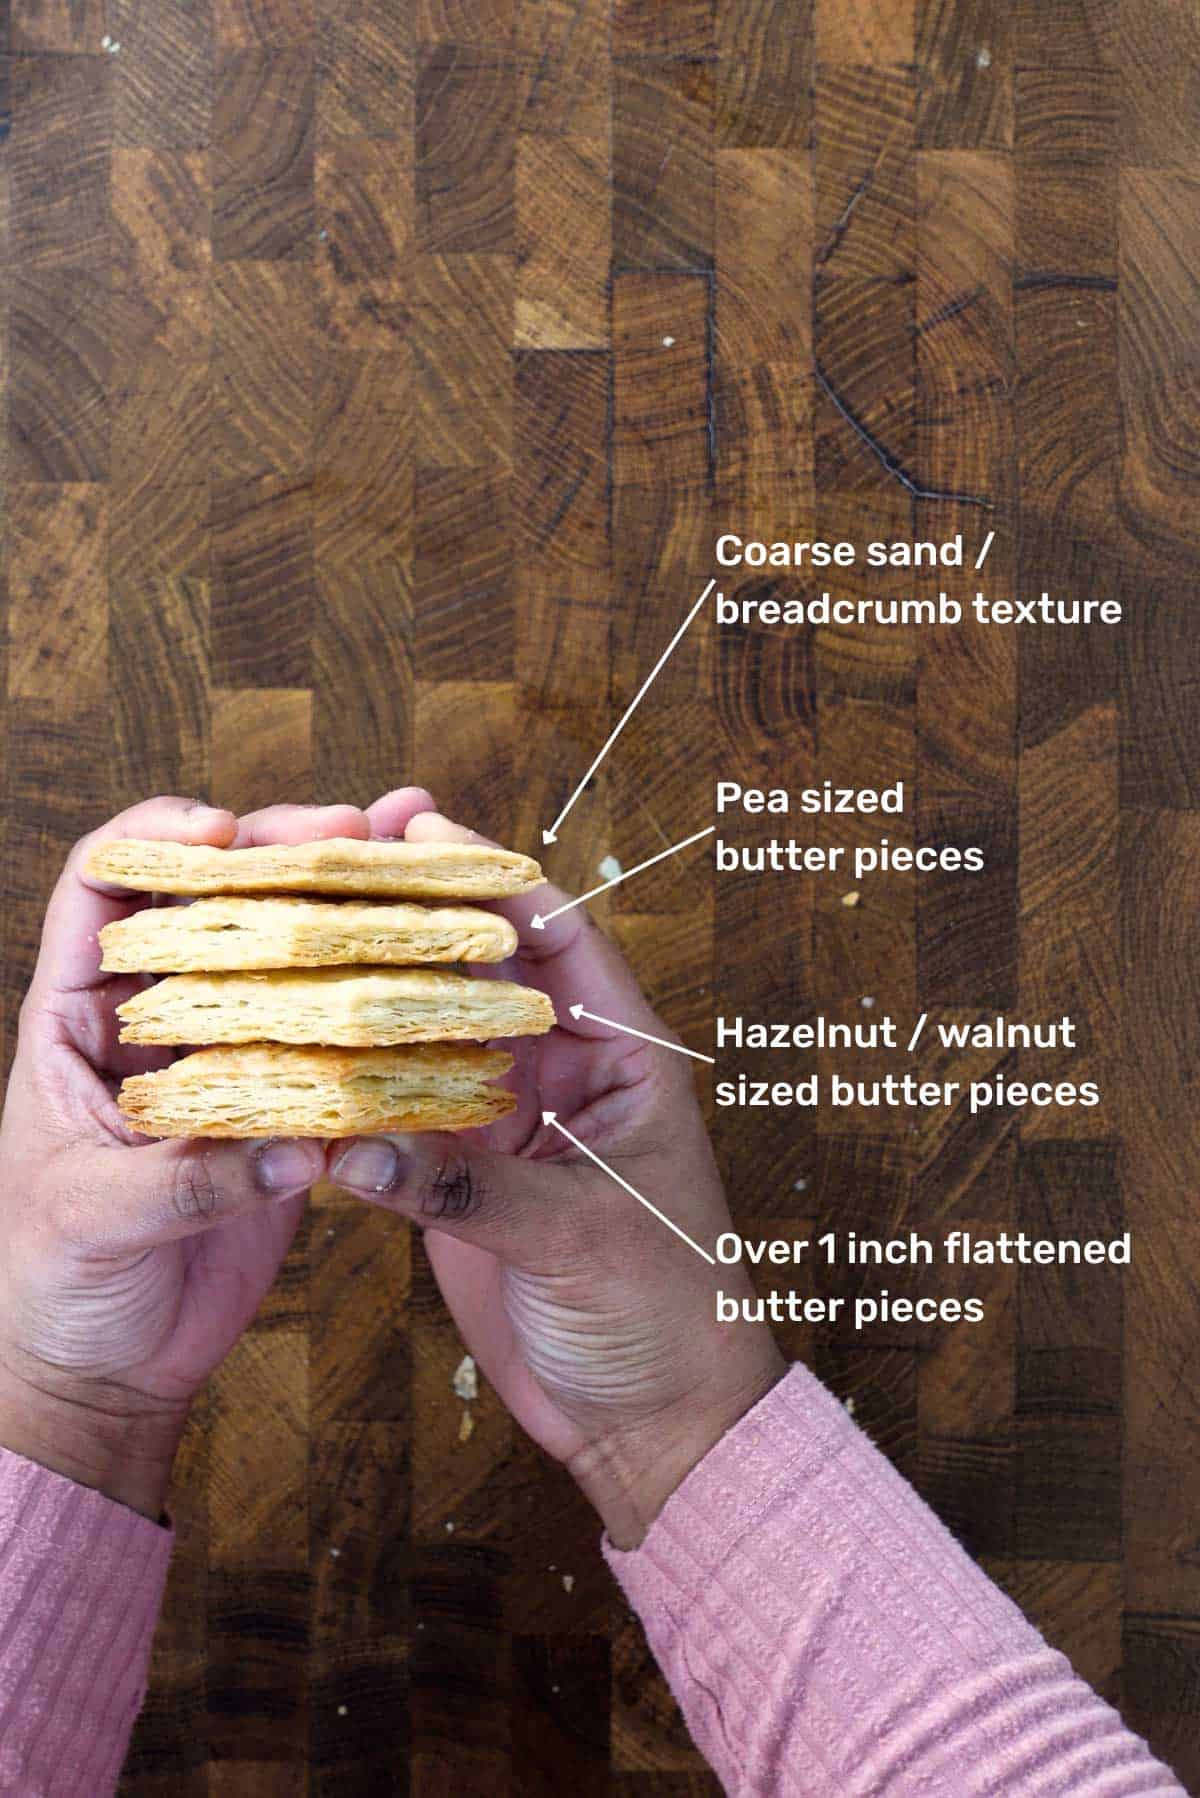
When butter is cut into or rubbed into the flour, the butter lumps in the flour can determine the final texture of the pie crust.
The larger the butter pieces, the flakier the pie crust. And the smaller the butter pieces, the more sandy or mealy the pie crust.
I personally love a beautifully flaky pie crust, but a crumbly (mealy) pie crust is better for a custard-based pie. Each has its purpose in life (and baking).
Flaky pie crust
- Perfect for fruit pies, and even for topping savory pies (such as meat pies).
- Butter pieces should mostly be ¼ – ½ inch or smaller, or about ½ – 1 inch flattened pieces for the ideal flakiness. Larger butter pieces can make the crust seem more like puff pastry.
- Because it’s really flaky, it can be harder to cleanly cut through the crust.
- Keep the butter pieces nice and chilled, and make sure there are larger butter pieces in the pie dough. I like to have large flat pieces of butter throughout the dough. The pie dough will also be “folded” to create layers.
Mealy pie crust
- Used for custard pies (such as pumpkin pie), and also as the bottom for meat pies. This is similar to shortcrust pastry as well.
- The crust is denser, and can hold up to heavier fillings.
- The butter pieces in the flour resemble wet sand or coarse breadcrumbs, because the butter pieces are very small, and the crust will also be sandy or crumbly.
- Keep the butter nice and chilled. The butter can also be grated and frozen to keep it small. You can also use a food processor since the butter needs to be very small to create a coarse breadcrumb texture in the dough.
Butter vs shortening
- Butter has a lower melting point and can soften easily.
- While butter is predominantly fat, it also contains milk and water.
The combination of these two factors can make the dough hard to handle when the butter softens, and also develop too much gluten, making the crust tough.
However, if the dough is kept cold and handled with care, it will produce the most flavorful pie crust with incredible flakiness. That’s why my preference is for an all butter pie crust.
- Shortening on the other hand has a higher melting point, so it doesn’t melt as quickly.
- It’s also 100% fat, and doesn’t contain any extra moisture.
Because of this, shortening doesn’t really add flavor to your pie dough. However, the dough is easier to work with. And since the dough won’t develop as much gluten, it’ll be more tender and keep its shape better.
Making pie dough by hand vs food processor
You can make pie dough by hand or with a food processor. However, the food processor gives you less control with the final consistency of your dough.
I prefer making pie crust by hand. This way, I have more control over how big the butter pieces are, and how much water I add to the dough, and the final consistency as well. However, the food processor can make things faster and easier.
If you’re a beginner, I highly recommend using your hands. That extra time you spend handling the dough will help you understand pie dough that much better.
I find that it’s harder to gauge how much water you need to make the dough, when I use a food processor. And there’s a higher chance of adding too much water, which can result in a dough that doesn’t hold its shape well.
The only time I use the food processor is to cut the butter into the flour to get a mealy pie crust. I still mix in water by hand afterward.
Ingredients you’ll need
You should keep all the ingredients cold or chilled for best results.
- All purpose flour – Preferably 10-11% protein content. AP flour is more widely available in stores.
- Cold butter – I use unsalted butter, but you can use salted butter too. If you do so, simply reduce the amount of salt you add. Fat in the butter inhibits gluten development. Do NOT use margarine.
- Ice cold water – Cold water helps to keep the butter solid.
- Salt and sugar – Salt is a must. Sugar is optional.
Optional addition
Iced vodka or iced vinegar – Replacing some of the water with vodka or vinegar also helps to reduce gluten development, since water aids in gluten development.
Tools you’ll need
Specialized equipment that’s helpful for making pie crust include,
- Pie plate – I like to use deep pie dishes that are 9 – 9.5 inches wide. Glass dishes let you check on the crust, but you can use ceramic or metal too.
- Foil OR parchment paper – I prefer foil. Ideally, extra wide, heavy duty foil, or 3 layers of regular foil.
- Pie weights – I use sugar or rice as pie weights. You need enough to fill the pie crust (more than halfway up the crust, or ideally all the way up to the top). Ceramic pie weights are too expensive and unnecessary.
- Spray bottle – To spray water to get the right dough consistency.
- Extra flour – To dust.
- Half sheet pan or metal baking tray – To bake the pie on.
- Pizza stone – If you’re making double crusted pies.
- Silicone pie crust shield – You can also use a shaped foil.
- Plastic wrap
How to make homemade pie crust (flaky as well as mealy)
Step 1 – Prepare the ingredients
The most important tip is to make sure EVERY INGREDIENT is chilled. If you have warm hands, stick your hands in the freezer too. Just kidding.
But really, if you do have warm hands, chilling the dry ingredients is also a good idea.
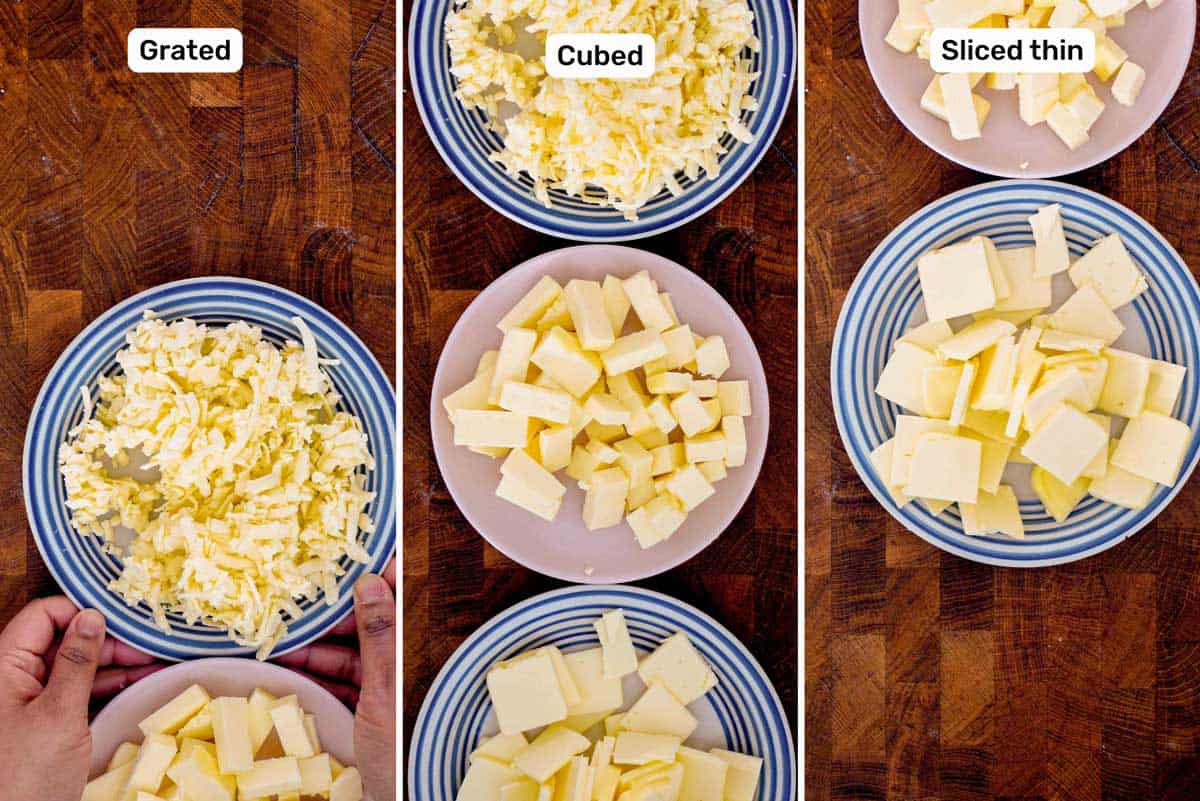
Cut the butter into smaller pieces and then keep it chilled until you need it (image 1).
- For a flaky crust – I like to cut them into ½ tbsp sized pieces, or thin 1 inch slices that are about 1 inch diameter (thin slices from a stick of butter).
- For a mealy crust – Grate chilled butter, then weigh it out. Then place the butter in the freezer to harden. You can cut it into cubes if you’re using a food processor too.
Make sure the water and vodka (if using) are also chilled.
Step 2 – Cut the butter
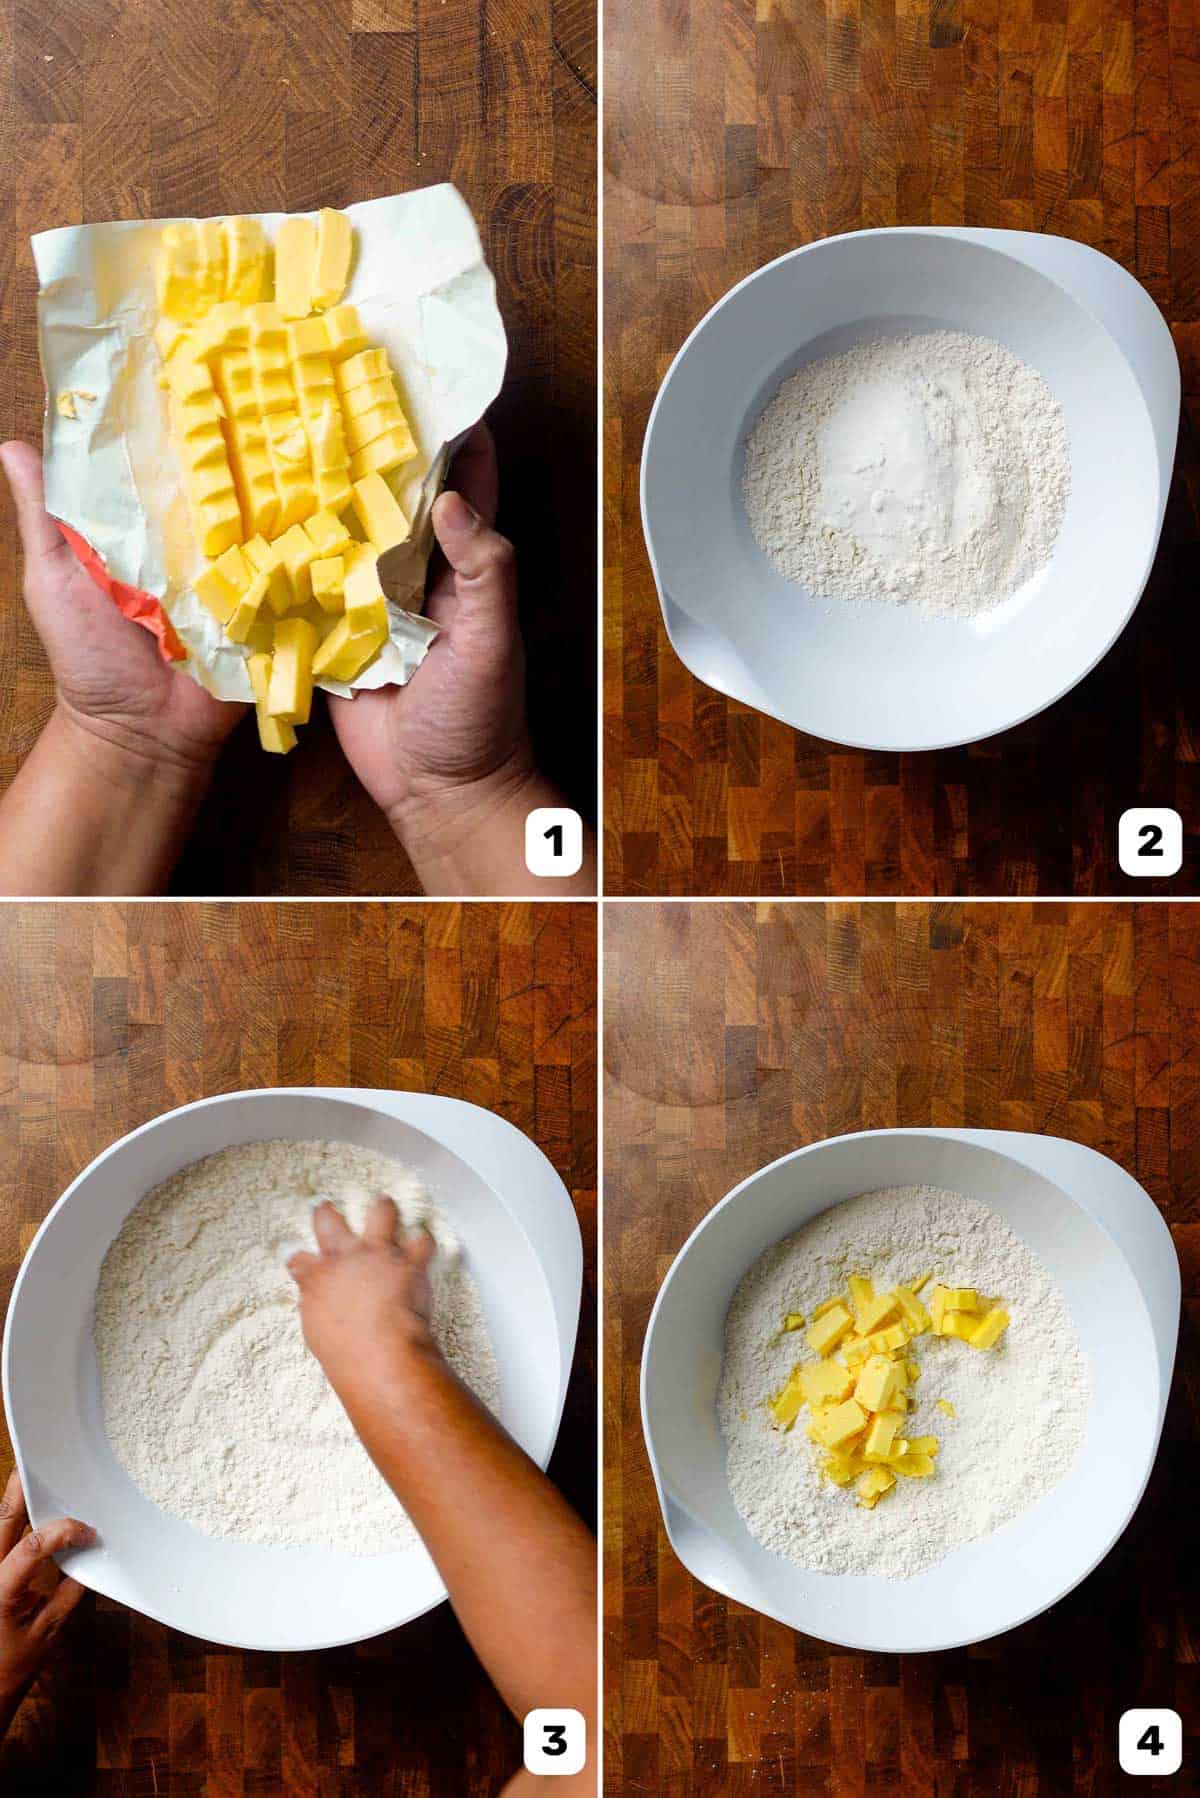
In a large bowl, place the flour, salt, and sugar (if using) (image 2). Mix to combine (image 3). Add the butter pieces to the flour (image 4), and toss the butter to coat it with the flour.
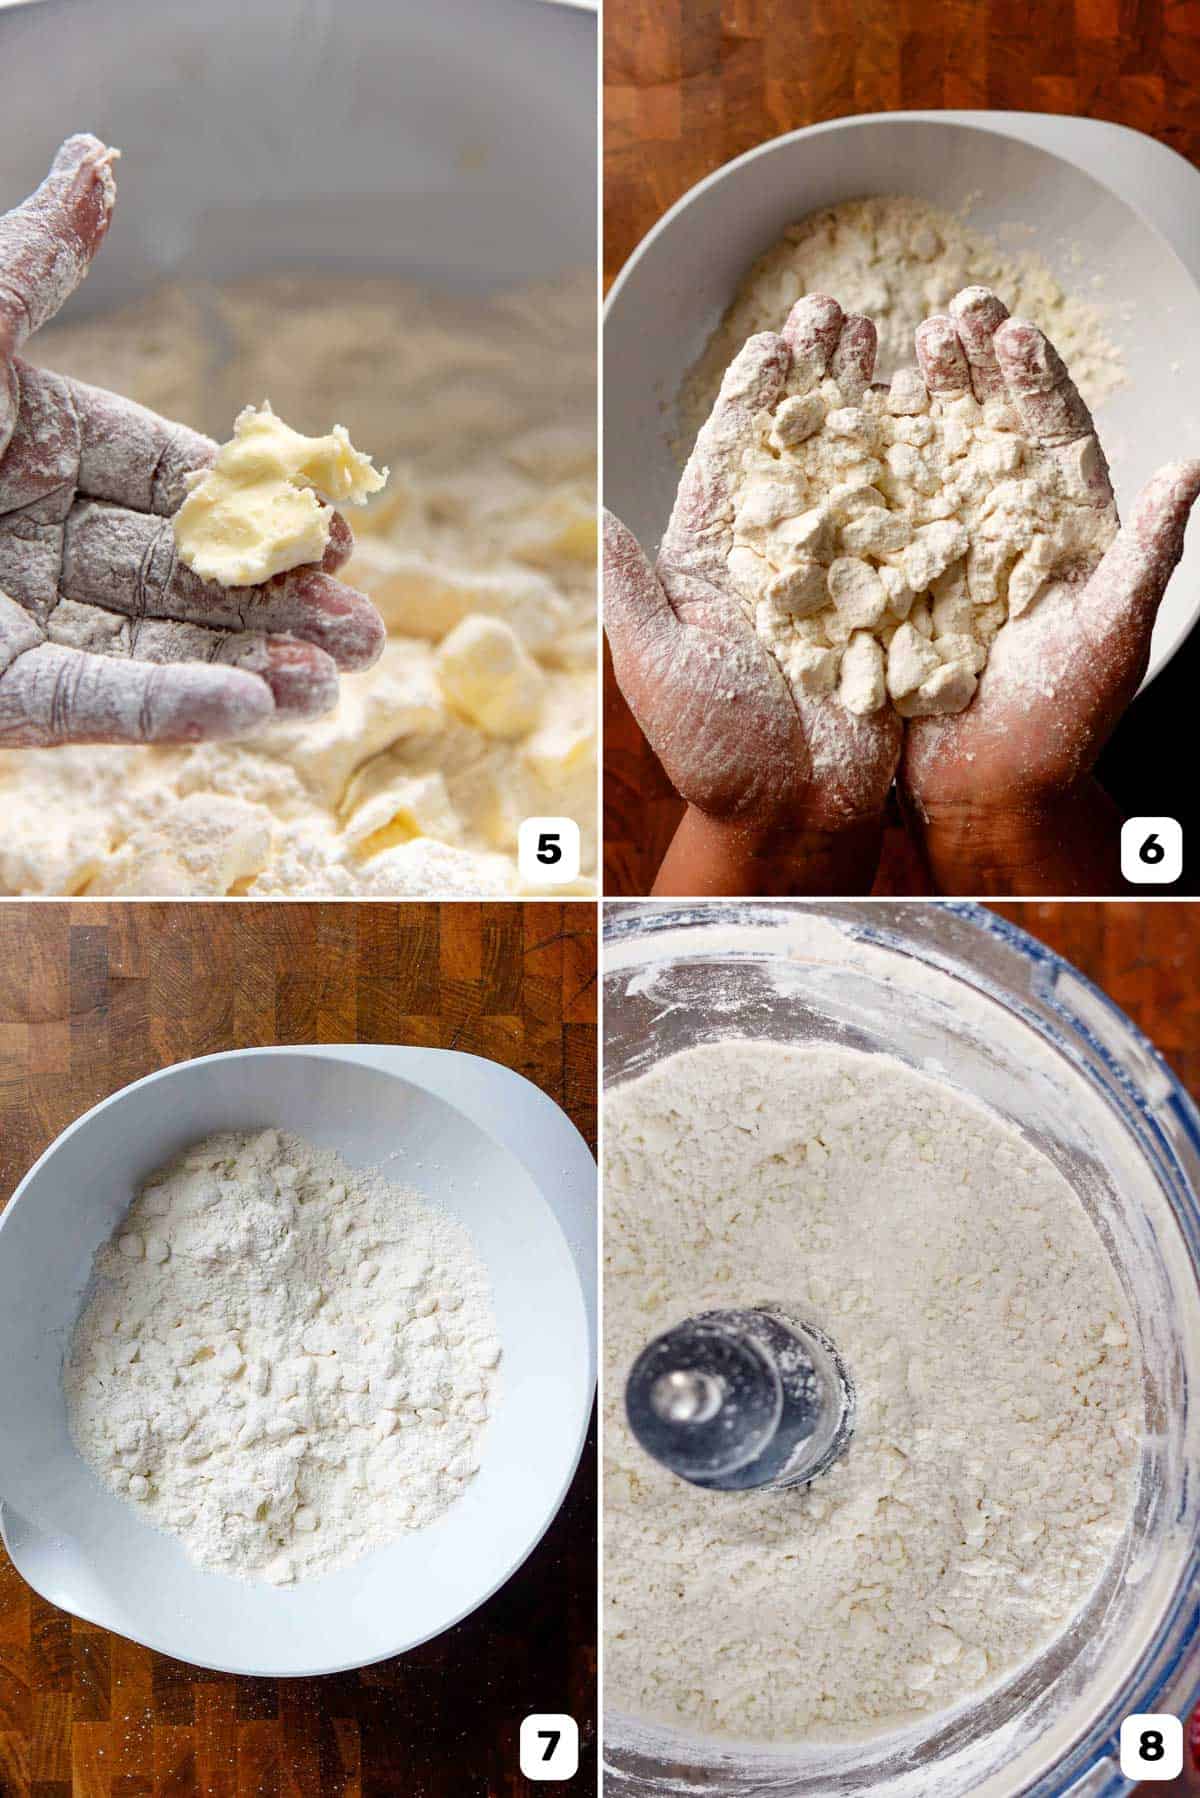
Use your fingers to press the butter pieces and flatten them (image 5). Break the flattened butter into smaller pieces, if needed. Toss the butter as you go to make sure the butter is still coated well with the flour (image 6). You can also use a pastry cutter for this part, or a food processor.
If the butter softens during this process, put it back in the freezer for a few minutes for the butter to harden again.
- For a flaky pie crust – You should end up with a mixture of larger pieces of butter (about ½ – 1 inch flattened pieces), and smaller pieces (image 7).
- For a mealy pie crust – The flour mixture should resemble coarse breadcrumbs or course sand. The butter pieces should be very small (image 8).
Step 3 – Add the liquid to the dough
Now that the butter is cut into the flour mix, we will add just enough liquid to bring the mixture together. The dough should be slightly on the drier side, so it’s important to gauge the dough consistency.
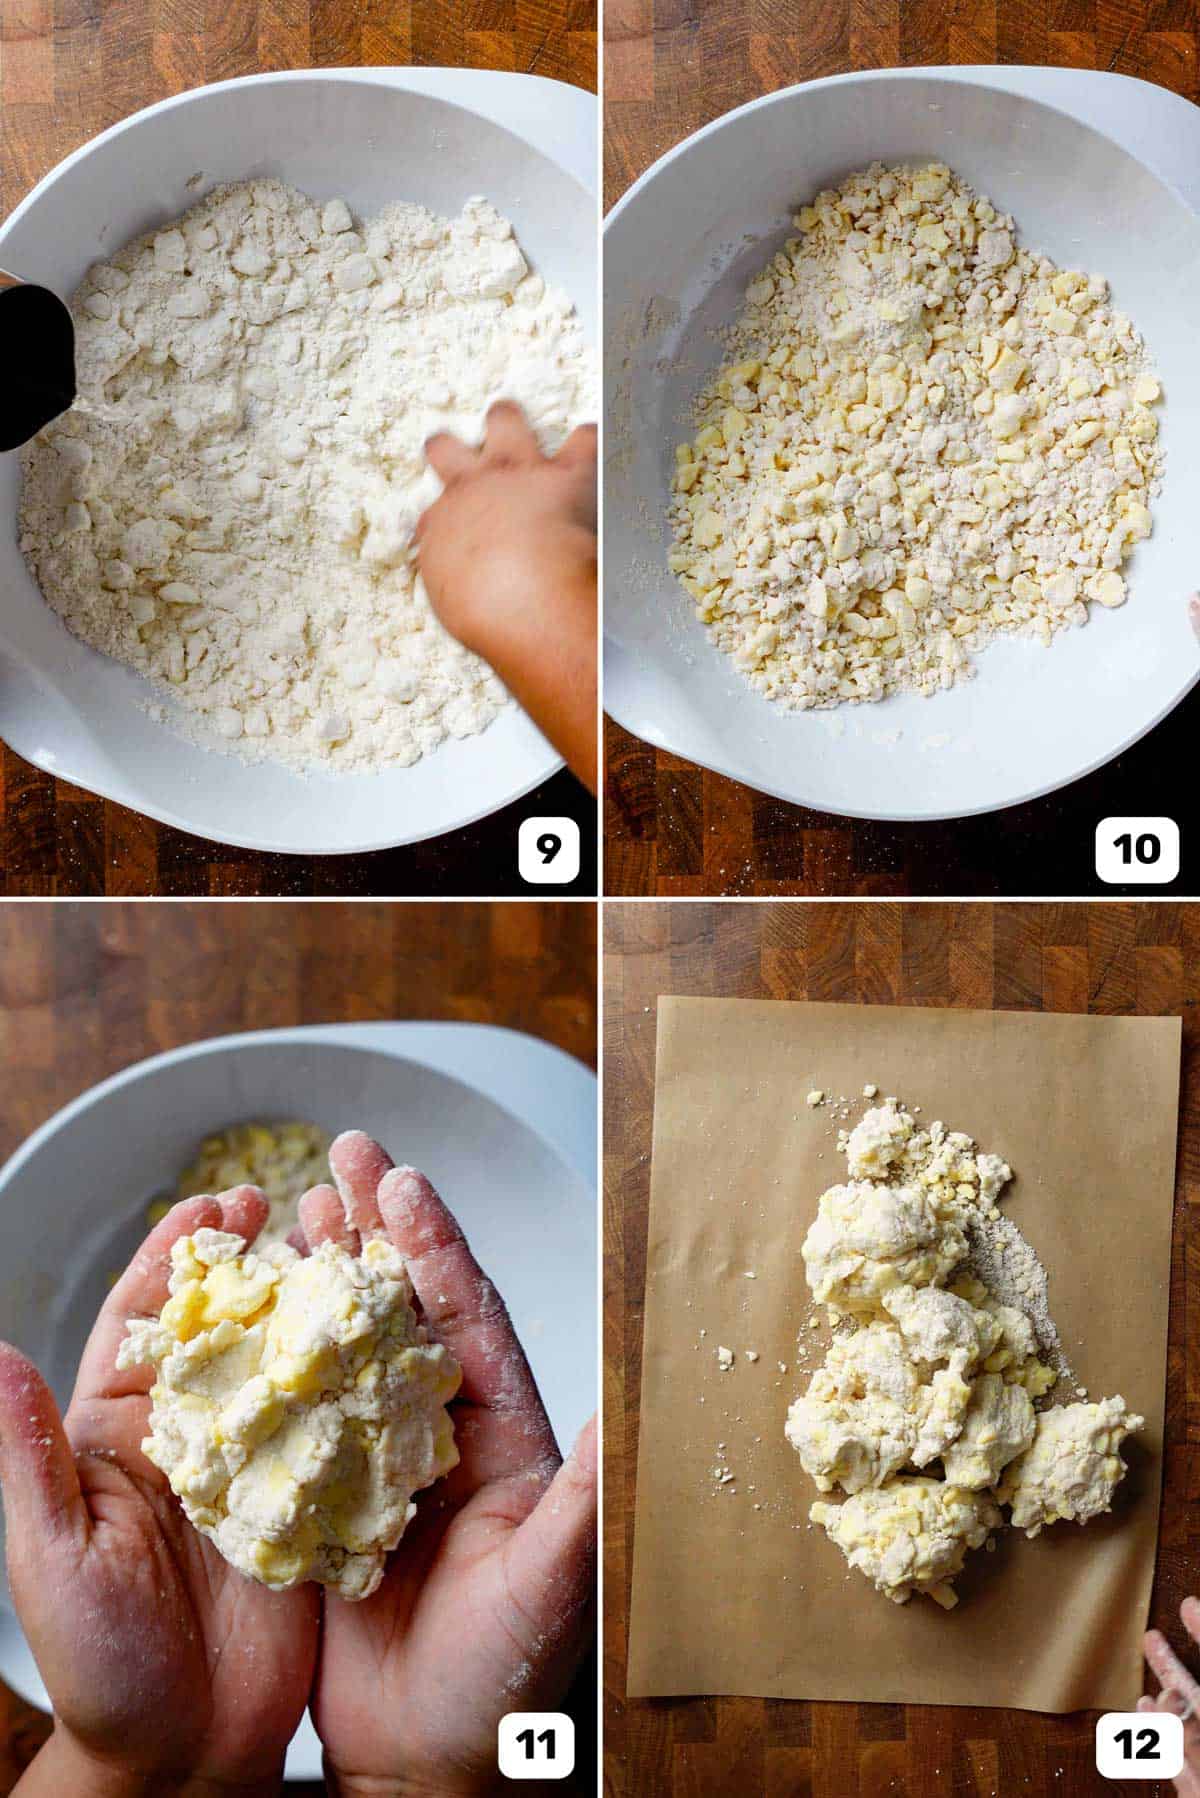
Mix the vodka (if using) with about ¼ cup of ice water, and pour it gently over the butter and flour mix while stirring the mixture with your fingers or a fork (image 9). This will start to create larger lumps (image 10).
Add more ice water, a little at a time, while stirring it in, until you’ve added just enough water to form the dough.
Pro tip
How to know that you’ve added enough water?
The dough should not come together on its own, and will still look like clumps. But, if you take some of the dough clumps and squeeze them together, they should come together with some dry spots still visible (image 11).
This is where many beginners encounter problems. Some add too little water, or more commonly, too much water.
As a beginner, what I used to do was squeeze portions of the dough in my hands and if it clumped together, then I set it aside. I do this until most of the dough can form clumps.
If there’s any dry flour mix left in the bowl that cannot clump up, just drizzle a little bit of water to let it to form a dough when squeezed.
Another technique is to use a spray bottle (filled with ice cold water) to spray enough water on the dry spots. This provides them with just enough moisture that they will stick together when squeezed.
As you add water to the dough, the clumps of dough will have excess moisture, while the dry parts have no moisture. The water in the clumps will help hydrate the drier parts of the dough when squeezed together and allowed to rest.
Why is the water amount so important?
Too much moisture can form too much gluten and create a dough that will shrink when baked, or not hold its shape properly as it bakes (i.e. losing the shape of the fluted edge for example).
If you do add too much water, you can fix it by sprinkling in some flour before forming a dough. OR, you can flour the dough disc liberally with some flour before you wrap the dough in plastic wrap.
The same principle applies when you’re making the dough in a food processor. Squeeze a little of the dough in your palm and it should stick together.
Step 4 – Shape the dough
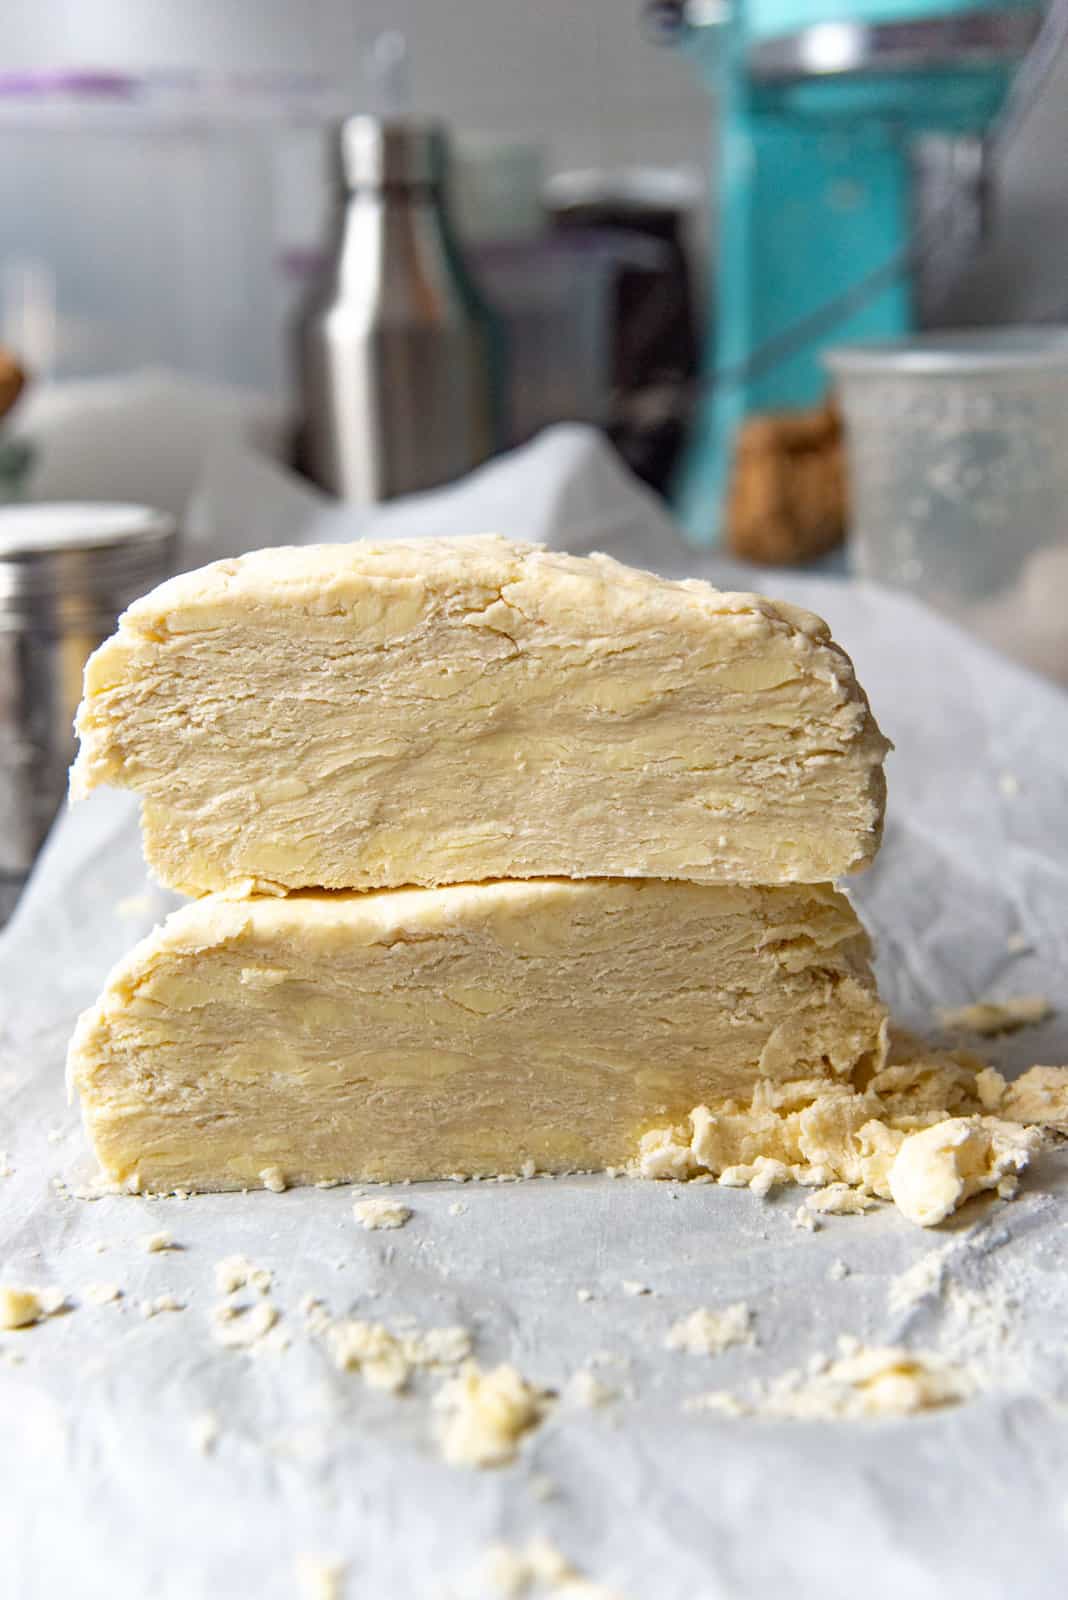
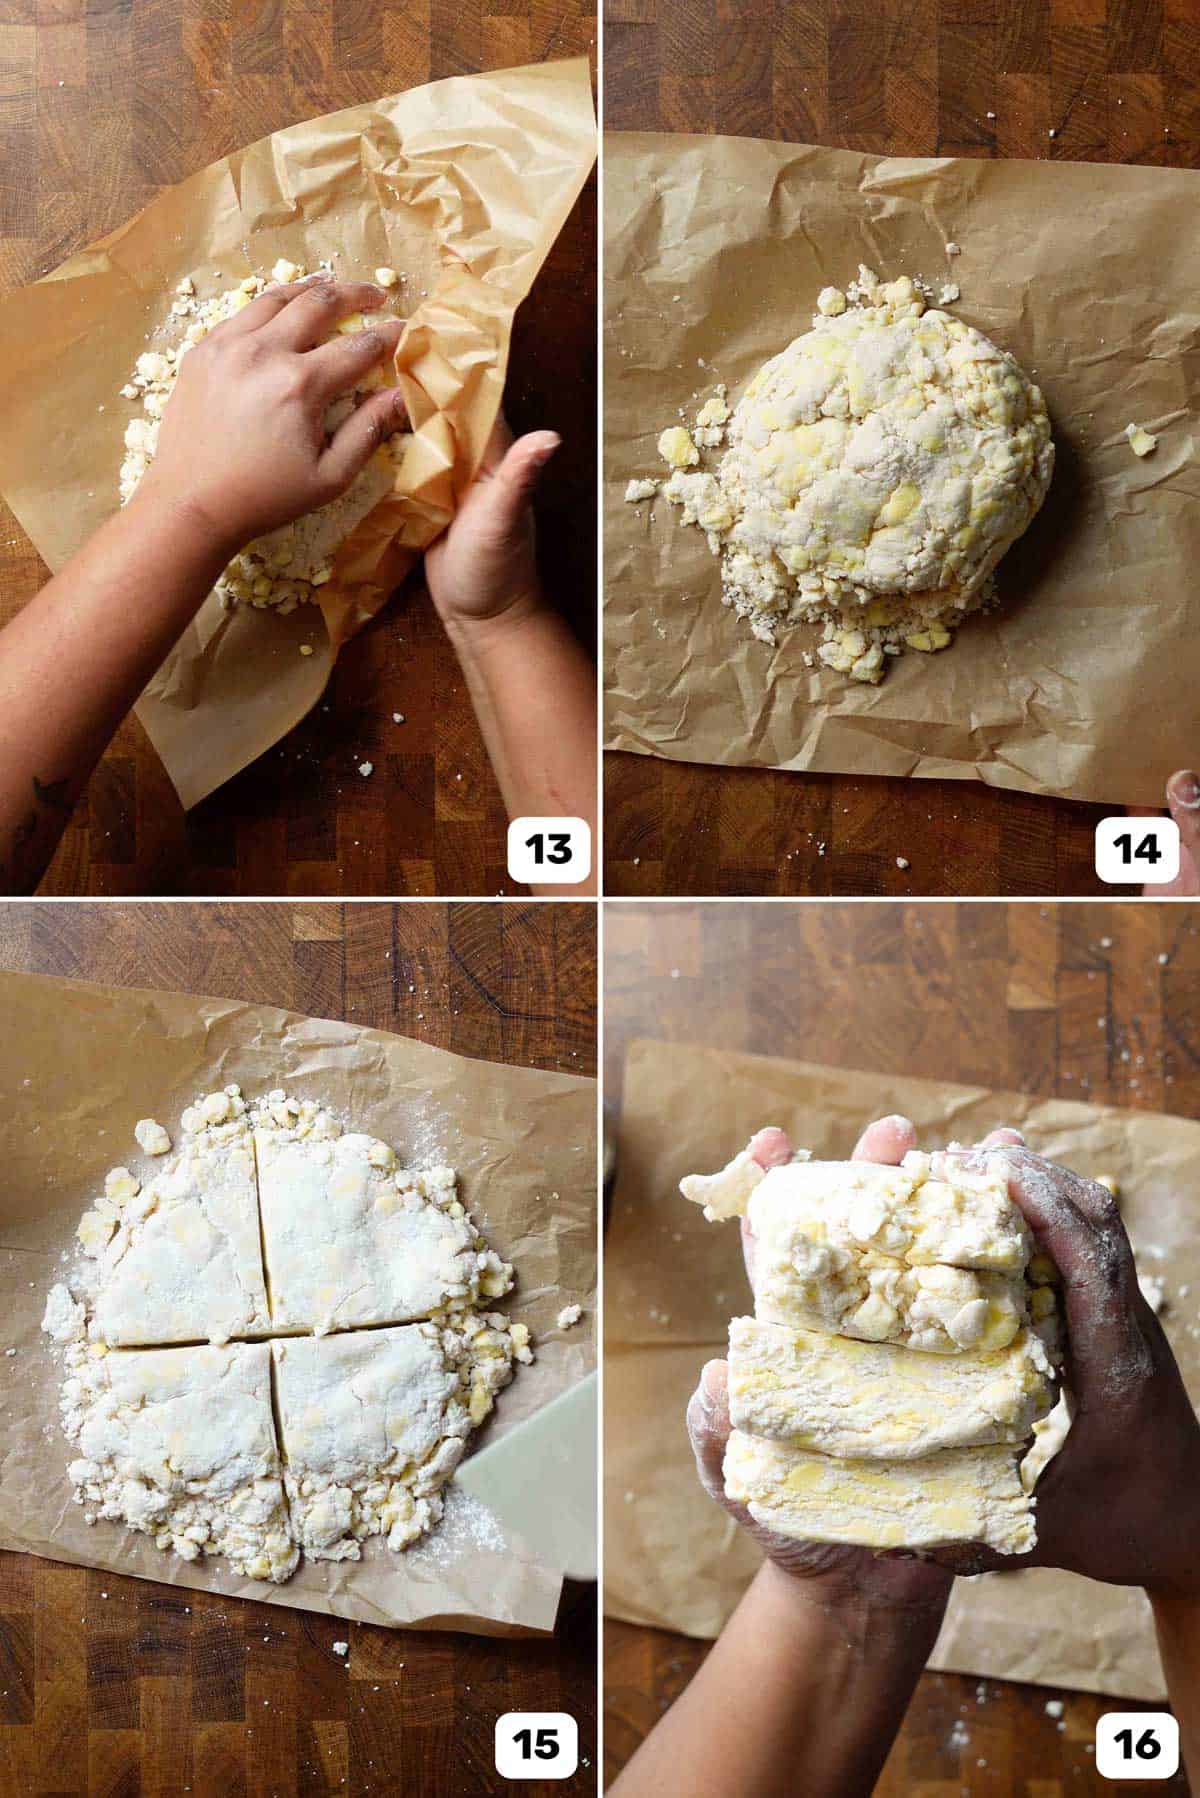
Transfer the dough clumps on to a floured surface, OR a large piece of parchment paper (image 12). Fold the dough over itself (image 13) and squish it together to form a dough mound, which will still have some dry spots, but is mostly held together (image 14).
Then gently flatten it on the parchment paper. It’s important to handle the dough as little as possible to prevent gluten development.
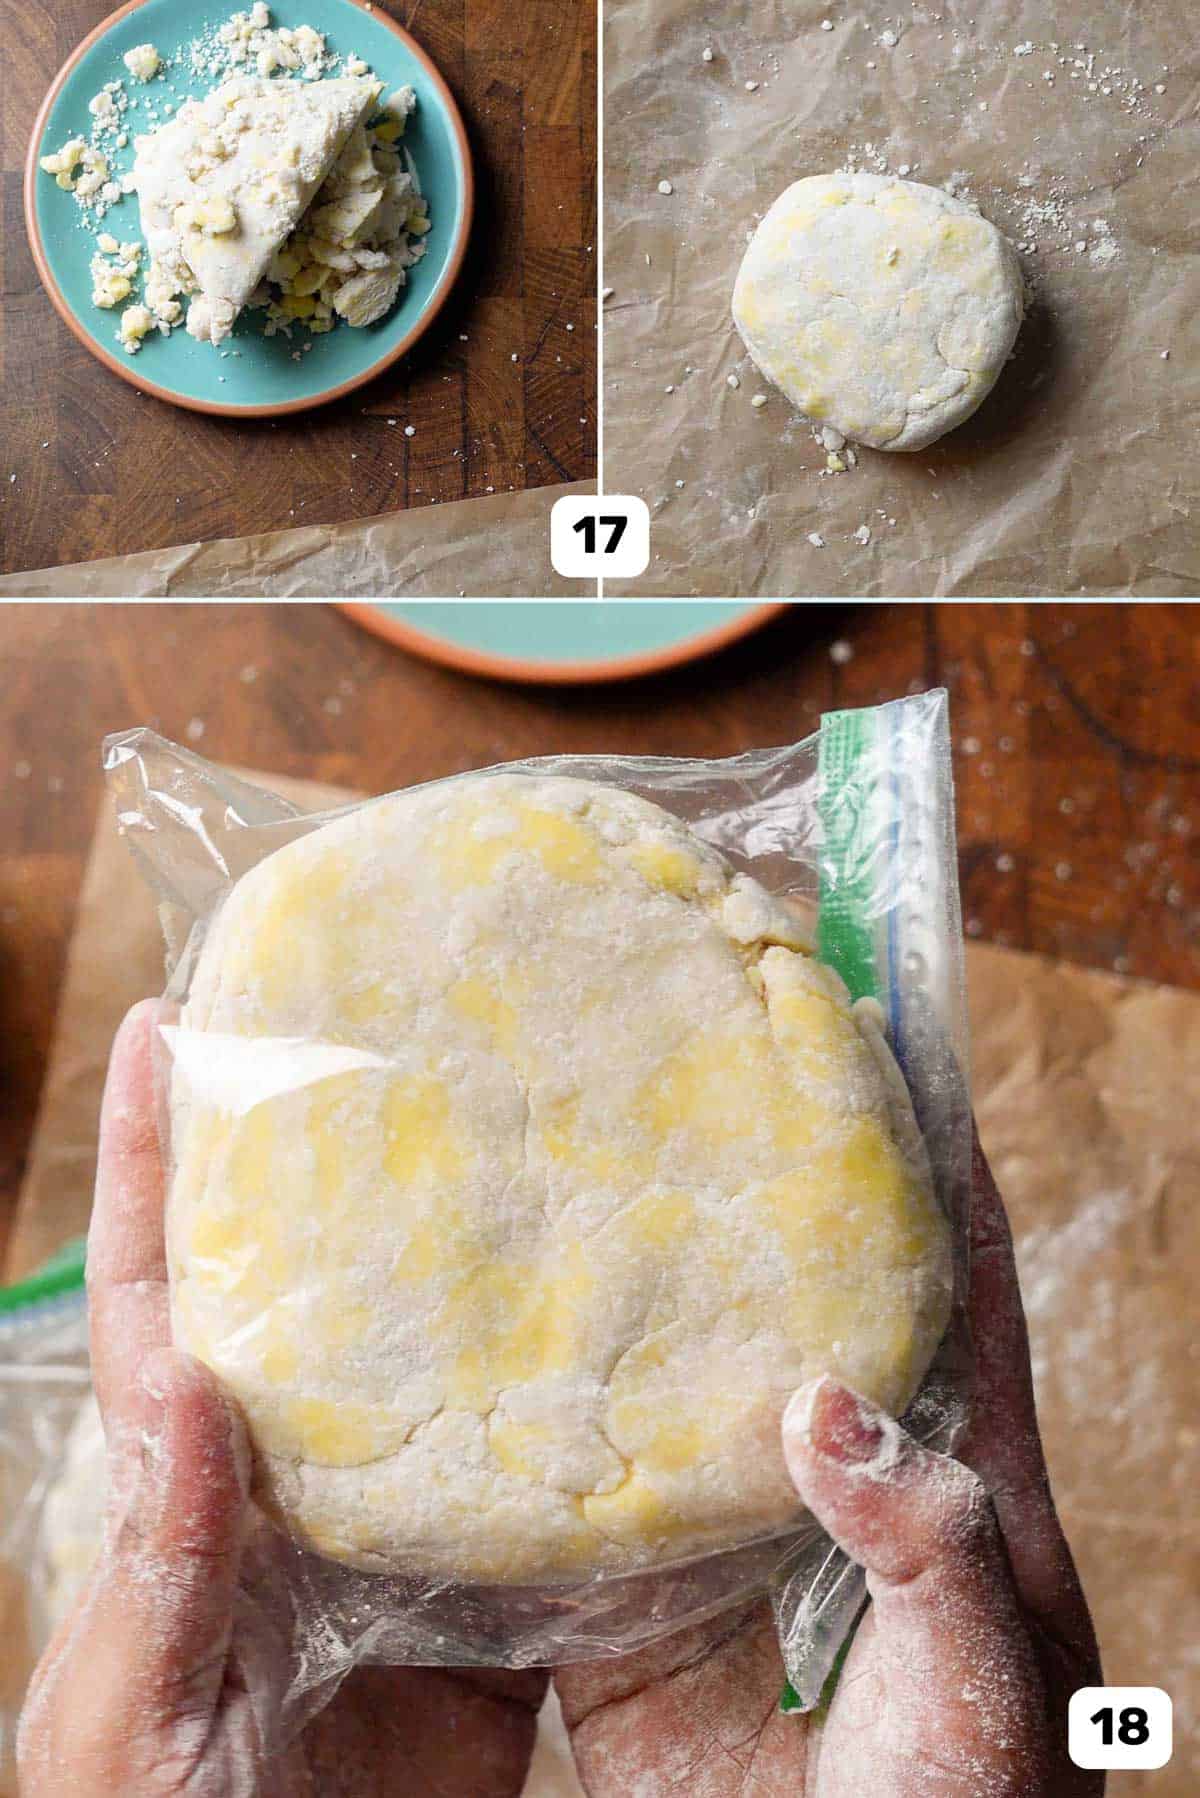
This next step is optional. Cut the dough into 4 portions and stack them (images 15 – 16). This stacking helps create the flaky layers as well.
Use the parchment paper to flatten the stack. Cut the dough in half again to make two equal dough portions (or divide the dough by weight) (image 17). Use drops of water / spray water from the bottle to moisten very dry spots that are not sticking to the dough (if needed).
Shape each portion into a circle and wrap each portion with plastic wrap / ziploc bag (image 18). This recipe makes enough dough for a standard double crusted pie.
If you added too much water, liberally flour the dough disc and wrap it in plastic wrap.
Step 5 – Rest the dough
It’s VERY important to let the dough rest in the fridge for at least 1 hour. This resting period will achieve a few things,
- Relax any gluten that developed in the dough while handling it.
- Hydrate the dough more evenly (as water will disperse from more hydrated areas to more dry ones).
- Chill the dough and butter so that it’s easier to manage the dough, and will also help create a flakier crust.
Pro tip
At any stage, if the butter softens, cover the pie crust (folded or in the pie plate) with plastic wrap and refrigerate or freeze until the butter firms up again before proceeding with the next step.
When the pie crust is ready, refrigerate the pie crust for at least 60 minutes, or 30 minutes in the freezer before baking.
This allows for the gluten to relax, and for the butter to become firm again. This will help prevent the pie crust from shrinking AND produce a nice flaky crust as well.
Step 6 – Roll out the dough
Once the dough is chilled, it’s ready to be rolled out. Remember the fridge and freezer are your friends, so use them whenever the butter is softening OR the dough is overworked and needs to just chill for a bit.
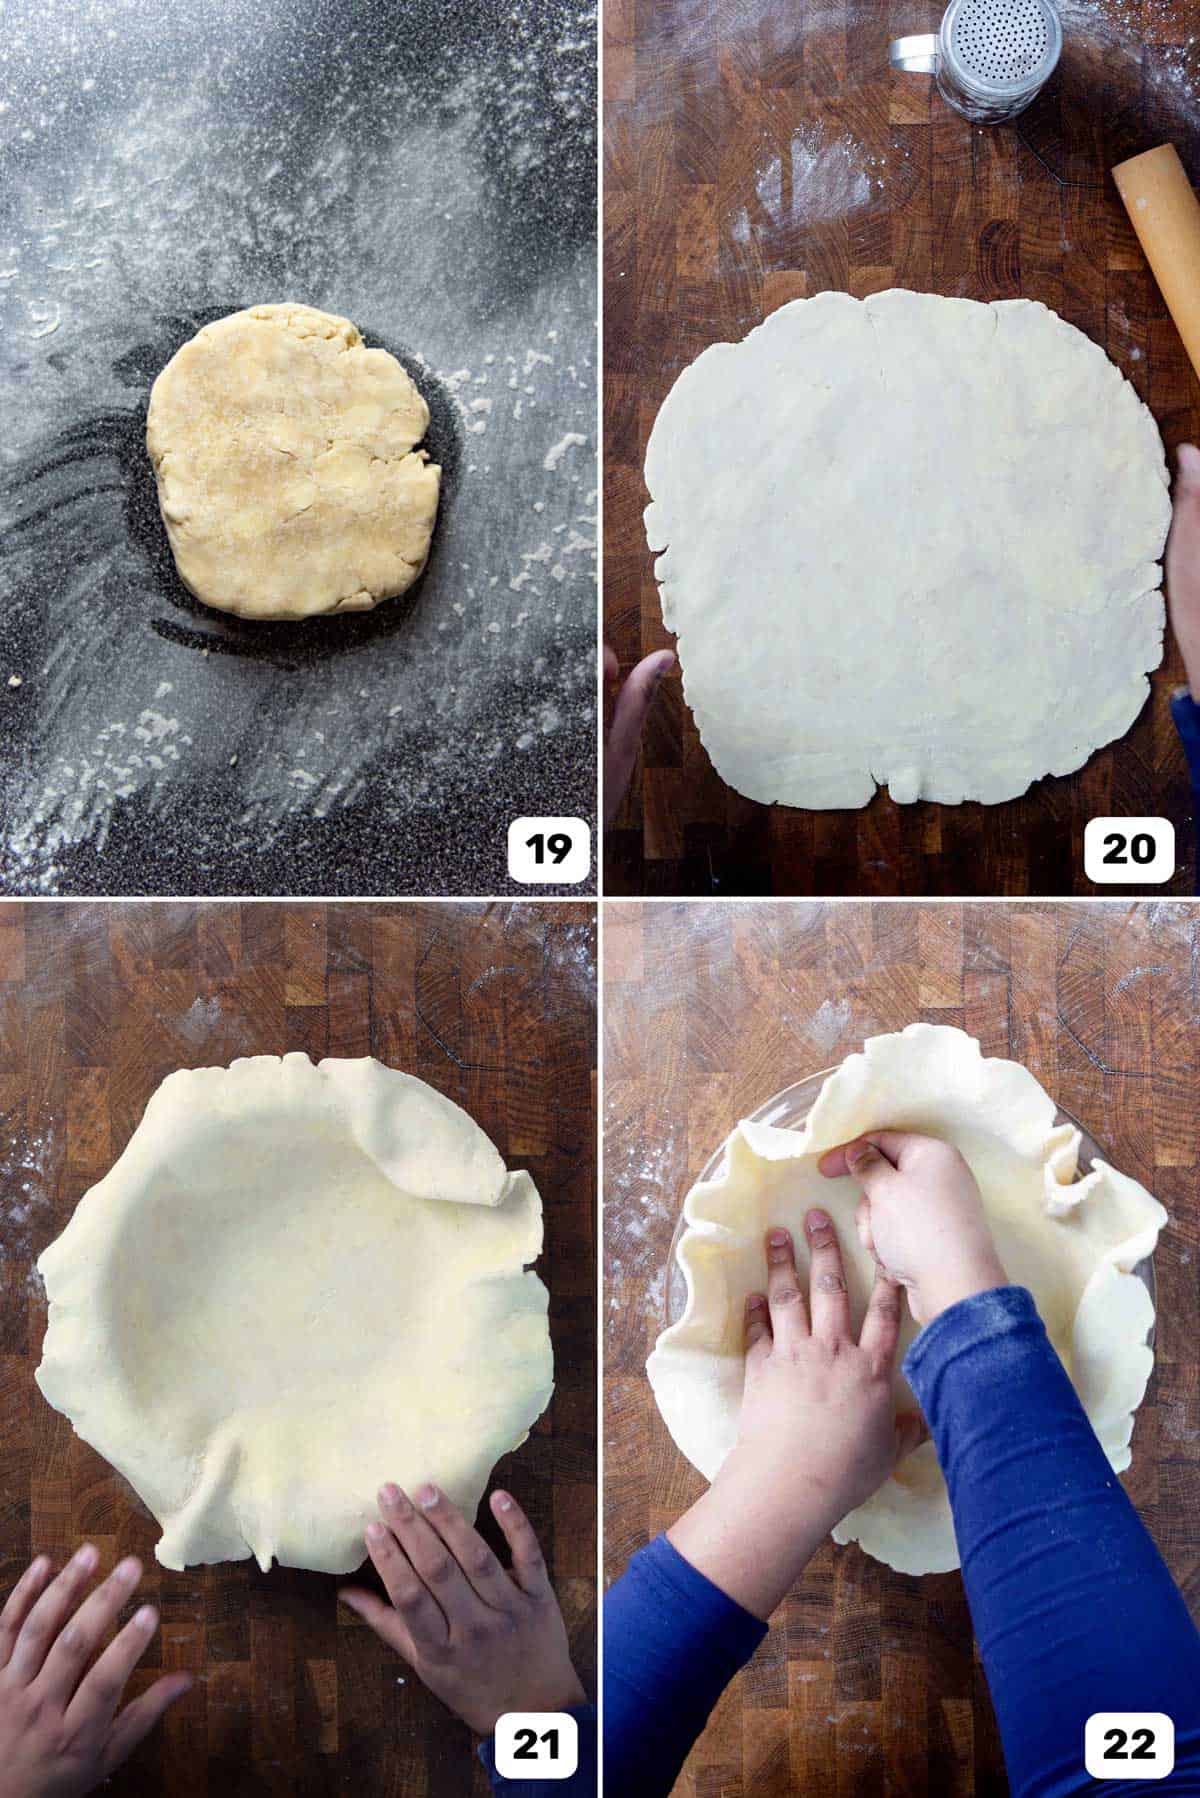
Flour your work surface and lightly dust the dough as well (image 19). The dough will be hard because it’s chilled, so you will need to make it a little pliable to roll it out properly.
Use your rolling pin to hit the dough firmly a few times. Do this on both sides of the dough disc.
Start rolling out the dough.
Make sure the dough and counter are lightly floured, and move the dough around to prevent sticking. To ensure the dough is evenly rolled out, and to prevent it from sticking,
- Roll out the dough and turn it a quarter turn, and keep repeating that process.
- Make sure to flip the dough over, so you roll it out on both sides.
If any cracks appear, simply press or pinch the dough together to reseal it, and keep going. It’s also important to maintain the shape that you need when rolling out the dough. For example, a round shape for regular pie plates, or a rectangle for sheet pans.
If at any point the butter softens and looks like it’s melting, OR if the dough is shrinking as you’re rolling it, place the dough on a baking tray and REFRIGERATE for about 20 minutes to relax the dough. This is so important, as this will help with the final flakiness as well as prevent the pie crust from shrinking when baking.
Roll out the dough until it’s about 3 mm in thickness (image 20). Some pie crust recipes will give you the diameter, but with this recipe, you want to go by thickness. This pie crust recipe allows for extra wiggle room to compensate for any errors.
Step 7 – Place the pie dough in the pie plate
Because of the butter content in the pie dough, you don’t need to butter or line your pie plate.
Standard pie plates are usually between 9 – 10 inches. You can also find shallow pie plates that are just over 1 inch in depth, but I like to use the deep pie plates that are about 2 inches in depth. I only use the shallow pie plate for fillings that are very rich and dense.
To transfer the rolled out pie dough into the pie plate (image 21), you can either,
- Fold the dough into quarters, and transfer it to the plate and gently unfold it, OR
- Roll the dough on the rolling pin, and then gently unroll the dough from the pin onto the pie dish.
It’s VERY IMPORTANT to remember the following when you’re fitting the dough in the pie plate.
DO NOT stretch the dough in the pie dish. Instead, lift the dough and let it fall onto the pie plate, and use the back of your fingers to press the dough into the edges of the pie plate. I also like to use the palm of my hand to hold the pie crust in place (image 22).
After placing the pie crust dough in the pie plate, you can trim off the excess crust. Leave an overhang that will help you create a crust;
- About 1 inch for a single crust pie.
- About 1/2 inch for a double crust pie.
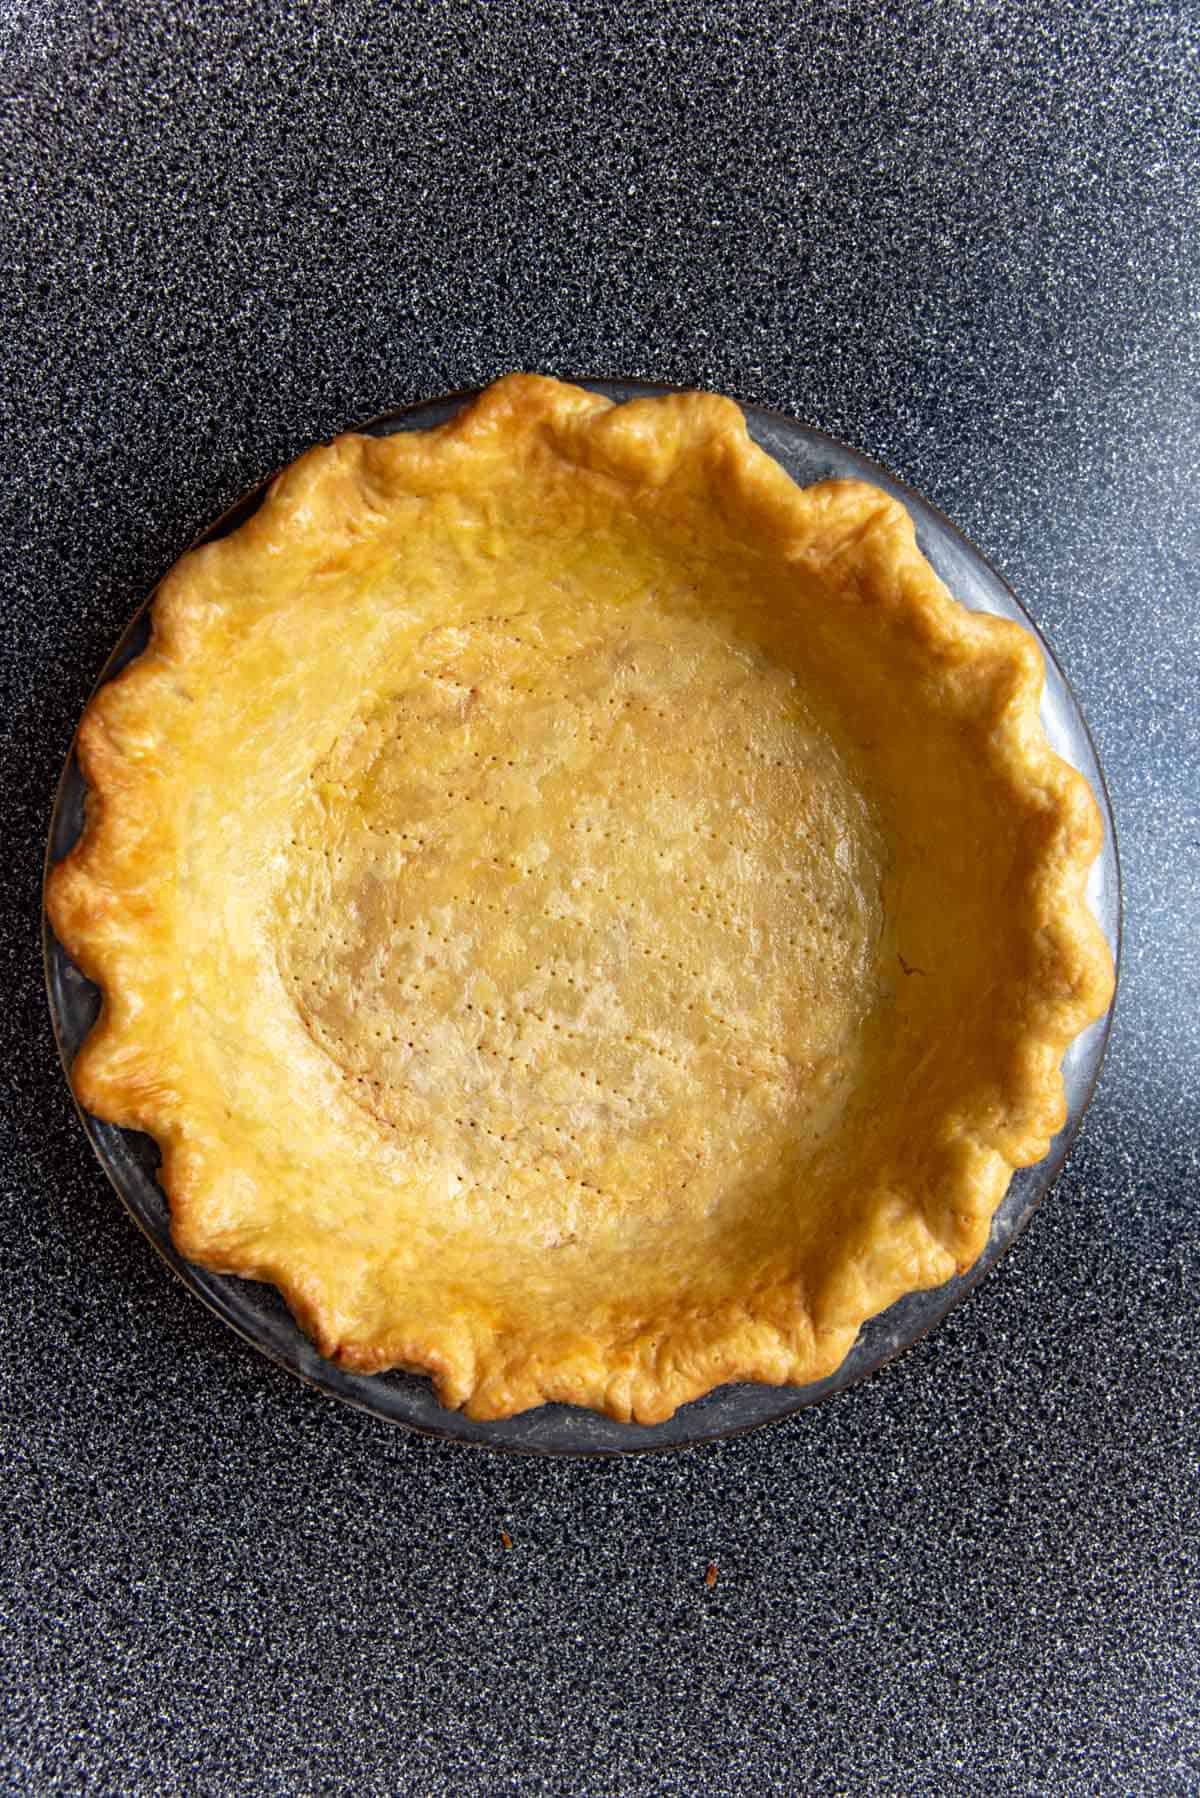
Now you’re ready to bake your butter pie crust. See my full guide here on how to blind bake pie crust.

My best tips and tricks for success
- Start with cold ingredients, especially chilled butter and ice water.
- Larger the butter pieces, the more flaky the dough, but then the dough may also require slightly more water to bring it together.
- Smaller butter pieces, will result in a more crumbly, mealy pie crust, and will also require less water to bring it together.
- If the butter softens at any stage, return the dough to the freezer to let the butter harden.
- Vodka can help with preventing gluten development, but it’s not essential.
- DO NOT overwork the dough. Use the parchment paper to fold the dough over to form the pie dough.
- The dough should not be fully hydrated, and some dry spots are expected. As the dough rests, the dough will fully hydrate.
- I prefer to let my dough rest at least for 4 hours, though 1 hour is the minimum.
- Rest the dough if it starts to shrink when you’re rolling it out. This will prevent the crust from shrinking in the oven as it bakes.
- DO NOT stretch the dough to fit it into the pie plate.
- Be generous with the pie crust border, as this can help with maintaining the shape.
- Bake the pie in the lower third of the oven, with a baking sheet / stone underneath to promote a perfectly baked bottom crust.

Pie crust troubleshooting
Why did my pie crust shrink?
If the gluten in the pie dough is overworked or stretched too much at any stage (mixing, shaping, rolling, or fitting in the pie plate), this can result in the pie crust shrinking during baking.
To prevent this, make sure to,
– Always keep the dough chilled.
– Do not add too much water (more water can encourage gluten development, which can cause the crust to shrink).
– Do not overwork or over-handle the dough.
– If the dough starts shrinking during the rolling out process, let it rest in the fridge for a few minutes before proceeding.
– Do not stretch the dough to fit it inside the pie plate.
My pie crust is not flaky?
The butter needs to be cold throughout the whole process. If it melts into the dough, the pie crust will not be flaky.
Another reason why you won’t get a flaky crust is if the butter pieces in the dough were too small. If you use a food processer, you can accidentally cut the butter too small. This is OK for mealy pie crusts, but not for a flaky crust.
So make sure to keep butter pieces at least hazelnut-sized, OR make sure there are larger, flatter pieces of butter in the dough.
Also make sure to cut the dough and layer it (stacking) to maximize the flakiness.
Why did my pie crust come out hard and rubbery?
This is a consequence of overworking the dough. The nice flakiness turns into a thick crust that’s too hard when the flour is overworked.
This can also happen if the crust is too thick. If you cannot roll out the dough to a 3 mm thickness, it’s because the dough was overworked. Let it rest in the fridge for at least 20 minutes, before trying to roll it out again.
My pie crust did not brown on the bottom
The trick to getting a nice brown crust is to ensure the pie plate is closer to the bottom element of the oven. This is why I recommend baking the pie crust in the lower third of the oven.
To aid with browning the pie crust well, I also recommend placing a pizza stone or baking tray in the oven, which will provide the pie plate direct contact with a hot surface. This will help caramelize the pie crust.
Why did my pie crimp lose definition after baking?
This happens when the dough has too much water.
It can also happen if the dough hasn’t rested enough before baking. But after making 100s and 100s of pie crusts, I can reliably say that this always happens when the dough is a little too wet.
That’s why the correct amount of water in the pie crust is for it to be a slightly dry dough than a well hydrated dough.

What to make with this pie crust
Since this recipe makes two butter pie crusts, you can either make 1 double crust pie, or 2 single crust pies! With single crust pies, you can blind bake them as well. I’ve already shared a detailed guide on how to fully blind bake or par bake pie crust.
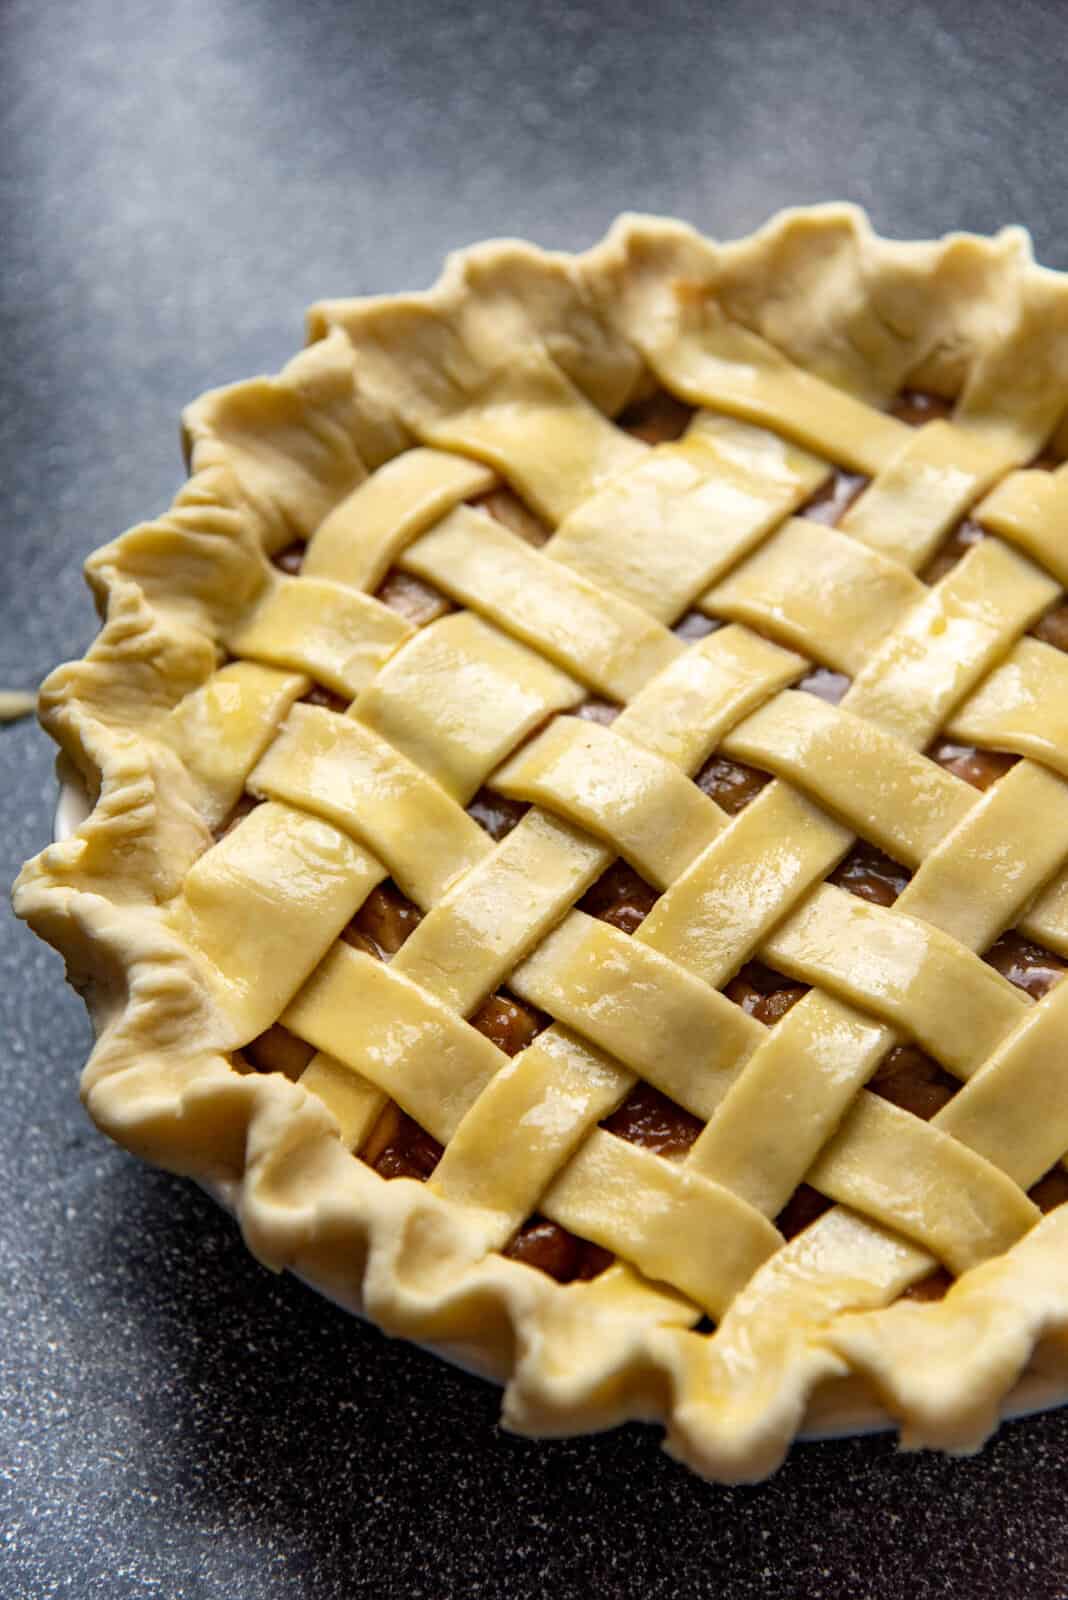
Double crusted pies
Single crusted pies
Tarts
Storage tips
Fridge
You can store the pie dough in the fridge for about 4 days, wrapped well in plastic wrap. But if there are any changes in color or texture, please discard the dough.
You can store a baked pie crust in the fridge for about 5 days, in an airtight container or wrapped well in plastic wrap. However, the pie crust will become stale over time.
Freezer
I prefer to store my pie crust dough in the freezer if I’m not going to immediately use it. To prevent freezer burn, wrap it with plastic wrap and preferably with a layer of foil as well, OR, store in a freezer-friendly container. The dough will last about 3 months this way.
Let the dough thaw out in the fridge overnight before using it.
Most baked pie crusts can also be stored in the freezer. The storage time will depend on the filling.

Recipe

Homemade Pie Crust (All Butter Pie Crust)
US based cup, teaspoon, tablespoon measurements. Weight measurements are recommended for accurate results whenever available.
Common Measurement ConversionsVideo
Equipment:
- 9 or 9.5 inch pie plate (between 1 – 2 inches deep)
- Foil or parchment paper
- Sugar or rice (as pie weights)
- Rolling Pin
- Spray bottle (optional)
Ingredients:
- 300 g unsalted butter preferably chilled
- 120 mL iced water
- 30 mL chilled vodka or use the same amount of iced water
- 400 g all purpose flour spooned and leveled when using cup measurements
- 30 g sugar
- ¾ tsp fine sea salt
- Spray bottle with ice cold water optional
Instructions:
Prep the butter
- Ideally, you should have all the ingredients chilled well. However, it's crucial that at least the butter, water, and vodka (if using) are chilled well.
- For a flaky pie crust – Cut the butter into smaller portions. Either into ½ inch cubes / batons, or cut the stick of butter into thin slices. Place the butter in the fridge to keep it chilled until you need it.300 g unsalted butter
- For a mealy pie crust – You can grate the butter and keep it frozen until you need it. I prefer to weigh the butter after grating it.
Make the dough
- Mix the flour, sugar, and salt in a large bowl.400 g all purpose flour, ¾ tsp fine sea salt, 30 g sugar
- Add the chilled / frozen butter, and toss to coat the butter with the flour.
- Use your fingers to squish each piece of butter, making sure to toss the butter in the flour periodically so that it’s all well coated with flour. Work quickly to prevent the butter from softening or melting.
- For a flaky pie crust, most of the butter pieces should be larger and flatter. Ideally, at least hazelnut-sized or walnut-sized. For a mealy pie crust, the dough crumbs should resemble coarse wet sand or coarse breadcrumbs. See pictures in the post for reference (images 7 and 8).
- Toss to make sure the butter pieces are coated in flour.
- Mix half of the iced water with the vodka (if using). Drizzle the water into the flour mixture, and mix it in using your fingers or a fork.120 mL iced water, 30 mL chilled vodka
- The lumps will become bigger as you mix in the liquid. Add more water until more of the dough forms larger, stickier clumps.
- Toss the clumps in the flour mix using your fingers to ensure that the water is mixing as evenly as possible. However, you will find that there will be large wet clumps of dough, and lots of dry spots in the flour mix as well. This is OK!120 mL iced water
- To check if there's enough water in the dough – Take some of the dough in your hands and squeeze it to form a large clump. The clump should just hold together, along with some dry spots present. Set this clump aside (either on your work surface or separate bowl). Repeat with the rest of the dough. You should only end up with a small amount of flour in the bowl that won’t clump up.
- However, if there is still a lot of flour mix left in the bowl that won't form clumps, drizzle a few drops of water to help with clumping when squeezed together. Alternatively, you can use a spray bottle to spray iced water on the dry flour spots, without adding too much water.Spray bottle with ice cold water
- The dough will have enough water if you can form a dough that's just holding together when squeezed, AND there should also be a few dry spots of flour. The more familiar you become with this dough, this stage will be easier to recognize. I usually never need more than 150 mL of water for flaky pie crusts, and less for mealy pie crusts.
- Place a piece of parchment paper on your work surface. Turn the pie dough clumps out onto the parchment paper. If the butter softens at any stage, remember to refrigerate / freeze the dough for a few minutes as needed.
- Use the parchment paper to fold the dough over to form a rough dough mound. Add a few water drops (or use the spray bottle) if needed, so that the dough sticks together. Remember that there should be some dry flour spots present.
- If there is too much water, and the dough is sticky, sprinkle more flour on the dough.
- Now slightly flatten the dough mound and cut it into four portions. Stack these portions on top of each other.
- Flatten the dough stack slightly, and cut it in half. You can either weigh the dough and cut it in half precisely, or cut two approximately even portions.
- Form a dough disc with each portion. Be careful and gentle when handling the dough. Wrap each disc with plastic wrap and let it rest in the fridge for at least 1 hour. I prefer to let it rest at least 4 hours, or overnight, to allow the moisture to evenly hydrate the dough.
Rolling out the dough
- Take one portion of pie dough. Unwrap the plastic wrap, and place it on a floured surface.
- Since the butter will be very firm, it'll be hard to roll out the dough right away. Strike the dough disc a few times with a rolling pin, on both sides, to make it more pliable and easy to roll out.
- Roll out the dough while maintaining the shape of a circle as best you can. Squeeze or pinch any cracked dough together to seal. Turn the dough a quarter turn after each roll, to ensure that the dough maintains the shape of a circle and also does not stick to your work surface. Use a light dusting of flour as needed, and also remember to flip the dough over so that you roll it on both sides.
- Roll the dough until it’s about 3 mm in thickness. The diameter may vary, but it should definitely fit a 9.5 inch diameter, deep pie dish.
- If the dough starts to shrink as you roll it, lightly flour the dough surface and either fold it into quarters OR roll it onto a rolling pin, and then cover it with plastic wrap. Let the dough rest in the fridge for at least 20 minutes, and then proceed with rolling it out again.
Lining the pie dish with the dough
- Now transfer the dough onto the pie dish. You can do this by rolling up the dough on a rolling pin and then carefully unrolling it over the pie dish.
- Do NOT stretch the dough to fit it inside the pie dish. This is crucial and a common beginner's mistake. Instead, carefully lift the pie crust and let it gently fall onto the pie dish. Use the back of your fingers to gently press the dough into the bottom of the pie dish, so that it fits neatly in the dish.
- There should be an overhang over the pie dish rim. Using scissors or a sharp knife, cut the excess pie crust, leaving at least a 1 inch (or up to 1.5 inches) overhang for single crust pies. Or a 0.5 – 1 inch overhang for double crust pies.
- For single crust pies – Roll the dough overhang under the pie crust to form a thick border. This should be flush against the rim of the pie dish. Either crimp or flute the crust edge.
- For double crusted pies – Roll out the second portion of dough until it's about 3 mm in thickness. Fold this in quarters and cover it in plastic wrap, and then keep it in the fridge with the pie plate until the filling is ready.
Recipe Notes
How to blind bake pie crust
See my post on how to blind bake pie crust for baking temperature and detailed step by step instructions to par-bake or fully blind bake this butter pie crust.How to make and bake a double pie crust
See my double pie crust recipe post for baking temperature and detailed step by step instructions on how to bake a filled double crusted pie (with a solid top crust).Nutrition Information:
“This website provides approximate nutrition information for convenience and as a courtesy only. Nutrition data is gathered primarily from the USDA Food Composition Database, whenever available, or otherwise other online calculators.”


Leave a Reply