


A homemade dog cake for your fur baby’s birthday is one of the best ways to show them how special they are to you!
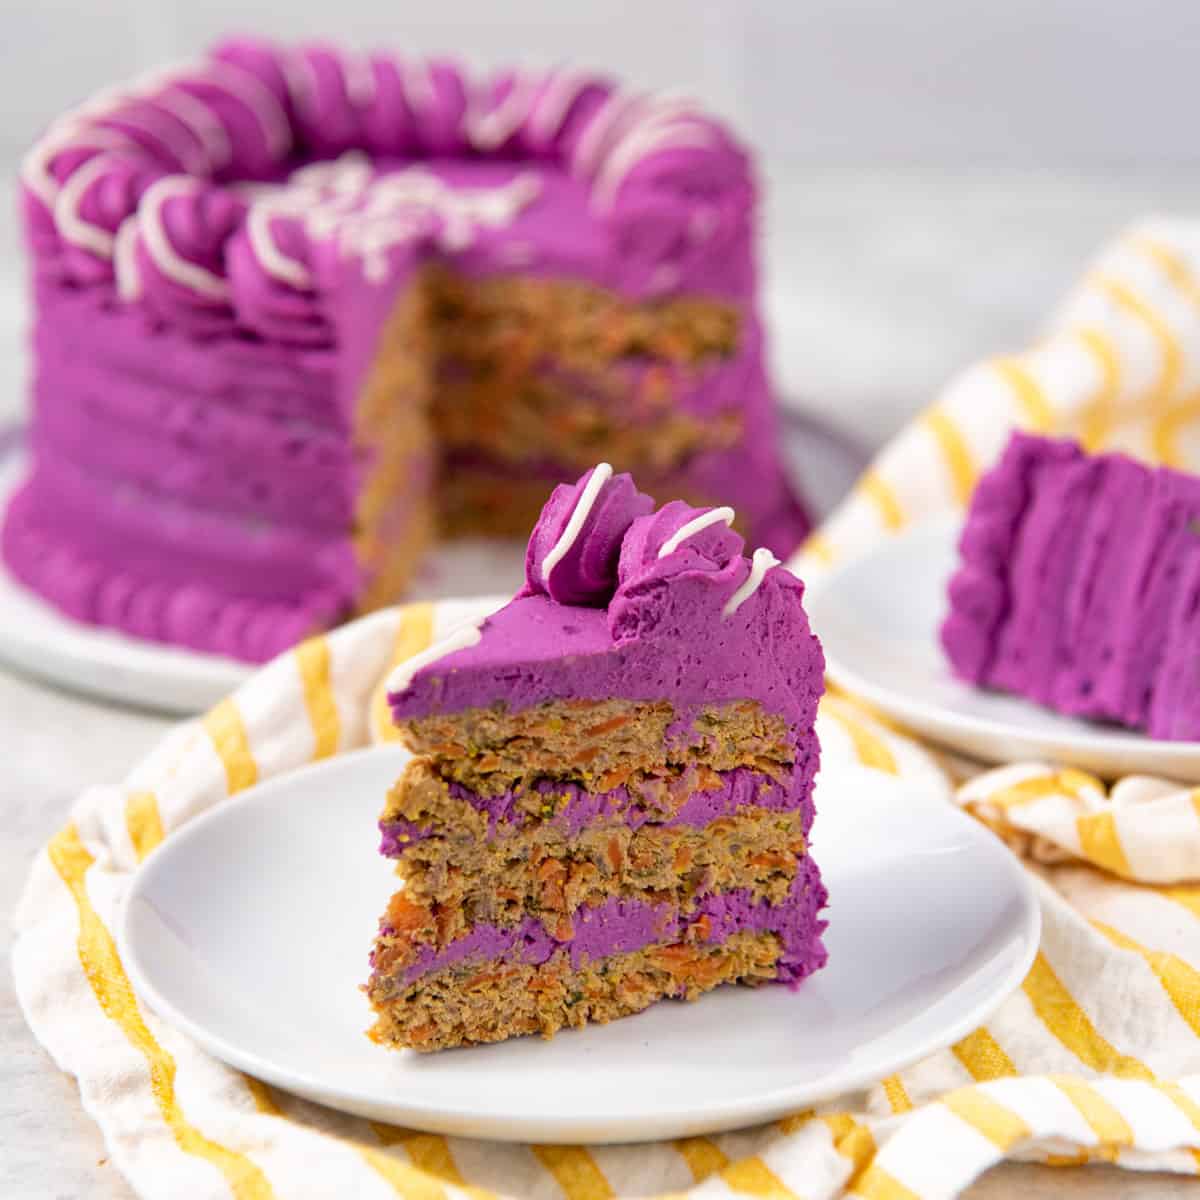
A meat cake with layers of delicious beef meatloaf and a sweet potato and cream cheese dog cake frosting! Plus, there are NO artificial colors used in this dog cake either.

This special dog birthday cake is super easy to make, and you don’t have to be a baker to make this for your furry friend either. Just like these meatballs for dogs, and these dog popsicles, this homemade meatloaf cake is a great way to show them how much they mean to you!
Why I love making this dog cake recipe
- Perfect for dogs with sensitive stomachs, especially because the recipe is so versatile!
- All of the ingredients (except one) for the cake are actual ingredients that are good for your dog (with the only exception being cream cheese, which is more of a treat for them).
- The cream cheese can be substituted with dairy free cream cheese, or swapped altogether for mashed potato if you like!
- Since this is not an actual cake, you don’t have to be stringent with the ingredient ratios either.
- It’s gluten free (which is fantastic for my pup who has such a sensitive stomach).
- Your pup can eat this as a full meal (as a one-off), instead of just as a small treat (like you would with a baked sweet cake for your dog or other homemade dog treats).
- I use absolutely NO food coloring in this cake!
- You can make dog-friendly “sprinkles” for this cake too!
Introducing our beautiful fur babies
We have (had) three dogs in our life,
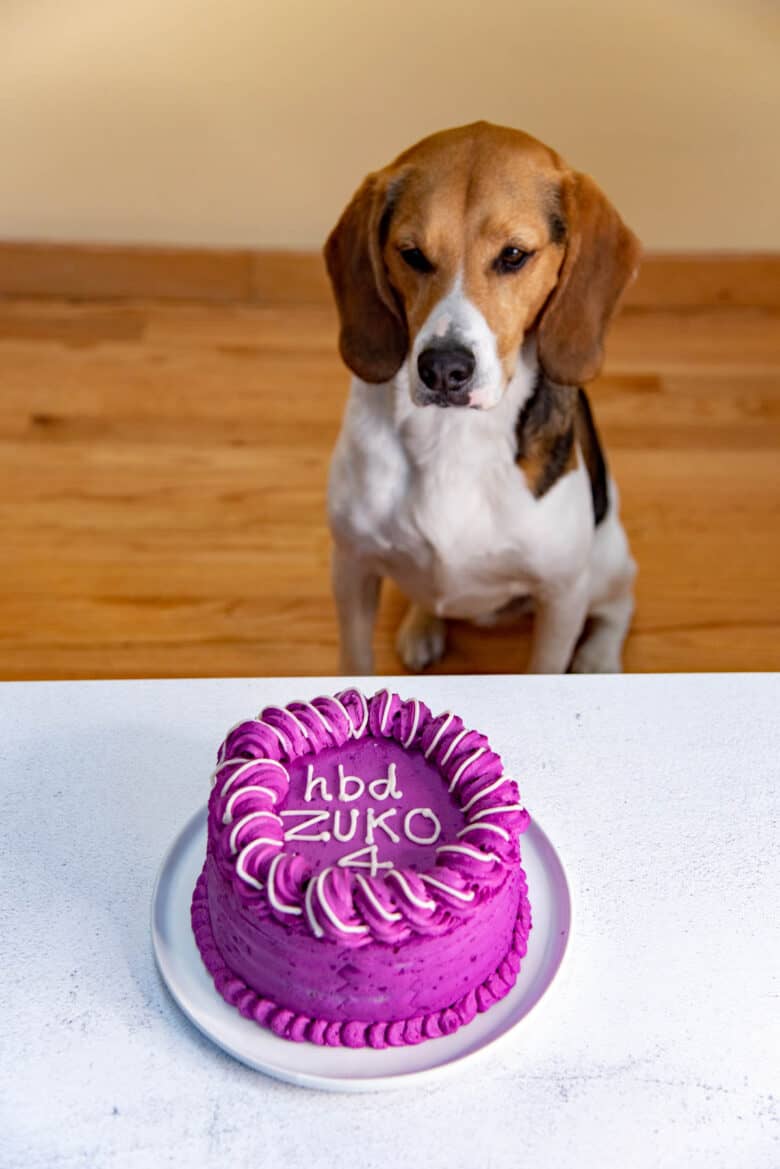
- Zuko, my smart and mischievous boy who has been with us since he was a puppy and is 4 years old now.
- Kita, my sweet, perfect angel, who was only with us for an year. He was at least 10 years old and he sadly passed away last year.
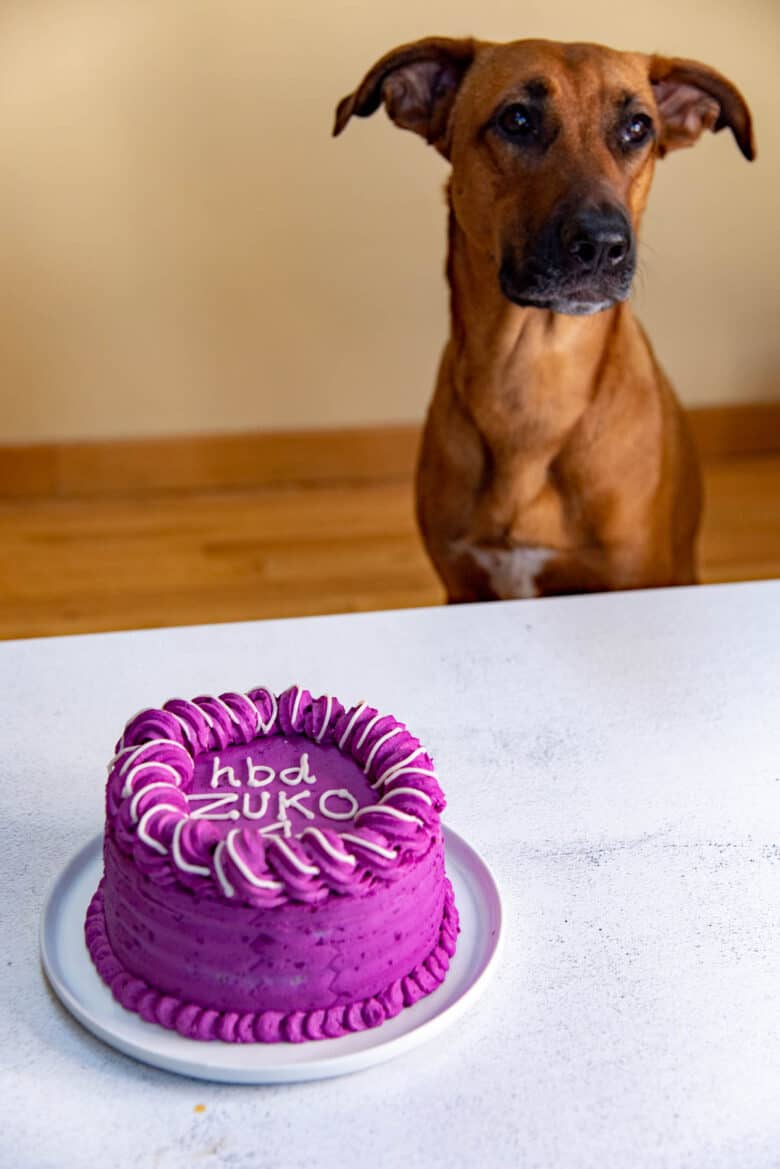
- Korra, my cheeky girl who we adopted last December and is just over an year old now.
Zuko has a particularly sensitive stomach, and we are very careful about what he eats. We take great care when we need to change his diet because small things can upset his stomach quite easily.
Korra has an allergy to kibble with chicken. So, we avoid feeding her chicken until we can precisely figure out what she is allergic to.
Kita was the boy that had a stomach of steel. He could eat anything, but chose to NEVER eat fruits and veggies, under any circumstances! So we did have to get creative with how we fed him a balanced meal.
All three of them have a special and eternal place in our hearts and they are my family. My babies.
Celebrating birthdays for puppies with sensitive stomachs
Let me preface all of this by saying that I am NOT a veterinarian or dog nutritionist. I made this puppy birthday cake because it’s a cake based on all the things that my dogs already consume at home.
I LOVE birthdays! And that includes my pups’ birthdays too. I often make these dog meatballs and frozen dog popsicles for them as a special treat, but I go a little further for this doggie birthday cake!
Zuko’s 1st birthday was celebrated with a peanut butter doggy cake and pupcakes. While he only had a small piece, he ended up having tummy issues. So, I had to think of an alternative.
That’s how I started making him a meatloaf cake!
Instead of making cake layers with all purpose flour, peanut butter, honey, oil, and other standard baking ingredients, I made simple cake layers with simple ingredients. A mixture of ground meat, veggies, fruits, and a binder!
I was able to add all of their favorite flavors, and sneak in some more nutrition through vegetables as well. I was able to eliminate most ingredients that Zuko doesn’t eat regularly (like flour, honey, peanut butter, oil etc.), so that I know that he could go crazy enjoying this cake on his special day.
The result was that he had no tummy issues because of his birthday cake!
That’s why this dog meatloaf cake is AMAZING for dogs with sensitive stomachs. You can make the meatloaf layers with ingredients that you KNOW your dog will love, and have no issues with. It’s the perfect dog-friendly cake.

Ingredients for the dog cake
Ingredients to make the meat cake layers
- Ground meat – I usually use beef or a mixture of beef and pork. Make sure it’s lean meat. You can use ground meat that your pup likes to and is able to eat.
- Carrots – You can replace the carrots with green beans or broccoli as well if you prefer. I’ve also used a mix of vegetables such as carrots, beans, kale, and beets.
- Apples – My pups love apples! But you can also substitute the apples with pears. You can also use berries (strawberries, raspberries, or blueberries). But remember that the berries will color the meatloaf layers. Apple has a more neutral color.
- Parsley – Flat leaf parsley and curly leaf parsley are superfoods for dogs. They have MANY vitamins and minerals that help with immunity, eye sight, and kidney and urinary health. But do NOT use spring parsley!
- Turmeric and a pinch of black pepper – I add these to the meatloaf because turmeric has anti-inflammatory properties that are beneficial for your dog.
- Eggs – Used as a binder for the meatloaf.
- Oat flour or quick cook oats – Used as a binder as well, and is a healthy carb for dogs.

Ingredients to make dog cake “frosting” with cream cheese and sweet potato
- Low fat cream cheese or dairy free cream cheese – This isn’t the healthiest for dogs, and of all the ingredients in this cake, this is the only ingredient that I consider to be a special treat for my pups. However, you can easily substitute this with mashed potatoes if you like.
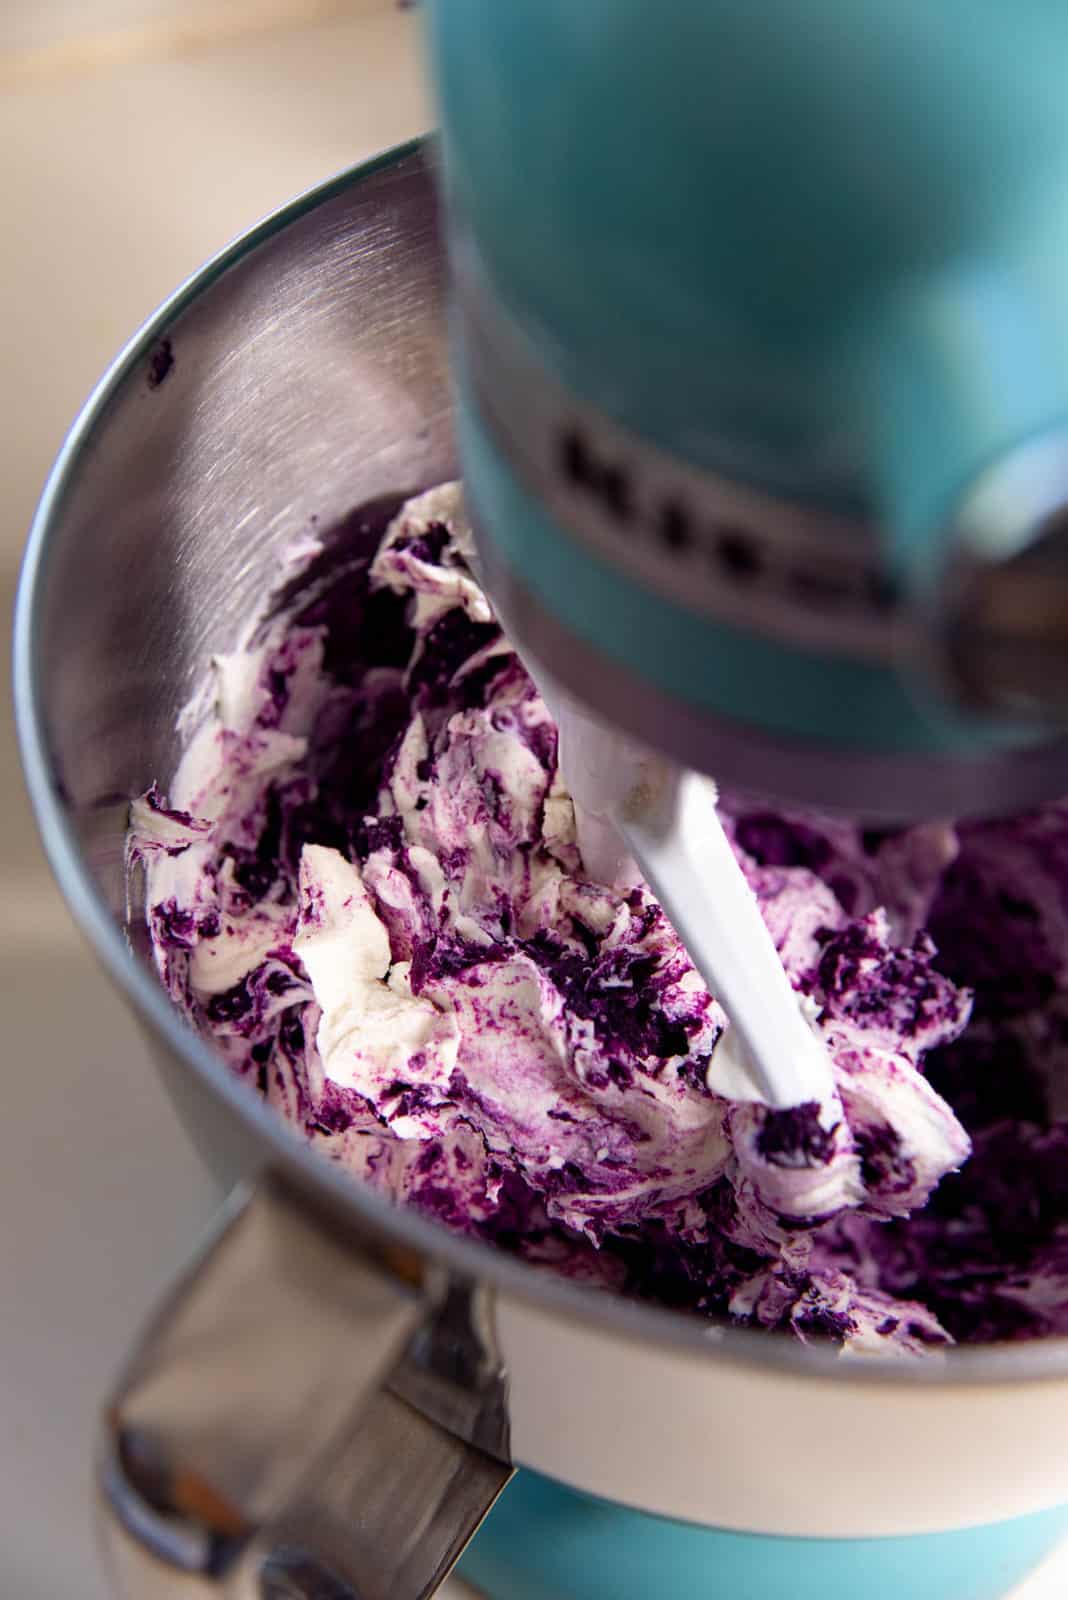
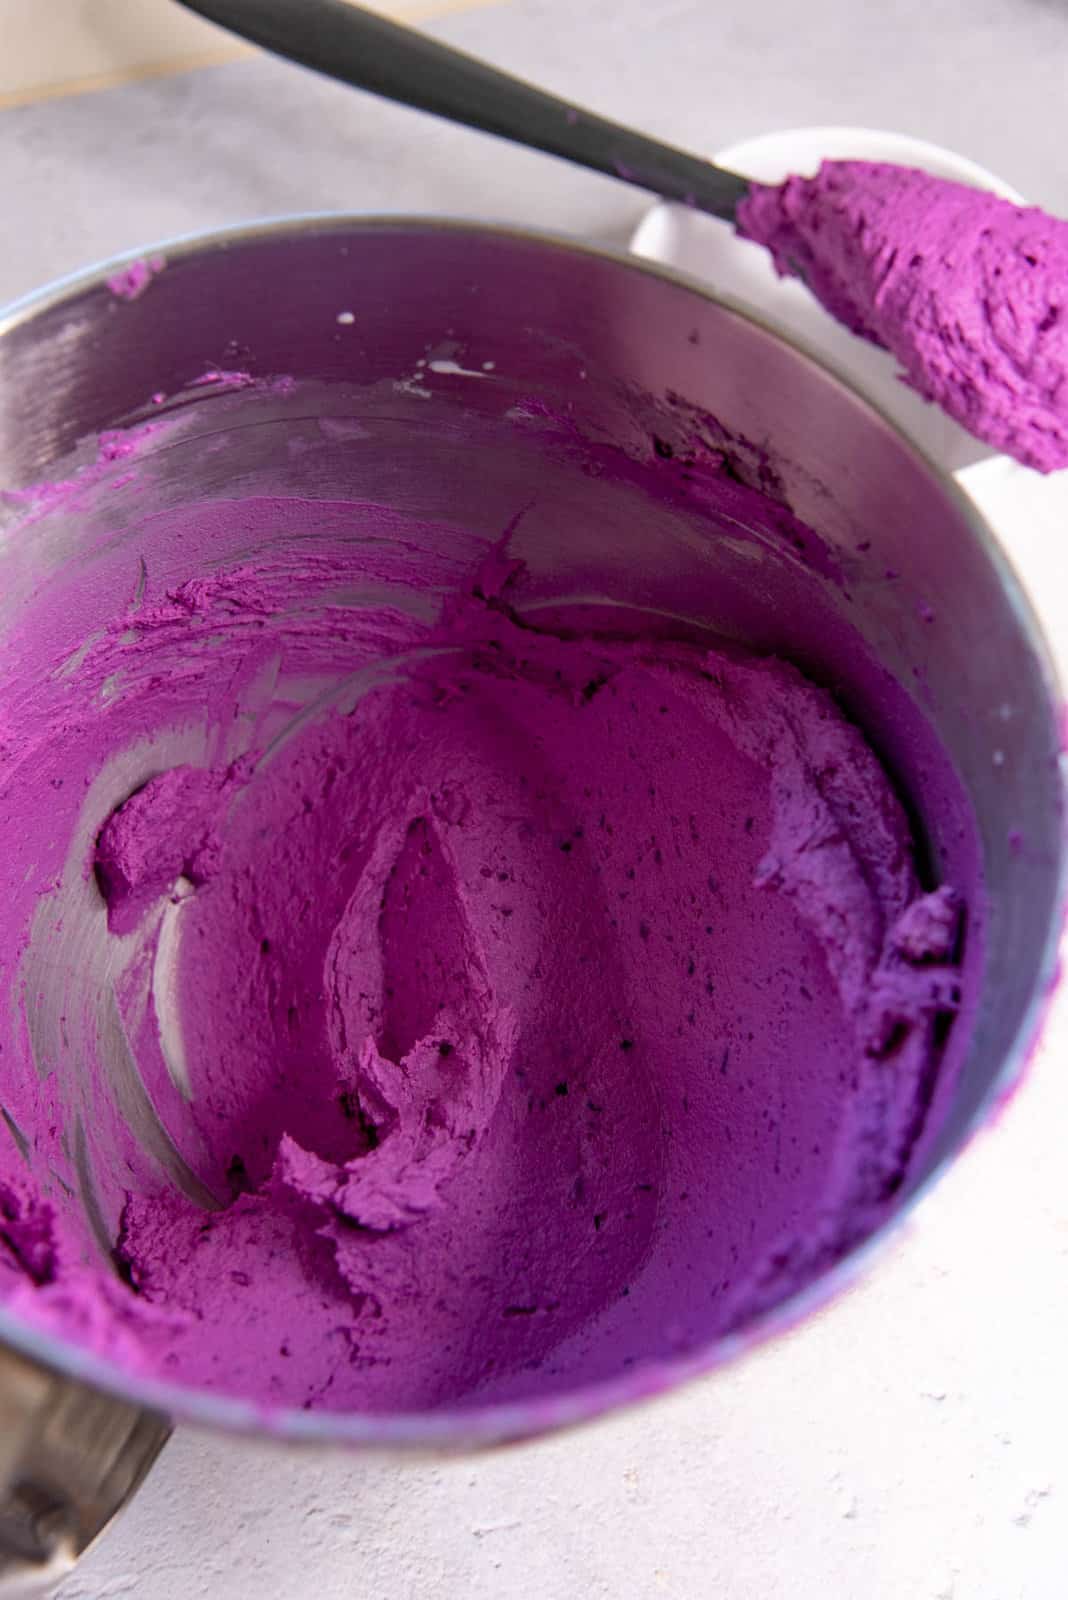
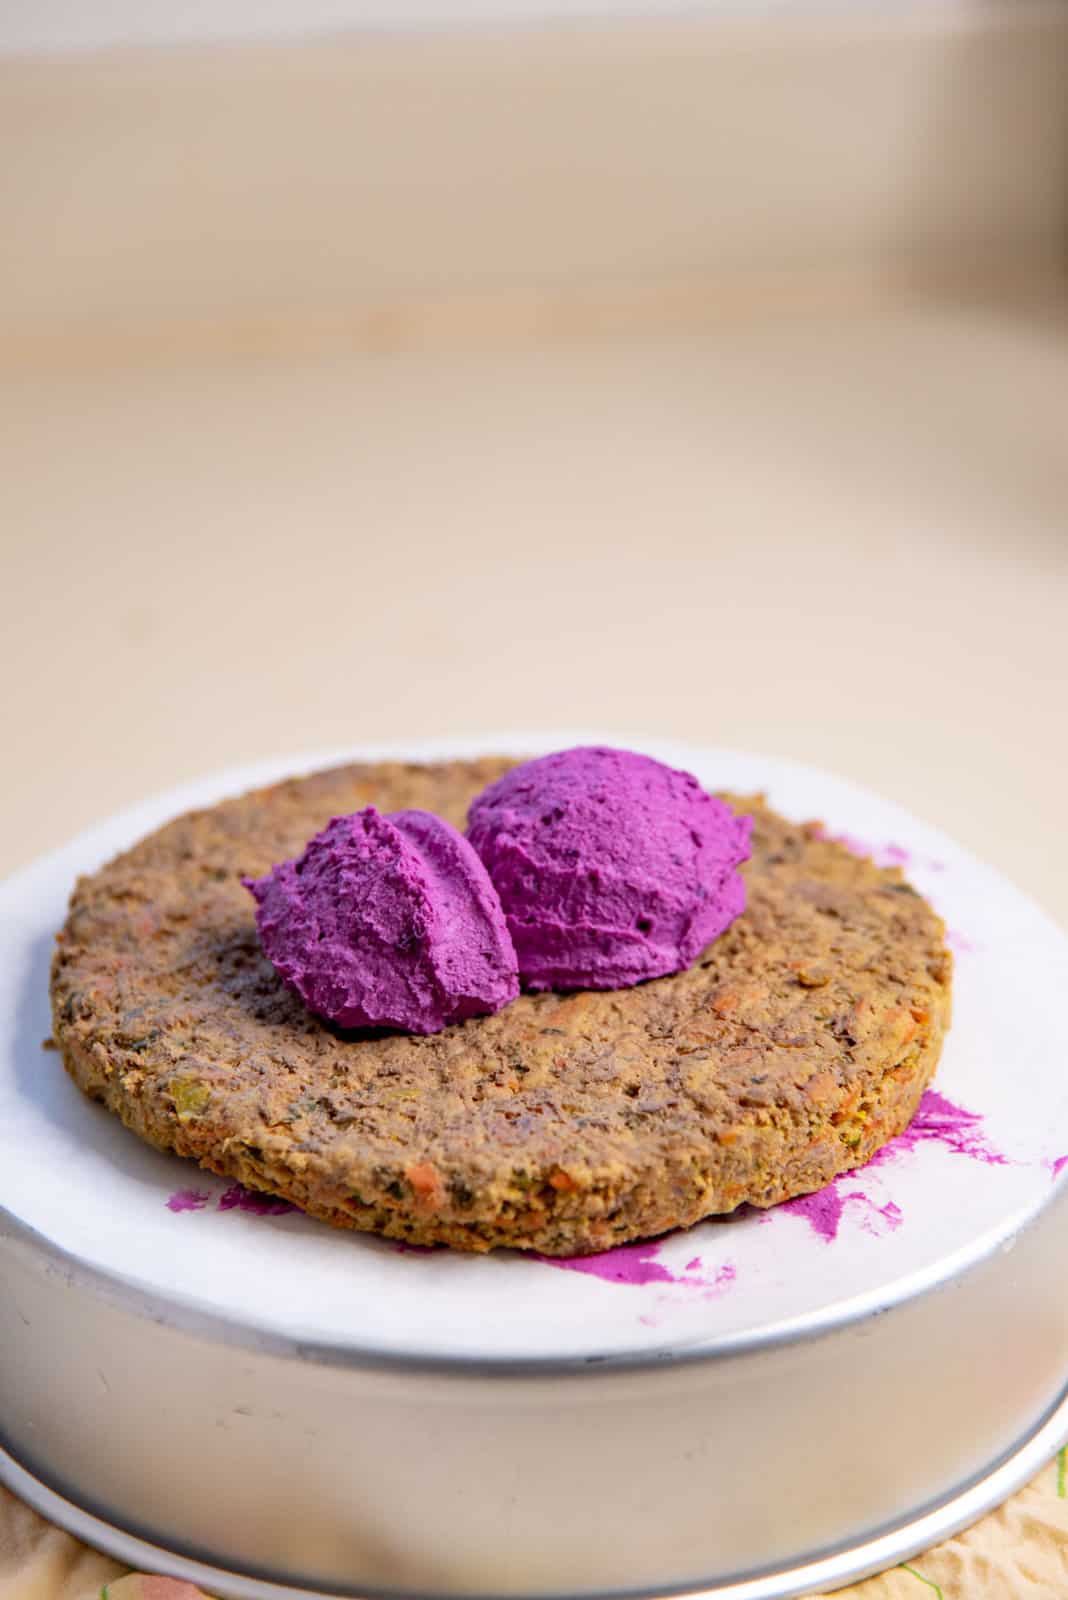
- Sweet potatoes – Sweet potatoes will naturally add color to your frosting. I have used the classic orange fleshed sweet potatoes for this frosting in past years. For this post, I used purple sweet potatoes which gave the frosting an incredibly vibrant purple color!
- Frosting substitute – You can also use mashed potatoes that have been colored with beetroot juice.

How to make a dog cake with meatloaf layers
For the meat cake layers
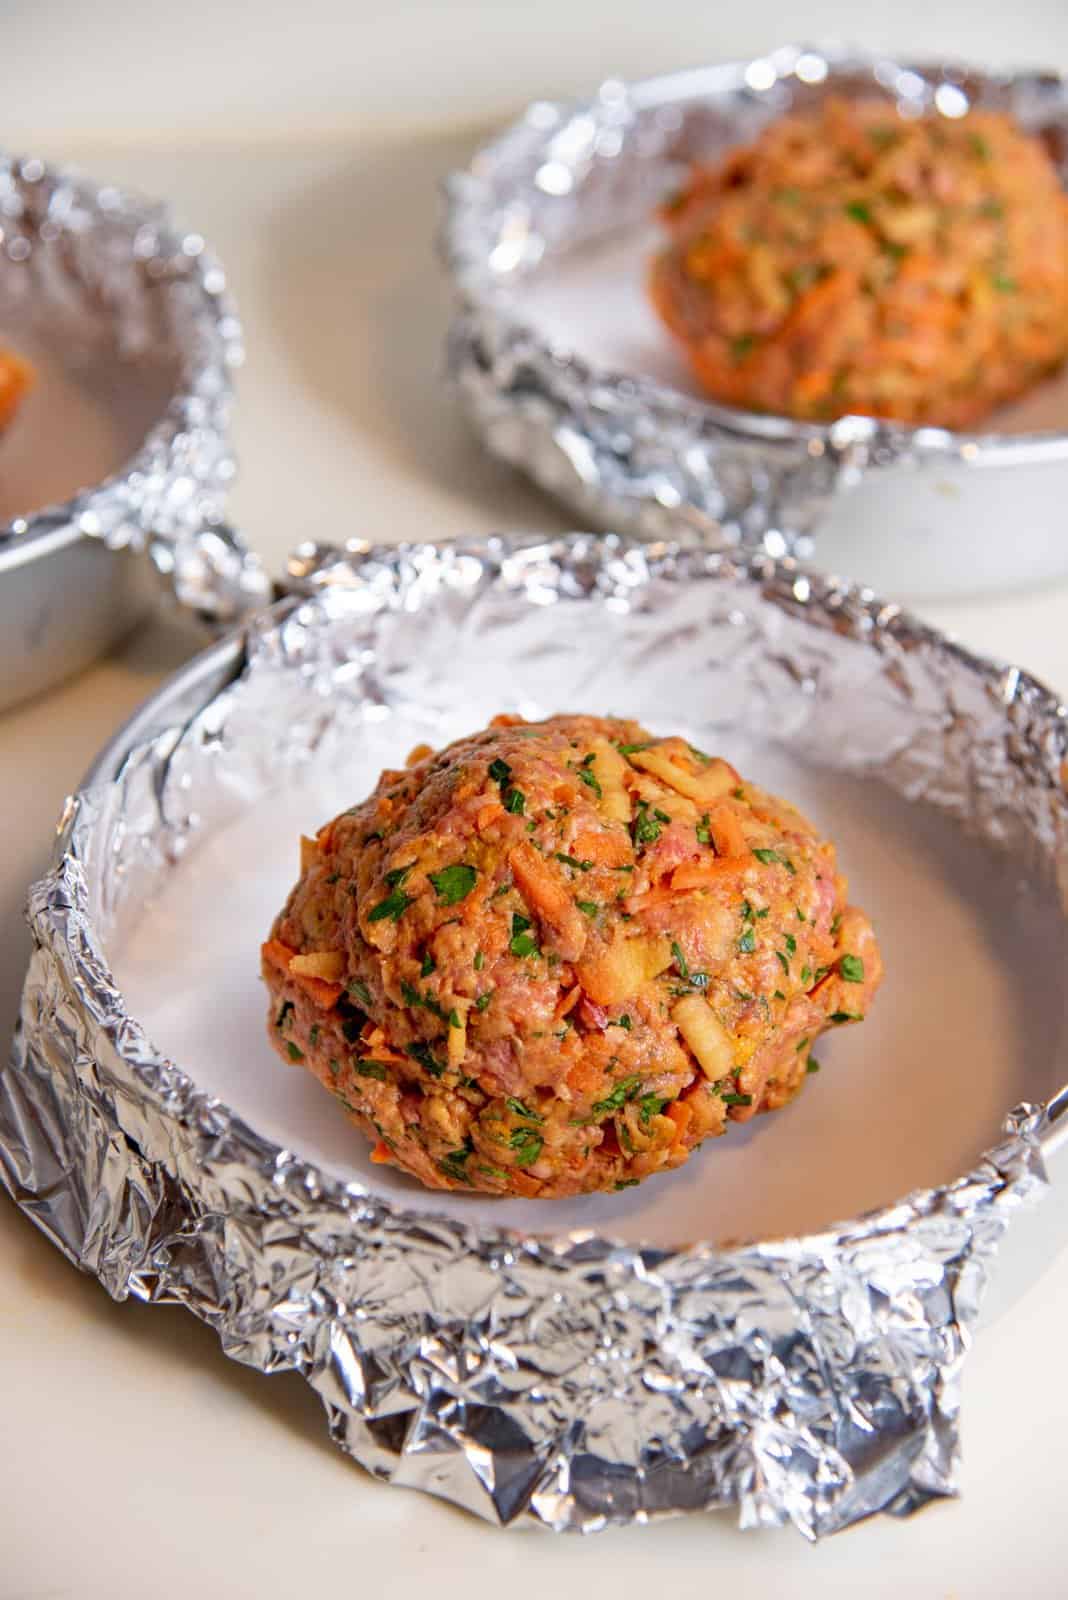
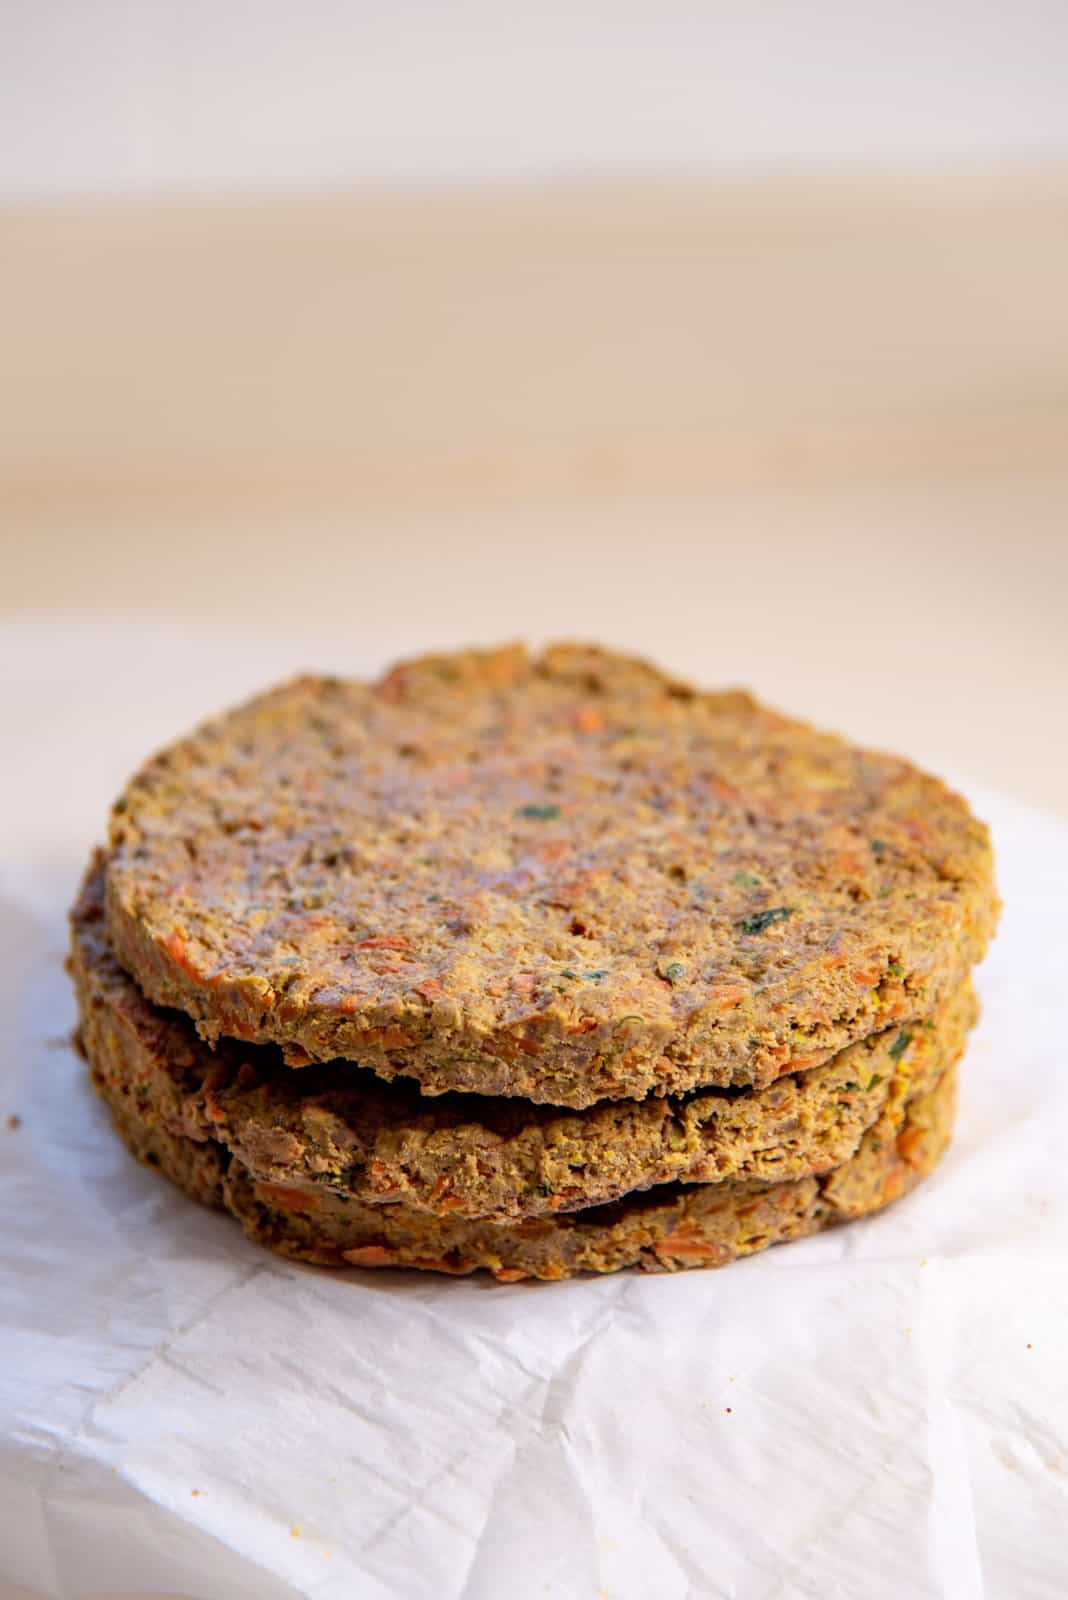
- Take three 8 inch round cake pans and line them with foil. Press the foil against the pan so that the foil is as smooth as possible without wrinkles. Then place parchment paper on top. The foil is to protect the cake pan from caramelized bits of meatloaf sticking to it.
- Preheat the oven to 350 F / 180 C.
- Grate the carrots and apples. Finely chop the parsley.
- In a large bowl, place the ground meat (I used ground beef here), and add the carrots, apples, parsley, turmeric, black pepper, and oat flour. Lightly mix the beef to incorporate all the ingredients. You don’t want to squeeze and be too rough with the meat, because this can lead to the layers shrinking too much once cooked.
- Halfway through the mixing process, add the eggs, and continue to mix until everything is well mixed.
- Weigh the meatloaf mixture and divide it into 3 equal portions.
- Press each portion into the bottom of each cake pan. Make sure that the thickness is as even as possible, and the edges are not jagged and uneven.
- Bake in the preheated oven for about 20 – 30 minutes until the meat is done. It shouldn’t take too long.
- Remove the cake pans from the oven and let the meatloaf dog cake layers cool down to room temperature. Place each layer on top of paper towels to absorb any excess fat, and set them aside until you’re ready to assemble the cake. You can also wrap in plastic wrap and store the dog cake layers in the fridge.


Making dog-friendly sprinkles
This is an optional step. It’s a little more involved, but they do make the meatloaf dog cake look that much more special and pretty, like a human cake!
These need to be made at least a day ahead of time. I usually make them two days ahead to give the sprinkles time to dry.
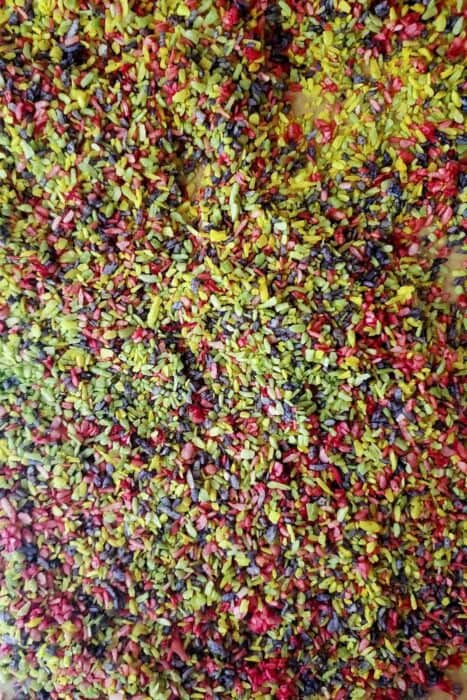
The first step is to find unsweetened desiccated coconut. Preferably the kind where the pieces are a little long, and not a fine powder. Although the fine powder could work well too.
The second step is to decide how many colors you want. Here are some options.
- Yellow – turmeric
- Pink – beetroot
- Green – spinach
- Purple – blueberries
- Red – raspberries
To make the sprinkles, place a little desiccated coconut in separate ziploc plastic bags. The sandwich-sized ziploc bags should be large enough.
For the turmeric, add about 1/4 tsp of turmeric with about 1 tsp of water to the coconut and then mix the coconut in the bag to color all the pieces of the shredded coconut. They may not be all uniformly colored, but that’s OK.
For all the other colors, lightly crush the fruit or vegetable with a few tsp of water. Then add the colored water to the shredded coconut. Close the bag and mix the coconut with the colored water inside the bag.
When all the colors are ready, remove the coconut from the bag and lay it out on a piece of parchment paper and let it dry.
You can also let it dry in an oven, but I have burned my coconut this way in the past because it does dry up very quickly in the oven and start to burn.
Mix the dried shredded coconut to create colored funfetti sprinkles that are safe for your dog!
Making the frosting for the dog cake
This is a simple recipe too.
- The day before I make the cake, I cut the sweet potatoes into thick rounds. Then I steam them until they are soft. These steamed sweet potato pieces are then cooled down to room temperature and stored in the fridge until the next day.
- Make sure to allow the cream cheese to soften to room temperature before using it as well.
- The next day, peel the skin off the steamed sweet potatoes and place them in a mixer bowl. With a paddle attachment, mix the sweet potatoes to break them apart.
- Add the softened cream cheese while mixing on medium speed, a small portion at a time, until all of the cream cheese is added. This is to avoid any cream cheese lumps from forming.
- After you add all the cream cheese, scrape down the sides and bottom of the bowl and then mix the frosting on high speed to get a nice spreadable mixture. If you want to make this mixture softer, you can add a little cream or plant based milk. But DO NOT add too much because if the frosting is too runny, you will need more cream cheese to make it stiff.
Now you can assemble the layer cake.


Assembling the cake
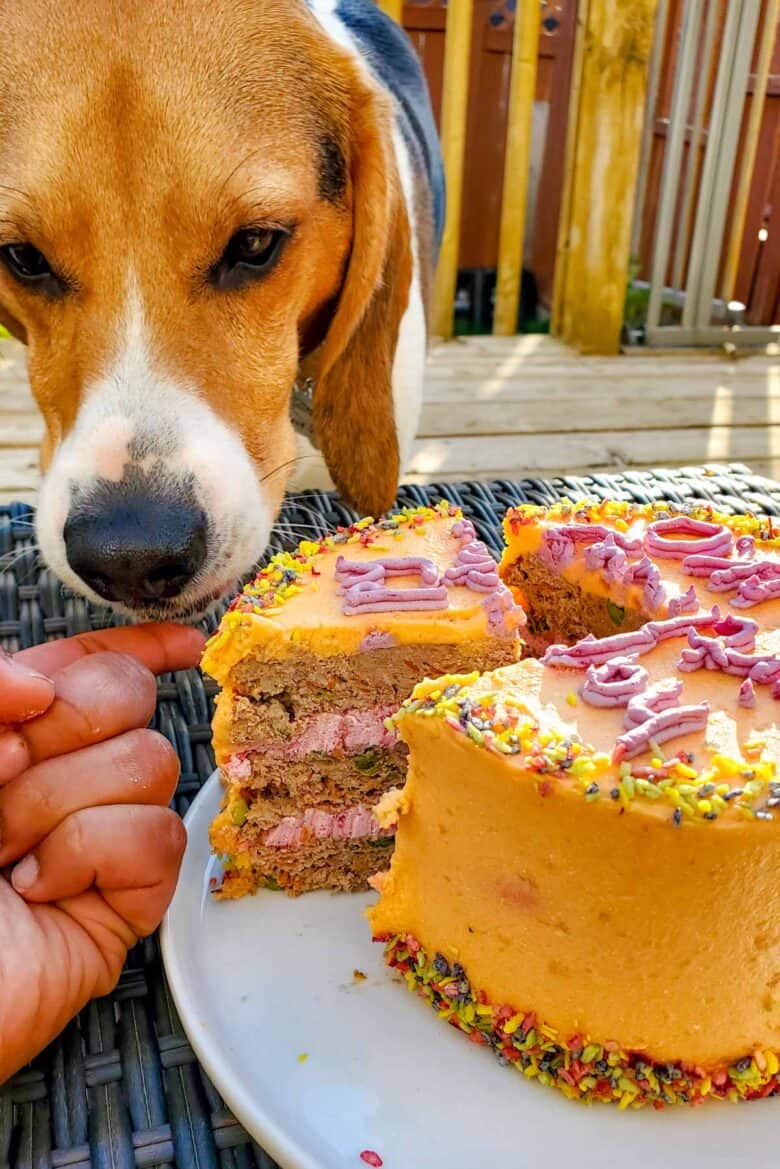
- This is an optional step, but I like to trim the edges of the meatloaf so that the thickness of the cake layers is more even. I use a small plate or bowl and place it over the cake layer and use it as a guide to trim the edges to get a nice, even circle. (If you like, you could even cut the meat cake layers into smaller circles to make a mini dog birthday cake.)
- Next, on a flat surface, place a round piece of parchment paper. Stick this parchment paper onto the flat surface (or cake decorating pedestal) using a small dollop of the sweet potato frosting. Spread a thin layer of frosting on top of the parchment paper (smaller than the cake layer) and place the meatloaf layer on top. The frosting will keep the cake in place.
- Spread a layer of the sweet potato frosting on top of the cake layer. I like to make it a little thick, but not more than half the thickness of the meatloaf layer. Top it with a layer of meatloaf. Repeat with frosting, and place the final layer of meatloaf on top.
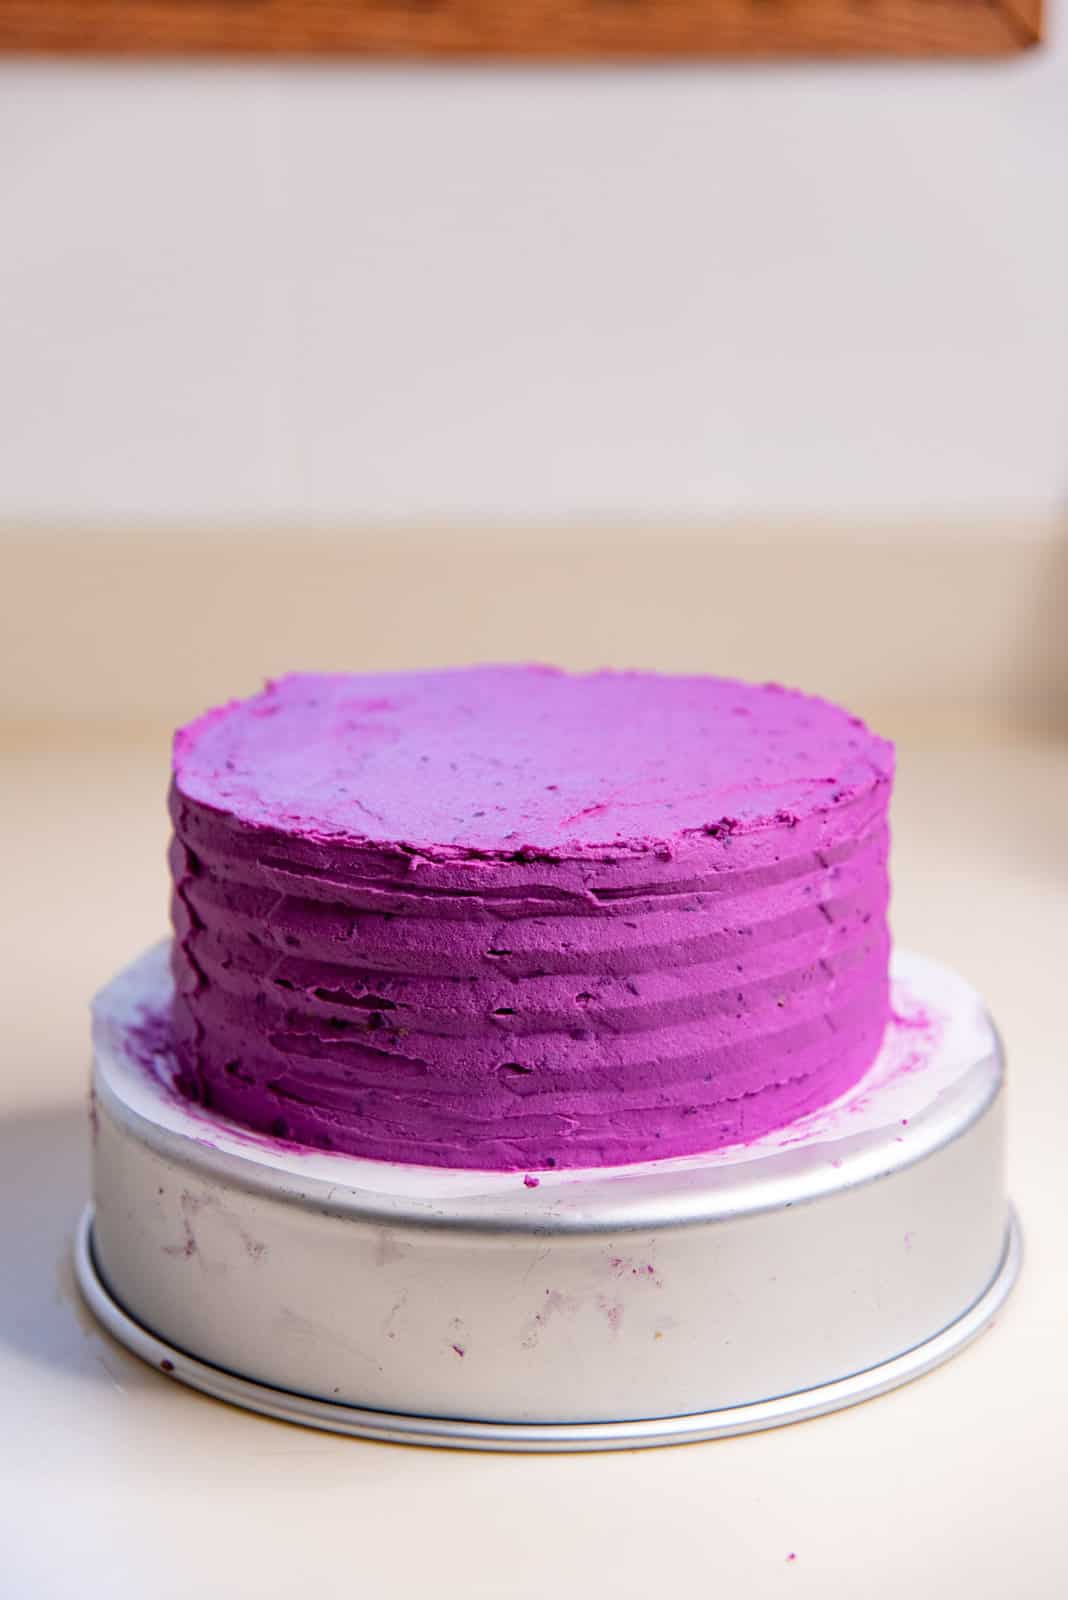
- Just like with a regular cake, I apply a “crumb coating” on the meatloaf dog cake layers to get a nice, smooth surface on the sides and top of the cake.
- Then, spread another thin layer of frosting over the crumb coating and use a bench scraper to get it as smooth as you like. If you want it to look more rustic, you can just use an offset spatula to spread the sweet potato frosting.
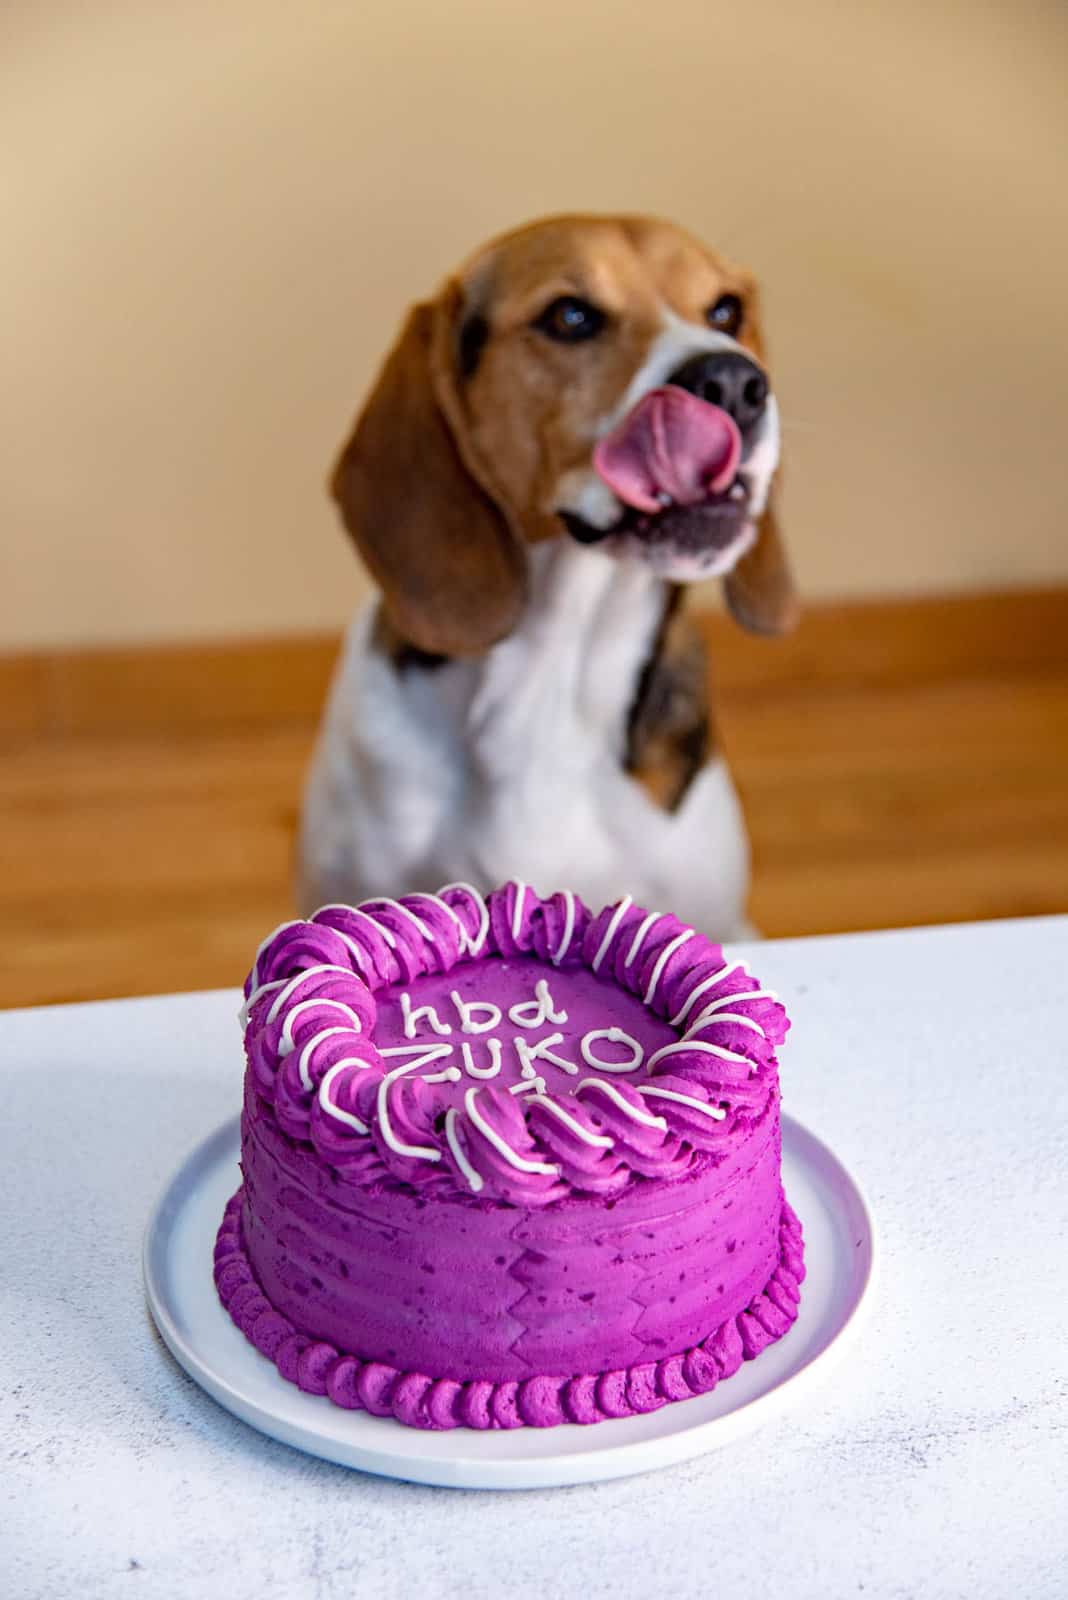
- Put some of the frosting in a piping bag with an open star or closed star piping tip, and decorate the border of the cake. This is optional of course, but there should be more than enough frosting to decorate the cake.


Decorating the dog birthday cake
- Feel free to decorate the meatloaf cake however you (and your dog) like(s)! Similar to the cake in this post, you can create a piped border along the top and bottom of the cake.
- To write a message on the cake, I use plain whipped cream cheese.
- If you made sprinkles, you can sprinkle the top or sides of the cake with the dog-friendly rainbow sprinkles too.
- The easiest method to decorate the cake is to use a variety of your pup’s favorite treats and to place them on top, along with fresh berries (if your dog likes them of course).

Storage instructions
Cake layers
The cake layers can be stored in the fridge for only up to 4 days (maybe 5). I treat them like leftovers for us humans, and don’t like to feed my dogs cooked food that has been stored for too long in the fridge.
However, you can store the meatloaf cake layers in the freezer for up to 1 month. Make sure that it’s wrapped well and stored in an air-tight container, or wrapped with foil to prevent freezer burn.
The meatloaf cake layers can be thawed out in the fridge and used to make a cake according to the recipe.
Frosting
The cream cheese and sweet potato frosting will only last about 4 days in the fridge due to the presence of dairy. I haven’t stored the frosting in the freezer before, but it is possible. However, you may need to re-whip the frosting once it has thawed out to get the correct consistency.
Assembled cake and leftovers
The meatloaf dog cake can be made the day before you need it and kept in the fridge until you need it for up to 24 hours.
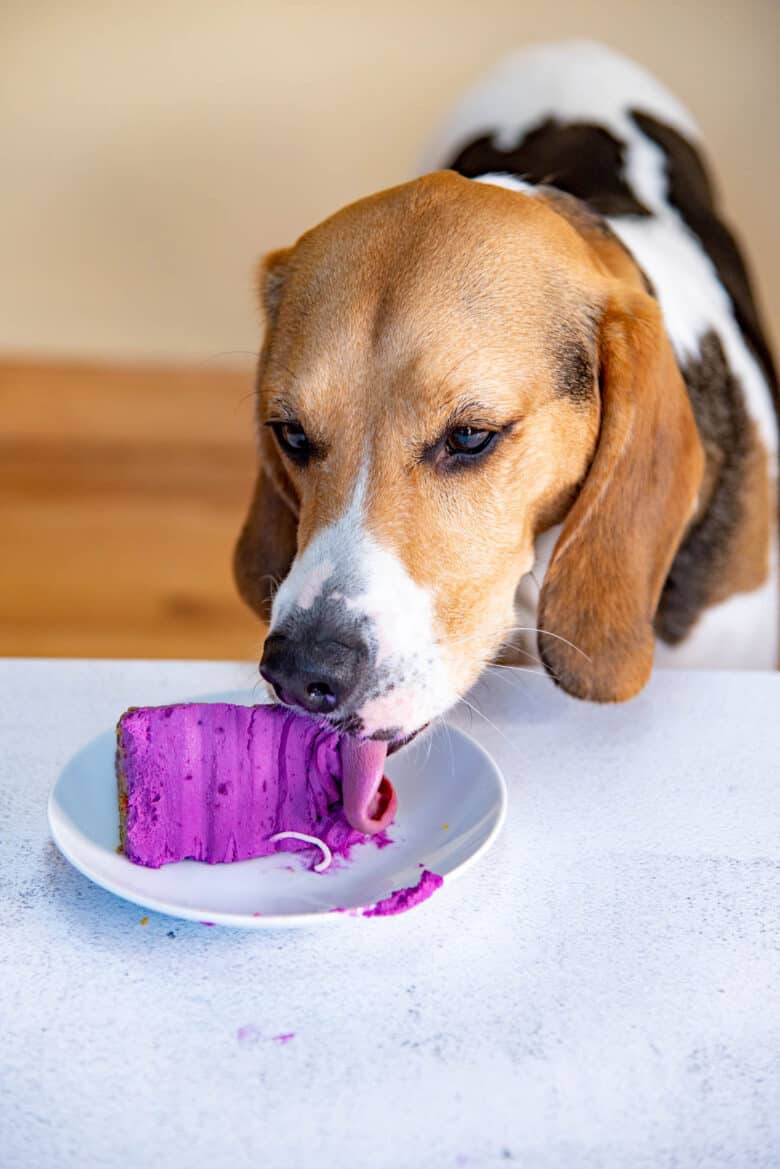
Since this cake can be served as a special meal, the cake usually is over within 2 days. My two pups ate the cake over two days with a little kibble.
However, the leftovers can be kept for a further 3 – 4 days (preferably 3 days) in the fridge. If you want to keep the cake for longer, I recommend freezing the cake in portions for up to a month or two.

Final thoughts and pictures
Well, I can’t really rate this recipe personally, because I’ve never tried it myself. But if my pups’ reactions are anything to go by, the recipe and cake are absolute winners! 🙂
I can most definitely say that they absolutely LOVE this cake! Let me just say that it was a challenge (to say the least) to photograph this cake with the pups in the background.
This was Korra’s first time with a dog cake, so she wasn’t very good at eating her cake slice off her plate. But Zuko is a seasoned veteran by now.
I guarantee that your pups will ABSOLUTELY LOVE this homemade dog cake recipe! And you, as their human, can feel good about them eating a birthday cake with their favorite ingredients that are actually good for them too.
That’s a win-win, if you ask me.
Finally, here are some pictures of my pups eating their puppy cake. I couldn’t choose just a couple, so I’m sharing six…


Recipe
Dog Birthday Cake (perfect for dogs with sensitive stomachs)
US based cup, teaspoon, tablespoon measurements. Weight measurements are recommended for accurate results whenever available.
Common Measurement ConversionsIngredients:
Meatloaf cake layers – makes 3 layers
- 900 g ground beef lean ground meat, 2 lbs
- 150 g grated carrots about 2 small carrots or 1 medium carrot
- 150 g grated apple from 1 large apple or 2 small apples (do not use the core or seeds of the apple)
- 50 g parsley finely chopped (about ½ cup, packed)
- 1 tsp turmeric
- Generous pinch of freshly cracked black pepper
- 2 eggs
- 3 tbsp oat flour OR ¼ cup quick cook oats
Dog friendly sweet potato cream cheese frosting – enough to fill, frost, and decorate the cake
- 450 g low fat cream cheese softened at room temperature
- 300 g steamed sweet potatoes or purple sweet potatoes (see recipe notes)
- 60 mL milk plant based milk, ¼ cup
- 115 g low fat cream cheese for piping words on the cake (optional)
Frosting alternatives (OPTIONAL)
Raspberry frosting (double if needed)
- 226 g low fat cream cheese softened to room temperature
- 100 g raspberries
Mashed potato frosting
- 226 g steamed potatoes
- 60 mL milk use as needed (see recipe notes)
- Beetroot powder or freeze dried raspberry or strawberry
Dog friendly sprinkles (OPTIONAL)
- ¼ cup Unsweetened shredded coconut per color
- 1 sandwich ziploc bag per color
- ¼ tsp turmeric for yellow
- Small piece of beetroot for pink
- A few frozen blueberries for purple
- A few frozen raspberries for red
- A handful of spinach for green
- Water to create the dye
Instructions:
Meatloaf cake layers
The day before
- Use 3 eight inch cake pans for the cake layers. Cover the cake pans with foil, making sure to flatten the foil against the surface to make the foil as smooth as possible.
- Place a parchment paper circle on the bottom of the cake pan to prevent sticking. Set aside until needed. You do not need to brush the pan with any type of fat.
- Preheat the oven to 350°F / 180°C.
- Grate the carrots and apples, and chop the parsley and set aside until needed.150 g grated carrots, 150 g grated apple, 50 g parsley
- In a large bowl, place the ground meat, and add the grated carrots, apples, parsley, turmeric, black pepper, and oats.150 g grated carrots, 150 g grated apple, 50 g parsley, 1 tsp turmeric, Generous pinch of freshly cracked black pepper, 3 tbsp oat flour, 900 g ground beef
- Gently mix to combine the ingredients, but do not squeeze the meat or over-handle it.
- Halfway through mixing, add the eggs and mix the meat mixture well until the eggs and meat are distributed well. At this stage, you should have a meatloaf mixture that holds well together.2 eggs
- Weigh the meat mixture and then split this meatloaf mixture into 3 portions (by weight).
- Place each portion inside each of the cake pans.
- Flatten the meatloaf portion into the bottom of the cake pans. Make sure the meat mixture is evenly thick throughout and the edges are neat as well. The cake layers will shrink as they bake, so this will prevent the layers from being too thick in the middle and thin at the edges.
- Bake the cake layers in the preheated oven for about 20 – 30 minutes until the layers are cooked through. It usually takes only about 20 minutes in my oven, so check on them at the 15 minute mark. If needed, rotate the cake pan halfway through the baking time (~10 minutes).
- Remove the pans from the oven and let the meatloaf cake layers cool down until warm or at room temperature.
- Next, take 3 large pieces of paper towels (or equivalent), and place the cake layers on the paper towels. This will absorb any excess oil from the meat. Stack the cake layers (along with the paper towels) and place them on a plate and let them chill in the fridge until you’re ready to use them. Wrap them in plastic wrap OR place them in a container if they are going to be stored overnight.
Frosting
The day before
- Cut the sweet potatoes into thick rounds.300 g steamed sweet potatoes
- Steam the sweet potato pieces on the stove or microwave until they are softened. Do not boil the sweet potatoes, as they will become waterlogged.
- To steam them, add about 1 – 2 inches of water to the bottom of a large pot. Place the sweet potatoes in a steamer basket.
- When the water comes to a boil, place the steamer basket in the pot and lower the heat. Cover the pot with a lid and let the sweet potato pieces steam until a fork can very easily pierce the sweet potato. This can take 10 – 20 minutes, depending on how thick the sweet potato pieces are. Remember to check the water level, and top up as needed.
- Allow the sweet potatoes to cool completely and then store them in the fridge in a container until the following day.
The following day
- Peel the sweet potato pieces and weigh them to get 300 g of sweet potato. Place the sweet potato in the bowl of your mixer.300 g steamed sweet potatoes
- With a paddle attachment, mix the sweet potatoes until it becomes mashed and fairly smooth.
- Next, add the softened cream cheese, and mix until the cream cheese and sweet potatoes are nice and smooth. If the cream cheese is very soft, it can be added as a block. If it's not as soft, then add the cream cheese in small portions (about ¼ block at a time).450 g low fat cream cheese
- If the frosting is too stiff, you can add up to ¼ cup of plant-based milk or regular milk. Add a tablespoon at a time until you get the consistency you like.60 mL milk
- The frosting is now ready to be used.
- Notes – If you want to use two types of frosting (one for the filling, one for the frosting), then split the recipe in half. Use half of the cream cheese with half the amount of sweet potatoes, and mix the other half of cream cheese (226g) with 100g raspberries.100 g raspberries, 226 g low fat cream cheese
- You can also use the steamed potatoes to make mashed potatoes for the frosting as well. Use beetroot juice or beetroot powder to color the mashed potatoes. See recipe notes.226 g steamed potatoes, 60 mL milk, Beetroot powder
Assembling the cake
- Optional – Trim the edges from the cake layers. Use a small plate or bowl that is slightly smaller than the size of the cake layer. Place it on top of the cake layer and use it as a guide to trim the edges, while retaining a circular shape.
- Take a piece of parchment paper as the base of the cake. Stick this parchment paper onto a flat plate or cake decorating turntable using a small dollop of the frosting.
- Next, spread a thin layer of frosting on top of the parchment paper to stick one cake layer.
- Place the first cake layer on this parchment paper and make sure it's secure using the thin layer of frosting.
- Spread a layer of frosting on top of the cake layer. Make sure the frosting layer is evenly thick.
- Place the second layer of meatloaf on top of this. Repeat with the frosting, and then place the third and final meatloaf layer on top.
- Spread the sweet potato frosting all over the cake layer top and sides in a thin layer to form a “crumb coating”. This layer will help to smooth out any bumps and uneven surfaces on the cake.
- Next, spread another layer of frosting with an offset spatula, and use a bench scraper to create a smooth surface. Alternatively, you can use a cake comb to create a pattern, or keep it rustic and create small swirls with the spatula instead.
- Place the remaining frosting in a piping bag with a frosting tip (I used an open star tip here), and pipe a decorative border on the top and/or bottom of the cake.
- OPTIONAL – Mix the remaining cream cheese with a little milk to form a pipeable mixture. Place this in a small piping bag and snip a very small hole at the end (or use a small round tip). Use this to pipe out “happy birthday (pup’s name)” on the cake surface.115 g low fat cream cheese
- If you prefer, you can also sprinkle the dog-friendly sprinkles on the cake.
- You can serve the cake immediately, or let the cake sit in the fridge for the frosting to set.
Dog friendly sprinkles (optional)
- First, you should decide how many and which colors of sprinkles you'll be making.
- Place ¼ cup of the shredded coconut in a plastic ziploc bag for each color you want to make.¼ cup Unsweetened shredded coconut, 1 sandwich ziploc bag
- Yellow – In a small bowl, mix the turmeric with 1 – 2 tsp of water. Add this to one of the bags and mix the coconut until it's yellow in color.¼ tsp turmeric, Water to create the dye
- Pink – Grate the piece of beetroot and mix it with 1 – 2 tsp of water. Squeeze the piece of beetroot in the water to get the color into the water. Place 1 – 2 tsp of the colored water in another bag of shredded coconut and mix until the sprinkles are colored a dark pink.Small piece of beetroot, Water to create the dye
- Purple – Repeat the same process as above with frozen blueberries, except you can simply crush the blueberries well to get the blue color.A few frozen blueberries, Water to create the dye
- Red – Repeat the same process with frozen raspberries and the shredded coconut.A few frozen raspberries, Water to create the dye
- Green – Place the spinach in a mortar and pestle and grind it with a little water to get green colored water. Mix the water with the coconut to create green colored sprinkles.A handful of spinach, Water to create the dye
- Line a baking tray with parchment paper, and spread out the colored sprinkles in a thin, even layer. Allow the sprinkles to dry for at least 1 day. Keep them out in the sun if possible for them to dry up faster.
- Mix the dried “sprinkles” together and use as rainbow sprinkles on your pup’s birthday cake.
Recipe Notes
A note about the frosting
Orange sweet potatoes usually have more water than purple sweet potatoes. You may not need to add any milk if you make frosting with orange sweet potatoes. If you’re making raspberry cream cheese frosting, mix the cream cheese with half of the raspberries first to color the cream cheese. The other half can be folded in so that the frosting has bits of raspberry in it.A note about using mashed potatoes for frosting
When substituting the cream cheese with steamed and mashed potatoes, do not overmix the potatoes as it’ll become gluey. This is why I prefer to use cream cheese. Mash the steamed potatoes with the milk until you get a pipeable consistency. Then add the beetroot powder to get the color you prefer. You can also use beetroot juice or crushed berries to get the color you prefer in the mashed potatoes, but you may need to reduce the amount of added milk to prevent the frosting from being too soft. For an orange or purple frosting, you have the option of mixing half potatoes and half sweet potatoes as well.Nutrition Information:
“This website provides approximate nutrition information for convenience and as a courtesy only. Nutrition data is gathered primarily from the USDA Food Composition Database, whenever available, or otherwise other online calculators.”


Leave a Reply