

Pâte Sucrée is a delightful French pastry. Buttery and sweet, and the perfect dough for delicious tarts. Here I’m sharing all my tips and tricks to perfect this beautiful pastry dough!
Learn how to make delicious, buttery, sweet French pastry dough, and use it for amazing desserts like this pineapple tart and strawberry tart. For the chocolate version, check out my chocolate pâte sucrée recipe.
What is Pâte Sucrée?
Pâte Sucrée is part of the pastry dough family. Pâte means dough in French (also can be used to describe paste or batter). Sucrée means sweet. So this sweet dough is the perfect vehicle for all kinds of sweet tarts and easy pastry recipes.
This pastry dough is used to line tart molds. The pastry is very similar to Pâte Sablée, but sweeter. This dough tastes like a sweet, buttery, shortbread cookie. So you could say that this dough resembles a sweet shortcrust pastry.

Ingredients to make pâte sucrée
The baking percentage for a Pâte Sucrée recipe is usually 100% flour, 40 – 50% butter, 40 – 50% sugar and 20 – 25% eggs. Slight variations are fine as long as you get the right consistency.
Here I use 100% flour, 46% butter, 37% sugar, 23% eggs. If you haven’t made pate sucree before, then I recommend following my recipe first, until you get a feel for the dough before trying different additions and variations.


Flour
For pâte sucrée, it’s important to use the right type of flour to get the right consistency. The dough needs enough structure to keep its shape (especially along the sides of the tart), but still be tender and crisp once baked.
Pastry dough (8% protein) or all purpose flour (10 – 11% protein) would be the right choice for this recipe.
Bread flour, on the other hand, could result in a dough that is harder to roll out, needs more water to have the same pliability, and also result in significant shrinkage once baked.
Butter
As with any pastry, I prefer to use unsalted butter. This is also recommended because there’s lower water content in unsalted butter (compared to salted butter). Unsalted butted has a richer flavor that’s perfect for this dough.
Unlike other pie crusts, the butter used for pâte sucrée is at room temperature. This is because the butter will be creamed, instead of being cut or rubbed into the flour.

Sugar
You can use caster sugar or confectioner’s sugar here. Regular granulated sugar doesn’t dissolve as readily, and can cause issues with the consistency of the dough, as well as the final baked pâte sucrée dough as well.
I use confectioner’s sugar because it dissolves and incorporates into the dough with ease. This makes the dough easier to manage. Caster sugar will result in a dough that is sweeter.
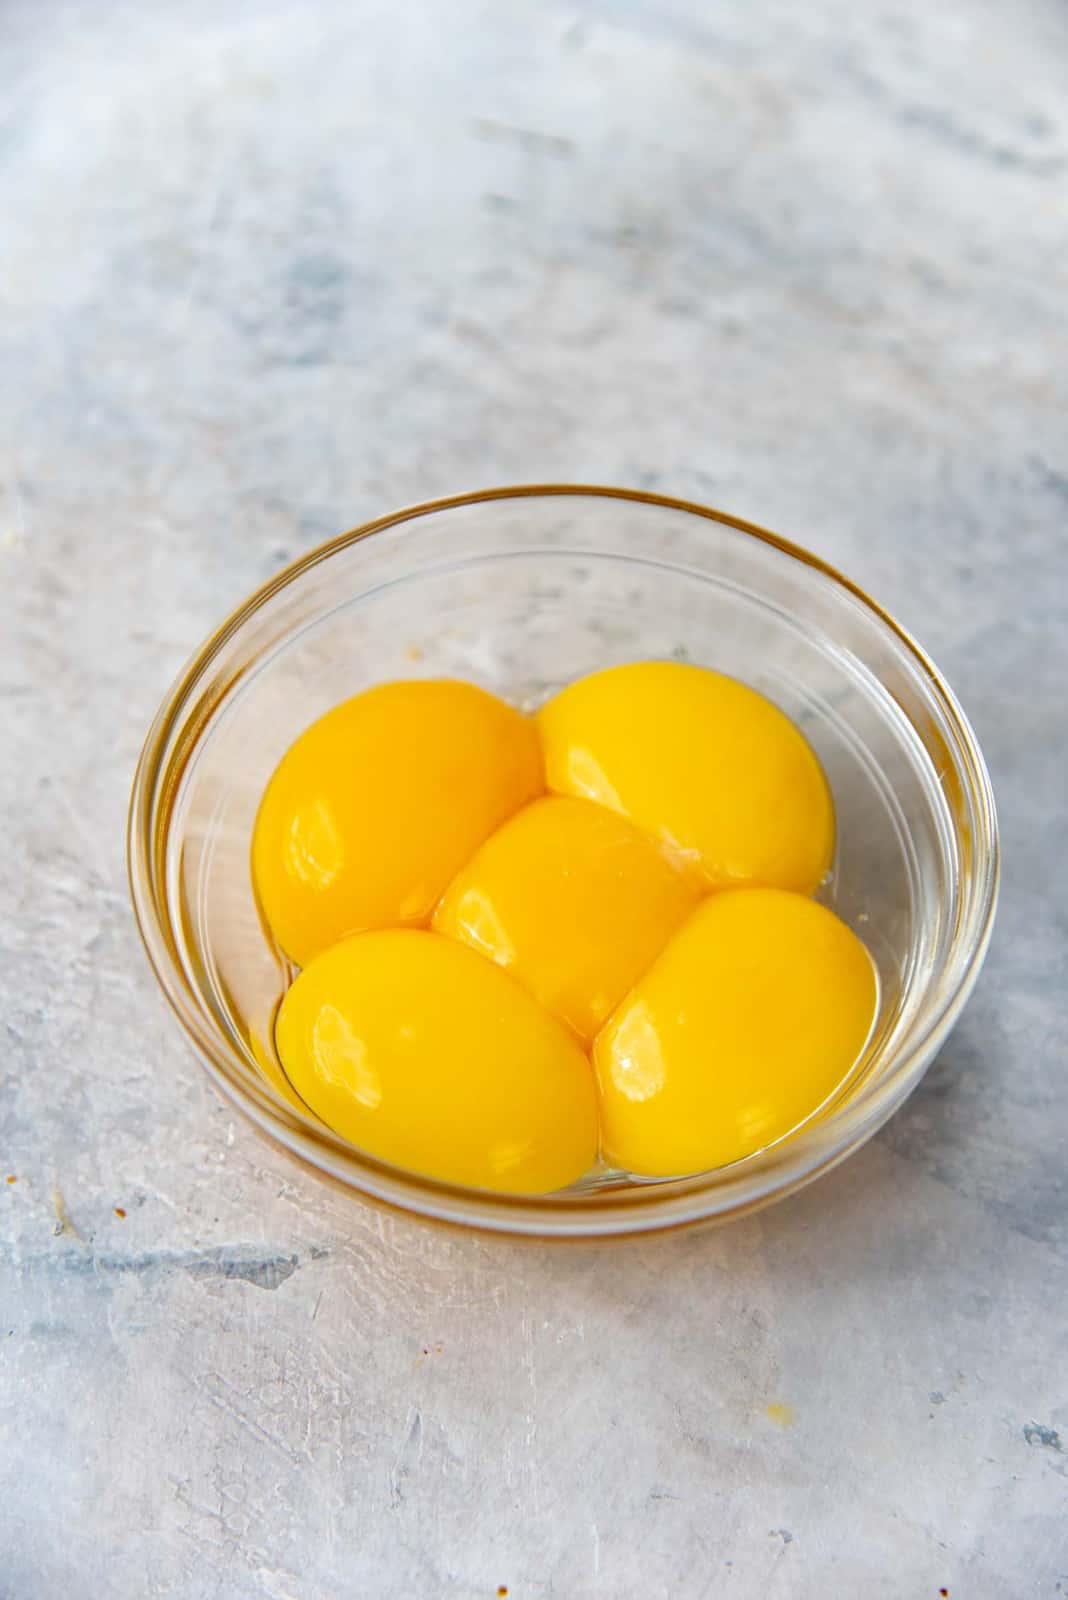
Eggs
You can use either whole eggs or egg yolks. I prefer to use egg yolks only, because the extra fat in the yolks helps keep the dough rich in taste, and also prevents too much gluten development.
So the tart will taste even better, and there’ll be less shrinkage once the tart is baked.
But you’re welcome to use whole eggs, but take care not to overwork the dough. Please note that pâte sucrée does not use ice water or ice milk, and relies on eggs for hydration.
Almond flour
Almond flour is an optional ingredient. Some recipes use almond flour because it can add a lovely nutty flavor to the pie crust.
If you’re a beginner, then I recommend skipping almond flour. Follow the original recipe for pâte sucrée, until you get a good feel for the dough and recipe, before you venture out to try other additions and substitutions.
Other flavoring
I like to add some vanilla extract to my pâte sucrée recipe. Vanilla flavoring can offset any “eggy smell” that could result from the additional egg yolks.
You can also replace the vanilla extract with almond extract if you like. However, when I make lemon tart or fruit tart, I add some finely grated lemon zest and lemon extract instead of the vanilla extract.

How to make Pate Sucree
You can make pâte sucrée in two different ways. The sanding method or the creaming method. I prefer the creaming method.
Sanding method
With this method, the flour and sugar are mixed together first. Then the butter is rubbed into the dry ingredients to form a sand like texture (all of the flour is coated with fat from the butter). Then the eggs are added to hydrate and form the dough. This can be done in the food processor, stand mixer, or by hand.
The butter in this method can be chilled, but can also be at room temperature.
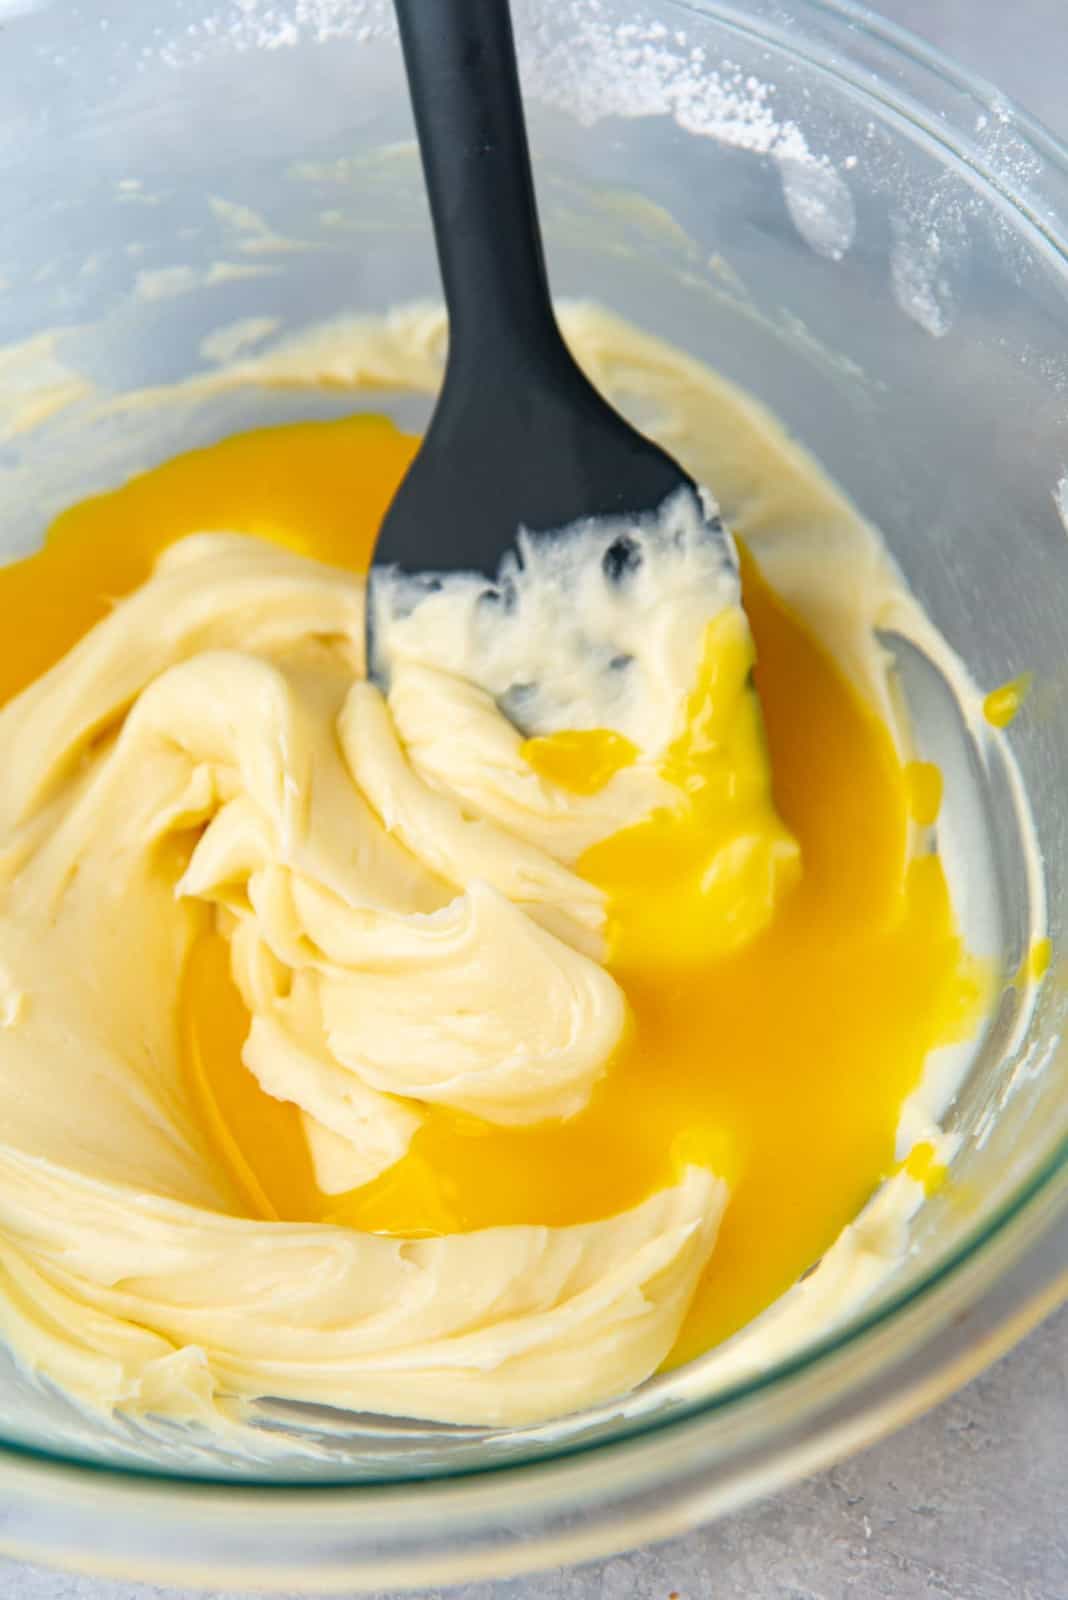
Creaming method
With this method, the butter and confectioner’s sugar are mixed together to form a mixture that looks like cream – soft and creamy.


You can use the stand mixer for this as well, but take care not to incorporate too much air into the butter and sugar mixture. It shouldn’t be light, airy and fluffy, but more like a thick body cream or lotion (soft and creamy).
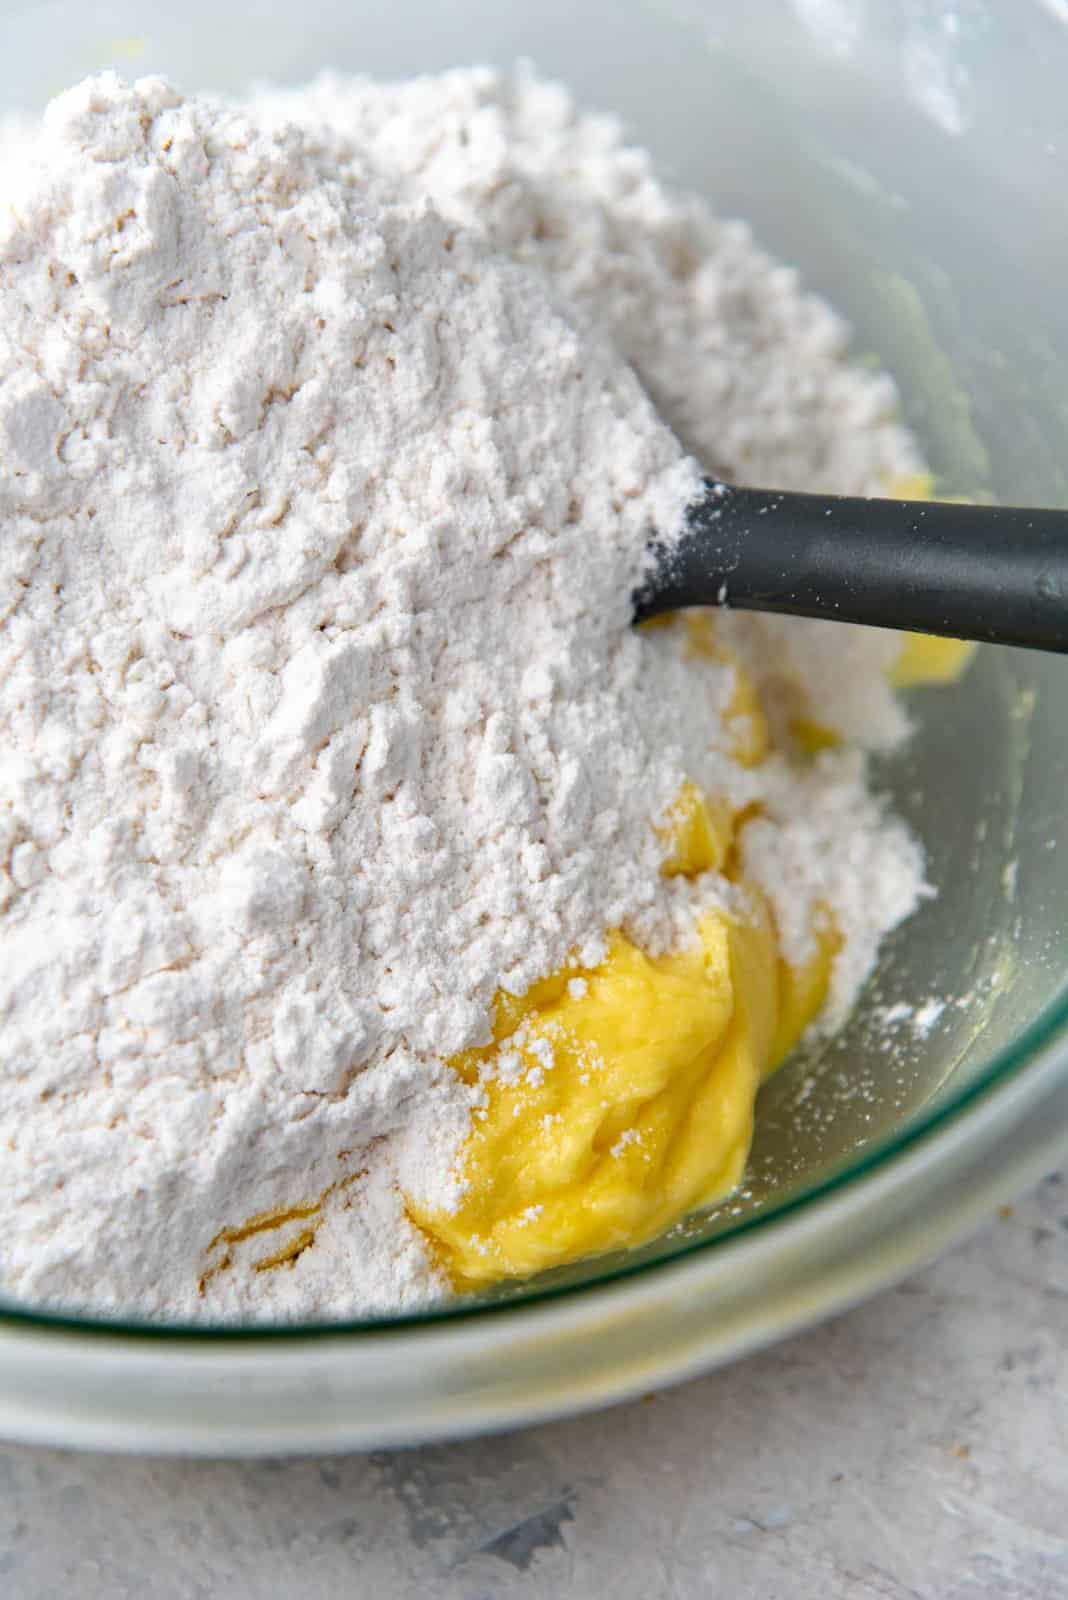
Then the eggs (egg yolks) are mixed in, and finally the flour is mixed in to form a dough.
For this method the butter must be soft, but not melted, so that it can easily be incorporated with the sugar and salt.
How to handle the dough
When the dough ingredients have been added together, it’s time to mix to form a dough. Be gentle with this process, so that you don’t overwork the dough.
I like to place the dough on a work surface (or large, shallow bowl), and use my dough scraper to cut through the dough several times to mix it properly. Then I fold it over a few times to make sure everything is spread out and evenly mixed.

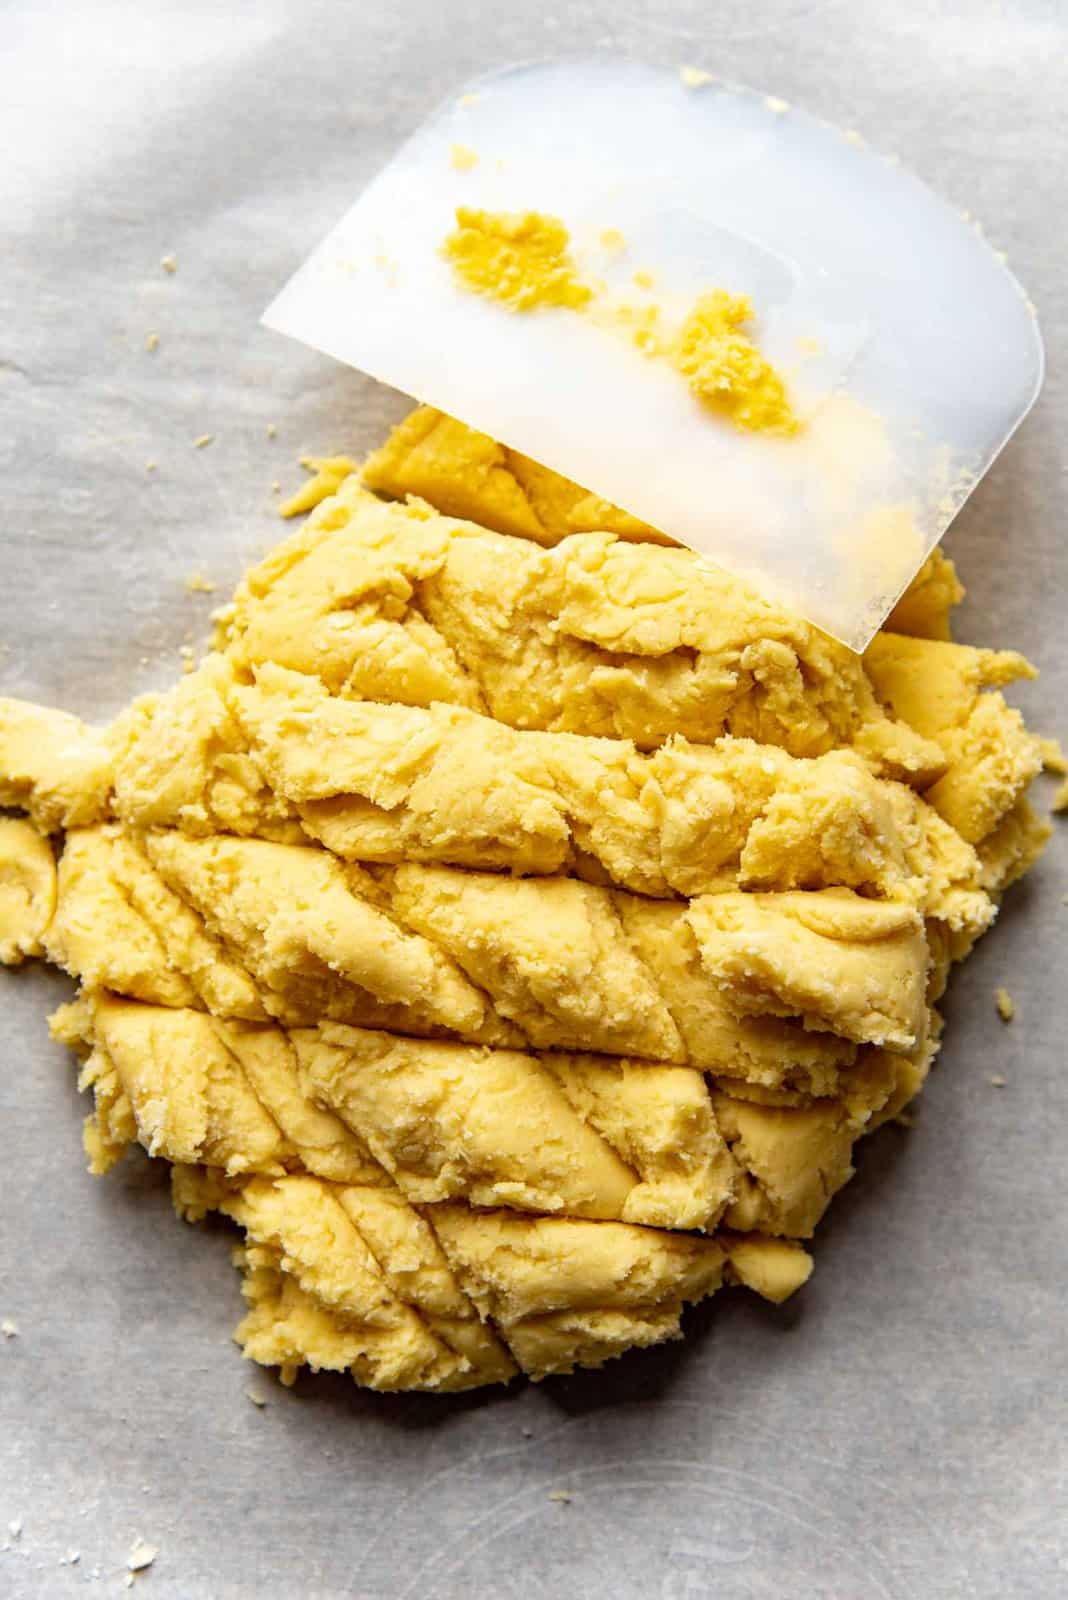

Next place the dough on a piece of plastic wrap. Use the plastic wrap to fold in the dough to make a smooth dough ball or disc. Cut this in half and form each half into a disc, and wrap in plastic wrap.

You can roll out the dough at room temperature, as long as you roll the dough between two parchment papers. This will prevent this soft dough from sticking to everything. Room temp dough is very easy to roll out, but will also be hard to manage and transfer into a tart mold.
I personally prefer to place the wrapped dough in the fridge for a few hours until chilled. If the refrigerated dough is too hard to roll out, let it soften slightly (it will happen fast), and then you can roll it out easily.
Cold dough is easier to manage and transfer to tart molds.
How to line a tart mold
Rolling out the dough
Because this dough has a high fat content, it’ll get soft easily out of the fridge. With my rolling pin, I prefer to roll out the dough between parchment paper if the dough is soft. If the dough is chilled, then I roll it out on a well floured work surface. Then I place it on the parchment paper halfway through so it’ll be easier to transfer to the tart pan.
With chilled dough, I might only use the bottom parchment paper and keep the surface lightly dusted. Chilled pâte sucrée dough is easy to move around, so I like to turn the dough a quarter turn each roll so that I can roll it out into a near perfect circle.
The dough thickness should be about 3 mm. Each disc is enough to line a 9 inch tart mold (1 inch height).
You can easily transfer the dough by lifting the parchment paper. But you can also use your rolling pin if your dough is still a little cold.
Since this dough is malleable and soft, you can also use extra pieces of dough and your fingers to fix any cracks or sparse spots.


Traditional fluted tart molds
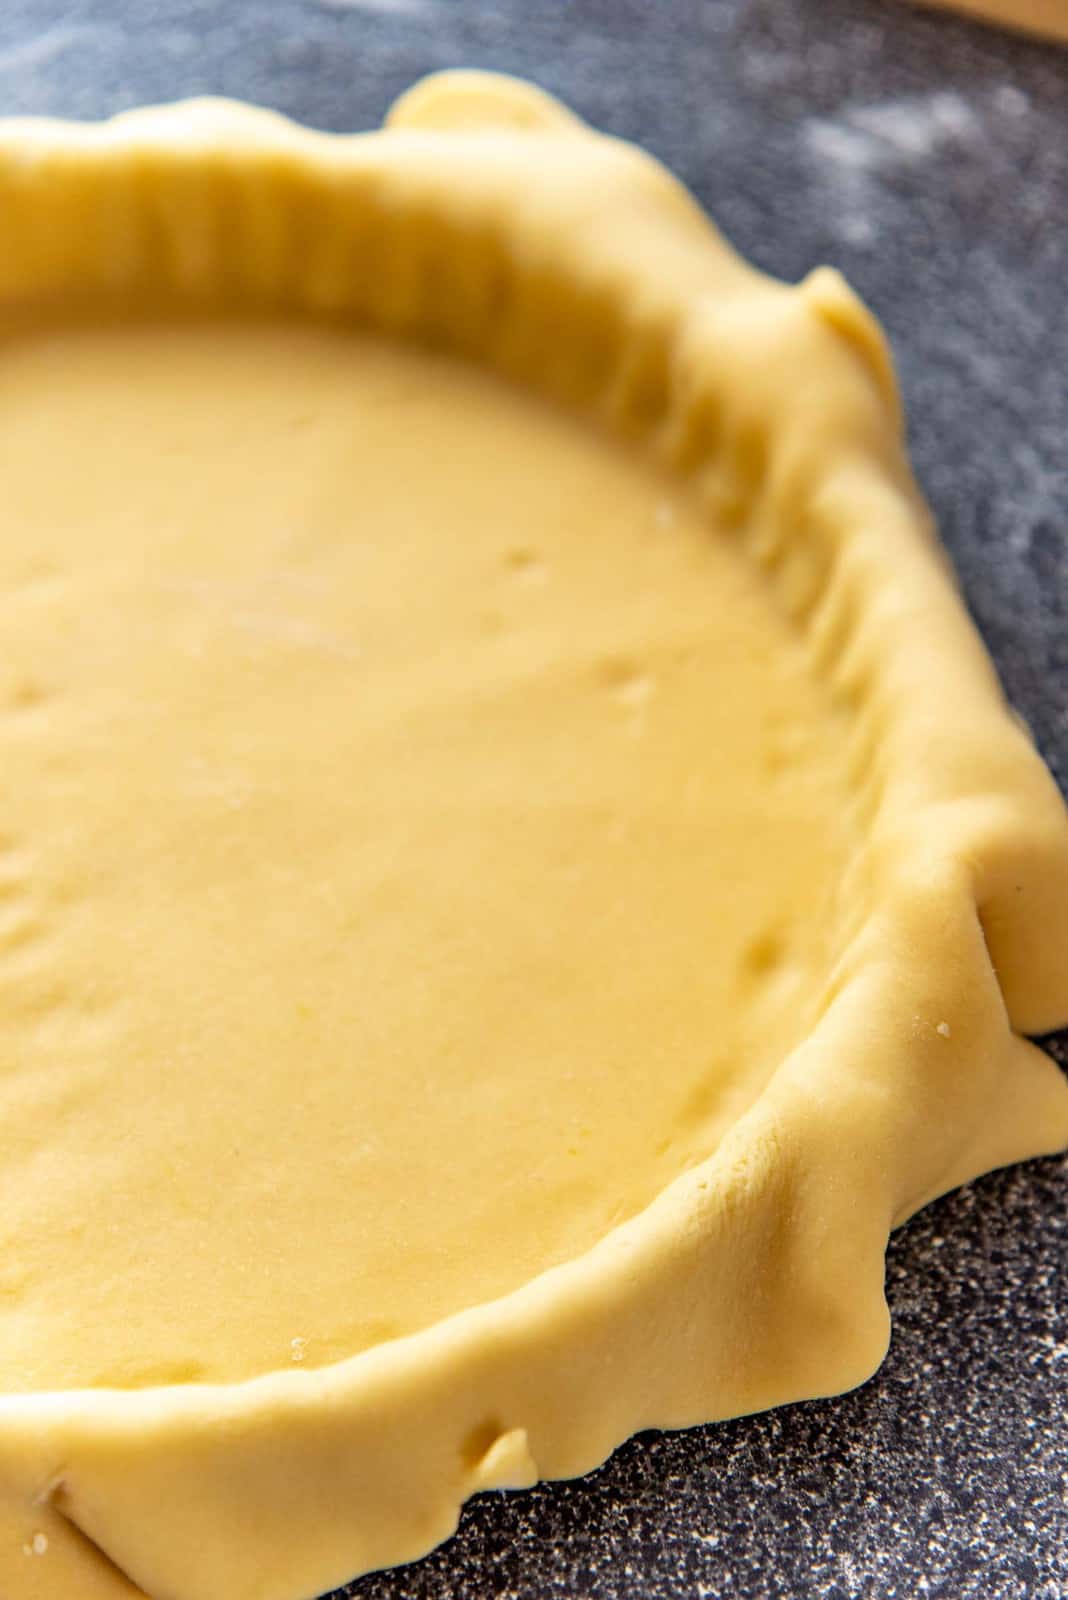
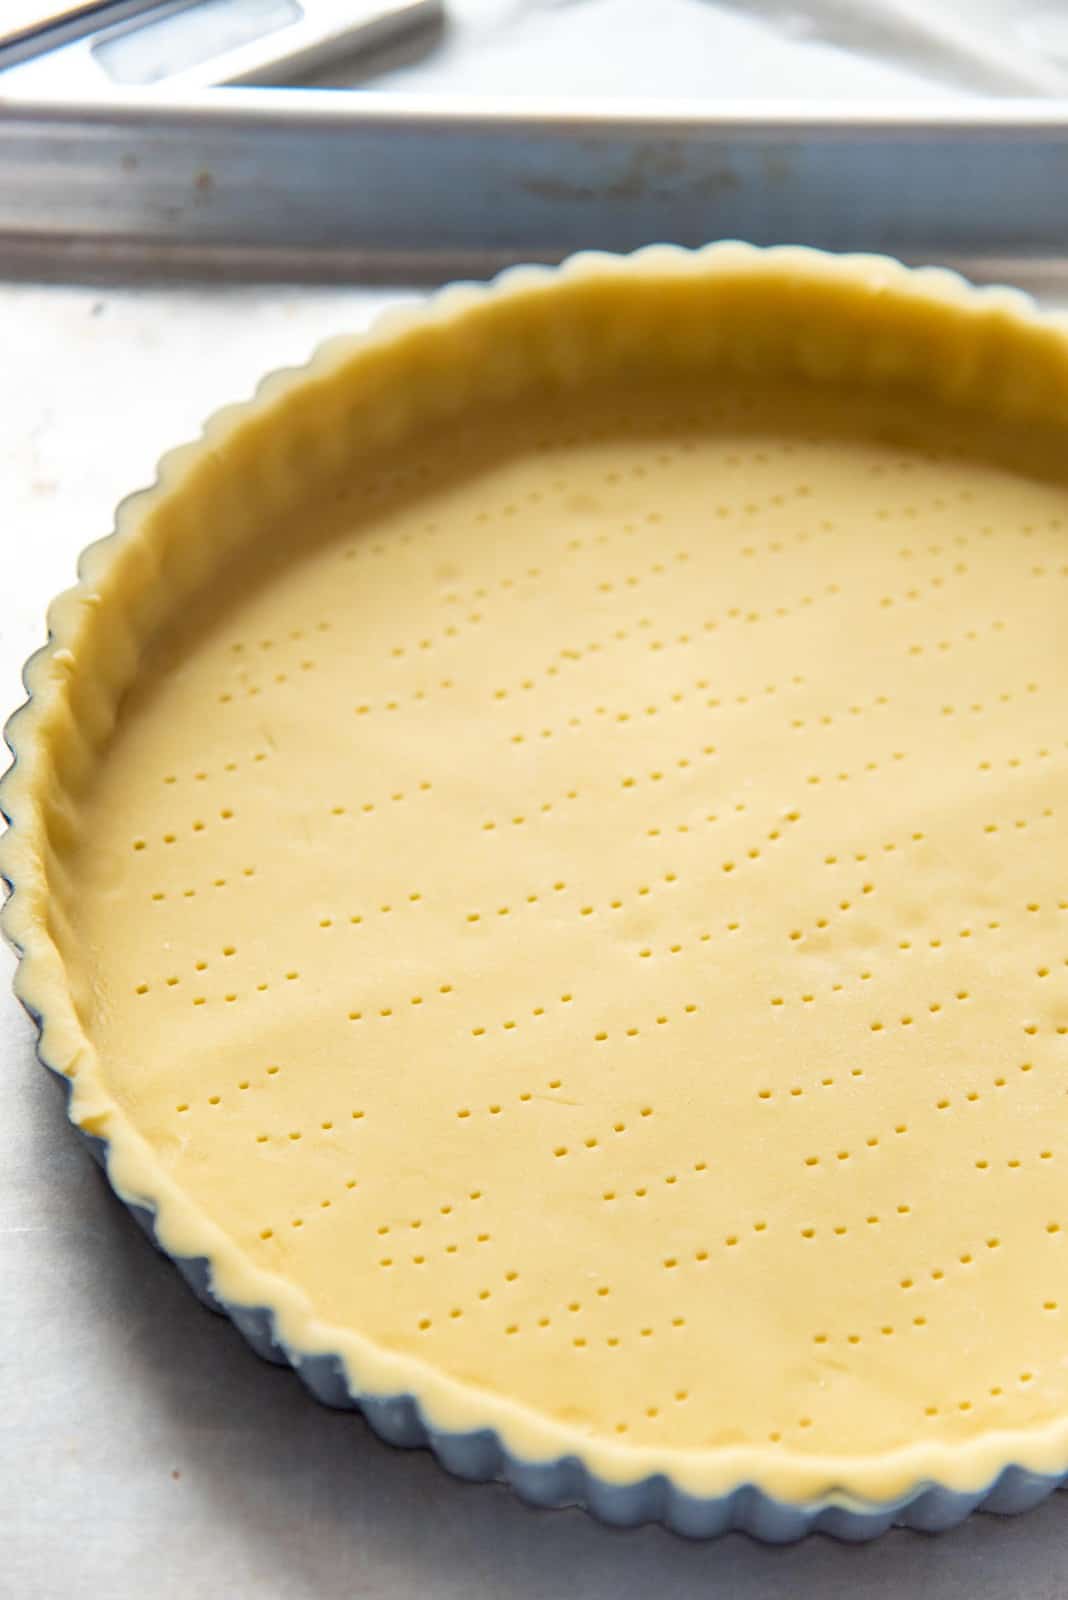
Place the dough loosely over the tart mold. Then gently press the dough into the corners and edges and sides, in a way that it maintains an even thickness throughout, and the bottom is evenly covered. Make sure not to stretch the dough at any point.
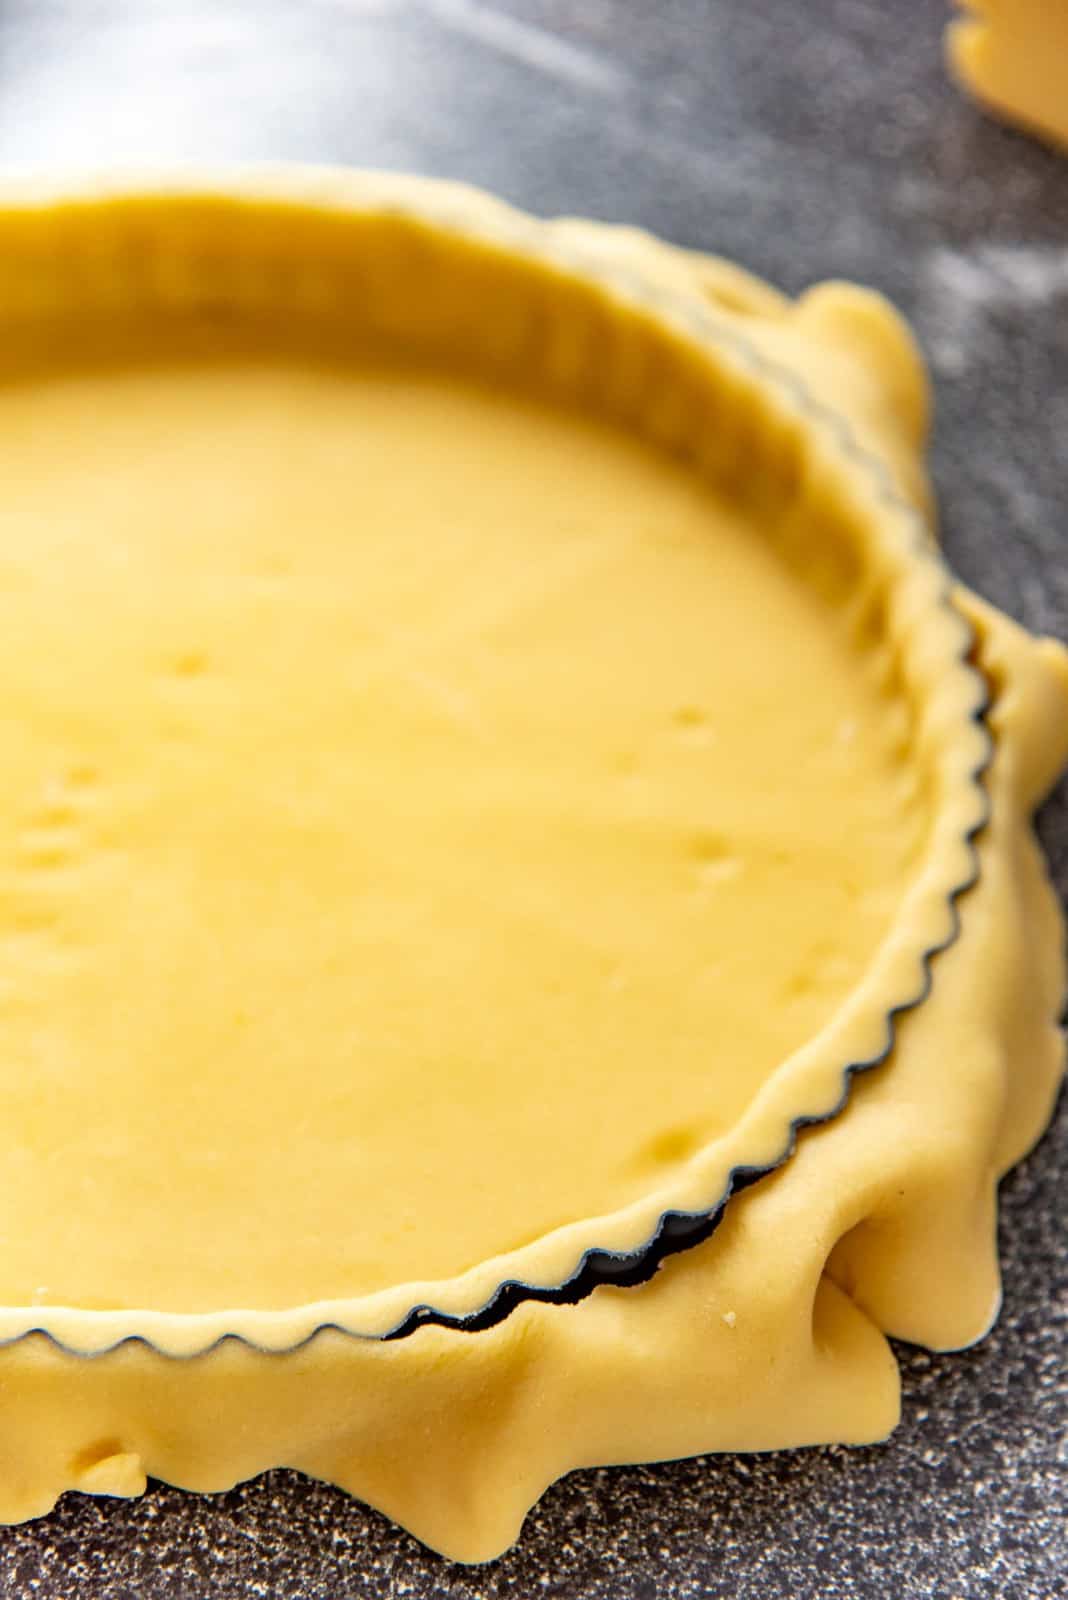
Once the rolled out pate sucree is in the tart pan, use a rolling pin to roll over the top of the tart to trim off excess dough.
If there are any tears, or you don’t have enough dough in some edges, you can use the trimmings to repair these spots. Dock the bottom with a fork.
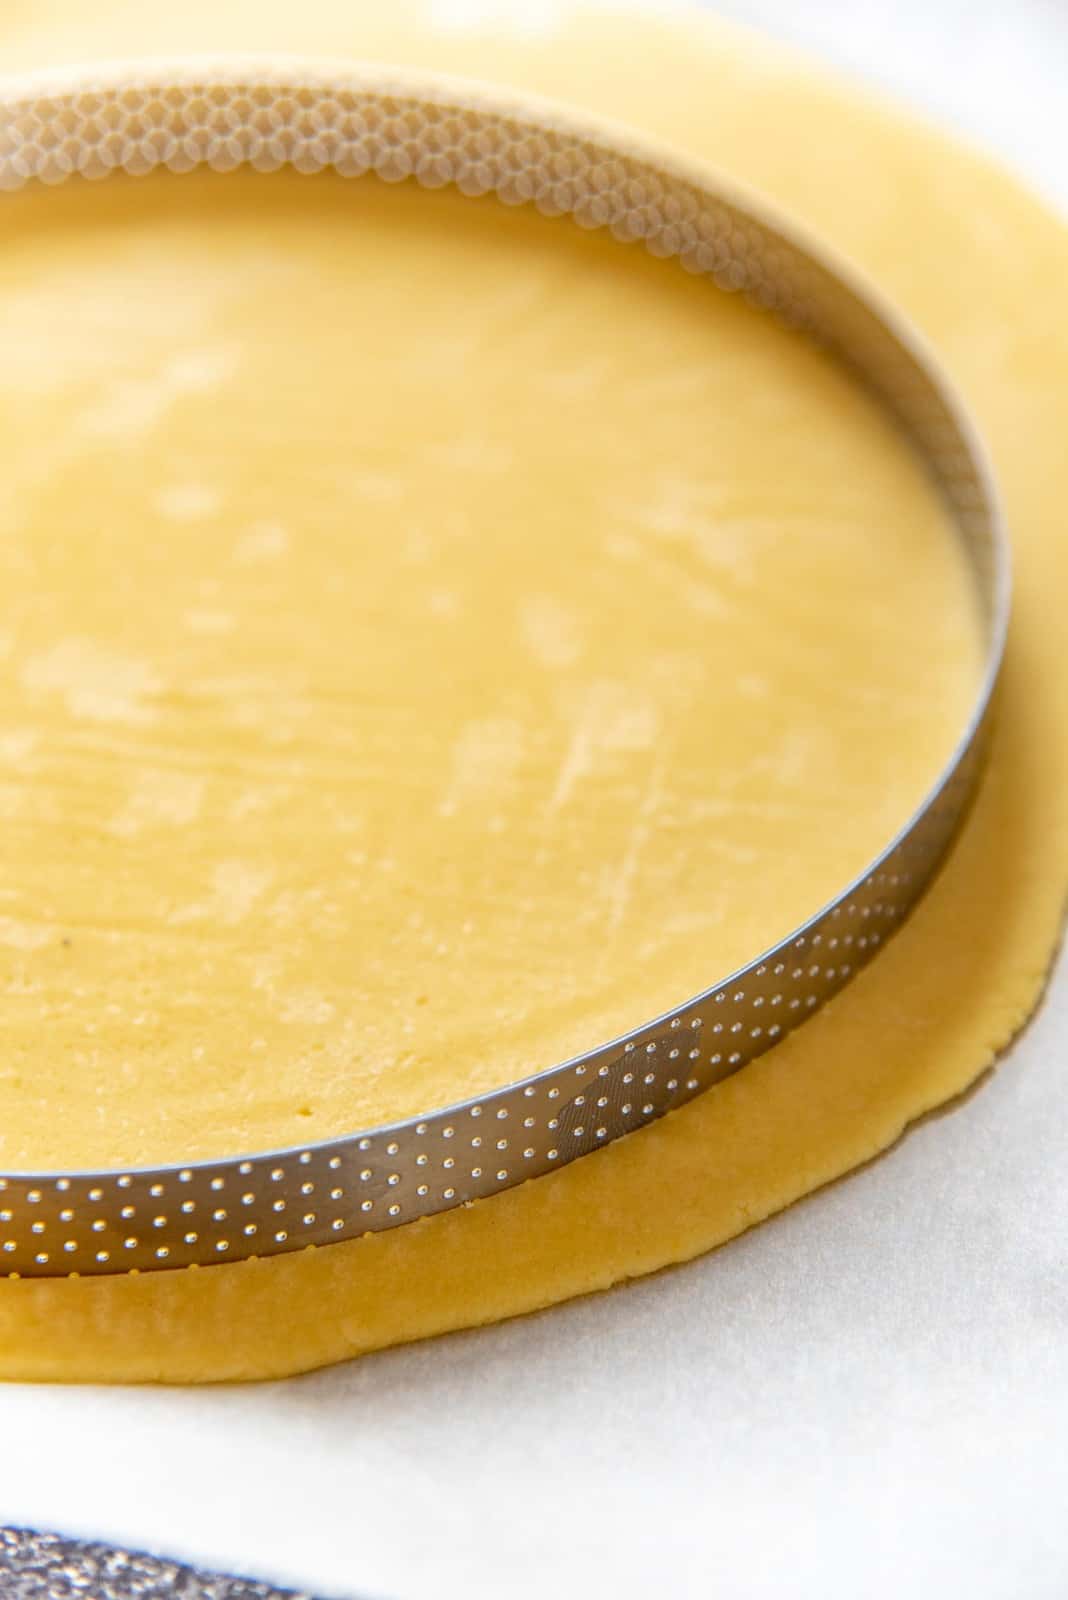
Straight edged, professional molds
With straight edged professional molds, you can use the same technique as above.
However, professional bakers use a different technique.
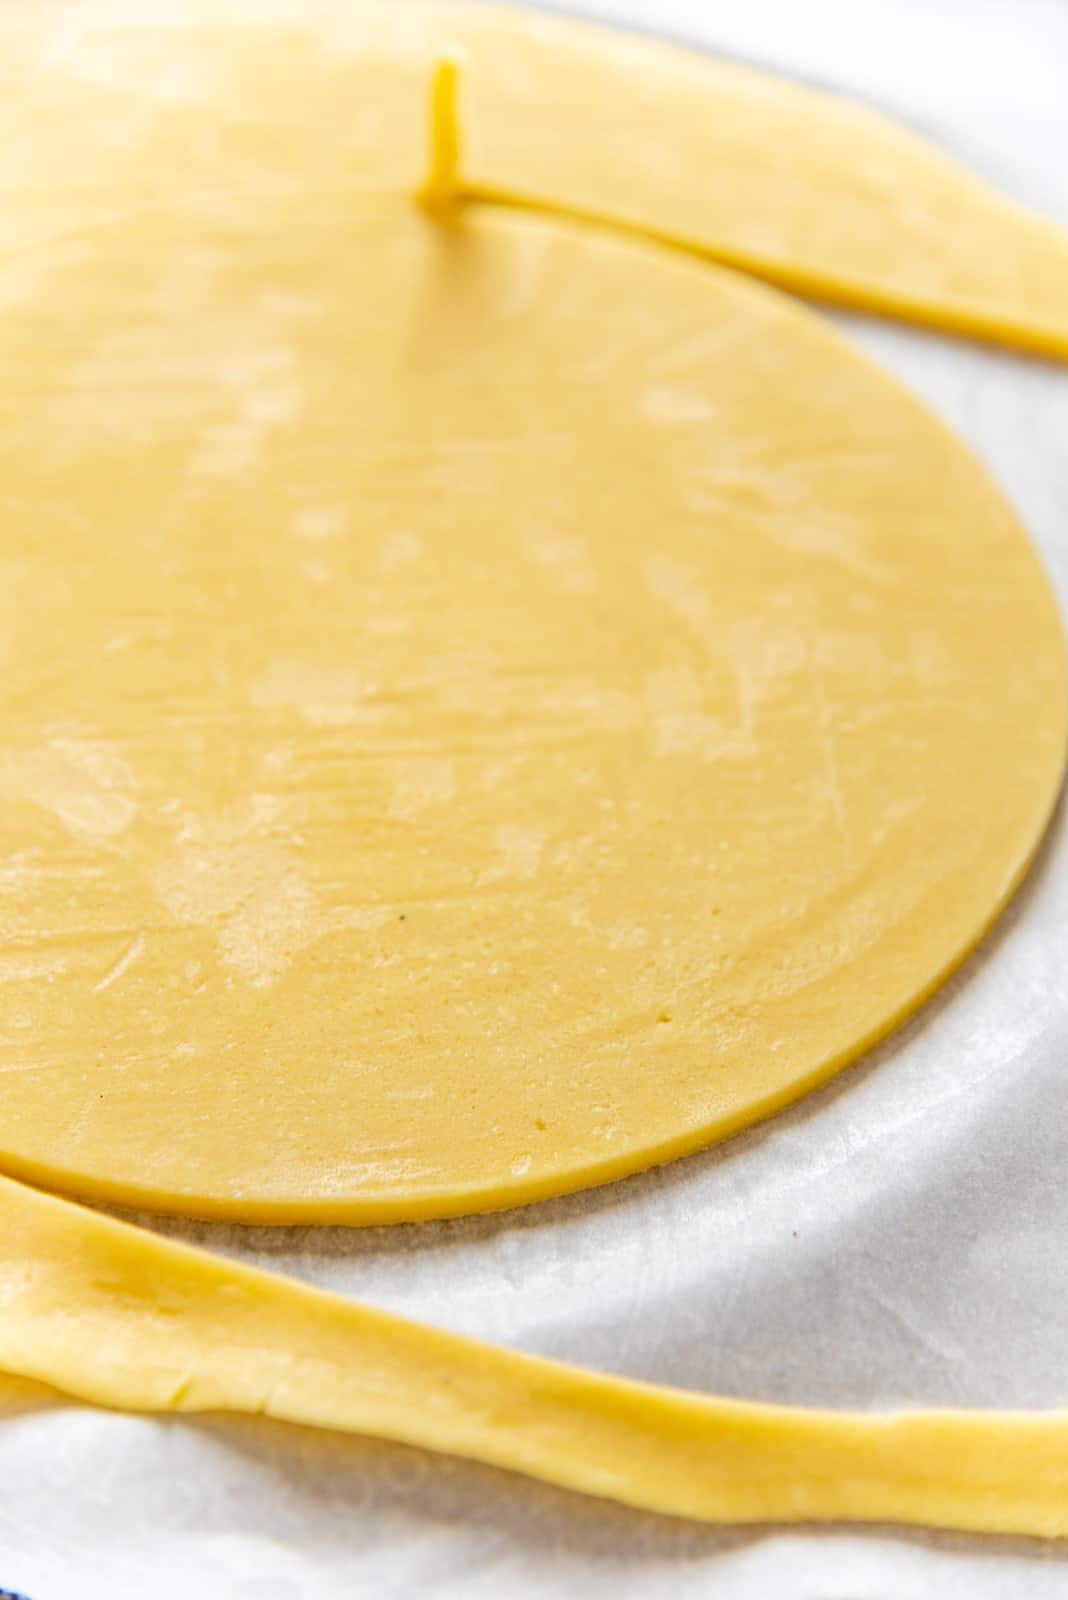
Use the tart mold to cut the pate sucree dough into a circle that will fit inside the tart shell. Make sure to cut the circle from the edge of the rolled out dough.
Then cut strips from the remaining dough, making sure the width of the strips is slightly bigger than the height of the tart mold.
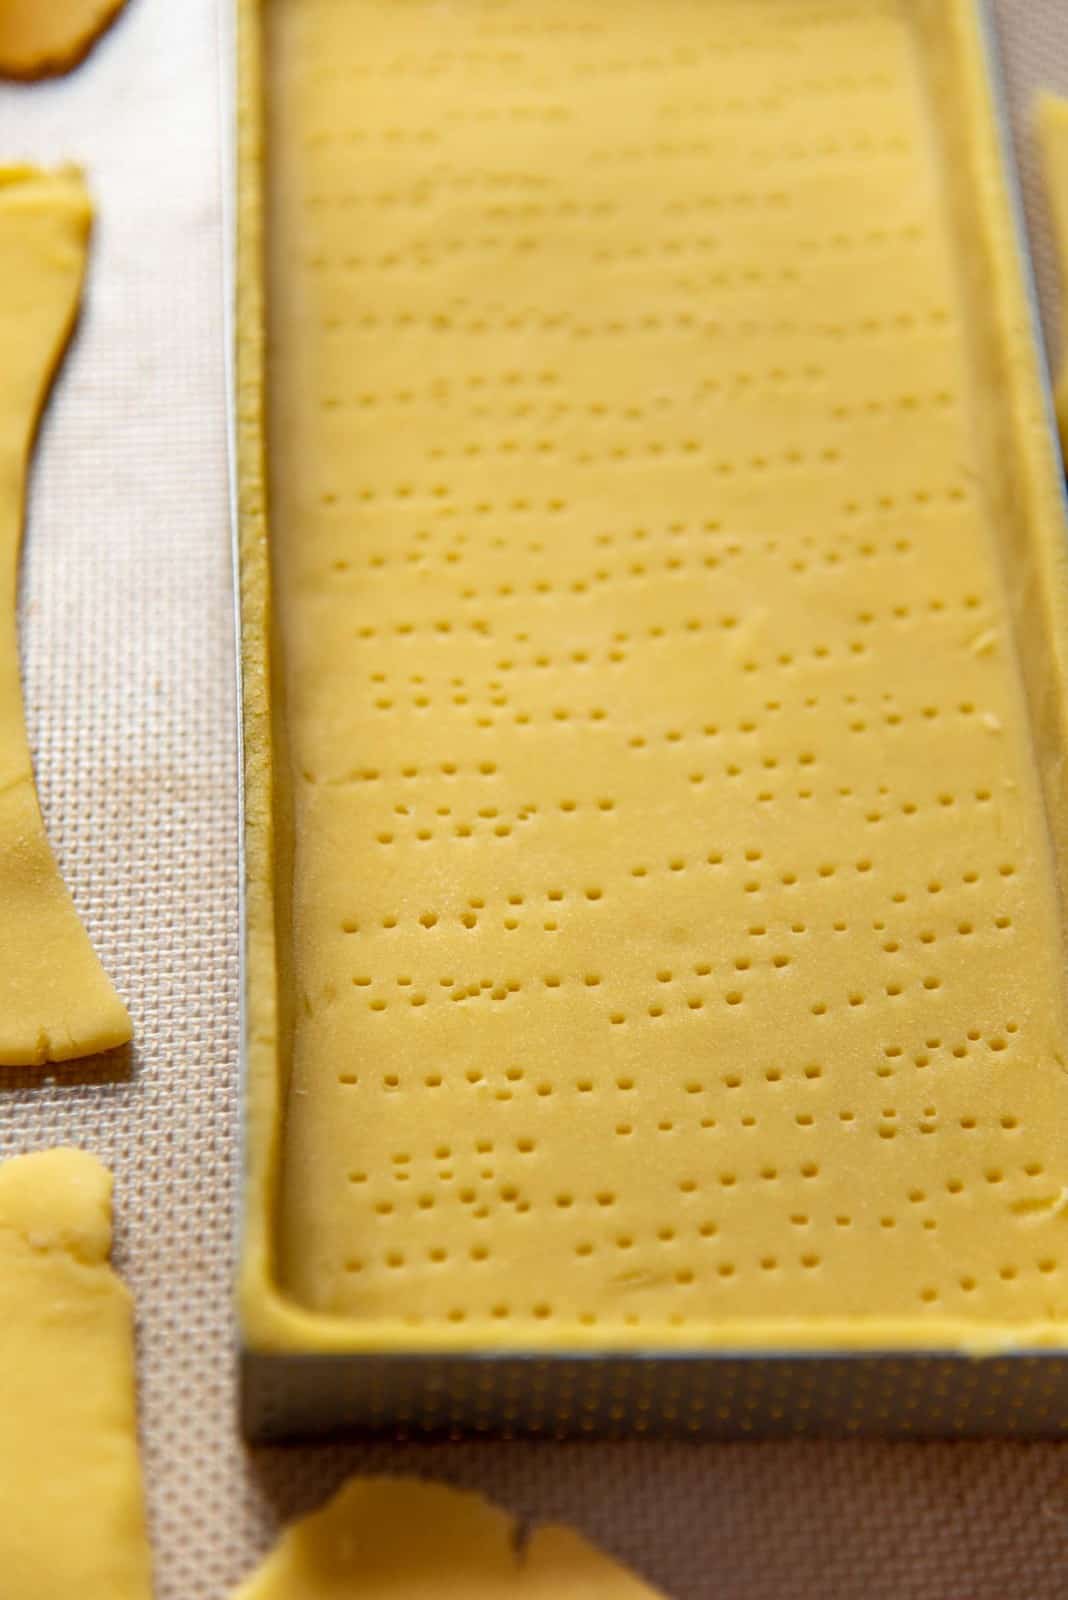
Place the tart mold on a silpat or parchment paper lined baking tray and place the round pastry dough inside the mold. Brush the edge of the pastry with a little cold water, and then gently place the strips of dough on the inside of the mold, making sure that they are resting against the mold. Gently press them against the sides of the tart, and also against the edge of the round dough at the bottom. The water will seal these edges as long as they are in contact.
Using a sharp pairing knife, trim off the edges by carefully running the blade over the edge of the mold. Dock the bottom with a fork.


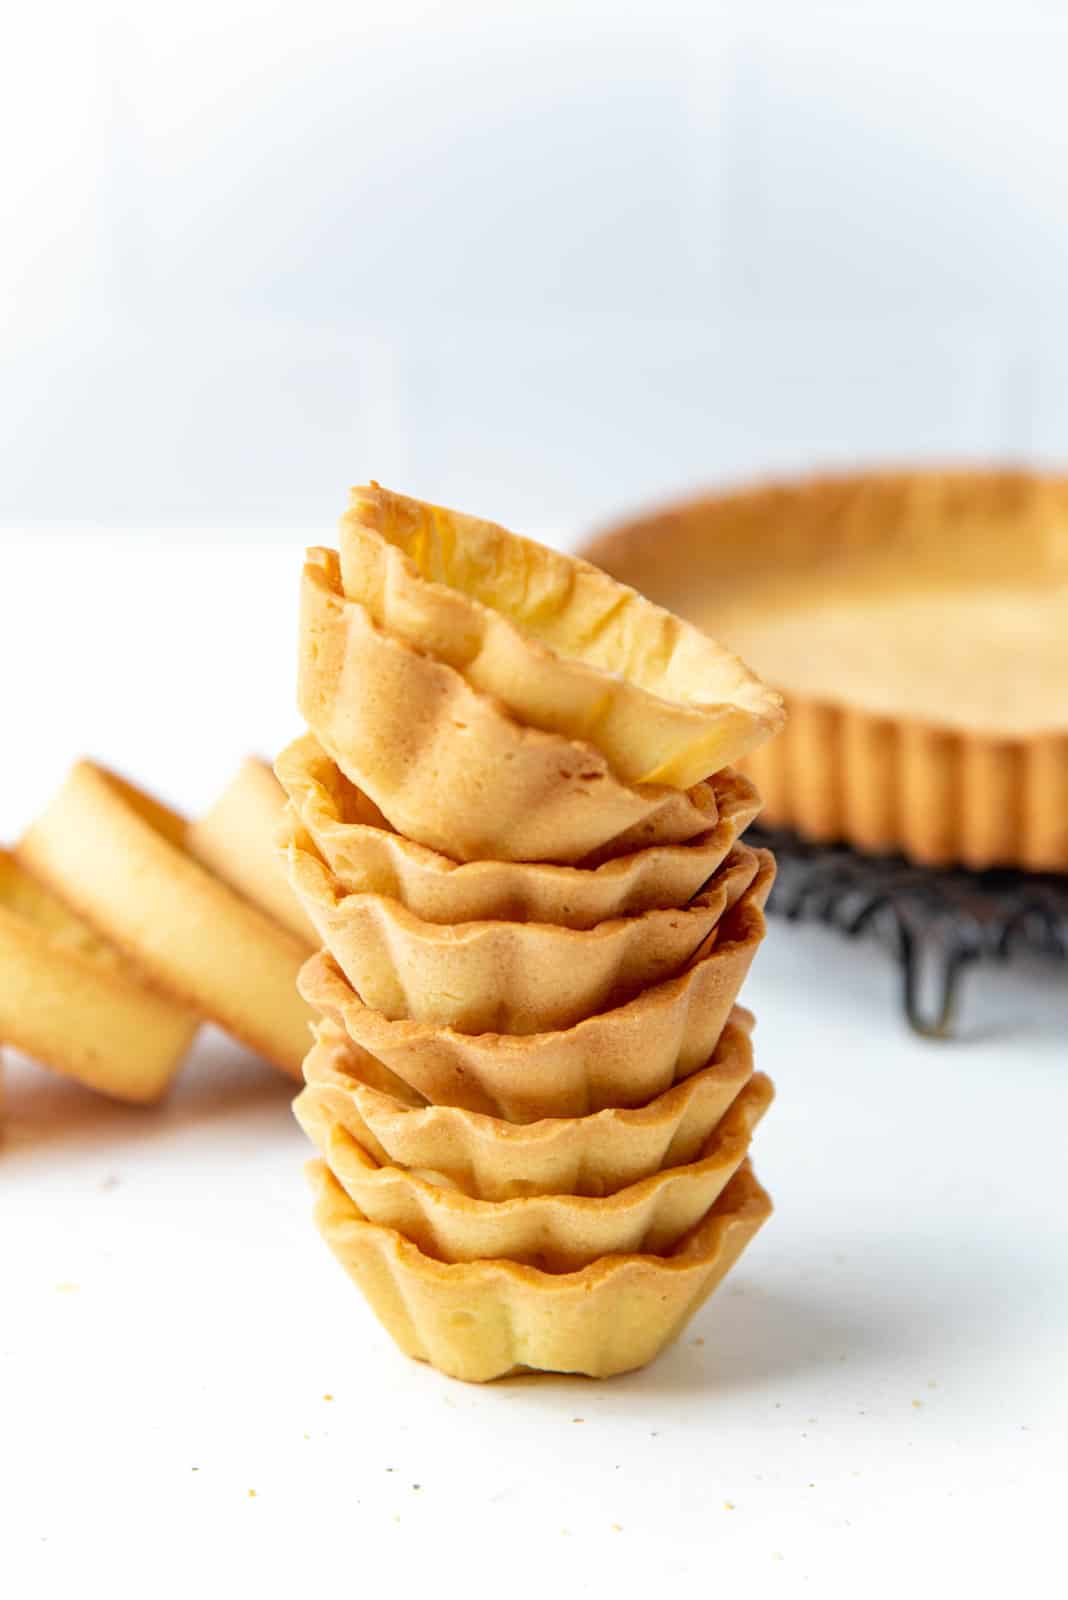
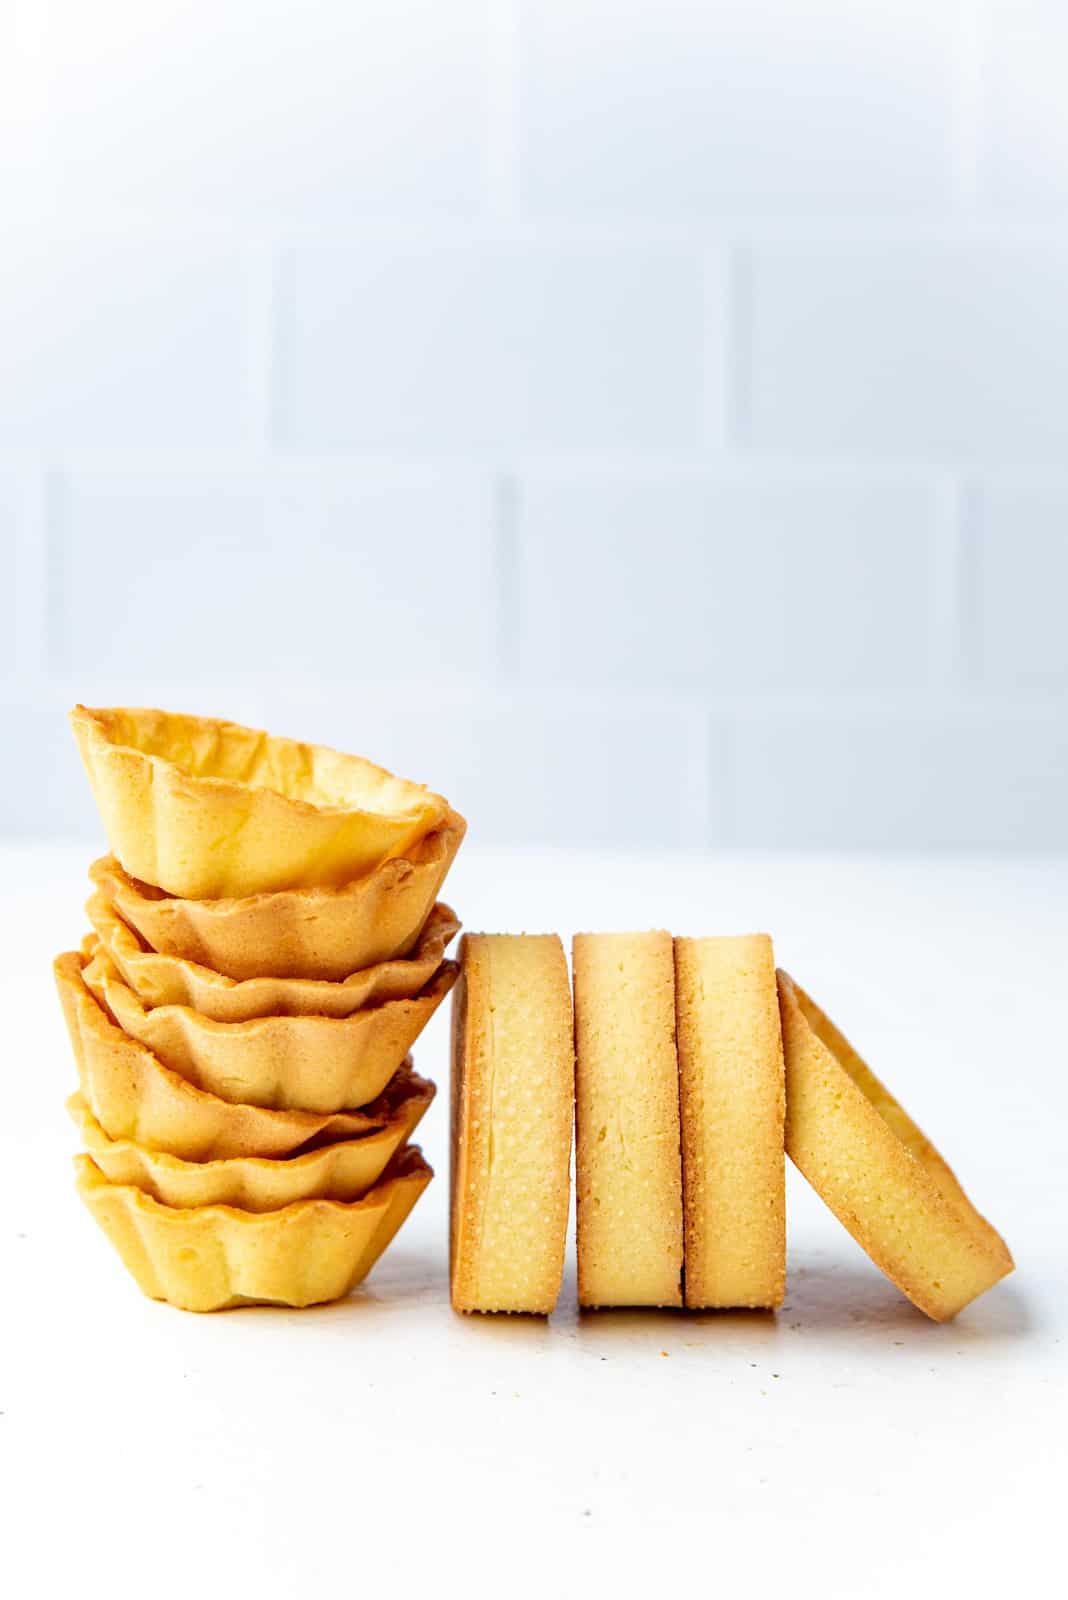
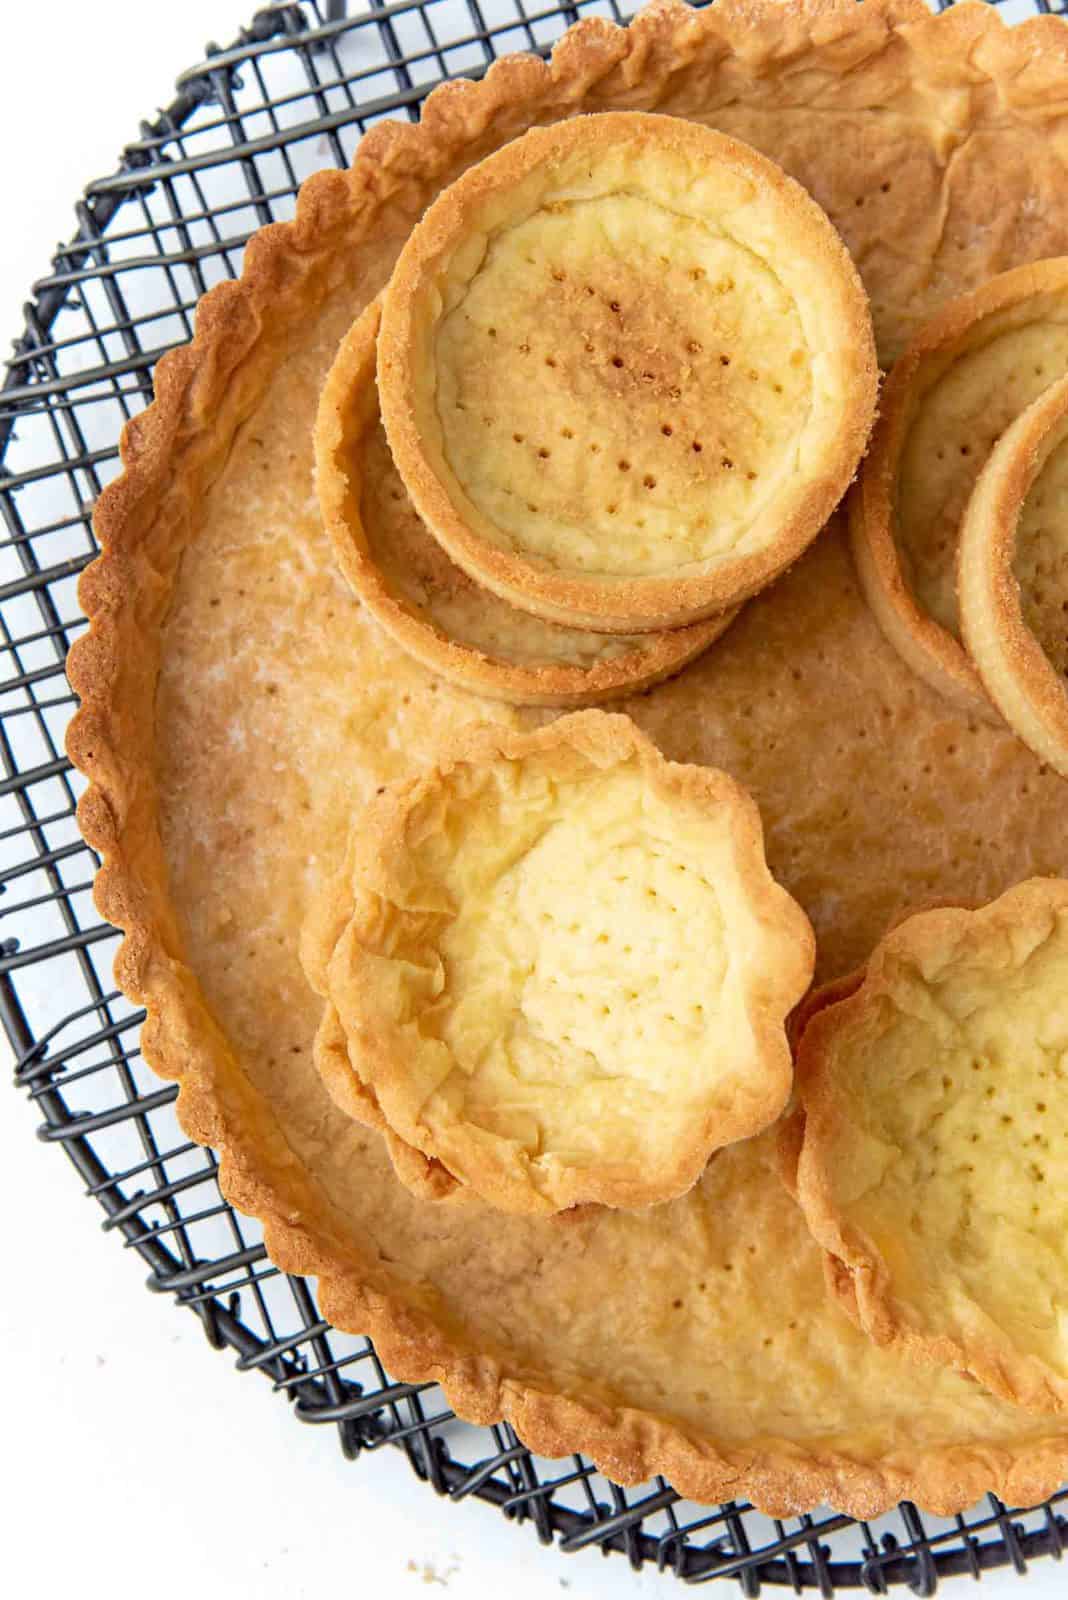
Mini tart molds
Mini tart molds can also be lined in either of these ways, depending on what type of mini tart mold you’re using.
If you’re using fluted mini tart molds, you will need to cut circles that are large enough to fit comfortably inside the mold. For these fluted molds, I use a plastic deli container lid as a guide, and cut circles using a sharp knife.
These are then gently placed in the tart molds, and then use your fingers to press the dough into the edges and sides. But make sure you’re not stretching the dough. Use trimmings to fix any bald spots or tears.
Use a fork to dock the bottom, which will also help with any trapped air.
If you have straight edged mini tart molds, you can use the same method above that professionals use, or the dropping method. Again, dock the bottom of these tarts with a fork.


Baking Pâte Sucree
Each pastry lined tart mold should be frozen or refrigerated before baking. The dough should be firm and chilled, and this can take a few hours.
This pate sucree recipe can be used to make tarts with a baked filling, or an unbaked filling too. It’s important to blind bake the pastry shell for both types of filling.
Baking with a filling
If you’re baking with a filling, the pastry will be blind baked with weights. Then once the dough is set, the weights are removed and replaced with the filling. Then the tart can be baked until the filling is set.
Baking without a filling
If you’re filling the tart with a filling that doesn’t require baking, then you will need to blind bake the tart mold completely.
How to blind bake a tart shell
You will need,
- Parchment paper or heavy duty foil to line the tart
- Pie weights, raw rice, dried beans, or sugar to fill the tart
I like to use parchment paper because I know it’s less likely to stick to the pate sucree dough. But the problem with parchment paper is that it may not be as malleable as foil to fit the corners of the tart mold.
I crumple up my parchment paper about twice to make it more likely to fit in all the corners of the mold. But you can use non stick foil or heavy duty foil as well.
Place the parchment paper inside the tart, making sure to have an overhang to cover the edges of the tart dough.
Fill the lined tart with something heavy. I use ceramic pie weights or dried beans for larger tarts, and rice or granulated white sugar for the smaller mini tarts. If the sides of the tart aren’t too tall (less than 1 inch), then you don’t have to blind bake with pie weights. But to ensure consistent results, I recommend using weights to blind bake.
Baking the tart shell
Preheat oven to 350 F / 180 C. Place the pate sucree lined tart molds on a baking tray and bake for about 10 – 15 minutes (depending on the size of the tart molds).
When the edges of the pate sucree dough just start to color, remove the tart from the oven, and carefully lift the parchment paper along with the pie weights.
At this stage you can either add the filling and bake the tart with the filling, OR you can place the empty tart shell back in the oven to continue baking until light golden or golden brown in color (about 10 – 15 minutes for a 9 inch tart).


How to prevent the crust from getting soggy with a fresh filling
When a completely blind baked pate sucree tart mold is filled with a filling (especially one with high moisture), the crust will absorb the moisture over time.
There is a way to prevent the tart mold from getting soggy from these fillings.
Chocolate
Melted chocolate can be brushed on the inside of the tart shell to form a barrier between the pate sucree and filling. You can use anything from dark chocolate to milk chocolate or white chocolate for this.
I recommend choosing a chocolate that will best complement the flavors of the filling.
Cocoa butter
Melted cocoa butter will behave much the same way as melted chocolate, and will harden to form a barrier. The great thing about cocoa butter is that it doesn’t have a strong flavor like chocolate and can be used with any filling.
Egg wash
A gorgeous egg wash will also create a barrier between the tart dough and filling. However the egg wash only seals the dough IF it is baked into the tart shell. So it must be brushed onto the shell during the last 5 minutes of baking time.
I bake the tart shell until light golden in color, them remove it from the oven. Then an egg wash is brushed all over the tart shell surface (all nooks and crannies and sides and bottom). Then it’s returned to the oven to be baked until the tart mold has a beautiful, shiny, golden brown color.

Storage instructions
These pastry shells taste much like shortbread cookies. Just like these cookies, pate sucree will lose its crispness the longer it’s stored outside.
They can be stored in air tight containers to keep them crisp for longer (about 1 week). You can also place the container in the freezer so that the tart shells can be kept for up to 3 months.
Why I love this recipe
- This recipe is authentic! Most pate sucree recipes use water in the recipe, whereas traditional pate sucree does not. Traditionally, it relies on eggs (whole egg or the yolks only) to hydrate the dough. This leads to less gluten development too.
- Exceptional taste. Since this is made with butter and egg yolks, the resulting pastry is rich, buttery, and delicious! It’s also crisp like a cookie.
- Very forgiving. If you use this recipe with all egg yolks, the high fat content will further prevent gluten development. This leads to a crisp, tender crust. PLUS it also means you can re-roll the scraps for more tarts and not have to worry too much about shrinkage. It also means you can easily patch up any holes and tears with no fear.
- Adaptable and flexible. This dough is a soft dough but can be molded to fit any shape of tart mold.
- Absolutely gorgeous results. Whether you’re baking the tart with filling, or filling a baked tart, the results will be stunning and consistent!
Serving suggestions
- To make beautiful tarts with sweet fillings like chocolate ganache or chocolate mousse.
- Fill it with pastry cream and top with seasonal fruits to make a delicious fruit tart (like this strawberry tart or this creamy pineapple tart).
- You can make mini tarts that are perfect for cocktail parties.
- OR instead of using this dough for tarts, cut cookie shapes and make buttery cookies (great as a base for linzer cookies!).
- And for a recipe variation, you can also check out my chocolate pâte sucrée recipe, and this intensely chocolatey chocolate ganache tart that I made with it.
Recipe
Pâte Sucrée Recipe
US based cup, teaspoon, tablespoon measurements. Weight measurements are recommended for accurate results whenever available.
Common Measurement ConversionsIngredients:
- 150 g unsalted butter 10 ¼ tbsp, very soft but not melted
- Pinch fine sea salt
- 120 g confectioner's sugar about 1 cup powdered sugar
- 70 g yolks 4 – 5 yolks, you could also use whole eggs, about 1 large egg + 1 egg yolk – see recipe notes
- 1 tsp vanilla extract or almond extract or lemon extract
- 1 tsp finely grated lemon zest optional, better for fruit tarts
- 325 g AP flour 2 ⅔ cup, measured by spoon and level method
Instructions:
- In a large bowl, place the butter and salt. Using a spatula or a hand whisk, mix the butter until you get a soft and creamy texture (like a thick body cream or lotion!).150 g unsalted butter, Pinch fine sea salt
- Sift the confectioner's sugar, and add it to the butter mixture.120 g confectioner's sugar
- Mix the sugar in until it's completely mixed in with the butter.
- Whisk the egg yolks (or whole eggs), and add this to the butter sugar mixture along with the vanilla extract (and lemon zest, if using).70 g yolks, 1 tsp vanilla extract, 1 tsp finely grated lemon zest
- Incorporate the egg mixture into the butter until smooth.
- Sift the flour, and add it to the egg, butter, and sugar mixture.325 g AP flour
- Gently mix in the flour. I like to use a spatula and mix the dough by cutting through the dough several times (see pictures in the post).
- Turn the dough out onto a work surface lined with parchment paper. Use the parchment paper to fold the dough over to incorporate all of the flour. If you used whole eggs, take extra care to not overwork the gluten in the dough.
- The dough will be very soft and a little sticky. This is normal. Handle the dough gently with floured hands.
- Cut the dough in half and shape each dough into a disc. Wrap each disc with plastic wrap and refrigerate for at least 1 hour to chill. If your tart mold is a rectangle or square, shape the dough into a rough square instead of a disc.
- Lightly flour your work surface. Place one of the chilled pate sucree discs on the work surface. Knock it a few times with the rolling pin to soften the dough and make it more pliable.
- Start rolling out the dough, turning the dough a ¼ circle every few rolls. This makes it easy to maintain a circle and also prevents the dough from sticking to the counter. If any cracks appear, shape the dough to seal those cracks as you go. If the dough gets too soft, carefully transfer it to the fridge for a few minutes to let it slightly harden again, OR roll it out between two parchment paper sheets.
- The dough needs to be rolled out to a thickness of 3mm. If at any stage the dough shrinks as you roll it out, that is an indication that the dough has been overworked.
- Transfer the dough onto a tray, cover with plastic wrap, and let it rest in the fridge for about 10-20 minutes. Then resume rolling it out afterwards.
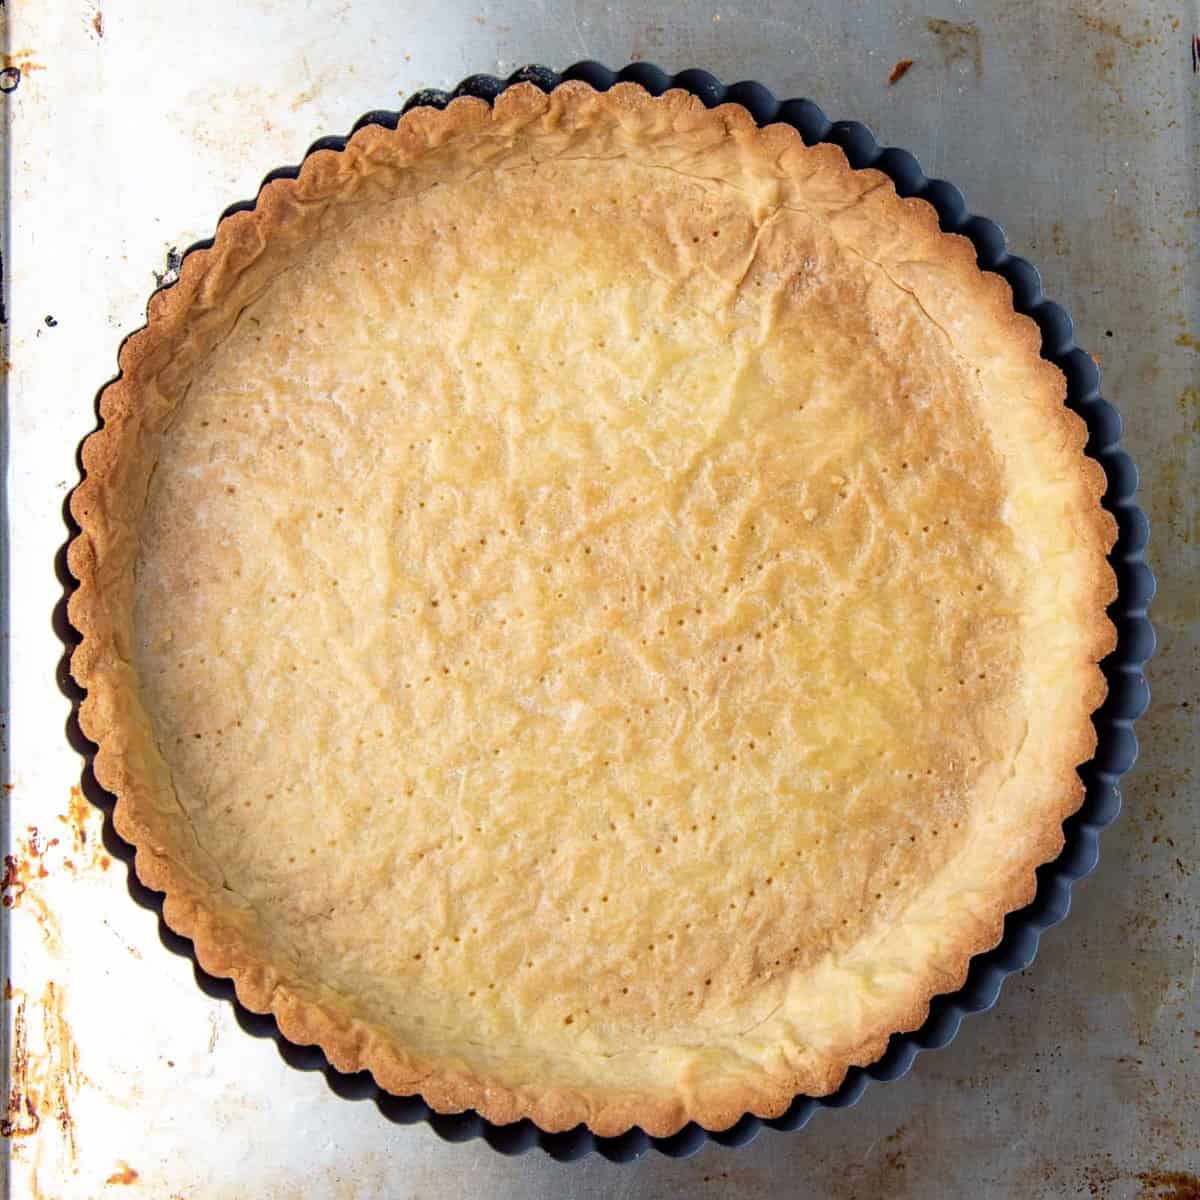
For tart pans
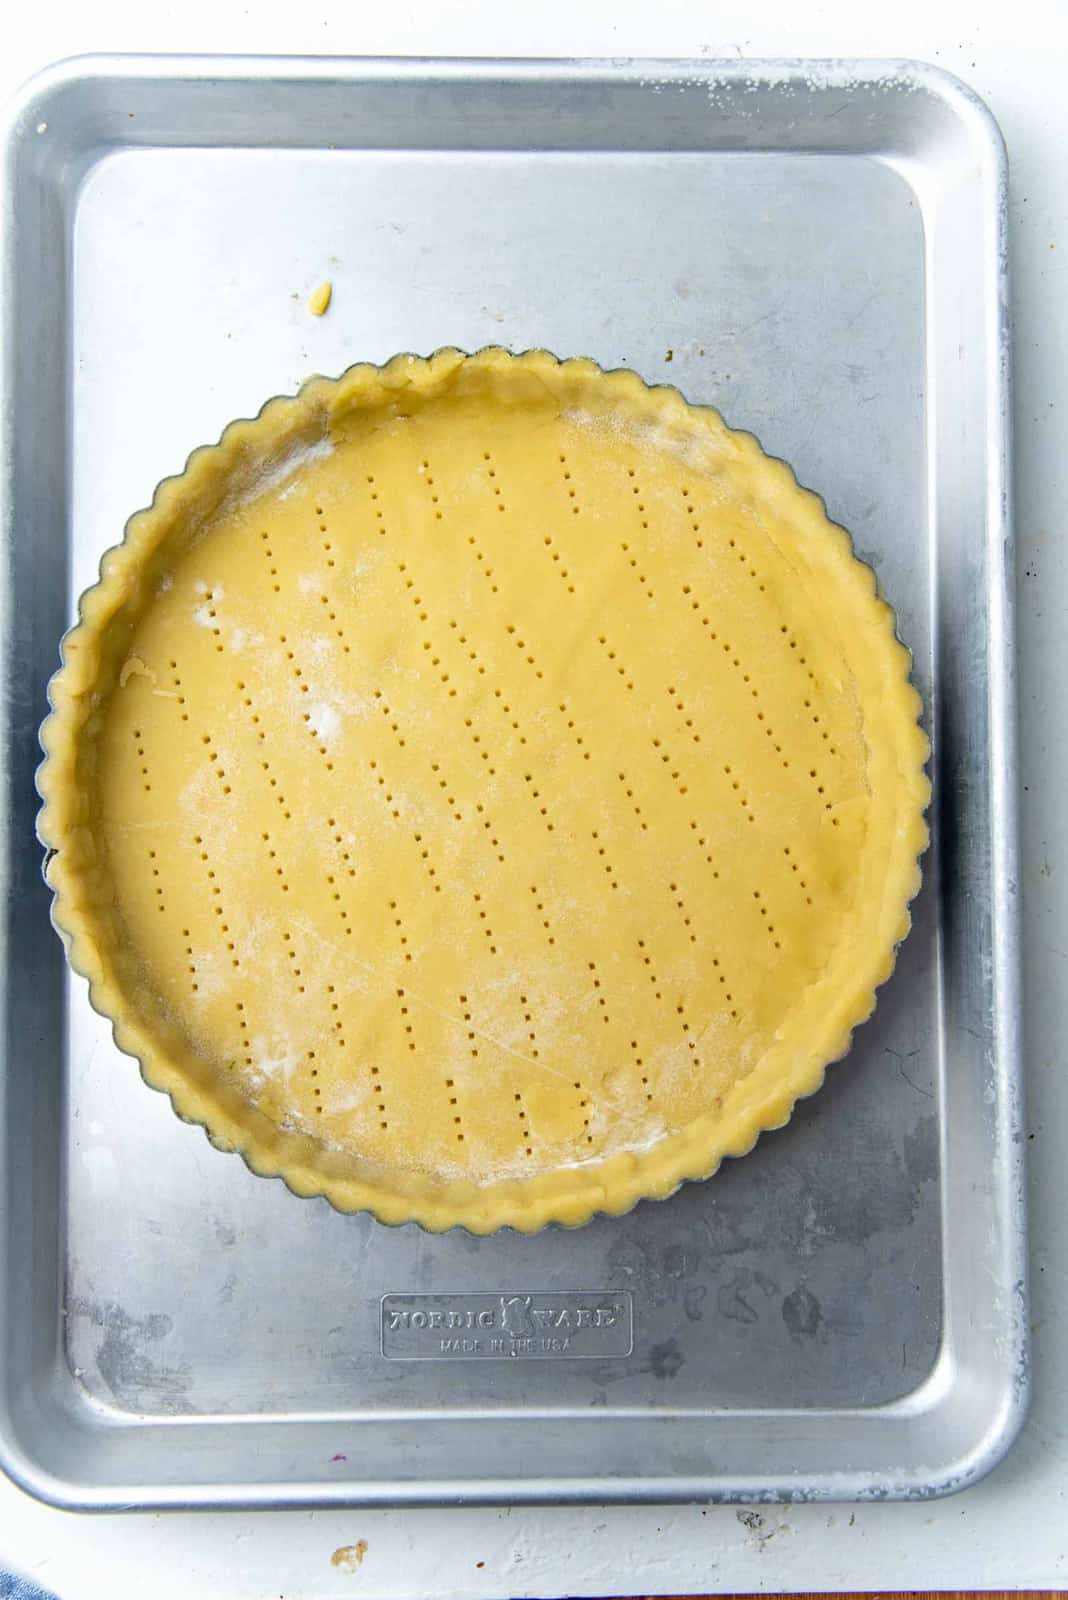
- Line the bottom of a 9 inch tart pan (1 inch height) with parchment paper, and lightly butter the sides.
- Transfer the rolled out pate sucree onto the tart pan, but make sure it’s not stretched out over the pan. Gently and carefully press the dough into the sides, edges and bottom of the pan. With a rolling pin, roll over the surface of the tart pan. This will trim off any excess overhang dough.
- Dock the bottom of the pan with a fork. Cover the surface with plastic wrap, and let the dough chill in the freezer for at least 30 minutes until firm.
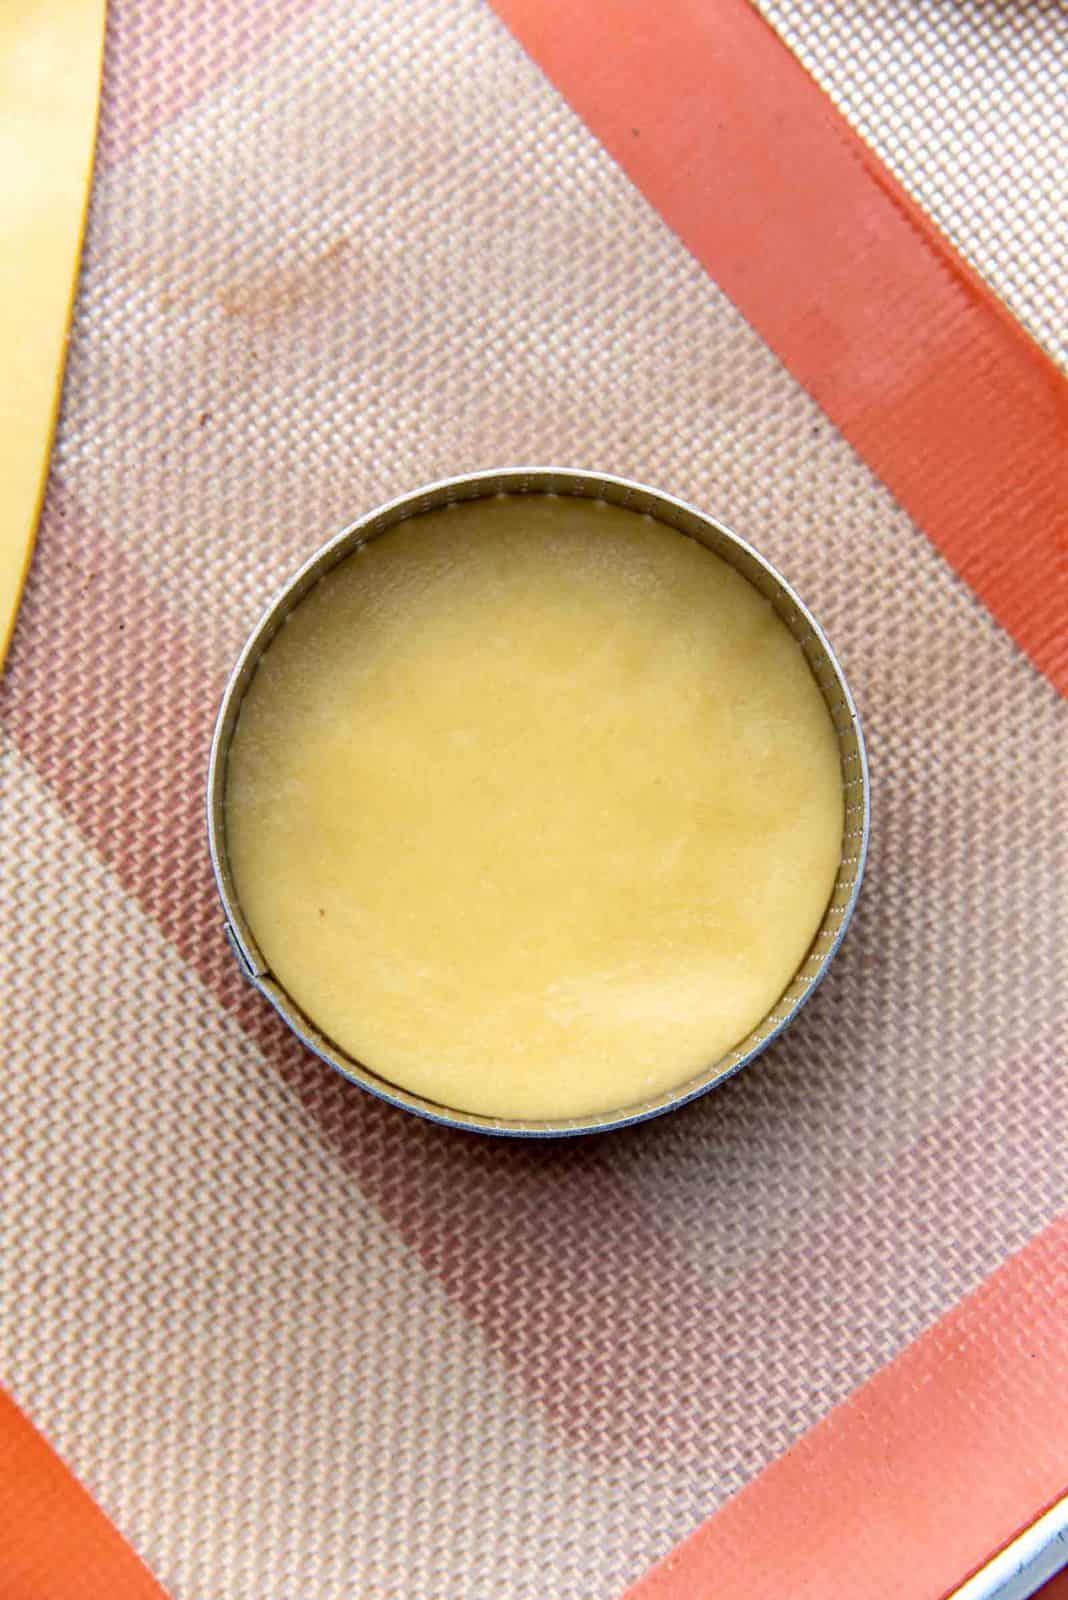
For a tart ring
- Place an 8 inch tart ring on a silpat lined baking tray and lightly butter the side of the tart ring. Using the tart ring, cut a circle in the rolled out dough. Make sure to cut the circle from the edge of the rolled out dough, with enough dough to cut 1 – 1.5 inch strips.
- Place the ring on the silpat, then place the round dough that you cut inside the tart ring.
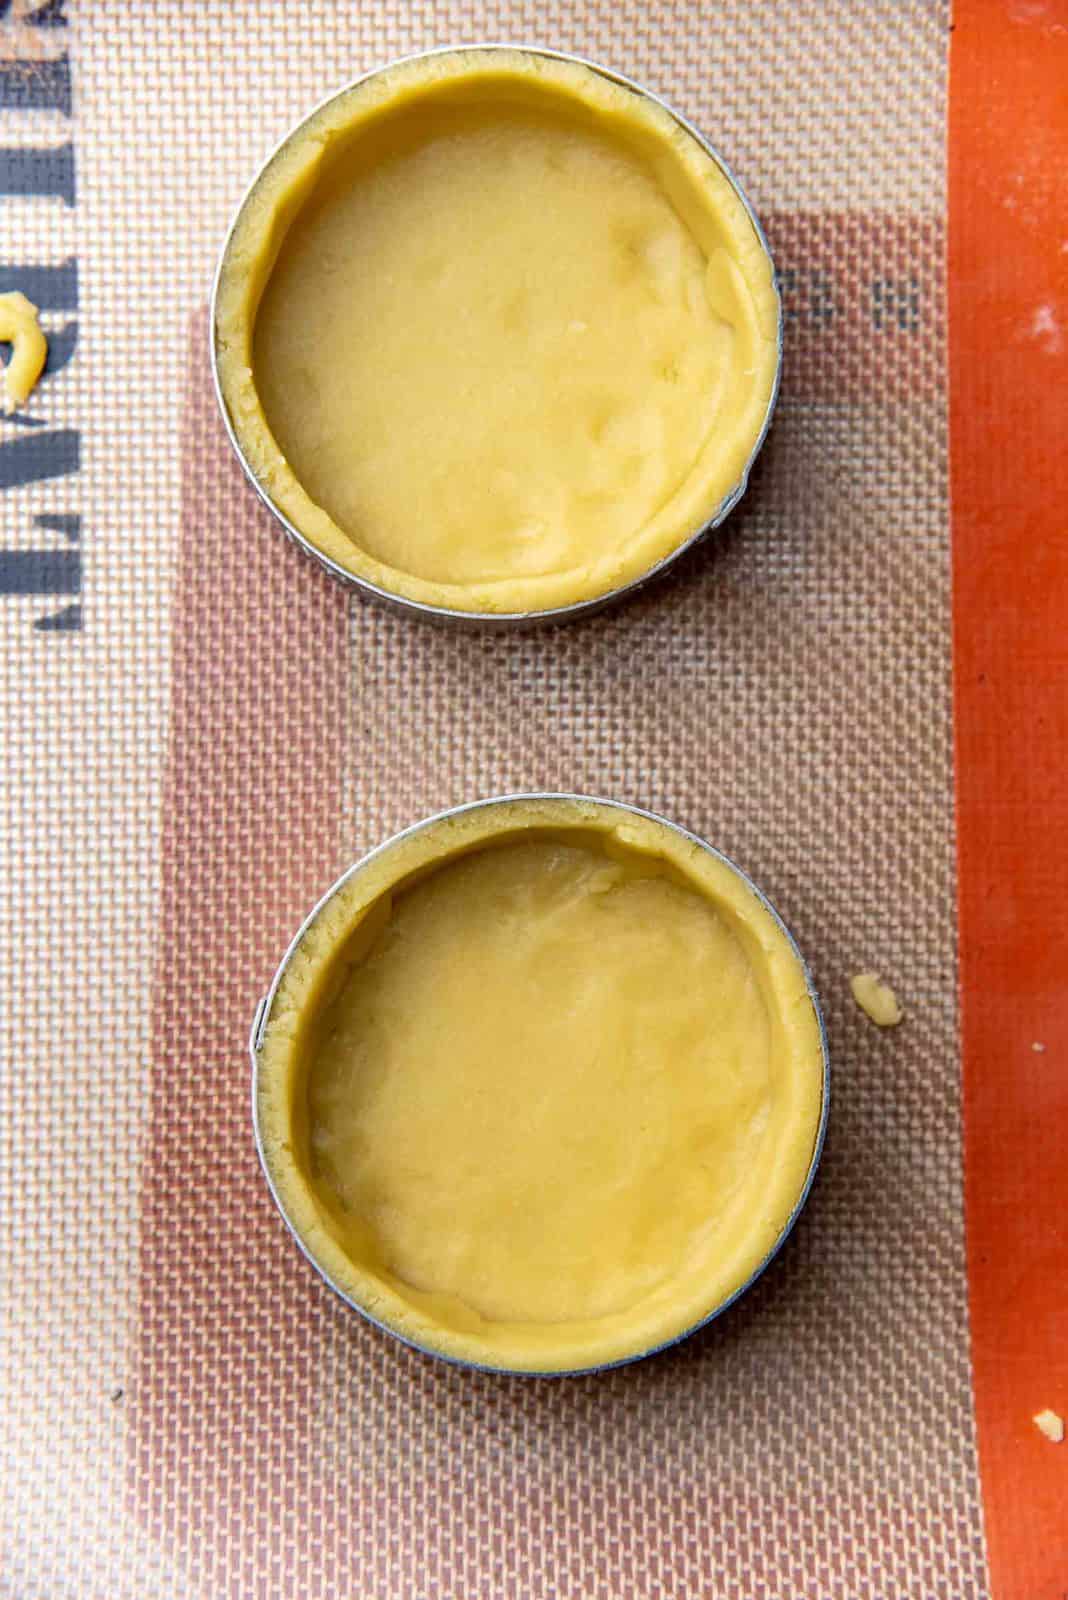
- Cut strips of dough that are a little taller than the sides of the tart pan (about 1 inch for the ones I use).
- Brush the edge of the round dough with water, and line the strips of dough along the side of the tart ring. Make sure the strips are placed flush against the round dough on the bottom, so that it forms a seal.
- Dock the bottom of the tart shell with a fork. Cover the tart shell with plastic wrap and let it chill in the freezer for at least 30 minutes until firm.
How to blind bake the pate sucree tart shell
- Preheat the oven to 350°F / 180°C.
- Place the chilled pate sucree lined tart pan on a baking tray (the tart ring should already be on a baking tray).
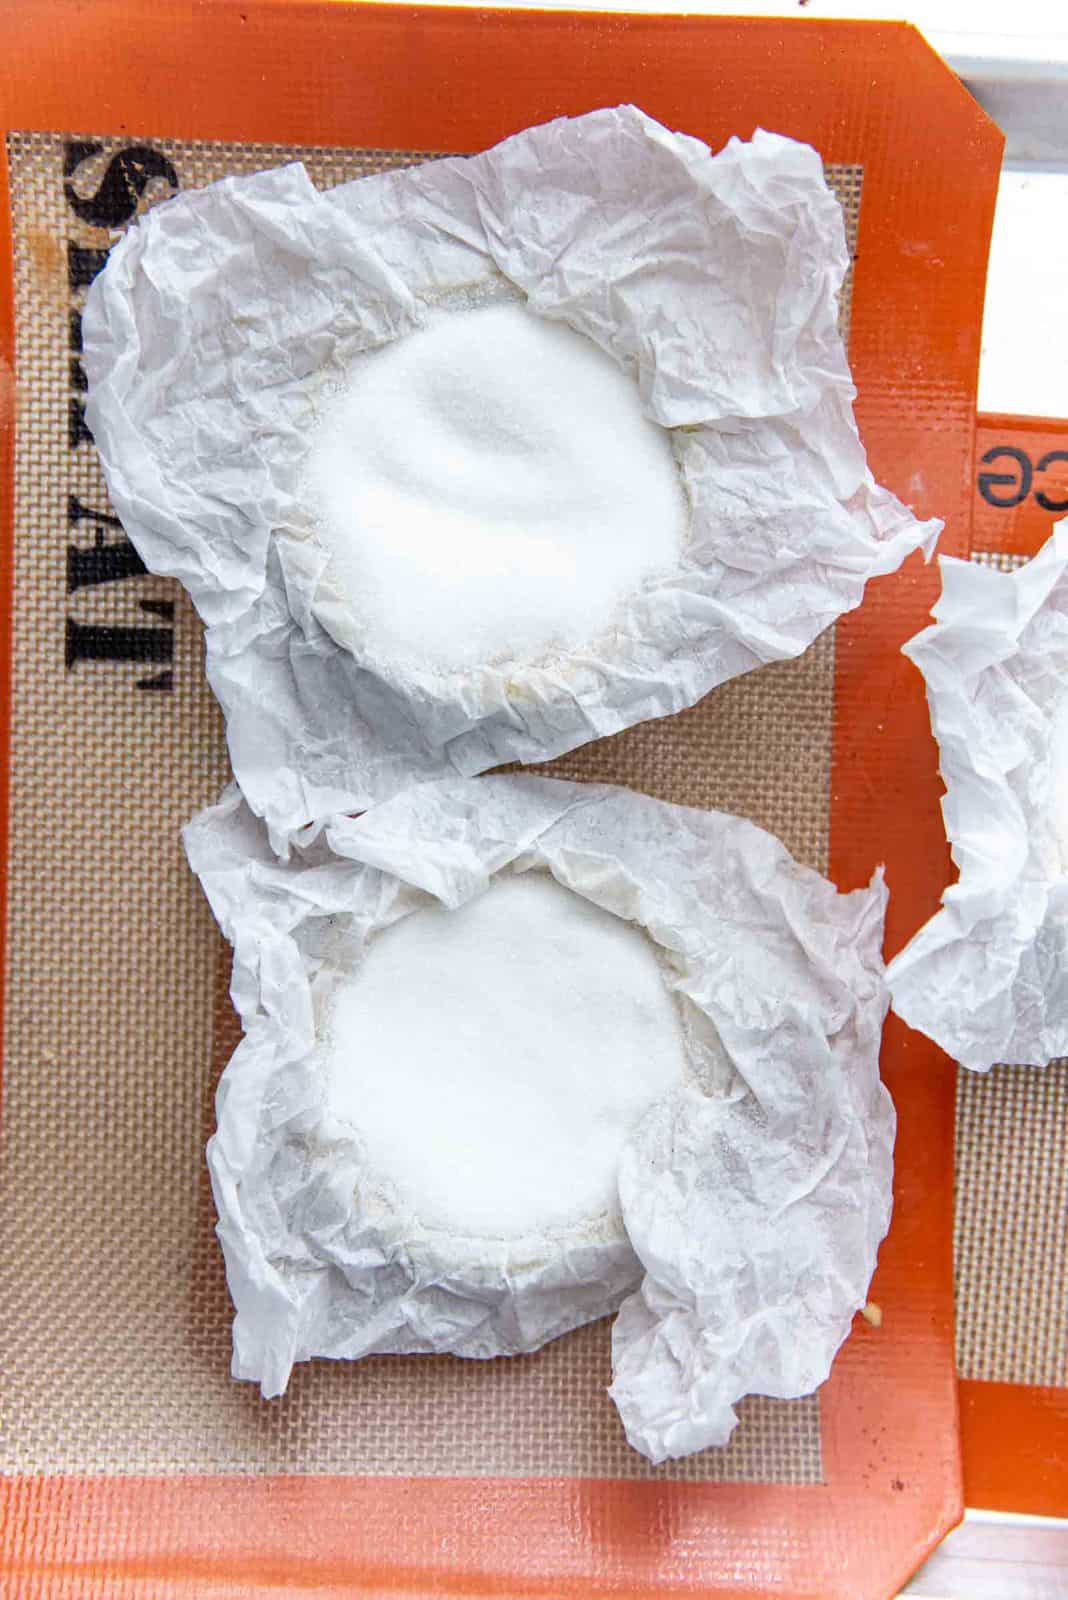
- Take a piece of parchment paper that is large enough to fit inside the pan (with some overhang), and crumple it up. Be careful not to tear it.
- Now unfold the parchment paper, and place it on top of the chilled dough. Weigh the parchment paper down against the tart dough with pie weights, or dry beans, or dry rice, or sugar. The parchment paper overhang should go over the edges to prevent the edges from browning too quickly.
- Bake in the preheated oven for about 20 – 25 minutes, until the edges are just starting to brown.
- Remove the tart from the oven, and carefully lift the parchment paper with the pie weights and set it aside.
- If you're baking the tart with a filling, this is where the filling would be used to fill the tart and then baked until the filling is set.
To completely bake the tart shell
- If necessary, dock the bottom of the pan again, and return the tart pan to the oven to bake until golden brown. This can take about 10 – 15 minutes.
- If you want to egg wash the tart shell, remove it from the oven 5 minutes before it’s done baking (when it’s a light golden color), and brush the entire surface and edges with an egg wash (whisked whole egg, or egg yolk + milk). Return it to the oven and bake for a further 5 minutes until the shell is golden brown and has a sheen.
- Remove from the oven and let it cool down slightly. When just cool enough to handle, remove the tart shell from the pan / ring and let it cool completely to room temperature on a cooling wire rack.
Storage
- Store the unfilled tart shells in air-tight containers, at room temperature, for up to 1 week. If you like, you can brush the inside of the cooled tarts with melted and slightly cooled chocolate or cocoa butter.
- OR wrap the shells with plastic wrap, and at least 1 layer of foil, and place it in the freezer for up to 3 months.
Recipe Notes
Notes on using eggs
- Using all egg yolks in the pate sucree will result in a richer, better tasting tart crust. The dough is also more delicate, and less likely to become too tough due to the higher fat content.
- If you use whole eggs, measure the egg amount by first adding 2 egg yolks, and then adding enough egg whites to get 70 g (usually 1 large egg + 1 yolk).
- The tart will still be buttery if you use whole eggs. However due to the higher moisture content and less fat content, it’s more likely to develop gluten. So it’s important that you do not over handle the dough to prevent that.
Making mini tarts
- You can also make mini tarts with this dough. Roll out the dough and cut large enough circles that will fit inside the mini tart molds. Be careful not to stretch the dough over the molds.
- Use rice or sugar to blind bake the mini tarts.
- They will need to be baked for about 15 – 20 minutes with the pie weights, and a further 10 minutes without the pie weights, or until they turn golden brown in color.
Nutrition Information:
“This website provides approximate nutrition information for convenience and as a courtesy only. Nutrition data is gathered primarily from the USDA Food Composition Database, whenever available, or otherwise other online calculators.”


Leave a Reply