


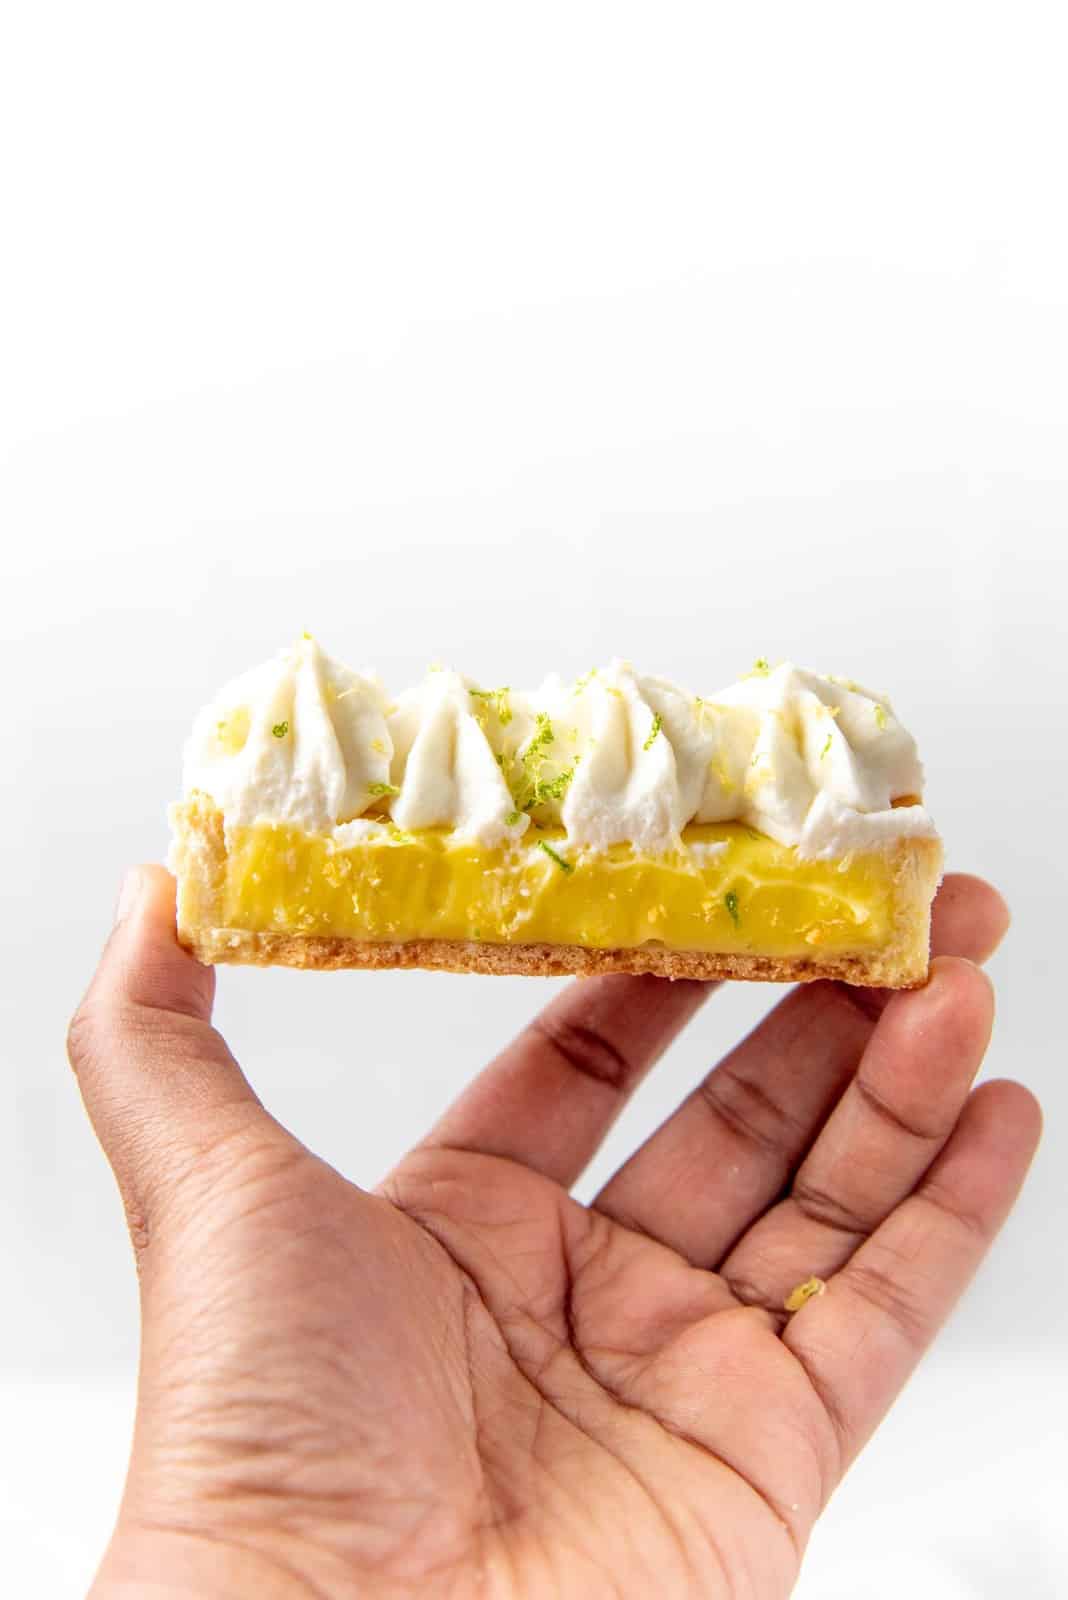
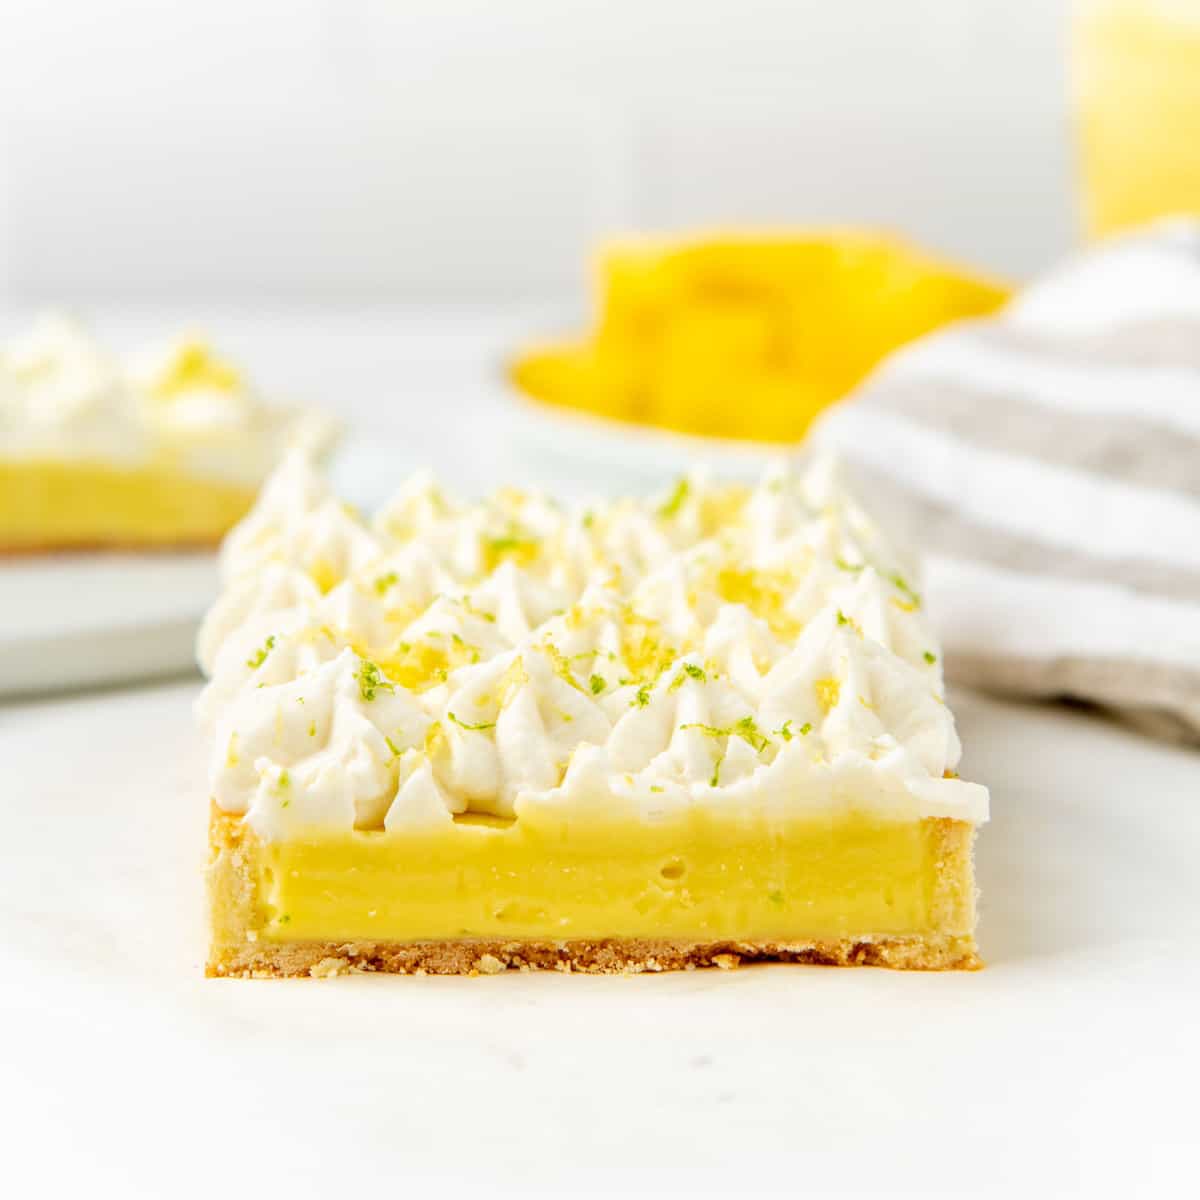
This Piña Colada Tart is a showstopper! The combination of sweet, tangy pineapple and creamy coconut makes for the perfect summer dessert!
A simple Piña Colada Tart, with buttery sweet shortcrust pastry, a creamy pineapple curd filling, and a light coconut whipped cream topping!

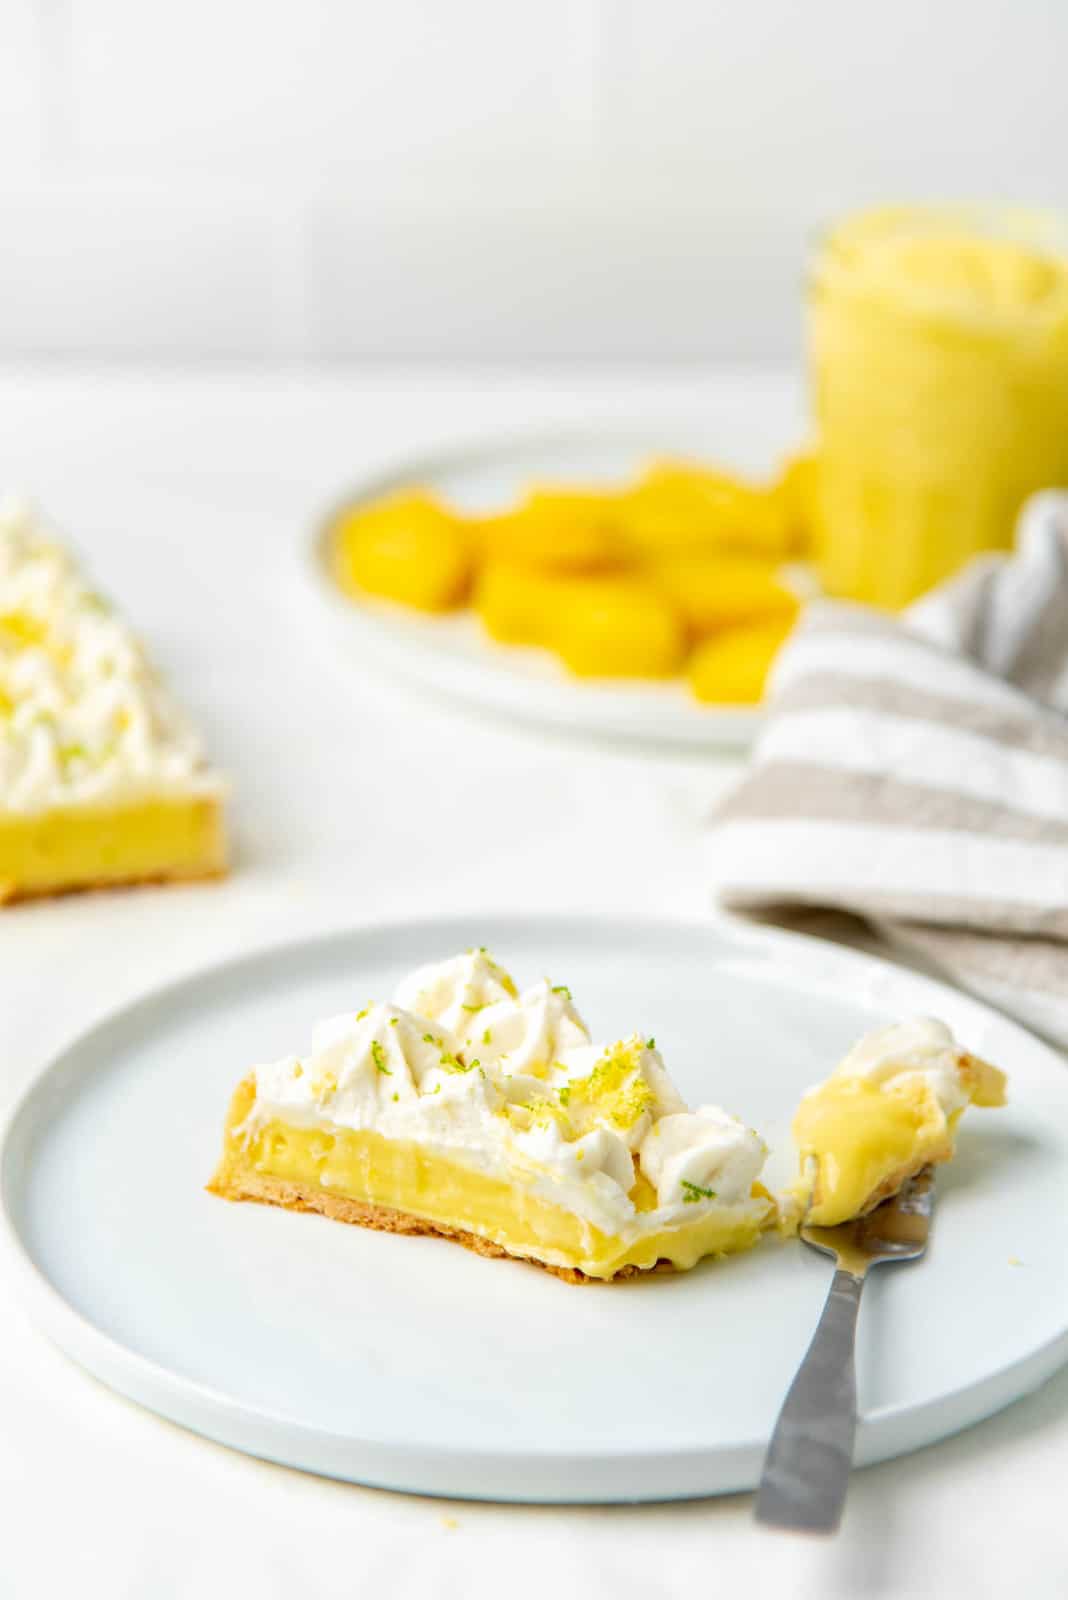
Sweet and tangy is my jam. I made a lemon tart a few months ago that hasn’t made it to the blog yet, but I figured I’d share this creamy pineapple tart first instead. Because it’s just that good! There is no alcohol in this tart, so it’s a family friendly virgin piña colada tart.
This recipe has three components,
- Tart base – I use my Pâte Sucrée recipe here. It’s the same tart base that I used for my strawberry tart here. But you can also use a graham cracker crust instead.
- Pineapple curd filling – You can find the recipe for my creamy pineapple curd here.
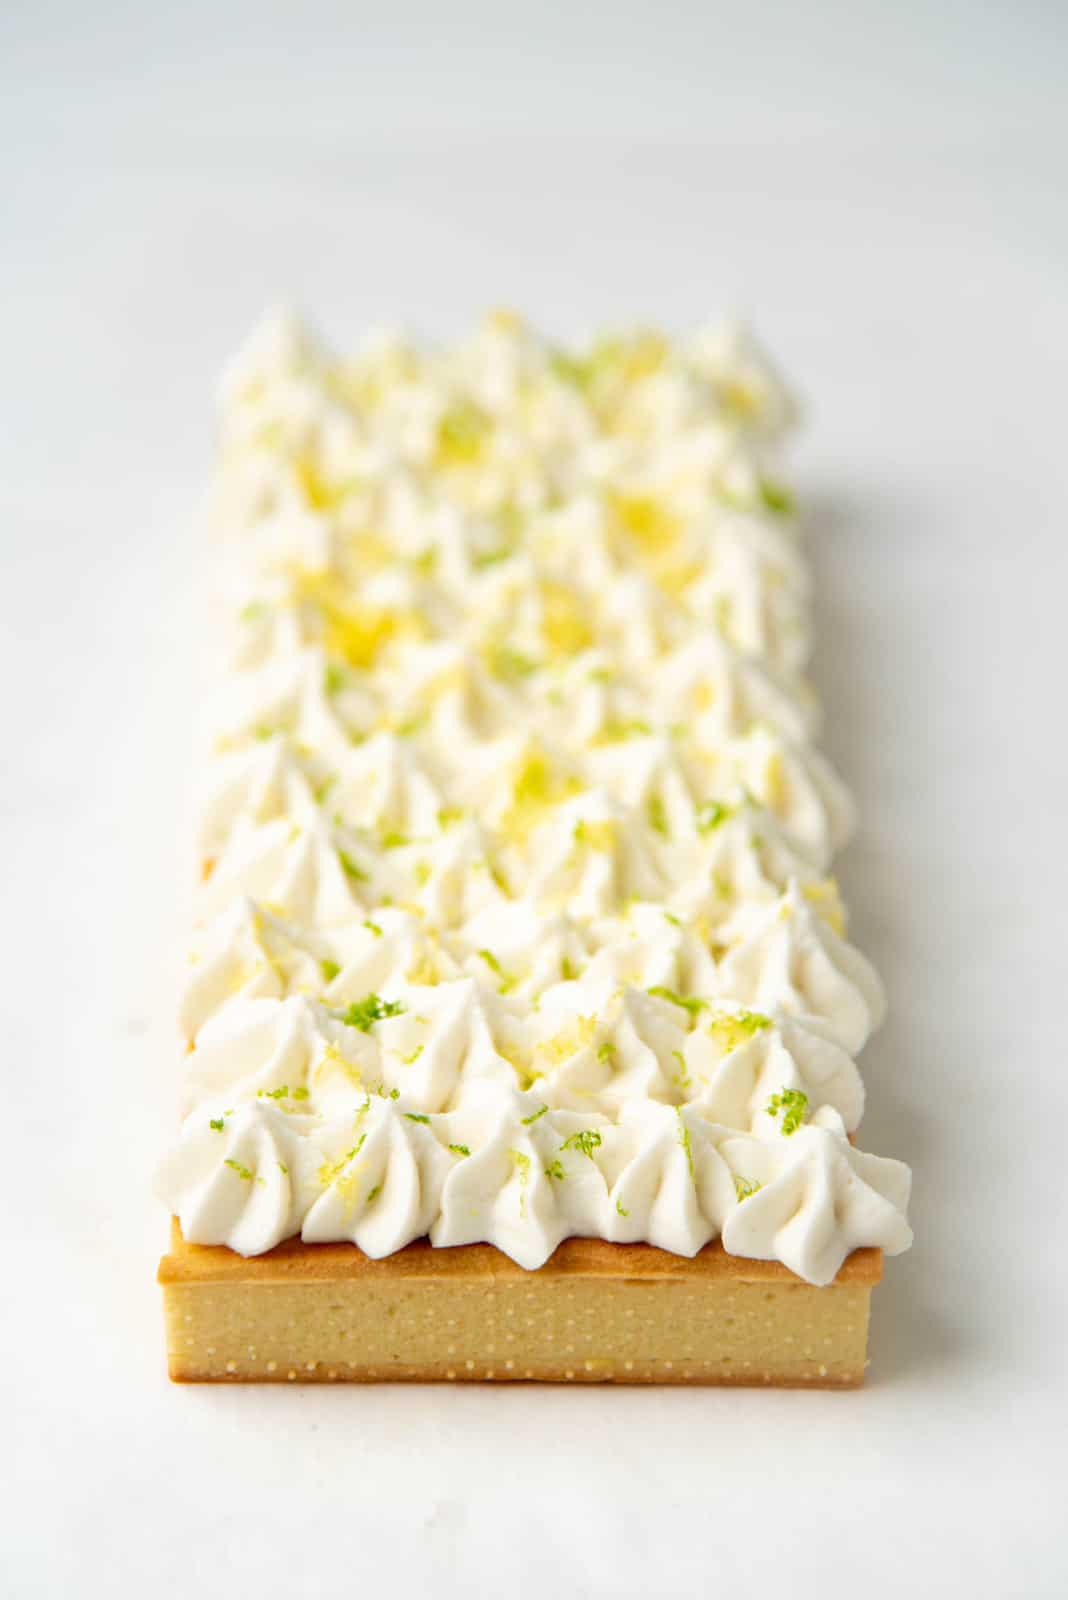
- Coconut whipped cream topping – A coconut and heavy cream whipped topping, to keep the tart nice and light.
How to make creamy coconut pineapple tart (Piña Colada Tart)
Making the tart crust
I make a classic pate suree crust for this tart. It’s a beautifully light, crisp, and buttery tart shell that is also very easy to make. You can find all the details on how to make a pate sucree tart shell in my sweet shortcrust pastry recipe post.
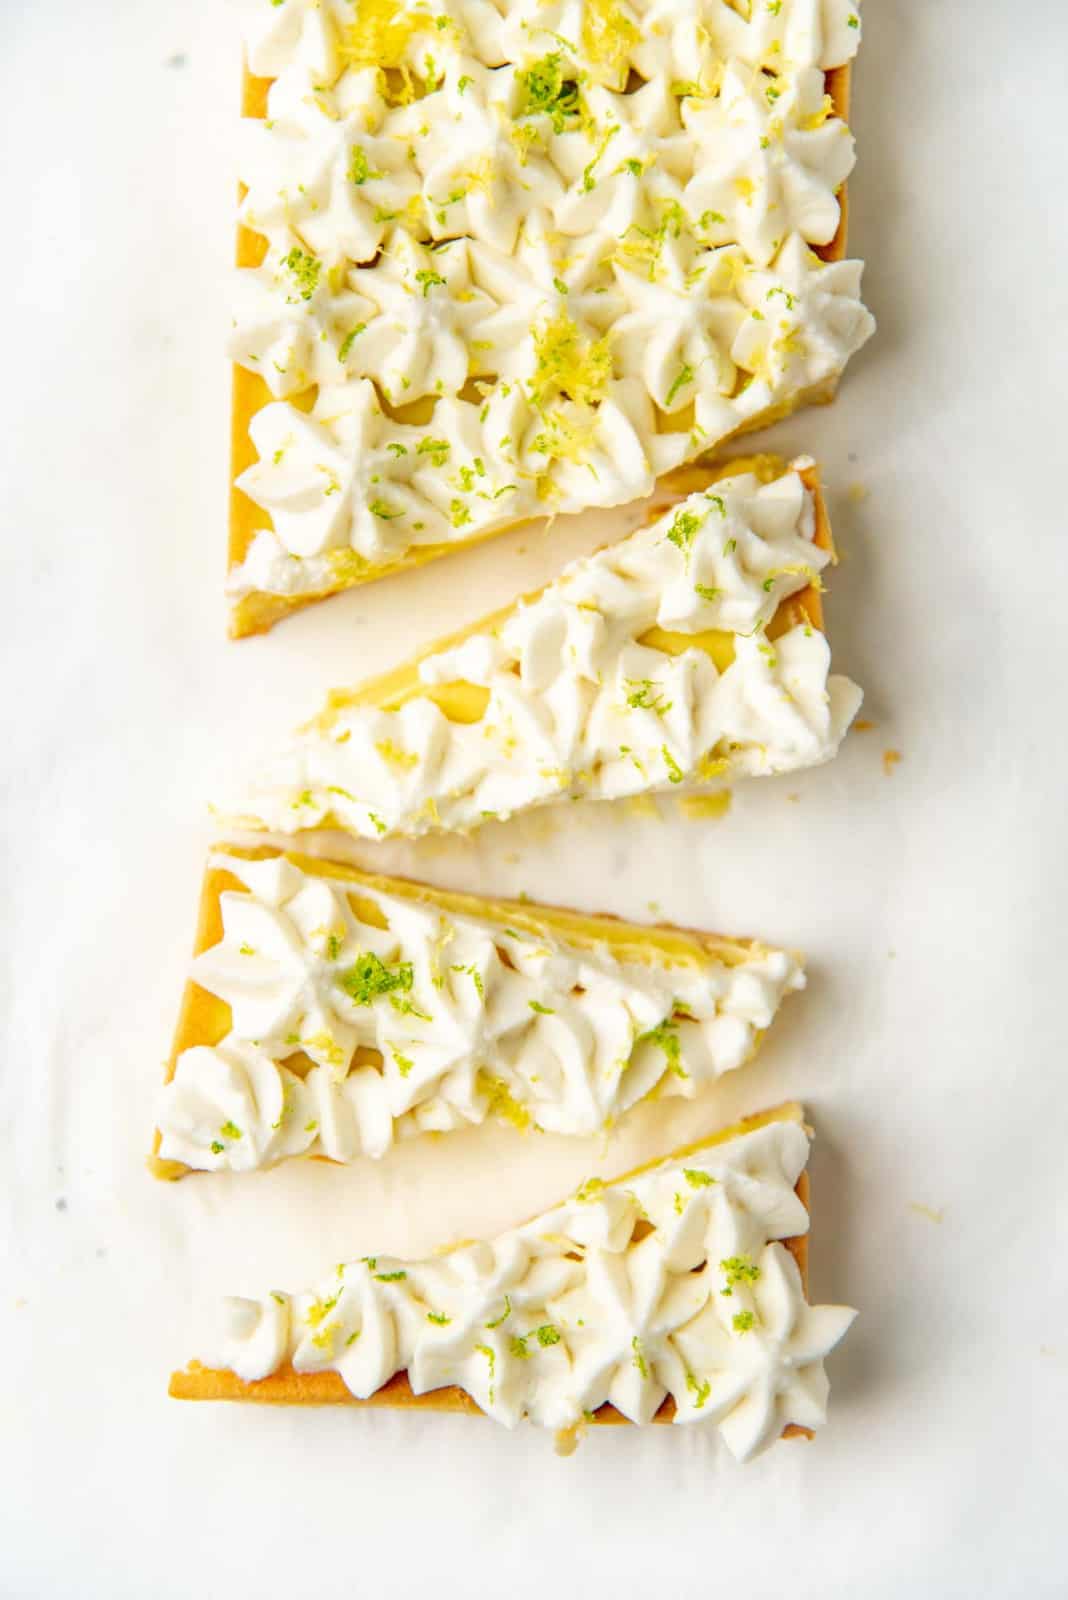
You can easily make this piña colada tart in a 9 inch round tart pan, but I make it in a rectangular tart pan (11″ x 4.5″).
The most important part of making this tart shell is to make sure you chill the tart for at least 1 hour before blind baking it in the oven. This helps prevent shrinkage (there could be just a little bit of shrinkage anyway though).


Making the pineapple curd
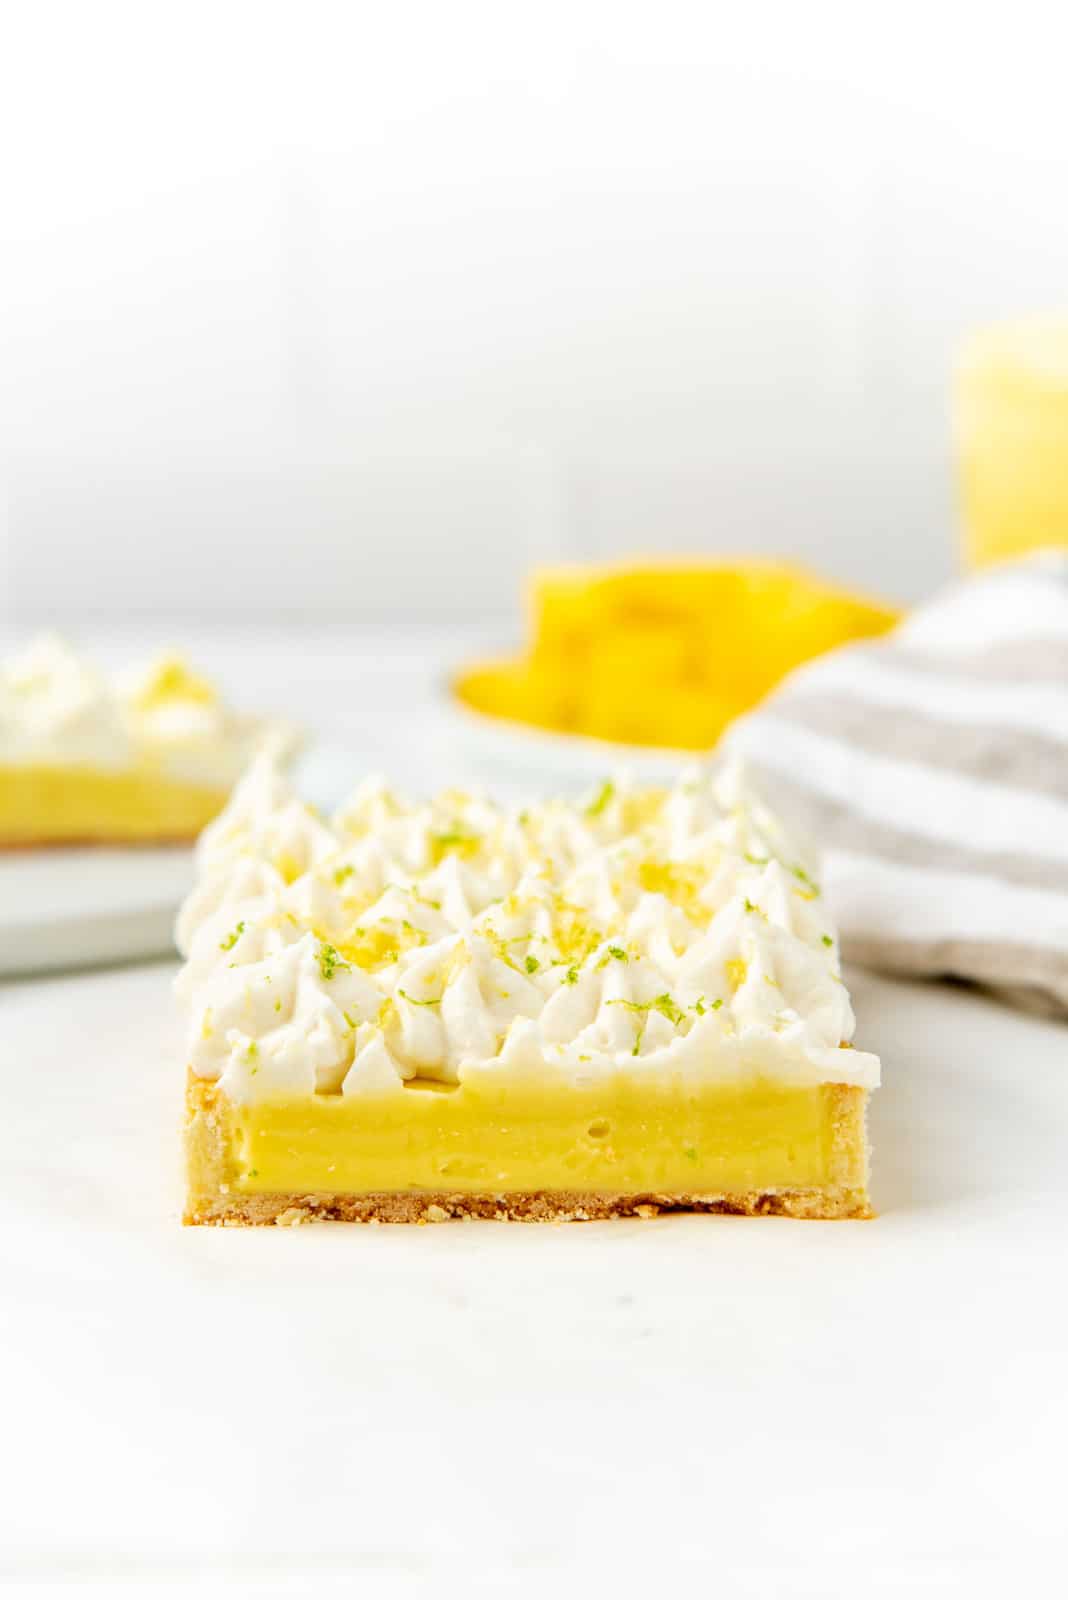
I made a creamy pineapple curd as the filling for this tart. The curd is creamy, tangy and delicious, and provides the perfect flavor balance with the fruity sweetness and tartness.
Since this creamy pineapple curd needs to be cooled down to at least room temperature (or colder) when filling the tart, you can make it the day before you bake the tart, and then let it chill in the fridge overnight.

Making the coconut whipped cream
I make a stabilized whipped topping here, so that the topping doesn’t dissolve or weep. The addition of gelatin keeps the coconut whipped cream stable on top of the tart.
To make the coconut and whipped cream topping, I refrigerated a can of coconut cream (unsweetened), and then scooped out the fat that hardens on top. This hardened fat is what will be whipped with the cream. Whisk the coconut fat until smooth. Set aside.
Bloom and microwave some gelatin that will be added to the whipped cream as well.
Mix the whisked coconut fat and an equal amount of heavy cream in a large bowl, along with some vanilla and sugar. Add the gelatin mix, while whisking the cream mixture. Whisk until you have a stiff but smooth mixture (not curdled).


Assembly
Assembling the tart is super easy.
Once you’ve got a cooled down pate sucree tart base, you can fill it with the whisked, creamy pineapple curd. This is the base of your piña colada tart.
To prevent the filling from making the tart soggy, I like to brush my pate sucree tart with melted cocoa butter or melted chocolate. I used melted white chocolate for that purpose here.
Spread the filling inside the tart and refrigerate for at least 1 hour, or until you’re ready to serve.
Make the whipped coconut topping and spread or pipe it on top of the creamy pineapple tart. Then decorate with toasted coconut flakes or lime/lemon zest and serve!


Workflow for making the Pineapple Tart
Day one
- Make the pate sucree dough in the morning. Then let it chill in the fridge overnight.
- Make the pineapple curd, and let it chill in the fridge overnight.
Day two
- Roll out the pate sucree dough and line the tart pan. Refrigerate for at least 1 hour.
- Bake the pate sucree tart.
- Once cooled, brush the inside of the tart with melted chocolate / cocoa butter.
Day three (or later in the day on day two)
- Whisk the pineapple curd until smooth.
- Fill the tart shell with pineapple curd and refrigerate for about 1 hour until the curd has set.
- Make the coconut whipped topping.
- Top the pina colada tart with coconut topping, and decorate.
- Refrigerate and serve if you’re making this on day two, or refrigerate the tart overnight to serve on the following day.

Shortcuts for making the Pina Colada Tart
My recipe for pate sucree is the base for this tart. It’s so buttery, and tastes like a sweet cookie! I LOVE making this tart crust because it’s easy, and always comes out perfect. It’s absolutely worth your while to make this crust for this dessert.
However, to make things easier, you can certainly use a store-bought, pre-made tart shell. You could even make your own graham cracker tart, or buy one from the store.
I use a combination of coconut and heavy cream to make a stabilized whipped cream. But you can make coconut whipped cream using only coconut too. Check out this recipe on Minimalist Baker to find out how.
Can I make this with alcohol?
Yes, you can.
When you’re making the pineapple curd, make it with 1/4 cup less of the pineapple juice. Instead, add 1/4 cup of rum after you’ve added the egg mixture, and cook according to the instructions.
Since you will be cooking the curd until it’s boiling, the alcohol may mostly evaporate. Thus leaving behind maybe a hint of booze, and the flavor of rum.
Make ahead and storage tips
This piña colada tart can be made and stored in the fridge for about 24 hours. Especially, if you brushed the tart with melted chocolate, because this will prevent the crust from getting soggy.
You can also make the pate sucree tart crust about 3 days in advance, as long as you store it in an air-tight container, at room temperature.
The pineapple curd will last about 5 days in the fridge. So as long as you’re filling and serving the tart within that timeframe, you’re good to go.
Why I love this recipe
I freaking love this pineapple curd! So much so that I baked the extra pate sucree crust, broke it into pieces, and dipped the pieces in the pineapple curd and ate ’em like chips!
And this tart screams summer. It’s sweet, tangy, and super refreshing with the creamy coconut combo. It’s the perfect summer dessert, and not too hard to make. Plus, I love that vibrant yellow!
Recipe
Piña Colada Tart (Creamy Pineapple Tart)
US based cup, teaspoon, tablespoon measurements. Weight measurements are recommended for accurate results whenever available.
Common Measurement ConversionsIngredients:
Pate sucree tart crust (makes enough for two 9 inch tarts or equivalent)
- 150 g unsalted butter 10 ¼ tbsp, the butter needs to be very soft but not melted
- Pinch fine sea salt about ⅛ tsp
- 120 g confectioner’s sugar about 1 cup
- 1 large egg see recipe notes
- 1 egg yolk see recipe notes
- 1 tsp vanilla extract or lemon extract
- 325 g AP flour 2 ⅔ cup, measured by spoon and level method
Pineapple curd
- 480 mL pineapple juice 2 cups
- 30 mL lemon juice 2 tbsp
- 100 g white sugar ½ cup
- 15 g Instant ClearJel or cornstarch (about 1 ½ tbsp)
- 6 egg yolks from large eggs
- 85 g unsalted butter 6 tbsp (cubed)
- 1 tsp powdered gelatin
- 1½ tbsp water to bloom the gelatin
Coconut whipped topping
- ¾ cup hardened chilled coconut cream see recipe notes
- ¾ cup chilled heavy cream
- 30 g confectioner's sugar about ¼ cup
- Pinch of salt
- ½ tsp gelatin optional
- 4 tsp water optional
To garnish
- Toasted coconut flakes
- Lemon and lime zest
Instructions:
Pate sucree tart crust
- Follow this pate sucree recipe, and make one 9 inch tart crust (at most 1 inch in height), or equivalent-sized tart crust.150 g unsalted butter, Pinch fine sea salt, 120 g confectioner’s sugar, 1 large egg, 1 egg yolk , 1 tsp vanilla extract, 325 g AP flour
- I used an 11 x 4.5 inch tart ring here. This recipe only uses one tart, so you can wrap and freeze the extra dough for another dessert.
Pineapple curd
- Place the water in a small bowl and sprinkle the gelatin over the surface. Stir with a toothpick or skewer to ensure that the gelatin is saturated. Let it bloom while you make the pineapple curd.1 tsp powdered gelatin, 1½ tbsp water
- Make the pineapple curd according to my pineapple curd recipe.480 mL pineapple juice, 30 mL lemon juice, 100 g white sugar, 15 g Instant ClearJel, 6 egg yolks , 85 g unsalted butter
- After making the pineapple curd, while it's still hot, add the bloomed gelatin and whisk to dissolve the gelatin. Let it cool down to room temperature before pouring into the tart shell.
- If there are leftovers, they can be kept in the fridge for up to 5 days. It's great with ice cream, yogurt, granola, or on toast!
Coconut whipped topping
- To remove the hardened coconut fat from coconut cream – Place an unsweetened coconut cream can (or two coconut milk cans), in the fridge overnight, undisturbed. The fat should float to the top and harden.
- Open the can/cans, and scoop out the hardened fat layer on top. This is what you will be using for this recipe. The coconut water at the bottom can still be used for curries or however else you'd like.
- Measure ¾ cup of the hardened coconut milk fat. Whisk it until smooth and free of lumps. Set aside.¾ cup hardened chilled coconut cream
- OPTIONAL STEP – Place the water in a small microwave-safe bowl and sprinkle the gelatin on top. Let it bloom for 10 minutes. Microwave for about 10 – 20 seconds, just to dissolve the gelatin. Do NOT let it boil. Temper the gelatin mix by adding a few tsp of cold cream.½ tsp gelatin, 4 tsp water
- Place the chilled heavy cream in a chilled metal bowl. Add the sugar and salt and mix them in. Add the whisked coconut fat as well.¾ cup chilled heavy cream, 30 g confectioner's sugar, Pinch of salt
- Start whisking the heavy cream with a hand-held electric mixer on high speed. Add the gelatin mix in one go (if using), being careful not to pour the gelatin directly on to the whisks (this will instantly cause lumps).
- Once the gelatin is mixed in, lower the speed to medium or medium-high and whisk until you have soft peaks. Lower the speed and whisk the mixture for the rest of the way until you have stiff peaks that look smooth. You can also manually mix the topping at this stage to prevent over-whisking and curdling.
- This topping needs to be used immediately. So make this when you’re ready to top the tart. It can be piped or swirled on top of the tart.
To garnish
- This tart doesn’t need any garnishes. However, you can top it up with toasted coconut flakes and/or citrus zest if you prefer.Toasted coconut flakes, Lemon and lime zest
- If the topping was made without gelatin, the tart is best served as soon as possible. If the topping has gelatin, then it can be stored in the fridge for a few hours.
Recipe Notes
Note about the eggs / egg yolks
Make sure to store the egg whites in a clean container with no fat and no traces of the egg yolk. The egg whites can be frozen! Then it can be used to make meringue, meringue buttercreams, pavlova or just egg white omelets.Note about the coconut
You will need 1 – 2 coconut cans (preferably unsweetened coconut cream, but full fat coconut milk is OK too). DO NOT shake the cans. Leave them on your kitchen countertop for a few minutes, and then transfer them into the fridge for at least 2 hours. The fat in the coconut milk will separate and harden on top. This HARDENED LAYER is what you’re going to use in the recipe.Nutrition Information:
“This website provides approximate nutrition information for convenience and as a courtesy only. Nutrition data is gathered primarily from the USDA Food Composition Database, whenever available, or otherwise other online calculators.”


Leave a Reply