


Imagine the softest, fluffiest bread roll with an enriched buttery and milky flavor, and then pair it with an almost shatteringly crisp bottom and flaky salt on top. That’s what this salt bread is, and I show you how to make the best version of it with my foolproof, reader-favorite step by step recipe!
I make this with bread flour and other pantry-staple ingredients, and I show how to make it without a mixer too. You can also make it dairy free or vegan with proper substitutions. You can make it all in one day if you prefer (if using a mixer), or do a cold overnight proof to develop even more flavor!

As an avid bread baker and a (self-proclaimed) connoisseur of Korean pop culture and cuisine, this shio pan is the perfect union of two distinct worlds for me! When I saw these salt bread buns going viral on social media, I knew I had to try it. Just one try, and I was in love!
There’s such beauty in simplicity with this recipe, and I’m SO excited to share it with you guys! If you like my homemade breads, I think this one’s going to be one of your absolute favorites. It’s THAT good.
Why this recipe rocks

- This is adapted from my popular Japanese milk bread recipe, so it guarantees foolproof, bakery style results!
- So fluffy and soft on the inside with the classic milky flavor infused with butter, with a delightfully crisp bottom, and a salty crunch on top. The way the textures work together is so simple yet mesmerizing at the same time.
- You can make these shio pan rolls ahead of time and freeze them for later too.
- I show you how to make these without a mixer too.
- Very customizable recipe. You can try it with different variations too.
What is salt bread?
It’s called “salt bread” because of the salted butter encased inside each roll, AND the sprinkling of salt on top of the bread. The result is a pronounced butter and salt flavor throughout these soft and fluffy bread rolls.
The bread rolls are also shaped like a croissant, where the bread is rolled up similar to croissants, but without the lamination layers.
The bottom of the bread is crisp because of the melted butter crisping it up in the oven. It also results in a visible pocket inside when done baking, where the butter was previously encased in the dough.

Japanese shio pan vs Korean sogeum ppang
You can trace the origin of salt bread back to Japan where they are called shio pan (shio = salt and pan = bread). But it became popular on social media recently with the Korean adaptation known as sogeum ppang (sogeum = salt and ppang = bread).
The main difference between the Japanese and Korean version is mostly the amount of butter in the bread.
The Japanese version typically uses less butter inside the rolls, giving it a balance of chewy and soft bread texture with buttery flavor. It’s a more classic, everyday sort of bread roll.
The Korean version uses more butter inside the bread, and can also use more butter on the baking tray, so that the bottoms “fry” as they bake, yielding a pronounced buttery flavor and richness to the rolls. (They may also sometimes incorporate different fillings and toppings.)
My preference is somewhere between the two versions and that’s what this recipe is. Larger pieces of butter encased in the rolls so I get that characteristic crispy bottom, but not add extra butter to the pan.
Ingredients you’ll need
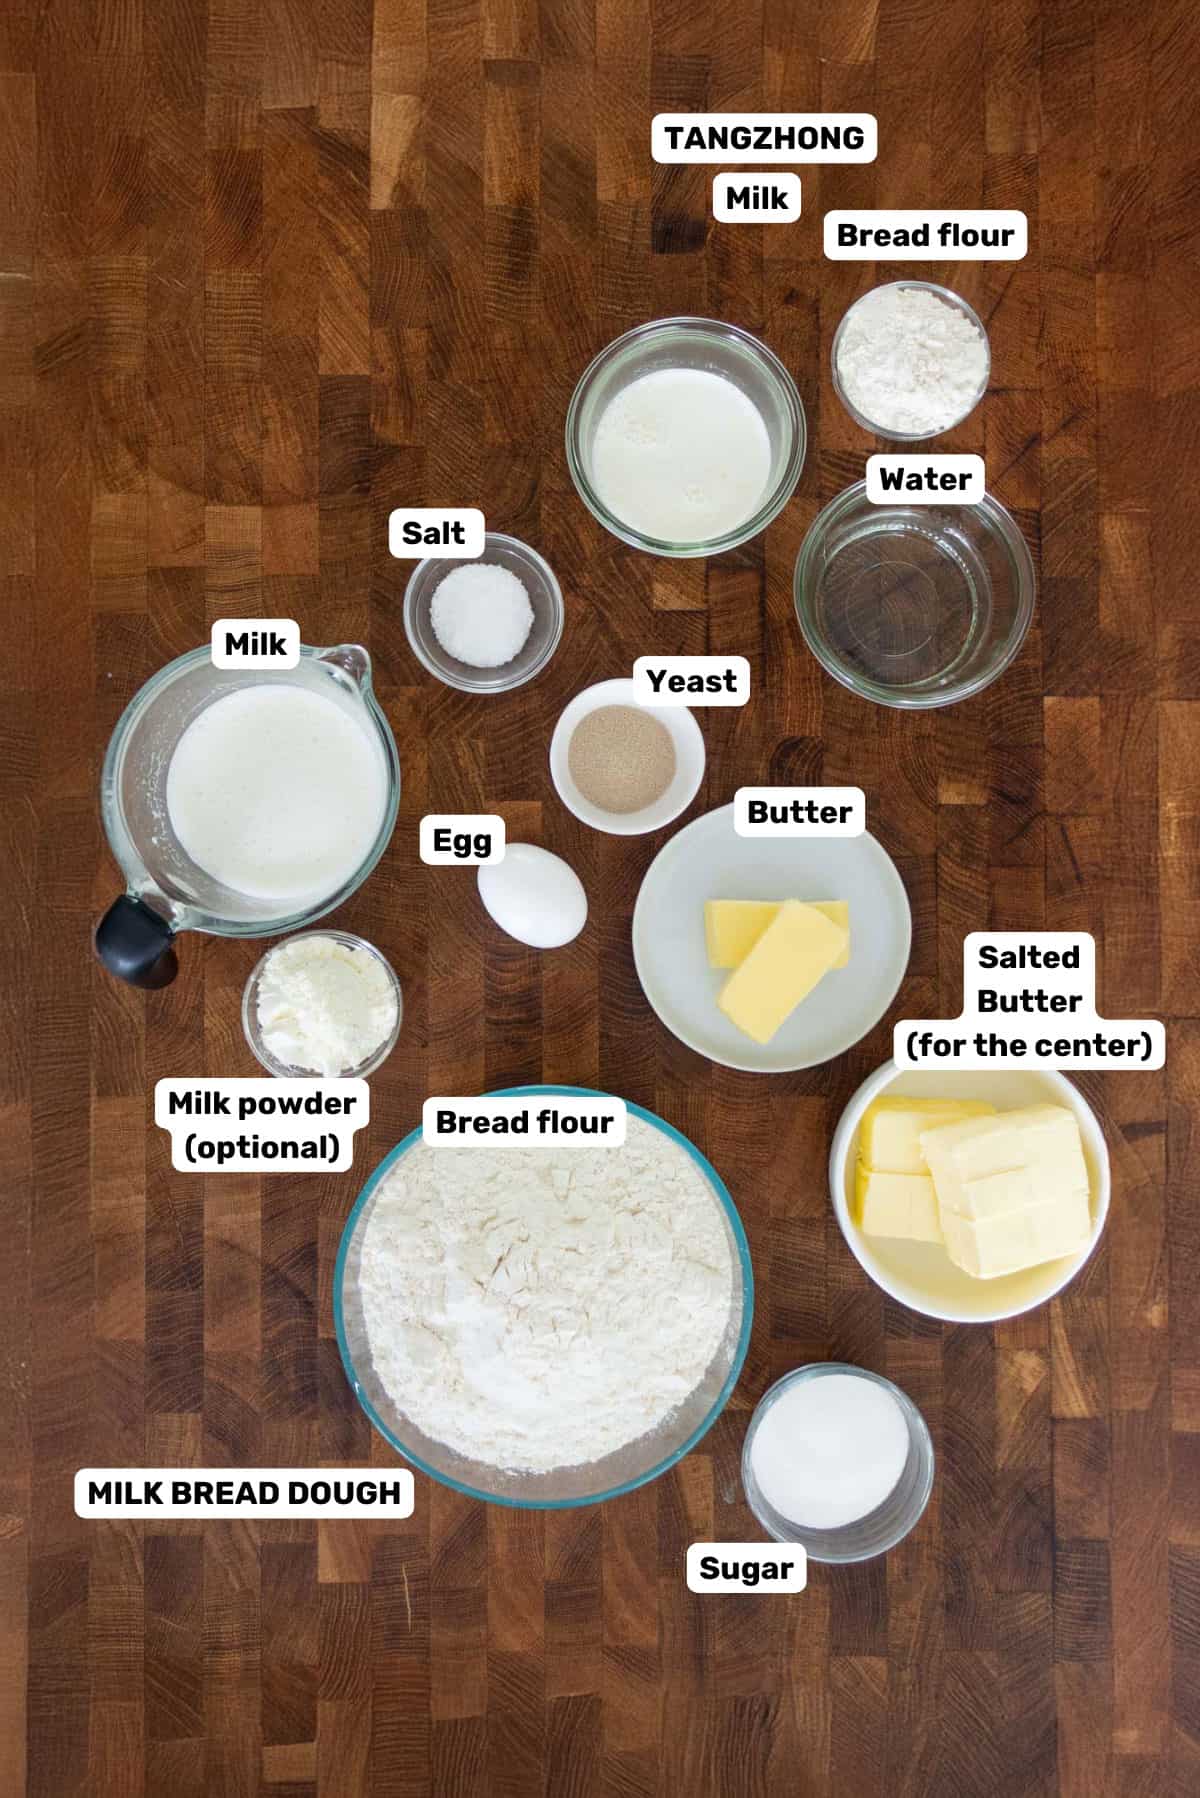
For the bread dough
- Bread flour – I use bread flour for this recipe. The extra gluten in this flour helps to create the soft but slightly chewy texture.
- Milk – I use full fat milk so that the bread gets the best milk flavor.
- Sugar – There is a hint of sweetness that complements the flavor of the bread.
- Yeast – You can use active dry yeast or instant yeast here. I’ve tried both, and you get great results with either option.
- Eggs – The egg is optional, but it adds extra richness to the bread. If you’d like to, you can replace the egg with more milk.
- Milk powder – Optional ingredient. The milk powder adds a lovely milky flavor and softness to the bread.
- Butter (for the dough) – I use unsalted butter, but you can use salted butter too. Just adjust the amount of salt in the bread dough recipe if using salted butter.
- Salt – Really brings out all the flavor in the bread. So, make sure your bread is properly seasoned.
Remaining ingredients
- Salted butter – To cut into cubes for the inside of each bun.
- Salt flakes – To sprinkle on top.
- Egg wash – To brush on top before baking.
Ingredient substitution notes
It is possible to make this dairy free / vegan. However, I haven’t tried this recipe with the following substitutions, so I cannot guarantee how good the results will be.
I have used barista grade plant-based milk (such as oat milk) instead of regular milk in recipes before. You can also use vegan butter for the bread dough.
You could use vegan butter for the butter that’s placed inside the rolls, but regular butter browns and toasts in the oven adding a lovely nutty flavor to the bread. This doesn’t happen with vegan butter, so the flavor may not be as complex.
How to make salt bread (step by step overview)
Step 1 – Make the tangzhong paste
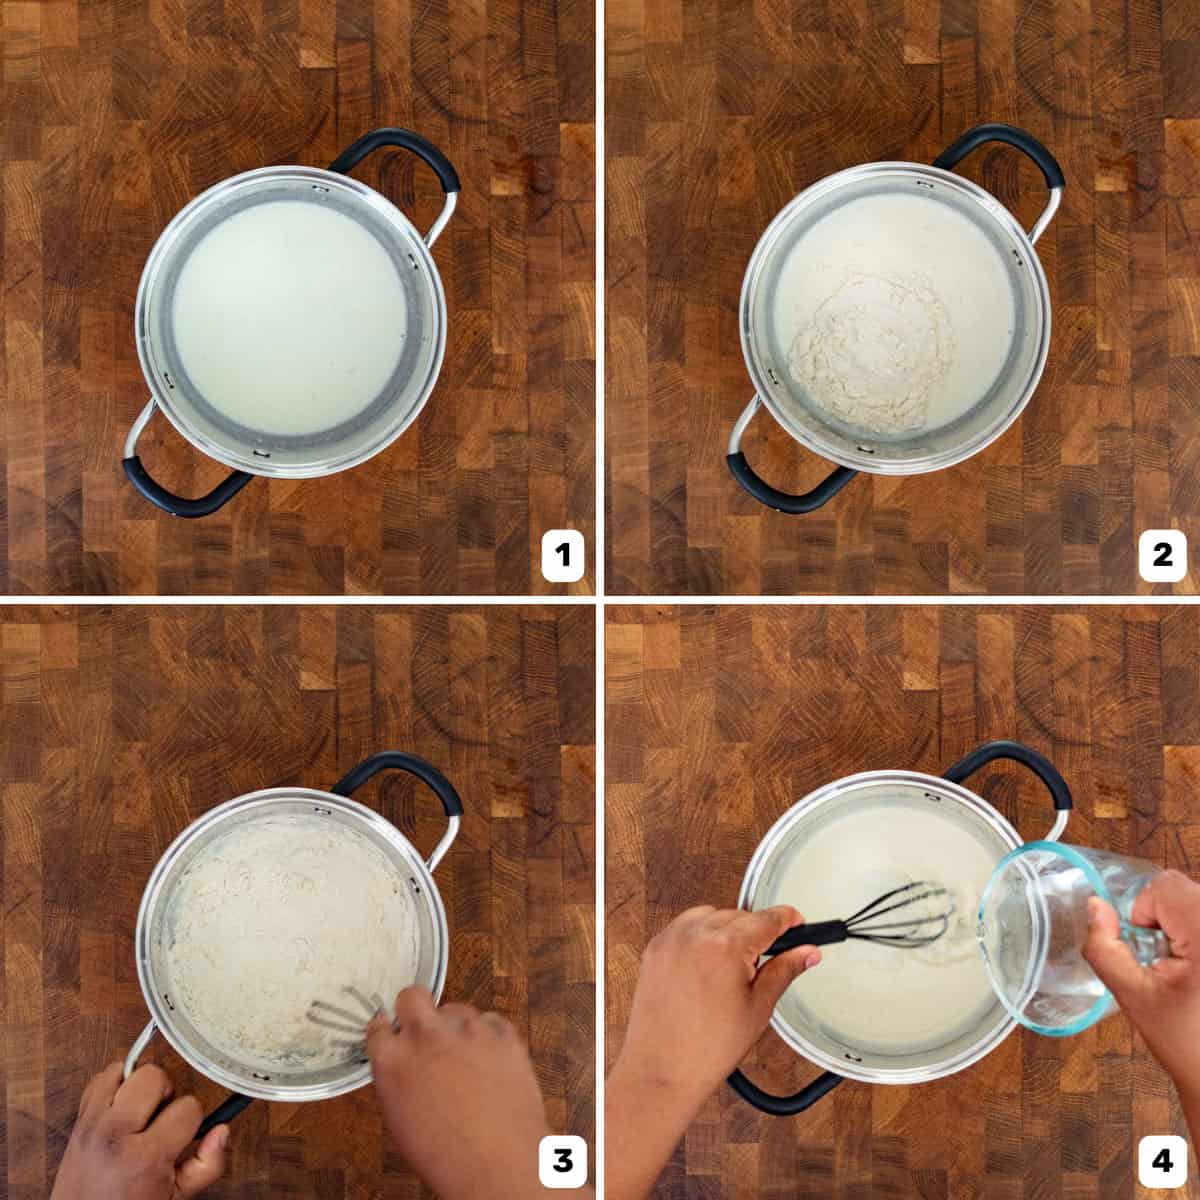
The tangzhong paste is the secret to the super soft, pillowy texture of Japanese milk bread.
To make this, place the milk in the pot with the flour (images 1 – 2). Then whisk the flour in until you have a smooth paste (image 3). Whisk in the water (image 4).
Then heat the mixture over medium heat while constantly whisking. The mixture will start to thicken as it heats up. The mixture at the bottom will start to thicken first. So, I like to whisk the mixture off heat to evenly distribute the heat (image 5).
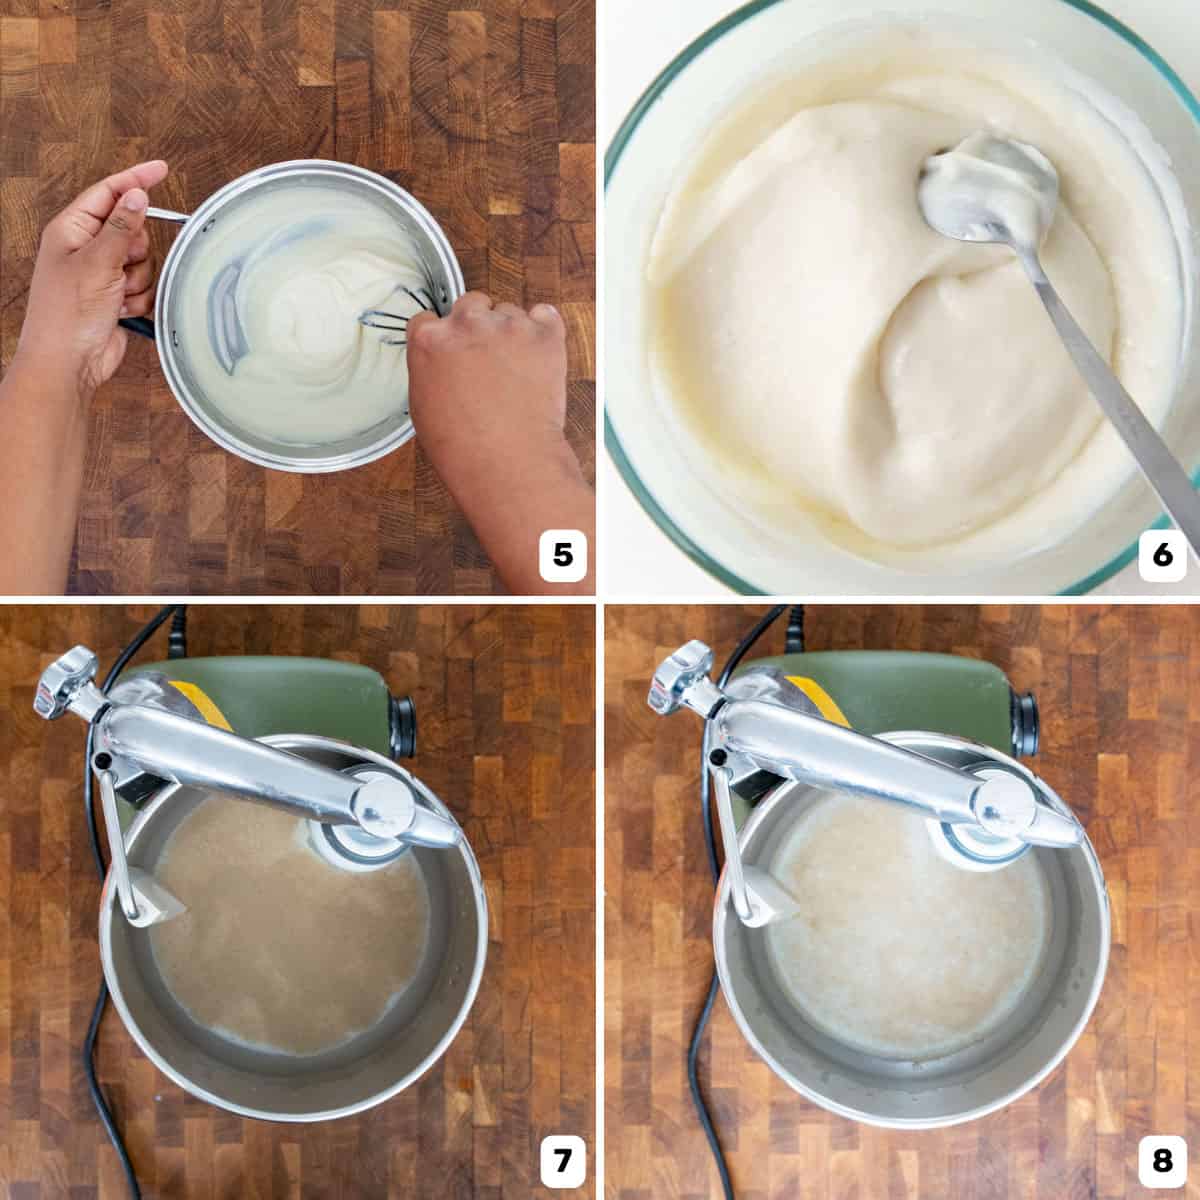
When the mixture resembles a thick but still flowing paste, remove it from the heat and scrape into a bowl. Cover with plastic wrap and let it cool down to room temperature (image 6) (or slightly warmer).
Step 2 – Activate the yeast
If you’re using active dry yeast, it’s crucial to activate the yeast first. Dry active yeast granules are larger in size and need to be dissolved and activated.
If you’re using instant yeast, it doesn’t need to be activated. However, if your yeast is old, it would be good to activate it first anyway to make sure it’s still active.
Place the lukewarm milk in your mixer bowl with a couple of teaspoons of sugar (or honey). Whisk to dissolve the sugar and sprinkle in the yeast (image 7). Then whisk to dissolve the yeast in the milk.
Let it sit for about 10 – 15 minutes. The yeast should start to form a frothy mixture on top (image 8). This shows that your yeast is activated and is fresh.
Step 3 – Add the wet ingredients
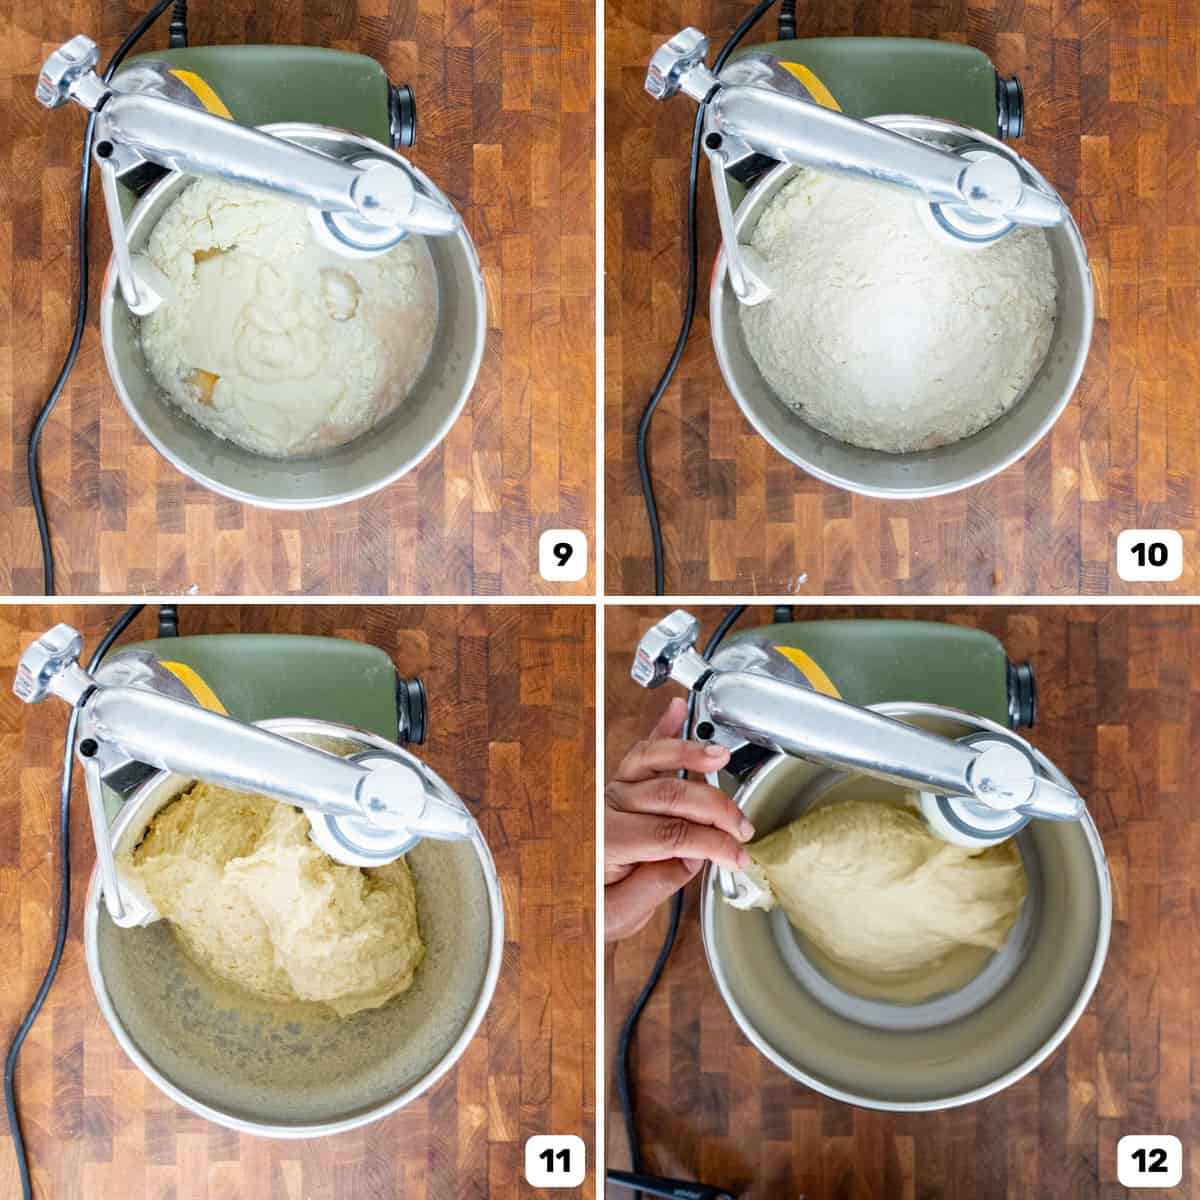
Next, add the wet ingredients into the bowl. The tangzhong, egg, remaining white sugar (sugar is considered a wet ingredient most of the time in baking) (image 9). You can whisk to combine if you want, but it’s not crucial.
Step 4 – Add the dry ingredients and mix
Add the milk powder, bread flour, and finally the salt over the flour, so it doesn’t make contact with the activated yeast (image 10).
Now, mix the ingredients together to form a scraggly dough (image 11). You can do this with a spatula, or the dough hook of your mixer.
Step 5 – Mix the dough
This dough will need time to properly knead. Our goal is to develop enough gluten to create a lovely chewy texture. With time, the dough will go from being sticky to smooth.
The dough is sticky because there’s a lot of hydration and enrichment, but that is what makes the dough soft. So, please avoid adding extra flour to make it “less sticky”, as it will make the final result dry and heavy.
Start kneading the dough for about 5 – 7 minutes until the dough starts to look smooth (image 12). You will need to scrape down the sides and bottom of the bowl to ensure everything is uniformly kneading.
We’re giving the dough a head start in developing gluten, before adding butter. Butter (or fats) make it harder for the gluten to develop.
Step 6 – Add butter
Add the softened butter that’s cut into smaller portions, and knead until the butter is mixed in with the dough (images 13 – 14).
This will make the dough stickier and loose, but don’t worry, it will come together.
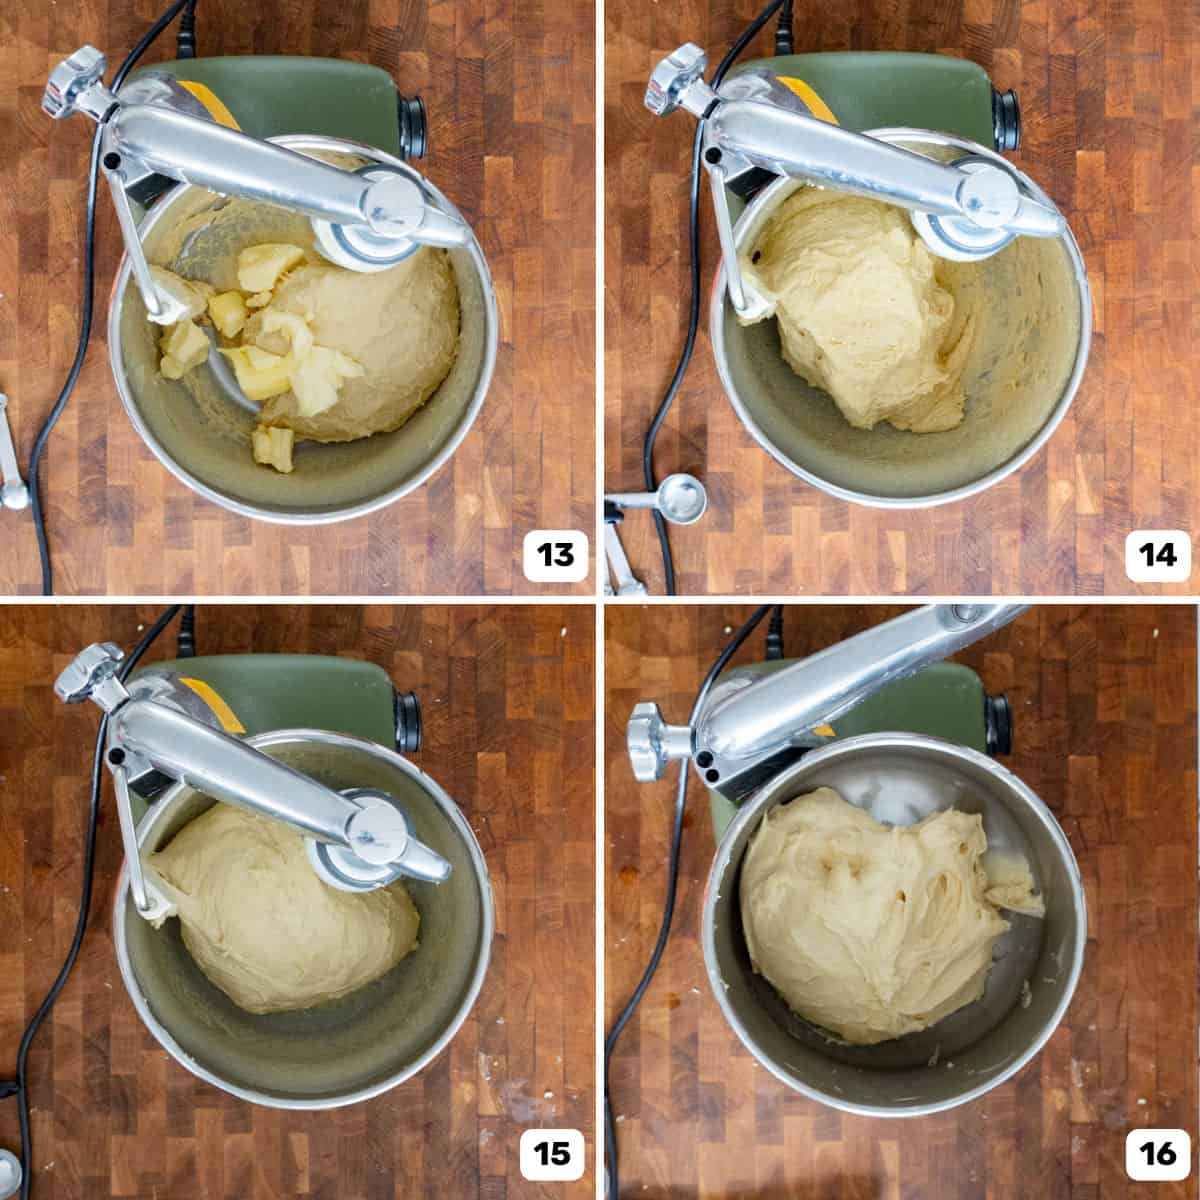
Step 7 – Knead the dough
After incorporating the butter, it’s time to knead the dough until the gluten is developed.
This can take as little as 12 minutes, or up to 20 minutes, depending on your mixer and speed.
The dough will start off sticky (image 15), and will easily break when you try to pull it.
Once the dough is kneaded, gluten will form and create a stronger structure. So, the dough will become smoother (image 16), and stretch more when you try to pull it.

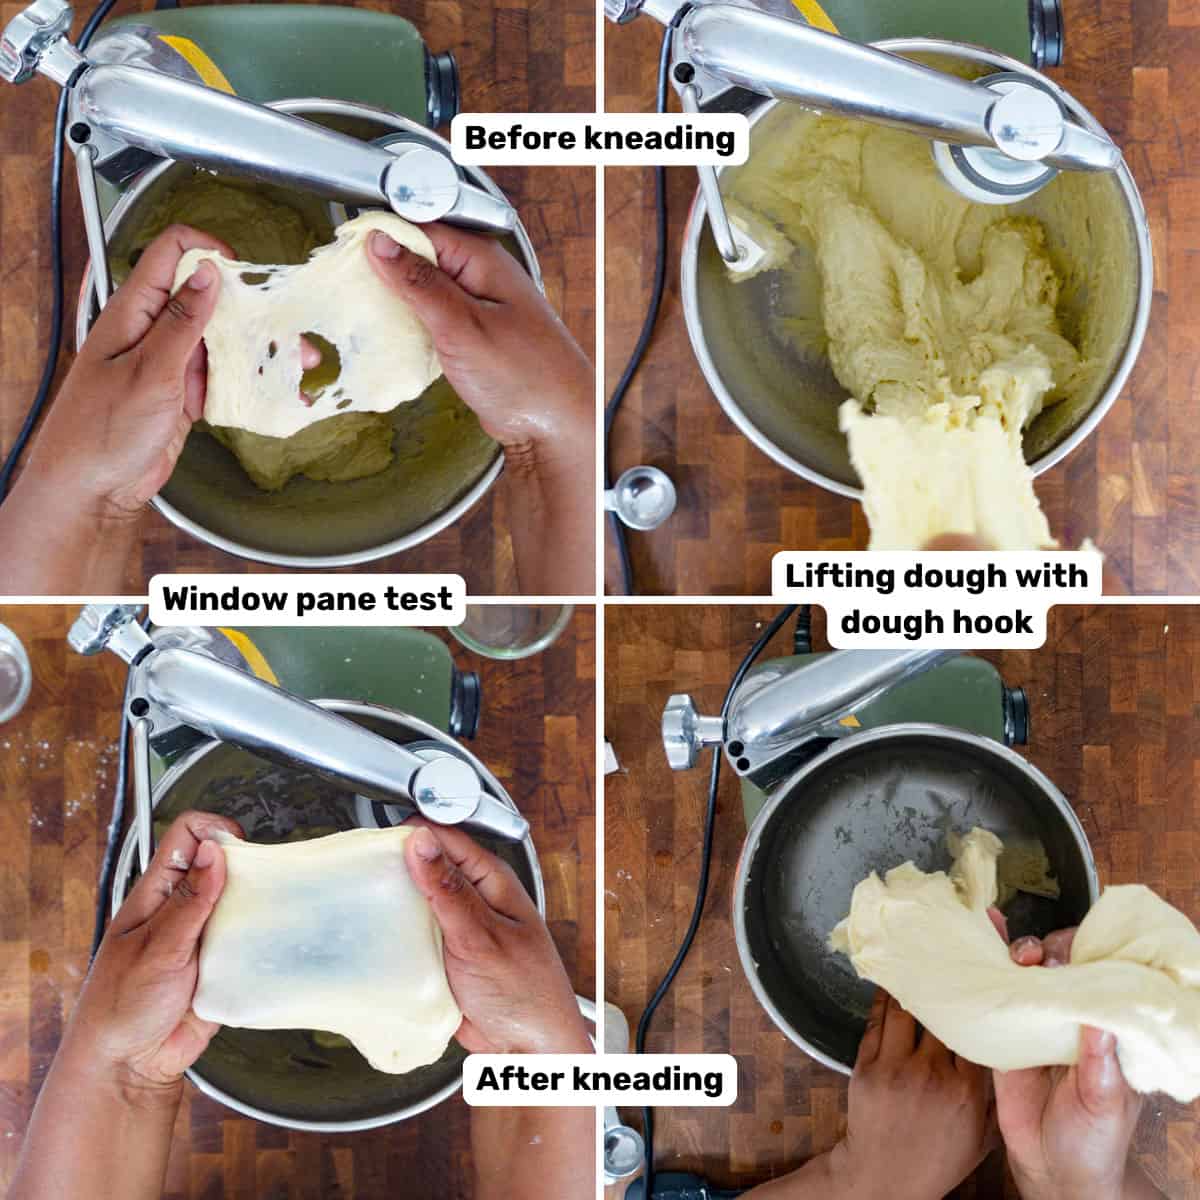
How to tell when the dough is done kneading
There are two keys ways to tell when the dough has developed enough gluten.
- The window pane test – The tried and true method. When you stretch a small portion of the dough, you should be able to stretch it thinly enough so that you can see your fingers through the dough, i.e. “a window pane”. This is especially helpful if you’re using the dough the same day.
- Lifting the dough from the bowl – I use this method if I know the dough will be resting in the fridge overnight. This dough might be very close to passing the window pane test, but not quite there. However, if you try to lift the dough out of the bowl, the whole dough will pull off cleanly from the bowl without breaking, or leaving any dough behind. That happens when the dough has sufficient gluten to give it structure.
Step 8 – Shape the dough
After kneading the dough to the correct consistency, place the dough on a lightly floured surface, and shape the dough into a tightly formed ball.
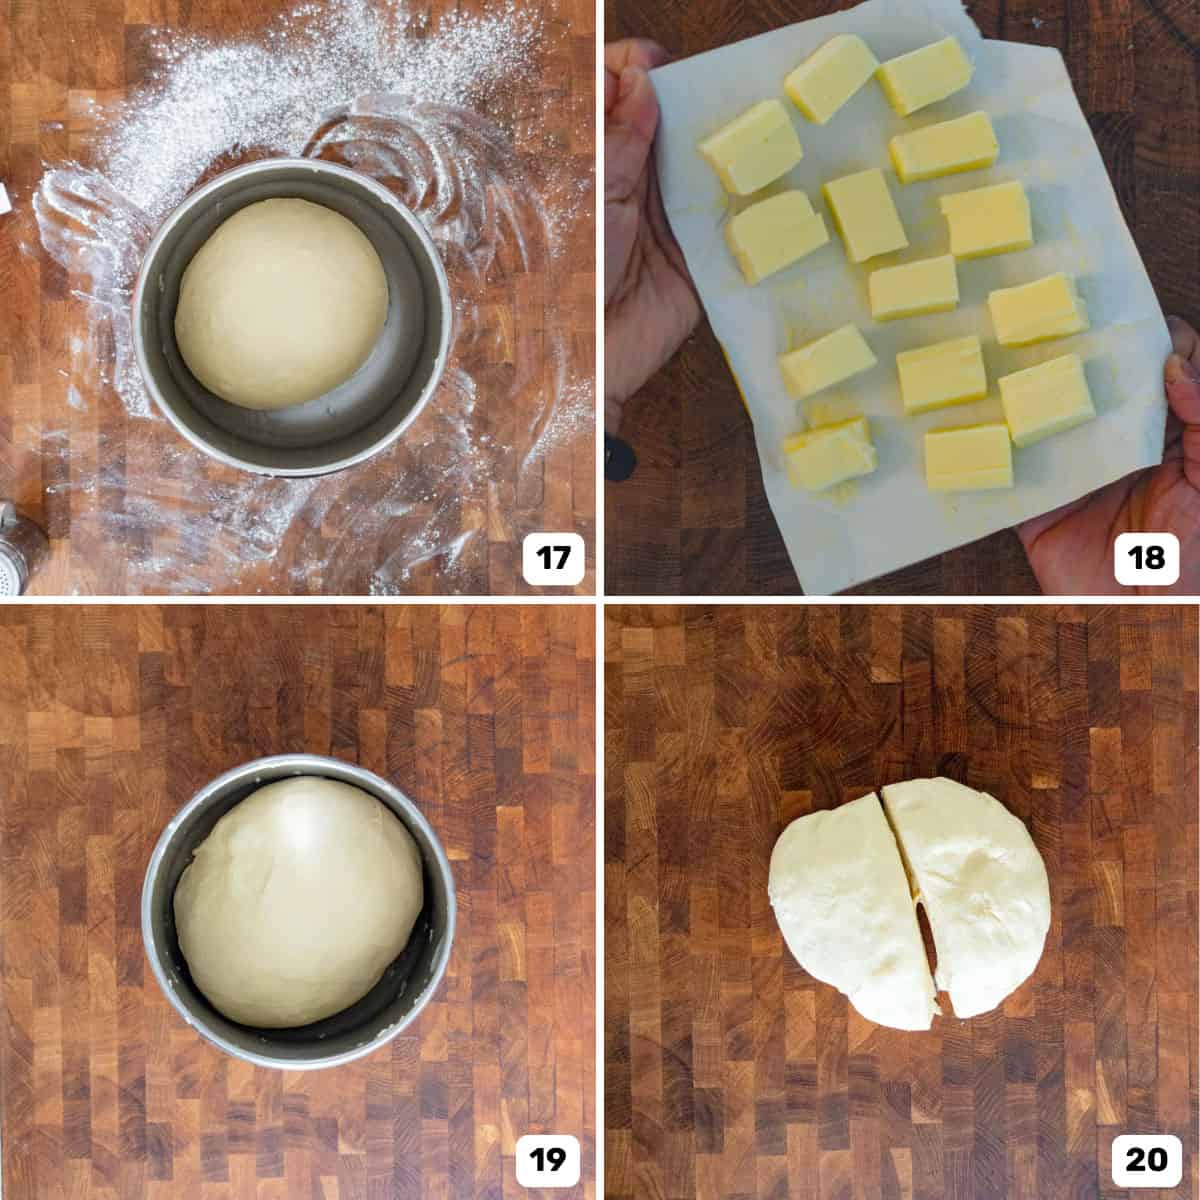
Fold the edges of the dough towards the center and flip it over to form a tight ball. Place this back in the bowl (image 17), and cover loosely with a plastic wrap.
Step 9 – Bulk fermentation
You can do this either at room temperature, or over 12 – 24 hours in the fridge.
- Room temperature – Let the dough proof at room temperature for about 1 hour to double in size. Ideally, the room shouldn’t be too warm, because it’s best to let the dough double in size over an hour. Don’t overproof, as this can lead to a beer-like aroma at the end.
- Overnight slow proofing in the fridge – Here, we proof the dough slowly in the fridge. The longer proof time allows for more flavor to develop through slow fermentation. It also helps to develop more gluten in the dough as it rests. The dough will be chilled, and a little easier to work with too.
Step 10 – Prepare the butter
Cut the salted butter into cubes (image 18). I like to weigh out each portion to make sure everything is even. Each portion can be between 10 – 15 g.
If you go higher than 15 g, the rolls will be very rich and buttery. My preference is to use butter that’s about 1 tbsp in size, which is about 14 – 15 g per bread roll.
This recipe makes 12 rolls, so make sure you have 12 butter portions. Keep the butter in the fridge until needed.
Step 11 – Portion and bench rest the dough
After doing the bulk fermentation (at room temperature or in the fridge overnight) (image 19), portion the dough and let it rest before doing the final shaping.
I prefer to weigh my dough out and then divide the dough into 12 portions equally by weight (images 20 – 21).
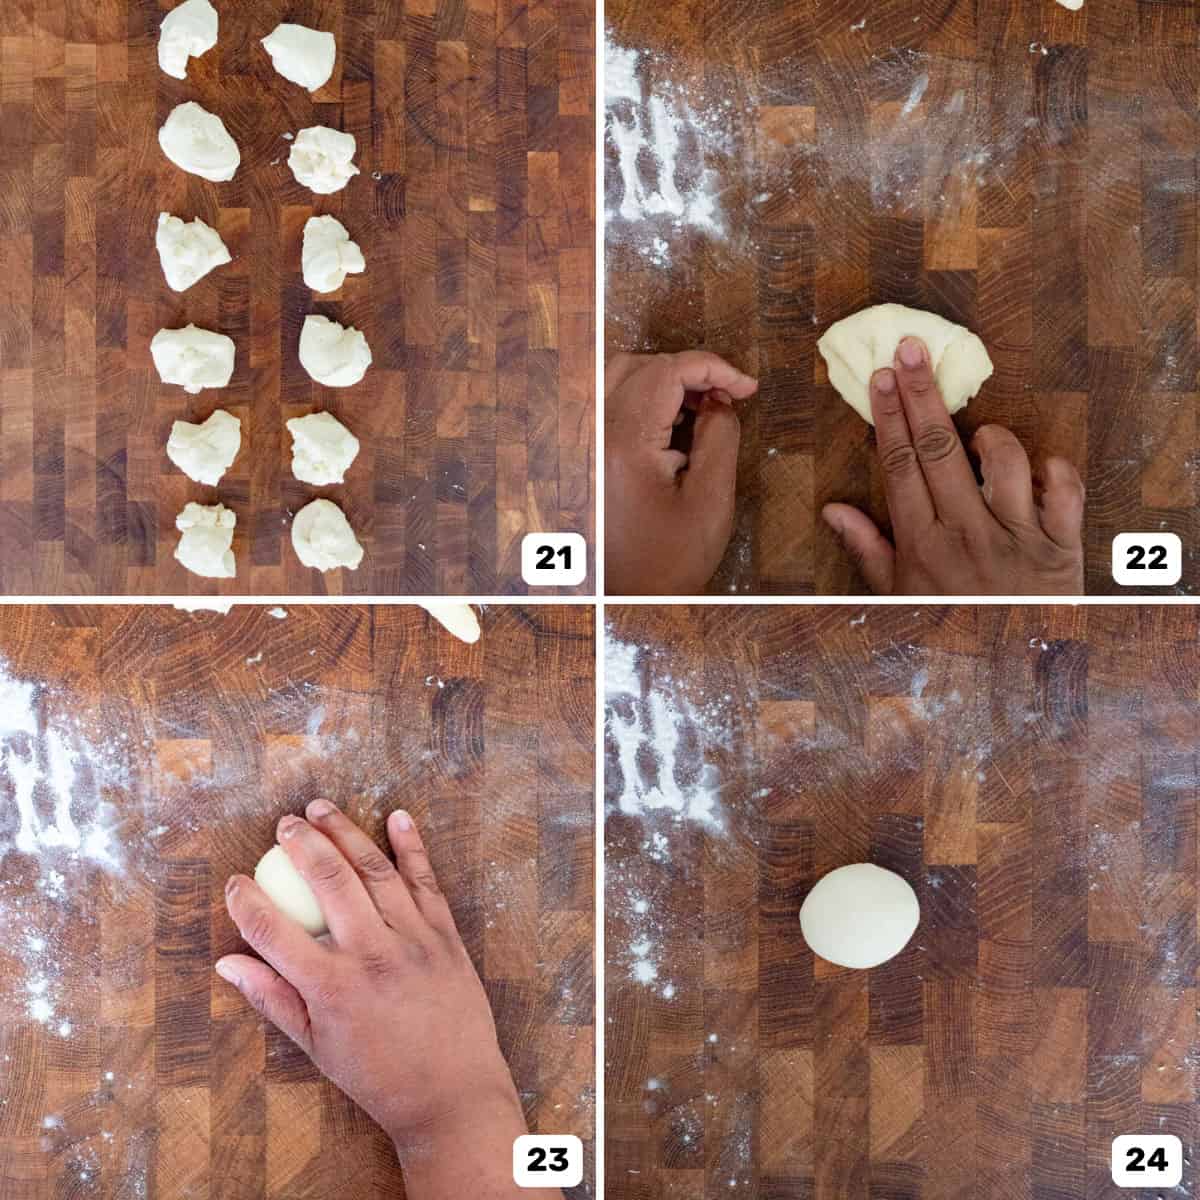
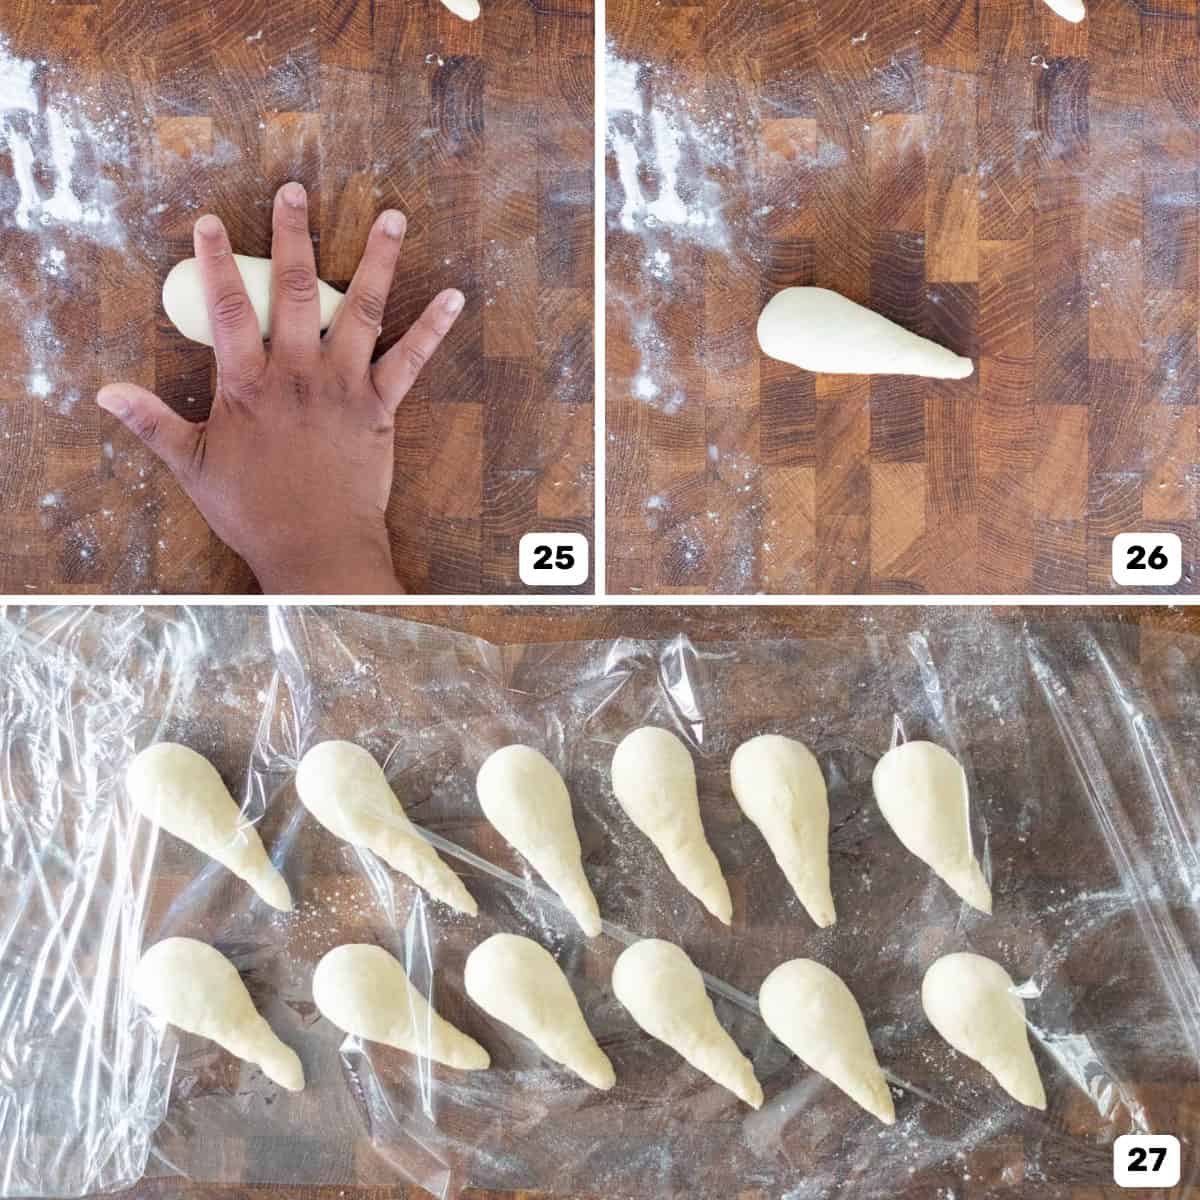
Once you’ve portioned the dough, shape each portion into a ball by bringing the edges towards the center (image 22) and pinching them together and then rolling the dough on the work surface to form a smooth ball (images 23- 24).
Then use your palm to roll one end of the dough ball to elongate it into a carrot-like shape (see pictures for reference) (images 25 – 26).
Place these on your work surface or a lined baking sheet, and cover them to let each dough portion rest for about 10 – 15 minutes (image 27).
Step 12 – Shape the buns
The croissant like shape for these buns comes from rolling out each portion into a long triangle shape, and then rolling it up with a piece of butter in the middle.
Use a rolling pin to roll out the thinner edge of the carrot shaped dough (images 28 – 29). This will make the narrow end stick to the work surface. Then slowly, use the rolling pin to roll out and stretch the thicker edge (image 30). It should only be slightly thicker than the width of your butter portions (about 2 – 3 inches wide), but the dough triangle will be fairly long (image 31).
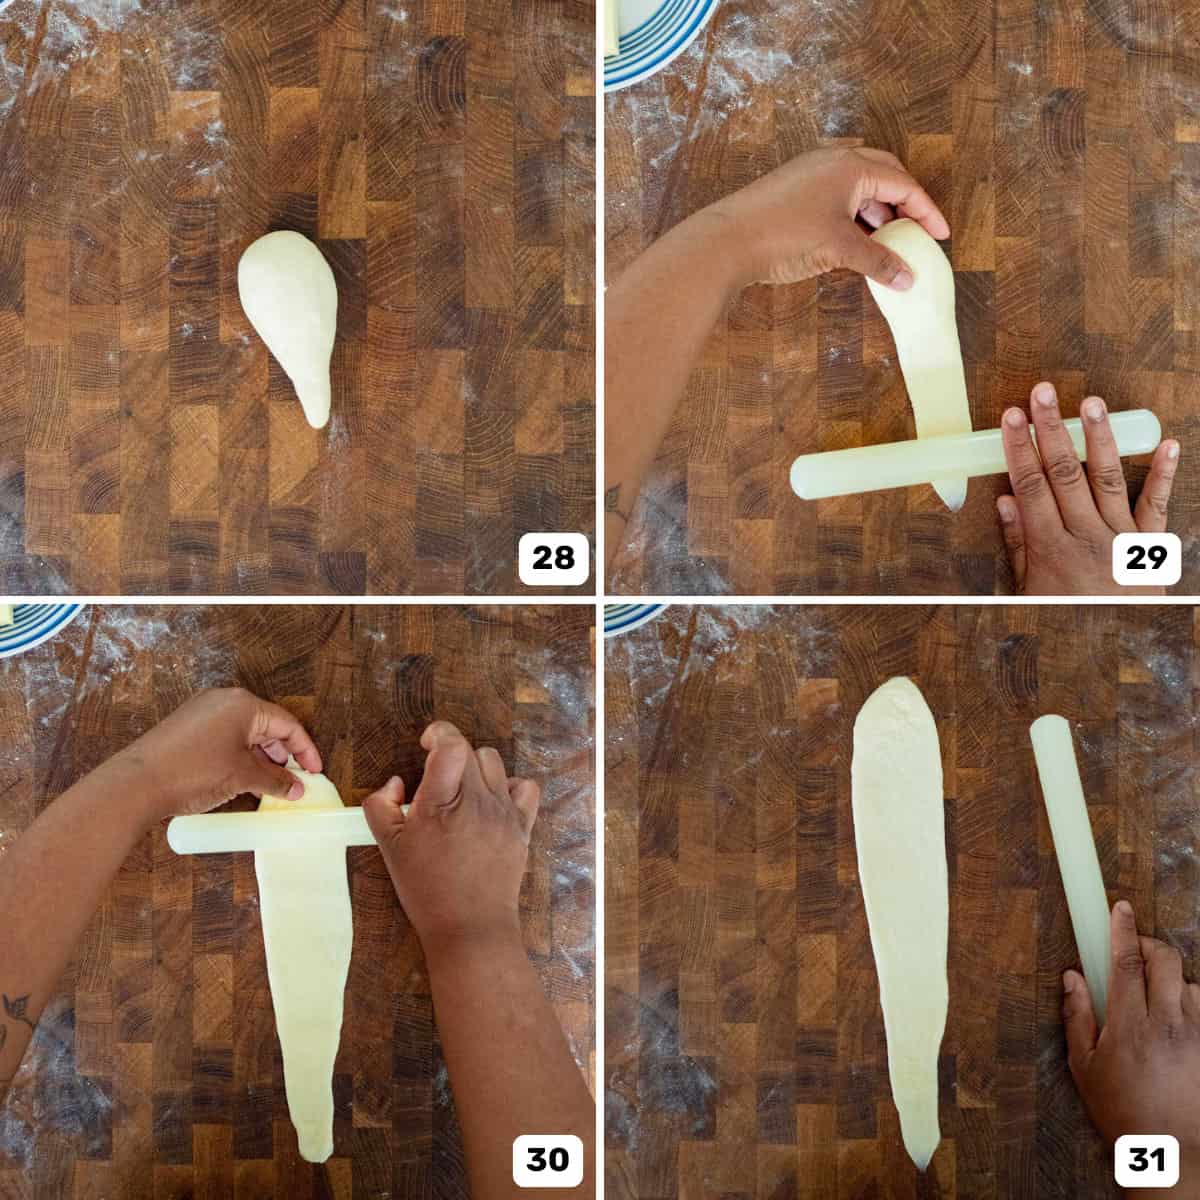
Don’t flour the work surface too much, especially under the narrow end of the dough, as it helps to have the dough stick to the surface on the narrow side.
Then place a butter portion on the wide end of the dough (image 32), and start rolling up the dough with the butter piece inside (image 33). I like to gently stretch the dough as I roll it up to make the dough narrower to create the “croissant-like” shape (images 34 – 35).
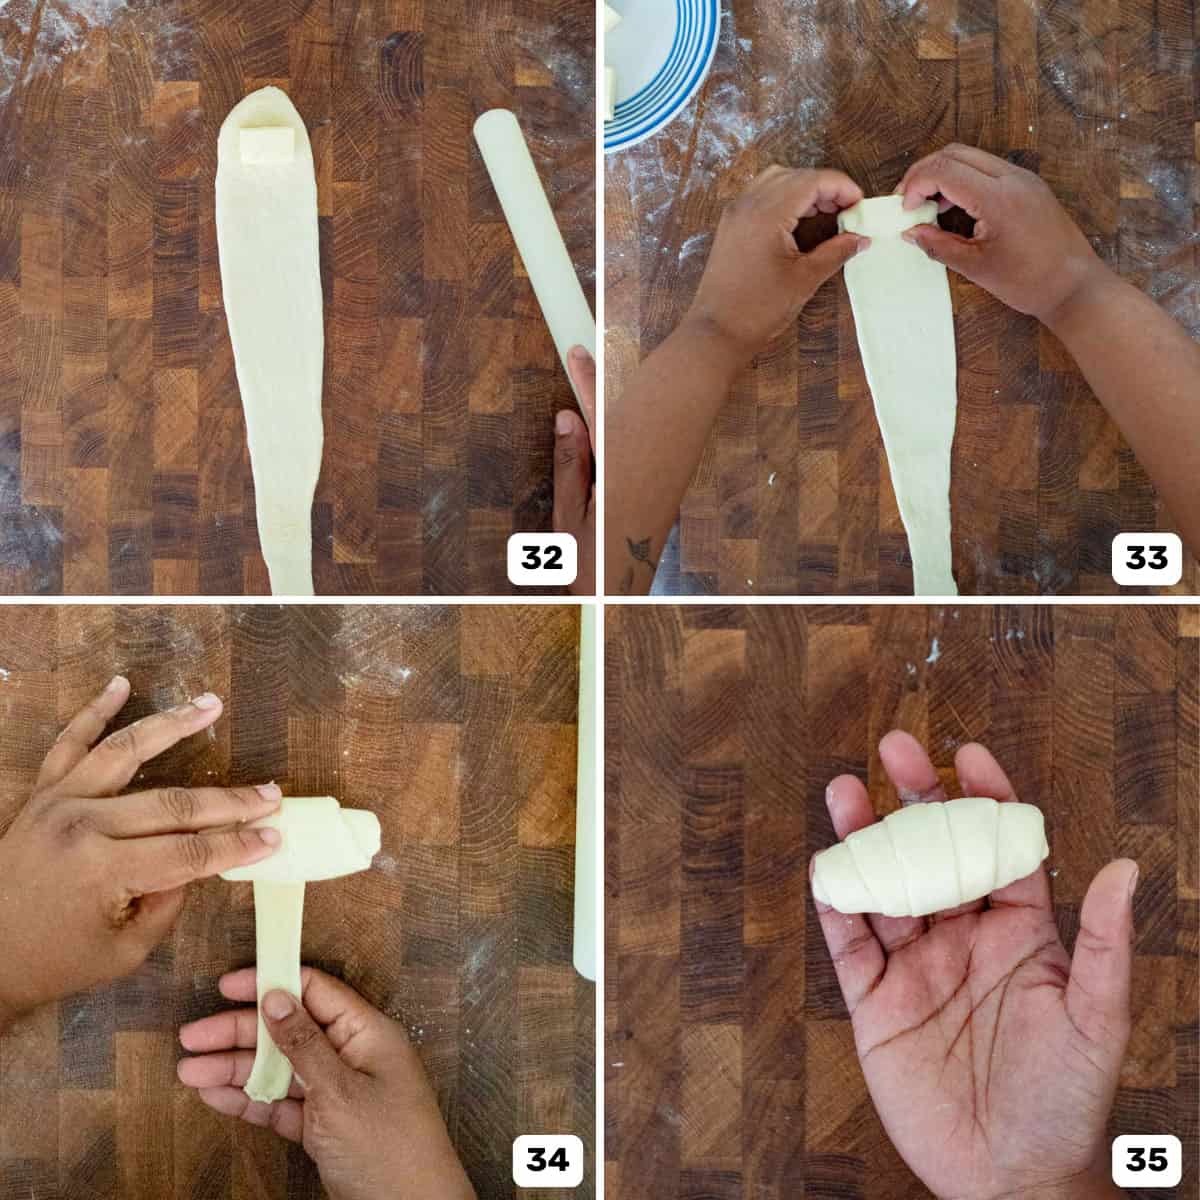
The longer the dough, the more “layers” you create. I prefer to keep it to only about 4 – 5 rotations (with 3 – 4 visible).
Step 13 – Final proof
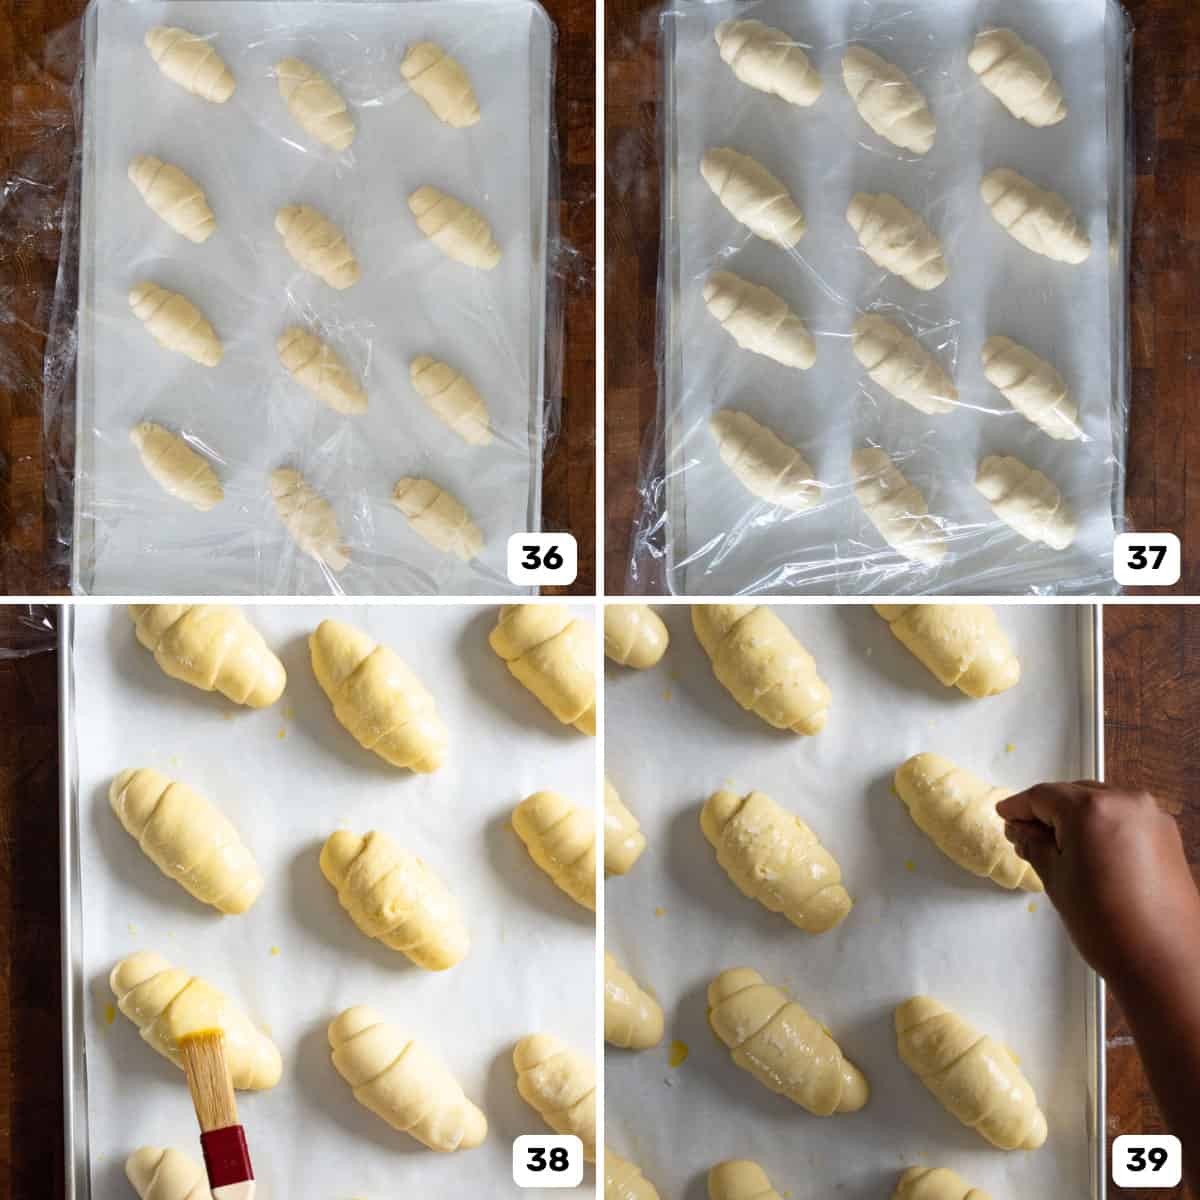
Place each shaped bun on a parchment paper-lined baking sheet, spaced well apart. In a half sheet pan, I only place 5 – 6 buns spaced out evenly (image 36). The images below show a full size sheet pan, that can fit 12 buns instead of 6.
Then cover the pan loosely with plastic wrap, and let it proof until doubled in size, or properly proofed (image 37).
Step 14 – Bake
While the buns are proofing, preheat the oven to 350 F and place a baking rack in the middle of the oven. Once proofed, the buns are ready to be baked, but first you have to brush them with an egg wash (image 38).
You can brush the bread rolls with,
- a whole egg whisked together, OR
- an egg yolk whisked with 2 tbsp cream or milk OR
- a milk wash (milk or cream only)
An egg wash will give you a more golden, shiny color when baked.
Then sprinkle the flaky salt on top (image 39). The wash will help the salt stick to the bread.
If you want to make your salt bread richer, and extra buttery like the Korean version (soggeum paan), then place a few pieces of butter on the half sheet pan as well (image 40). Then place the rolls in the oven and reduce the heat to 325 F.
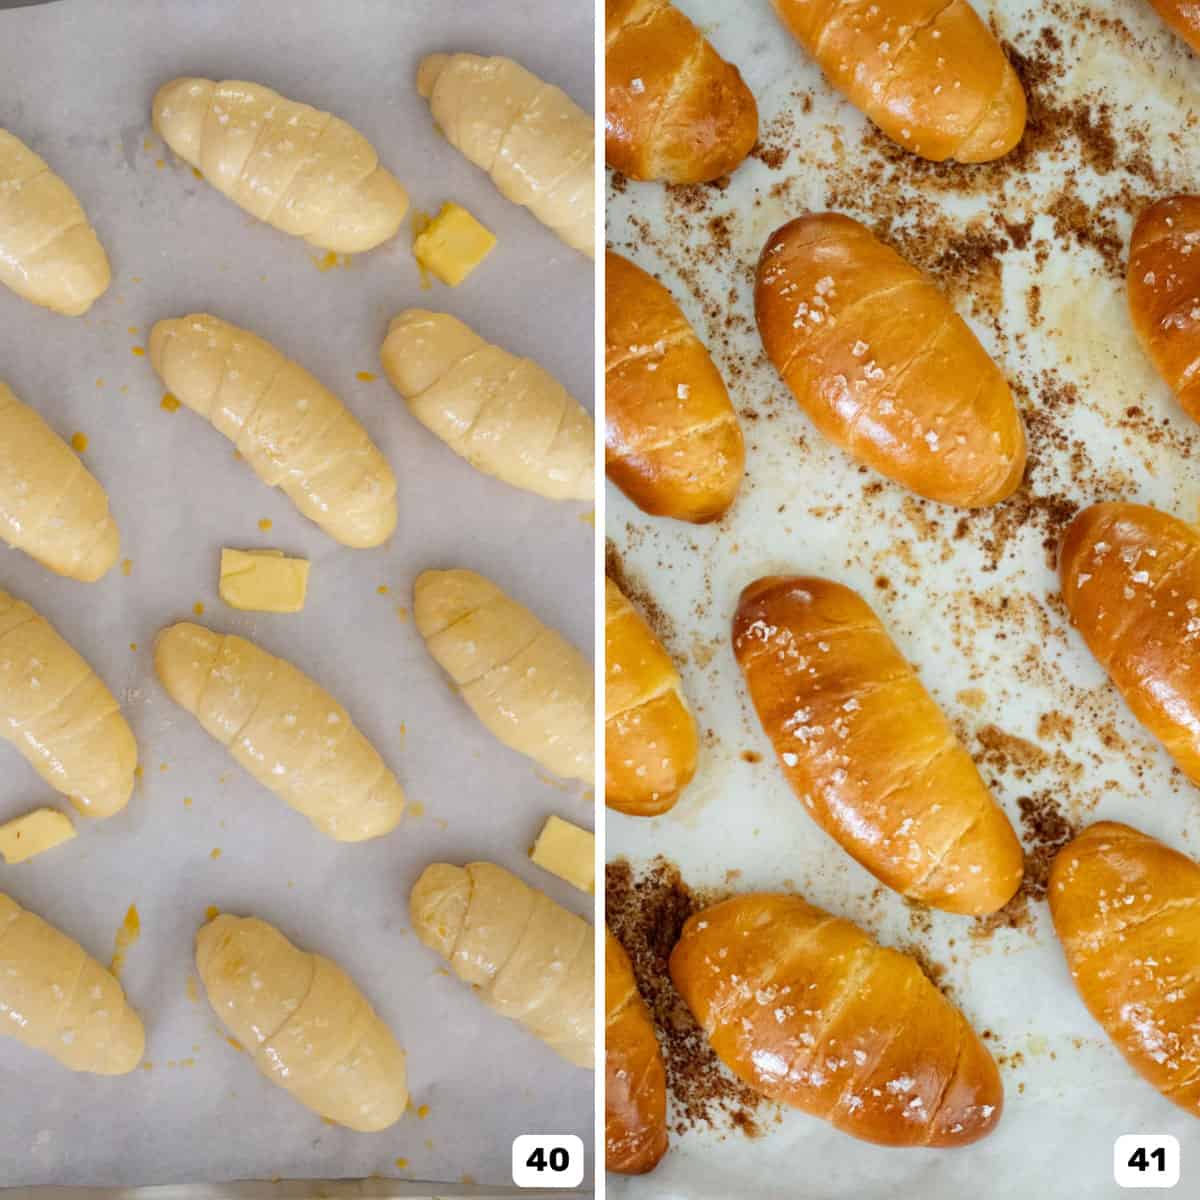
Bake the bread rolls in the oven for about 20 – 30 minutes, until the bread becomes a beautiful golden brown (image 41), and the bottom is nice and crisp!
The baking time will depend on the oven and the baking tray too (darker baking trays will bake faster than lighter ones).
The butter will melt out of the bread rolls and pool on the baking tray. The butter will also start to turn golden brown as it turns into brown butter. This is normal, so don’t worry!
Step 15 – Let the bread rest
After baking, remove the salt bread from the oven and let it rest on the baking tray with the melted butter. The bread will absorb some of the butter as it cools.
Then transfer the bread rolls onto a wire rack to cool. Serve at room temperature or a little warm (because ain’t no way you’ll be able to wait for them to cool down completely, ha!)


How to make salt bread dough by hand
You can make the bread dough without a mixer, but it will take longer, and a 24 hour rest time is essential.
You can knead the dough by hand, but this can take at least twice as long, and is very sticky and messy to do.
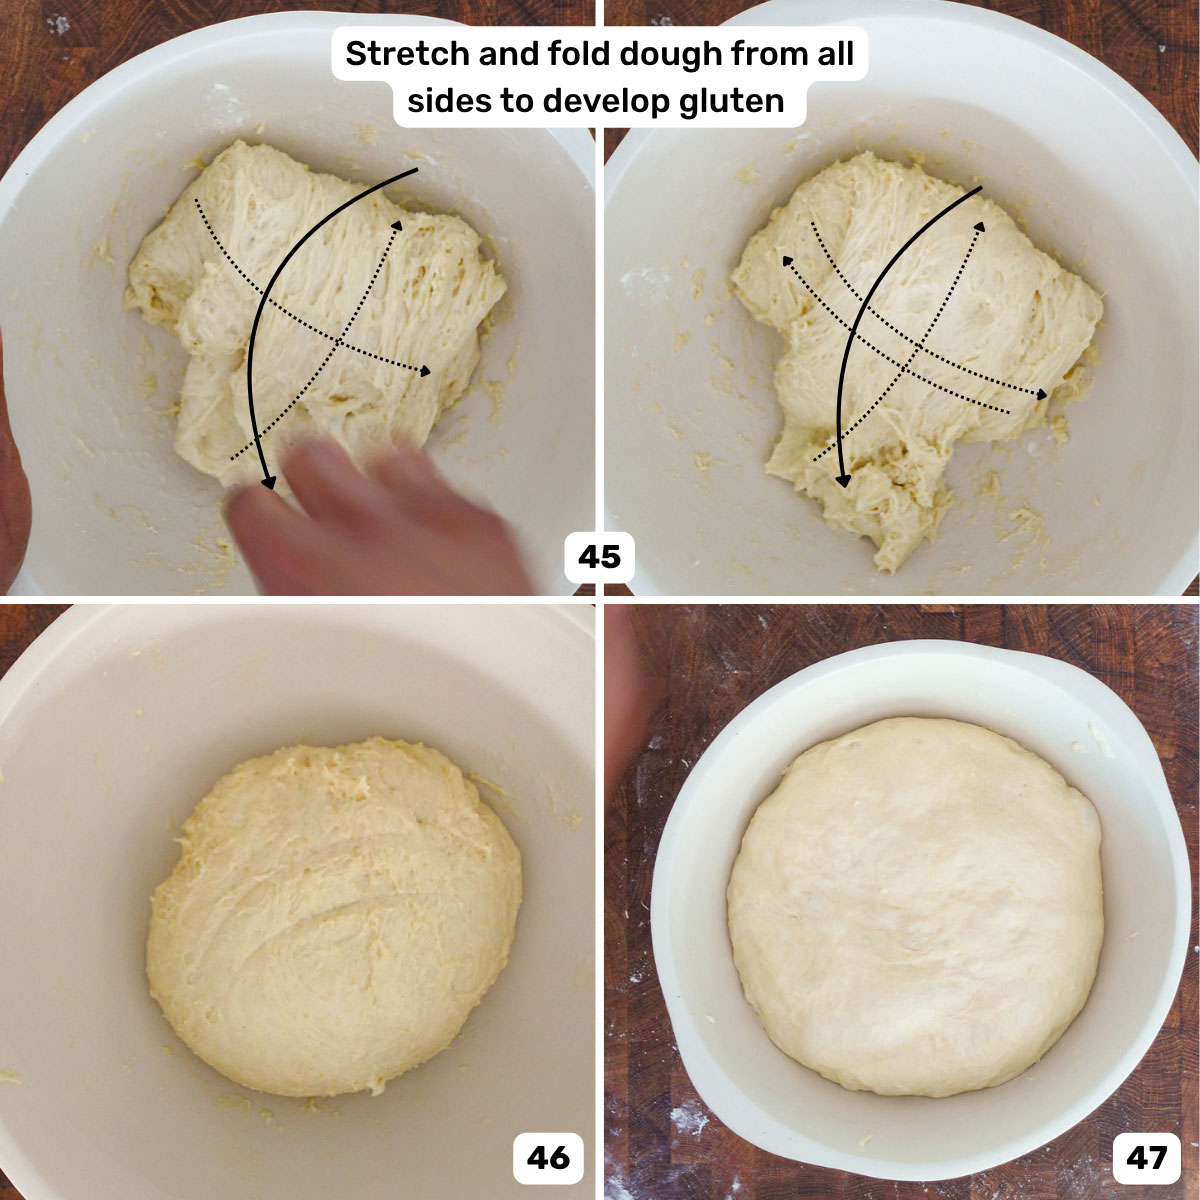
The other option is to mix the dough by hand (image 42), and then let it rest to hydrate (image 43) evenly for about 2 – 3 hours in the fridge, while stretching and folding the dough one cycle, every 20 – 30 minutes. Each stretch and fold cycle is shown in images 44 – 45).
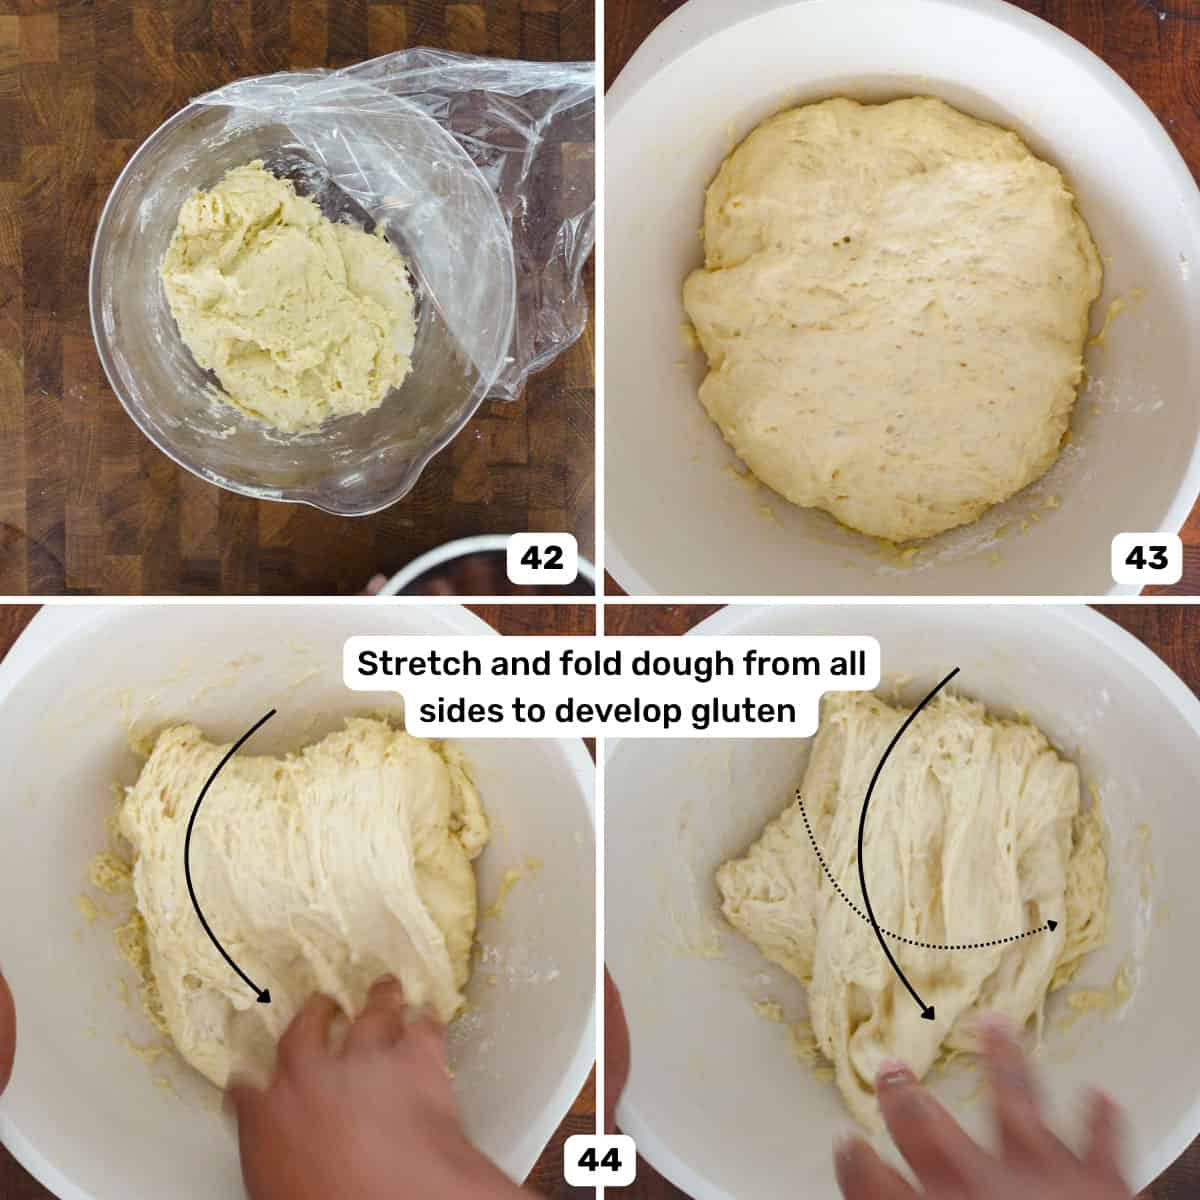
This will transform the dough into a more smooth dough. Repeat this process until you have a smooth and strong dough, where you can lift it out of the bowl cleanly without breaking it. Make sure to use a wet hand to stretch and fold the dough to prevent it from sticking.
Then shape the dough and let it proof (image 46) in the fridge for at least 12 hours, ideally 24 hours (image 47). Then proceed with the recipe.
My expert recipe tips
- Use bread flour for the best results. The higher gluten percentage helps with the structure of the shio pan rolls.
- You don’t have to follow the kneading and proofing times exactly. Instead, use them as a guide. Check the consistency of the dough to know when the dough is at the correct stage.
- Use weight measurements for consistent, replicable results. Volume measurements, especially for dry ingredients (such as flour), can lead to inconsistent results.
- Make sure the dough has enough gluten developed, because the stretchability of the dough is crucial for shaping it.
- While using milk powder is optional, it adds a lovely milky flavor to the bread that I highly recommend.
- Use a good salted butter that you like to eat! Do not use spreadable butter or margarine. It won’t give you the same results.
- You can make the salt bread in one day with a mixer, without an overnight cold proof.
- You don’t need an overnight cold proof if you make the dough with a mixer, but it can make the dough easier to work with, and develop more flavor during the slow fermentation.
- Once the dough is shaped, you can freeze it and bake at a later date! Just make sure to thaw it out in the fridge overnight, before letting it proof at room temperature prior to baking.

Salt bread variations I’ve tried
This classic version is hard to beat, but there are a couple of different versions that I really love!
- Garlic butter salt bread – I made garlic butter and placed that inside the dough instead of regular butter. SUPER delicious garlic bread rolls!
- Cheesy salt bread – Add some grated cheese to the dough to make cheesy salt bread rolls! I didn’t like placing the cheese in the middle, because the cheese will melt and harden as it cools down. But the cheese in the dough will infuse the bread with the cheese flavor, which is so much better!

Recipe FAQs and troubleshooting
Can I make this recipe vegan or dairy free?
You can make the dough itself vegan or dairy free easily. However, the salted butter that’s placed inside needs to be replaced with a good vegan butter alternative, and not margarine.
The vegan butter also won’t caramelize the same way as regular butter, so the flavor profile might change.
Why are my salt bread rolls dense?
The rolls will turn out dense for a few different reasons.
1 – The yeast wasn’t active
2 – The dough was underproofed before baking.
3 – The dough was overproofed before baking and collapsed.
4 – Did not use accurate weight measurements to make the dough, resulting in an imbalance between wet and dry ingredients (too much dry ingredients).
5 – Added extra flour during the kneading process.
Why is my bread dough so sticky?
This dough has a high level of hydration with the tangzhong and milk. In addition, the bread also has butter and eggs, which makes this an enriched dough, similar to brioche dough.
As a result, the dough will be sticky. But it’s this higher hydration and fat content that make the dough incredibly soft. As you knead the dough, the stickiness will gradually disappear as the gluten develops.
My salt bread doesn’t have the butter hole?
Sometimes the butter can migrate to the edge of the bread roll, instead of staying in the middle. The hole then also moves towards the end of the bread roll instead of staying in the middle.
If the butter melted while the dough was proofing (proofing temperature was too high), this can also lead to not having a butter hole in the middle.
The final reason is because the butter piece was too small, and melted too fast as it baked. So, the dough expanded into the hole.
What’s the best way to store salt bread?
You can store the bread in an airtight container at room temperature for about 1 day.
I prefer to store them in the fridge (in an airtight container) for about 5 – 7 days.
But since I make a double batch so often, I also like to freeze leftover baked salt bread as it lasts much longer that way. I freeze them on a sheet pan, in a single layer, so they freeze individually.
Can I make these ahead of time?
Absolutely!
You can either freeze BEFORE baking the salt bread, or AFTER baking it.
Both options are great, and the better option depends on how quickly you need them after freezing.
You’ll need to thaw out unbaked frozen salt bread rolls in the fridge for 8 – 12 hours. Then let them proof at room temperature until doubled in size and they are nice and puffy, before baking them. They are “freshly baked”, but it takes longer.
You can thaw out baked frozen salt bread rolls in the fridge for 8 – 12 hours, and then reheat them in the oven at 300°F / 150°C until heated through, before serving. So, the buns will be as fresh as they were when you froze them (will even taste freshly baked!), and it’ll be faster to get them on the table too.
What’s the difference between salt bread and regular butter rolls?
Butter rolls are usually brushed liberally with butter after they bake. Salt bread dough, on the other hand, is wrapped around a piece of butter that melts as it bakes and makes the bottom crisp while keeping the insides soft.
Finally, the salt bread rolls absorb the melted butter as they cool down, making them uniquely buttery and soft and delicious.

Recipe

Salt Bread (Shio Pan / Sogeum Ppang)
US based cup, teaspoon, tablespoon measurements. Weight measurements are recommended for accurate results whenever available.
Common Measurement ConversionsIngredients:
Tangzhong
- 60 mL water ¼ cup
- 60 mL milk ¼ cup
- 23 g bread flour 2 tbsp
Milk bread dough
- Tangzhong room temperature (above)
- 120 mL milk ½ cup, lukewarm
- 7 g active dry yeast 2 – 2 ¼ tsp., OR 5 g instant yeast (2 tsp)
- 50 g sugar ¼ cup
- 15 g dry milk powder 2 tbsp
- 1 egg
- 350 g bread flour about 2 ⅔ cups, spooned and leveled
- 1 tsp sea salt
- 58 g unsalted butter softened, 4 tbsp / ½ stick
Filling
- 170 – 180 g salted butter 12 – 13 tablespoons, cut into 12 portions
Topping
- 1 large egg for the egg wash
- 2 tbsp milk or cream
- salt flakes such as Maldon (to sprinkle on top)
Instructions:
Tangzhong
- Place the water in a small saucepan. Add the bread flour and whisk until you have a smooth mix with no lumps. Add the rest of the milk and whisk to combine.60 mL water, 60 mL milk, 23 g bread flour
- Heat over medium heat while whisking constantly until the mixture thickens. The resulting mixture should have a thick, spoonable, pudding-like consistency.
- Scrape the mixture into a bowl and then cover with plastic wrap. Make sure the plastic wrap is touching the surface of the tangzhong to prevent a skin from forming on top.
- Allow the tangzhong to cool to room temperature, or only slightly warm (lukewarm is fine).
Milk bread dough
- Activating the yeast – If you're using active dry yeast, activating it first is essential. With instant yeast, it's optional, but if you're not sure how fresh the yeast is, then I recommend activating it first to make sure.
- In your mixing bowl, place the lukewarm milk and dissolve about 1 tsp / 5 g of the sugar in the liquid. Sprinkle the yeast over the milk and gently stir to mix. Allow the milk + yeast mixture to stand for about 10 – 20 minutes until the yeast is activated. The mixture should become bubbly and frothy on the surface.120 mL milk, 7 g active dry yeast, 5 g sugar
- Once the yeast is activated, add the milk powder (if using), the rest of the sugar, tangzhong, egg, flour, and finally the salt.Tangzhong, 15 g dry milk powder, 1 egg, 350 g bread flour, 1 tsp sea salt, 45 g sugar
- Using a spatula or the dough attachment from your mixer, mix the dough to combine the ingredients and to help form a scraggly dough.
- With the dough hook attached to your mixer, knead the dough for about 5 minutes on a low speed (speed 2 or 3). The dough will be very sticky and stick to the sides, but continue mixing and the dough will start to come together.
- After 5 minutes of kneading, add the butter in 3 – 4 additions, mixing for about 20 seconds in between. Scrape down the sides and the bottom of the bowl to make sure the dough mixes well.58 g unsalted butter
- Once all the butter is incorporated into the dough, turn up the speed to 4 – 5 (medium speed) and knead for a further 10 – 15 minutes. Scrape the bowl once or twice while kneading.
- The dough should become smooth, satiny, and pull off cleanly from the sides of the bowl. To check if the dough is kneaded enough, try to lift the dough out from the bowl using the dough hook. If the dough comes off cleanly from the bowl without tearing and leaving any dough behind in the bowl – then you have kneaded the dough properly.
- Place the dough on a lightly floured surface and shape it into a ball. Then place the dough back in the mixing bowl and cover with plastic wrap.
Bulk fermentation
- To make the salt bread on the same day, bulk ferment the dough at room temperature ONLY until doubled in size (or slightly less). This should take at least 1 hour, or up to 2 hours. I prefer to not let it proof too fast.
- To make the salt bread the following day, transfer the bowl into the fridge to slow proof for 8 – 12 hours. You can keep it in the fridge for up to 24 hours hours, if needed.
- Once the dough is proofed, we are ready to portion the dough and shape it into the initial "carrot-like" shapes. This can be done even when the dough is cold.
Portioning and pre-shaping dough
- Turn the dough out onto a lightly floured surface and press all the excess air out of the dough.
- Weigh the dough and divide it into 12 equal portions by weight. Keep the dough portions covered with a sheet pan or plastic wrap to prevent them from drying out.
- Take a portion of the dough and roll it into a ball. Then use the palm of your hand (lightly floured if needed), and roll just one end of the dough ball back and forth to lengthen it into a carrot-like shape (see pictures in the post for reference).
- Place this back under the plastic wrap. Repeat with all the dough portions so you have 12 pieces of dough that look like carrots (or stubby baseball bats!).
- You can keep these dough portions covered on your countertop, OR on a sheet pan. Let them rest for about 10 – 15 minutes at room temperature. Or up to 1 hour in the fridge.
Preparing the butter portions
- Cut the butter block into 12 equal rectangle-shaped portions. Make sure the butter blocks are no more than 1.5 – 2 inches wide. Each portion should weigh about 10 g (for less buttery rolls), or up to 15 g (for more buttery rolls).170 – 180 g salted butter
- Place the butter portions back in the fridge.
- You can also use smaller butter pieces and stick them together into 12 blocks as well, instead of cutting portions precisely (so that there's no wastage).
Shaping the dough portions
- Line two half sheet pans with parchment paper. Make sure the sheet pan has a lip around the edge to contain the melted butter.
- Take one of the carrot-shaped dough portions and place it on your counter. Your work surface shouldn't be floured too much, as the narrow end of the dough should stick to the surface to help stretch out the dough.
- Use a rolling pin to roll out the narrow end of the dough flat onto your work surface. Then roll out the dough in the opposite direction towards the thicker and wider end. I like to hold the wider end of the dough as I roll it out, so that I can gently stretch the dough as it's rolled out.
- The resulting dough triangle should be fairly long (about 10 inches), with the wide end being no more than 2.5 inches wide (just a little wider than the butter block). This is the step that may require some practice, but it's easy once you get the hang of it!
- Place a butter portion on the wide end of the triangle, and start rolling up the dough with the butter inside.
- Roll up the dough towards the narrow end while making sure to center it, so that it rolls up fairly symmetrically. I like to gently stretch the dough and make it narrower as I roll it up (see pictures in the post for reference).
- Then place the salt bread (with the narrow end tip on the bottom) on the parchment paper lined sheet pan. This is so that the dough won't unravel as it bakes.
- Repeat with all the dough portions.
- Place 6 salt breads on each half sheet pan, evenly spaced out. Loosely cover with plastic wrap or with a sheet pan cover.
Final proof
- Preheat the oven to 350°F / 180°C (convection oven). Place the oven rack in the middle of the oven.
- Let the bread poof at around 77 – 79°F / 25 – 26°C. This can take up to 2 hours, depending on the temperature and humidity.
- The salt bread will almost double in size, and will look pillowy. When you shake the tray, the bread will jiggle.
- Finger indentation test to check if the bread is properly proofed.Use a finger to gently press into the dough. Since there is a piece of butter in the middle, make sure to press the dough at the ends instead of the middle. Once you've created an indentation that's about 1 cm / ½ inch deep, remove your finger and see how the indentation behaves.If the indentation bounces back completely – still under-proofed.If the indentation bounces back only partially, leaving a shallow indentation – perfectly proofed.The indentation remains and doesn't change at all – bake immediately (almost over-proofed). If the whole dough starts to deflate when poked – over-proofed.
Baking salt bread
- Whisk the egg to create an egg wash. For a richer egg wash, only use the egg yolk whisked with milk / cream. You can also just brush the bread with milk or cream instead, but this will create a matte crust, while egg wash will create a shiny crust.1 large egg, 2 tbsp milk or cream
- Once the bread is properly proofed, brush the top of the buns with the egg wash or milk wash. Then sprinkle salt flakes on top.salt flakes
- OPTIONAL – If you want a richer, more buttery version, you can place 1 – 3 tbsp of butter on the baking tray, so that more butter melts on the tray to make the bottoms even more crisp and buttery.
- Place the bread rolls in the oven, and reduce the oven heat to 325°F / 165°C. Bake the salt bread rolls until they turn a beautiful golden color, which can take between 25 – 35 minutes. The bottom of the buns should also be a dark golden brown color.
- Once baked, remove the tray from the oven. Allow the salt bread rolls to sit on the baking tray for a few minutes. There will be melted butter in the tray, but the butter rolls will absorb some of that butter as they cool.
- Then transfer the salt bread onto a baking rack to cool down further.
- You can serve the shio pan (classic Japanese version with less butter), or the Korean soggeum ppan (more buttery version) while still a little warm, or at room temperature.
Recipe Notes
Notes on proofing
I prefer to let the bread proof slowly than let it proof fast in an environment that is too warm. This also allows the gluten to develop as it proofs. It’s also vital that the final proofing temperature isn’t too warm, as this will cause the butter to melt before baking.Proofing test (finger indentation test)
- If you make a small indent on the dough with your finger tip and it bounces back slightly, then it’s ready to be baked.
- If the indentation stays, it’s starting to over-proof, so bake it as quickly as possible.
- If the bread deflates when poked with a finger, then it has definitely over-proofed and may need to be re-done.
Storage
Store in an airtight container for one day at room temperature, or 5 – 7 days in the fridge. To freeze them for longer, I place them on a sheet pan, in a single layer, so that they freeze individually, and I can remove only one at a time. They freeze well for at least 3 months, possibly longer, but I haven’t tried freezing them for longer than 3 months so far. To reheat, let them first thaw out fully in the fridge. Then reheat at 300°F / 150°C until heated through.Nutrition Information:
“This website provides approximate nutrition information for convenience and as a courtesy only. Nutrition data is gathered primarily from the USDA Food Composition Database, whenever available, or otherwise other online calculators.”


Leave a Reply