




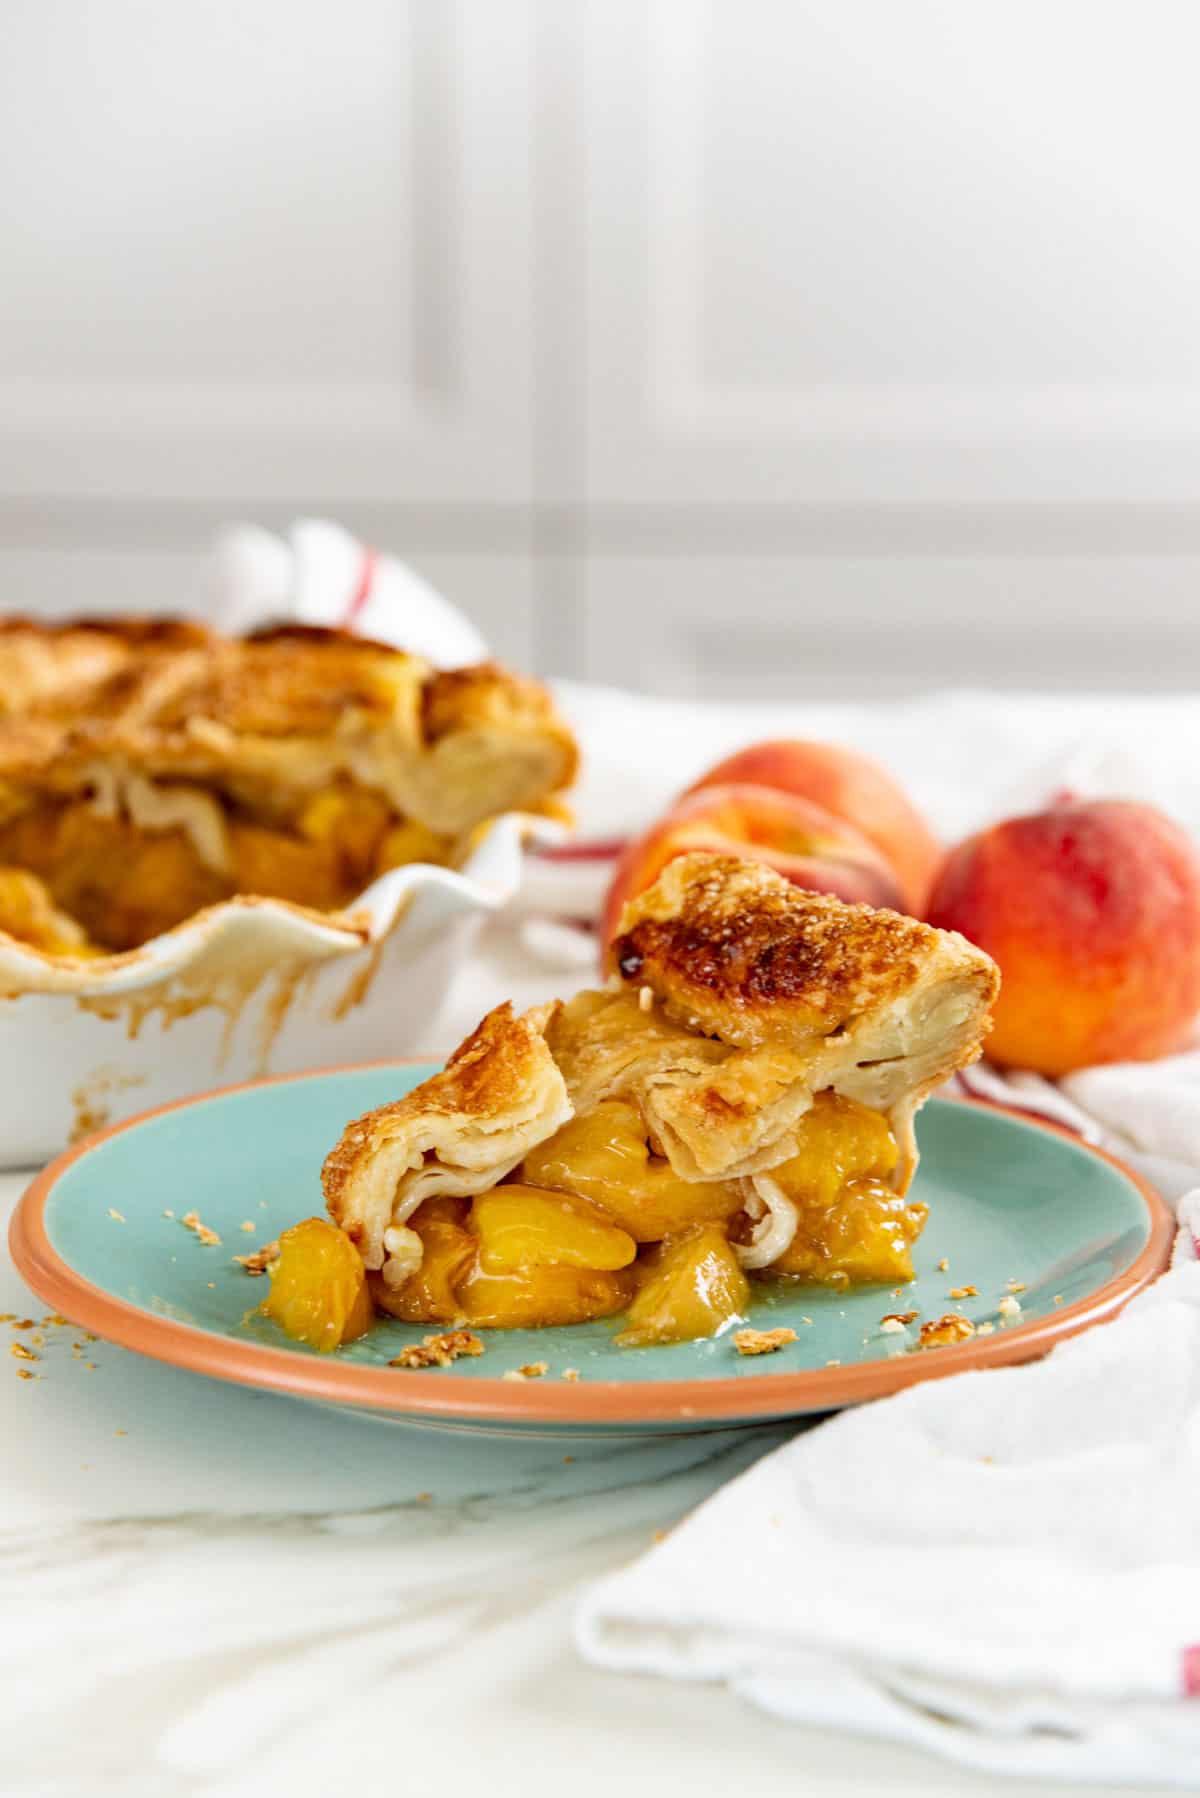
If mushy, runny pie fillings and soggy pie crust bottoms are ruining peach pie for you, you’ll love this peach pie recipe with all my tips to ensure a perfectly baked, buttery, flaky pie crust, and a very peachy, juicy filling!
Make it with fresh or frozen peaches any time of the year, and freeze it for later too (because I use freezer-friendly tapioca starch as the thickener). And the filling is only lightly spiced, just to enhance the flavor, while keeping the fruity peach flavor front and center!
- Why this recipe works
- Ingredients you’ll need
- How to make peach pie (step by step overview)
- Should I pre-cook the peach pie filling?
- Making the pie with frozen peaches
- How to tell when the pie is done baking
- How to prevent a soggy pie crust
- My best recipe tips
- Recipe variations
- Make ahead and storage tips
- Recipe FAQs
I mastered pies a little later in life compared to most other pastries and desserts. But now, fruit pies are one of my favorite ways to enjoy summer fruit! A buttery, flaky, perfectly baked pie crust encasing a sweet, juicy fruit filling, served with a dollop of whipped cream or a scoop of vanilla ice cream. That’s the good stuff, indeed!
And I developed this recipe to have everything I ever wanted in a peach pie! A sweet, fruity filling that’s NOT mushy or runny, but still very juicy. And the filling tastes very peachy, not overpowered by sweetness or spices.
And the best part is that you can make this with fresh or frozen peaches, so you can make it any time of the year! Which is why I love making this for Thanksgiving and the holidays!
Why this recipe works

- Well-tested recipe, using fresh and frozen peaches, different ways of cutting the peaches, PLUS using different types of thickener too.
- Make with fresh peaches in the summer, OR use frozen peaches all year round!
- It’s lightly spiced, just enough to enhance the peach flavor, and not overpower it.
- The peach filling itself is so fruity, juicy, and delicious, I often make it on its own to serve with ice cream.
- The filling isn’t “set” because I cut the peaches into cubes or slices that are large enough to fall out on their own, but the filling isn’t runny either.
- This pie is packed to the brim with peaches, so the filling to crust ratio is never disappointing!
- I share tips on how to ensure a perfectly baked pie crust, with never a soggy bottom!
Ingredients you’ll need
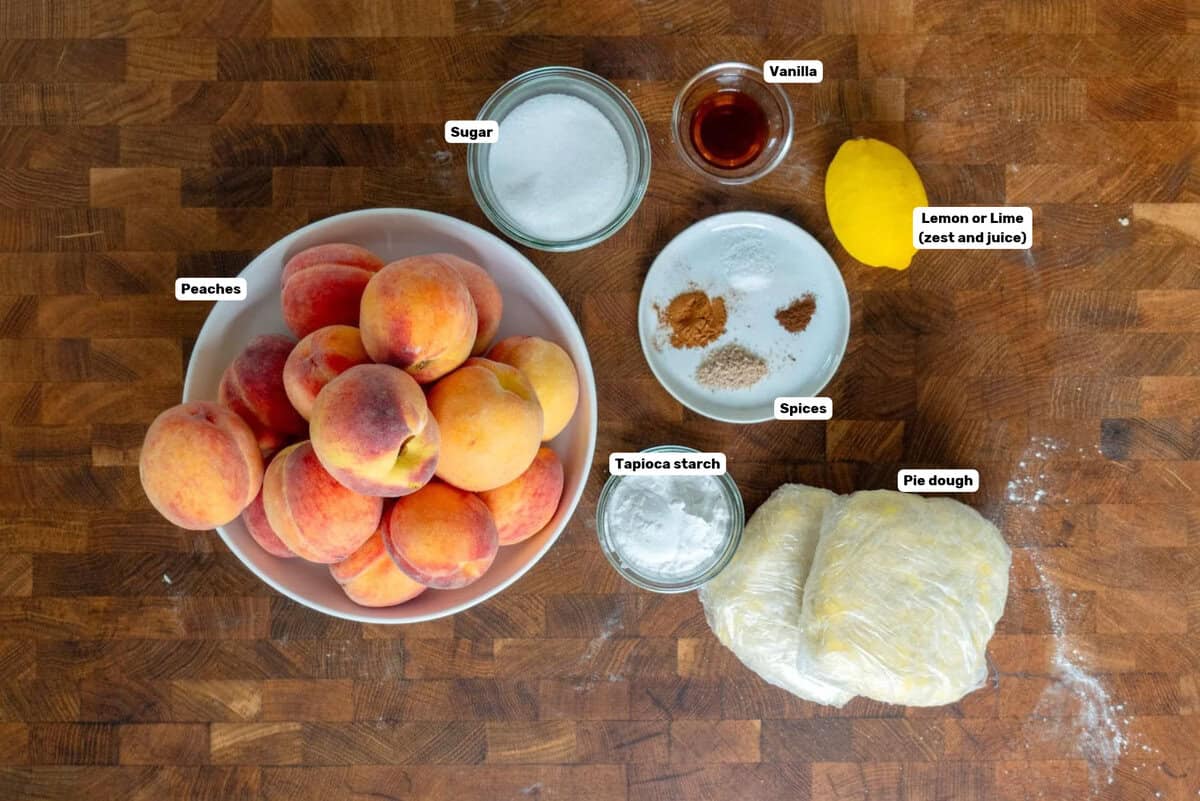
- Peaches – Fresh or frozen.
- Tapioca starch – I prefer tapioca starch as the thickener, since you can freeze it after cooking, and it won’t break down like cornstarch.
- Sugar – White sugar adds sweetness without altering the flavor.
- Lime juice and zest – Brightens the flavor of peaches. You can substitute it with lemon juice as well.
- Spices – It’s important not to overwhelm the flavor of peaches with the spices. Spices that pair well with peaches include,
- Cinnamon
- Ginger
- Nutmeg
- Cardamom
Cinnamon is usually quite common in peach pies, but I do find that it can overpower the peach flavor a bit too much for my liking. I prefer to use nutmeg and cardamom, but I also like to add fresh ginger when I want a little warmth in the peach filling.

Tips for choosing and using fresh peaches
- It goes without saying that the better your peaches taste, the better your fresh peach pie will also taste. For the best flavor and texture, use peaches that are perfectly ripe, and are still fairly firm to the touch (only a little give).
- I actually like to buy peaches that are slightly underripe, and then let them ripen at home. That way, I can use them as soon as they reach the desired ripeness.
- I prefer to use freestone peaches, as the pits are easier to remove. But you can use clingstone peaches as well, it’ll just take longer to remove the pits.
- You can use overripe peaches too, but the softer they are, the more likely they will break down and become mushy during baking.
- You can use peaches with the skin, or without. The difference will be in the texture, as the skin adds more texture to the filling.
- To remove the skin, either peel off the skin, or blanche and peel off the skin. I’ve tried both methods, and actually prefer blanching and removing the peel.
Tips for using frozen peaches
- While you can use peaches while they’re still frozen, the thickener (tapioca starch) doesn’t mix evenly with them. This can cause the starch to form clumps as it heats up.
- So, I prefer to thaw out at least half of the peaches (low power in the microwave), so that the starch can dissolve and properly mix with the peaches.
Choosing the right thickener
The reason I love using tapioca starch is that I love the texture of tapioca starch thickened filling. PLUS the cooked pie and filling can be frozen for a later date (unlike with cornstarch that breaks down after freezing and thawing).
Another option is instant type clearjel which also holds up really well to freezing, but you have to take care when mixing it with the fruits.
Cook type clearjel also works really well, but doesn’t hold up to freezing as well as instant clearjel (but it’s better than regular cornstarch).
How to make peach pie (step by step overview)
This pie is a double crust pie! You can have a crumble or cobbler topping on top instead of a pie crust too, if you prefer. But, here I’m showing you how I make a lattice crust peach pie.
I made my all butter pie crust recipe that makes enough for a double crust. You can use storebought pie crust too, for convenience. Just keep in mind that this pie is made in a deeper dish than a standard pie crust.
If you purchase premade pie crust, you’ll need to adjust the amount of pie filling that we are using here.
Step 1 – Make the pie dough
Make my all butter pie crust dough a day ahead, and divide the dough into two portions. Wrap each portion and let it rest in the fridge overnight.
My recipe post contains all the details for the perfect, beginner-friendly all butter pie crust!
Step 2 – Line the pie plate
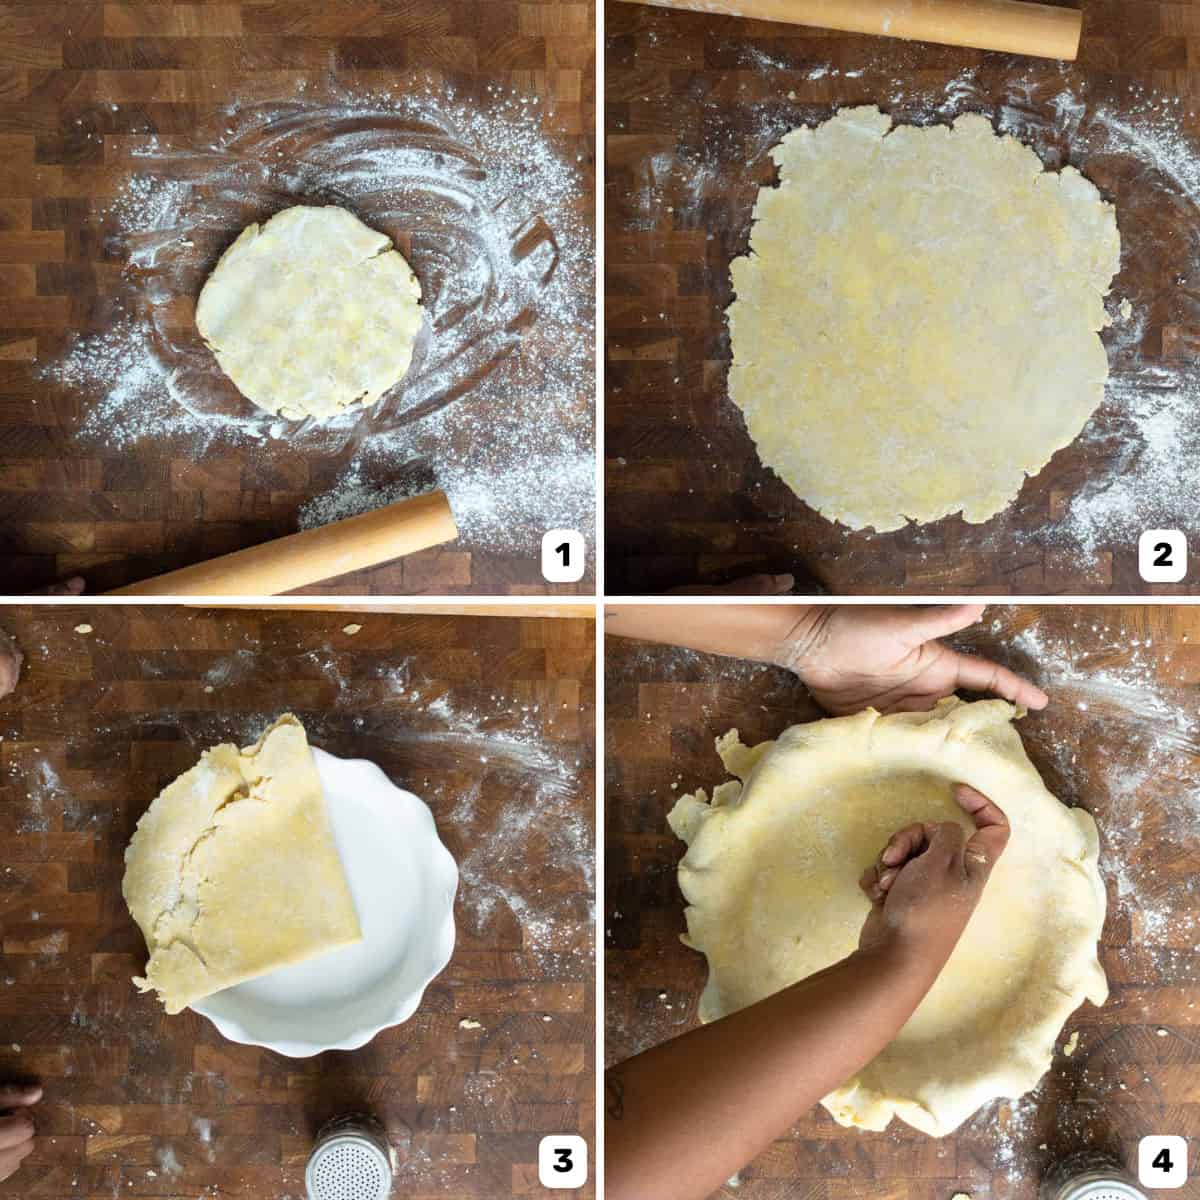
Roll out one of the dough portions to about a 3 mm thickness (images 1 – 2). Carefully place it in the pie plate making sure not to stretch the dough (images 3 – 4).
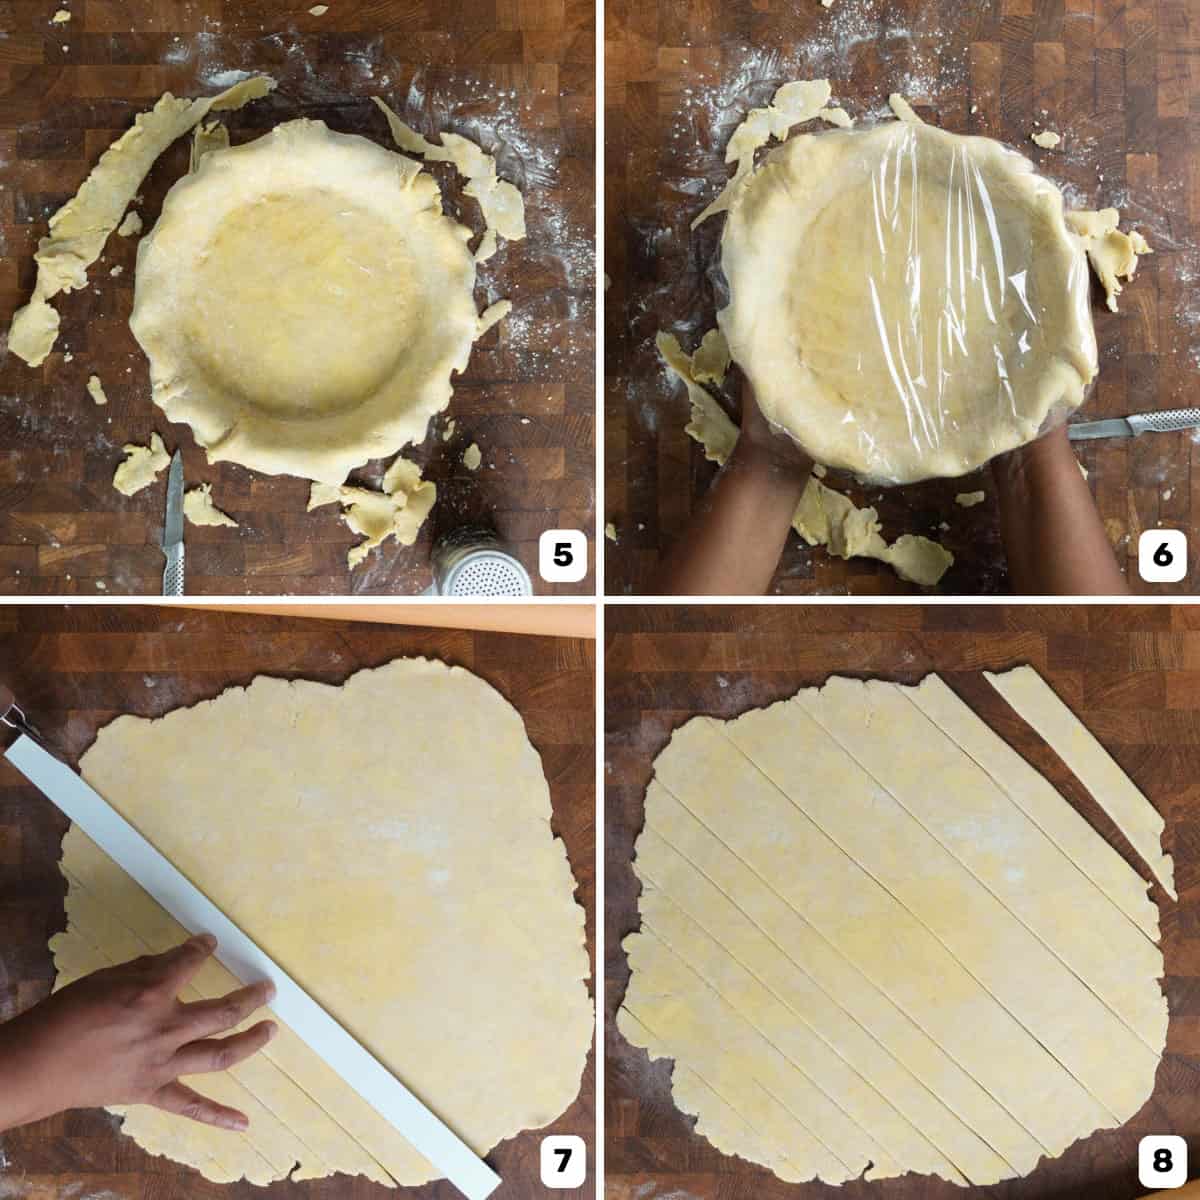
Trim the edges leaving a 0.5 – 1 inch overhang. I like to leave a 1 inch overhang, because I like having a thicker pie crust border (image 5).
Then completely cover the pie plate with plastic wrap and leave it in the fridge until the filling is ready (image 6). It’s important to ensure the crust is covered well, or the exposed dough will become dry and crack.
Step 3 – Roll out the top crust for a lattice
Roll out the second dough portion. I prefer to have a slightly thicker top crust but that’s just my preference. Make sure the crust is rolled out to a size that will generously cover the top of the pie plate.
Then use a ruler to mark evenly spaced strips (image 7). You can have all the strips the same width, or have some thick and some thin (image 8). Totally depends on what pattern you’d like on your pie.
Cut the strips and place them on a tray. Cover them with plastic wrap and refrigerate until needed.
You can also form a lattice with the strips on a parchment paper and then place it in the fridge as well. This way, you can place the formed lattice directly on the filled pie.
Step 4 – Blanch the peaches
Bring a large pot of water to a boil. Place another large bowl in the sink and fill it with cold running water, or an ice bath. Drop the peaches into the boiling water (about 3 – 4 at a time) and make sure they are submerged for about 30 – 45 seconds. Then transfer the blanched peaches into the cold running water, or the ice bath.
Repeat with all the peaches.
Step 5 – Prepare the peaches
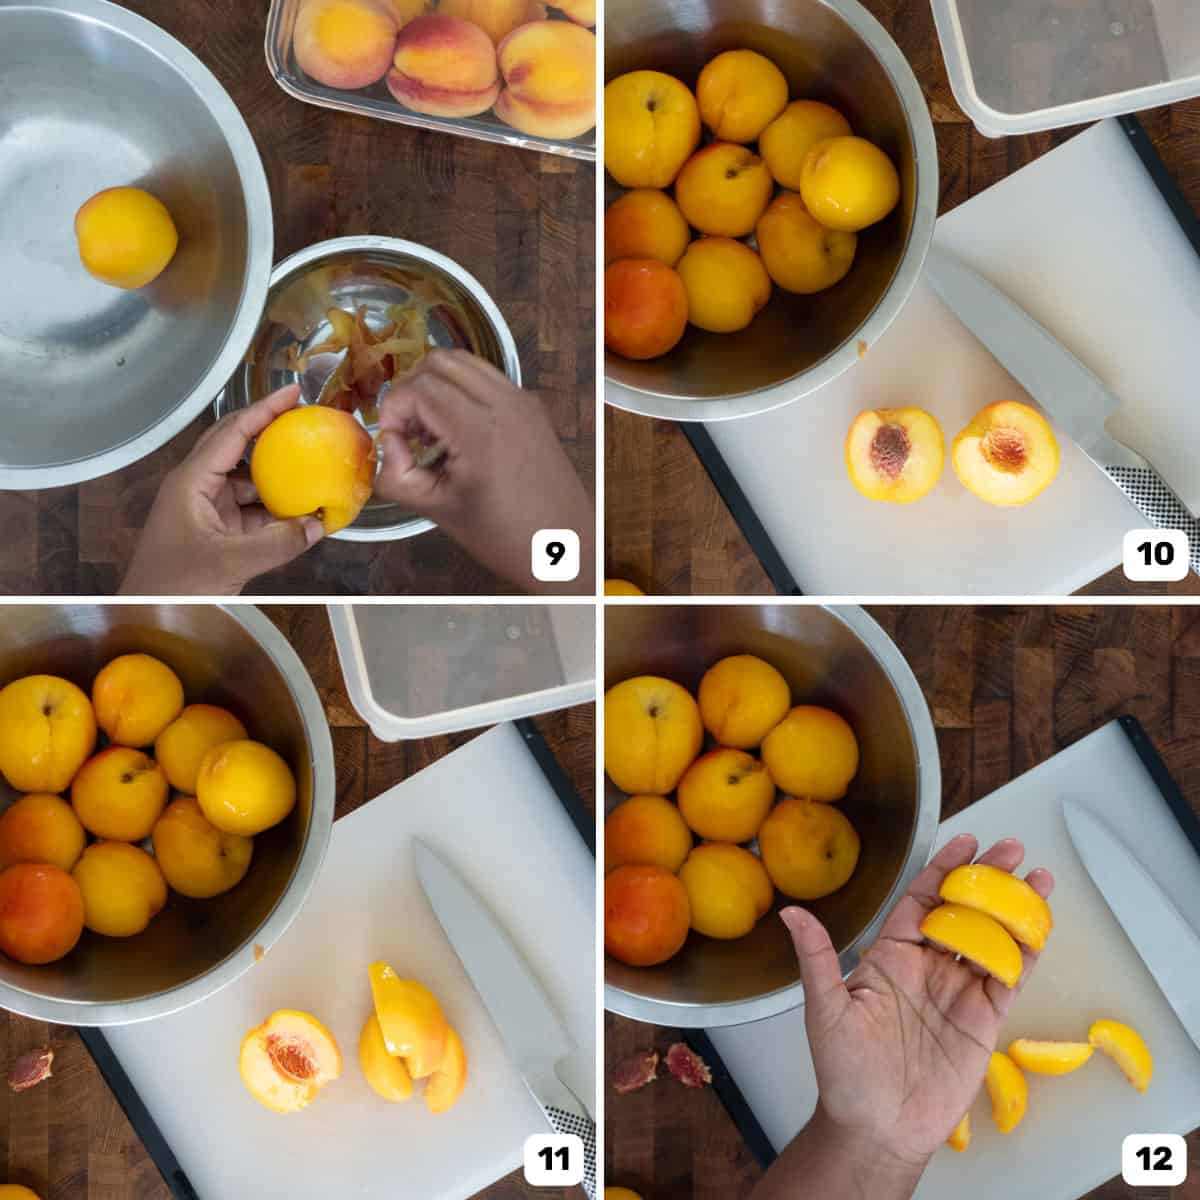
Then start peeling off the skin from the blanched peaches and place the peeled peaches on a plate with paper towels to catch any extra water (image 9).
- Freestone peaches – Cut the peaches in half, and then the pit should come out freely without any resistance (image 10).
- Clingstone peaches – Cut the peaches in half and use a sharp chef’s knife to pry off one side. Then use a spoon to scoop up the pit. I have also seen some removing the pit from whole peaches (without cutting it in half) by using a long nose plier.
Step 6 – Cut the peaches
Once the peaches have been cut into half, you can either slice them into wedges, or cut into chunks. The shape does not matter, but the thickness of the peach pieces do!
Each half should be cut into about 4 wedges. Make sure the wedges are between 3/4 – 1 inch thick in the middle (images 11 – 12).
If you want cubes or chunks, cut the peach halves into 1 inch slices first, and then cut each of the slices into 1 inch cubes.
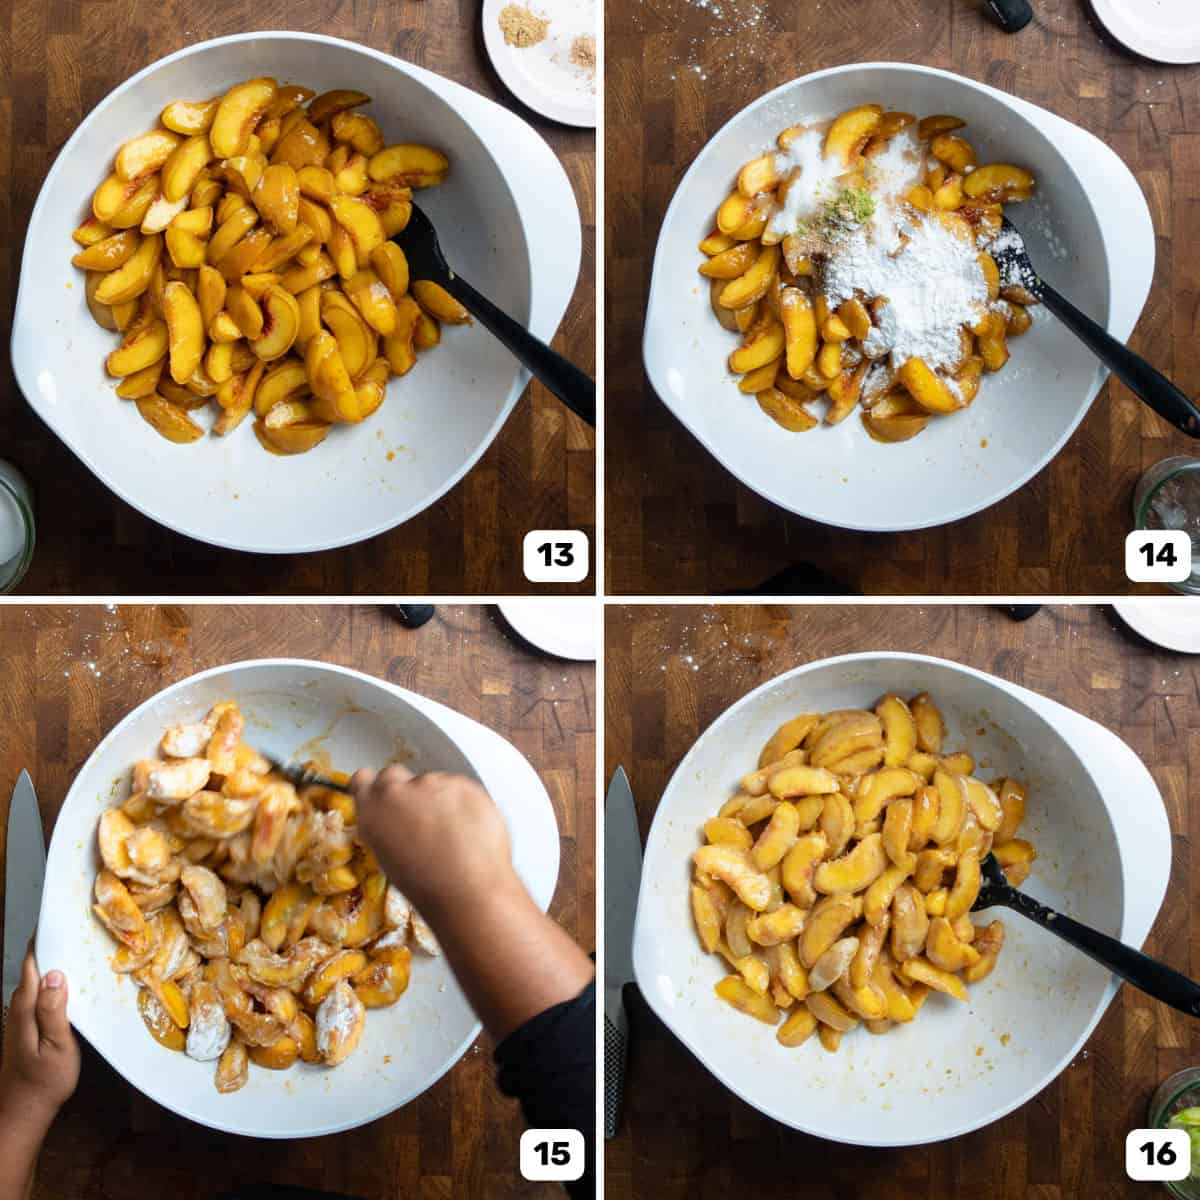
Place the peach pieces in a large bowl (image 13).
Step 7 – Prepare the peach pie filling
Mix the sugar and starch together until well-combined (this is especially important if you use instant clearjel instead of tapioca starch).
Then add the sugar starch to the peaches, along with the lime zest, lime juice, and spices (image 14). Mix to combine everything well (images 15 – 16).
Place this in the fridge until you get the top pie crust ready.

Should I pre-cook the peach pie filling?
Peaches release more liquid in pie fillings because they are juicier than most fruits. When certain pie fillings tend to be juicier than usual, I prefer to partially cook it down, like I do with my strawberry rhubarb pie and cherry pie. But with this peach pie, I don’t always do that.
If you use instant clearjel as the thickener, you don’t need to worry about cooking at all, because clearjel will thicken the juices WITHOUT heat.
However, you CAN cook down the juices to make the pie “less juicy” and to concentrate the flavor more. To do so,
- Mix the peaches with the 75% sugar and spices (not the starch), and let it sit in the fridge overnight (8 hours).
- Then, place a sieve or colander over a large bowl, and place the filling inside the colander. Let the juices drain into the bowl below.
- Transfer the juice into a pot, and cook the mixture until it starts to reduce and thicken. When the liquid is thick, and almost jello-like, remove the pot from the heat and let it cool down slightly.
- Mix the starch with the remaining sugar and whisk to combine. Place the peaches (in the colander) in the bowl with the sugar and starch and mix to combine. Add the thickened syrup and mix.
- This filling can then be placed inside the pie crust.
Step 8 – Assemble the peach pie + lattice crust
Preheat the oven to 400°F / 191°C, as it’s best to let the oven preheat for at least 45 minutes before baking the pie. I also like to place a sheet pan on the bottom rack of the oven, so that it preheats with the oven and can directly heat the pie crust from the bottom as well.
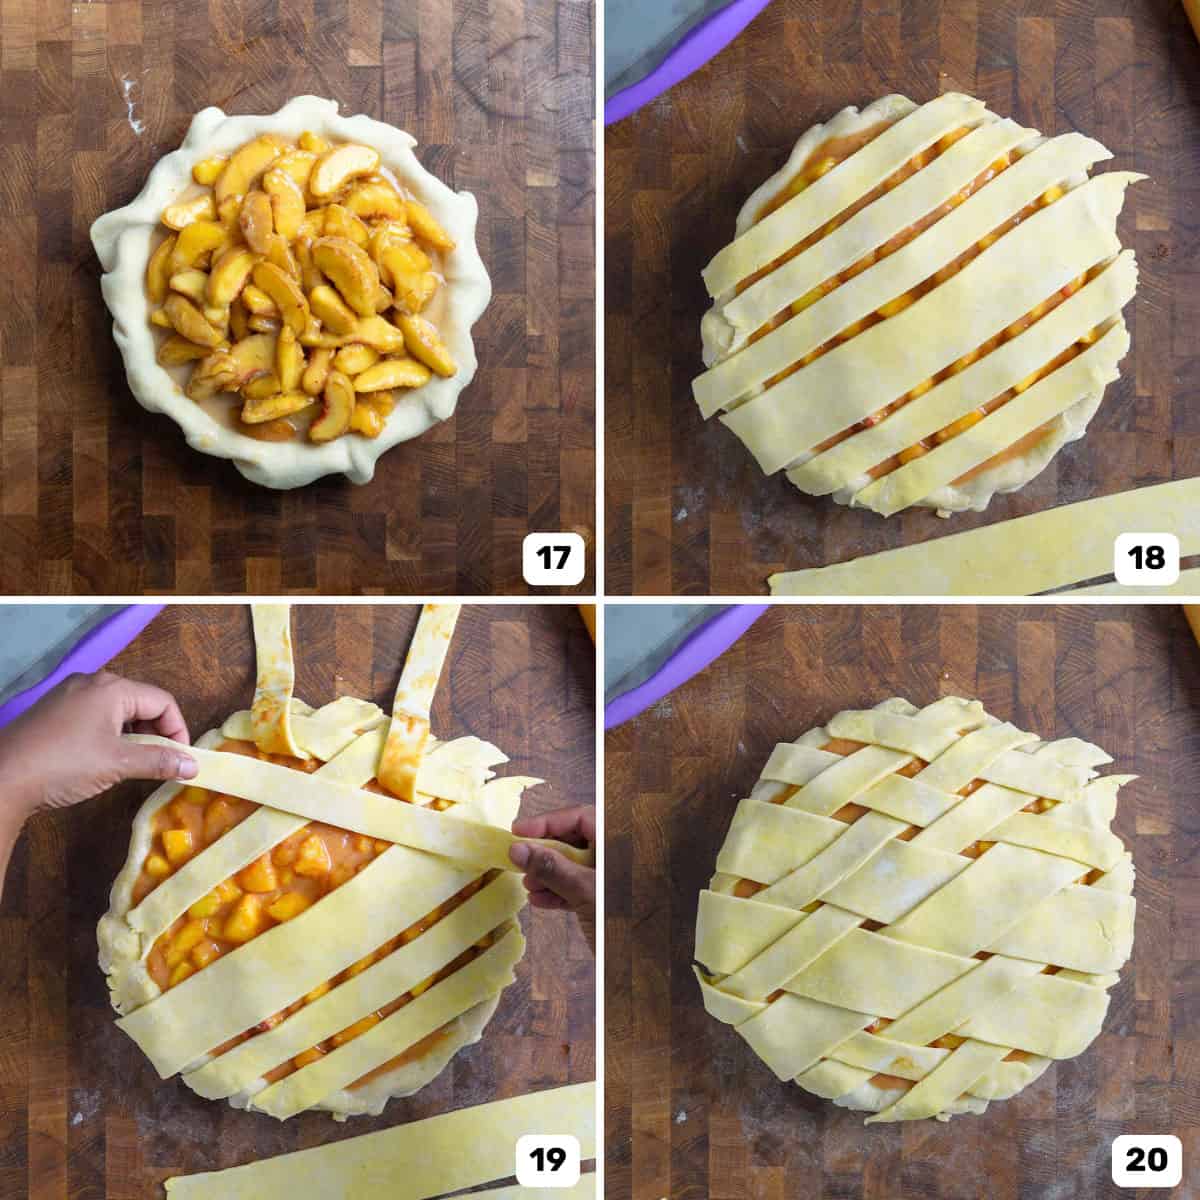
Place the peach filling in the chilled pie crust (image 17). Make sure to get all of the filling, including any leftover juices.
Use pie crust strips to create the lattice crust on top. Keep the longer strips for the center of the pie, and the shorter strips for the edges of the pie.
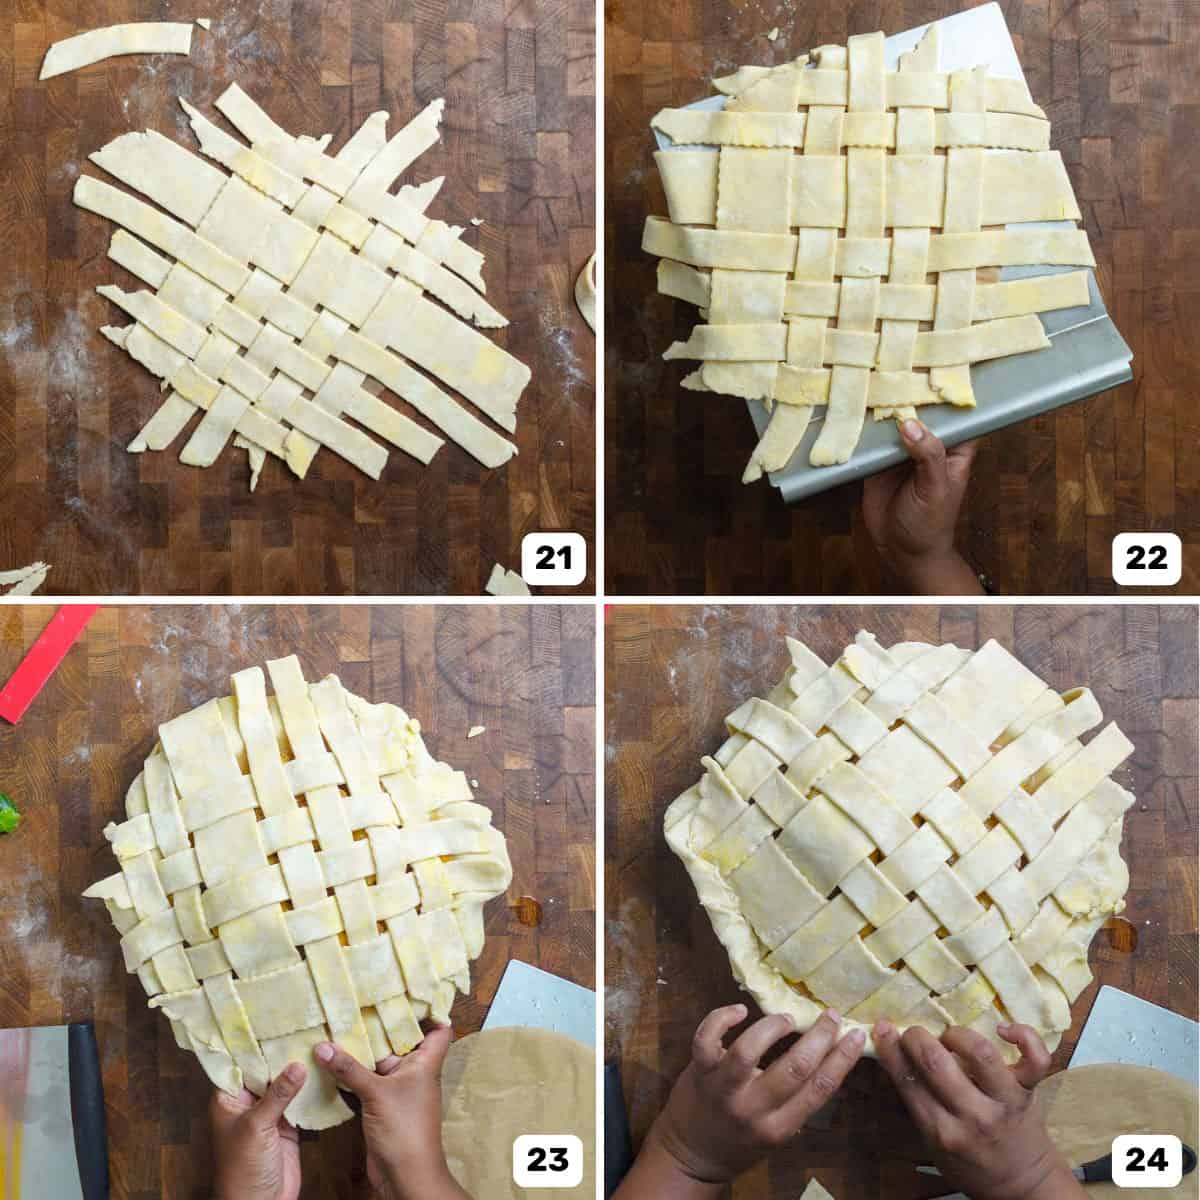
First place the strips in one direction on top of the pie (image 18). Then start weaving in the other strips in a different direction to create a lattice pattern (see pictures for reference) (images 19 – 20).
You can directly create the lattice crust on the pie. Or, you can create the woven lattice on a parchment paper separately, and then transfer this directly onto the pie crust as well (images 21 – 22).
Step 9 – Form the crust
Press down the lattice crust onto the bottom crust to seal it together (image 23). Then trim off the excess along the 1 inch overhang.
Then roll the pie overhang into the pie to create a thick border (image 24). The pie crust will have started to soften, so transfer the pie into the fridge for about 30 minutes to let it harden again.
Once chilled, create a fluted edge on the crust, and prepare the pie for baking (image 25).
Step 10 – Bake the pie
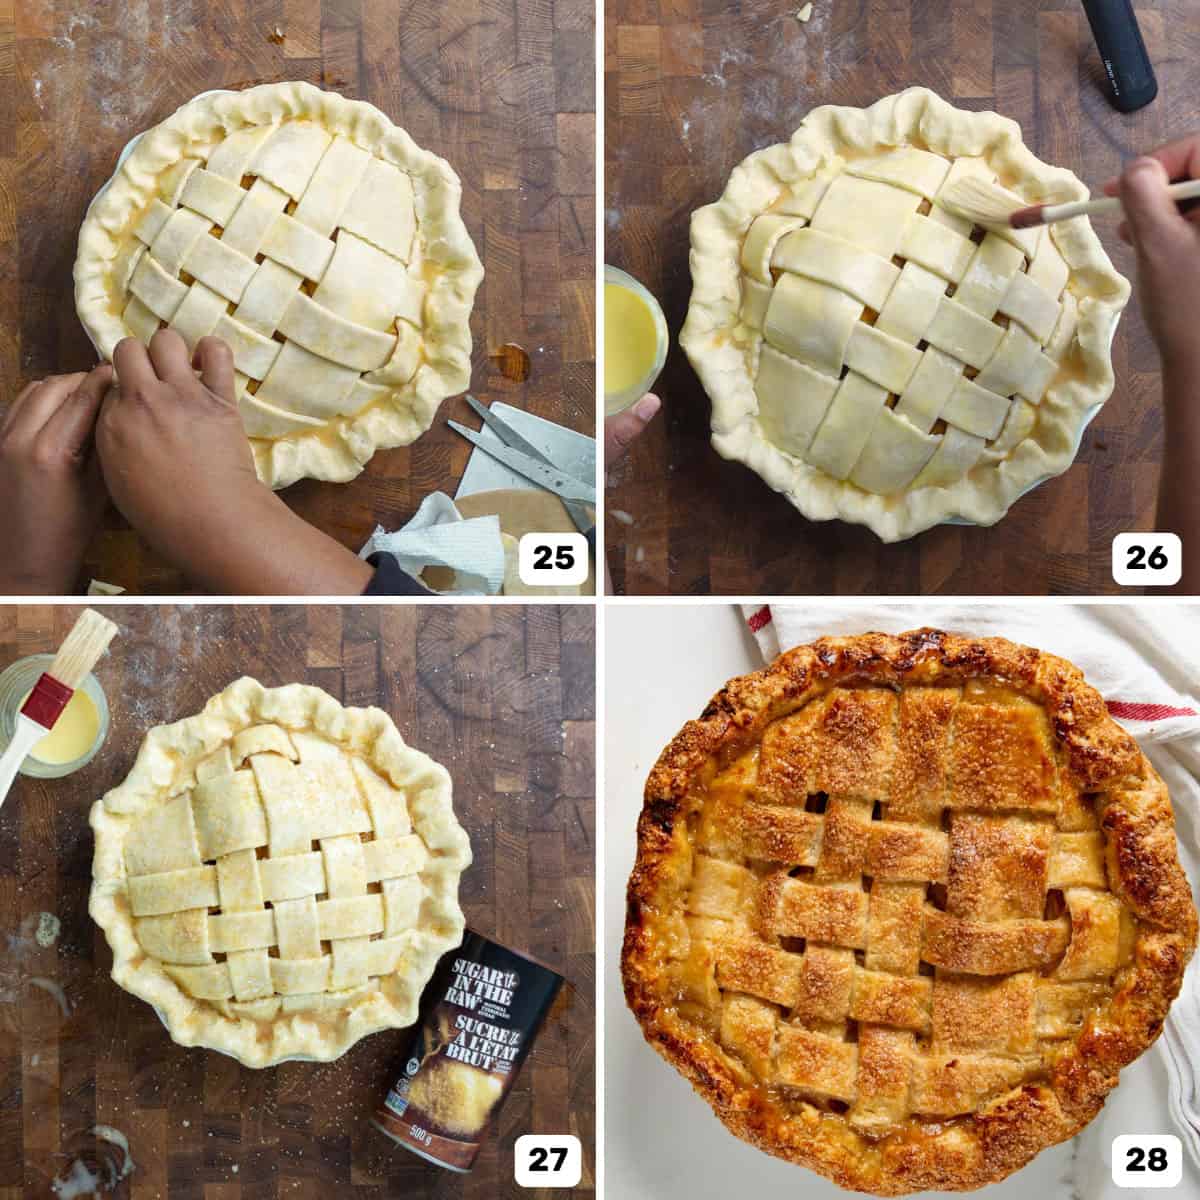
Brush the surface of the pie with an egg wash (egg + milk whisked together), and sprinkle raw sugar on top (optional) (images 26 – 27). Then transfer the pie into the preheated oven, on the preheated sheet pan on the bottom rack of the oven.
Lower the heat of the oven to 350°F / 180°C. And let the pie bake for about 1 hour. If the crust starts to caramelize too much, cover the edge with foil.
Step 11 – Cool down and serve
After baking, remove the pie from the oven and let it cool down to room temperature (or slightly warmer) (image 28).
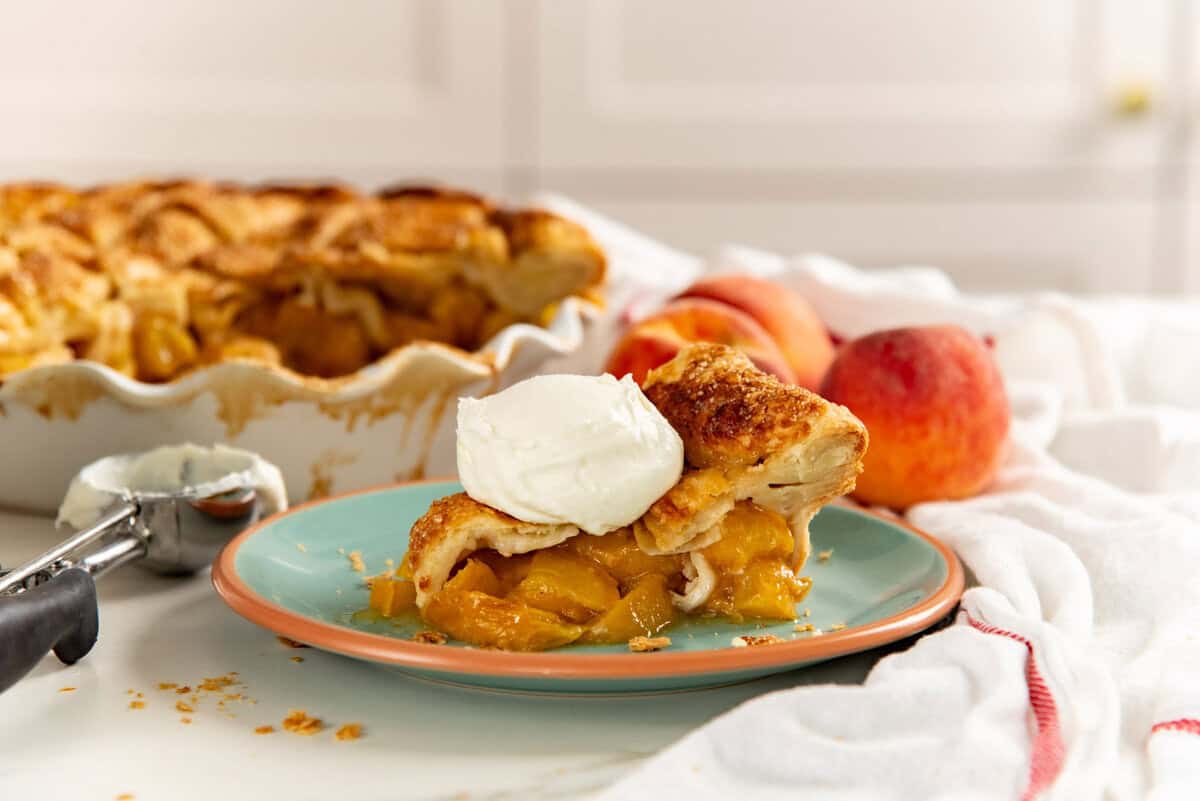
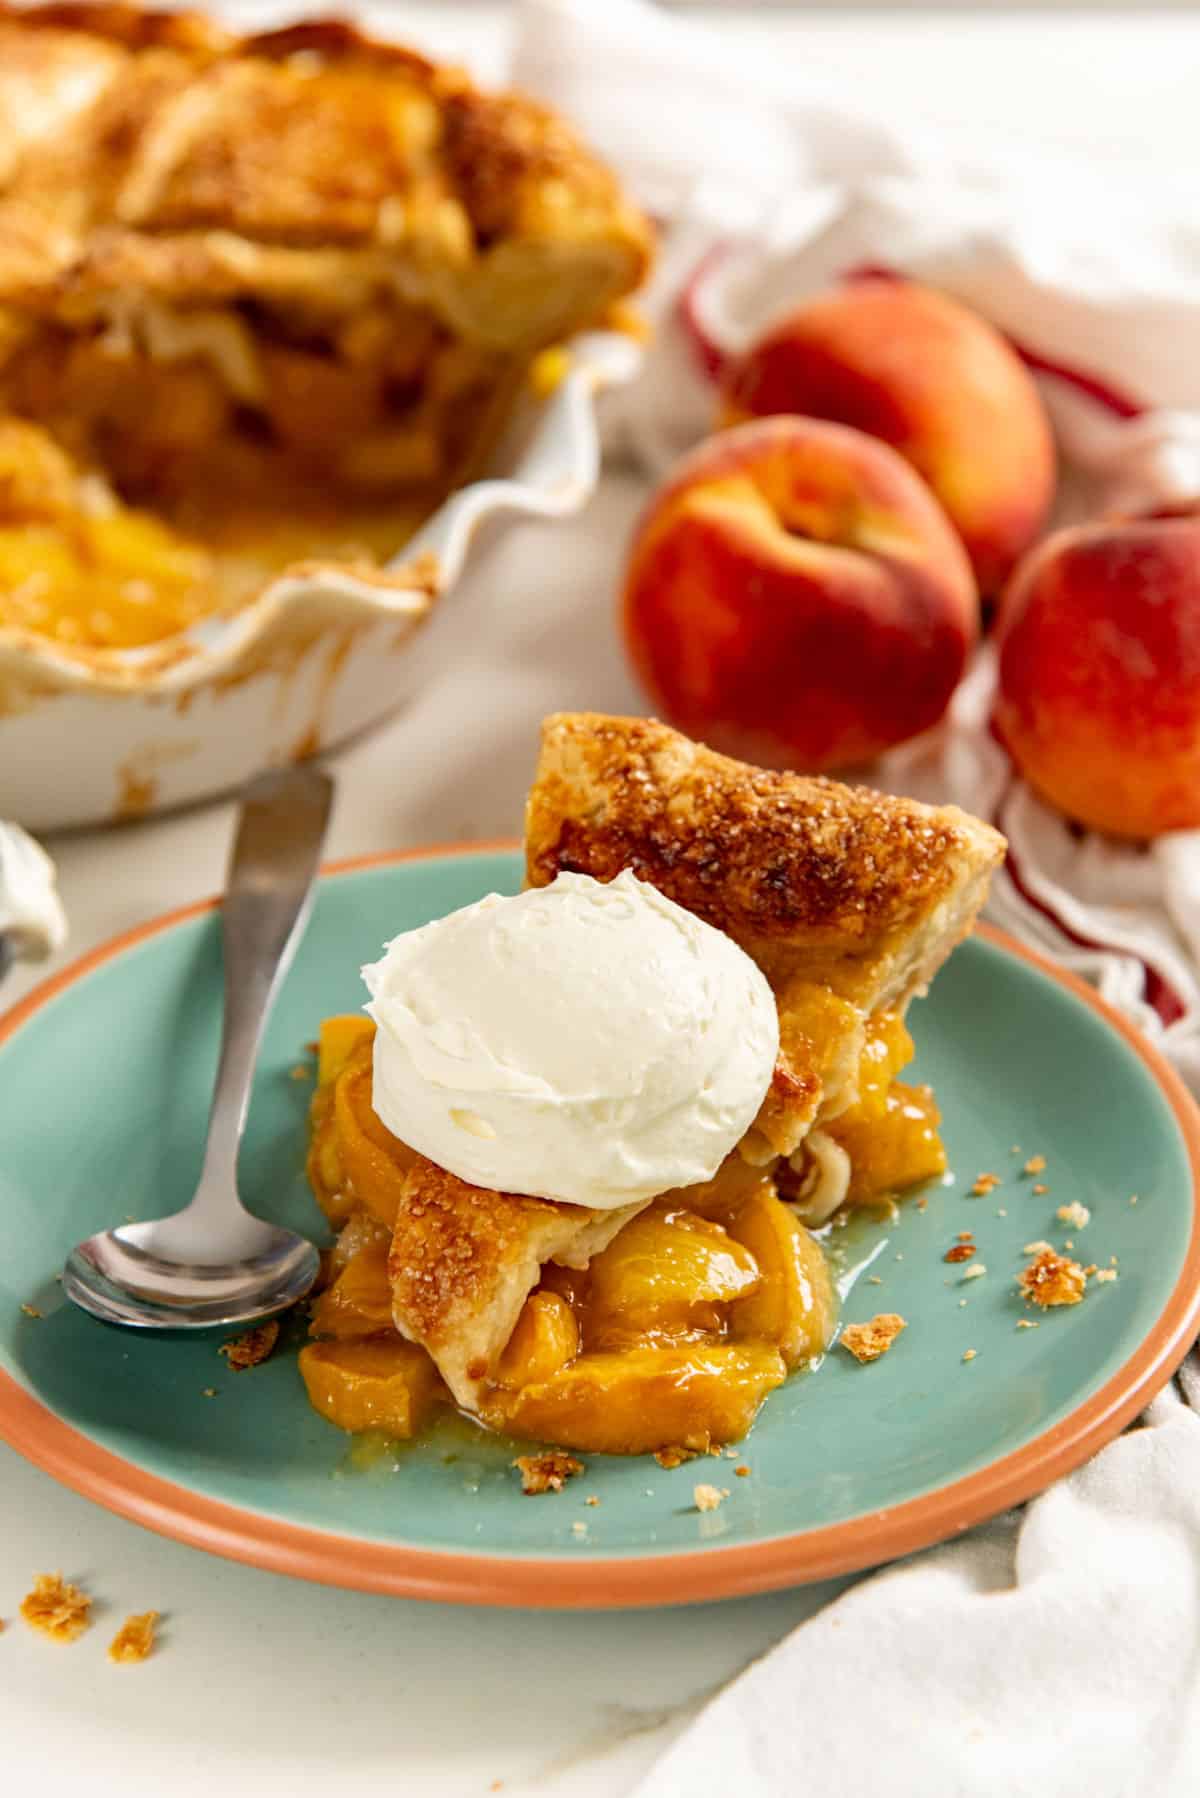
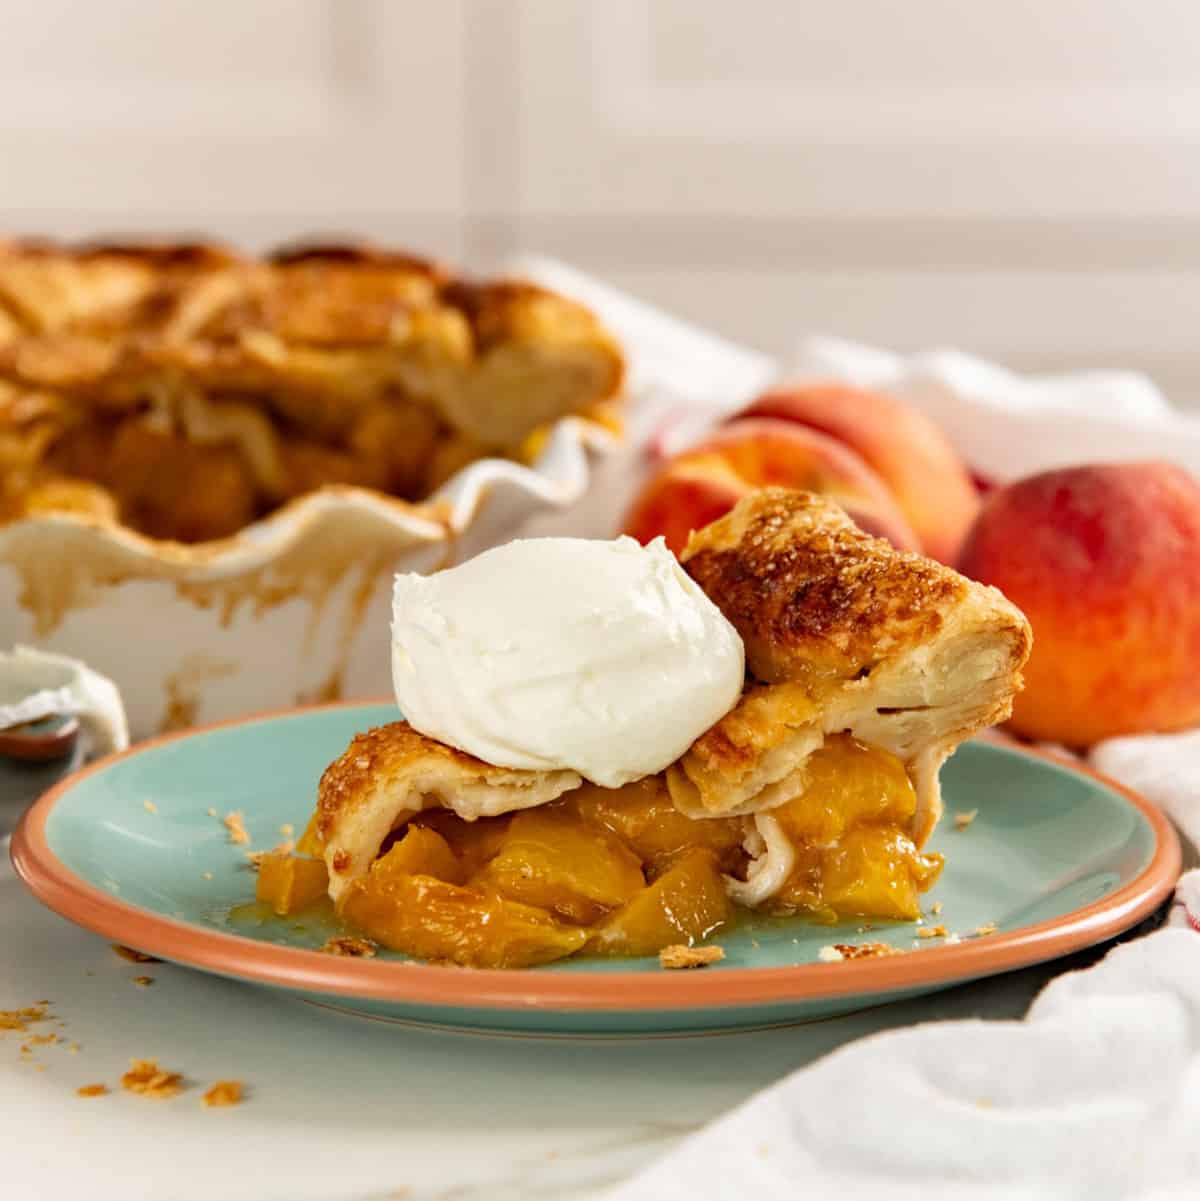
Serve the peach pie at room temperature (or slightly warmer) with ice cream or whipped cream.
Making the pie with frozen peaches
I’ve made frozen peach pie with frozen peaches from the supermarket, and I’ve also tested this recipe with fresh peaches that I blanched and then froze myself. And it works really well, either way!
The frozen peaches don’t need to be thawed overnight, BUT it does help if the peaches are at least partially thawed so that the starch can dissolve well.
I have also defrosted peaches in the microwave (low power), so that they are partially thawed.
Alternatively, you can mix the peaches with the sugar and spices in a bowl, and let it thaw overnight. Then you also have the option of cooking down the liquid before mixing in the starch and adding the filling into the pie crust.
And since you’re baking the the pie for an hour, you don’t need to adjust the time for partially frozen peaches at all.
How to tell when the pie is done baking
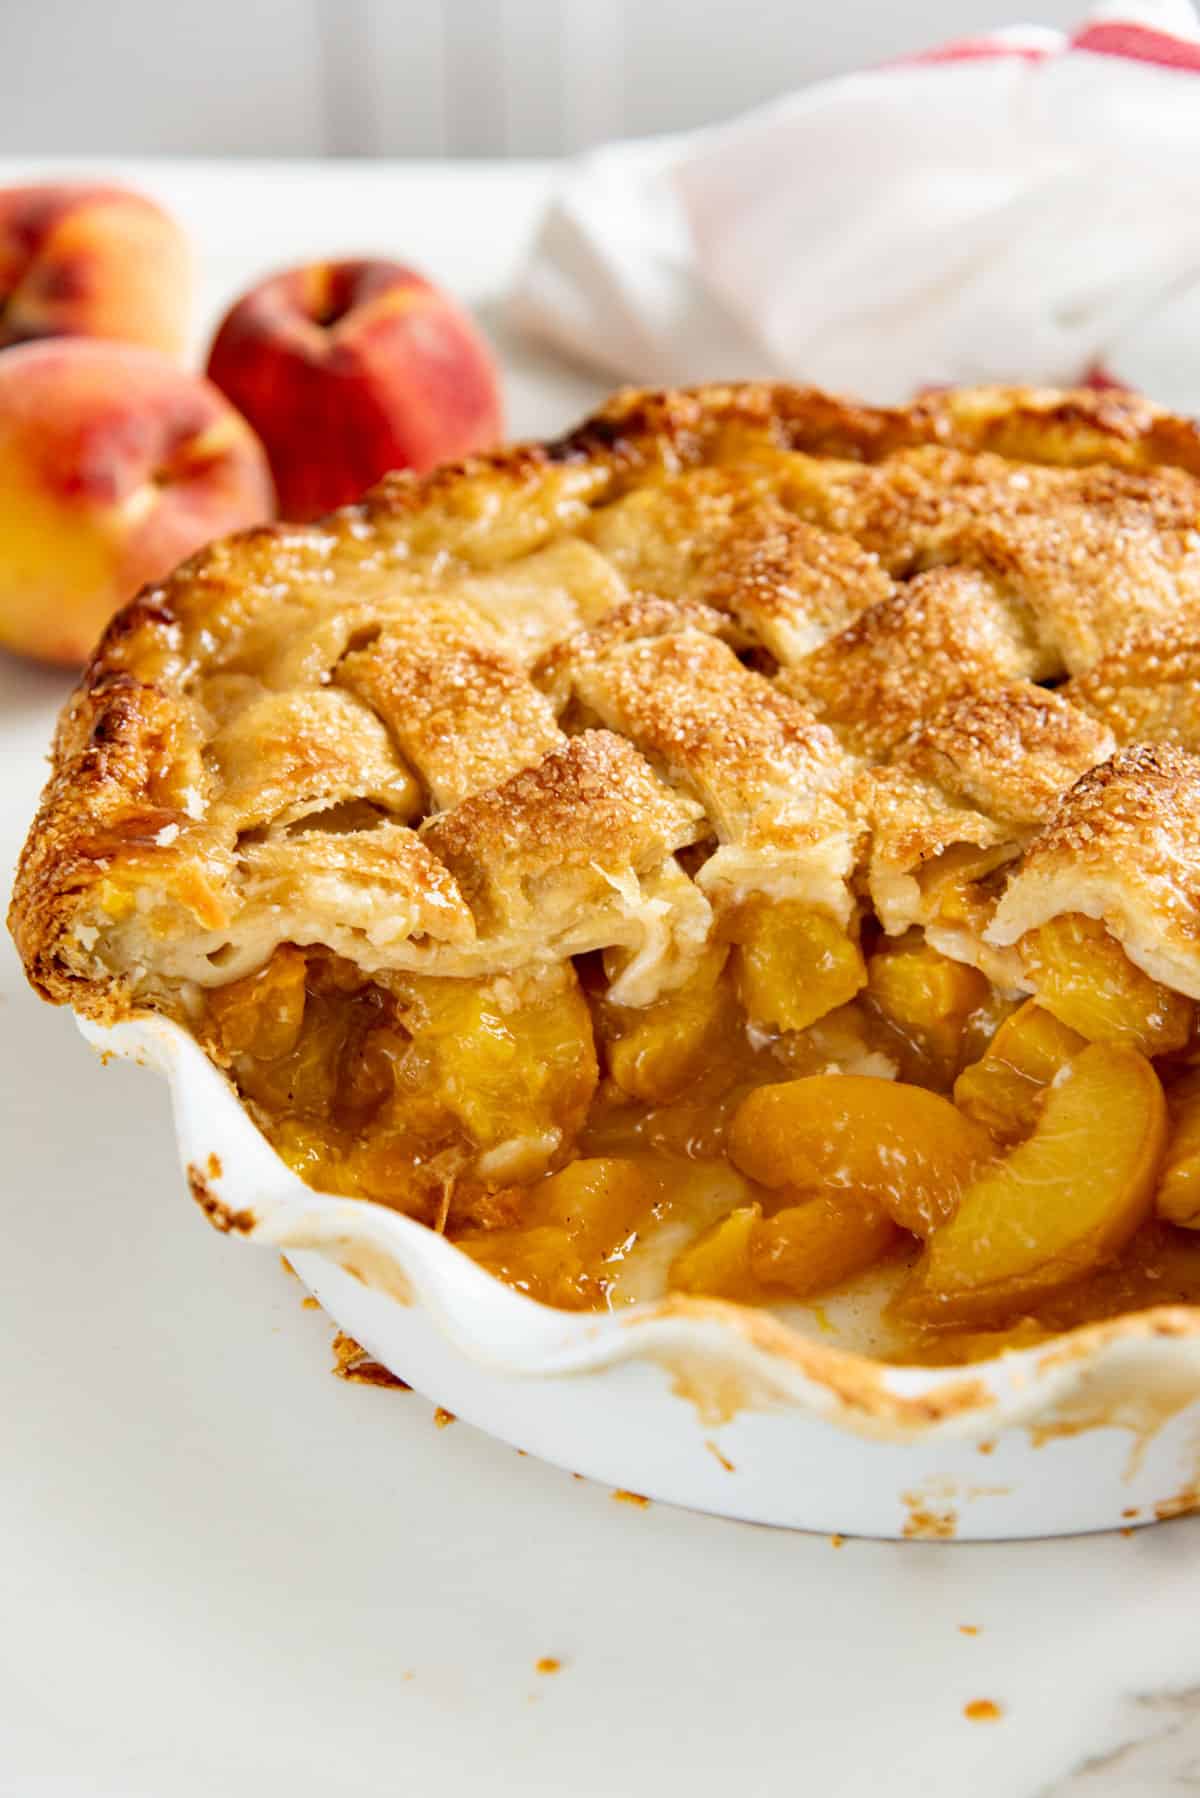
The pie is done baking when the pie crust on top is evenly browned, and the peach pie filling is thickened and bubbling.
Since this pie is baking at a lower heat, the risk of burning is low! The minimum time I have kept the pie in the oven to fully bake is about 50 minutes, and the maximum is 60 minutes.
How to prevent a soggy pie crust
- Preheat the oven to 400°F.
- Bake the pie in the lowest rack of the oven.
- Place a half sheet pan on the lowest rack of the oven, so that it will preheat for at least 45 minutes.
Allowing the sheet pan to preheat for that long ensures that the metal pan absorbs and retains the heat, so the pie crust is in direct contact with the high heat for longer.
This ensures the crust bakes from the bottom more evenly with direct contact, while also being closer to the lower oven element.

My best recipe tips
- Use peaches that are ripe, but still a little firm to the touch (only the slightest amount of give when pressed gently).
- If you do use overripe peaches, then I highly recommend letting the filling sit overnight in the fridge, so the juices can be cooked down to reduce the liquid.
- Blanching the peaches is the easiest way to remove the skin without damaging the fruit or removing too much of the flesh.
- If you’re planning on freezing the peach pie, I recommend using tapioca starch or instant clearjel as the thickener.
- My thickener of choice is tapioca starch, because I like the texture of the filling when thickened with it! However, you can use cornstarch as well.
- You can cut the peaches into wedges OR chunks! Just make sure they are about 1 inch thick so that the peaches hold their shape as the pie bakes, and doesn’t turn into mush.
- When rolling out and lining pie plates, make sure the pie dough is always chilled. The chilled butter will help create flaky layers in the baked crust.
- When lining the plate, never stretch the dough to fit it into the pie plate. Stretching will cause the dough to shrink when baked, so make sure the dough is relaxed when lining the pie plate.
- If you’re not confident with latticing pie crust, the lattice can be created on a parchment paper first, and then transferred onto the pie afterward.
- Bake the pie on the lowest rack of the oven so that the bottom of the pie bakes through.
- Preheat a baking sheet on the lowest rack until it’s heated through, so that the pie plate has direct contact with the heated pan AND the pan will catch any drippings from the pie too!
- Remember to let the pie cool down before cutting into it! This allows the juices to thicken, so that the filling won’t be too runny!
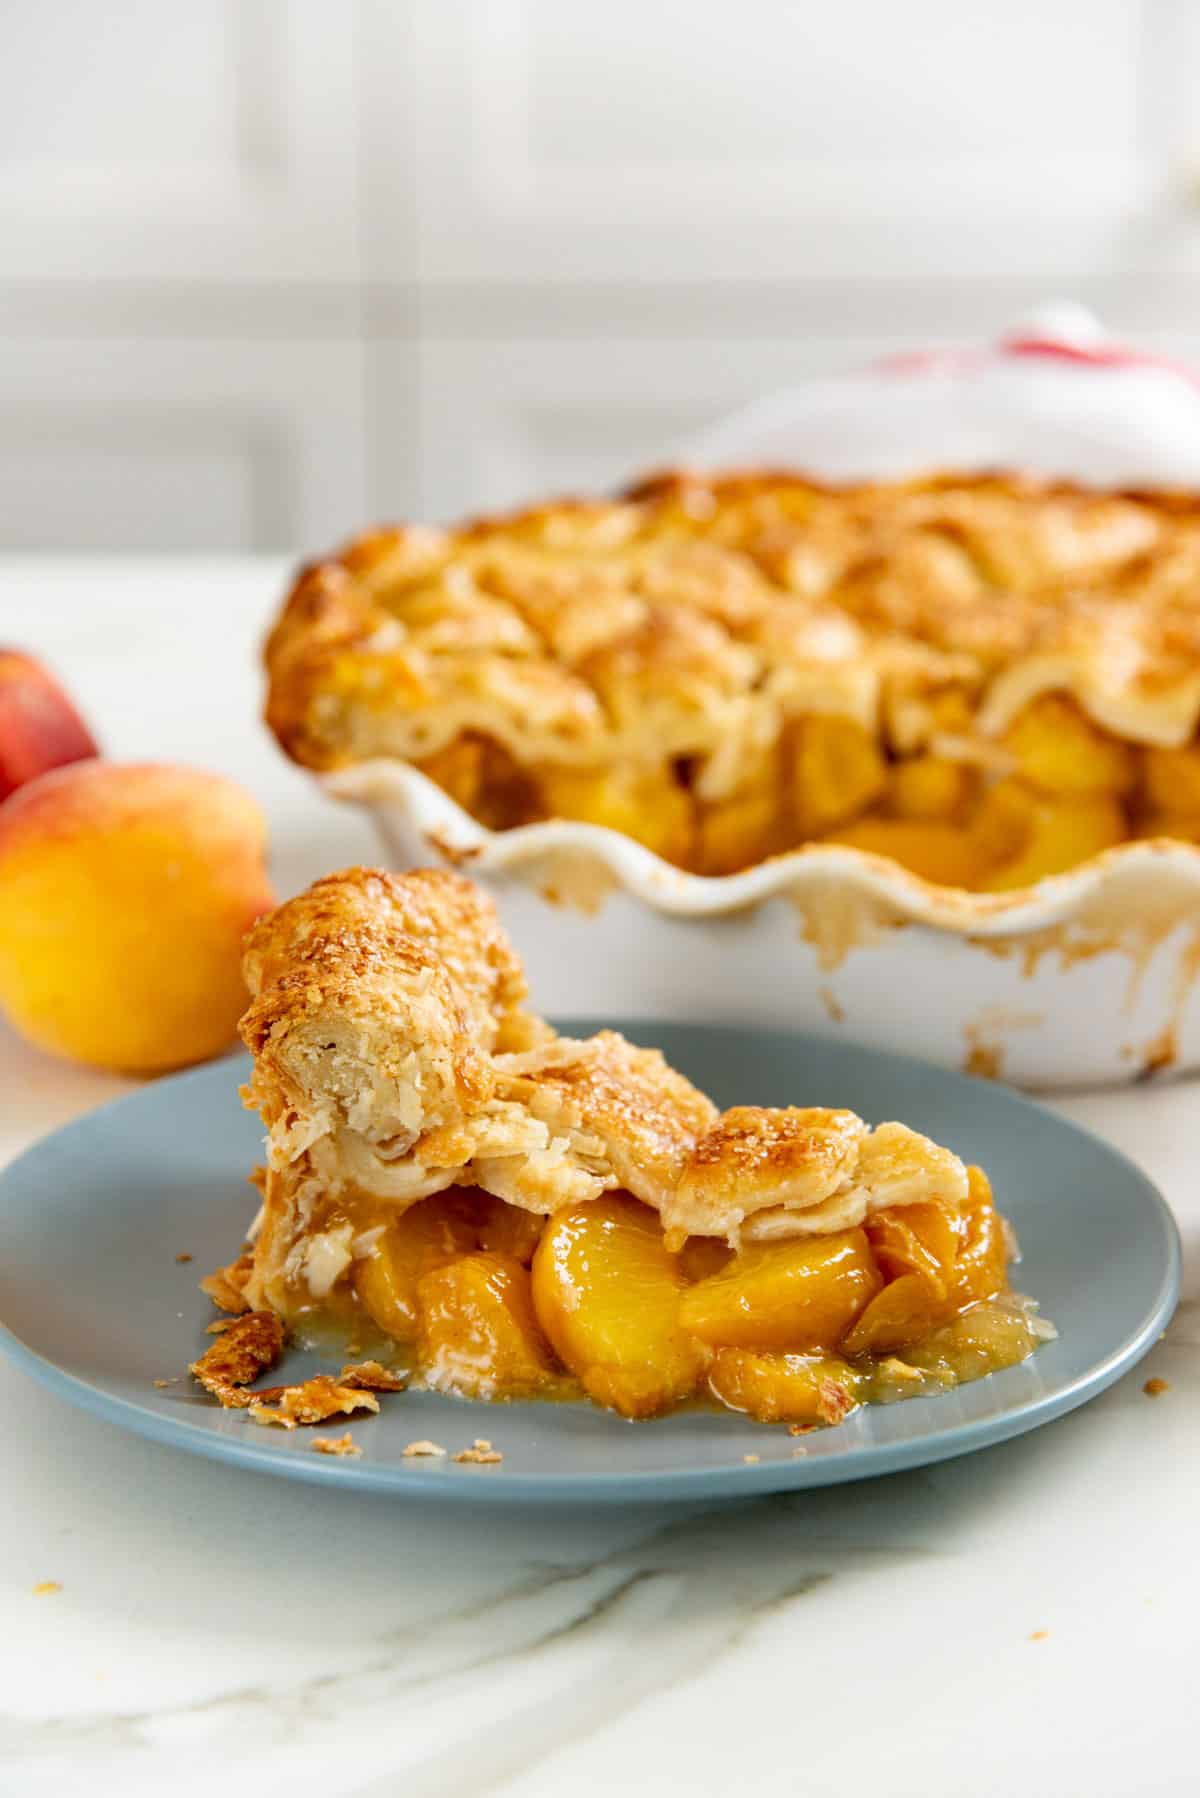
- It’s normal for the peaches to fall out of the pie as you cut it, especially if you cut wedges, since the pieces are fairly large and can be slippery.
Recipe variations
You can easily alter the spices in this homemade peach pie for different flavor profiles!
- Cinnamon and ginger – A warming, spiced peach pie.
- Nutmeg – Just a little warmth without any overpowering spices.
- No spices – Only adding lime or lemon juice to really let the peach flavor shine.
- Thyme – A herby peach pie. Thyme adds a lovely herbaceous flavor that contrasts with the fruity freshness of peaches.
Other fruit combinations,
- Peach and raspberry pie – Substitute about 1/3 – 1/2 of the peaches with raspberries. I LOVE this combination so much (hello, peach melba popsicles!).
- Peach and rhubarb pie – Same method as with the raspberries. The sour rhubarb and sweet peaches are a lovely flavor combination.
- Peach and plum pie – Half peach and half plum to make a stone fruit pie with the flavors of both peaches and plums.
Instead of a lattice top pie, you can also top the peach pie with other options.
- A streusel topping for a peach crumble pie (like these peach crumble bars).
- Peach cobbler pie topped with a biscuit-type topping (similar to classic peach cobbler).
- You can also choose not to do a lattice pie, and just cover the pie with second pie crust. Just make sure to cut out some circles on the surface to allow good venting for the liquid. You can see my double pie crust recipe for instructions on how to do so.
- Or you can skip the second crust and make an open face peach pie or even a rustic peach galette.
Make ahead and storage tips
You can make this peach pie ahead of time and freeze it – baked or unbaked!
If the peach pie is baked, then make sure to use a freezer-friendly thickener, so that the filling remains thickened and intact even after thawing.
This isn’t too much of a problem for unbaked pies.
For both baked or unbaked pies, make sure the pie is wrapped well with plastic wrap, and then a layer of foil before putting it in the freezer for later.
Baking from frozen
You can bake the pie from frozen, but if the whole pie is frozen, it’ll be risky placing a frozen pie plate on a hot surface. So, I recommend placing the pie plate in the cold oven and preheating to 400°F WITH the pie plate on the half sheet pan. This allows the plate to gradually reheat with the oven. After the oven preheats, bake at 400°F for about 10 minutes, and then reduce the heat to 350°F and bake for a further 40 – 50 minutes.
A baked pie tastes best within 24 hours. However, you can store it in the fridge for up to 4 – 5 days. However, the longer it stays in the fridge, the crust will become soggy because of the filling.
Recipe FAQs
Can I used canned peaches?
I haven’t tried it myself, unfortunately. But it is possible. To ensure perfect results, use canned peaches in juice, rather than syrup.
Drain the liquid thoroughly, and if possible, pat dry the slices with a clean napkin to remove excess moisture too.
Can I use cornstarch or a different thickener?
Yes, you can! You can use cornstarch, instant clearjel, or cook type clearjel as a thickener.
Cornstarch and cook type clearjel won’t freeze well, so keep that in mind when using these options as thickeners.
Why is my peach pie runny?
The simple reason is that there wasn’t enough thickener for the amount of liquid in the peaches. This can happen if your peaches were overripe, or the starch wasn’t measured properly.
If you think your peaches are overripe, or you’re worried about how much liquid your peaches are releasing, then I highly recommend cooking down the liquid to a thick, jammy texture to reduce the amount of liquid in your pie filling.
Can I pre-cook my pie filling?
I don’t recommend cooking the peach pieces, as this would create a more jammy texture instead of intact peach pieces in the pie. However, I do recommend letting the peaches sit in the fridge overnight (without the starch), and then reducing the liquid that comes out of the peaches by cooking it down on the stove (without the peach pieces).
This will reduce the liquid and concentrate the peach flavor without softening the peach pieces too much.
What’s the best way to serve this pie?
I love adding a dollop of whipped cream on top! You can use easy chantilly cream or stabilized whipped cream for this. A scoop of vanilla ice cream is also perfect, if the pie is served warm!
For a more tangy topping, I like to mix yogurt or sour cream with sweetened whipped cream.
Recipe
Peach Pie
US based cup, teaspoon, tablespoon measurements. Weight measurements are recommended for accurate results whenever available.
Common Measurement ConversionsIngredients:
Pie crust
- 1 recipe all butter pie crust
Filling
- 1.7 kg peaches about 12 – 15 medium peaches OR 1.5 kg frozen peaches
- 2 tsp lime zest or lemon zest
- 3 tbsp lime juice or lemon juice
- 150 g white sugar
- 50 g tapioca starch 5 packed tbsp (OR cornstarch)
- ½ tsp ground cardamom
- ½ tsp nutmeg
Optional spices
- ½ tsp cinnamon for a very subtle cinnamon flavor
- 1 tsp freshly minced ginger
Topping
- 1 egg for egg wash
- Raw sugar for sprinkling
Instructions:
Pie crust
- Make a flaky pie crust according to my all butter pie crust recipe which will make two pie crusts.1 recipe all butter pie crust
- Let the dough rest overnight.
Bottom crust
- Roll out the first portion of dough to about a 3 mm thickness and line a deep dish pie plate (about 2 inches deep). Make sure not to stretch the dough to fit it in the pan.
- Trim the excess pie dough, leaving a 1 inch overhang to make a thicker pie crust edge.
- Cover the pie plate completely with plastic wrap and refrigerate until the pie filling and top pie crust are ready.
Top crust
- Roll out the second pie crust into a circle that's about 3 – 4 mm thick. Cut the dough into strips for the lattice crust by using a sharp knife and ruler (see pictures in the post for reference).
- Place the strips on a parchment paper-lined pan and cover with plastic wrap and keep in the fridge until needed.
Peach pie filling
Prepare the peaches
- Bring a large pot of water to a boil.
- While the water is coming to a boil, get another big bowl and fill it with an ice bath or cold running water from the tap.
- When the water comes to a boil, reduce the temperature to a simmer. Place a few peaches in the simmering water and blanch them for about 45 seconds. Do not overcrowd the pot, as this will reduce the temperature of the water.1.7 kg peaches
- Remove the peaches from the water and immediately plunge them in the ice bath (or the bowl with cold running water).
- Wait for the water to come to a simmer again, and repeat with all the peaches to blanch them all.
- Once all the peaches are in the ice bath, and they have cooled down, they’re ready to be peeled.
- Carefully remove the skin from the peaches.1.7 kg peaches
- Cut the peaches in half and remove the pit. You may need to use a sharp knife against the pit to shimmy the two halves open (if you have clingstone peaches). Then remove the pit using a spoon if needed.
- Cut the peach halves into wedges that are about ¾ – 1 inch thick in the center, or 1 inch chunks (¾ – 1 inch thick slices, and then 1 inch dice).
- The weight of the peaches without the peel and pits should be around 1500 g.1.7 kg peaches
Peach filling
- Place the peaches in a large bowl. See recipe notes below on how to prepare the peach pie filling to reduce the liquid.1.7 kg peaches
- Whisk the sugar and tapioca starch together in a separate bowl.150 g white sugar, 50 g tapioca starch
- Add the sugar-starch mix into the peaches, along with the zest and juice and spices (if using).2 tsp lime zest, 3 tbsp lime juice, ½ tsp ground cardamom, ½ tsp nutmeg
- I personally prefer to only use 2 spices at a time to not overwhelm the flavor of peaches. So you can choose to add any combination of the optional spices you like too.½ tsp cinnamon, 1 tsp freshly minced ginger
- Stir to combine and make sure there are no starch lumps.
- Remove the pie crust lined dish from the fridge and transfer all the filling into the dish. Make sure to scrape in all the juices as well.
- While getting the pie ready, PREHEAT the oven to 400°F / 191°C. Move the oven rack to the lowest rack position in the oven, and place a sheet pan on it to preheat with the oven. Make sure the sheet pan preheats at 400°F for at least 45 minutes as well.
Lattice crust
- Take the pie crust strips from the fridge and weave a lattice crust directly on top of the pie. You can also create the lattice crust on a parchment paper, and then transfer the lattice onto the pie as well.
- Press the lattice crust onto the bottom crust so that they stick together. I don’t find that I need water to make the crusts stick together, but you can use a little water if you want. Then trim off the excess lattice crust to match the overhang.
- Then roll the dough overhang into the pie to create a thick pie crust edge.
- Cover the pie with plastic wrap and refrigerate for about 30 minutes until the crust is chilled again.
Bake the pie
- After 30 minutes of chilling, remove the pie from the fridge and flute the pie crust. Then brush it with an egg wash and sprinkle raw sugar on top.1 egg, Raw sugar for sprinkling
- Place the pie in the oven, on the preheated sheet pan. This sheet pan helps to cook the pie crust from the bottom, AND to catch any butter or juices dripping down from the pie as well.
- Lower the heat of the oven to 350°F and bake the pie for 60 minutes. If the crust starts to brown too much, cover it with foil or a silicone pie crust shield.
- After baking, remove the pie from the oven and let it cool down to room temperature (or slightly warmer) before serving.
- Serve the peach pie with whipped cream or vanilla ice cream.
Recipe Notes
Nutrition Information:
“This website provides approximate nutrition information for convenience and as a courtesy only. Nutrition data is gathered primarily from the USDA Food Composition Database, whenever available, or otherwise other online calculators.”













Leave a Reply