


A double crust pie is a showstopper no matter the occasion! This double pie crust recipe shows you how to make a perfect, foolproof double pie crust with a solid top crust.
No more soggy, underbaked, shrinking crust. No burnt edges, no thick and tough crust. Just perfectly baked, flaky, tender, buttery, caramelized pie crust, with all the tips I’ve learned over decades of baking pies!
I honestly can’t think of anything that completes or elevates a holiday dessert spread more than a double crusted pie! Whether it’s Thanksgiving, Christmas, or a summer BBQ, a double crust pie is the sweet, sweet pièce de résistance.
And here, I’m sharing all the tips, tricks, and baking hacks to make perfect double crust pie. No more soggy bottomed or shrinking or unravelling pie crust!
I already shared how to make the perfect all butter pie crust, and how to blind bake pie crust, with all the tips for beginners to get it right.
Here, we’ll look at how to make a double crust pie dough. Unlike with blind baking, double crusted pies are filled with a filling, and the top and bottom crusts are baked at the same time as the filling.
Why this recipe works

- Having made pies for years and years, I’ve learned what works and what doesn’t, and I share my method to achieve perfect results in this extensively tested recipe.
- I share tips to ensure that your bottom crust is baked through, golden brown, and never undercooked.
- I also share troubleshooting tips to explain what can go wrong and how to avoid those pitfalls!
What’s a double pie crust?
A double crust pie (or two crust pie) is a pie made with both a bottom and top crust, and a sweet or savory filling inside.
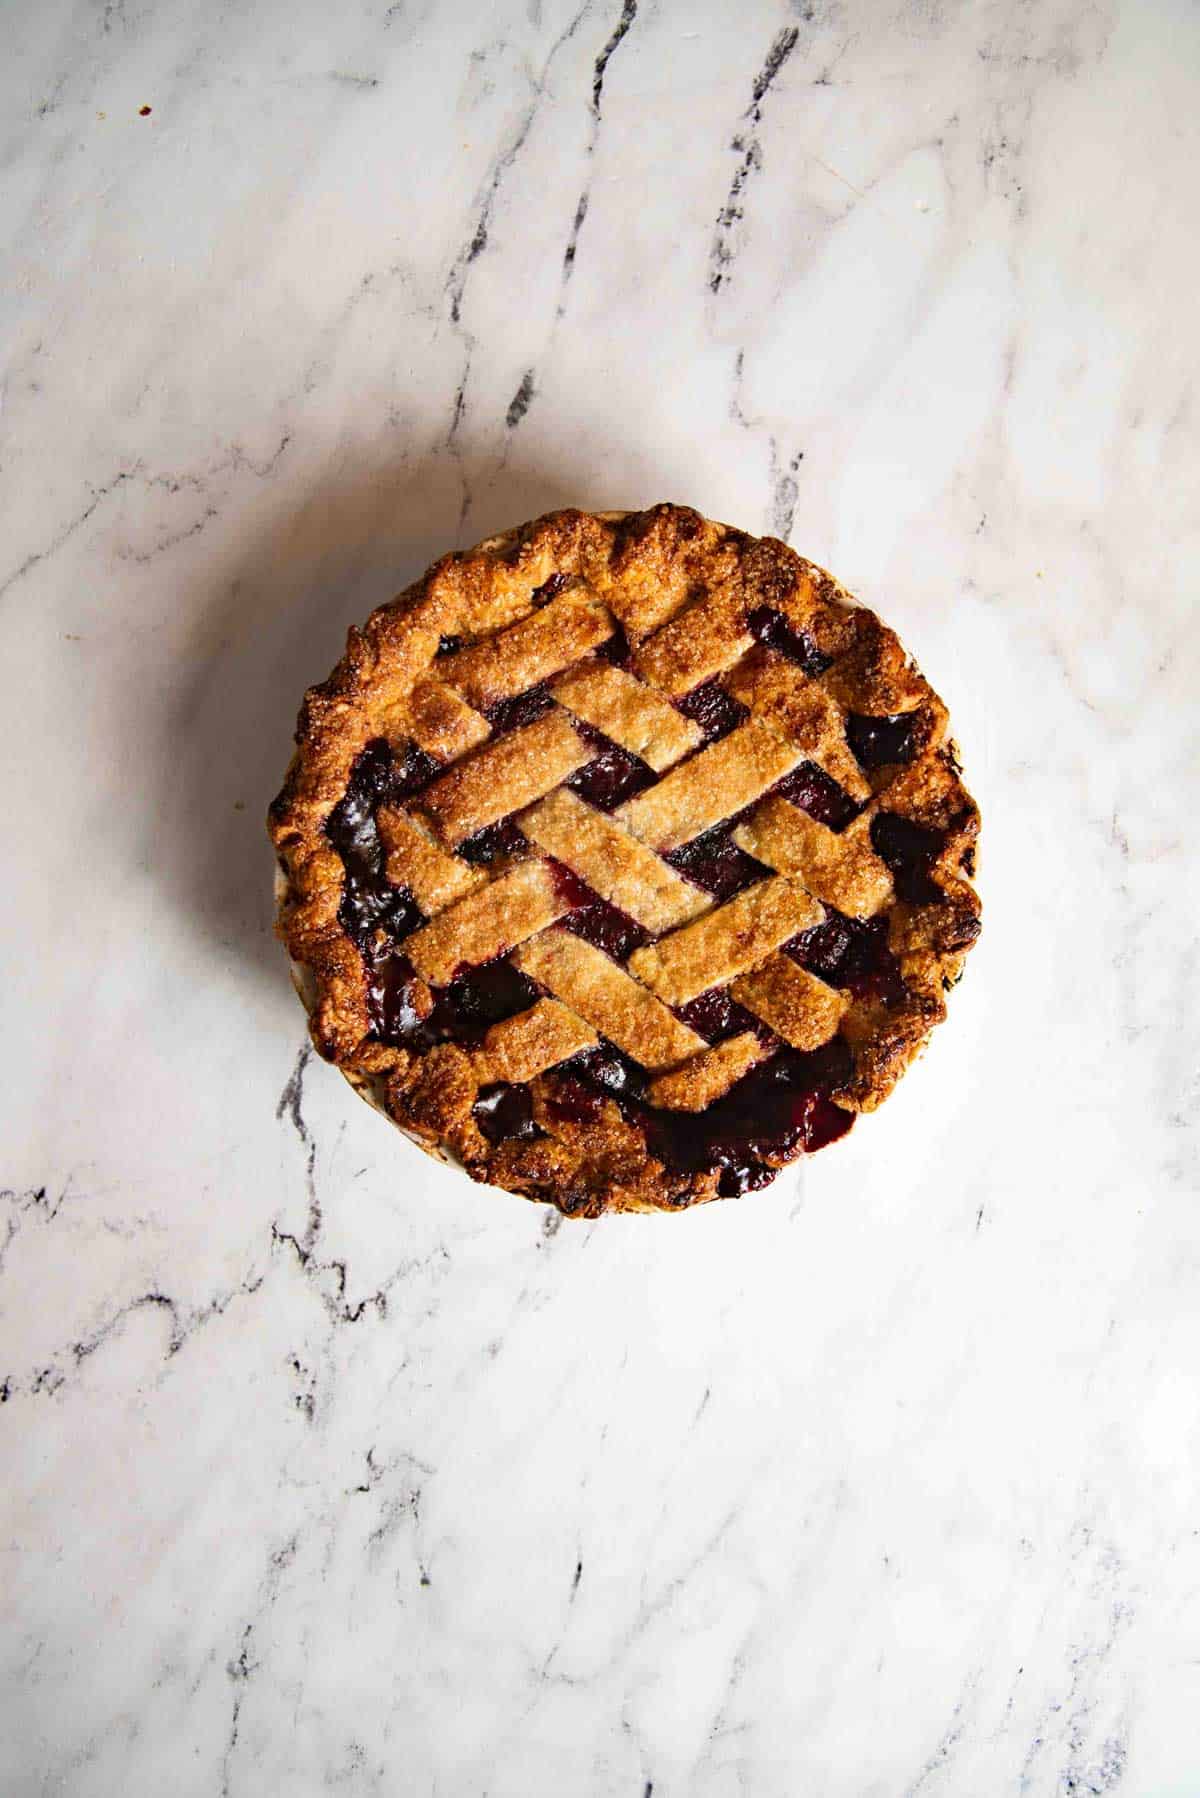
The top crust can be a solid pie crust, or a lattice crust, or any decorative pie crust.
When to use a double crust vs lattice crust?
There are no hard and fast rules about this. However, since a lattice crust is more open on the top (compared to a solid double crust), the lattice crust is perfect for a super juicy pie, allowing extra liquid to evaporate as steam and moisture and bubble up (like this butterscotch apple pie, strawberry rhubarb pie, mixed berry pie etc.).
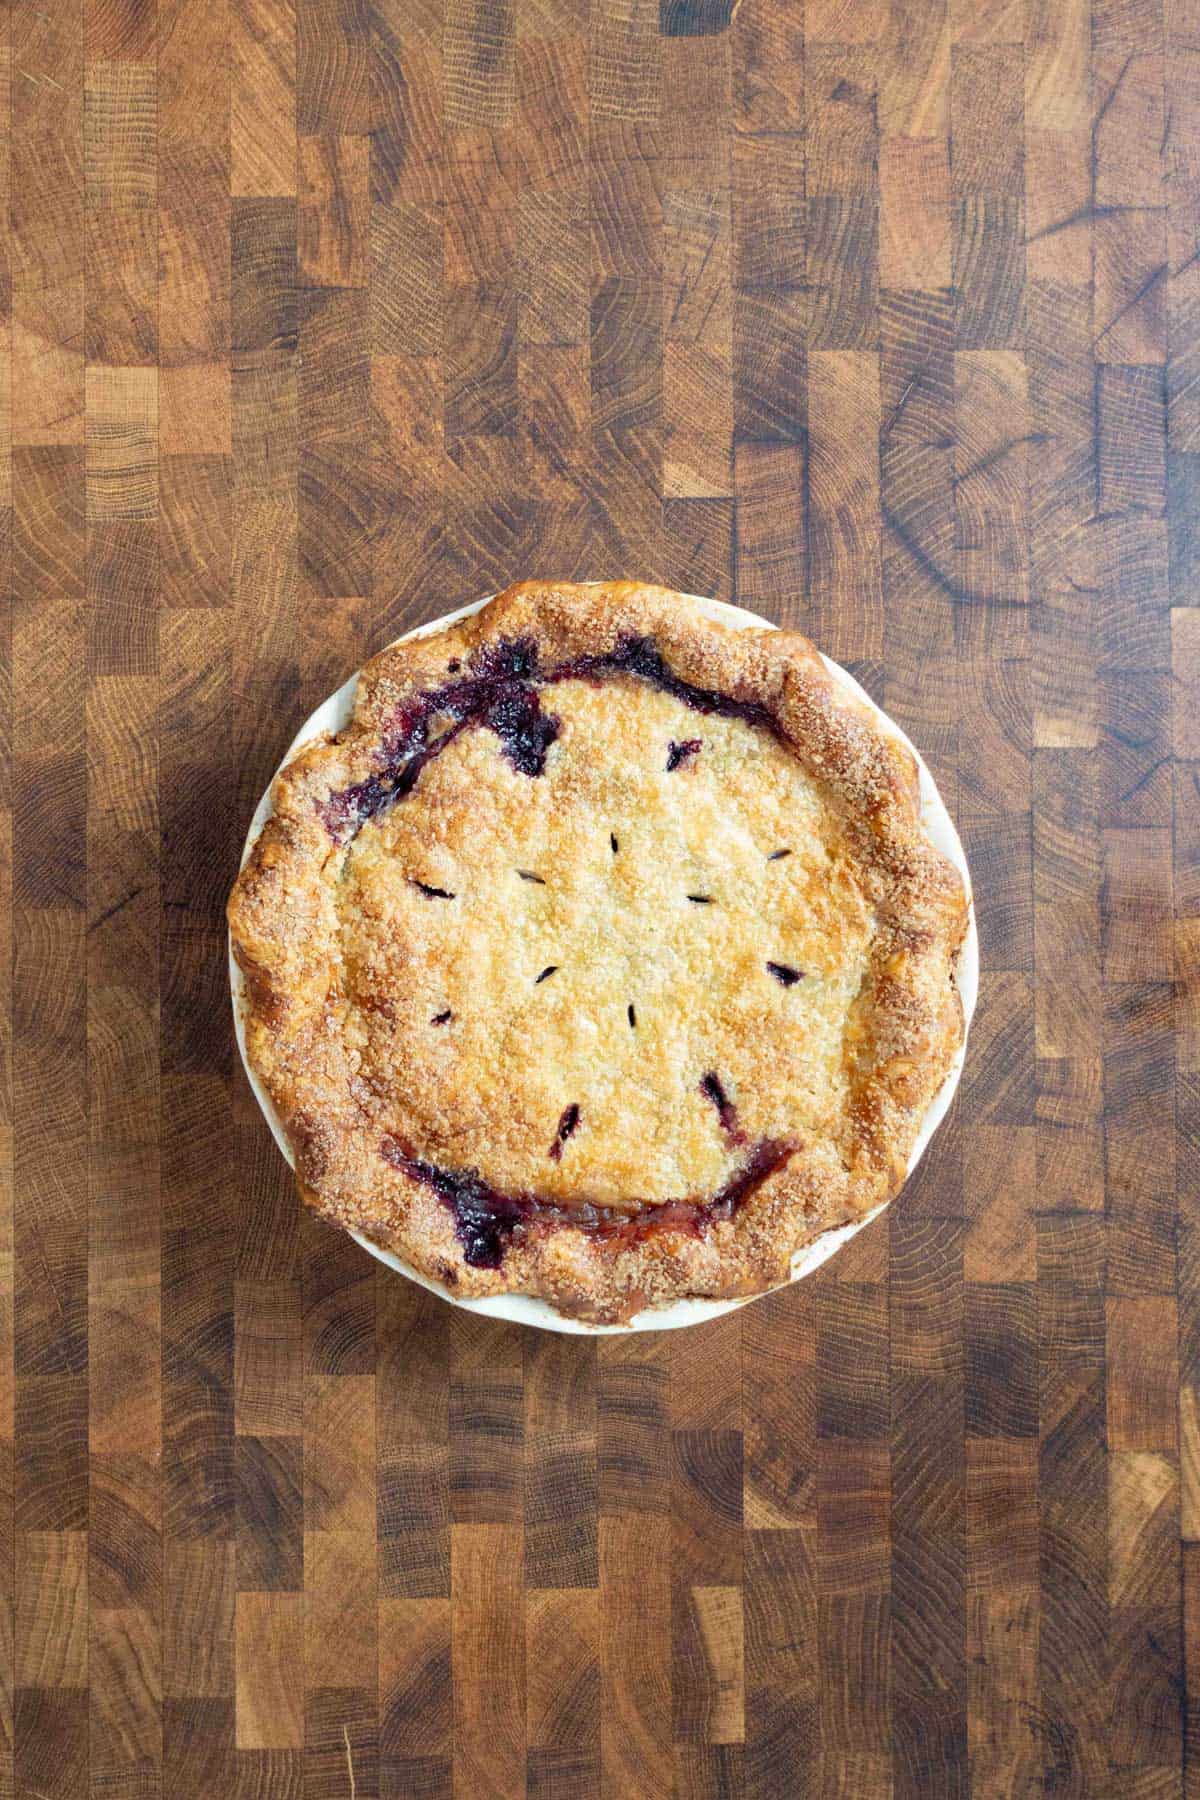
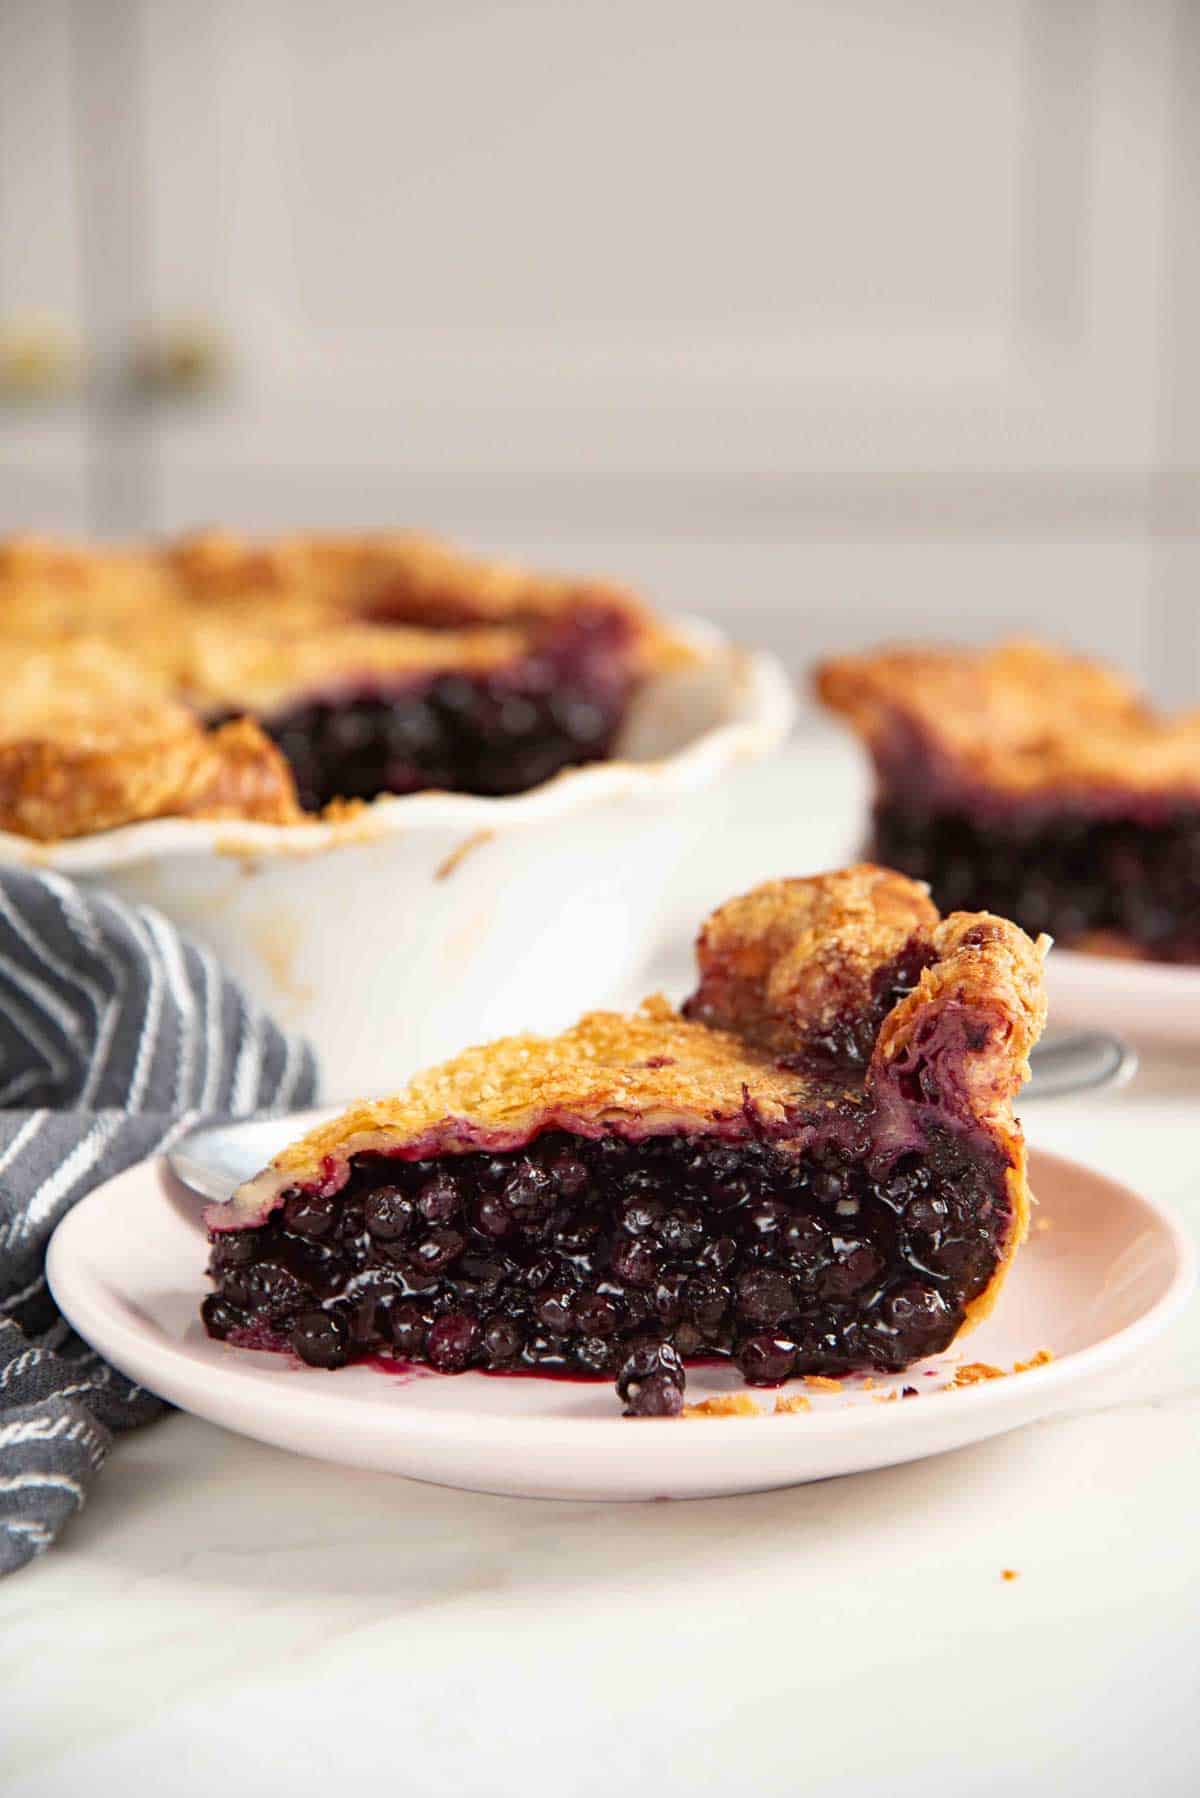
Whereas a solid double crust is perfect for fillings that are starchy or dense. The closed crust will trap more of the moisture, keeping the filling perfectly juicy, like in this wild blueberry pie.
I tend to use either interchangeably. Depending on if I want more of the flaky pie crust on top (solid double crust), or a crust that looks pretty and decorative (lattice crust or other decorative cut outs, like I do with this cherry pie).

The four keys to perfect double crusted pies
My (and probably yours too?) biggest pet peeve with double crusted pie is underbaked pie crust.
The bottom crust end ups being under cooked, and doesn’t caramelize properly. The wet filling makes the crust soggy, and prevents the crust from cooking through. Sounds familiar?
Here I’ll show you how to prevent all these pitfalls! I share tips on how to make sure your bottom crust fully cooks through and turns golden brown in the oven.
- The bottom crust should be rolled out fairly thin. Avoid THICK pie crusts on the bottom.
- Make sure the filling has enough starch to soak up excess liquid. I also like to sprinkle the bottom crust with semolina or breadcrumbs before adding the filling.
- Bake double crusted pies on a preheated metal sheet pan or pizza stone.
- Place the pie closer to the bottom element of your oven. Either on the lowest rack or one above the lowest rack (lower third).
Ingredients and tools you’ll need
Ingredients
- Pie crust – You can use my all butter pie rust for a tender, flaky, flavorful pie crust, OR my pate sucree (shortcrust pastry) for a more cookie-like crust, OR my graham flour pie crust for a flaky, buttery crust with the nutty flavor of graham crackers!
- Pie filling of your choice.
- Egg – For the egg wash.
- Raw sugar – To sprinkle on top.
Tools
- Pie plate – I’m using a 9 inch deep pie plate here, but you can use a sheet pan as well.
- Half sheet pan or pizza stone – To place the pie plate on.
- Rolling pin
- Scissors
- Knife or pastry cutter
- Pastry brush
How to make a double pie crust (step by step overview)
Step 1 – Make your pie dough
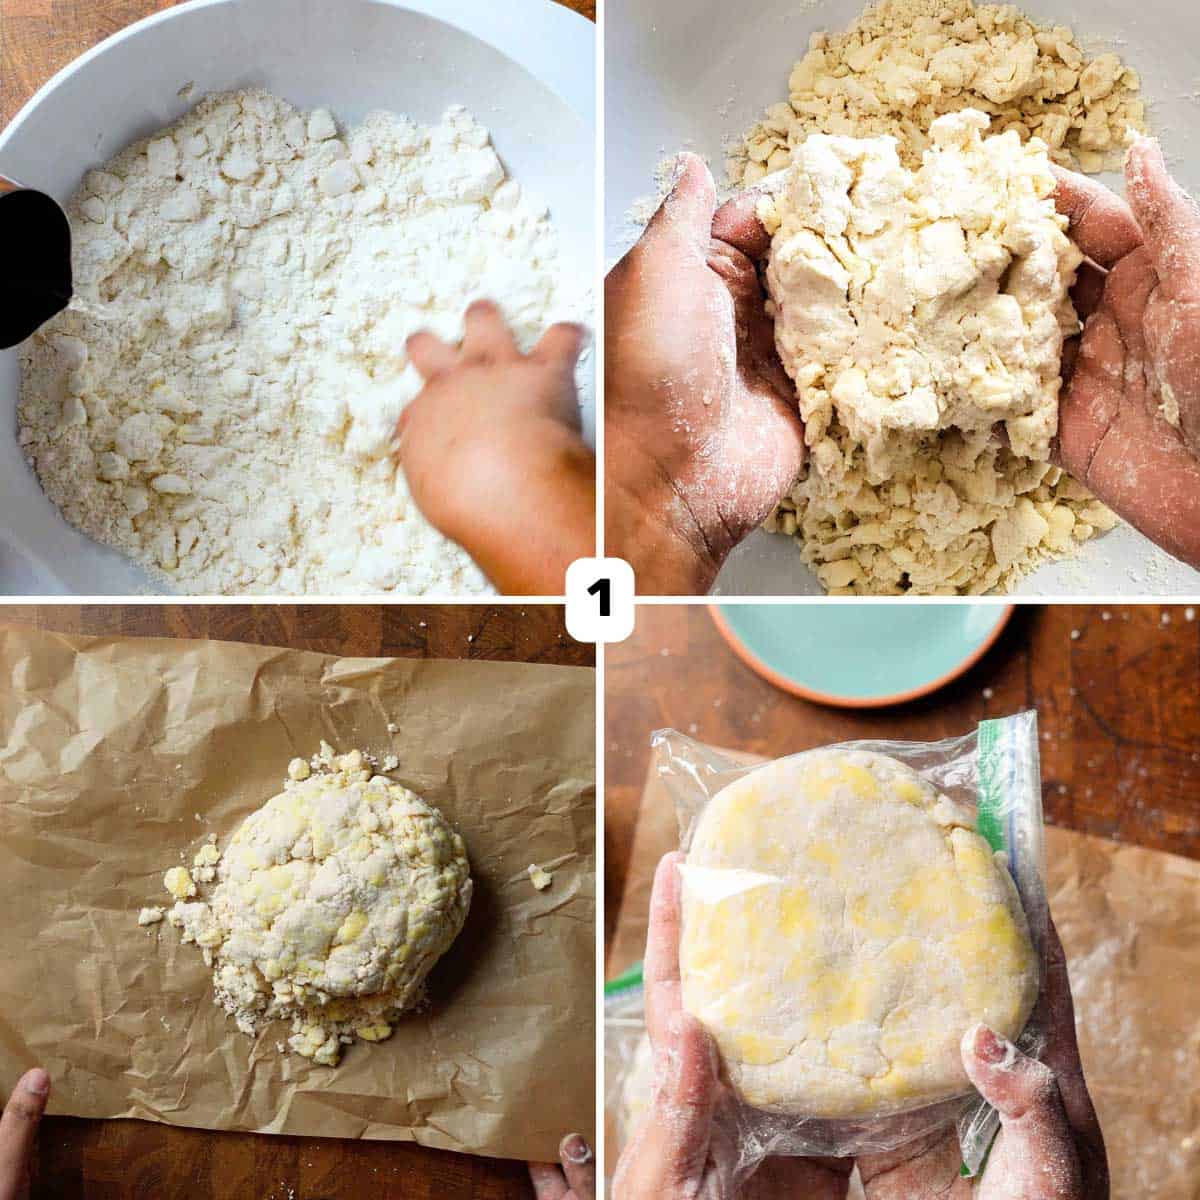
I’m using my all butter pie crust here (image 1). Since I keep the butter pieces fairly lumpy, the crust is very flaky. But you can change the texture by changing the size of the butter pieces in the dough as explained in my pie crust post.
My pie recipe is enough for 1 double crusted pie, with each portion making more than enough to line a 9 inch deep pie pan.
You can also use my pate sucree recipe for the top crust. The crust will be sweeter, and have a more cookie-like texture, than a flaky pastry texture.
Make sure the dough is well-rested and chilled in the fridge before rolling it out.
Step 2 – Roll out the dough
Make sure to keep the dough cold while rolling it out (image 2). This makes the dough easier to manage. And keeping the butter cold ensures a flaky crust.
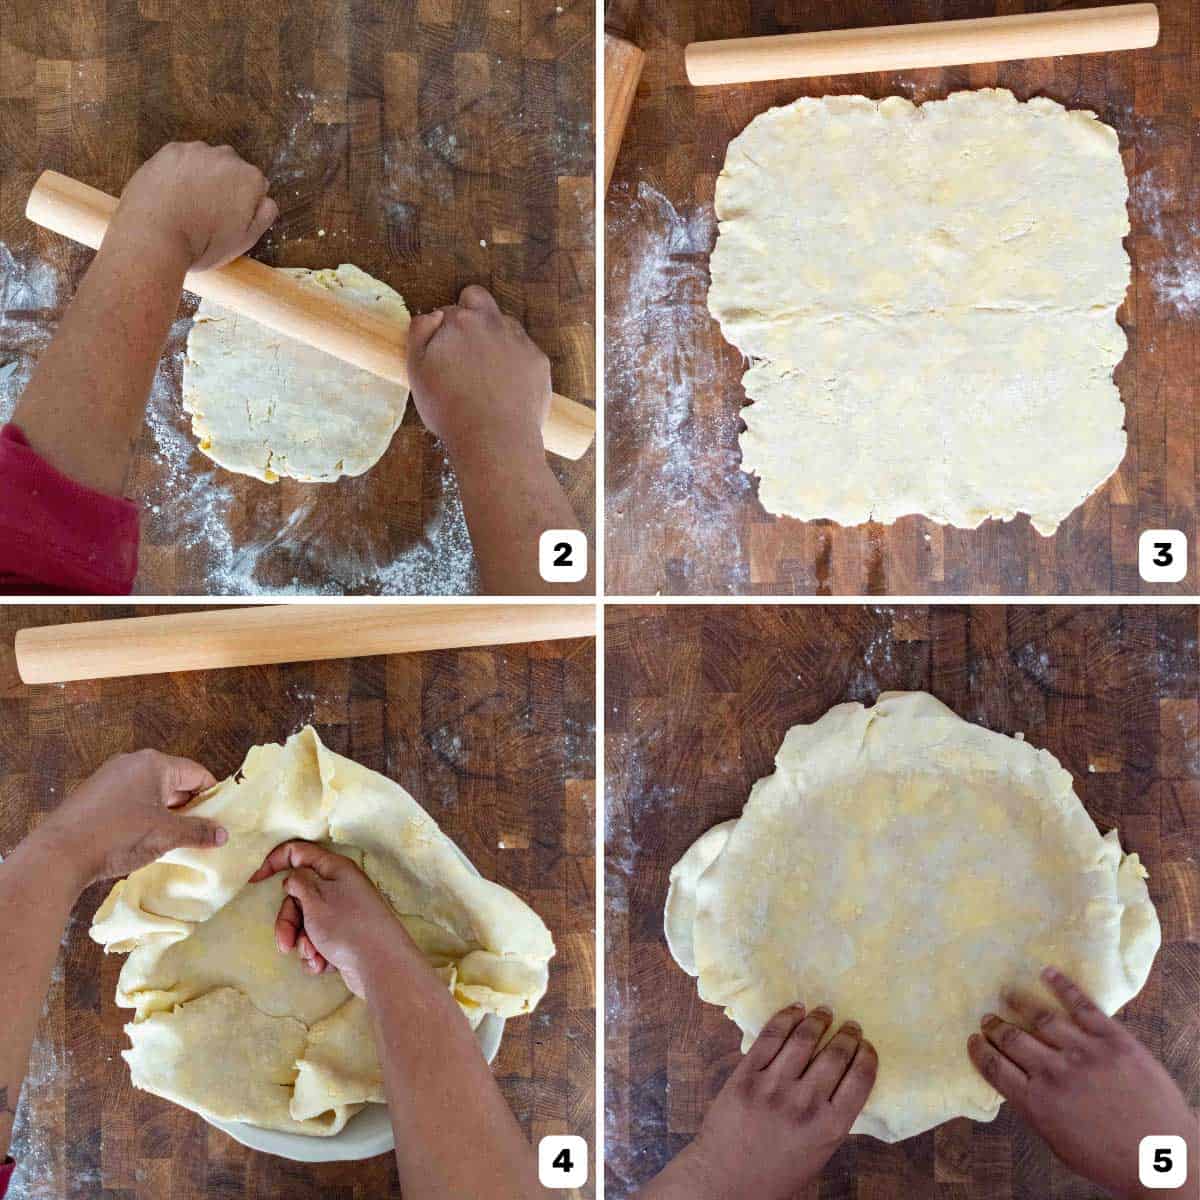
Roll out one portion of the pie crust, maintaining a round shape to fit in a 9 inch pie pan. The key is to roll out the dough until it has a thickness of about 3 mm. If the dough starts to shrink, cover and let it rest in the fridge for about 30 – 60 minutes before trying to roll it out again.
Rather than going by the diameter of the rolled out dough, make sure the thickness is correct (image 3).
Roll out the second pie dough the same way as the first. However, the second crust can be slightly thicker if you like, as this will be the top crust. Generously flour the rolled out crust and fold it loosely into quarters. Wrap with plastic wrap and keep this in the fridge until needed.
Step 3 – Line the pie plate with pie dough
Because of the butter content in the pie dough, you don’t need to butter your pie plate to prevent the crust from sticking.
To transfer the rolled out pie dough into the pie plate, you can either,
- Fold the dough into quarters, and transfer it to the plate and gently unfold it, OR
- Roll up the dough on a rolling pin, and then gently unroll the dough from the pin onto the pie dish.
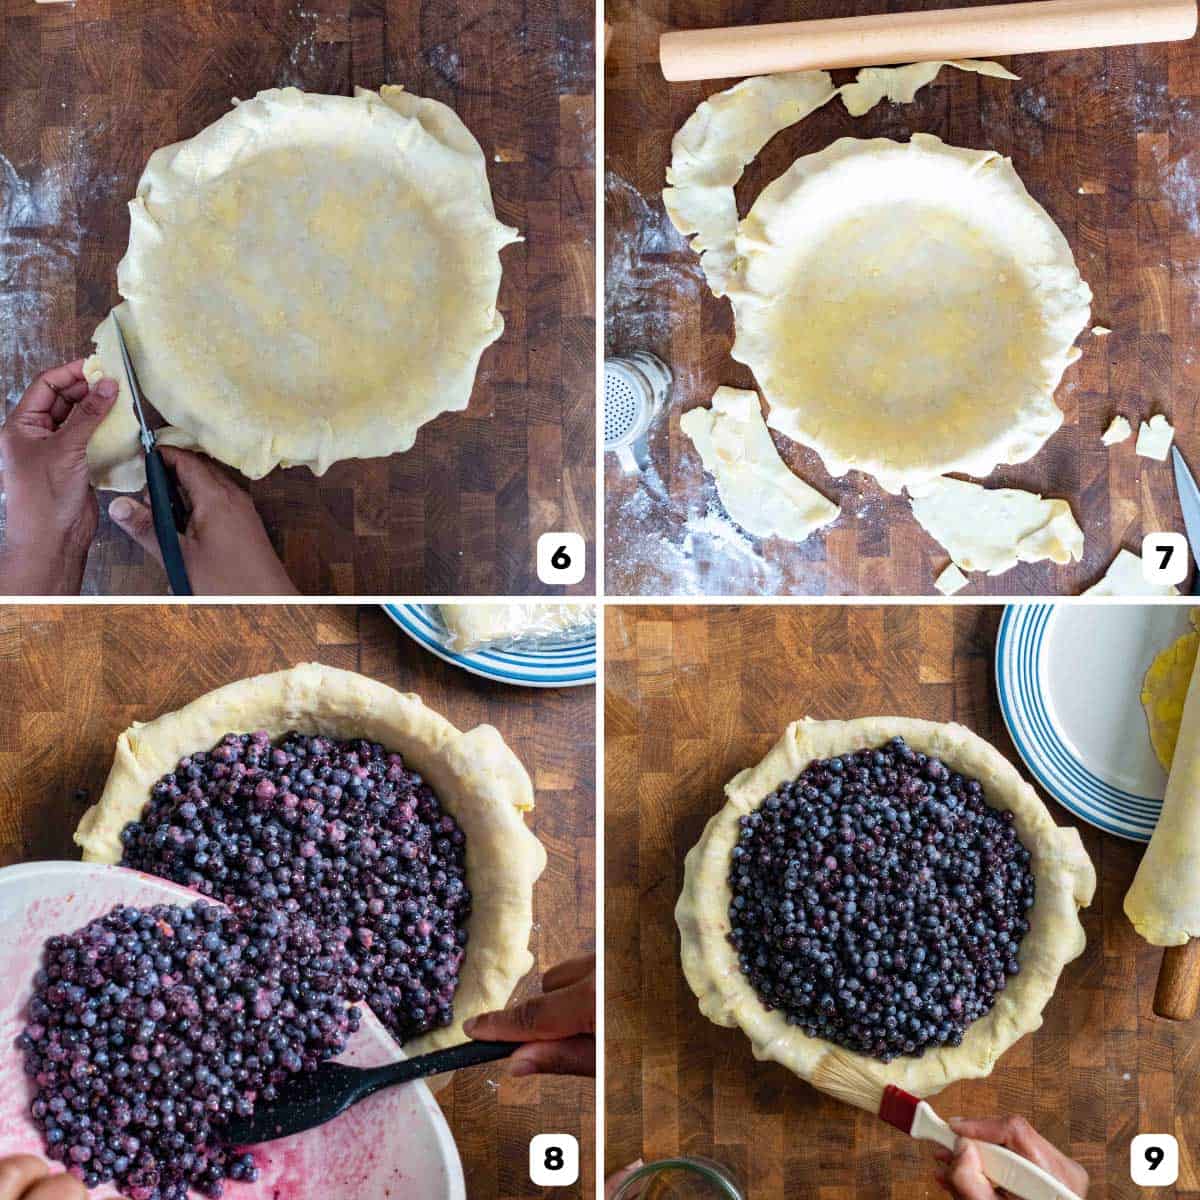
Then, carefully fit the pie dough in the pie plate by lifting the dough and gently laying it back down while using your hand to fit the dough into the plate (image 4). This is to avoid stretching the dough, as stretched dough will shrink as it bakes.
Use the back of your fingers to gently press the dough into the bottom edge of the pie dish, so that it has a proper grip and takes the shape of the pie plate (image 4). Gently unravel any folds in the dough along the side of the pie plate (image 5), so that the dough lines the sides of the pie plate well, while leaving an overhang over the edges.
For a double crust pie, I like to keep an overhang of about 1/2 – 3/4 inch, and trim away the rest (images 6 – 7).
Wrap the pie plate with plastic wrap and keep in the fridge until needed (unless the pie filling is ready and you’re ready to fill and cover the pie).
Step 4 – Prepare the filling and fill the pan
Precooked or partially cooked fillings will need to be made ahead of time so that it has time to cool down before pouring it into the pie crust.
I also like to thaw out frozen fruits overnight before making the filling. Especially, if the frozen fruits are lumpy and not individually frozen.
But once your filling is ready to go, place the filling in your pie crust lined pie pan (image 8).
Pie filling tip
If the filling is an extra juicy filling, you can sprinkle the bottom of the pie crust with just a thin layer of breadcrumbs or semolina flour.
This will act as a barrier between the crust and the filling, and absorb extra juices and help thicken the filling even further.
This extra layer helps prevent a soggy crust as well.
Step 5 – Double crust pie
Once you’ve filled your bottom crust with the filling, it’s time to place the second pie crust on top.
To ensure the top crust sticks to the bottom, I like to brush the edge of the bottom pie crust with a little water (image 9).
Then place the second pie crust on top (image 10). Press down along the edge of the pie plate, so that the top crust sticks to the bottom crust (image 11). Then trim the excess pie crust on the top, matching the overhang on the bottom pie crust (images 12 – 13).
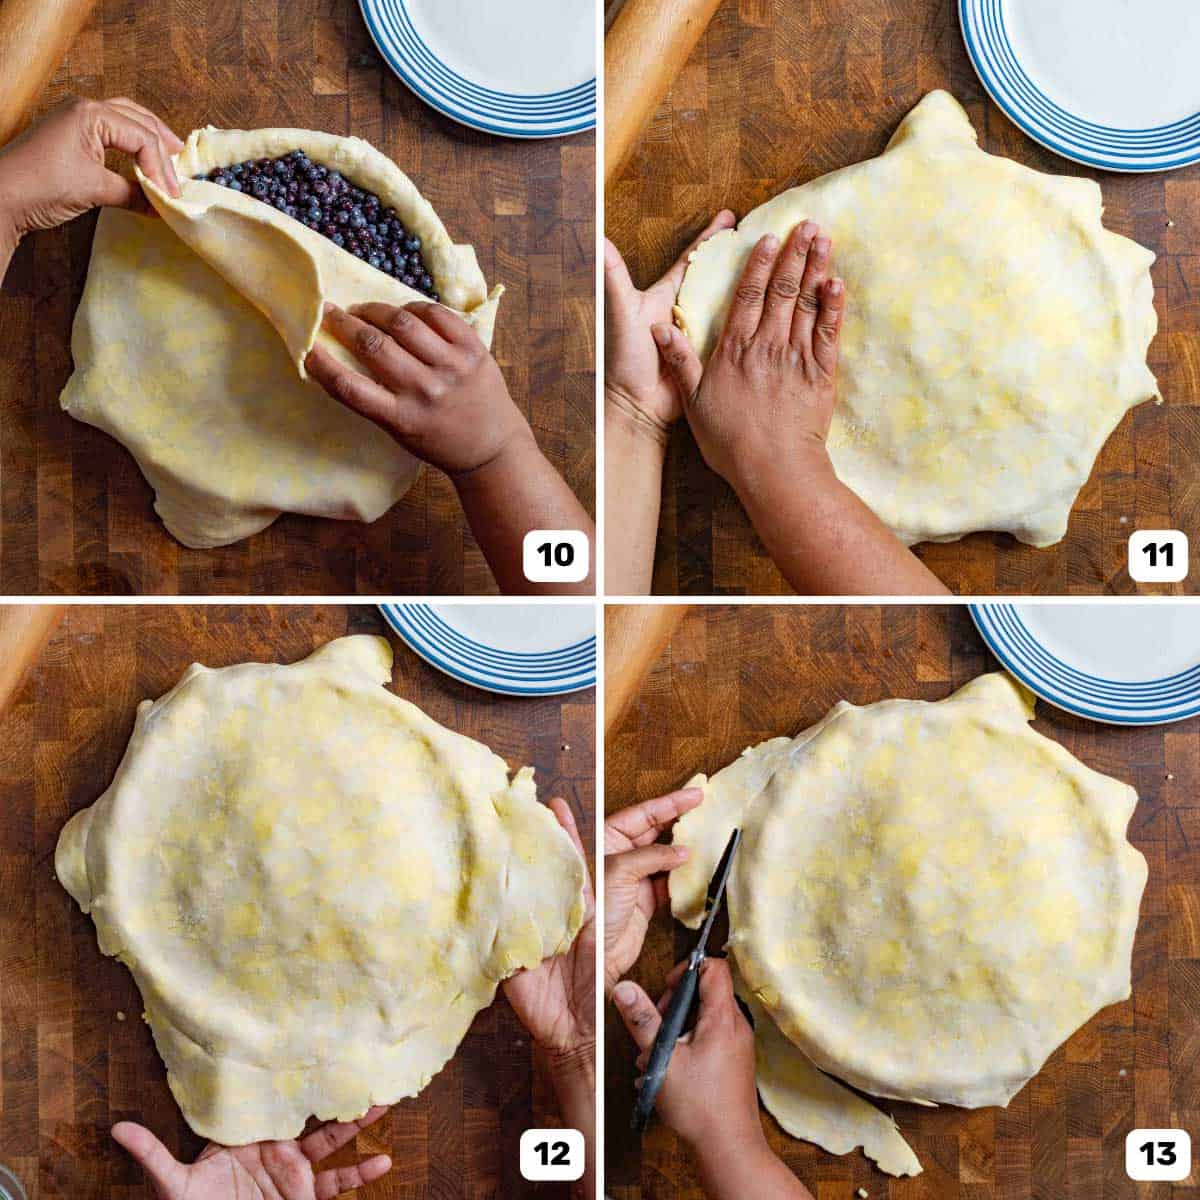
Press the edges of the two crusts together all along the pie, or use a fork to crimp it to seal.
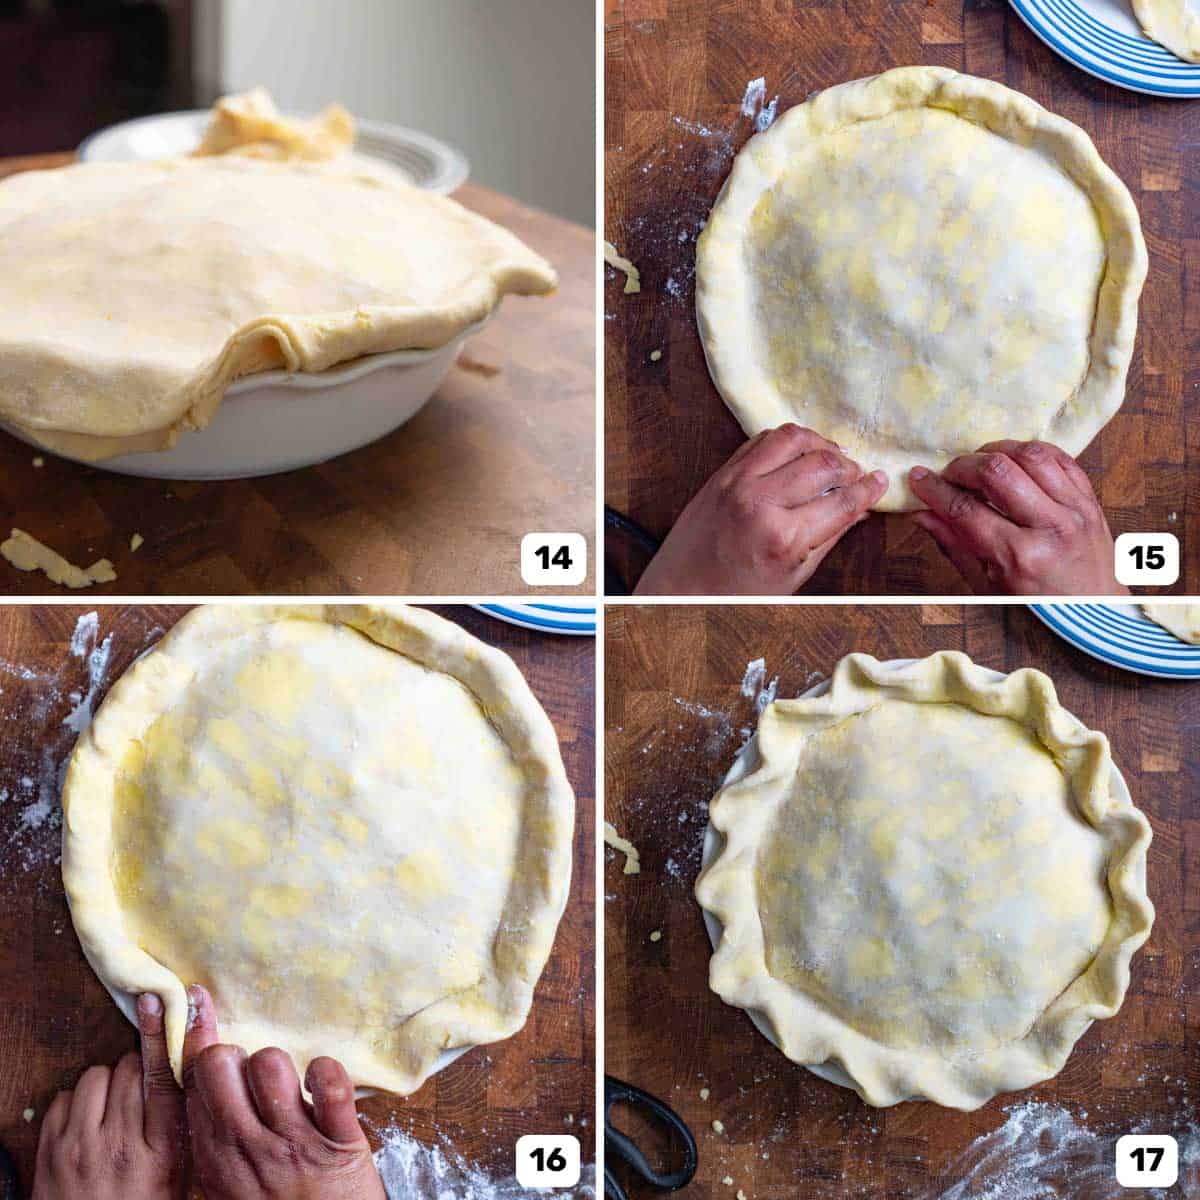
Then tightly roll the excess overhang UNDER the pie crust to create a thick edge (images 14 – 15). Crimp or flute this thickened edge of the pie (images 16 – 17).
Step 6 – Preheat oven and place the pie in fridge or freezer
Preheat the oven to 425 F, and place the oven rack in the lower third of the oven. For me, this is either the bottom shelf or the one above that.
While the oven preheats, place the pie in the fridge or freezer.
Then place a half sheet pan OR pizza stone in the oven as well. Allow this sheet pan or pizza stone to fully preheat BEFORE you place the pie pan in the oven.
Step 7 – Prep the pie and bake
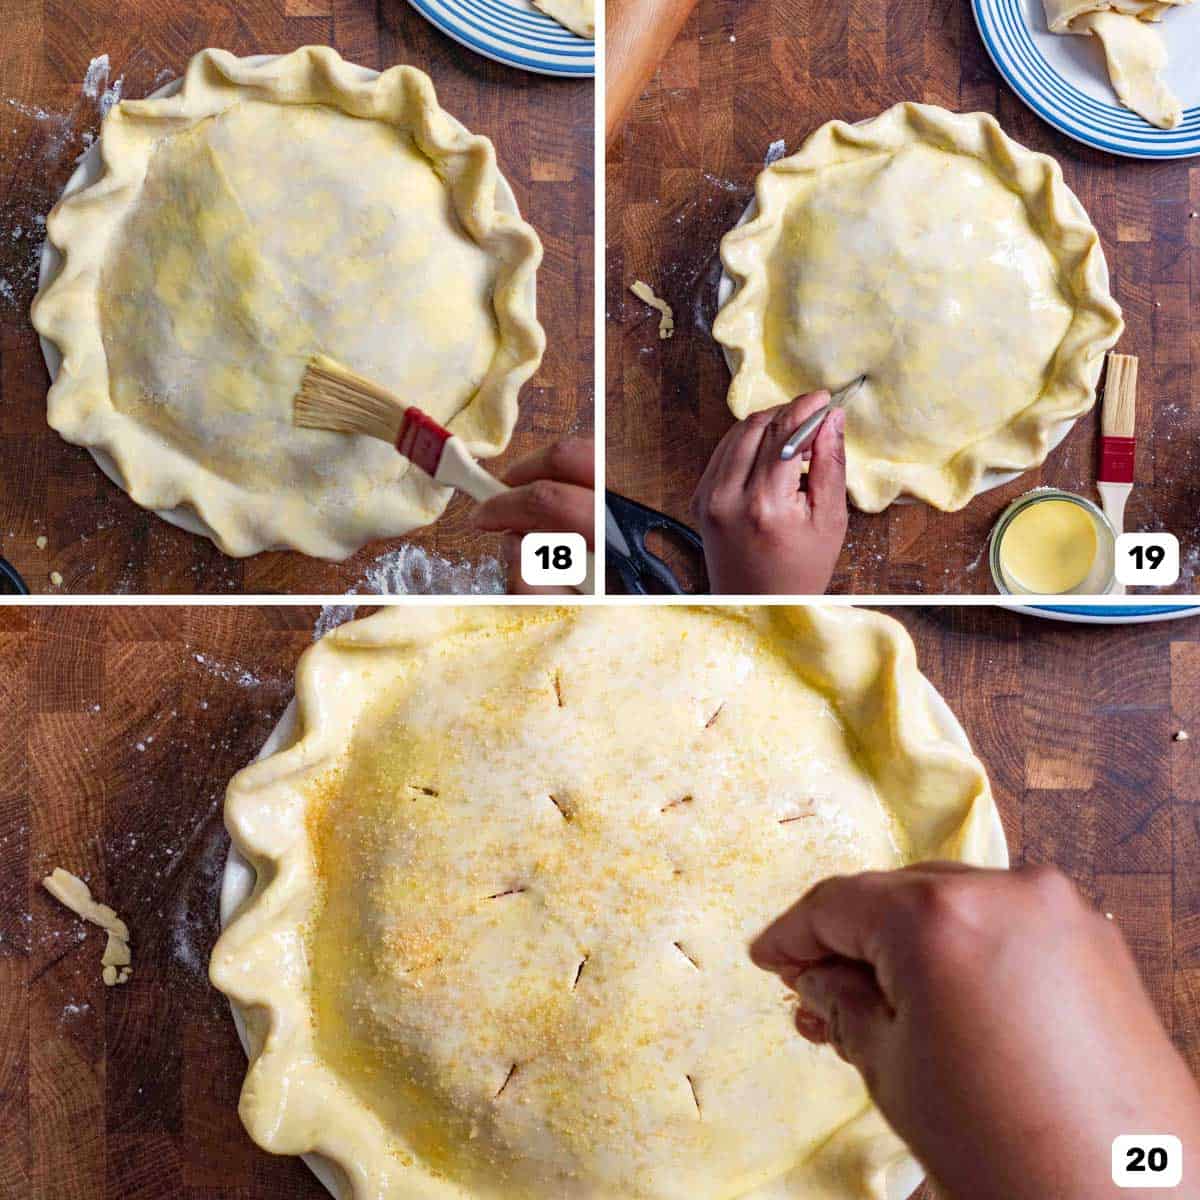
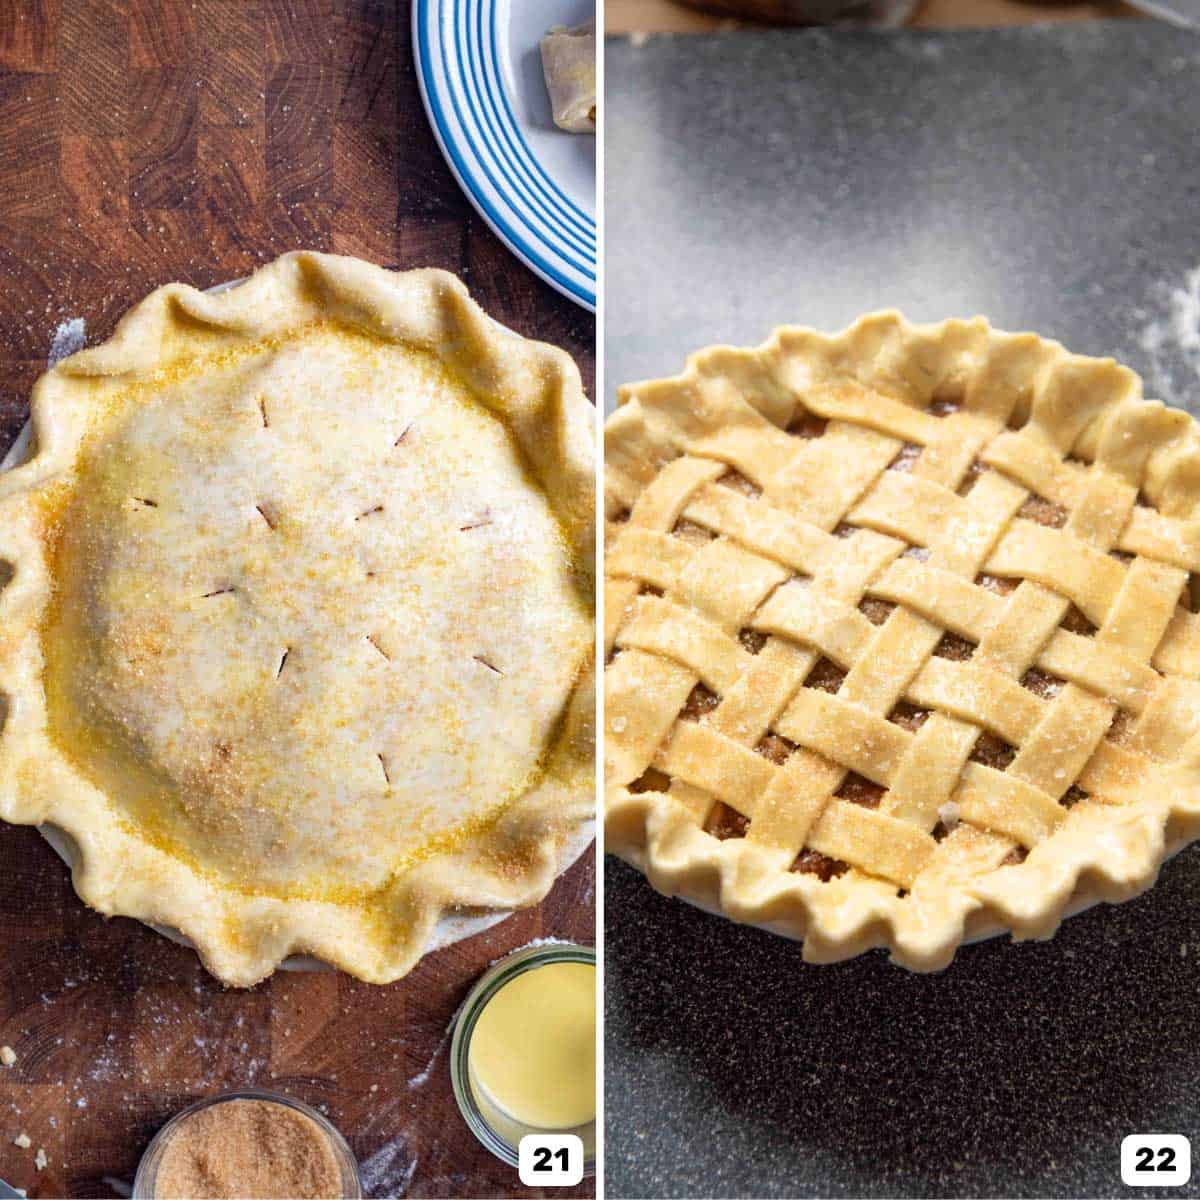
Before baking the pie, I like to brush the top with an egg wash (image 18), so that the crust will have a beautiful golden sheen once baked. Sprinkling the top with raw sugar can add a nice little crunch as well (image 20)!
But most importantly, cut vent holes in the crust to allow steam to escape as the filling cooks. Simply cutting slits in the crust is sufficient (image 19).
You can also cut a decorative pattern on top, but you may need to do this BEFORE placing the top crust on your pie. A lattice crust is also a double crust option (image 22).
Then place the pie on the preheated sheet pan / pizza stone. Let the pie bake at 425°F / 218°C for about 10 minutes, and then lower the heat to 350°F / 180°C, and bake for a further 50 – 55 minutes.
If the crust is browning too quickly, you can cover it with a silicone pie crust shield.
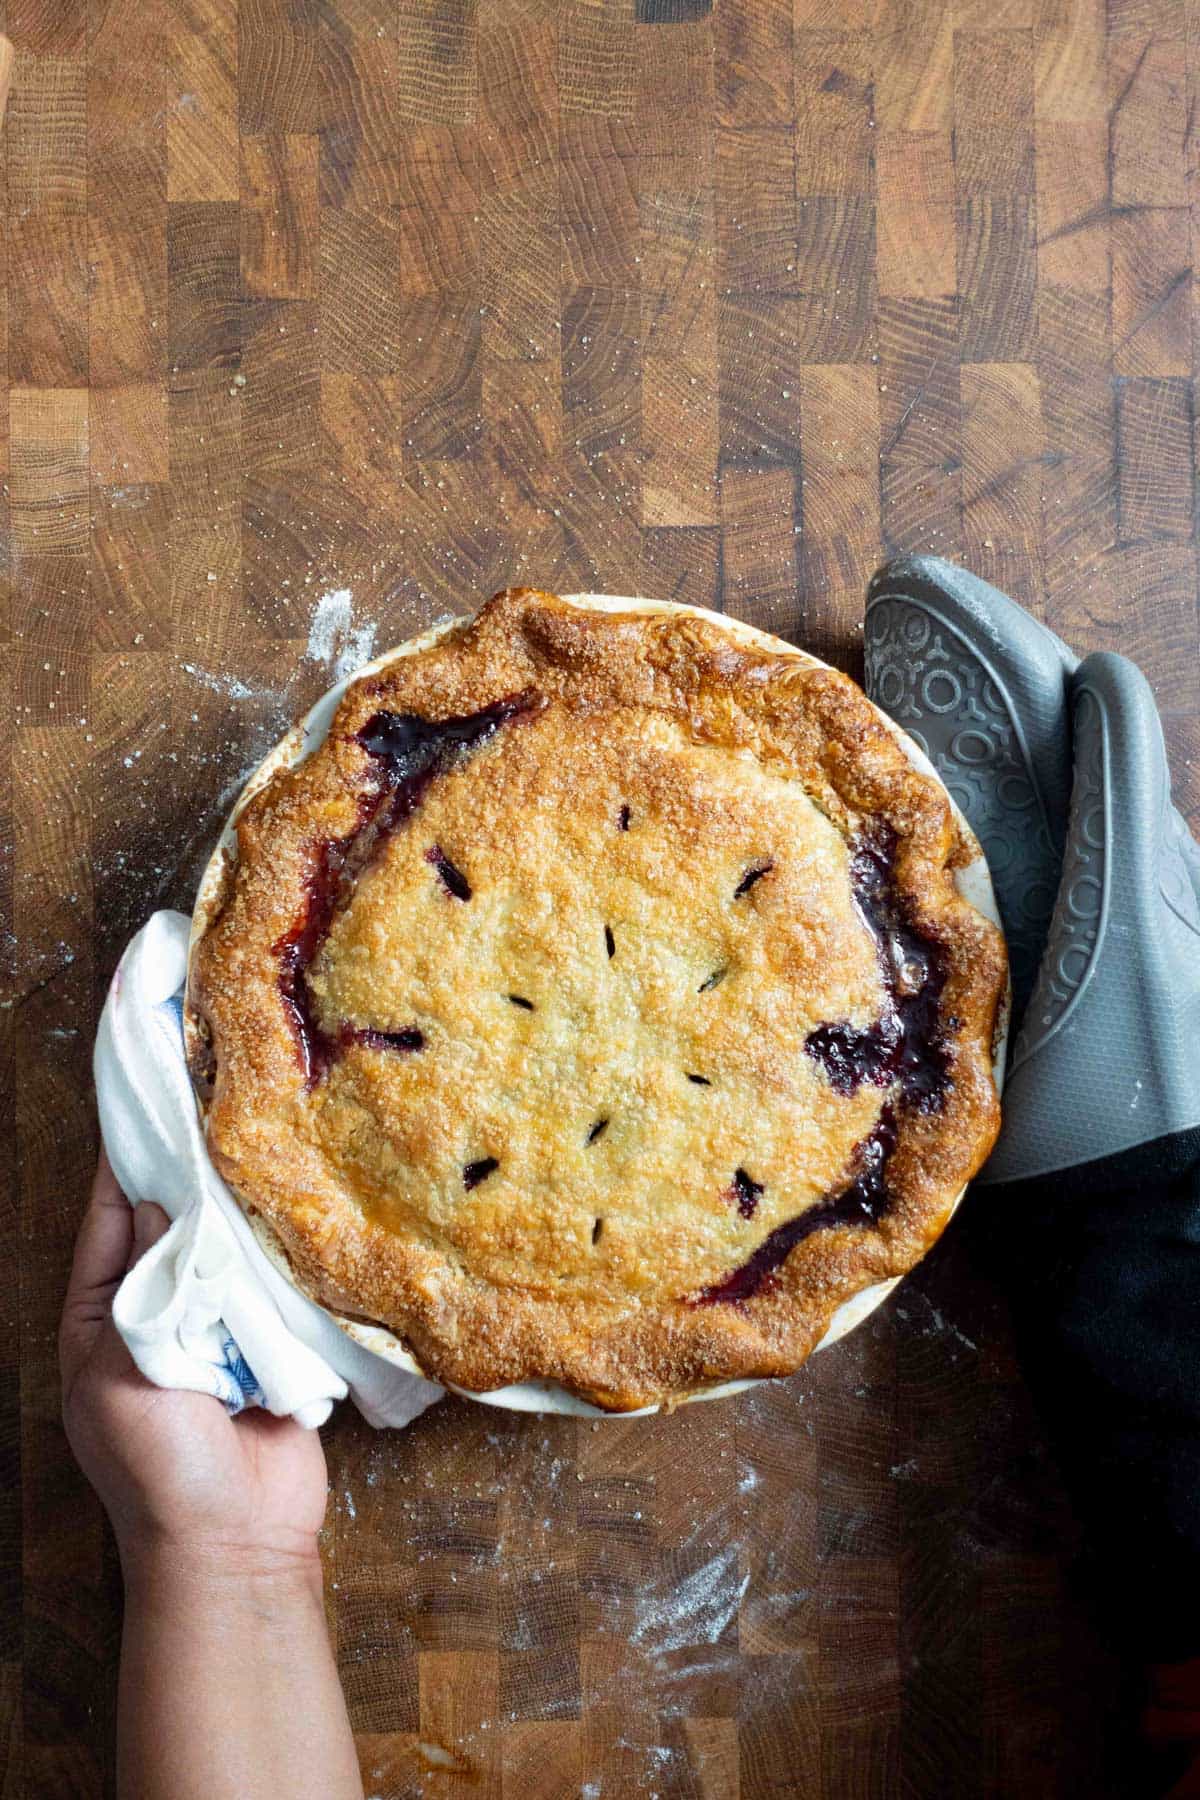
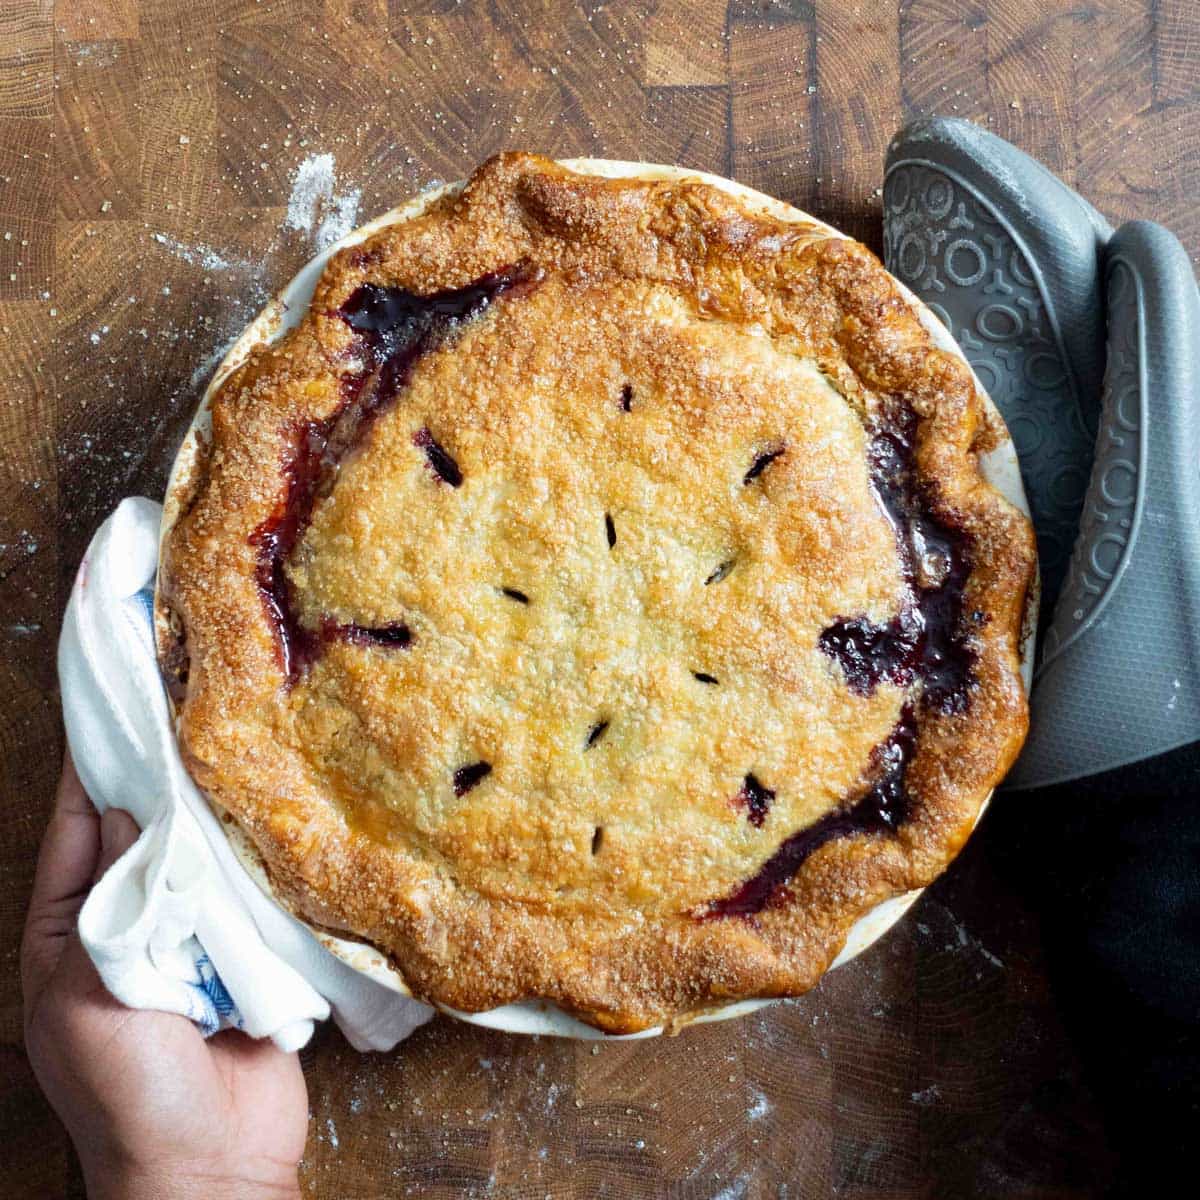
Step 8 – Let the pie cool before cutting into it
Once baked, remove the pie from the oven and let it cool before cutting into it (hardest part for me!). This lets the filling set, so it’s easier to cut.
Now you’re ready to serve the pie!
Pie dough science and pro tips
- Start with cold ingredients, especially chilled butter and ice water.
- If the butter softens, return the dough to the freezer AT ANY STAGE to let the butter harden.
- I use butter over shortening, because the flavor with butter is so much better! Shortening pie crust is easier to handle, but has much less flavor.
- DO NOT overwork the dough. Only handle the dough just enough to bring it together. Use the parchment paper to fold the dough over to form the pie dough. The more you handle / knead the dough the tougher it becomes.
- The dough should not be fully hydrated, and some dry spots are expected. As the dough rests, the dough will fully hydrate.
- Rest the dough if it starts to shrink when rolling it out. This will prevent the crust from shrinking in the oven.
- Make sure your bottom crust is thin so that it will bake better and won’t end up undercooked.
- DO NOT stretch the dough to fit into the pie plate.
- Add a layer of breadcrumbs or cookie crumbs or semolina to the bottom pie crust to help absorb extra moisture and to act as a barrier between the crust and the filling.
- To seal the top crust to the bottom crust, roll the excess crust UNDER the pie crust edge. This way the ends won’t unravel easily and will form a more stable crust.
- Brush the pie crust with an egg wash to get a beautiful sheen.
- Preheat the oven properly to ensure the baking sheet / pizza stone also preheats well before placing the pie on top.
- Bake the pie in the lower third of the oven, with a preheated baking sheet / stone underneath to promote a perfectly baked bottom crust.
Troubleshooting pie crust
My pie crust is shrinking
Pie crust can shrink in the oven if,
– The pie dough was overworked and the gluten wasn’t rested properly.
– Dough was stretched when lining the pie plate, so it shrunk as it baked.
– The pie crust had too much water. Extra water can lead to more gluten formation, which will make the crust more elastic.
Pie crust is thick and tough
This can also happen if you overwork the dough. The extra gluten formed will make the dough more tough and rubbery, and it can even lead to the dough shrinking and becoming thicker as well.
Why is my bottom pie crust soggy?
The bottom pie crust can end up soggy and underbaked because it’s in contact with a juicy filling, AND isn’t directly exposed to the heat.
There are two ways to avoid this.
Par-bake the bottom crust, so that the crust has a chance to bake before adding the filling (as I explain in my post on how to blind bake pie crust). But this will make it harder to apply a top crust, as the parbaked crust will be less flexible to form a seal.
The second method is to make sure the bottom crust gets direct heat to facilitate baking. This is what I prefer to do by placing the pie crust closer to the bottom element of the oven (and on a pre-heated pizza stone or baking sheet).
My pie crust edges are burning before the middle cooks through?
The edges tend to bake faster than the center. To avoid the crust from burning, you can cover it with a silicone pie crust shield.
Alternatively, you can simply use a piece of foil to fashion a pie crust shield.
Can I prevent the juices from bubbling through the crust?
It’s normal for some of the juices to bubble through the venting holes or through the lattice crust on a pie. It’s also a good sign that indicates your pie is baked through!
However, if there’s a lot of liquid coming through, the filling may not have enough starch to thicken the liquid / juices.
Make ahead and storage tips
The great news is that there are so many ways to prep for pies ahead of time!
- You can freeze the filling in the shape of your pie dish, so you can just drop it into any pie crust and bake it.
- You can also assemble the pie and freeze it for about 2 months, before baking the whole pie from frozen.
- You can even freeze a BAKED pie! Just let the pie thaw out over 24 hour in the fridge, and gently reheat the pie in the oven for a juicier filling and crisp crust.
- The baked pie will last in the fridge for about 5 days.
Recipe
Double Pie Crust
US based cup, teaspoon, tablespoon measurements. Weight measurements are recommended for accurate results whenever available.
Common Measurement ConversionsEquipment:
- 9 or 9.5 inch pie plate (between 1 – 2 inches deep)
- Foil or parchment paper
- Sugar or rice (as pie weights)
- Rolling Pin
- Spray bottle (optional)
Ingredients:
- 300 g unsalted butter preferably chilled
- 120 mL iced water
- 30 mL chilled vodka or use the same amount of iced water
- 400 g all purpose flour spooned and level when using cup measurements
- 30 g sugar
- ¾ tsp fine sea salt
Instructions:
Making the dough
- Make the pie crust dough according to the instructions in my all butter pie crust recipe here. Make sure the dough is well-rested for a few hours before rolling it out. We'll be using both dough portions for this double pie crust recipe.300 g unsalted butter, 120 mL iced water, 30 mL chilled vodka, 400 g all purpose flour, 30 g sugar, ¾ tsp fine sea salt
Rolling out the dough
- Take one portion of pie dough. Unwrap the plastic wrap and place it on a floured surface.
- Since the butter will be very firm, it'll be hard to roll out the dough right away. Strike the dough disc a few times with a rolling pin, on both sides, to make it more pliable and easy to roll out.
- Roll out the dough while maintaining the shape of a circle as best you can. Squeeze any cracked dough together to seal. Turn the dough a quarter turn after each roll, to ensure that the dough maintains the shape of a circle and also does not stick to your work surface. Use a light dusting of flour as needed, and also remember to flip the dough so that you roll it on both sides.
- Roll the dough until it’s about 3 mm in thickness. The diameter may vary, but it should definitely fit a 9.5 inch diameter, deep pie dish.
- If the dough starts to shrink as you roll it, lightly flour the dough surface and either fold it into quarters OR roll it onto a rolling pin, and then cover it with plastic wrap. Let the dough rest in the fridge for at least 20 minutes, and then proceed with rolling it out again.
- Now transfer the dough onto the pie dish. You can do this by rolling up the dough on a rolling pin and then carefully unrolling it over a pie dish, or folding the dough into quarters and unfolding it in the pie dish.
- Once you've lined the bottom crust in the pie plate, repeat the process to roll out the second portion of pie dough for the top crust. Fold the top crust into quarters and wrap it in plastic wrap. Keep it in the fridge until you need it.
Lining the pie plate with the bottom crust
- Do NOT stretch the dough to fit it inside the pie dish. This is crucial and a common beginner's mistake. Instead, carefully lift the pie crust and let it gently fall onto the pie dish. Use the back of your fingers to gently press the dough into the bottom of the pie dish, so that it neatly fits in the dish.
- Make sure the dough lines the sides of the pie dish in one smooth layer as well, with no folds or wrinkles.
- There should be an overhang over the pie dish rim. Using scissors or a sharp knife, cut the excess pie crust, leaving at least a 0.5 – 1 inch overhang. Measure the overhang from the inner rim of the pie dish.
- Loosely cover the pie crust with plastic wrap and let it rest in the fridge for at least 45 minutes. If the butter softens at any stage, refrigerate the crust.
Assembling the pie
- Fill the pie plate with your pie filling of choice.
- Take the second rolled out dough portion. You can keep the crust whole, or create a pattern on the top crust. It'll be easier to cut out the design before placing it on the pie. Instead of cutting slits to create vents, you can cut small decorative holes or shapes.For example, you can use a small star or round cutter to cut out a few holes instead of venting slits.
- You can also cut the second dough into strips, so that you can form a lattice crust on top.
- Next, brush the bottom border of the pie crust with a little water. Place the top crust over it, fairly taut. Then press down the top crust so that it sticks well to water brushed edge of the bottom crust.
- Cut the excess dough from the top crust, while leaving the same 0.5 – 1 inch overhang. Roll this overhang under the pie crust edge to form a pie crust border and crimp it with a fork OR create a fluted edge.
- Refrigerate the pie for at least 30 minutes before baking, while you preheat the oven.
Baking double crusted pies
- Follow your particular recipe instructions for best results for the pie filling you're using. However, these general instructions below should work for most fruit pies.
- Preheat the oven to 425℉ / 218℃ (conventional oven). Place the oven rack in the lower third of the oven, and then place a baking sheet or pizza stone / steel. Allow this to preheat with the oven. Make sure it's properly preheated before placing the pie on top of it (this is crucial for a perfectly baked bottom crust).
- Place the pie on the preheated baking pan / pizza stone and bake at this temperature for about 5 minutes.
- Then lower the heat to 350°F / 180°C (conventional oven). Bake the pie for a further 55 – 60 minutes. If the pie crust edge is browning too fast, cover the edge with a silicone pie crust shield, or with a piece of aluminum foil shaped into something similar.
Recipe Notes
All butter pie crust dough
Follow the step by step instructions in my all butter pie crust recipe.Blind baking pie crust
Follow step by step instructions in my post on how to blind bake pie crust to par-bake or fully blind bake pie crust.Nutrition Information:
“This website provides approximate nutrition information for convenience and as a courtesy only. Nutrition data is gathered primarily from the USDA Food Composition Database, whenever available, or otherwise other online calculators.”


Leave a Reply