

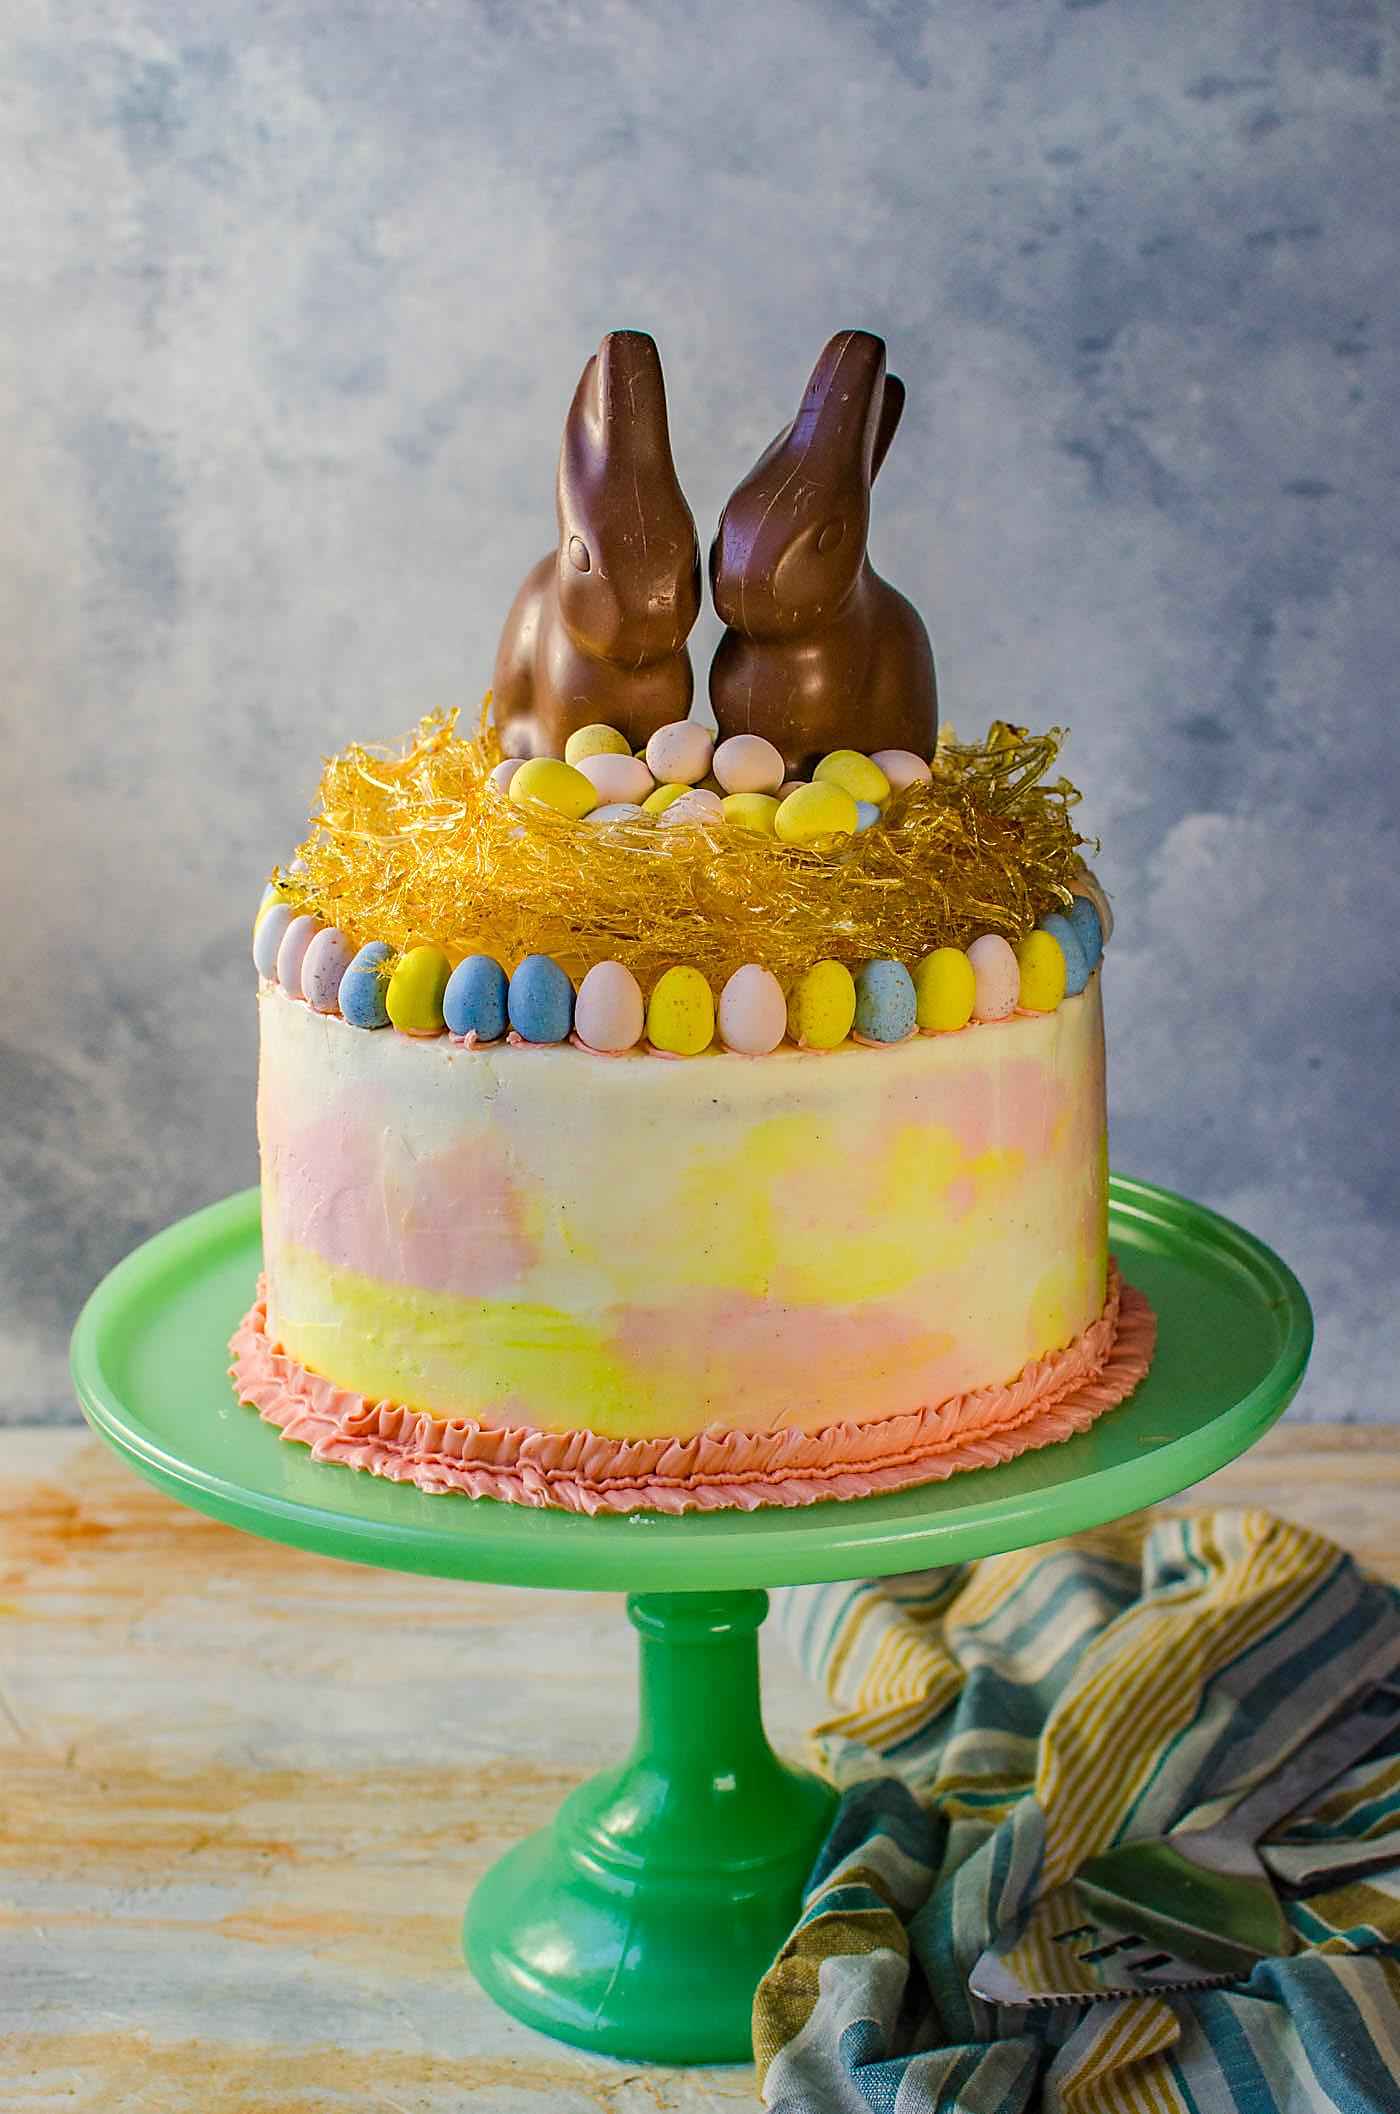
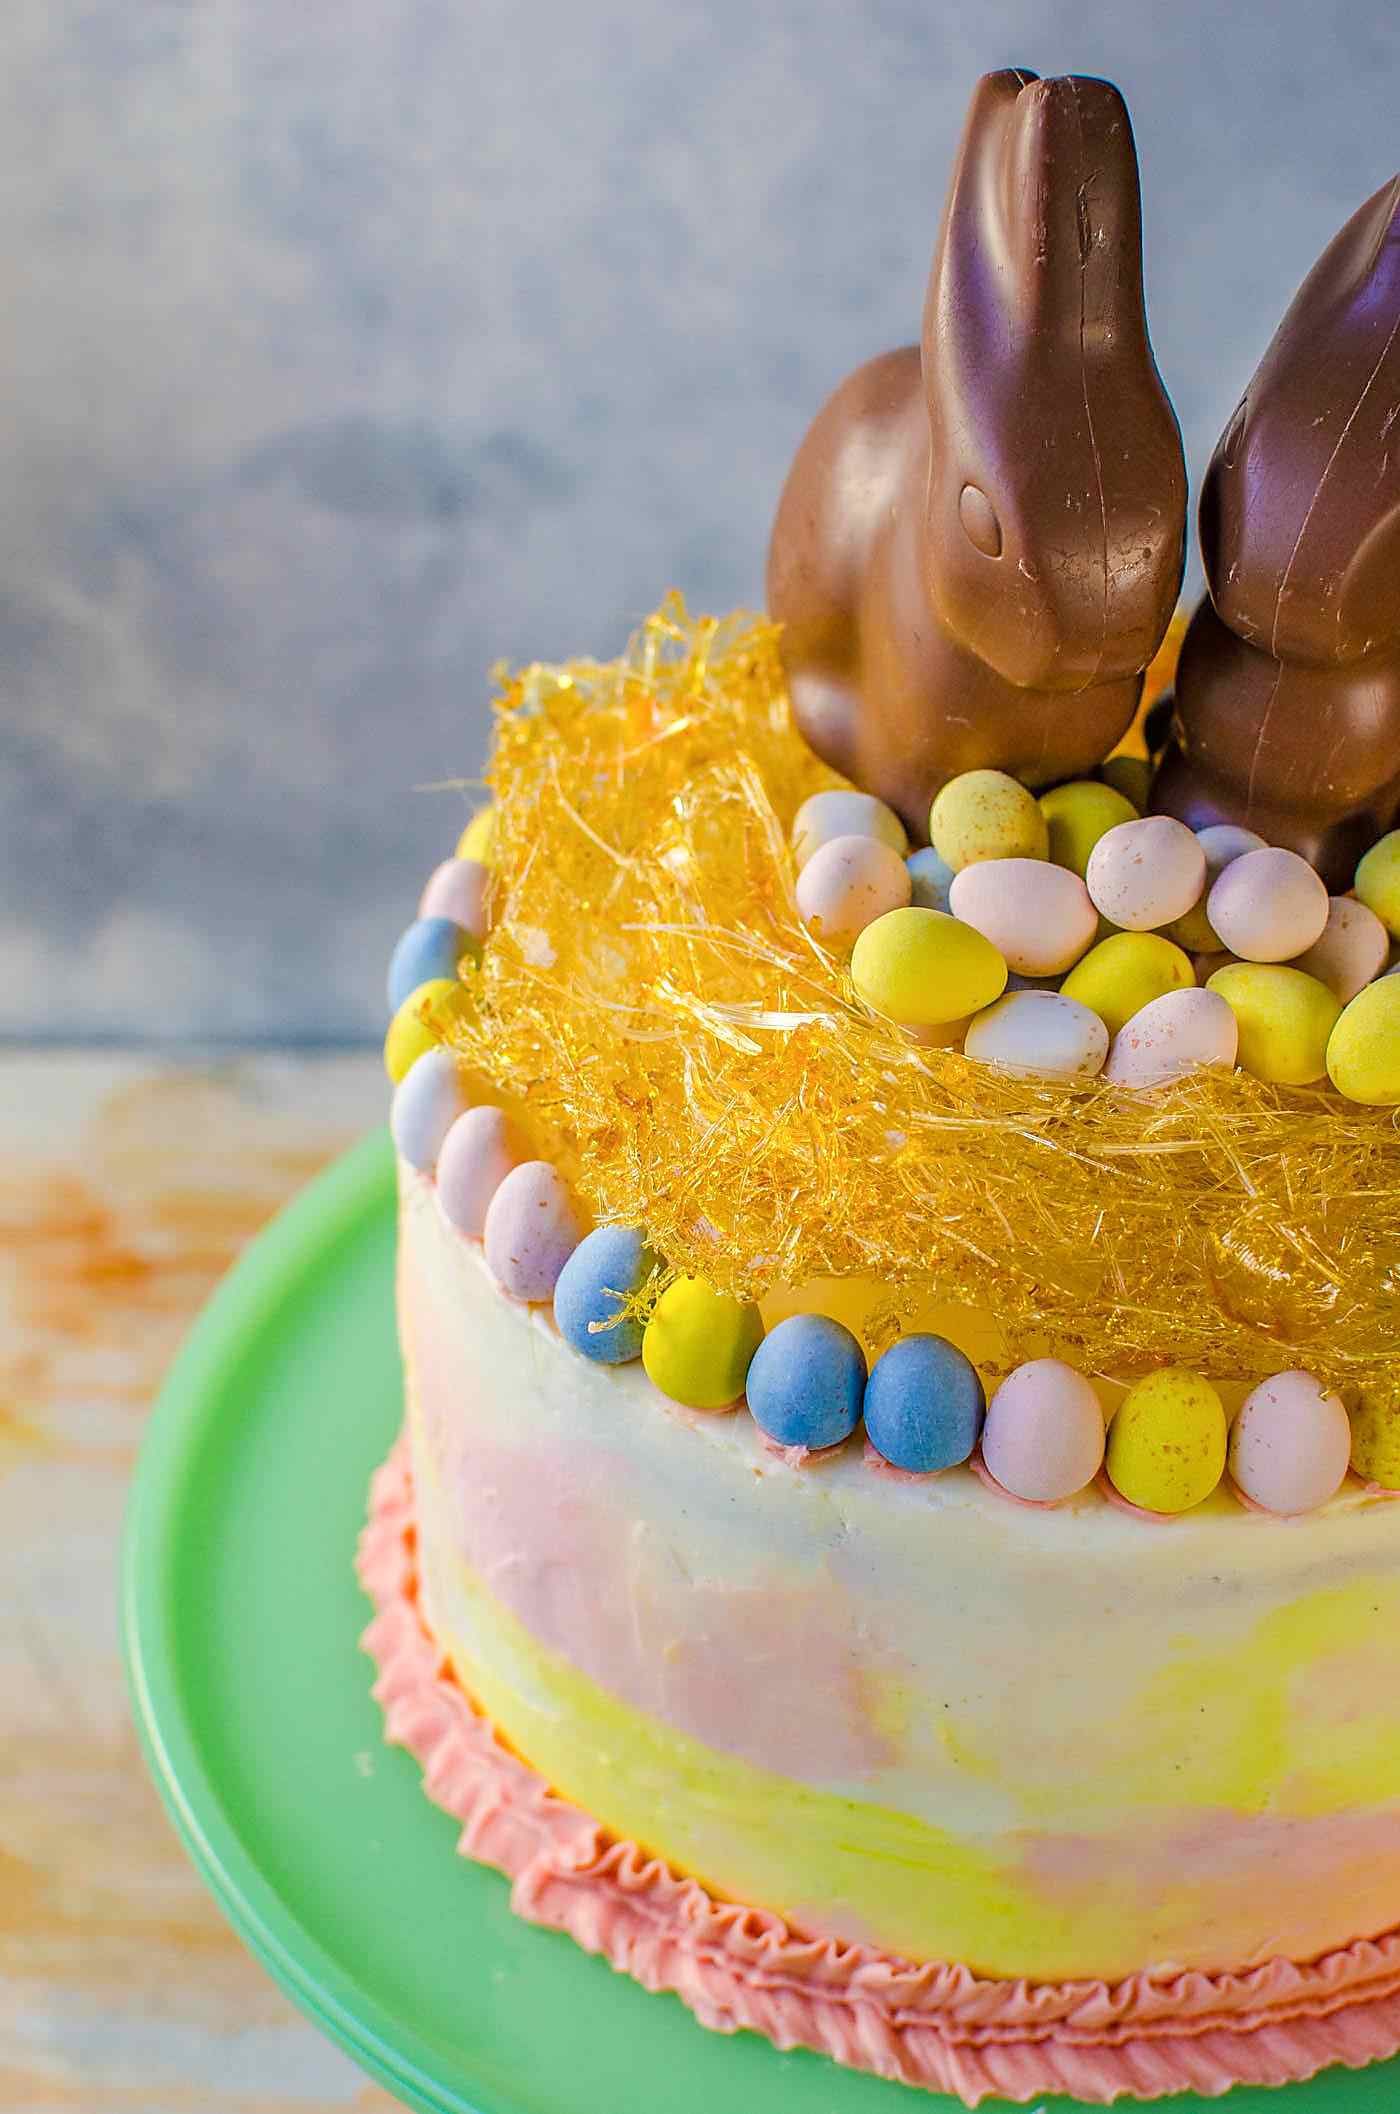
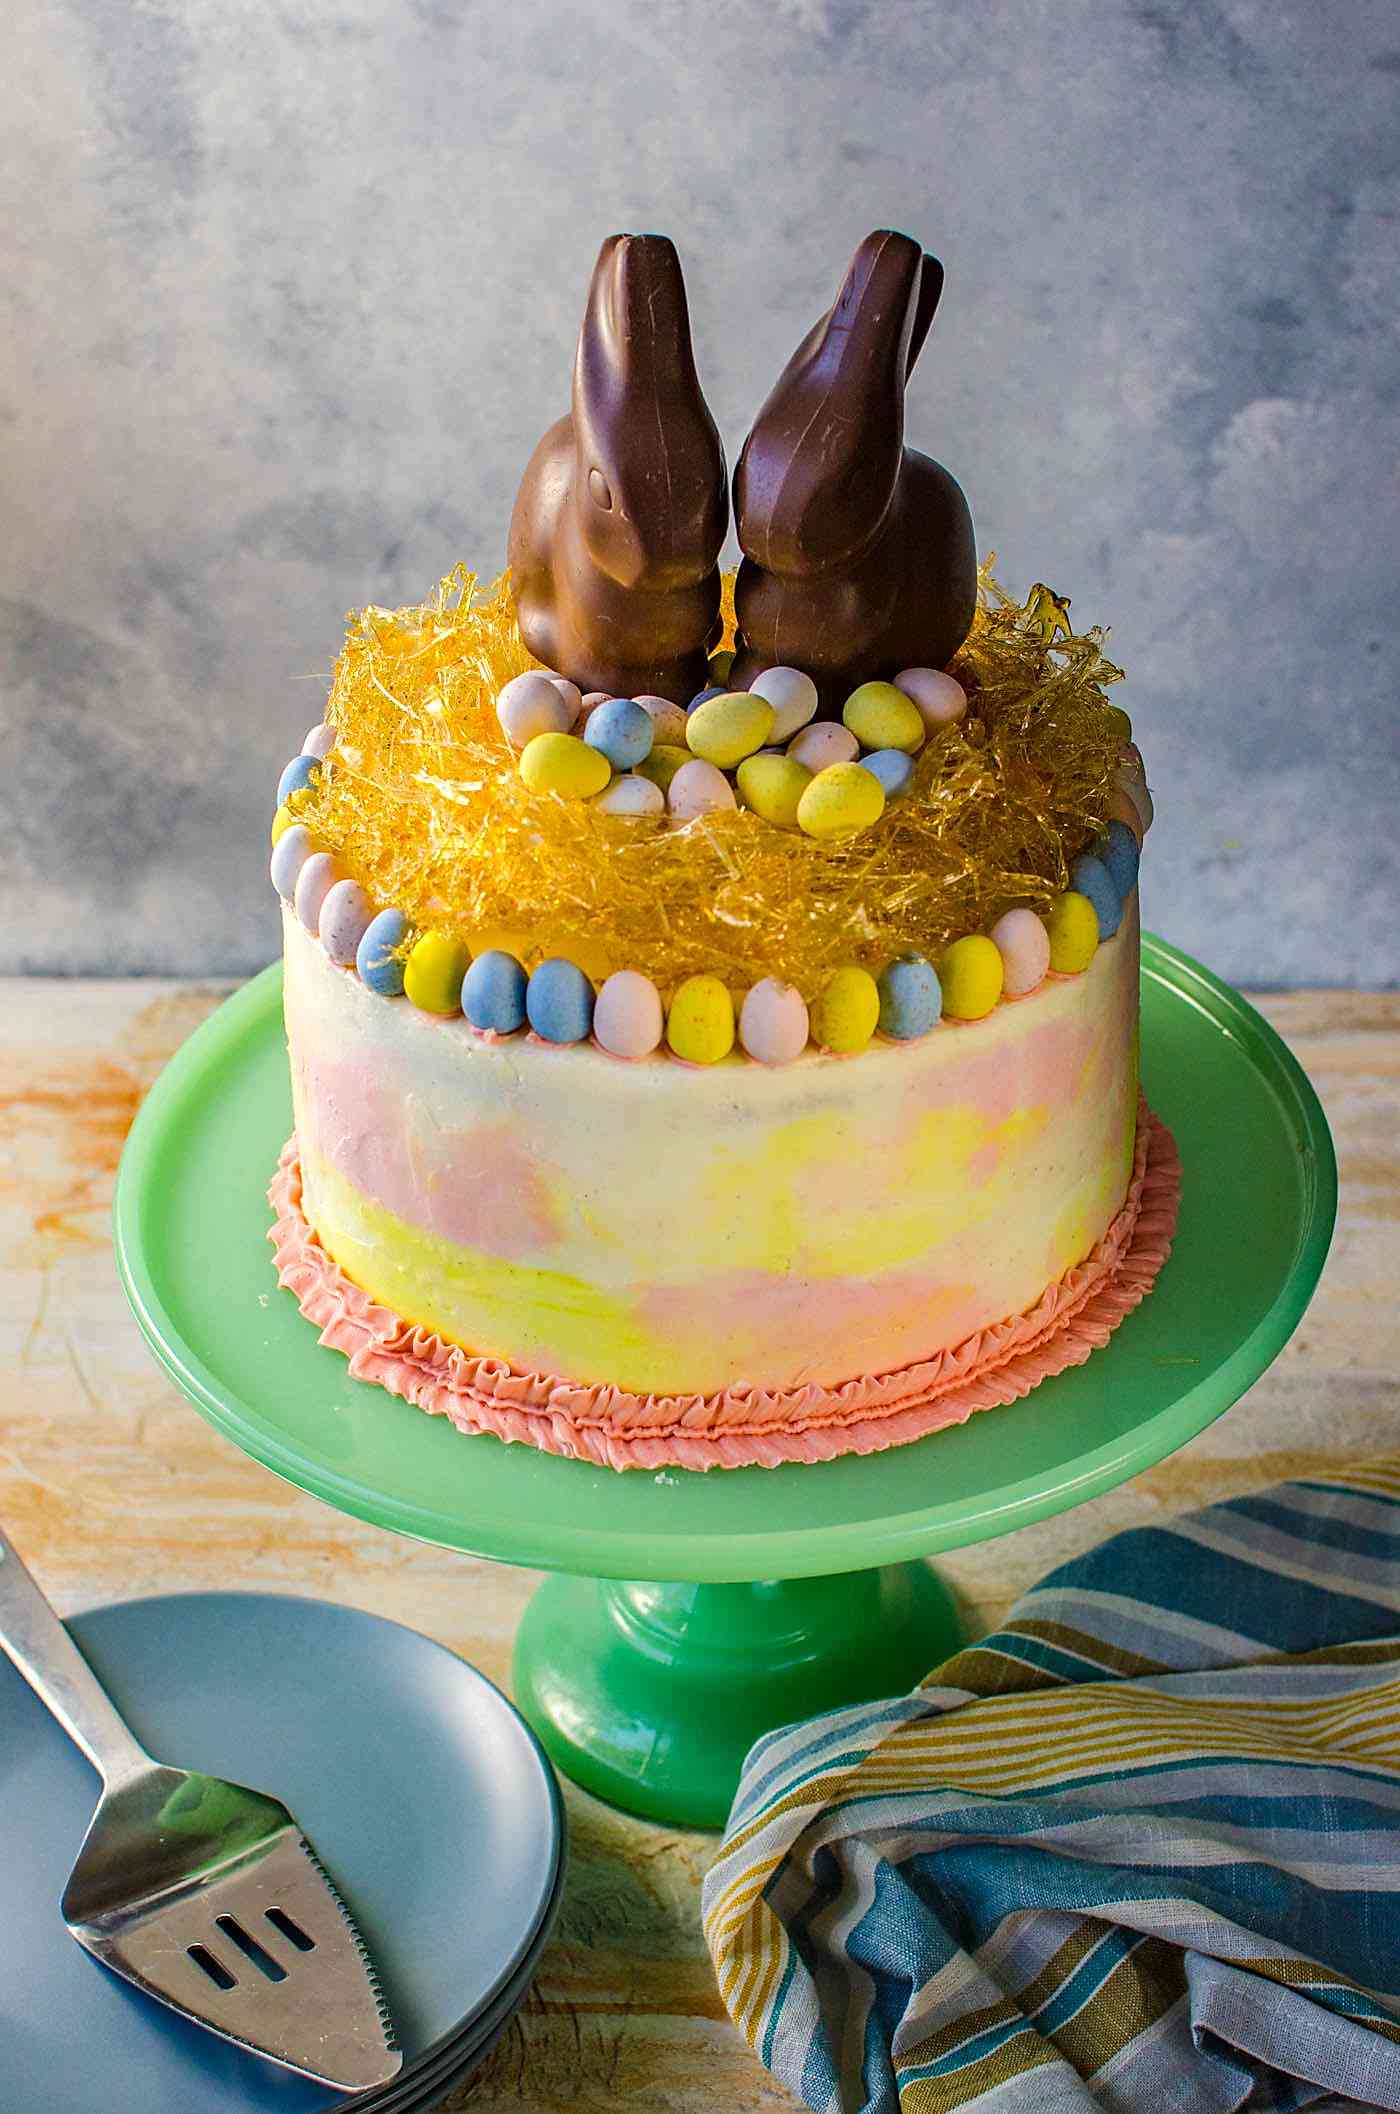
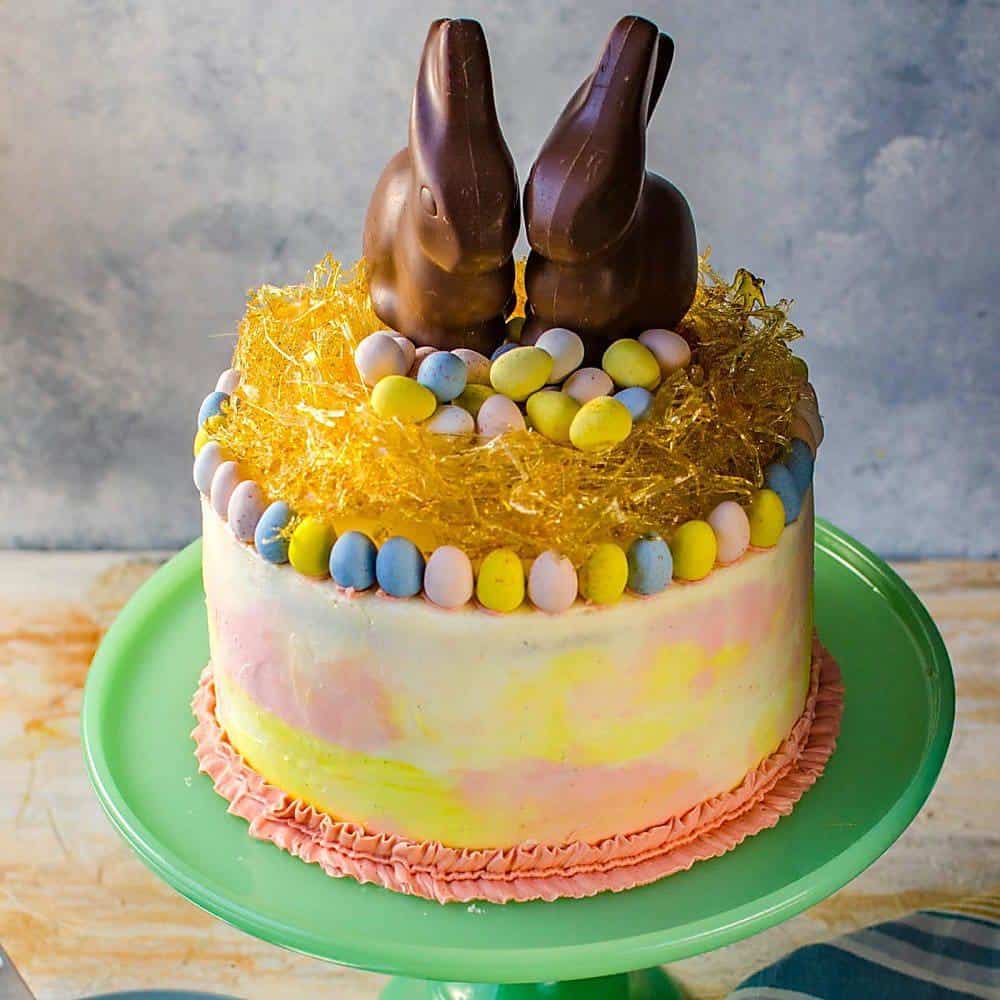
A spectacular Easter-themed Vanilla Chai Cake with soft, fluffy vanilla buttercream frosting, with a gorgeous pastel watercolor effect, decorated with Easter eggs, chocolate bunnies and a caramelized nest on top!
A sunny, happy and outrageously delicious cake to celebrate all of life’s special occasions and nostalgic memories! For another delicious Easter cake, check out my best carrot cake recipe with cream cheese frosting.
So Spring has officially sprung and I come to you bearing something delicious today! A wicked Vanilla and Chai Cake with Vanilla Buttercream. Chai and vanilla swirled cake layers sandwiched between soft and creamy vanilla buttercream, this is an Easter cake that screams SPRING (much like this ginger cardamom cake). And also, EAT ME.
To tell you what this cake is, and where it comes from, would be a trip down memory lane to a deeply nostalgic time and place. This vanilla and chai cake is inspired by the Sri Lankan ribbon cake.
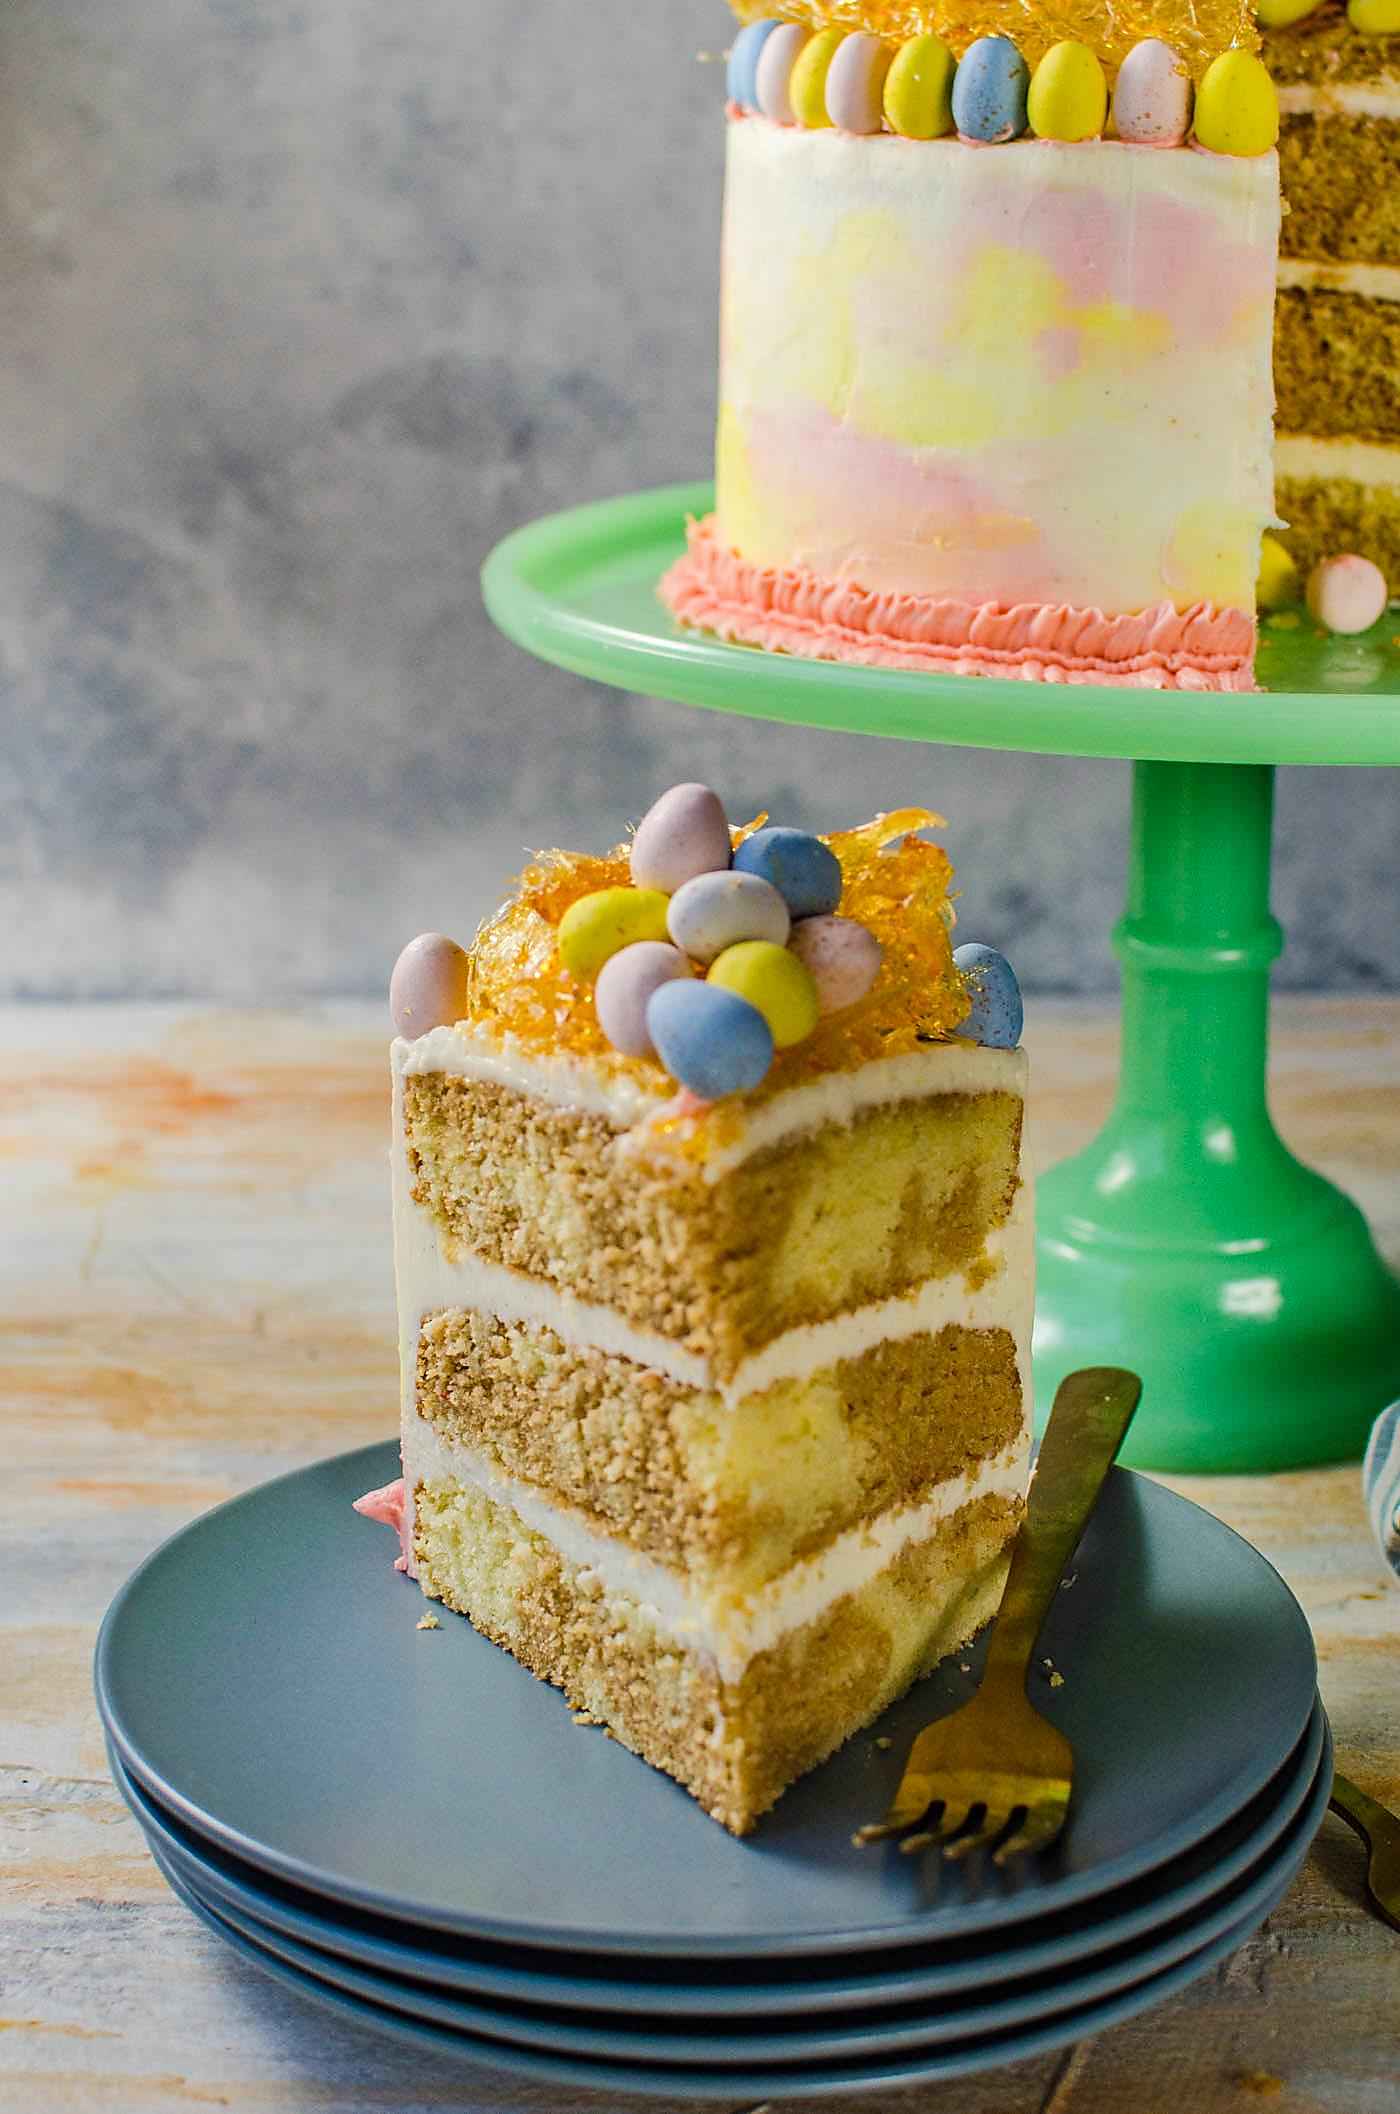
What on earth is a ribbon cake you ask? Far as I know, ribbon cakes are uniquely Sri Lankan (just like this Sri Lankan butter cake). It’s a soft vanilla cake recipe, except it has 2-3 soft pastel color batters either swirled together or prepared as two separate cakes and then put together for a delightfully warm and pretty pastel ribbon effect.
It’s one of my favorite special occasion cake recipes! It’s a happy cake, a celebratory cake, a birthday cake, and it’s very popular in Sri Lanka. It’s guaranteed to be a hit no matter what occasion you bake it for, and it’s very easy to make.

Sri Lankan vanilla ribbon cake is the very first cake that I learned to make when I was about 8 years old. My mother’s ribbon cake was well-known in lands far and wide and well-requested for, so naturally this was the cake that she taught me to make first.
It’s when I first realized how intensely happy it made me to bake, and no matter where I was in life or what I was doing, it was a happy place that I could always retreat to, that I could always count on.
The decision to give this cake a Spring makeover is a nod to my little sister and all the memories that I share with her that are to do with cakes, Spring and Easter! 🙂
My little sister and I used to have a baking ritual. I would bake and she would butter and line the pans and even do the dishes afterwards, in exchange for the privileges of licking leftover cake batter from the bowl and the beater! 🙂
So I’d always make sure there was a good amount of leftover cake batter for her in the bowl after baking. Just like I chose the colors of the ribbon cake when my mother and I used to make it when I was little, eventually my little sister got to choose the colors when I baked them with her.
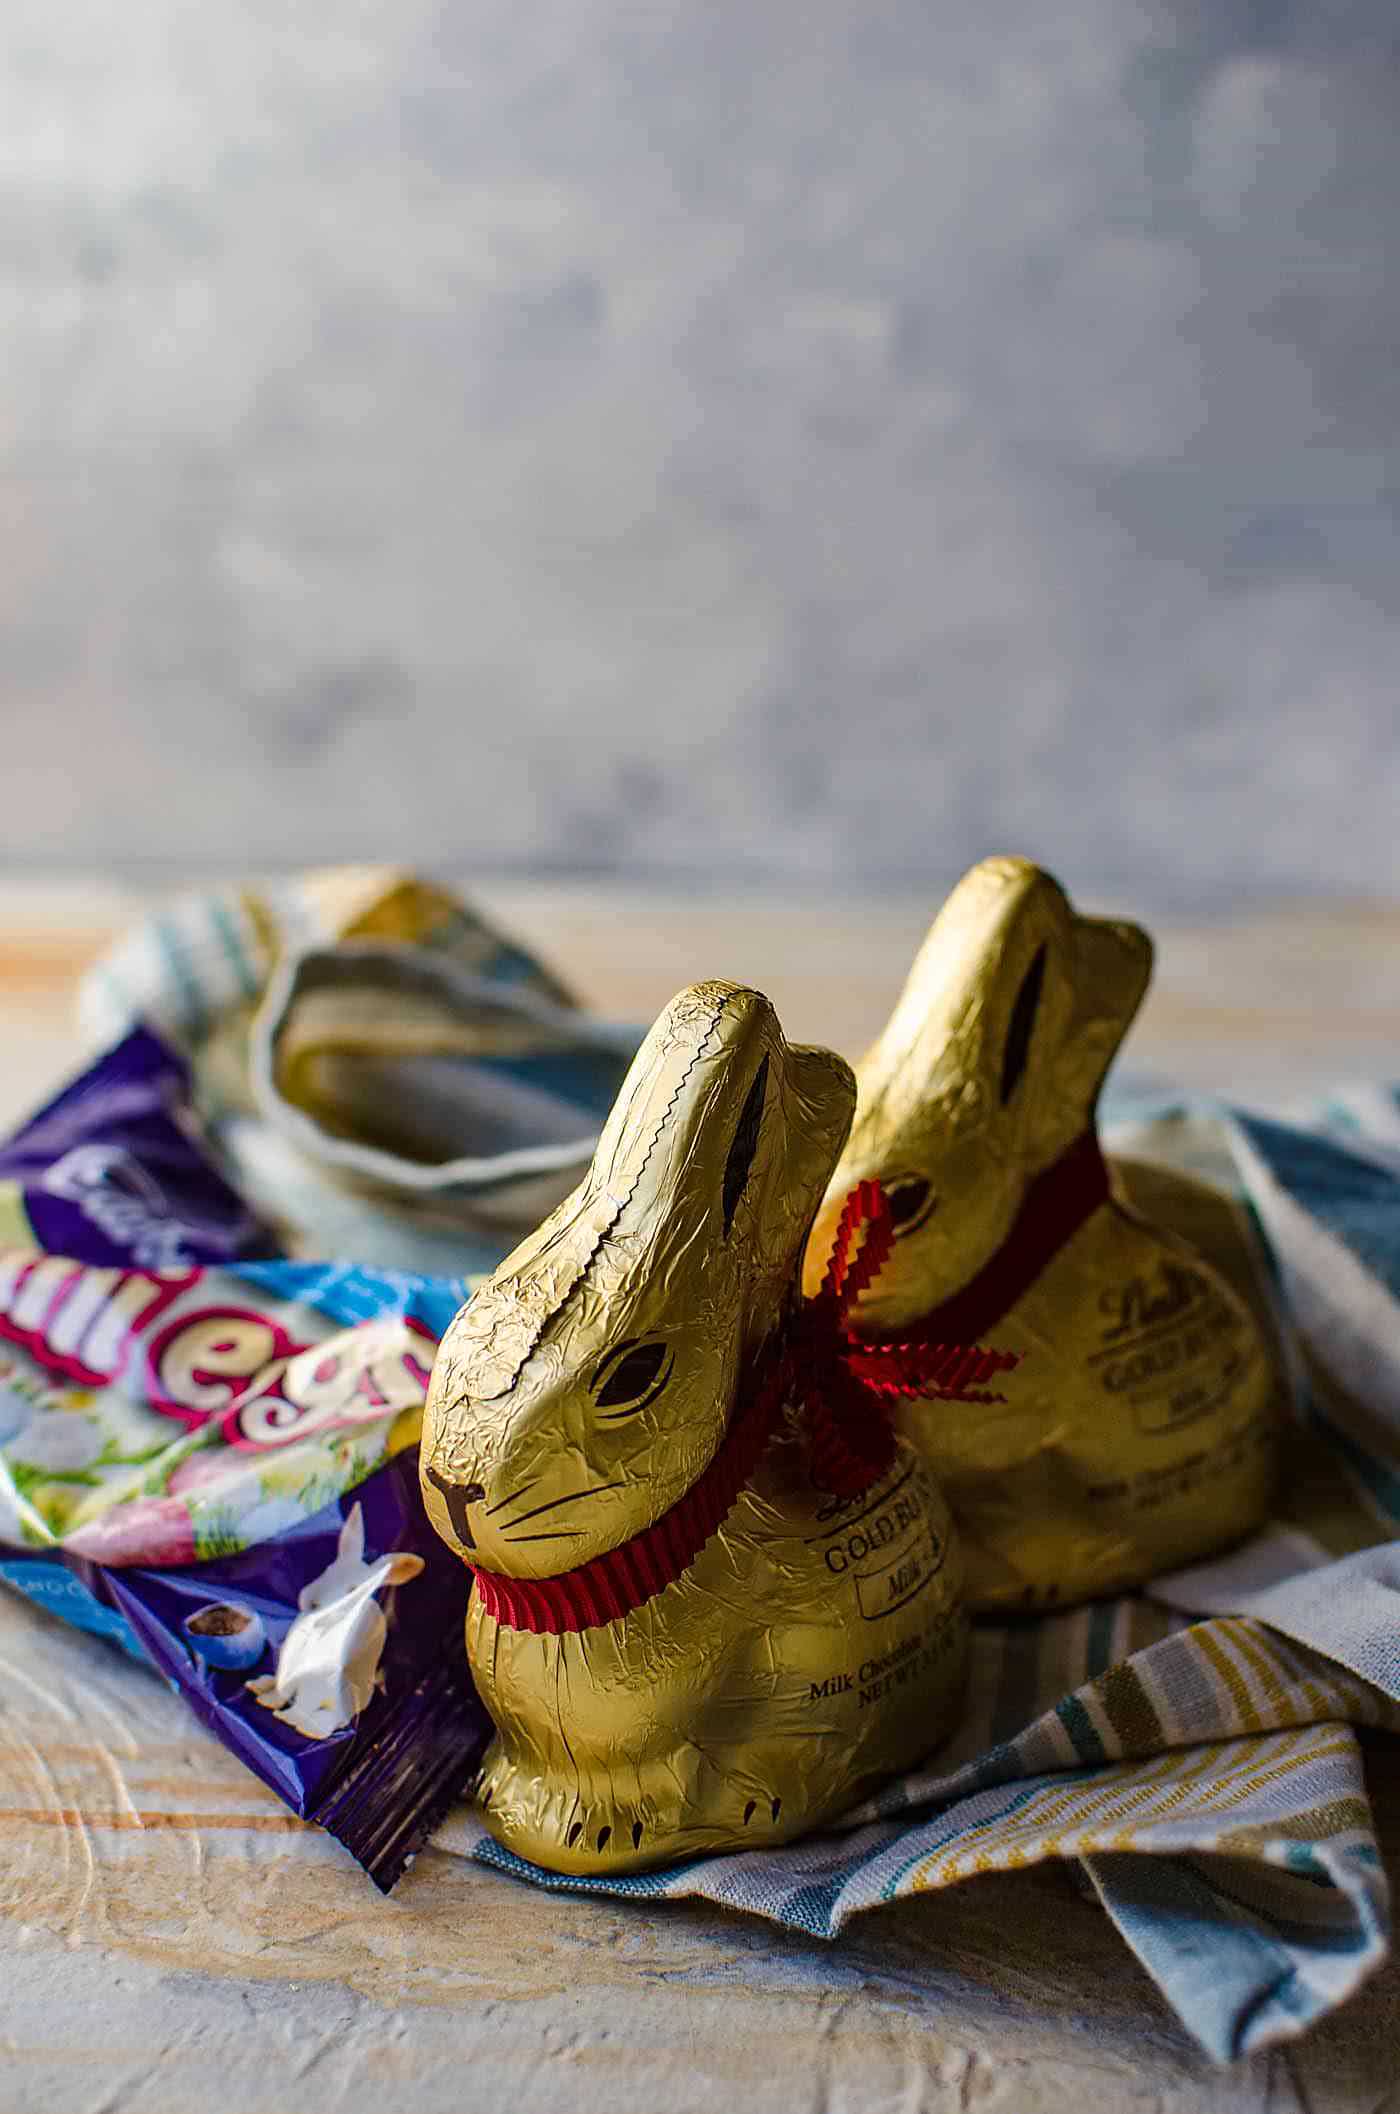
We had other Easter traditions too. 🙂 When she was around 10, and I got my first job, I started buying her mini Easter eggs every year. I’d wait for the pre-Easter sales of course (it was my first job, not my dream job), and then buy her mini Easter eggs or our favorite – Lindt Easter Bunnies!
And we’d ride that chocolate high all the way until the day after Easter sales. We continued that tradition for many years, even after she got her first job and there was enough money between us for even more Easter bunnies.
We live in two different countries now, but Easter eggs and Lindt bunny chocolates always remind me of her without fail. And I’m sure it’s the same for her too. This cake is colorful inside and out, and I added a twist to make it even more special – chai! A little bit of warming, fragrant spice to go along with all that lovely pastel color and chocolate.
For this vanilla chai cake, I decided to go with 2 classic Easter colors. The pale pink batter is flavored with a chai powder, and there’s no coloring used for this because the chai powder gives it that color naturally.
You can of course add a few drops of pink coloring to make the colors pop more if you like. I used chai diaries instant masala chai, because the instant powder blends in with the cake really well and the flavor is so pronounced.
Do not use chai “tea bags” for this purpose. The “yellow” layer is just plain vanilla cake. Again, you can add a couple of drops of yellow coloring if you’d like to enhance the colors a bit more.
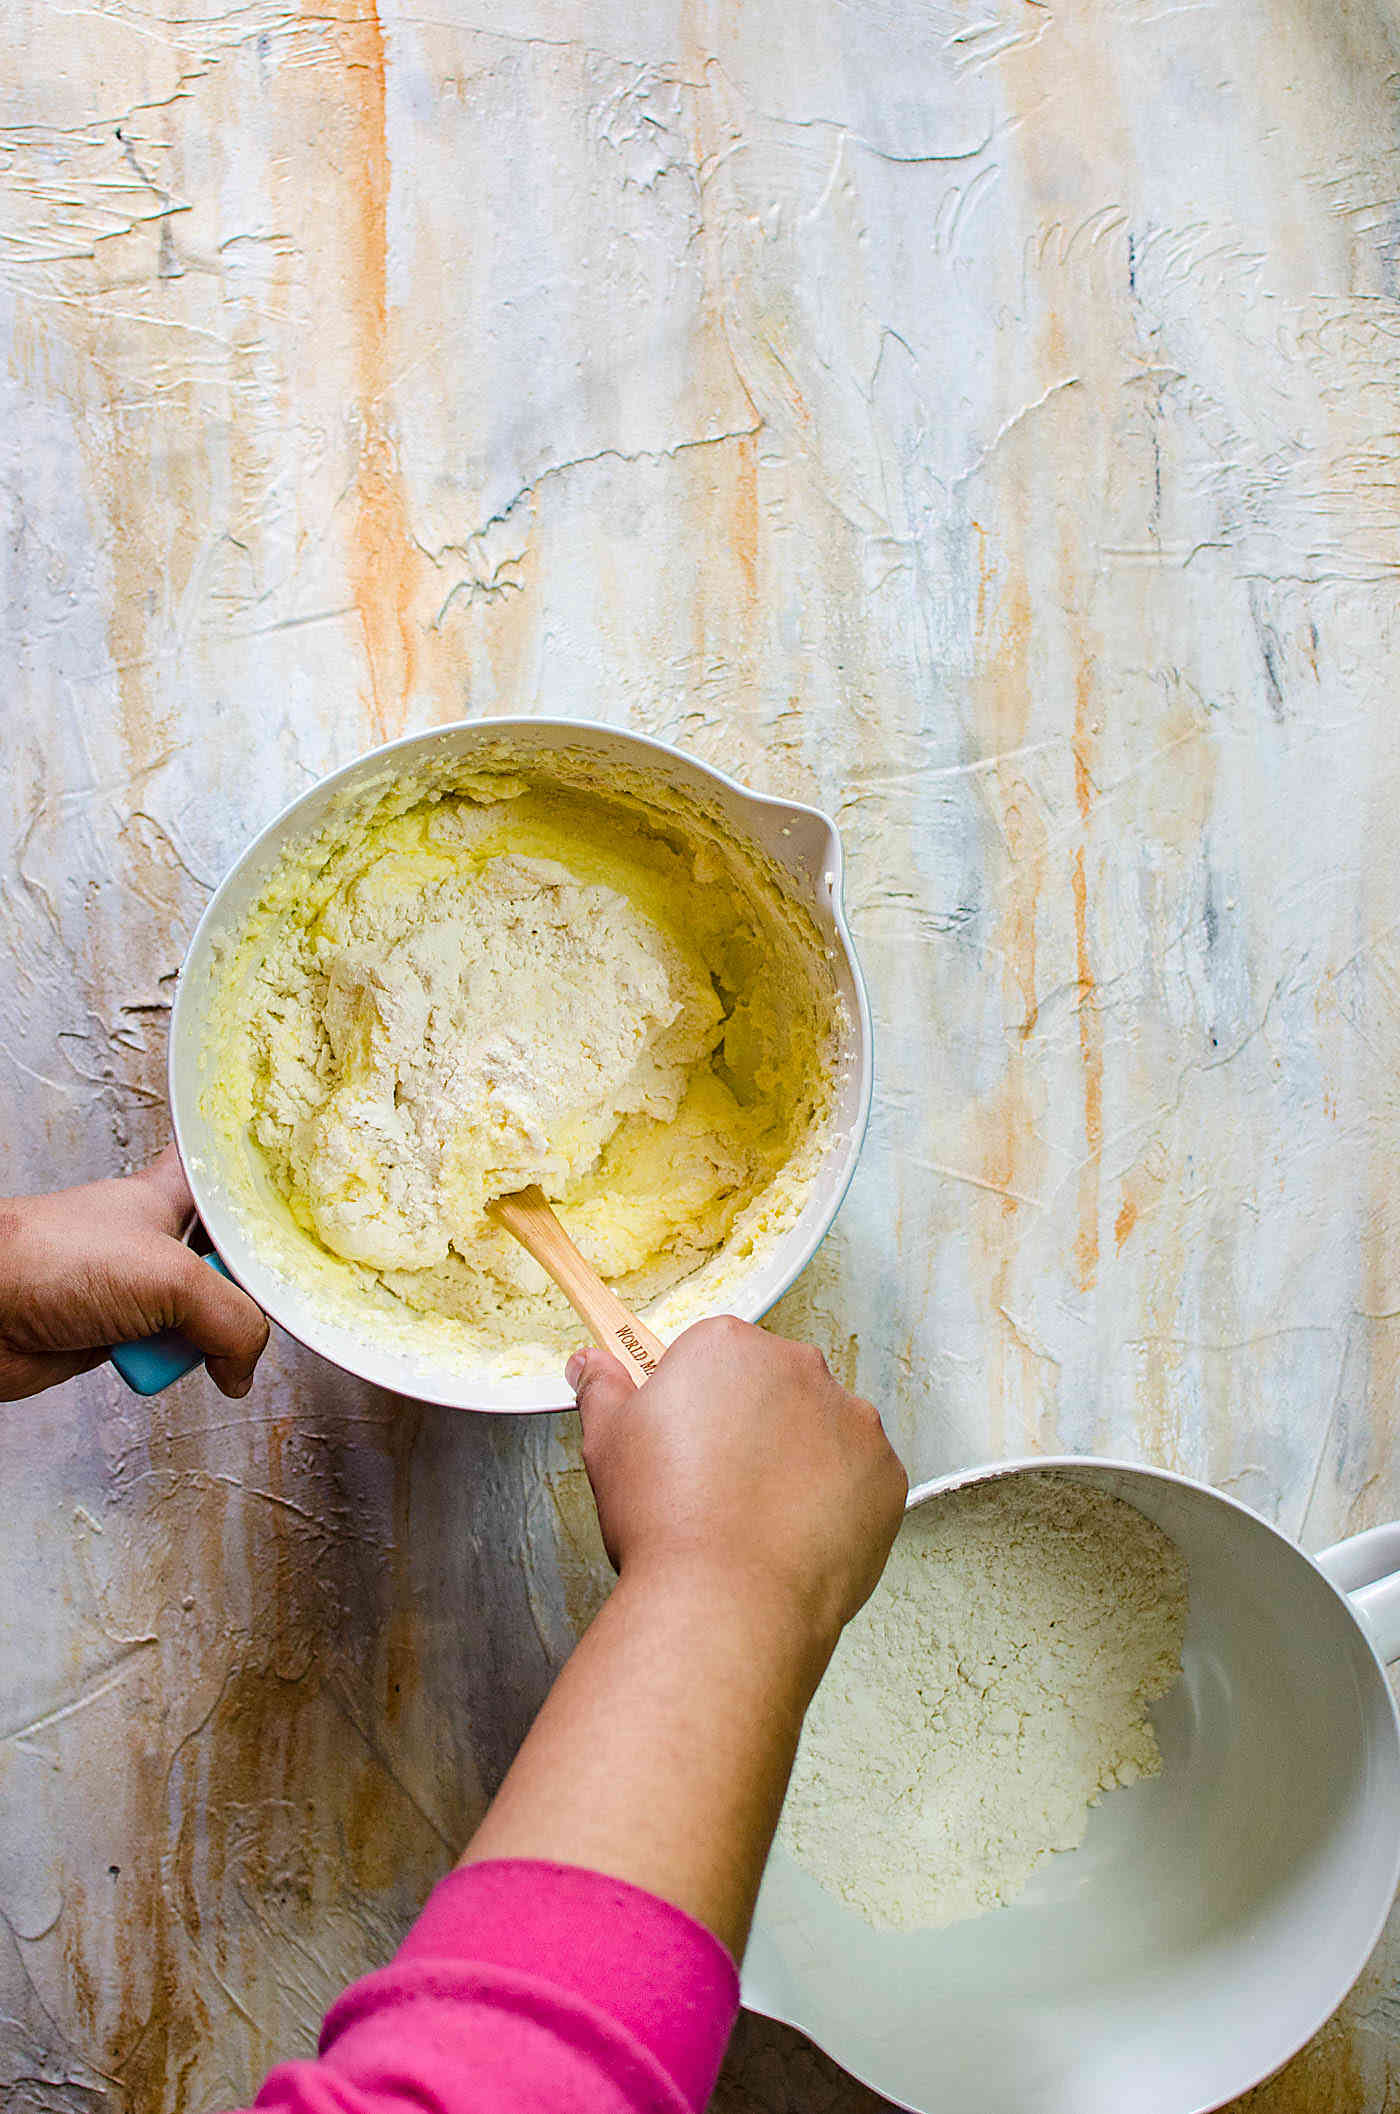
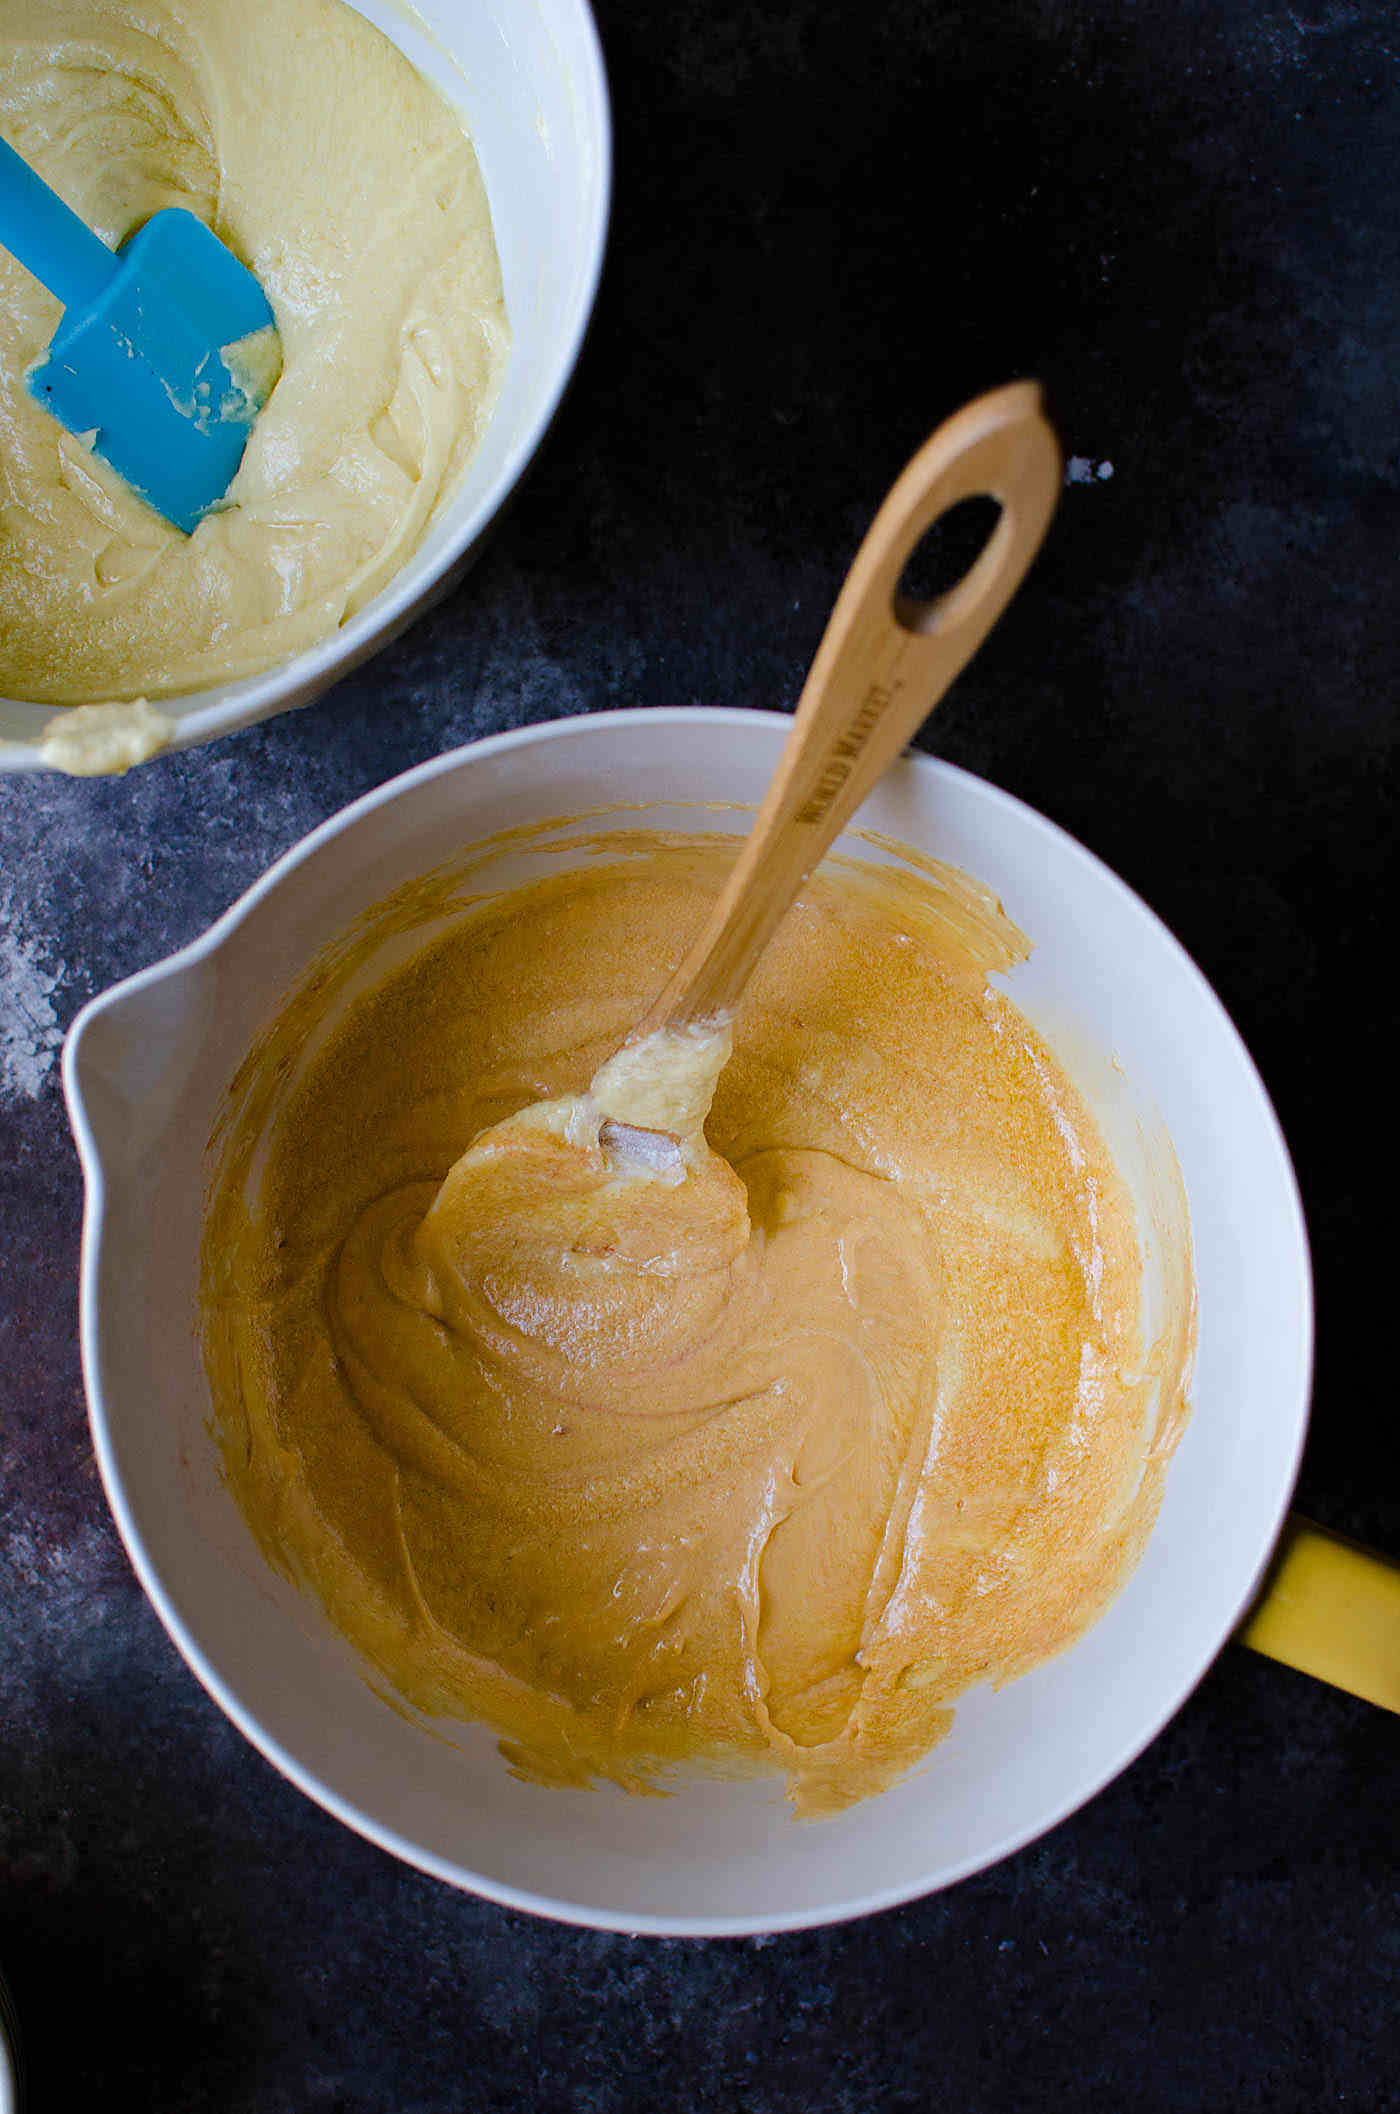
The cake is easy to make, you can either use your stand mixer or hand mixer. Since I was going to divide the batter between 2 bowls, I used my gorgeous pastel bowls (which I also got from World Market!) to make the batter with my hand mixer. Once the cake batter is made and divided and colored, dollop each batter alternately into 3 prepared cake pans.
You can swirl it for added effect. Once the cakes are baked, they NEED to be left to cool down completely. Do not be tempted to ice the cake while still warm. The frosting will slide right off. It’s best to make the cake the day before, and the frosting can be made the following day.
The fluffy vanilla buttercream frosting recipe couldn’t be simpler! Just remember to use good quality vanilla extract. Nothing ruins a delicious vanilla cake recipe like the flavor of artificial vanilla. I did use coloring for the frosting to get that pastel watercolor effect and also for the final “ribbon” at the bottom.
How to make the caramelized nest
I wanted this cake to be an incredible centerpiece for an Easter-themed event, one that will be a showstopper with that addictively creamy vanilla frosting, chai and vanilla flavors, and that sunny pastel watercolor frosting. A few more Easter decorations were all that I needed. Mini Easter eggs and chocolate bunnies fit the bill, but what about an amazing caramel nest? 100% edible as well!
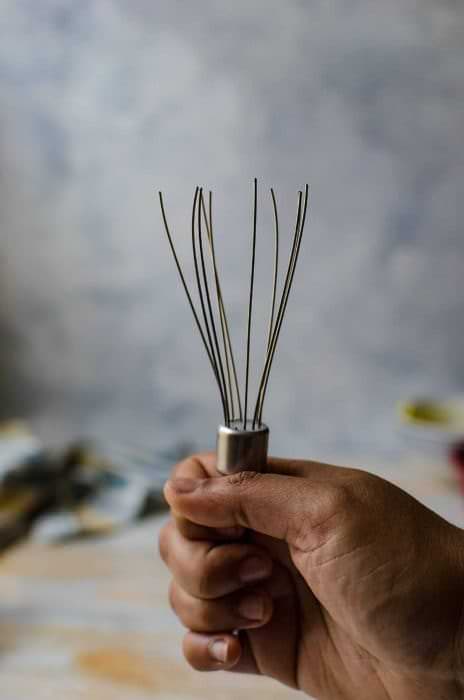
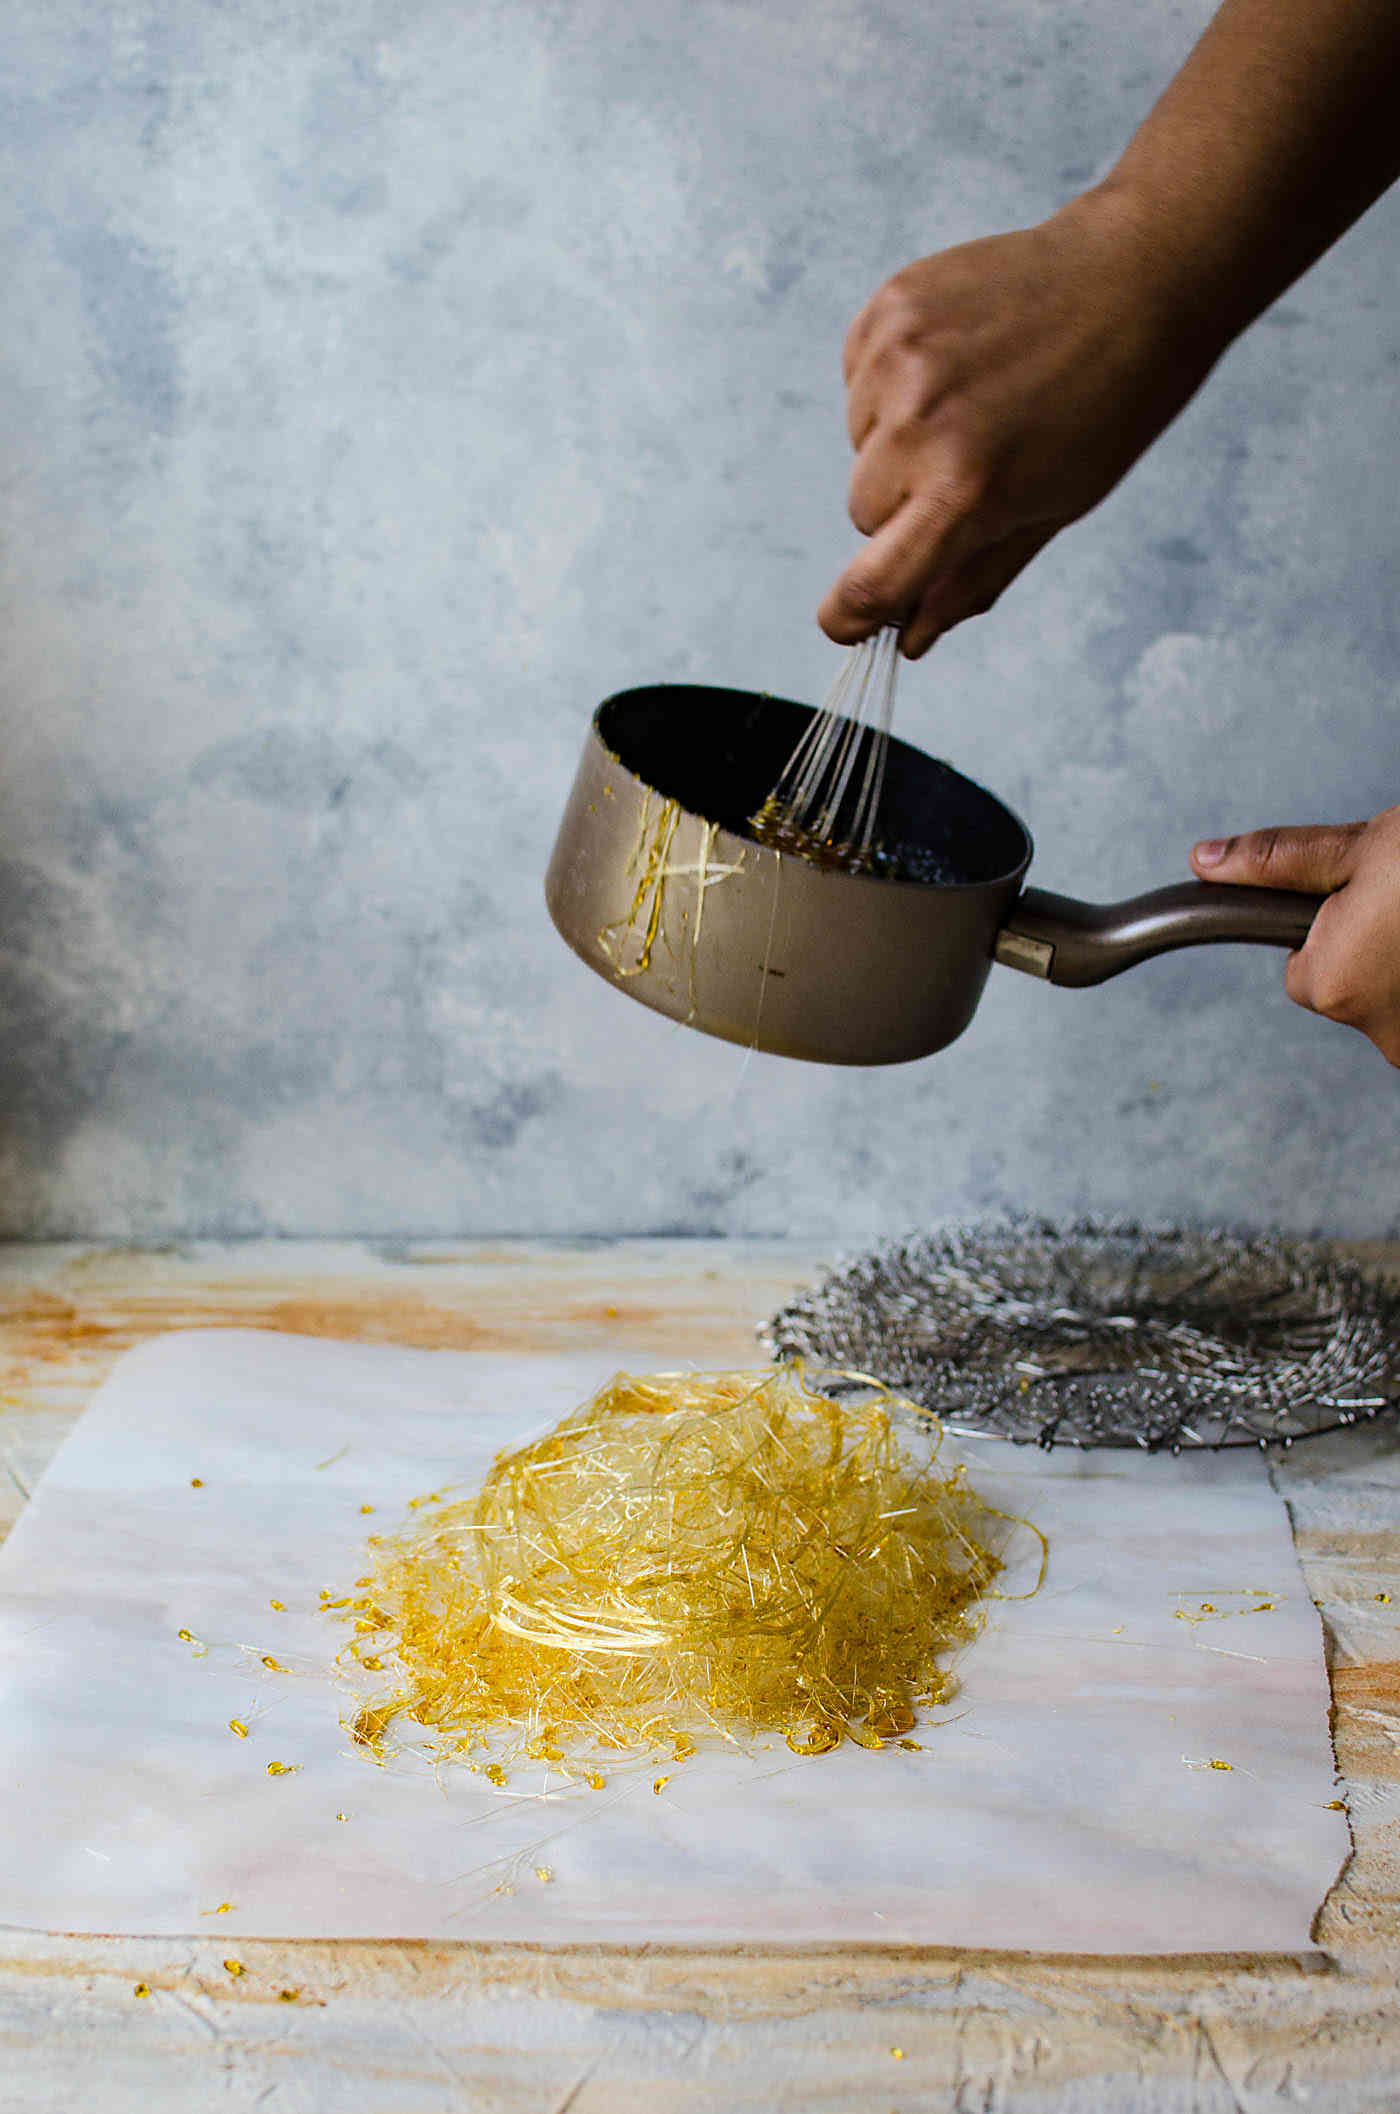
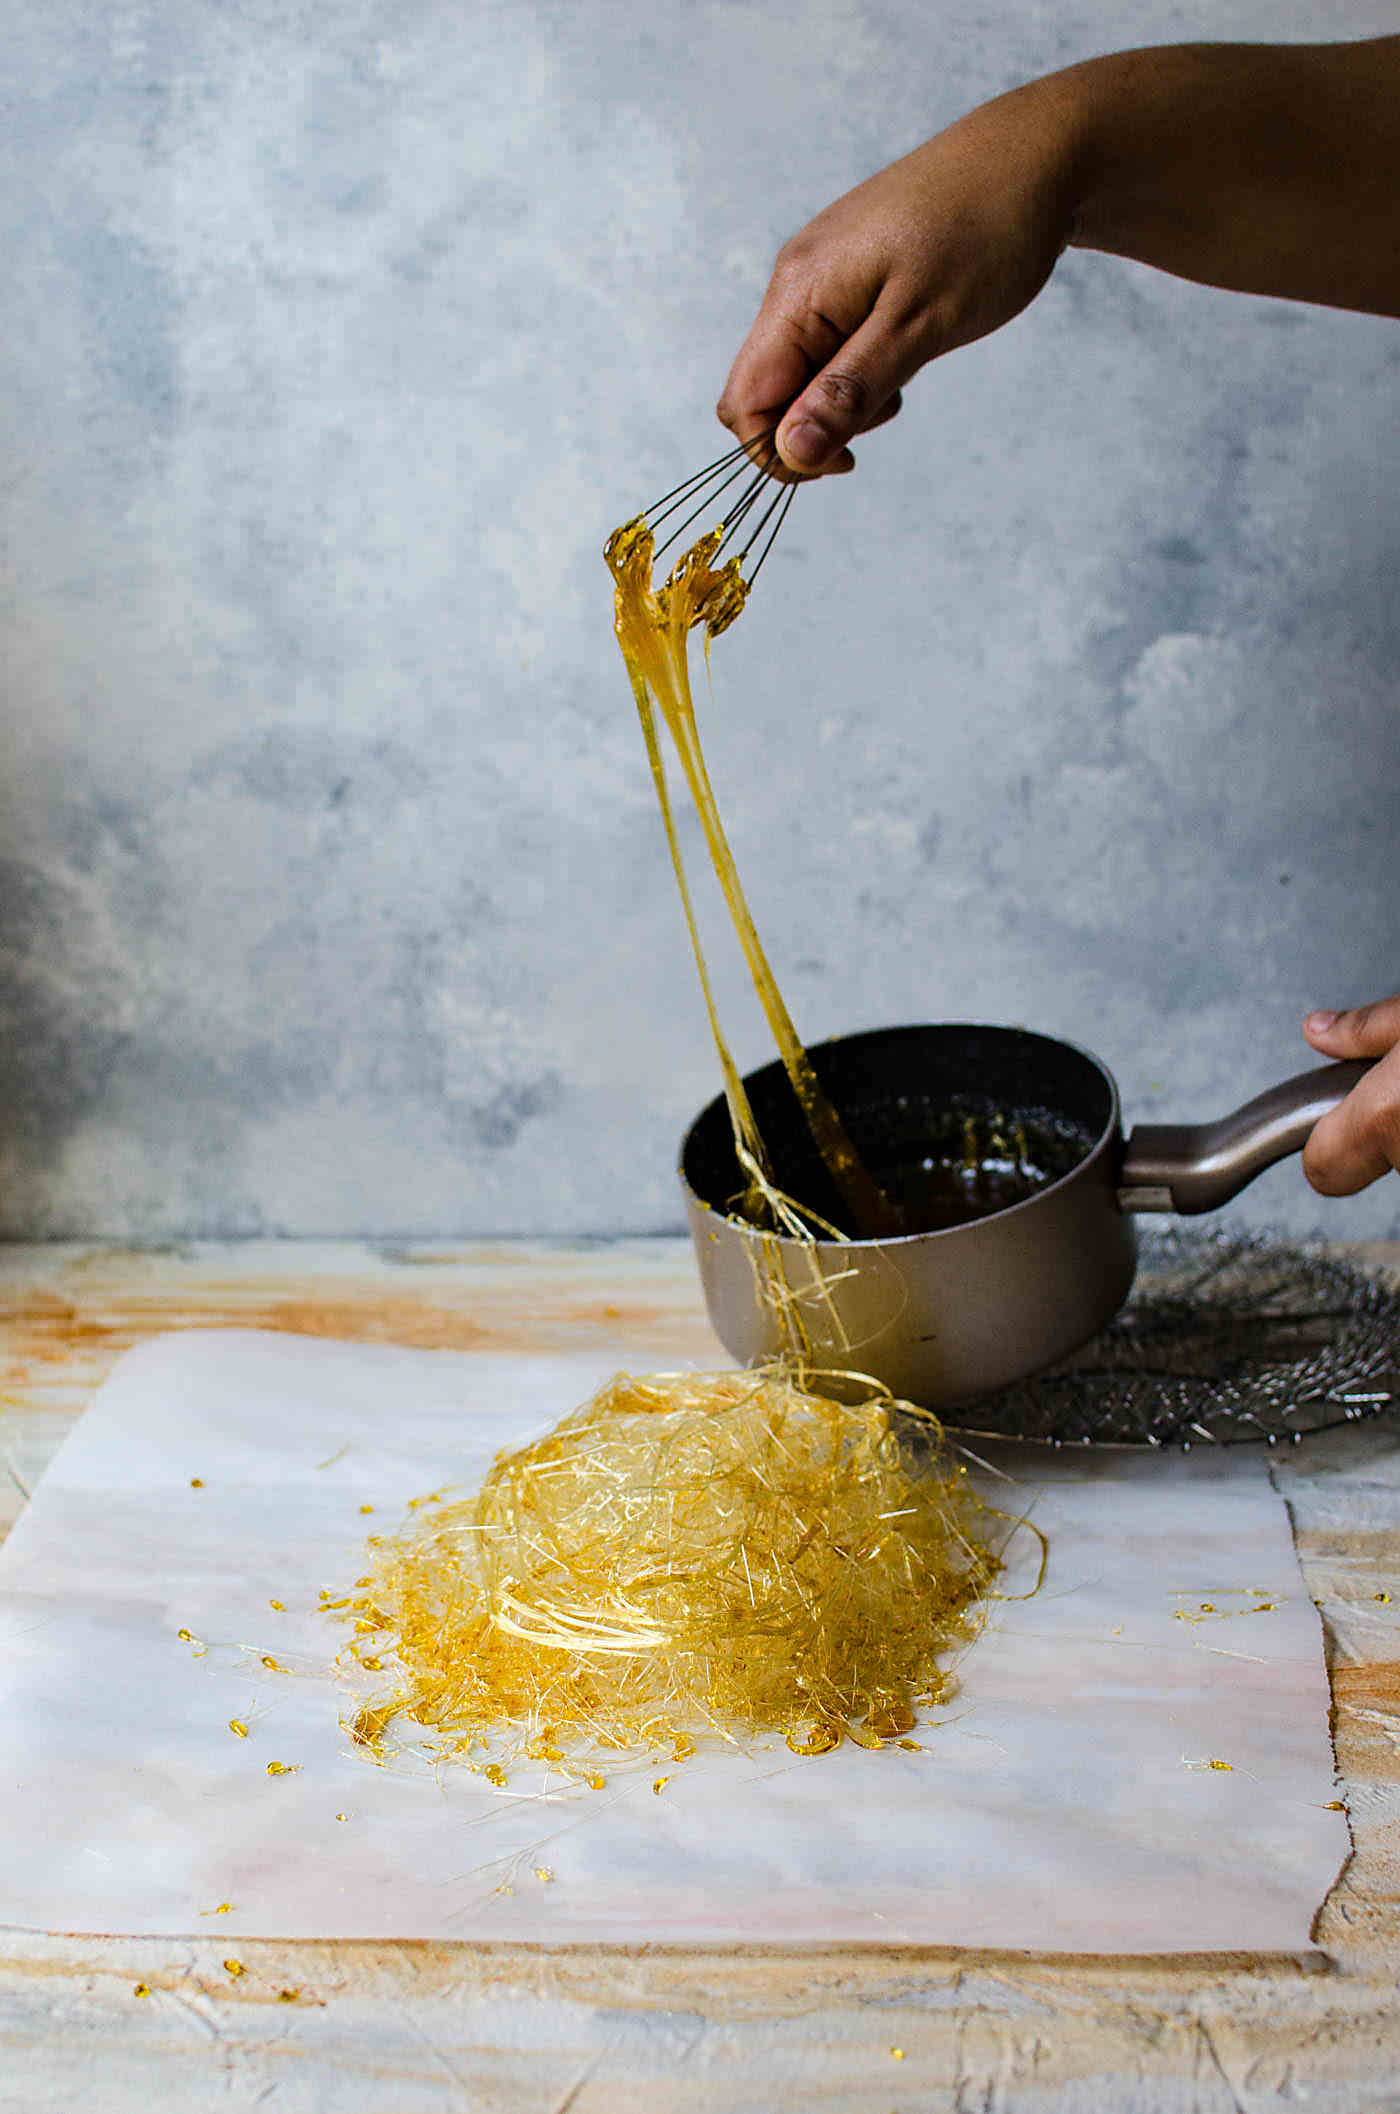
The caramel nest is easy and heaps of fun to make! Just make caramel with 1 cup of sugar (you will have leftover caramel), and while the caramel is still hot, fling it around on a parchment paper in a circular pattern. I used an old whisk where I cut the ends off, which will make the caramel flinging even easier.
You can use your hands to guide the sugar to form a nest-like shape (before it sets – which happens quickly).
Alternatively, you can line the outside of a bowl with parchment paper (or oil it very lightly), and then fling sugar at it until the outside of the bowl is completely covered.
Once set, you can gently unmold it. This sugar nest will keep for 24 hours in an airtight container, but make sure to include some silica gel packets so that there’s no moisture inside the container. Moisture will kill the shape of the nest and make it sticky.
Put the nest on top of the cake just before serving. It truly is a stunning cake topper along with all those Easter eggs, and you know how much kids will flip for that caramel nest!
This vanilla chai cake is a lot of family traditions in one gorgeous cake, for me. A soft vanilla ribbon cake that has been passed down through generations and decorated with some of my most cherished Easter traditions. This cake is designed to do one thing and one thing only – delight and please a crowd. 🙂

Recipe Video
Recipe
Vanilla Chai Cake (Easter Cake)
US based cup, teaspoon, tablespoon measurements. Weight measurements are recommended for accurate results whenever available.
Common Measurement ConversionsIngredients:
Vanilla Chai Cake
- 340 g unsalted butter 12 oz / 3 sticks, softened
- 425 g white sugar 2¼ cups
- ¼ tsp sea salt
- 6 large eggs room temperature
- ¾ cup warm milk
- 2 tsp good quality vanilla extract
- 340 g AP flour 12 oz / 2 ¾ cups (measured by spoon and level method)
- 3 ¼ tsp baking powder
- 2 tbsp chai mix powdered chai mix
Fluffy Salted Vanilla Buttercream
- 680 g unsalted butter 6 sticks, softened
- 850 g confectioner's sugar 30 oz / 7½ cups (spooned and leveled)
- 1 tsp sea salt
- ½ cup heavy cream you may not need the whole amount
- 1 tbsp vanilla extract I prefer vanilla bean paste to get the little specks
- Pink and yellow gel coloring
Caramel Easter Nest (optional)
- 150 g white sugar ¾ cup
- 3 tbsp corn syrup to prevent crystalization
- 3 tbsp water
To Decorate
- Cadbury mini eggs 4 – 5 mini bags or 1 large 10 oz bag
- Lindt Bunnies large or mini (whichever you prefer)
Instructions:
Vanilla Chai Cake
- Butter and line 3 x 8 inch cake pans. Preheat the oven to 325°F / 163°C.
- Place the butter, salt and white sugar in a bowl and whisk until light and creamy.340 g unsalted butter, ¼ tsp sea salt, 425 g white sugar
- Add the eggs (one at a time), mixing well between each addition.6 large eggs
- Add the milk and vanilla, and mix in well.¾ cup warm milk, 2 tsp good quality vanilla extract
- Sift the flour and baking powder together. Add the flour to the wet ingredients in 2 additions and fold in to mix. Be careful not to over-mix.340 g AP flour, 3 ¼ tsp baking powder
- Divide the batter into two bowls and add the chai powder to ONE of the bowls. Stir gently until just mixed in.2 tbsp chai mix
- Dollop each of the batter into the 3 prepared cake tins evenly to create a swirled look (you can use a butter knife to swirl the batter if you like as well).
- Gently shake the pan to spread the batter evenly, and knock out any gas in the batter.
- Bake in your preheated oven for 20 – 30 minutes until the middle is springy to the touch. Check after 15 minutes to make sure you don’t over-bake.
- Remove the cakes from the oven and let them cool down completely. To store for later, wrap the cooled cake layers individually in plastic wrap (or equivalent) and store at room temperature for up to 12 hours, or longer in the fridge.
Salted Vanilla Buttercream
- Place the butter and salt in a large bowl and whisk until light and fluffy. This can take about 10 minutes, depending on the weather. Add the confectioner's sugar, a little at a time at low speed, until it’s all incorporated.680 g unsalted butter, 1 tsp sea salt, 850 g confectioner's sugar
- Add the vanilla and whisk at medium high / high until the buttercream is light and fluffy. Make sure you scrape down the sides periodically.1 tbsp vanilla extract
- While the buttercream is being mixed, add half of the cream in a drizzle and whisk for 1 minute until the buttercream is light, fluffy and well mixed. Add more if you want the buttercream to be softer. Cover and set aside until you are ready to use. If the buttercream sets, whisk it to make it fluffy again before frosting the cake.½ cup heavy cream
Caramel Nest (this is an optional step)
- Use an open whisk, or cut off the rounded wire tips of an old whisk to form an open whisk (see picture in the post).
- Place the sugar, corn syrup and water in a saucepan. Heat gently until the sugar is completely melted – swirl the saucepan to help the sugar melt evenly.150 g white sugar, 3 tbsp corn syrup, 3 tbsp water
- Cover the pot and let the sugar syrup simmer for 1 – 2 minutes (the condensation will help wash down the sugar crystals from the sides of the pot).
- Uncover and let the sugar syrup boil, until the sugar turns into a golden amber color. You can gently swirl the pot so that the sugar caramelizes evenly.
- While the sugar is cooking, line your table top with a large piece of parchment paper, or turn a bowl (about 7 inches in diameter) upside down and lightly oil the outside of the bowl. This is a messy job, so you can lay newspapers in the area around your workspace to make clean up easy.
- When the sugar is ready, use a whisk to dip into the caramel and then gently fling caramel threads on to the bowl / parchment paper.
- Shape the caramel into a bowl-like (nest-like) shape, and let the caramel set.
- Store in an airtight container (with some desiccant to make sure it lasts longer).
Assembling & Decorating The Cake
- Place one cake layer (flat side down) on a cake tray. Add ½ – ¾ cup of the buttercream frosting on top and spread it evenly. Repeat with all the cake layers, with the last layer placed with the flat side up.
- Apply a thin coating of vanilla frosting on the sides and on top to form a cake crumb layer, and to fill in the sides of the cake layers. Refrigerate for a few minutes until the coating has set.
- Once set, generously spread frosting on the sides and on top (this will be the frosting layer). Use a cake scraper or spatula to smoothen the sides and the top so that you have clean straight surfaces. Refrigerate to set.
- Add about ½ cup each of buttercream into two bowls and color them with pink and yellow.Pink and yellow gel coloring
- When the cake has set again, dot the surface of the cake with pink, yellow and white frosting, and smoothen the sides again to form a watercolor frosting effect with the pastel colors.
- Refrigerate until you’re ready to serve the cake.
- Transfer the cake to a cake serving platter, and pipe a border along the bottom of the cake.
- The cake can be served as is, or decorated with chocolate on top.
- Place Easter eggs along the top border of the cake. Top with the caramel nest in the middle and fill it up with chocolate eggs and bunnies, just before serving. Enjoy!Cadbury mini eggs, Lindt Bunnies
Nutrition Information:
“This website provides approximate nutrition information for convenience and as a courtesy only. Nutrition data is gathered primarily from the USDA Food Composition Database, whenever available, or otherwise other online calculators.”


Leave a Reply