


This graham flour pie crust is for anyone who can’t choose between a buttery, flaky pie crust and the nutty, delicious graham cracker crust! This graham flour pie crust combines the best of both and makes an incredibly flaky pie crust with the flavor of classic graham crackers!
This pie crust can replace a classic pie crust in any pie recipe. It goes so well with cream pies, custard pies, and fruit pies too. Here I’ll show you how to make this fantastic crust with foolproof results with a step by step recipe.
Why I love this recipe
- Just like my classic pie crust recipe, this recipe will provide detailed step by step instructions on how to make this pie crust.
- I provide tips on how to make perfect pie crusts that are easy to follow, even if you’re a complete beginner!
- Graham cracker pie crust has more flavor and a texture that I love, and it’ll make your pies even better!
- This pie crust can be blind-baked, par-baked, or baked with the filling too, just like regular pie crust.
Having trouble with pie crusts? I got you!
Have you tried making homemade pie crusts, but they always end up,
- Rubbery and too thick and hard?
- Not flaky or crumbly?
- Misshapen and shrunken in your pie dish?
Then you absolutely need to check out my guide to Perfect Pie Crusts for beginners! I cover everything in that post, including,
- What to look for when adding liquid, to make sure your pie dough has just enough water. This is important because depending on the type of flour, weather etc., the amount of liquid you add can slightly vary.
- How to fix pie dough that has either too much or too little moisture.
- Pro tips on rolling out the dough and lining pie dishes, without causing the dough to shrink.
- How to bake a pie crust with absolutely perfect results, every time.
- Plus more troubleshooting advice.
Generally, most people who know how to make pie crusts learned how to do so from their parents or grandparents (at least from my observations). However, they can’t always explain what to do, what to look for, and why they do what they do to get perfect pie crust results.
But with my recipe posts, I provide all that information and more. With plenty of trial and error, and after following 100s of pie crust tips and tricks, I’ve found what helps for beginners! What makes sense, and why it works. So, I compiled all those tips and tricks in one article with a foolproof recipe in my perfect pie crust post.
The same tips and advice apply to this graham flour pie crust as well.
So let’s get started.
Ingredients to make graham flour pie crust
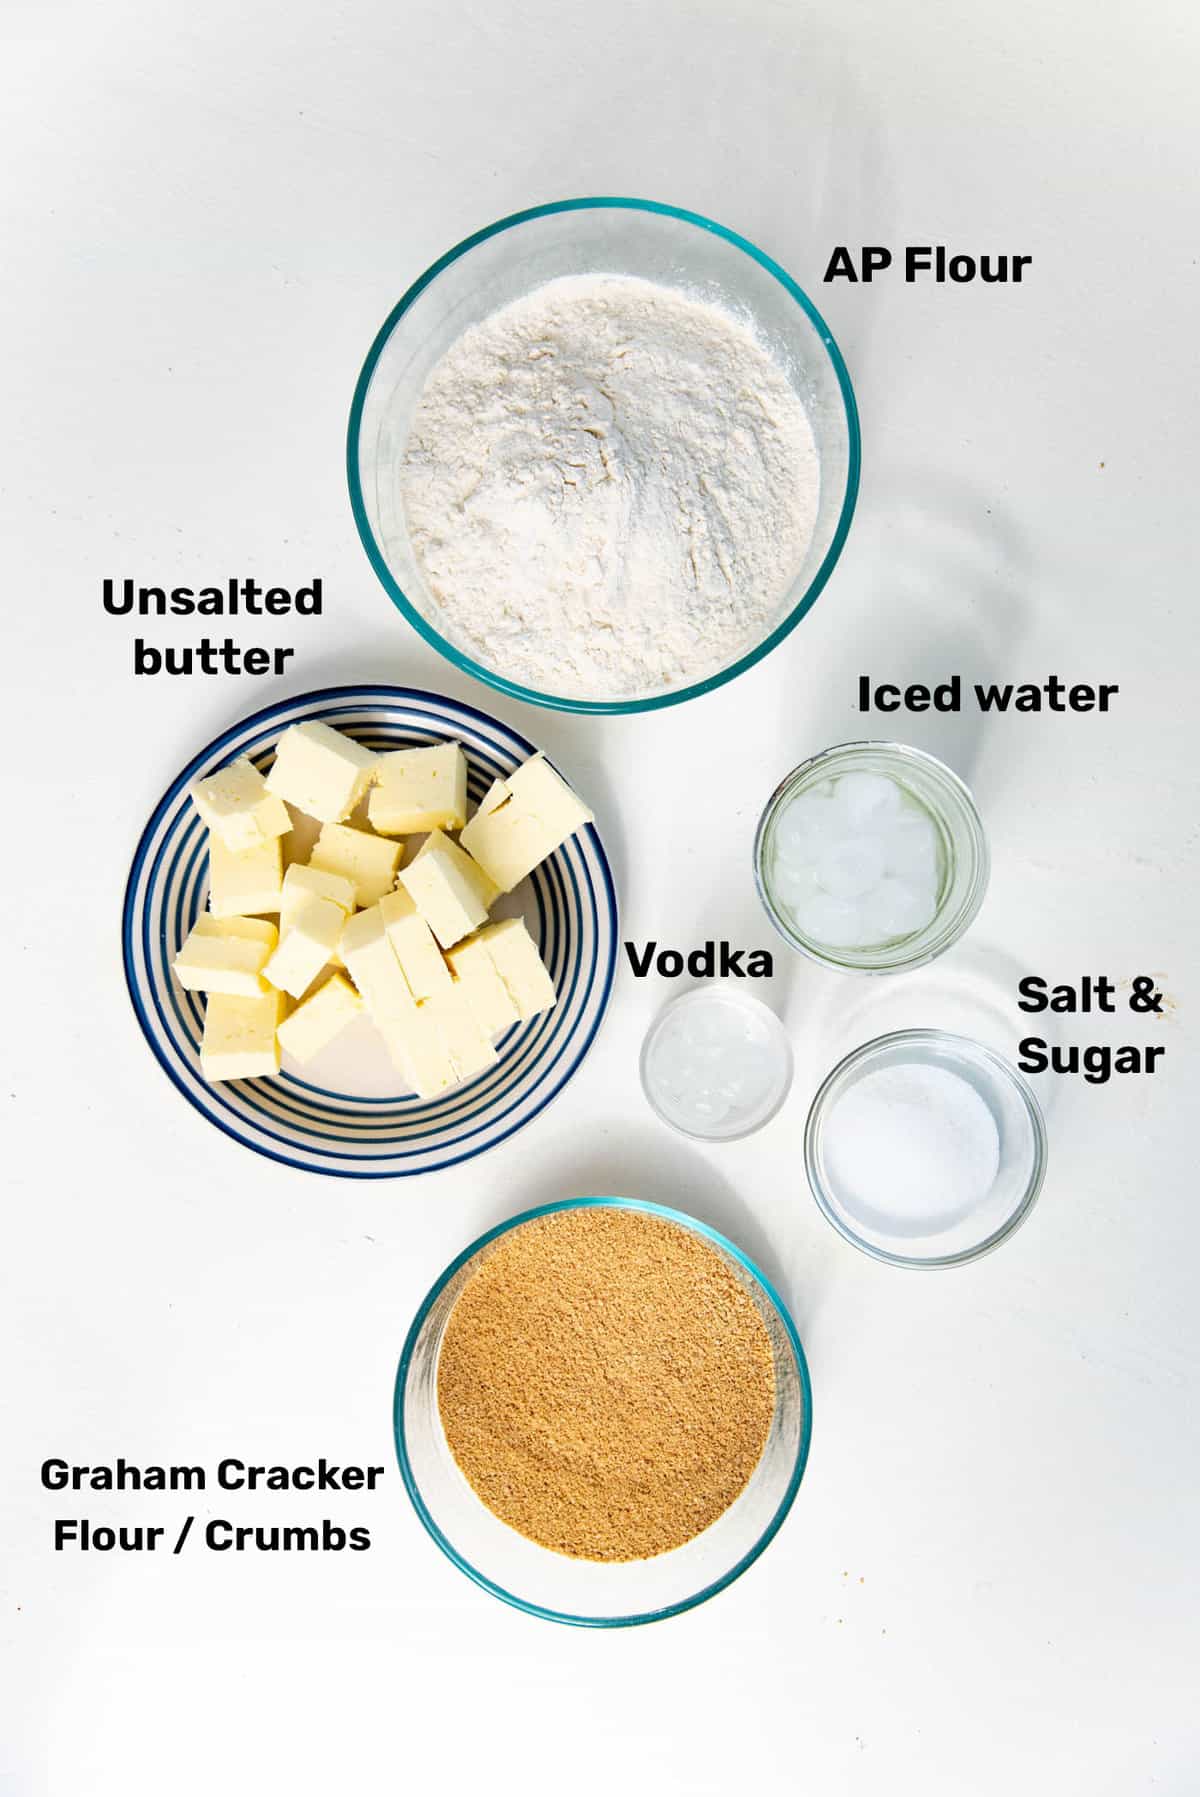
Ingredients for the dough
AP flour – All purpose flour has medium protein content and is the most suitable flour to use for various baking recipes. Traditionally it can contain between 10 – 12% protein content.
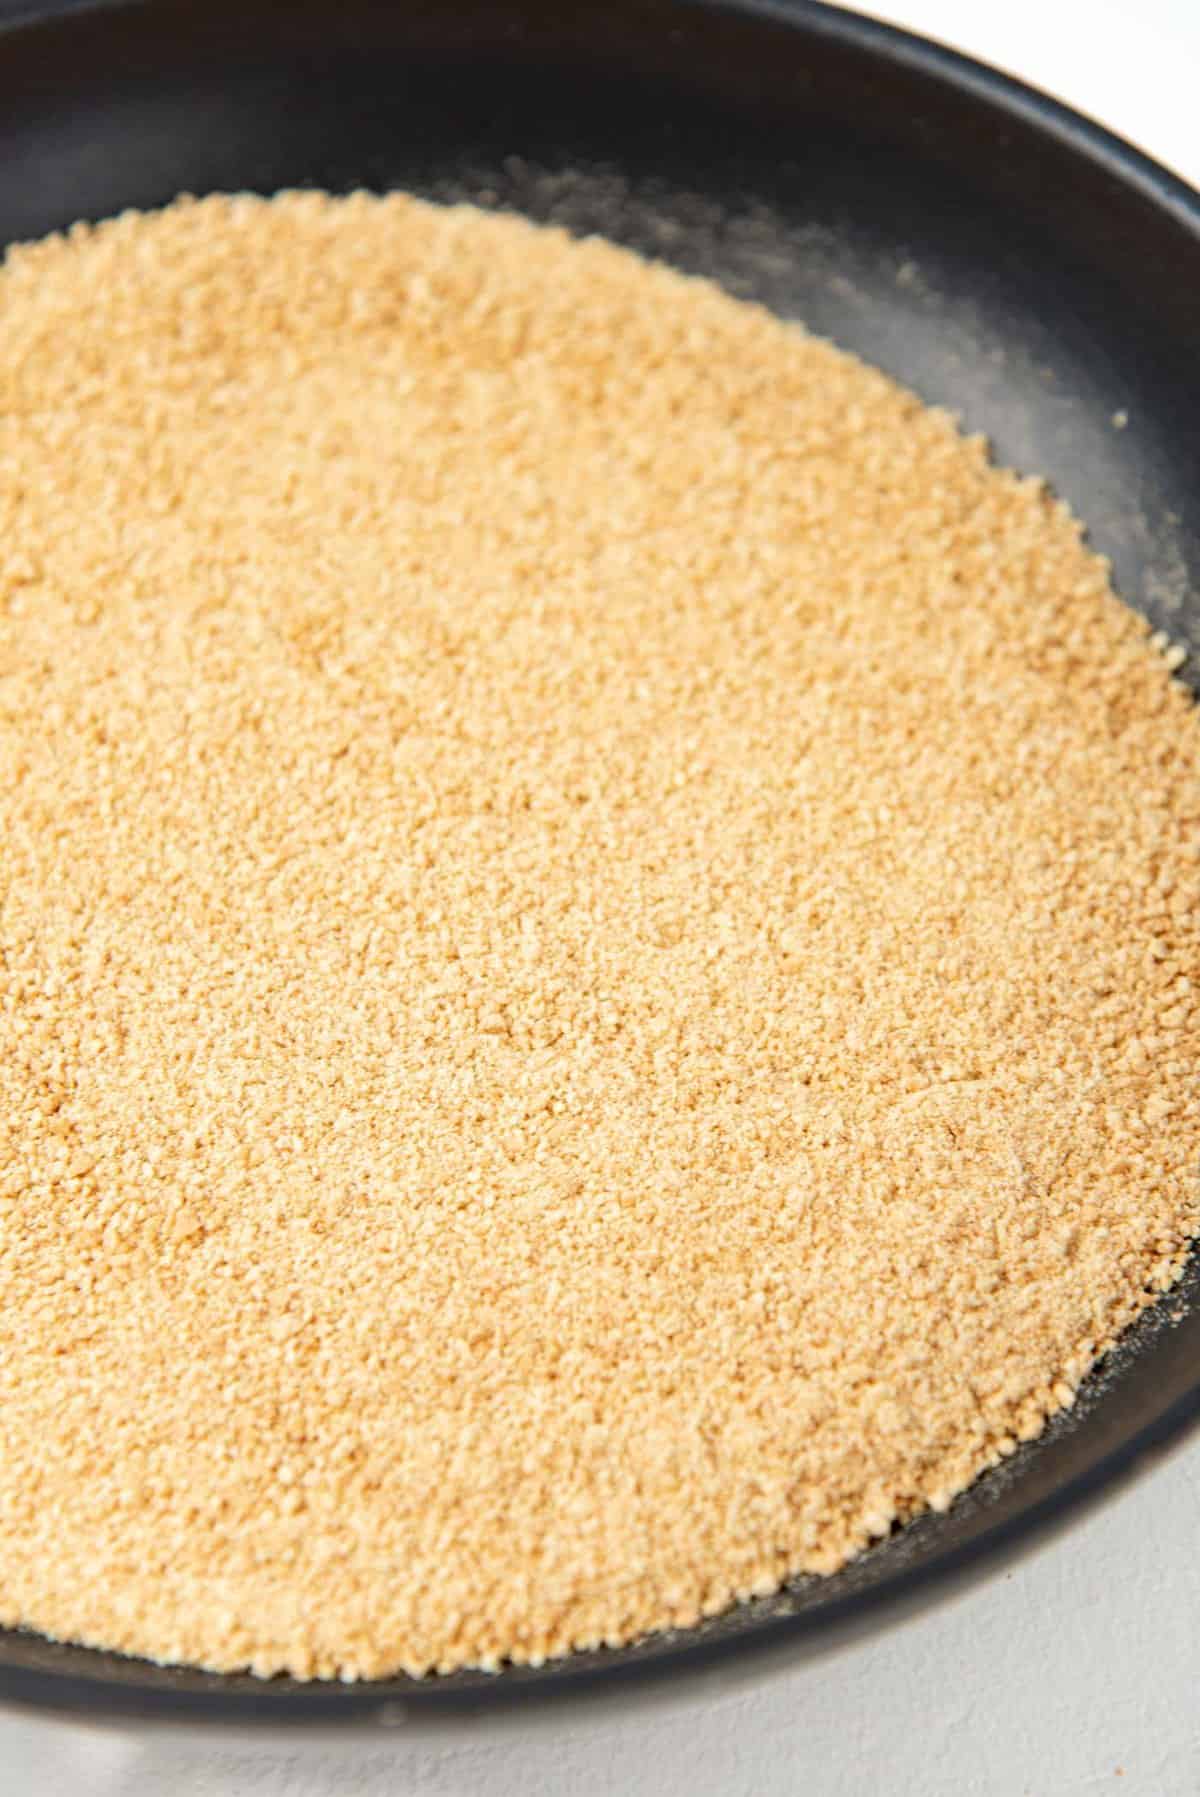
Graham crackers – For this pie crust, I use the classic honey graham crackers. However, you can use cinnamon or other flavors as well. The crackers are processed in a food processor so that they are ground into fine crumbs.
Unsalted butter – Just like my classic pie crust, this will also be an all butter crust. I use unsalted butter that is chilled and cubed. But you can use salted butter as well. Just reduce (or eliminate) the amount of salt you add.
Salt – I prefer my crust to have some saltiness (over sweetness). So salt is non-negotiable for me. It’s the difference between a delicious crust and a bland crust. Reduce the salt if you use salted butter.
Sugar – I add sugar for flavor and to bring out the nutty flavor of the graham crackers.
Ice water – One of the most important steps in making pie crusts is to keep the dough nice and cold. So, it’s important to use ice cold water. I use ice cubes to keep the water chilled. The flour will also form gluten in the presence of water in the dough. So it’s important to only add just enough to hydrate the dough. Otherwise the dough might form TOO MUCH gluten.
Iced vodka – I use just a small amount of chilled vodka in my pie crust when I can. While using vodka is optional, it does help to keep the pie crust tender and flaky, because it prevents some gluten formation in the dough. This is because vodka doesn’t have much water, but it still helps to hydrate the dough.
Other equipment and ingredients needed
Pie plates – A traditional pie plate can be between 9 and 10 inches in diameter. A regular pie plate will have a depth of about 1.5 inches, and a shallow pie plate will be about 1 inch in depth. A deep pie plate will have a depth of around 2 inches (maybe up to 2.25 inches). This pie crust recipe will be enough to cover a 2 inch deep pie plate, and to have a top crust as well (i.e. double crust pie).
Spray bottle with cold water – This is totally optional. But if you’re a beginner, and you have had issues with adding too much water to your pie crust before, then a spray bottle will be your savior! You can use this to mist the water into dry spots on your dough so that you can control the hydration, without adding too much AND without handling the dough too often.
Rolling pin – To roll out the pie dough.
Egg wash – An egg wash is optional when making pie crust, but it can be beneficial in some applications. An egg wash will give the crust a beautiful golden sheen when baked through. An egg wash can also help to “seal” the crust, and slow down the crust from getting soggy when filled with a cooked filling.
Foil or parchment paper – When blind-baking a pie crust, you will need either foil or parchment paper to place inside the crust. This will act as the barrier between the crust and the pie weights. I prefer to use foil.
Pie weights – Absolutely necessary when blind-baking or par-baking. You can purchase ceramic pie weights, but after using many different types of pie weights, I have two favorites.
- Regular granulated white sugar
- Uncooked rice
Both of these are small enough to cover a larger surface area, and be more efficient in keeping the crust in place while it bakes.
Baking tray or pizza stone – This equipment will help you get that beautiful golden crust on the bottom of your pie as you bake it. Trust me!
Step by step recipe for making the graham flour pie dough and pie crust
Making the dough
It’s imperative that the butter and liquid ingredients are all chilled prior to making the pie dough. This will make sure that the dough (and most importantly, the butter) will be nice and cold.
To keep the butter cold, cut it into cubes, weigh, and then keep them chilled in the fridge until needed.
Place the graham crackers in the food processor and process until you have fine crumbs that resemble coarse flour. You could also purchase graham cracker crumbs separately.
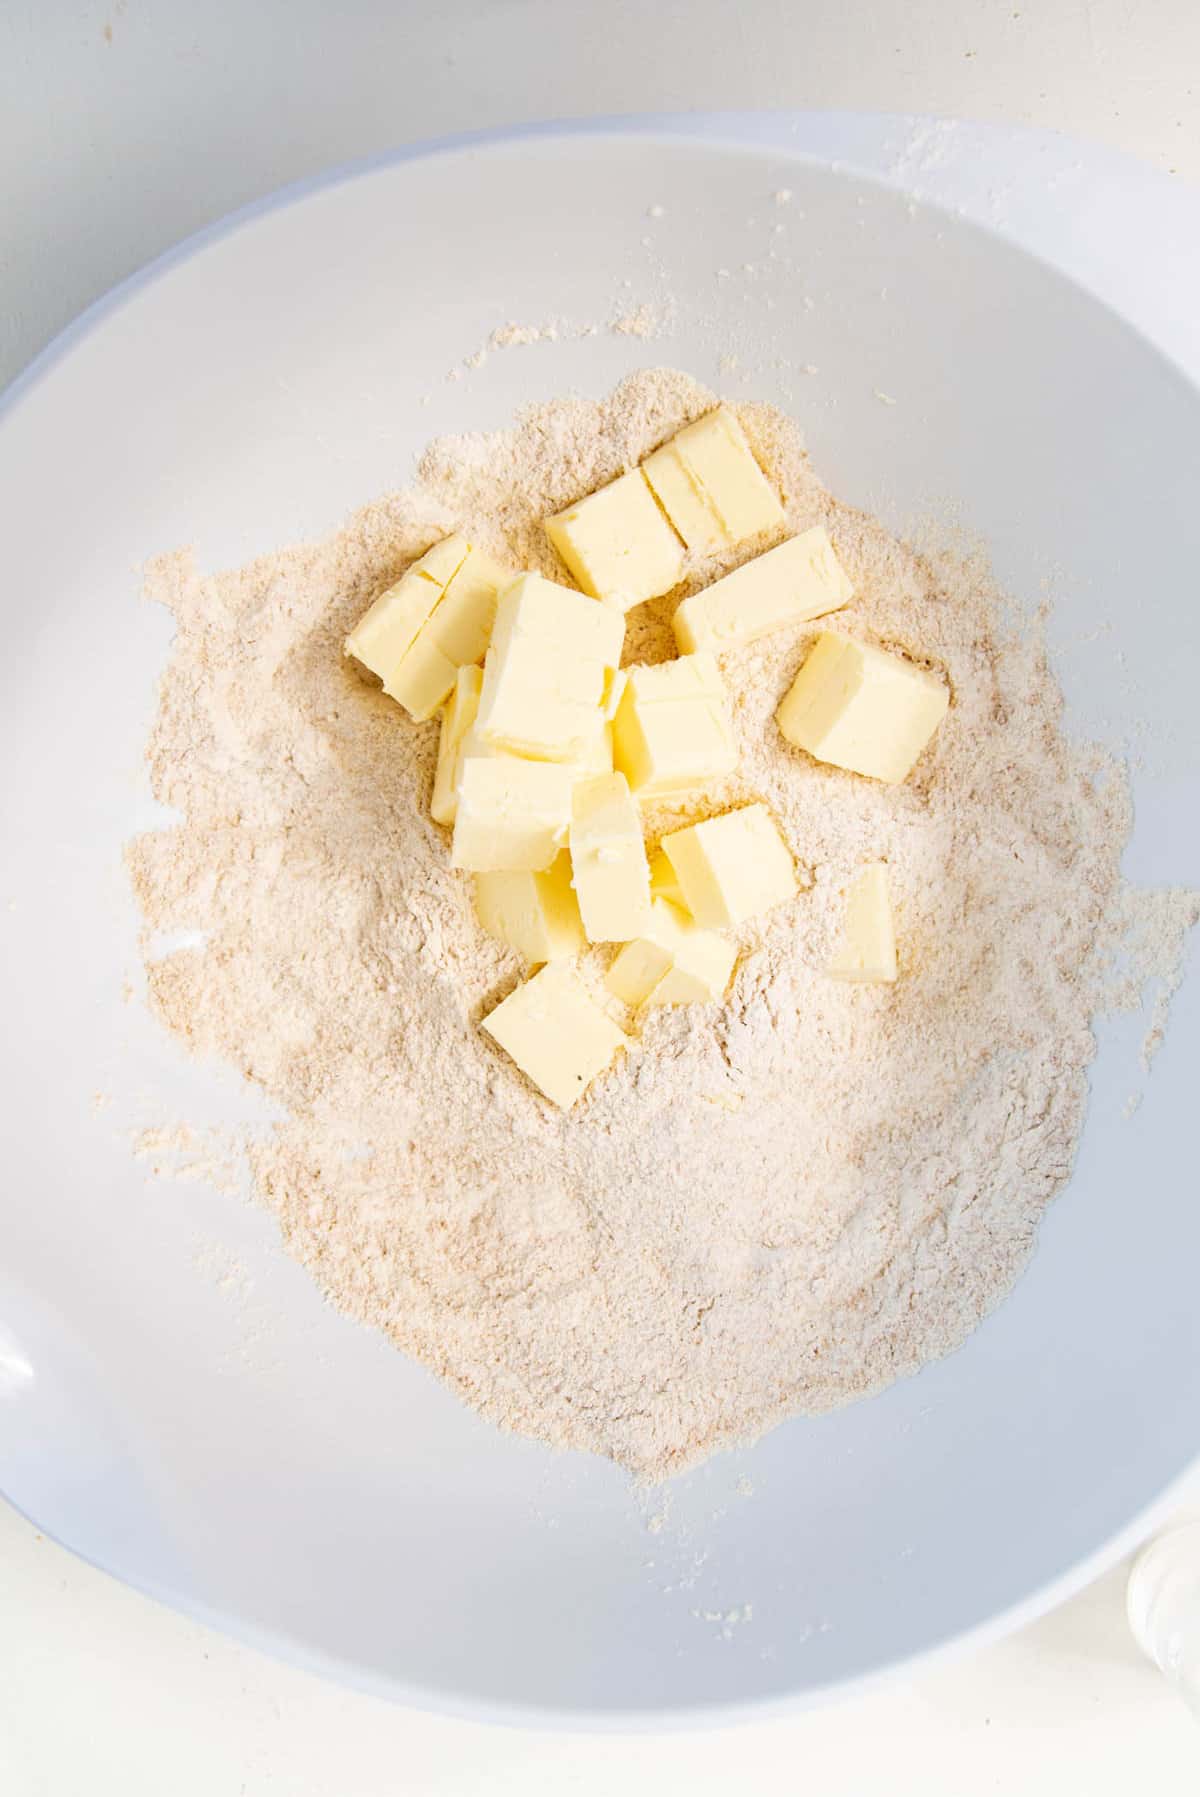
Place the graham flour, AP flour, sugar, and salt in a large bowl. Whisk to mix it all together as shown below.


Mixing the butter
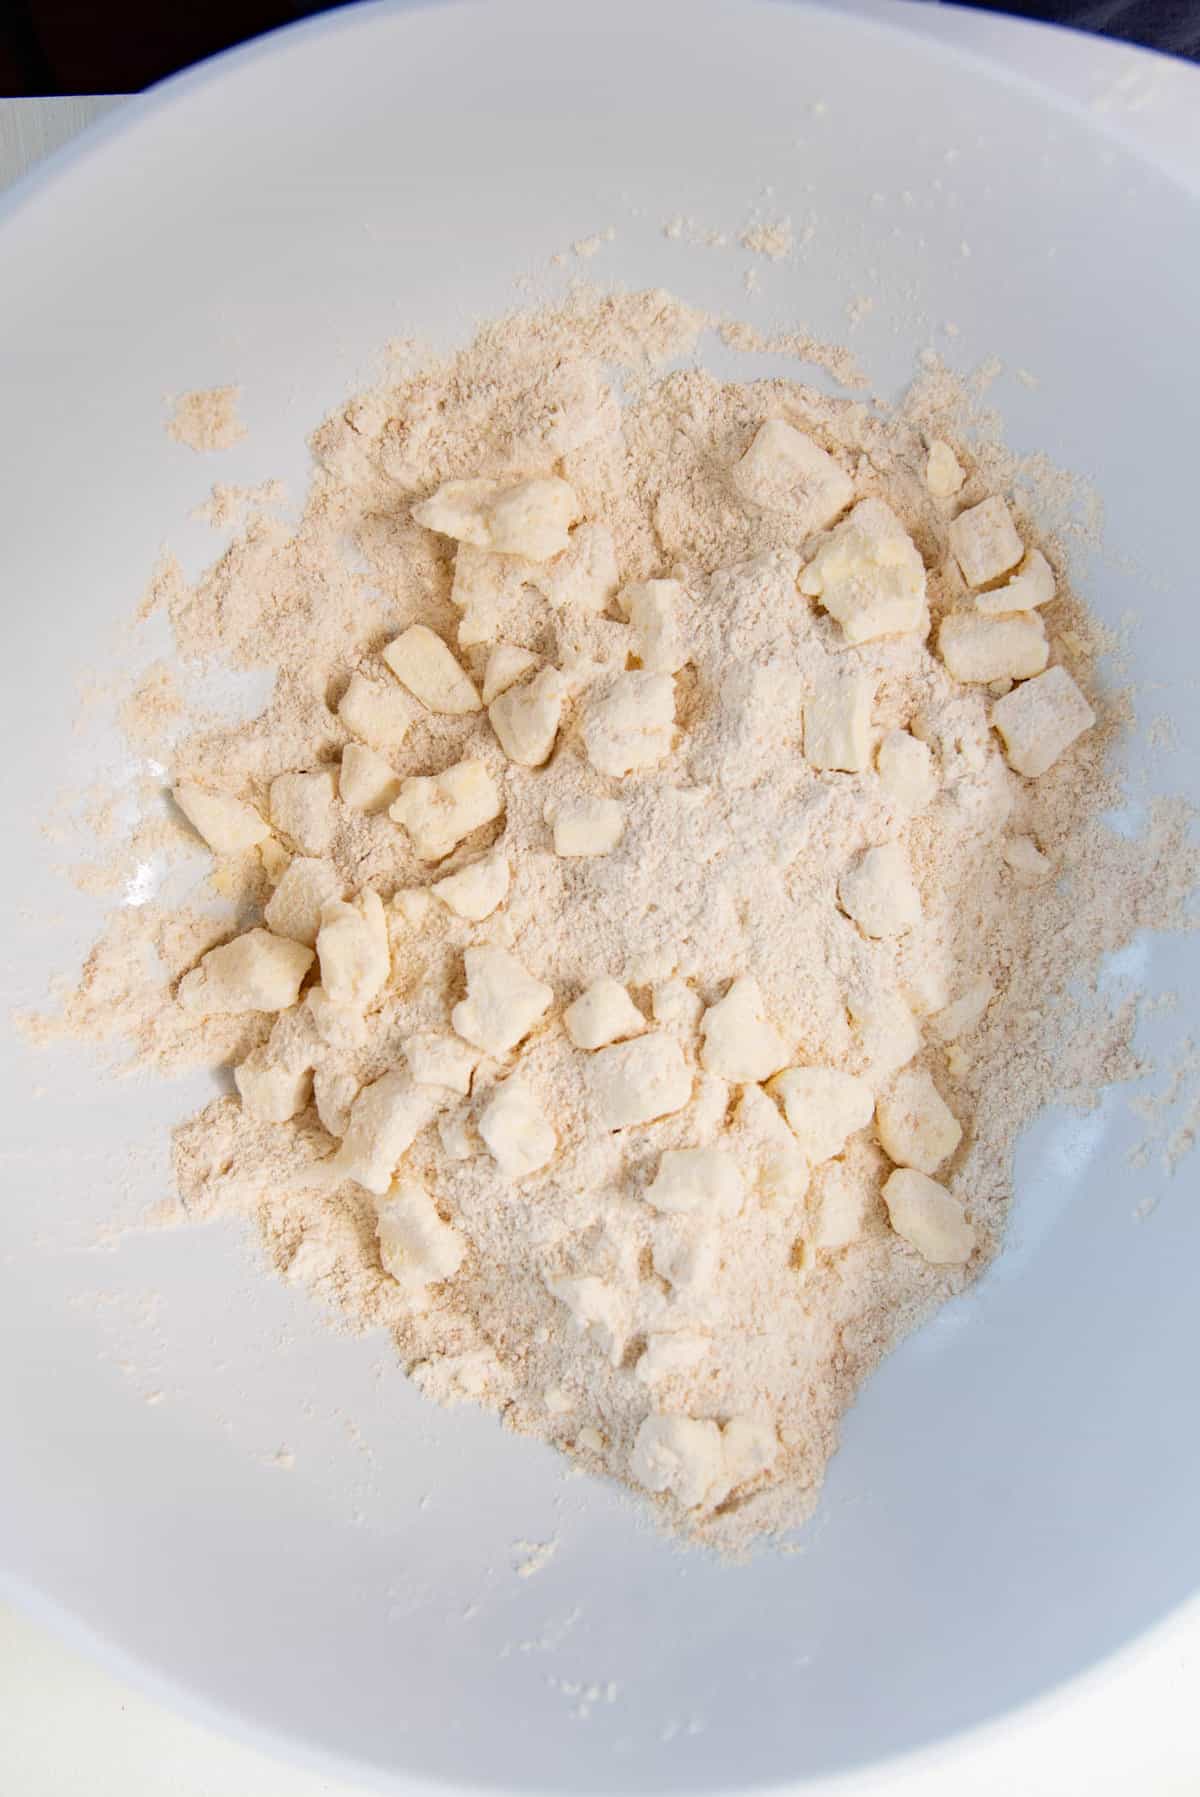
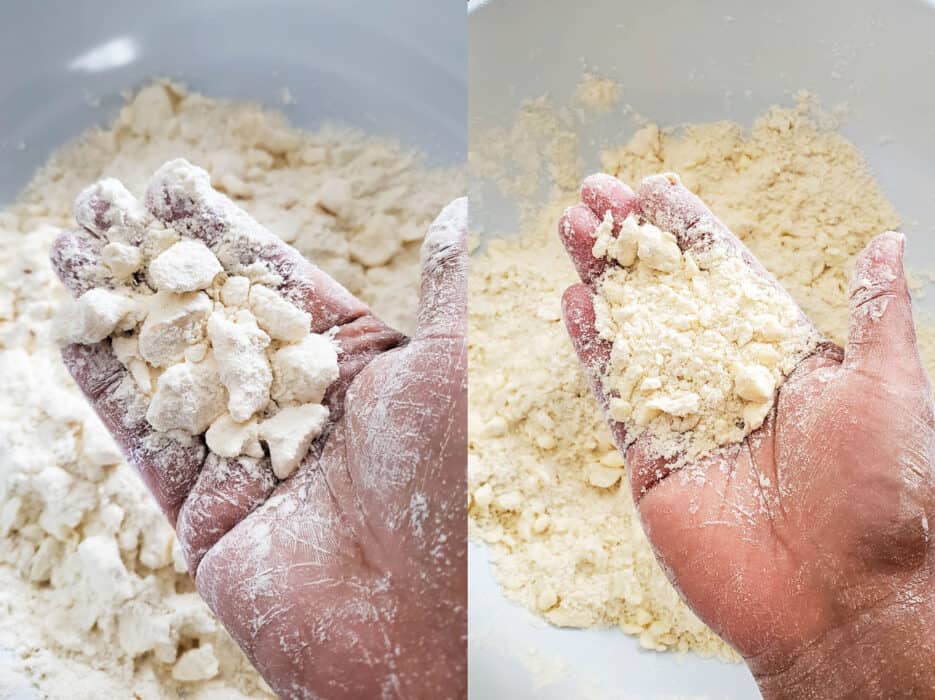
Add the butter and toss the cubes to coat with the dry inredients. Working quickly, cut the butter into the dry flour. This can be done in several different ways.
- Using a pastry cutter, cut the butter into the flour to get smaller butter pieces coated in the flour mix.
- Use your fingers to squeeze the butter pieces to flatten them and break them into smaller pieces. Coat the flattened butter pieces with the flour mix as you go. This is my preferred method.
- Instead of cutting the butter into cubes, you can grate frozen butter and then keep that chilled in the fridge until this step. Then add the grated butter into the flour and toss to coat. Since the butter pieces are already small, you don’t have to do anything further.
- You can also use a food processor. Pulse the flour mixture and butter until the butter is processed into smaller pieces and mixed with the flour.
The larger the butter pieces, the more flaky the pie crust. And the smaller the butter pieces, the more mealy and crumbly the pie crust. I aim to have butter pieces that are about the size of hazelnuts, or large flattened pieces of butter, along with smaller coarse sand-like pieces.
If at any point the butter is too soft, please place the entire bowl in the fridge of freezer until the butter firms up again. This happens to me during summer, because the kitchen is warm and my hands also warm up quite a bit. I just cover the bowl with plastic wrap and place it in the fridge or transfer the flour and butter in to a freezer bag, and then place this in the fridge or freezer.
Adding the liquid
After you cut the butter into the dough, you can mix in the liquid. Make sure the butter is still nice and cold, and the vodka (if using) and water are also chilled.
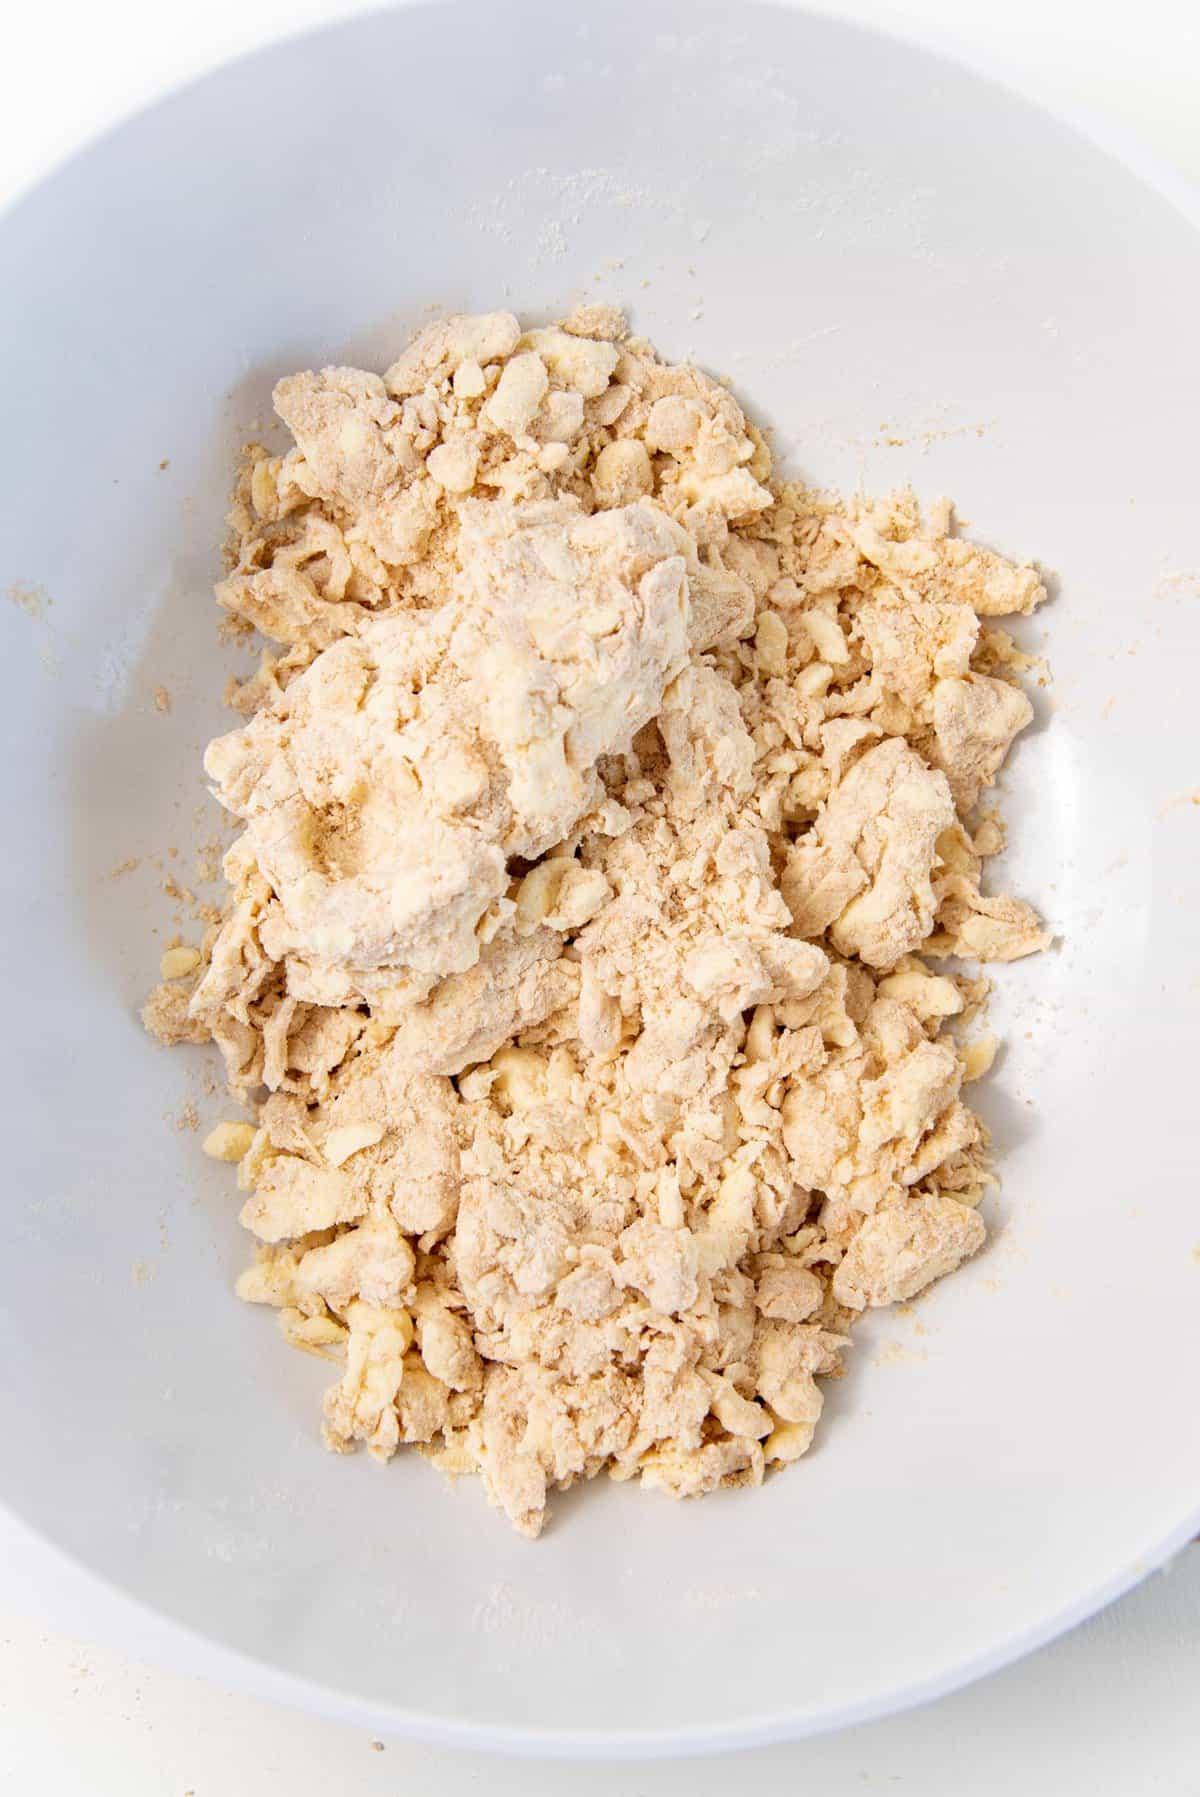
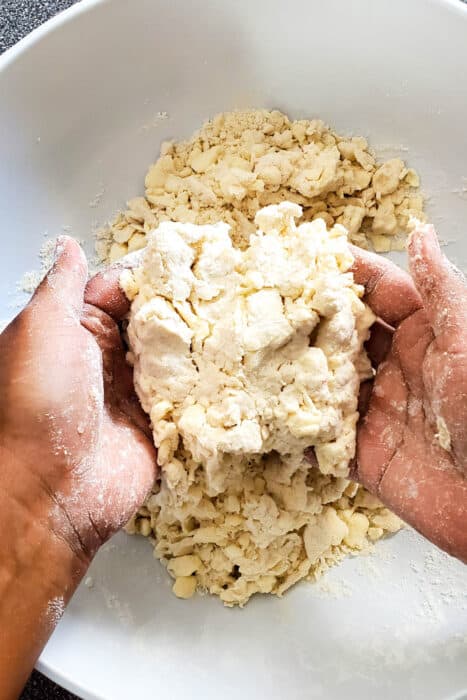
Mix the vodka with about 1/2 of the water and add this to the flour – butter mixture, and gently mix it in. Only use your fingertips to mix the dough because you don’t want to handle the dough more than you need to.
Then stream in the rest of the ice cold water in small amounts and mix it in with your fingers as well. Do not knead the dough.
The dough should just hold together, while still having some dry spots. If the whole dough is saturated with water and is even a little sticky to the touch, then you’ve added too much water.
I’ve shared tips on how you can make sure to add just enough water to your dough in my article on how to make perfect pie crusts. This is where a spray bottle comes in handy. When I was learning how perfect my pie crusts, this was the hardest part to learn. So I share how I learned to get this step right in that pie crust guide.
The same techniques apply in this graham flour pie crust as well.
Creating the layers for flaky graham flour pie crust
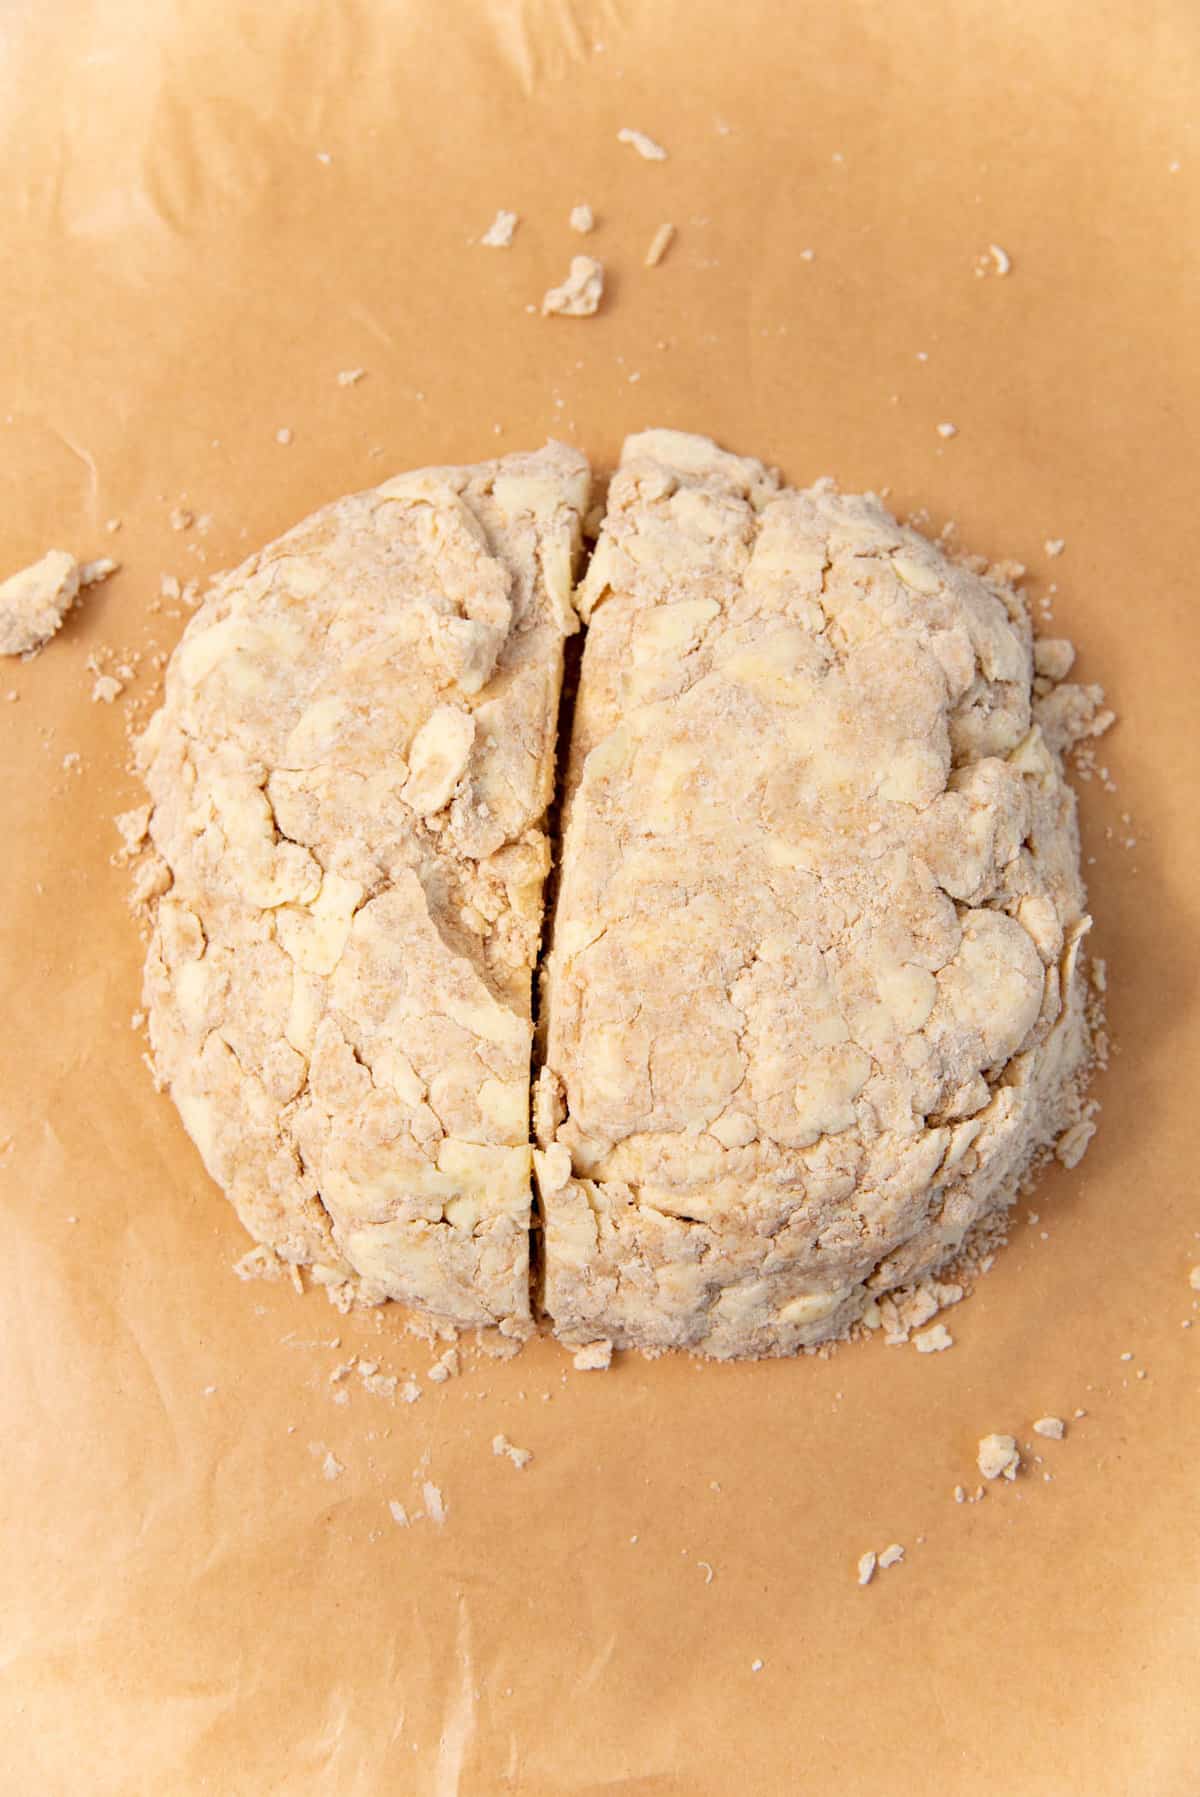
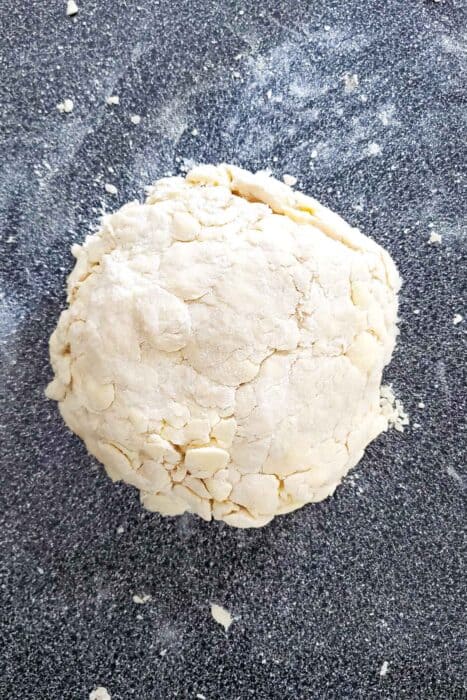
Once you have formed the dough, flatten it into a disc or square shape. Cut the dough into four pieces and stack them on top of each other. Slightly flatten the dough again and cut it in half.
Form each portion into a round disc and wrap each with plastic wrap. Refrigerate for at least 1 hour. I prefer to let it rest in the fridge overnight.


Rolling out the dough
For more detailed information, you can read the tips I have shared here. But here’s a quick overview.
Roll out the pie dough on a well-floured countertop or work surface. If your dough had too much water added to it, you can add more flour to your countertop to prevent the dough from sticking.
If the butter and dough are too solid, use your rolling pin to slap the dough a few times to make it more malleable.
Roll out the dough in mostly one direction, from the center towards the outside. Rotate the dough 90 degrees each time, and also remember to flip the dough over and repeat on the other side too.
Cracks will appear in the dough, so just pinch them together to close any cracks as you roll it out.
It’s very important that,
- The dough does not stick to the countertop. So move the dough around to make sure it’s not sticking, and use flour on your work surface as needed.
- The dough is evenly thick throughout. It’s OK if the dough is slightly thinner at the edges, but most of it should be evenly thick to ensure that it bakes evenly too. The thickness of the dough should be about 3 mm.
Once the dough has been rolled out, you can transfer the dough to line your pie dish.


If the pie dough shrinks as you roll it out at any point, wrap the dough with plastic wrap and place it on a tray and refrigerate it for at least 20 minutes. The dough shrinks because the gluten has been overworked, and the more you roll it, the more it’ll want to shrink. Letting the dough rest in the fridge will help relax the gluten, so you can roll it out better afterwards.
This will prevent the dough from shrinking as it bakes.
Lining the pie dish
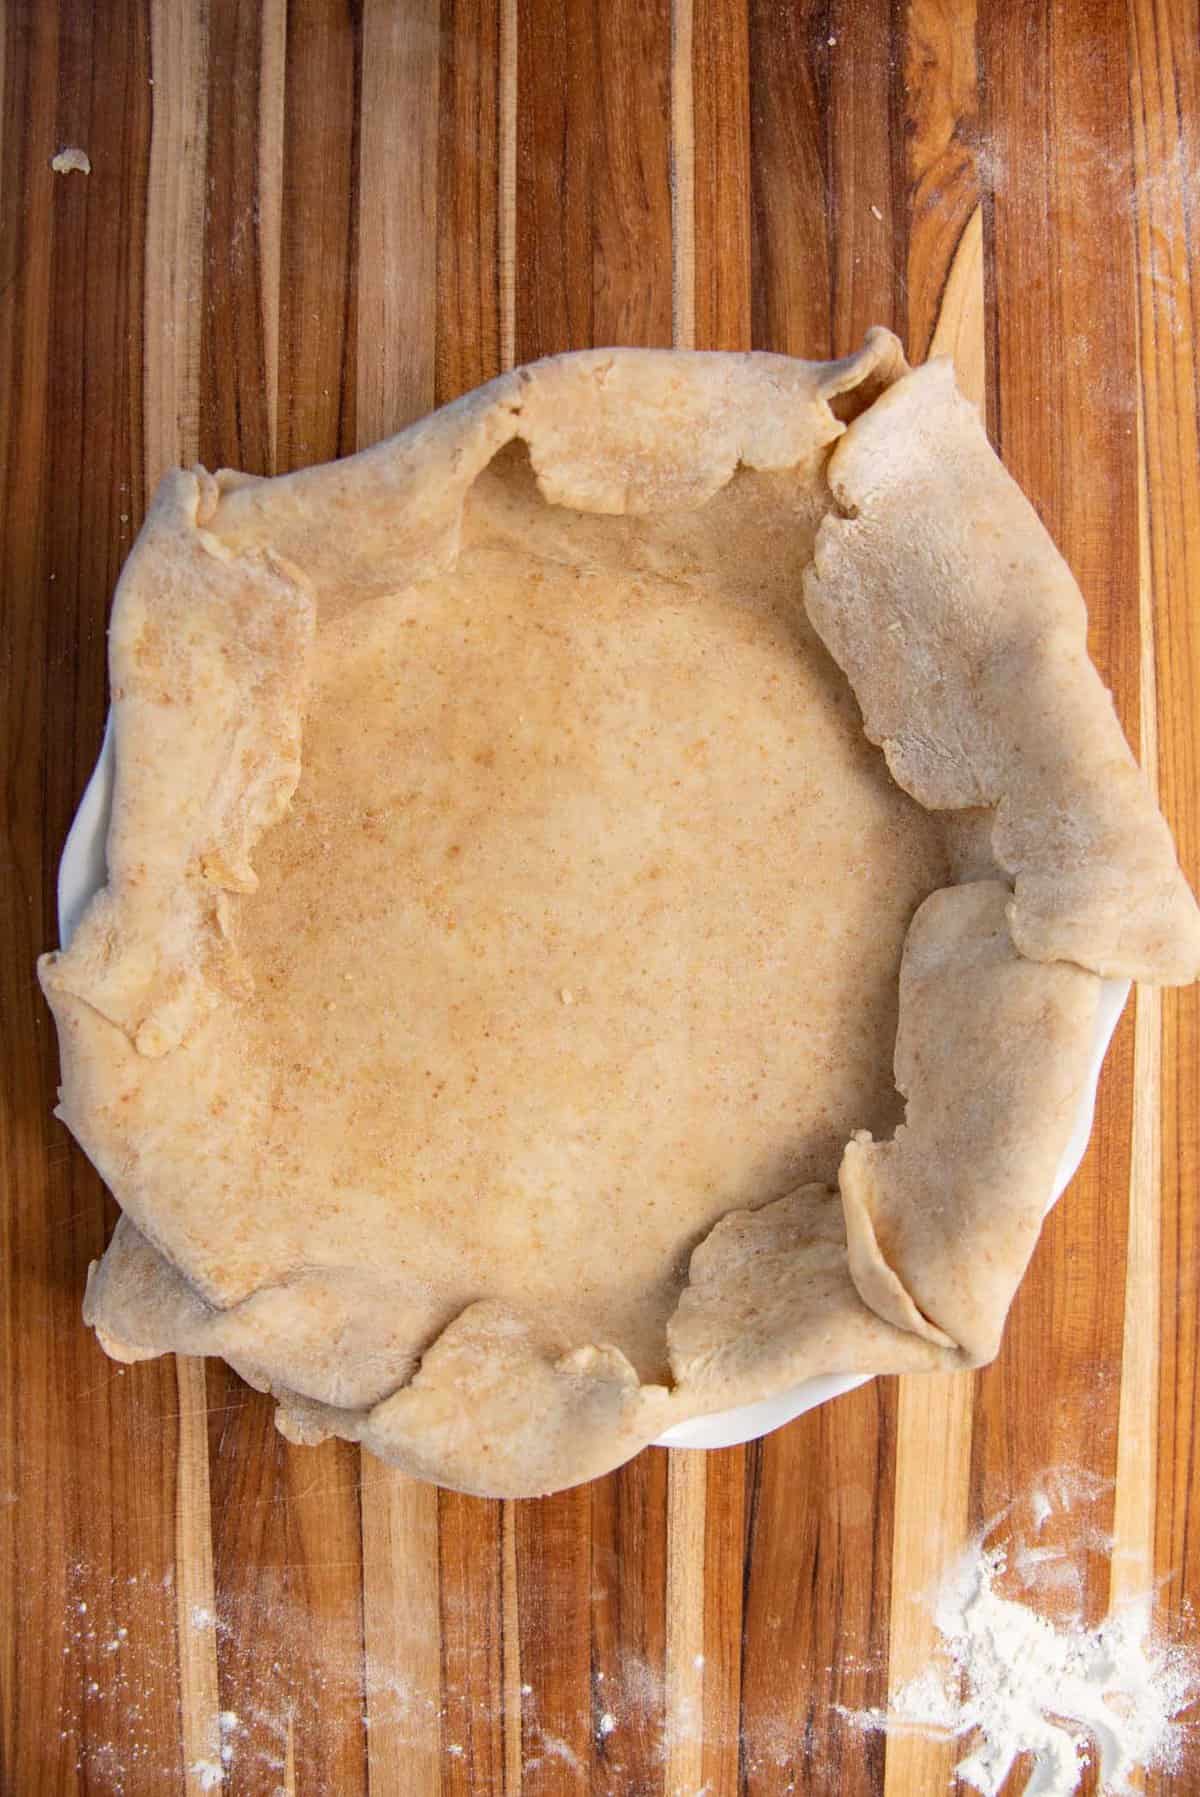
Carefully transfer the rolled out pie dough into the pie dish.
Roll up the dough onto the rolling pin, and then unravel it over the pie dish.
Gently fold the dough into quarters (roughly), and then place the dough in the pie dish with the corner close to the center of the pie dish. Then unfold so that the rolled out dough is centered better in the pie dish.
When fitting the dough into the pie dish, DO NOT stretch the dough to fit the plate. Instead, gently lift the dough and let it gently fall onto the pie dish. Then using the back of your fingers, gently press it into the inside edges of the pie dish WITHOUT stretching the dough.
Stretching the pie dough will cause the pie crust to shrink as it bakes.
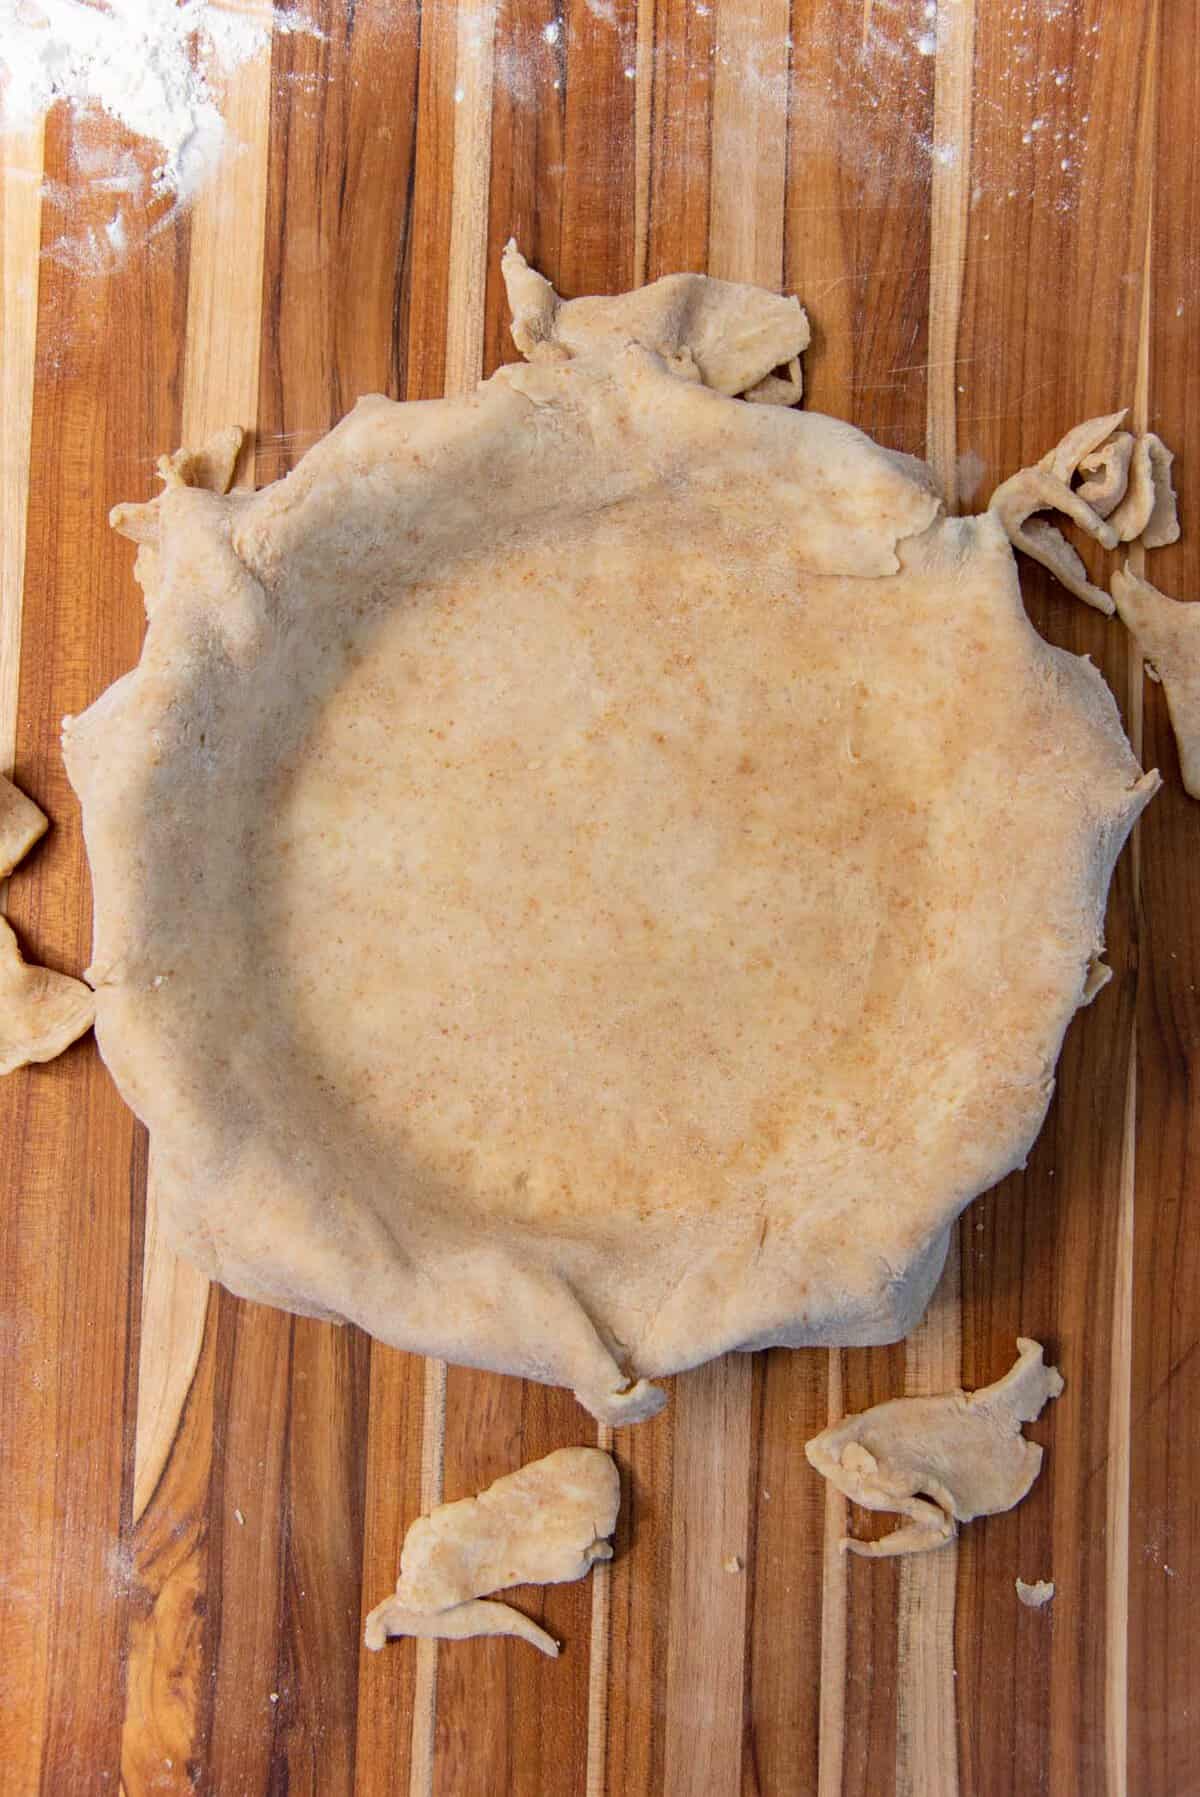
Cut the overhang of the pie dish so that there is at least 0.5 inch over the edge of the pie dish. If you’re a beginner, it’s safer to have a 1 inch overhang. Any scraps can be used to repair any holes in the pie dish, and to also mend any edges that don’t have enough dough to create a fluted edge.
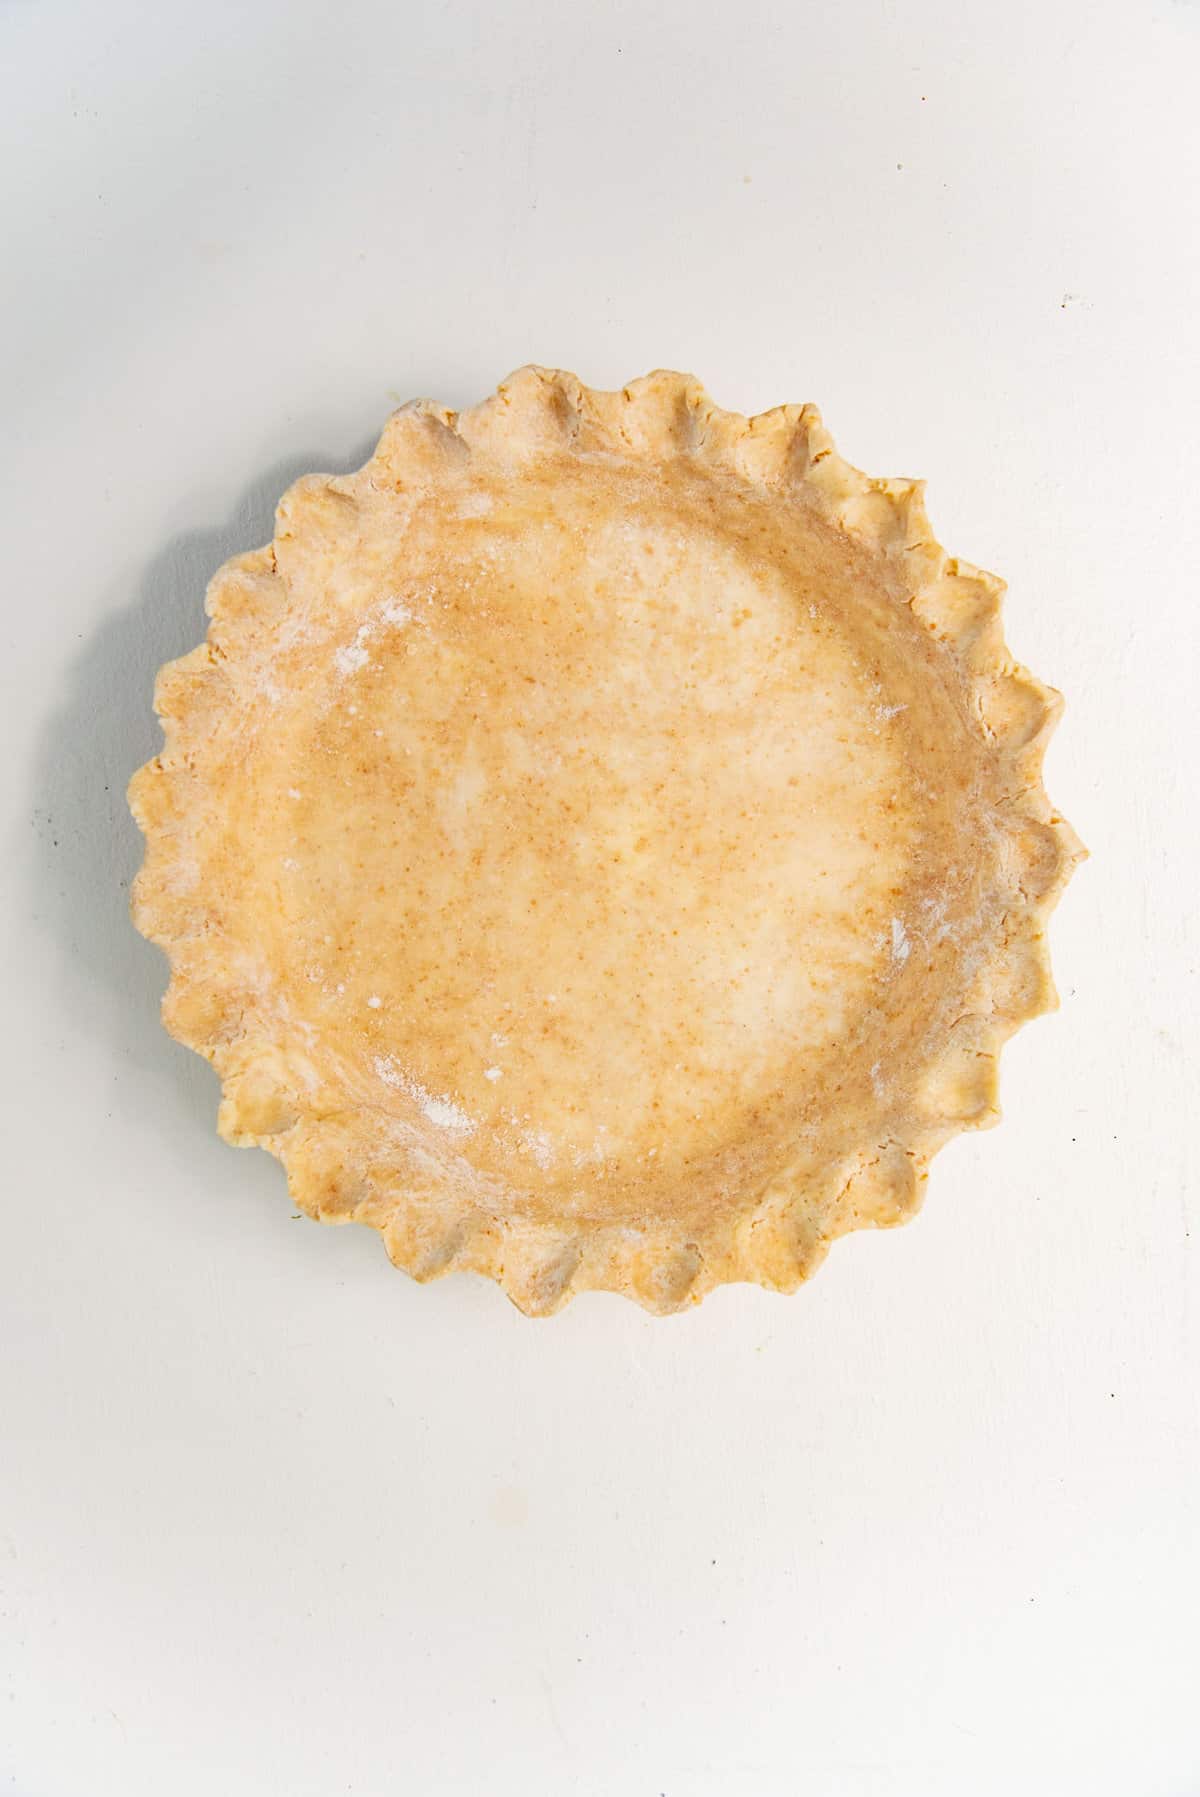
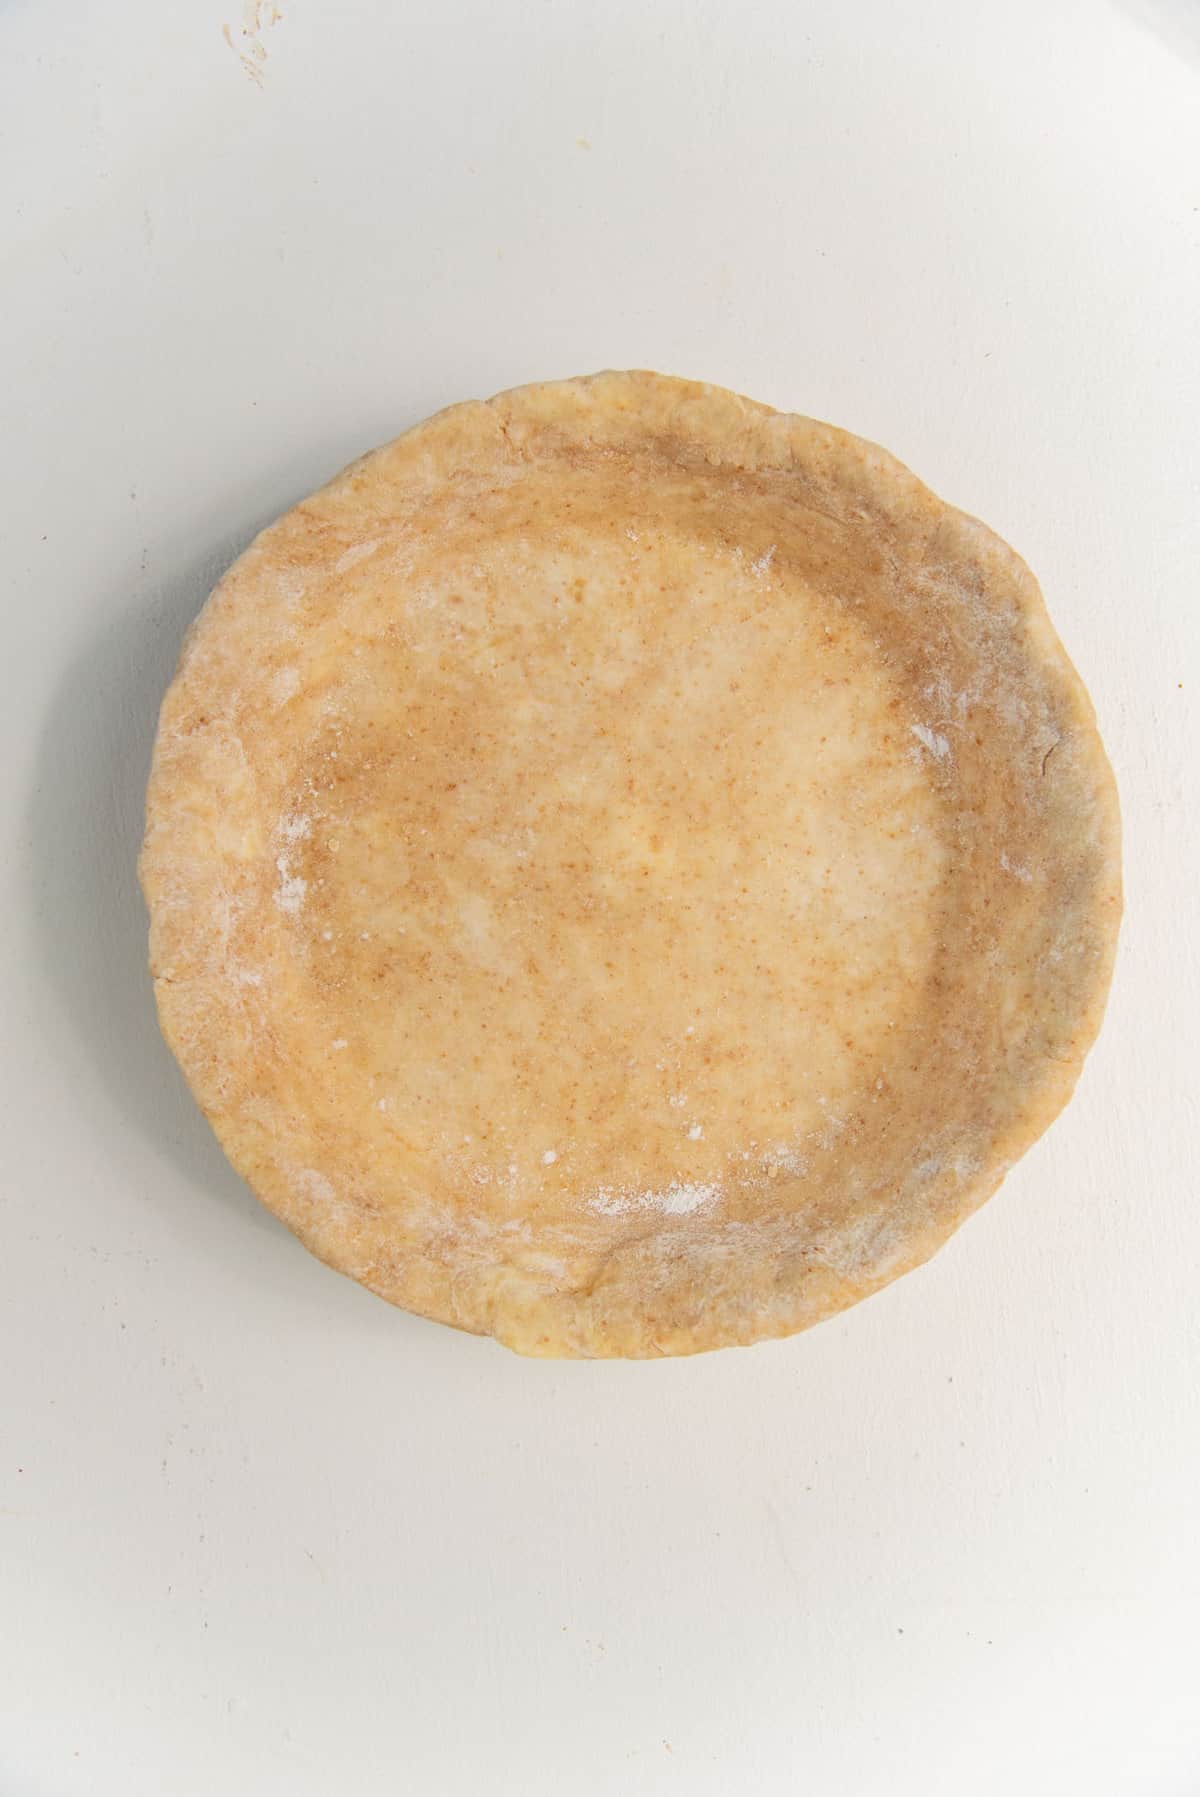
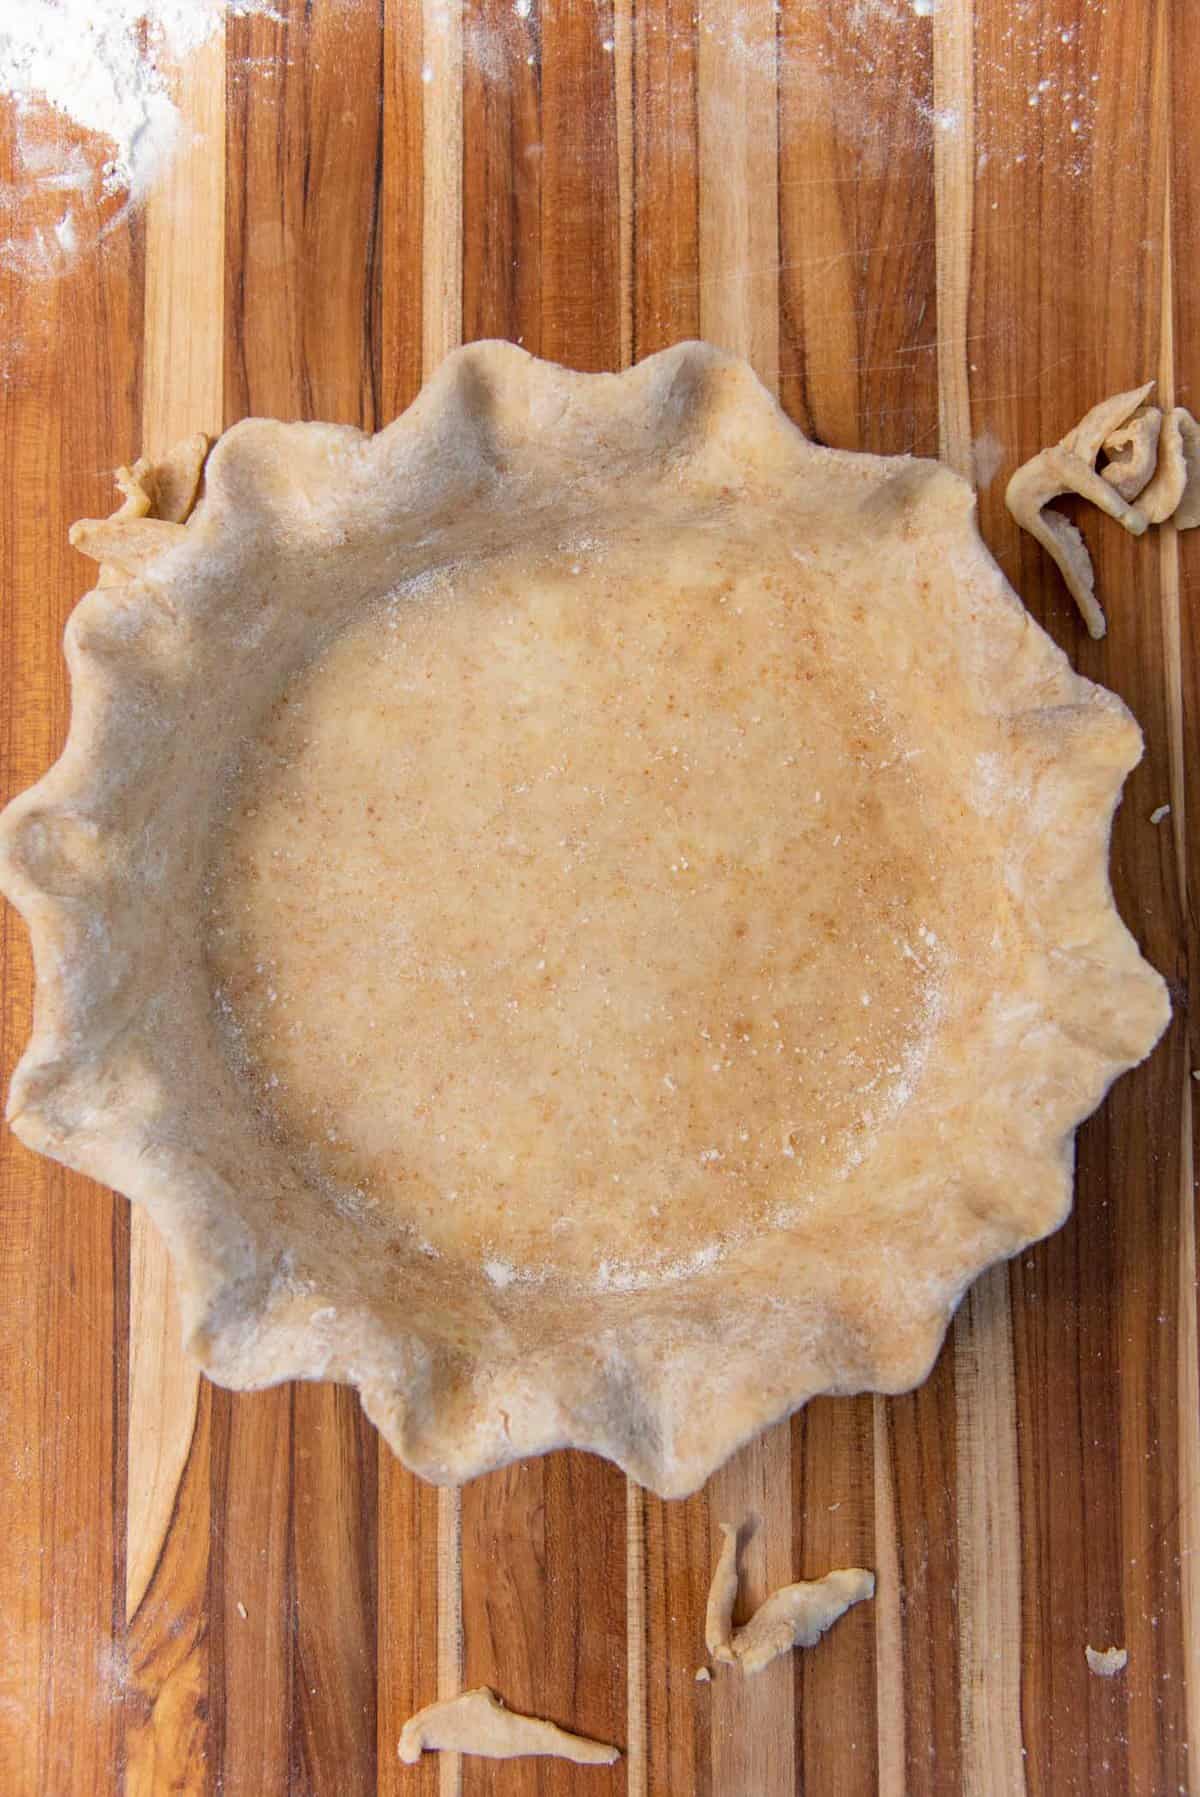
Roll the pie crust overhang underneath to create a thickened pie crust that is flush against the edge of the pie dish. Then you can create a decorative pie crust edge as well. The classic method is to use your fingers to create a fluted pie crust edge. However, you can also use a fork to crimp it.
Cover the pie crust and pie plate and let it refrigerate for at least 45 – 60 minutes before baking. You must ensure that the crust is nice and chilled when you bake it. This helps to create a crust that is wonderfully flaky, and prevents the crust from shrinking as well.
If at any point the crust is too soft, you can transfer it into the fridge for a few minutes so that the dough hardens, and it will be easier to handle.
Baking the graham flour pie crust
Par-baking and blind-baking
While the pie crust is chilling, preheat the oven to 350 F / 180 C. Place the oven rack in the lower third of your oven. Keep a baking tray or a pizza stone on the oven rack as the oven preheats. If you’re using a pizza stone, make sure that it preheats for at least 45 minutes, ideally 60 minutes. The baking tray should preheat for about 30 – 40 minutes as well.
Line your pie crust with foil or parchment paper, ensuring that the whole crust is covered. You may need to use two pieces of foil as well. Then fill it with white sugar or rice. Make sure that you fill the pie plate at least 3/4 of the way up, or right up to the point before the fluted edge starts. This is because you want the sugar to weigh down the crust and flatten it against the pie plate. This will prevent the crust from shrinking, or creating air bubbles below the crust.
In the image below I use a layer of foil and then parchment paper as well. You do not have to do this. The reason I did this here is because I had to use 2 pieces of foil that were not very strong. It would have been hard to lift the sugar out of the pie after baking with just that flimsy foil.
If you’re using a pizza stone, I still recommend using a baking tray under the pie plate, so that it can catch and contain any melted butter. Otherwise the melted butter will create too much smoke as it drips.
Place the pie plate in the oven and bake for about 60 minutes.
Then remove the pie plate from the oven and carefully lift out the foil WITH the sugar or rice inside. Be careful not to rip the foil so that the rice and sugar won’t spill all over the pie crust. That would be VERY hard to clean up!


Par baked crust
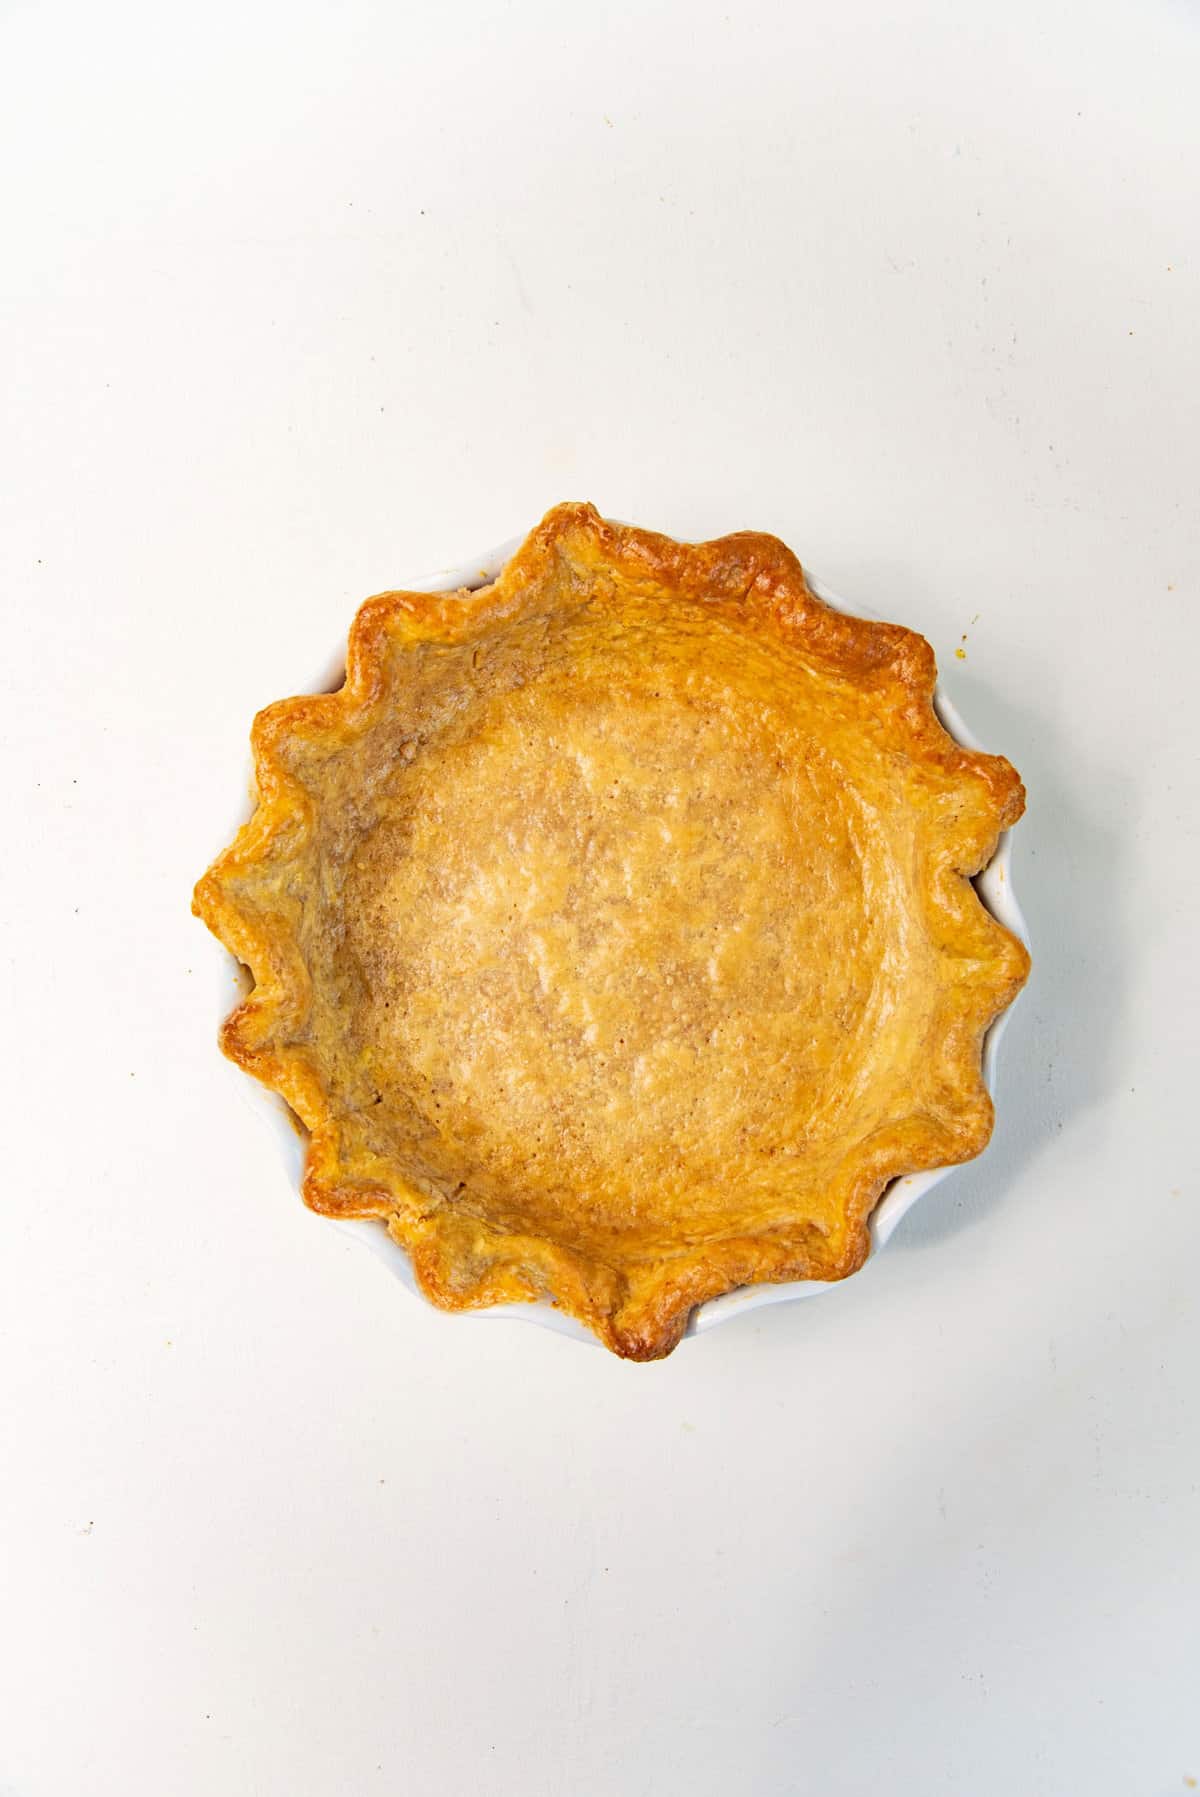
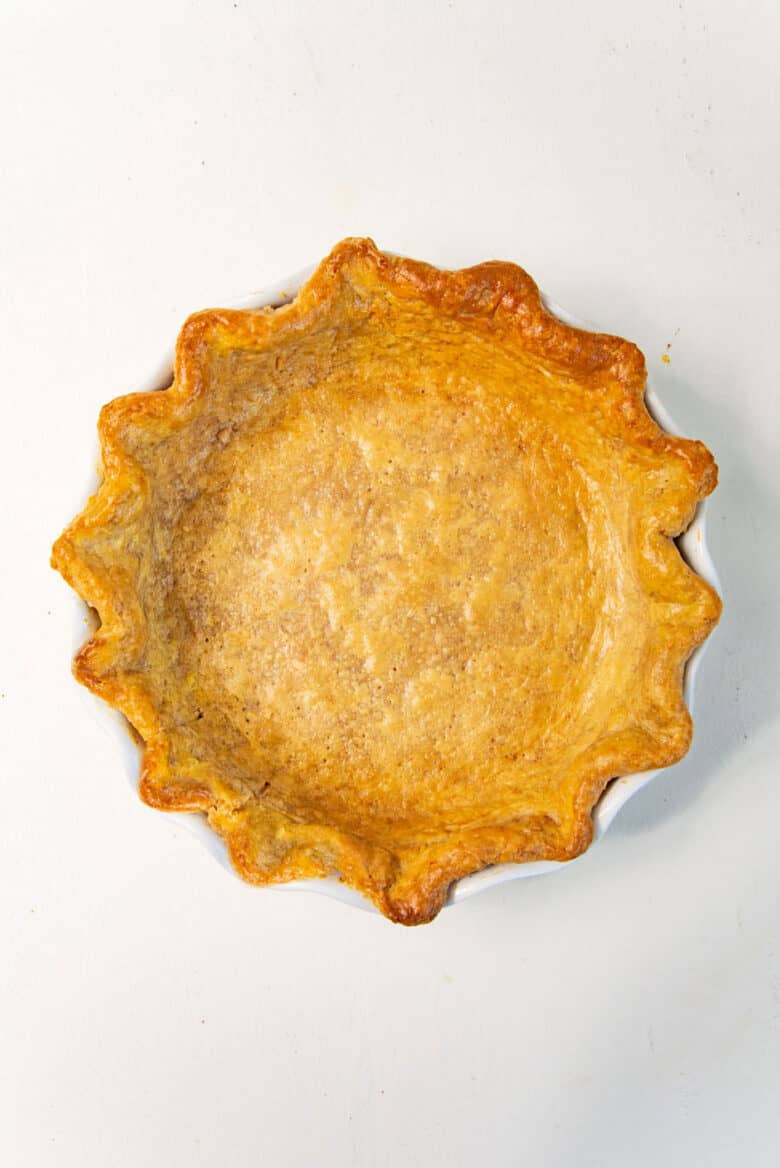
Prick all over the bottom of the par-baked crust with a fork. Then bake the pie crust in the oven for a further 5 – 10 minutes until the crust has lost the glossy look from the melted butter. The surface should have a more matte look.
For a fully baked (blind baked) crust
Prick all over the bottom of the par-baked crust with a fork. Return the pie crust into the oven and bake it for a further 15 – 20 minutes. Optionally, in the last 5 minutes, you can brush an egg wash over the crust and let it bake the final 5 minutes until the crust turns a glossy golden color.
If you’re looking to make a double crusted pie, you can follow the tips I share here to make double crusted pies perfectly.
There you have it! Now you can make a flaky, buttery pie crust that tastes like graham crackers! The graham flour added to the pie dough will give the crust a darker color than regular pie crust – almost like it was made with wheat flour. The flavor is nutty, sweet, and definitely tastes like graham crackers!
Pie recipes you can make with this graham cracker pie crust
This pie crust can replace almost ANY pie crust! But it’s obviously more suited to be used with sweet dessert pies. I made this incredible banana cream pie using this graham cracker pie crust.
You could also make a delicious graham cracker mixed berry slab pie! Just substitute some of the flour with graham flour (by weight).
This butterscotch apple pie would be AMAZING with this graham flour pie crust too.
You could even make a galette with this version of pie dough. Like this strawberry galette or peach galette.
Pro tips for getting perfect graham flour pie crusts
Make sure that the butter, water, and vodka (if using), are chilled before using. You could even chill the flour and the bowl if you like. The butter should be firm throughout the whole process of making the pie crust, even after cutting the butter into the flour. This ensures that you get flaky, butter layers!
If at any point in the recipe, the butter softens too much, return the dough to the fridge or freezer to let the butter harden again.
When mixing the dough, do not overwork the dough. Do not knead it. Mix it just enough to form the dough. Pie dough does require some gluten, but too much gluten will make the dough too rubbery and hard to roll out.
Vodka will help with limiting gluten development, but you can leave it out if you like. However, be extra careful about not overhandling the dough if you’re not using vodka.
Flour your worktop and move the dough around while rolling it out to prevent it from sticking to the worktop. Also roll it out on both sides to help with getting a smooth rolled out dough.
Do not stretch out the dough to fit it in the pie plate. Gently ease the dough into the pie plate instead.
Blind bake / par bake the pie crust in a low heat oven! Not at high heat.
Place the pie dish on a pie plate and/or baking tray. This will help the pie crust form a golden crust at the bottom.
If you’re using a pizza stone, keep the pie plate on a baking tray while baking, so that any melted butter won’t drip onto the pizza stone or the oven and create too much smoke.
Storage instructions
This graham flour pie dough can be kept in the fridge for up to 3 days, if wrapped very well. You can also store the pie dough in the freezer for about 2 months. Let the dough thaw out in the fridge overnight before using.
A baked graham flour pie crust will be good at room temperature for about 3 days (stored in an air-tight container, with no filling), but it will get soggy. It will last in the fridge for about 5 days, but it will get soggy there as well. If you need to “re-fresh” the crust, you will need to reheat it in the oven for a few minutes.
Frequently Asked Questions
My pie crust shrinks
Too much gluten is responsible for making the pie crust shrink. The gluten acts like elastic and doesn’t want to stretch out. Another reason the pie crust shrinks is if there isn’t enough weight on the pie crust as it blind bakes. This allows the crust to slip down the sides of the pie plate.
To prevent this, make sure to,
Always keep the dough chilled.
Do not add too much water (more water can encourage gluten development, which can cause the crust to shrink).
Do not over-work / over-handle the dough.
If the dough starts shrinking during the rolling process, let it rest in the fridge for a few minutes before proceeding.
Do not stretch the dough to fit it inside the pie plate.
Make sure that the pie crust edge is thick, and is gripping onto the top of the pie plate well. So that it will hold firm in place.
Line and generously fill the pie crust with rice or sugar, right up to the top, so that the crust is pressed well against the plate and won’t slide down the pie plate either.
Can I make this gluten free?
Unfortunately I haven’t made gluten free pie crust, so I don’t have experience with it. However there are many recipes out there that do make great gluten free pie crusts. You can try this recipe for sour cream GF pie crust or this foolproof GF pie crust recipe too.
Substitute 1/3 of the flour with gluten free graham crackers, and you should be able to get similar results.
Can I make this vegan?
Nabisco graham crackers are vegan. So you can make this pie crust vegan by substituting the butter with a good quality vegan butter. Make sure to use a vegan butter that is solid in the fridge, so that you can still get great flaky results.
Also make sure the graham cracker brand that you’re using is vegan.
My pie crust is not flaky
If the butter was cut into very small pieces (sandy texture), then the pie crust will be more crumbly than flaky. This can happen if you use a food processor, as you have less control over how big the butter pieces will be when making the pie crust.
This can also happen if the butter softens and melts into the flour, rather than remaining as larger pieces. Those larger pieces of butter in the dough are what create the light, flaky layers.
Recipe

Flaky Graham Flour Pie Crust (Flaky Graham Cracker Crust)
US based cup, teaspoon, tablespoon measurements. Weight measurements are recommended for accurate results whenever available.
Common Measurement ConversionsEquipment:
- 9 or 9.5 inch pie plate (between 1 – 2 inches deep)
- Foil or parchment paper
- Sugar or uncooked rice to be used as a pie weight
- Rolling Pin
- Spray bottle (optional) filled with ice water
Ingredients:
- 150 g graham crackers (about 9 – 11 cracker sheets)
- 300 g unsalted butter chilled
- 120 mL ice water
- 30 mL chilled vodka or replace with ice water
- 250 g all purpose flour (spooned and leveled when using cup measurements)
- 30 g sugar
- ¾ tsp fine sea salt
- Spray bottle with ice water optional
Instructions:
Making the dough
- Ideally, you should have all the ingredients chilled well. However, it's crucial that at least the butter, water, and vodka (if using) are chilled well.
- Cut the butter into cubes, about 1 x 1 cm OR 1 x 2 cm. Keep the butter in the freezer until you're ready to use it.300 g unsalted butter
- Place the graham crackers in a food processor. Pulse until the crackers are processed into fine crumbs – like coarse flour. Set aside.150 g graham crackers
- Mix the graham cracker crumbs, flour, sugar, and salt together in a large bowl.250 g all purpose flour, 30 g sugar, ¾ tsp fine sea salt, 150 g graham crackers
- Add the cubed butter, and toss to coat the butter with the flour mix.300 g unsalted butter
- Using your fingers, squish each piece of butter, making sure to toss the butter in the flour from time to time so that it’s still coated with flour. Work fast, so that the butter won't soften or melt.
- For a flaky pie crust, most of the butter pieces should be larger and flatter. Ideally, at least hazelnut-sized or walnut-sized, but flatter.

- Toss once more to make sure the butter pieces are coated in flour.
- Mix half of the iced water with the vodka (if using). Drizzle this into the flour mixture, and mix it in using your fingers or a fork.120 mL ice water, 30 mL chilled vodka
- The lumps will become bigger as you mix in the liquid. Add more water until more of the dough forms larger, stickier clumps.
- Toss the clumps in the flour mix using your fingers to ensure that the water is mixing as evenly as possible. However, you will find that there will be large wet clumps of dough, and lots of dry spots in the flour mix as well. This is OK!120 mL ice water
- Move the larger clumps of dough out of the way to check if there is a large amount of flour or butter mix that is very dry. Either drizzle a few drops or spray ice water on the very dry flour at the bottom of the bowl to help them hydrate a little. If there is only a little dry flour/butter mix at the bottom, then you can skip this step.Spray bottle with ice water
- The dough will have enough water if you can form a dough that is just holding together when squeezed, AND there should also be a few dry spots of flour. The more familiar you become with this dough, this stage will be easier to recognize. I usually never need more than 150 mL of water.

- Place a piece of parchment paper on your work surface.
- Turn the pie dough out onto the parchment paper. If the butter softens at any stage, remember to refrigerate / freeze the dough for a few minutes as needed.
- Use the parchment paper to fold the dough over to form a rough dough mound. Add a few water drops (or use the spray bottle) if needed, so that the dough sticks together. There should still be some dry flour spots.Spray bottle with ice water
- If there is too much water, and the dough is sticky, sprinkle more flour on the dough.
- Slightly flatten the dough mound into a circular disc. Cut it into four portions. Stack these portions on top of each other.
- Flatten the dough again slightly, and cut it in half. You could either weigh the dough and cut it in half precisely, or cut the two portions approximately.
- Form a dough disc with each portion. Be careful and gentle when handling the dough. Wrap each disc with plastic wrap and let it rest in the fridge for at least 1 hour. I prefer to let it rest at least 2 hours, or overnight.
Rolling the dough
- Take one portion of the graham flour pie dough. Unwrap the plastic wrap and place it on a floured surface.
- Since the butter will be very firm, it'll be hard to roll out the dough right away. Strike the dough disc a few times with a rolling pin, on both sides, to make it more pliable and easy to roll out.
- Roll out the dough, from the center out when possible, while maintaining the shape of a circle as best you can. Squeeze any cracked dough together to seal.
- Turn the dough a quarter turn after each roll, to ensure that the dough maintains the shape of a circle and also does not stick to your work surface. Use a light dusting of flour as needed, and also remember to flip the dough so that you roll it on both sides. This will ensure that both sides of the dough will be smooth.
- Roll the dough until it’s about 3 mm in thickness. The diameter could vary, but it should definitely fit a 9.5 inch diameter, deep pie dish.
- If the dough starts to shrink as you roll it, lightly flour the dough surface and either fold it into quarters OR roll it onto a rolling pin, and then cover it with plastic wrap. Let the dough rest in the fridge for at least 20 minutes, and then proceed with rolling it out again.
- Now transfer the dough onto the pie dish. You can do this by rolling up the dough on a rolling pin and then carefully unrolling it over a pie dish (see pictures in my classic pie crust post for guidance).
- DO NOT stretch the dough to fit it inside the pie dish. This is crucial and a common beginner's mistake. Instead, carefully lift the pie crust and let it gently fall into the pie dish. Use the back of your fingers to gently coax the dough into the bottom of the pie dish, so that it fits neatly in the dish.
- There should be an overhang over the pie dish rim. Using scissors or a sharp knife, cut the excess pie crust, leaving at least a 1 inch (or up to 1.5 inches) overhang for single crust pies. Or a 0.5 – 1 inch overhang for double crust pies.
- If the butter softens at any stage, refrigerate the crust. Do not discard the scraps, as you can use these to "fix" any issues in the pie crust.
- For single crust pies – Roll the dough overhang under the pie crust to form a thick border. This should be flush against the rim of the pie dish.
- For a fluted crimped edge – Hold your thumb and index finger on one hand parallel to each other, and rest the tips of those fingers against the outside edge of the pie border. Then using the index finger or thumb on the other hand, gently push the inside edge of the pie border between the two fingers on your other hand, to create the crimped edge. Repeat this all along the pie border to form a fluted pie crust edge (see the video clip below for guidance).
- Cover the pie crust loosely with plastic wrap and let it rest in the fridge for at least 45 minutes.
Blind baking pies
- Preheat the oven to 350°F / 180°C (conventional oven). Place the oven rack in the lower third of the oven, and place a pizza stone OR baking tray on the rack. Let the oven preheat for at least 30 – 45 minutes.
- Take a large piece of foil or parchment paper (large enough to fit inside the pie plate), and gently crumple it, making sure not to tear the foil / paper. You may need two pieces of foil / parchment paper – depending on the width.
- Then unfold the foil / paper carefully, and smooth it out. The foil / paper should now be flexible enough to fit inside the pie plate, on top of the chilled pie crust. Make sure the foil / paper is touching the whole surface of the pie crust, and loosely covers the border of the pie crust as well.
- If needed, use two pieces of foil (overlapping) to make sure the bottom and sides of the pie crust are fully covered.
- Fill the pie plate with sugar or rice (not both!), or ceramic pie weights. Make sure the weights come at least ¾ of the way up the pie plate.
- Transfer the pie plate into the preheated oven, on top of the baking tray or pizza stone. If you're keeping the pie plate on the pizza stone, then keep the pie plate on a baking tray (with a lip) and then place this on top of the pizza stone. The baking tray will catch any butter that will melt from the crust.
- Bake for about 60 minutes, rotating once halfway through the baking time, if needed.
- After 60 minutes, the bottom of the crust should start to caramelize and turn golden brown in color. The sides and top of the crust will still be very blonde in color (i.e. only have a little bit of color).
- Remove the pie plate from the oven and then VERY CAREFULLY, remove the foil / paper from the pie plate along with the baking weights (making sure not to spill anything!). Immediately transfer the weights into an empty bowl or plate. Be careful with this step since the foil will be hot, and you need to hold it firmly to prevent any tearing and spilling of contents.
- Using a fork, prick the entire bottom of the pie crust in the pie plate.
For par baking
- Return the blind baked pie crust to the oven and bake for a further 5 – 10 minutes until the bottom of the crust looks matte or dry, and the sides have a little golden brown color. If the crust is browning too much, place a pie shield or a shaped piece of foil to cover the edges of the pie crust.
Fully baked pie crust (blind baked)
- Return the blind baked pie crust to the oven and bake further for about 15 – 20 minutes, until the crust turns golden brown. For a shiny finish, brush an egg wash all over the pie crust before the last 5 minutes of baking. Then bake for the last 5 minutes, until the crust is golden in color and shiny. If the crust is browning too much, place a pie shield or a shaped piece of foil to cover the edges of the pie crust.
For a double crusted pie crust
- Roll out the second portion of dough until it's about 3 mm in thickness. Fold this in quarters and cover it in plastic wrap, and then keep it in the fridge with the pie plate until the filling is ready.
- Fill the pie plate with your filling and cover the pie with the second rolled out pie crust. You can either keep the top crust whole, or cut out shapes from it as well. You can also cut the second dough into strips, so that you can form a lattice on top (like in this classic apple pie).
- Next, brush the bottom border of the pie crust with a little water and then press the top crust down so that it sticks well to the bottom crust.
- Cut the excess dough from the top crust leaving the same 0.5 – 1 inch overhang. Roll this overhang under the pie crust to form the same pie crust border and crimp it with a fork OR create a fluted edge.
- Refrigerate the pie for at least 30 minutes, before baking according to the pie recipe instructions.
Nutrition Information:
“This website provides approximate nutrition information for convenience and as a courtesy only. Nutrition data is gathered primarily from the USDA Food Composition Database, whenever available, or otherwise other online calculators.”


Leave a Reply