


Get ready folks, here’s ALL you need to know about how to make Homemade PERFECT, AUTHENTIC French Croissants! With step by step, detailed instructions to troubleshoot and to ensure you get the best, crisp, flaky croissants!
Plus, you can also make perfect pain au chocolat (chocolate croissants) with the same tried and true, reader-favorite recipe.

I am really stoked to share this recipe and guide with you guys. It’s been MONTHS in the making, and hundreds of croissants have been sacrificed to the pastry gods to perfect this recipe. But before I get into it, a couple of things first..
- This is a long post. There is a contents table below to guide you through the post.
- There is a jump to recipe button at the top, if you’d like to zip straight down to the recipe. However, I do highly recommend reading the post to understand how and what works in the recipe, so you can perfect your homemade croissants!
- Why you should try this recipe
- Read this before you attempt the recipe
- Important factors for making croissants
- Making a small batch vs regular
- Ingredients for perfect French croissants
- How to make French croissants (step by step overview)
- Frequently asked questions about making classic croissants
- Process of making classic croissants, at a glance
- Timeline for making homemade croissants
Croissants are French viennoiserie pastries that are actually from Austria (Vienna). They are made with a yeast leavened dough that has been laminated with butter, in multiple layers.
Why you should try this recipe

- This is a very detailed, step by step recipe and troubleshooting guide.
- I go through each step and what to look for at each stage of the process, so you know if you’re on the right (or wrong) track.
- This is a small batch croissant recipe, to make it easier and more manageable for home bakers.
- This recipe is adapted from a Le Cordon Bleu viennoiserie course recipe. The same course where I perfected my brioche (which is now a very popular recipe on the blog!).
- This is great for intermediate-level bakers, but also for beginners looking for a challenging project.
- Makes the BEST croissant bread pudding and chocolate croissants too.

Read this before you attempt the recipe
You may have beginner’s luck, but don’t expect to get perfect croissants the first time you try it. My first time was a disaster, but I didn’t have any of these tips.
However, there is absolutely NO substitute for practice! The more you make croissants, the more familiar you will be with the process, and have a better feel for the dough.
Don’t rush the process.
If you fail the first time, don’t worry. Even failed croissants taste too damn delicious. I’ve made dozens upon dozens (upon dozens) of batches, and failed multiple times. But never did I chuck the croissants in the trash because they sucked.
I didn’t have a comprehensive guide when I first started, but now that I’ve learned so much, I want to pass it all on to you, my lovely readers!

About US volume measurements (cup measurements) in this recipe
You may notice that I have given ingredient measurements in grams. Including liquids. This is because this recipe requires precision, for perfection.
If you have been following my blog or seen my cookbook, you know that I am a huge advocate for using scales and weights instead of cups to measure ingredients (especially dry ingredients for baking). The consistency and accuracy of it cannot be overstated.
Get a kitchen scale for consistent results
A kitchen scale is inexpensive (you can easily get one for less than $10 at supermarkets or on amazon), and it will last you a LONG time and make all of your baking experiences much simpler and smoother.
However, I have included cup measurements here, somewhat begrudgingly, for anyone who insists upon them. But please note that if you do use cup measurements, there can be great variations in ingredient measurements, so it would be difficult to guarantee the results.
Should I bother making croissants at home?
Have you ever had a fresh croissant before? Chances are, you would never have realized how flaky, buttery, and above all, crispy, a freshly baked croissant is!
The crisp, flaky layers shatter as you bite into a fresh croissant, and that my friends, is oh-so satisfying!
However, freshly baked croissants lose that shattering crispness quickly (in a few hours), so it’s very unlikely that you will ever come across such a crisp, hot out of the oven croissant at supermarkets, or even most bakeries for that matter.
So if you’d like to know what the big deal is about a freshly baked, flaky french croissant, chances are you’ll have to make it yourself! And with this recipe and guide, I’m going to show you how to do just that! 🙂
But before I get into the recipe, first let’s talk about two important factors that are not ingredients in the recipe.

Important factors for making croissants
Temperature
Specifically, the temperatures of the butter block or “beurre de tourrage” or “tourrage“, and the dough or “détrempe“.
Some recipes online will say that both of these need to be very cold, and at the same temperature to make perfect croissants. While it’s crucial that both of these components need to be chilled, they do not HAVE to be at the same temperature.
They need to be cold so that they can remain as separate layers as they are being laminated. If either of these is too warm, the butter can melt into the dough.
Without proper lamination, there will be no flaky layers in your French croissants. And you may end up with something that resembles brioche, instead of croissants.
How cold these ingredients should be depends on the next factor.
Pliability
Both components (butter and dough) need to be pliable for this recipe to work. Cool but pliable.
As long as they are both cool and also pliable, they roll out easily while still maintaining separate layers.


What’s the difference between this and the Le Cordon Bleu recipe?
My first time making croissants was many years ago. I gave up after several failed attempts. Last year, I was lucky enough to take a course on viennoiseries at Le Cordon Bleu, which immensely helped me perfect my croissants!
The recipe for French croissants that I am sharing here is an adaptation of the recipe I learned in that course. I adapted it to suit a home baker, who may not have the resources needed to make a large batch.
The original recipe makes about 12 – 15 croissants, but this small batch version makes about 6 homemade French croissants.
I also increased the amount of butter in the tourrage, as I found that increasing it slightly makes the butter block more manageable.
The sizes of the dough and butter blocks have also been modified from the original recipe to suit the smaller batch size.
This recipe also uses active dry yeast (instead of fresh yeast that was used in the original recipe), because that is more readily available in stores.
Making a small batch vs regular
A small batch of croissants will make 5 – 7 croissants. This may seem like a lot of effort for a few croissants. I’ve also made larger batches that yielded 12 croissants, and let me tell you – that is so hard to manage!
Making a small batch is great because,
- It’s a manageable size for a home baker.
- You can make it completely by hand (don’t need a mixer for the dough).
- You don’t need a large work surface to roll out the dough. With the regular size, I have to constantly let the dough hang over the kitchen counter while working with it, and that’s a hassle.
- Easier to get perfect results.
- Faster to work with. The larger the dough size, the longer it takes to roll out the dough. This can warm up the dough too much. May not be a problem in the winter (especially here in Canada), but in the summer, it’s a nightmare.
- If you DO want to make more than 6, then simply make multiples of this recipe instead. That’s what I do now, and it’s honestly easier and faster than making a large double batch.

Ingredients for perfect French croissants
Butter
This is the most important ingredient for making french croissants. While there is a little butter incorporated into the dough (or detrempe), the bulk of the butter will be in the tourrage. Tourrage is the cold butter block that will be encased in the dough.
ALWAYS use unsalted butter that is cold, and also preferably European butter. Avoid using salted butter, because salted butter has a more brittle texture and won’t give you great results.
European butter is made with milk with a higher fat content, and is creamier than regular butter. Not only is it richer in taste, the higher fat content also plays an important role in making the butter pliable. Pliable butter will easily roll out with the dough, creating beautiful lamination in your dough.
Regular butter from the supermarket has a lower fat content (about 11% or lower). This makes the butter more brittle and break in the dough, rather than being pliable.
What if I can’t find European butter?
Well, then you’re in the same boat as me! I had such a hard time finding European butter here in Ottawa. After much searching, I finally found two brands. It was a European-style butter, made in Canada, with 82 – 84% butterfat milk.
It doesn’t have as high of a fat content as I would have liked (only 12% fat content), but it did help with the pliability.
But don’t worry, even if you can’t find European-style butter, you can certainly still make croissants with regular butter, though it might be harder.
The reason why the cheaper, regular butter is brittle is because it has higher water content (and low fat content). This extra water needs to be absorbed to help make it a little more pliable, when making perfect French croissants. To do this, you’d need to mix the butter with 10% of flour in weight. This is done by mixing the flour with room temperature, softened butter, and then spreading it into the block shape.
The results aren’t always 100%, but this trick does produce better results than with regular, cheaper butter.
Flour
I use all purpose flour (aka plain flour). This has about 11% protein content. You can also use bread flour that has a higher protein content. I have used both and they both work well in this recipe. AP flour is more readily available though.
Yeast
For this recipe (and like all my bread recipes) I use active dry yeast. If you have instant yeast, you can use that instead.
The usual rule of thumb is that you use about 25% less instant yeast (by weight), than active dry yeast. Although some sources recommend a 1:1 substitution. Just bear in mind that if you do use instant yeast, it is more active than active dry yeast, and proofing times may be shorter.
Also, if you use active dry yeast (as I have), you will be activating it first. But if you use instant yeast, then you can add it straight into the ingredients, and start kneading right away.
Water + milk
I use a combination of water and milk here, but you can use all milk if you prefer. I also like to use 3% (full fat) or 2% milk in my baking, but you are welcome to use any kind of milk you have at home.
Sugar + honey
While the original recipe called for malt syrup instead of honey, you can use any inverted sugar source available in your kitchen – honey, malt syrup, corn syrup, maple or golden syrup. Yeast feeds on inverted sugar much faster, and that is why a little of this is added to the yeast to help activate it.
Can I just use all sugar instead of honey?
Yes! You can use all sugar (5 g + 20 g).

How to make French croissants (step by step overview)
Making the detrempe
This is the dough that will be encasing the tourrage (butter block). This dough is meant to be a lean dough. Which means the dough isn’t enriched with lots of butter and eggs, and is smooth. Similar to a pain au lait.
Unlike other types of bread dough, you don’t need to knead this for too long. That is because the folding and rolling of the dough when making French croissants, is going to keep developing the gluten.
Since we are making a small batch of croissants here, you can totally make the detrempe by hand. It’s not that hard. However, if you choose to make a double batch, then I recommend using a stand mixer fitted with the dough hook attachment, for kneading.
Making the detrempe is easy
- First, activate the yeast by dissolving it in the warm liquid and inverted sugar mixture, and let it “come alive”.
- Next, add the sugar, and melted and cooled butter.
- Followed by the flour, and finally the salt.
- Mix the dough to from a scraggly, rough looking dough – this lets the flour hydrate.
- Knead it for about 3 – 5 minutes until nice and smooth.
If you don’t want to knead by hand, then you can also use a stand mixer.


The dough will need to proof next. While it’s proofing, you can get the butter block ready.
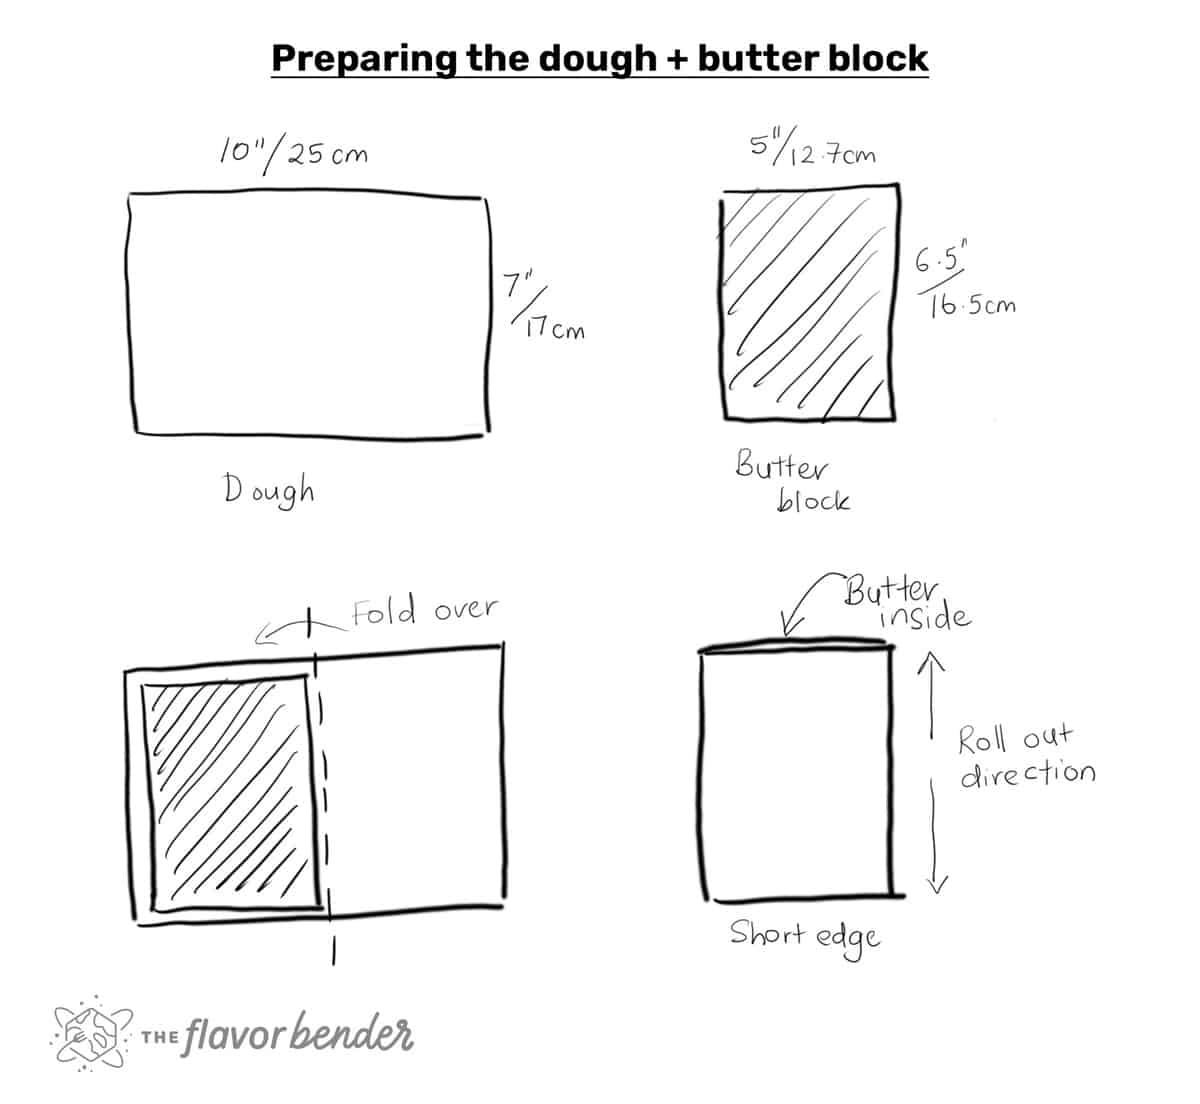
Once proofed, shape the dough into a rectangle (7 x 10 inches), then wrap it and freeze for a few hours, or overnight.
The dough needs to be very cold, but pliable. I usually freeze it overnight, and then let it thaw until it’s the right consistency the following day. DO NOT place it in the fridge as the dough will keep proofing in the fridge and the yeast will remain active.


Making the butter block
I used European style butter in this recipe, because it gives me the best results.
You can shape your butter block into two different shapes. A butter square, or a butter rectangle. Here, I make a butter rectangle.
To shape the butter, you can either cut the butter into slices and then fit them in the pre-cut parchment paper, OR you can use a heavy rolling pin and mold the butter until it’s pliable and thin enough to fit in the pre-cut parchment paper.
With both methods, you will be enclosing the shaped butter in the parchment paper and then roll it into a block that is 5 x 6.5 inches, and has an even thickness.
Enclosing the block in parchment paper helps maintain the shape of the butter, and roll it to an even thickness. You can also use wax paper if you like.
Keep this butter block in the fridge until completely hardened. This can take a few hours. However, since I like to freeze the dough overnight, I keep the butter in the fridge overnight too.
Tips to remember when enclosing the butter in parchment paper
Remove the dough from the freezer and allow it to thaw just enough so that it’s nice and pliable. The temperature of the dough should still be around 40° – 50° F / 4° – 10° C. Make sure the dimensions are 7 x 10.5 inches.
When the dough is pliable, remove the butter from the fridge. The butter should be around the same temperature, BUT it won’t be pliable. So, it’s important to hit the butter with a heavy rolling pin to make it pliable. When you do this, take care not to crack or break the butter, but it should leave a mark.
Then use the rolling pin again to even out the thickness of the butter, and shape the butter into a smooth rectangle that is about 5 x 6.5 inches (half the size of the detrempe), while still on the parchment paper. This makes it easier to place the butter on the detrempe, and move it around if needed.
The butter should also be around 40° – 50° F / 4° – 10° C. But what’s more important is that it’s cold AND pliable.
Don’t flour the surface of the detrempe, because the flour will make it harder for the butter block to stick to the detrempe.
Use your hand to gently tap the butter block on the detrempe to help “seal” it to the dough surface. Make sure the butter is not peeking out of the dough.


Roll out and fold the dough
Here we will be rolling out and folding the dough twice to create 25 dough and butter layers. Folding the dough is how you laminate it to create the beautiful, flaky layers. These layers are important for a French croissant! To prevent the dough from sticking, make sure you lightly flour your work surface.
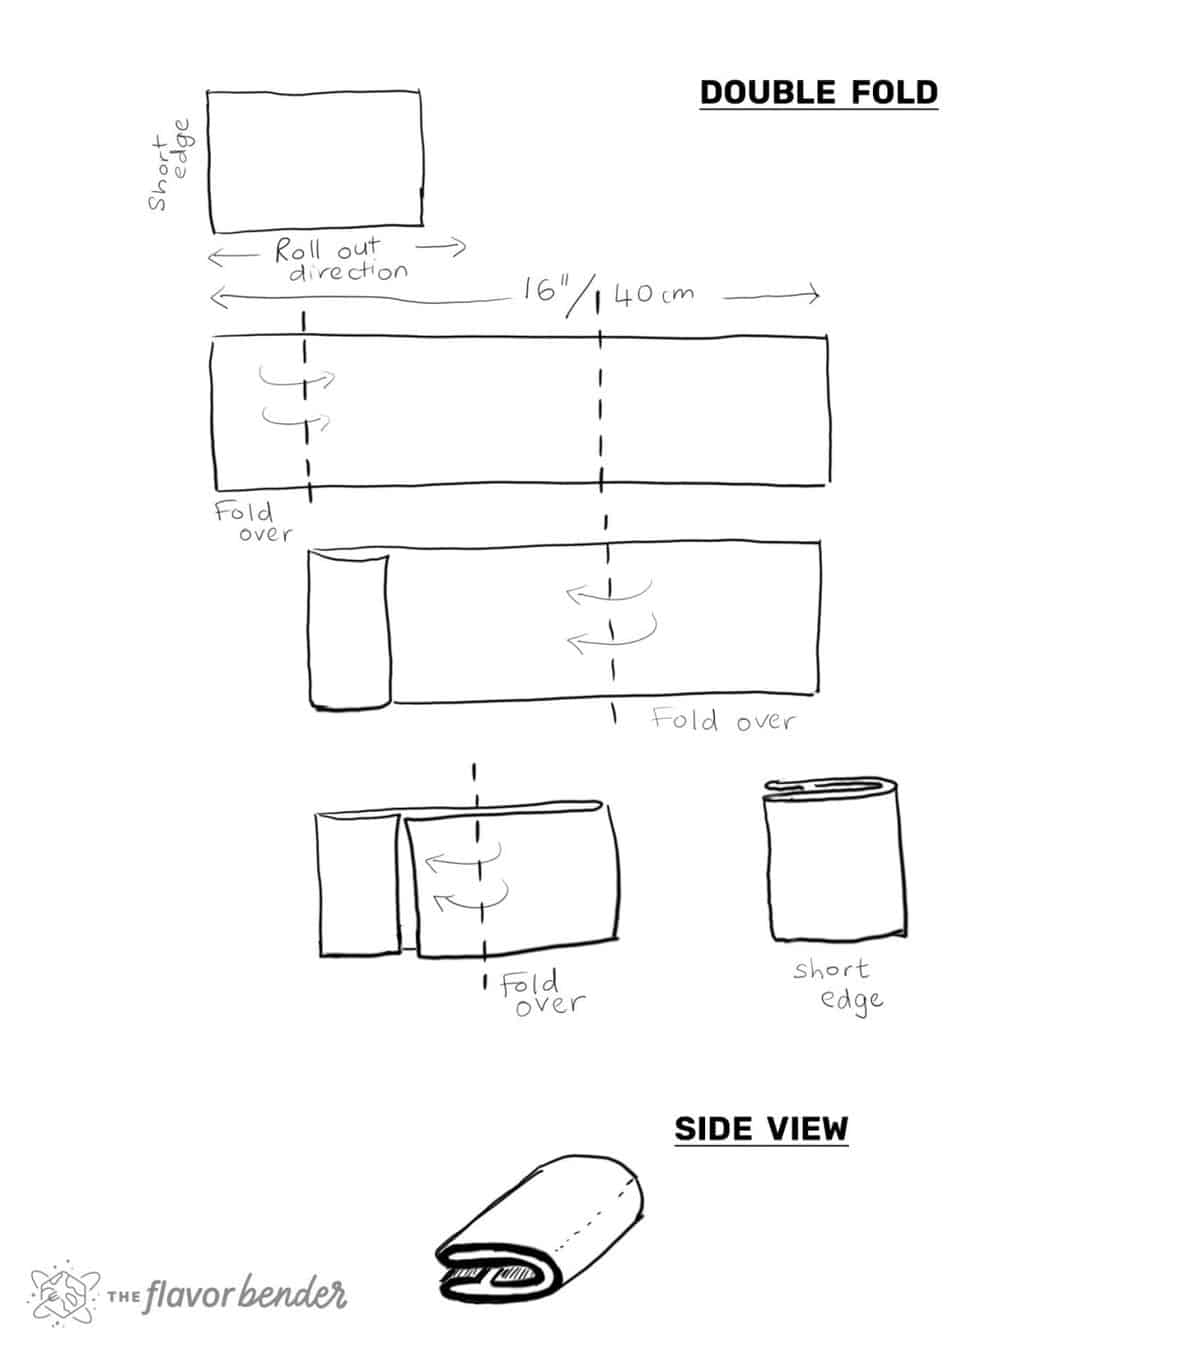
The first fold will be a double fold that will create 9 dough and butter layers.
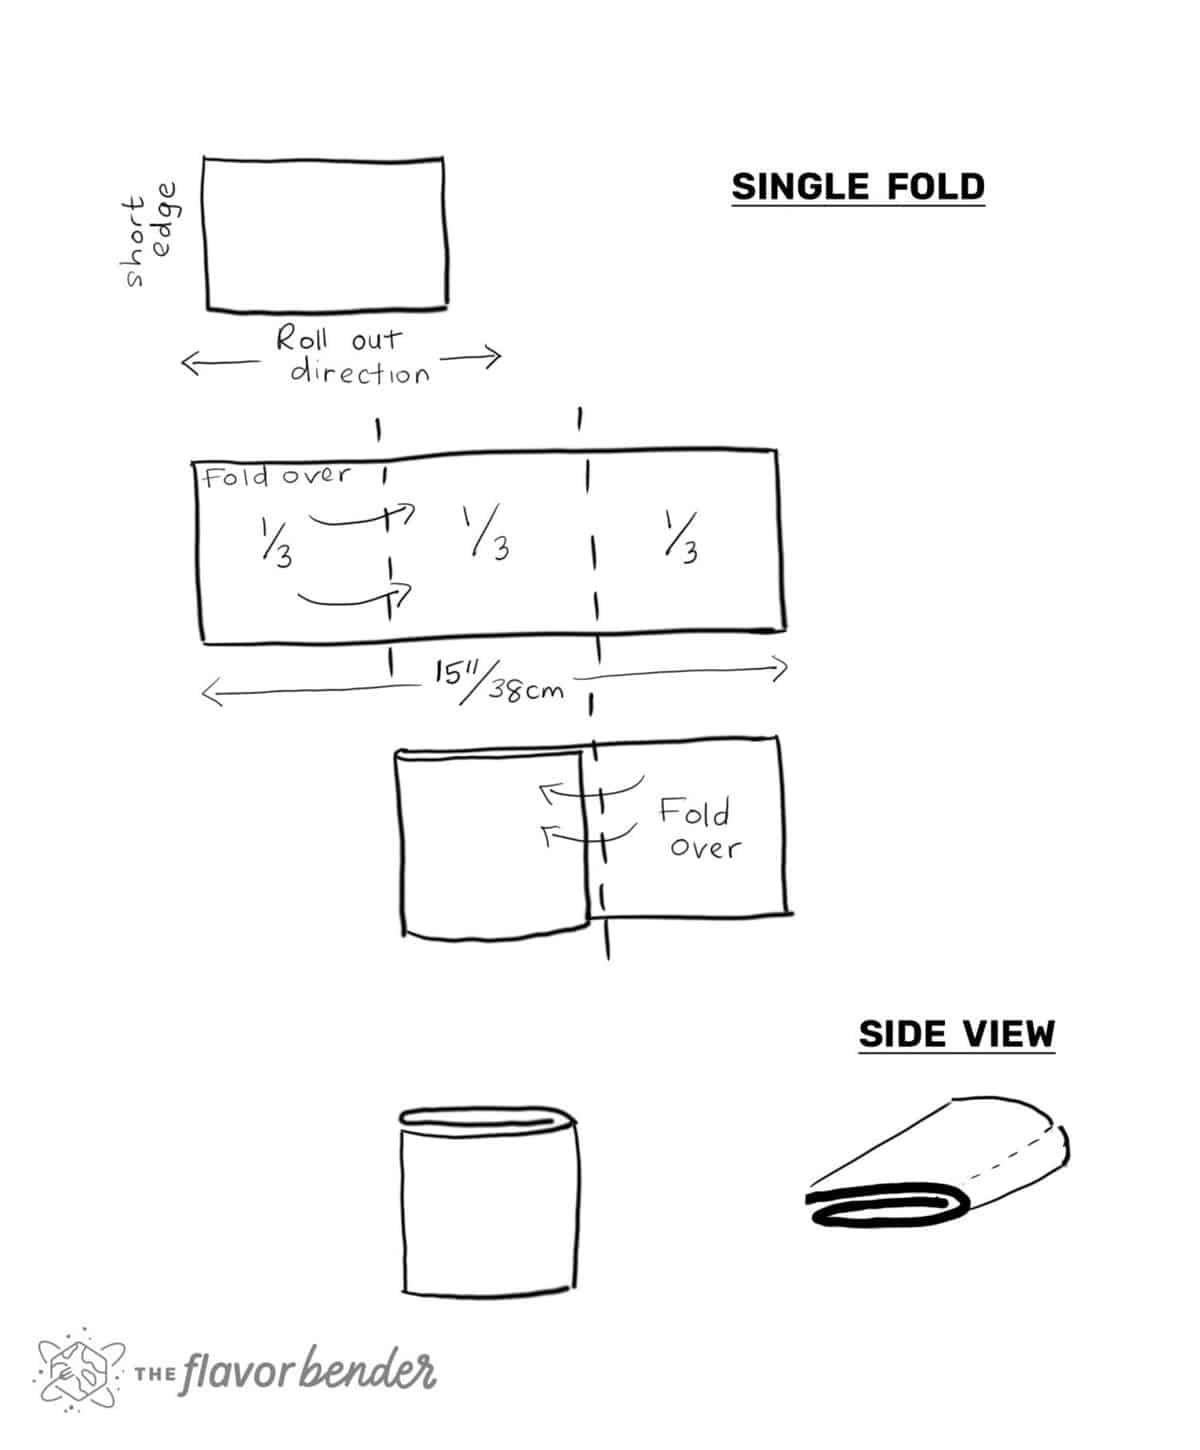
The second fold will be a single fold that will increase the layers to 25.
When you’re rolling out the dough and folding it, it’s very important that the dough is always chilled. It’s also important that the dough rests for at least 30 minutes between rolling out stages.


How to do a double fold
A double fold makes 4 layers of the dough.
From one edge, fold approximately ⅙ – ⅛ th of the dough inward. So in this case, from a 16 inch (40 cm) dough, fold about 2 -3 inches (5 – 7 cm) inward.
Then bring the other edge of the dough to meet the folded edge. Then, fold this entire folded dough in half again like a book. You have now created 4 layers of the dough. Each layer is 3 layers of dough + butter. Resulting in 9 separate layers of alternating butter and dough (12 layers overall).


How to do a single fold
Single fold makes 3 layers of the dough.
This fold is more straight-forward. The rolled dough is essentially folded into thirds.
So for this dough, once it’s rolled out to about 15 inches (38 cm), fold in about 5 inches (12.7 cm) towards the center. Then fold the other edge of the dough over the folded portion. You have now basically stacked the dough three times, and created 3 layers.
Each layer has 9 separate layers of dough and butter from the previous double fold, and now put together with the single fold, it creates 25 separate and alternating dough and butter layers (27 layers overall).

Why do you cut the corners of the dough?
In the recipe, I talk about making cuts at the corners/edges of the folded dough to “release the tension”. When you fold the dough over, the gluten at the folded corners develop more tension.
Then when you roll it out, these corners resist stretching (resulting in more rounded corners). So the cuts help maintain the rectangle shape when you roll out the dough.

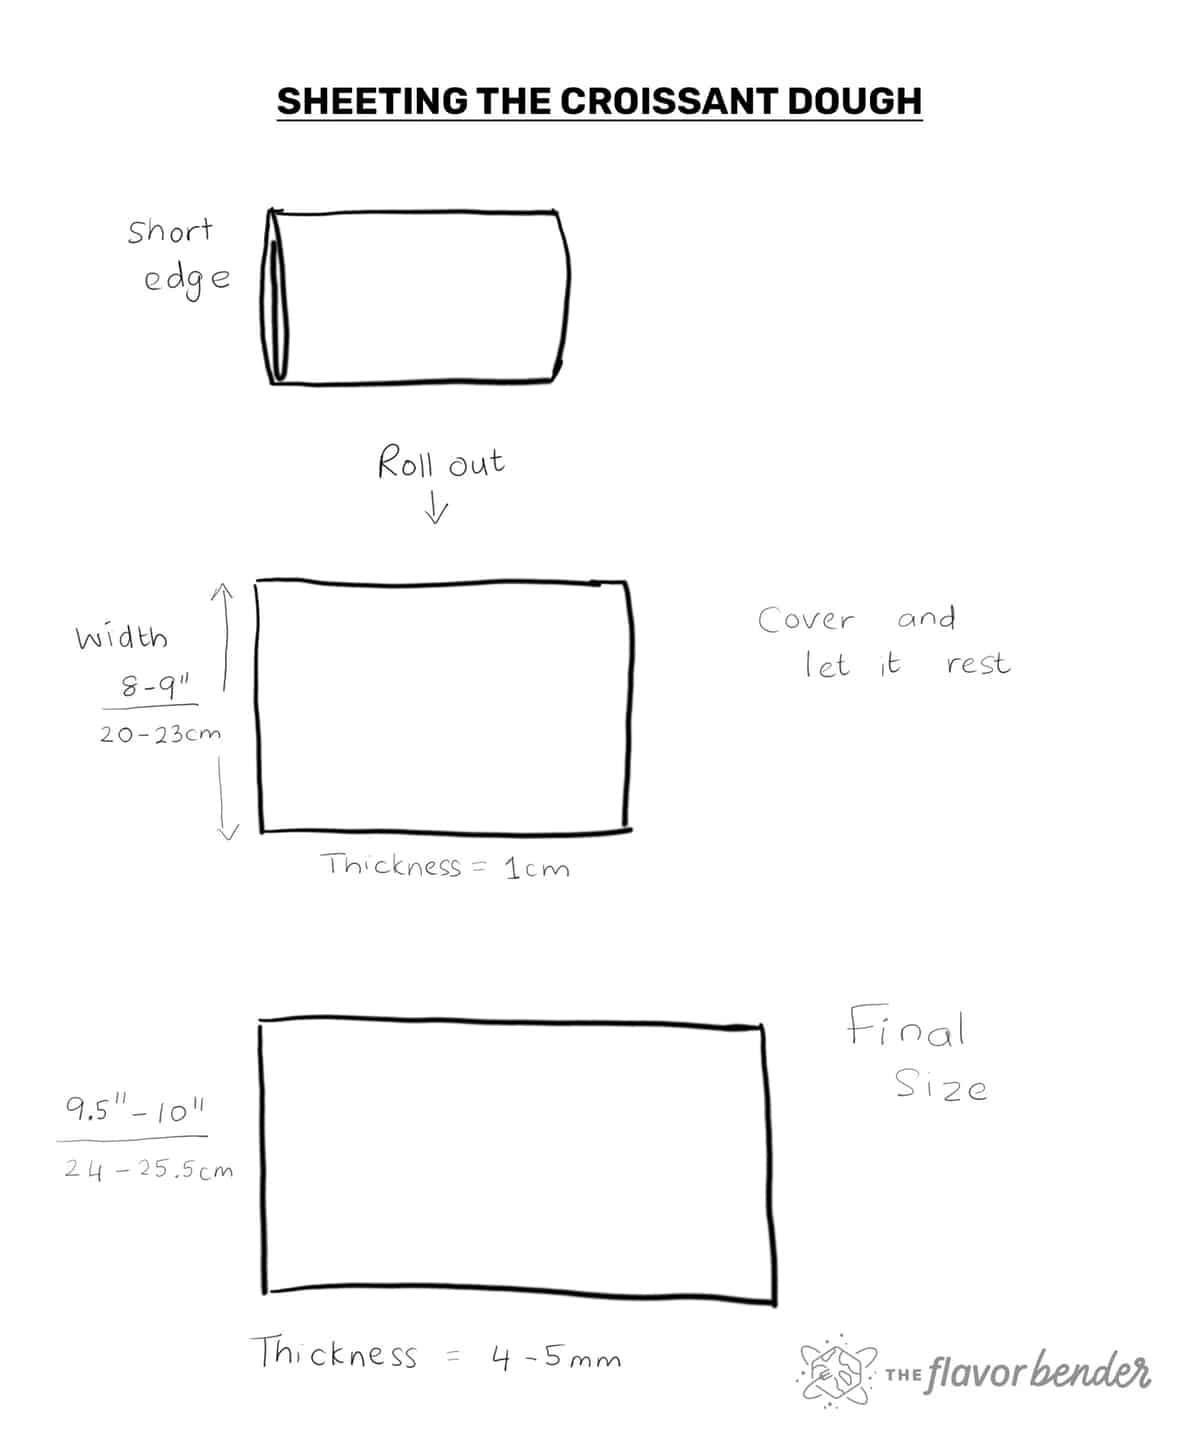
Final roll out or sheeting the croissant dough
The recommendation here is to split this process into two parts. Here’s why.
The dough to make french croissants, needs to be about 0.4 – 0.5 cm thick, which is pretty thin. And as you roll the dough out to get to that stage, it is going to start to resist. This is because the dough has been overworked and the gluten is springing back.
So the process is broken into two steps, where you first roll the dough out to about 1 cm in thickness. Let it rest so that the gluten can relax, and then roll it out the rest of the way to the desired shape and thickness.
Resting the dough is VERY important because if you try to “force” the dough while rolling it out, the butter can incorporate into the dough, and you will lose the characteristics flakiness and crispness of croissants.


Cutting and shaping French croissants
This is the final stage of working with the dough.
Once the dough is sheeted, it’s time to cut it. Here are some tips to help you cut and shape the dough properly to get perfect homemade french croissants.
Before trimming or cutting the rolled out dough, gently pick it up to loosen it from the kitchen counter top/work surface, and put it back on the counter again. This allows the dough to return to its normal size, preventing distortion when cutting it.
Make the marks BEFORE you cut the dough. I also lightly mark the lines I have to cut through. Either use a pizza cutter, or a long sharp chef’s knife to cut the dough.
If you use a knife, DO NOT DRAG the knife along the dough, as this will pull and destroy the layers you have created. Cut the dough by pressing the knife straight down.
When you roll the dough into croissant shapes, make sure that you don’t roll it too tightly, or too loosely. The spiral should be tight, without being taut.
When these croissants have been rolled up, I do not shape them into a crescent shape. This is because I don’t want to stretch the dough base too much so that I retain the perfectly laminated layers.
Without a wider base, there’s really no reason to form the croissant into a crescent shape.


Proofing and baking
Make sure you keep enough space between the croissants on the baking tray. I only bake 6 croissants per half sheet pan.
Make sure the tip of the croissant (i.e. the tip of the croissant triangle) is placed UNDER the croissant when you’re putting them on the baking tray / baking sheet. This prevents the croissants from unraveling during baking.


Then loosely cover them with plastic wrap. I also like to place another half sheet pan on top, so that a nice, warm space is created inside the two half sheet pans. This will be better for proofing, but not crucial.
Proof the croissants in a warm place that doesn’t go above 85°F / 29°C. If it’s too warm, the butter layers will melt.
Personally, the ideal temperature in my experience is about 77°F / 25°C. It can take 2 – 4 hours to proof depending on the ambient temperature – about 3 hours in the winter, and just under 2 hours in the summer, for me. So check on the croissants from time to time to make sure.

How to tell the croissants are ready to be baked
When the croissants have proofed properly, they would have doubled in size, and look nice and puffy. Plus, if you give the baking tray a little shake, the croissants will wobble like jell-o.
If they jiggle like jell-o, while still keeping it’s shape, then they are ready to be baked. Then you know they are ready.


Egg wash
Brush them on top with an egg wash. Usually an egg wash is 1 egg + egg yolk, but since we’re only making 6 croissants, you can use just 1 yolk + 2 tbsp water/cream/milk.
This is mixed until completely smooth, and then very carefully brushed on top of the croissants with a soft pastry brush. PLEASE be careful when brushing the croissants because they are very delicate at this stage!

Baking the croissants
Preheat the oven for at least 30 minutes before baking the croissants.
I like to bake the croissants in my conventional oven at 375°F / 190°C for about 30 minutes, until the croissants are puffed up and a beautiful, golden brown in color. You can also bake them at about 400°F / 205°C for about 7 minutes, and then reduce temp. to 350°F / 180°C and bake for a further 15 – 20 minutes.
When the croissants are done, resist the temptation to rip into ’em immediately! Easier said than done, I know.
But these babies are still fragile while hot, so let them cool down at least a little bit to allow the croissant structure to set. If they came out perfect, you can expect incredibly crispy, flaky layers in your croissant, with a glossy look on the surface.
And then when you cut into a croissants, you’ll be greeted with a beautiful, honeycomb crumb.
Congratulations! You just made glorious croissants, and it’s time to go ahead and enjoy the fruits pastries of your labor.

Frequently asked questions about making classic croissants
Why don’t my homemade croissants have any layers?
The butter either melted into the dough during the croissant making process, or the butter wasn’t evenly rolled out (likely because it broke) inside the dough, ruining the lamination.
Why is my butter coming through the croissant dough?
If the butter block was too cold when rolling out the dough, the butter can be too brittle and break through the surface of the dough. This can ruin the lamination of the croissants. Use butter with a higher butterfat content, and make sure it’s cold but pliable.
Why does my croissant not have a honey comb structure inside?
This can also happen if the butter was brittle and broke inside the dough. It can also happen if the butter was too soft and got absorbed by the dough. Another reason would be if the croissants were under-proofed.
Why is the inside of my croissant look like bread?
The same reasons as above.
Why is there a pool of butter under my croissants?
If there’s a pool of butter AFTER proofing the croissants, that’s because they were proofed in an environment that was too warm. This causes the butter between the layers to melt.
If there’s a pool of butter AFTER the croissants were baked, then this is usually because the croissants were under-proofed before baking.
Can I use a butter substitute?
Unfortunately, no. Vegan butter substitutes are not as creamy, and can be very brittle. Which wouldn’t work for croissants.
Can I use bread flour?
I have used both, and have gotten good result with both. Some recipes note that AP flour is the best, while others say bread flour is the best. Honestly, I feel like they both work just as well. You can even use 50% AP Flour and 50% Bread flour too.
My croissant dough isn’t rolling out well. It keeps shrinking when I try to roll it out.
Stop. Right away. Do not force your dough to roll out, if it doesn’t want to. This can cause the butter to be pushed into the dough and result in bread-like croissants.
If this happens, wrap the dough and put it back in the fridge for at least 30 minutes to let the gluten relax. Then go back to rolling it out again. It should be easier now.

Process of making classic croissants, at a glance
Here is the list of steps for making croissants. Please note that I did not include any refrigeration / freezing steps here.
- Make the dough (detrempe), proof and shape into 7 x 10.5 inches rectangle (18 x 27 cm).
- Make the butter block / tourrage, shape into 5 x 6.5 inches (13 x 16.5 cm).
- Encase the butter in the dough.
- Roll out to a length of 16 inches (40 cm).
- First fold (double fold).
- Turn 90° (so that the short side is closest to you).
- Roll out to a length of 15 inches (38 cm).
- Second fold (single fold).
- Turn 90°
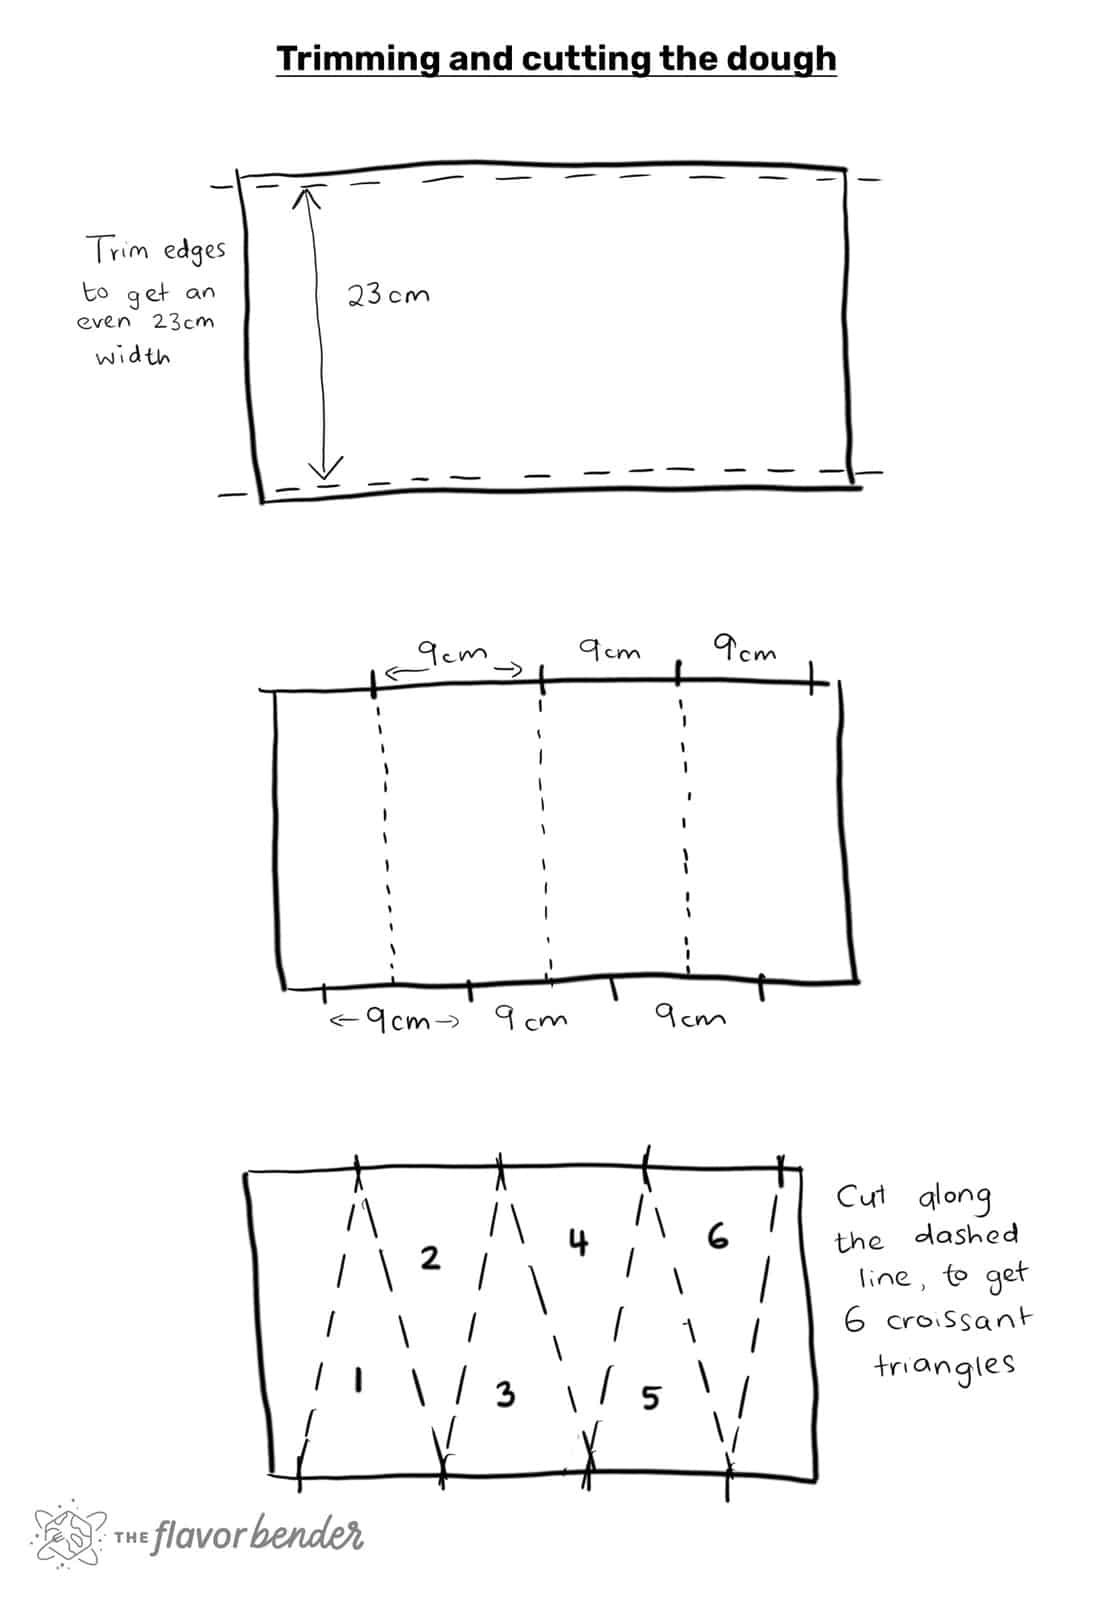
- Sheeting the dough – first stage. Roll out to 1 cm thick (width of 8 inches / 20 cm).
- Sheeting the dough – second stage. Roll out further to 5 mm in thickness (width of 9.5 – 10 inches / 24 – 25 cm).
- Trim the dough along the length of it.
- Mark 3.5 inch (9 cm) marks along one long edge.
- Then on the opposite edge, make marks centered between the first set of marks.
- Connect the marks on opposite edges to cut triangles.
- Shape croissants.
- Proof, apply egg wash, and bake.

Timeline for making homemade croissants
I prefer making these over the course of 3 days. There’s very little active time, and it’s mostly a lot of waiting, between stages. If you really wanted to, you can make these in one or two days – but I wouldn’t recommend that for a beginner.
Day one – afternoon / evening
Make the dough, and let it proof for about 1 hour. Then deflate it, shape it, and keep in the freezer (wrapped).
While the dough is proofing, shape the butter block (tourrage), wrap it, and keep in the fridge.
Day two – morning
Remove the dough from the freezer and let it defrost, until it’s pliable but still cold.
Remove the butter block from the fridge and hit it with a rolling pin until it’s pliable, while still being cold.
Enclose the butter in the dough. With the short side facing you, roll the dough out for the first time, and then do a double fold. Wrap and let it rest in the fridge for at least 30 minutes (60 minutes if the dough softened too much).
Again with the short side facing you, roll out the dough and do a single fold. Wrap and let it rest in the fridge for at least 30 minutes (60 minutes if the dough was too soft).
Turn the dough 90 degrees again, and roll it out until you have a dough that is about 1 cm thick and about 9 inches wide. If the dough resists even a little bit, wrap and put it back in the fridge for at least 30 minutes again.
Next, wrap the dough and store in the fridge overnight.
Day 3 – early morning
Roll the dough out to a thickness of 0.5 cm, with a width of about 9.5 – 10 inches.
Cut the dough to croissant shapes. Roll up the cut dough into croissants and place them on baking trays.
Let them proof until doubled in size.
Preheat oven at least 30 minutes before baking. Brush the croissants with an egg wash and bake in preheated oven until the croissants are done.
However, if you have room in your fridge to keep an undisturbed half sheet pan, then follow the timeline below for Day 2 and Day 3.
Day 2
On day 2, after you let the dough rest for another 30 – 60 minutes, roll it out until 1/2 cm thick. Then cut the dough and shape the croissants as well.
Place the croissants on a baking tray, and wrap it REALLY well with plastic wrap, without crushing the croissants. You don’t want the croissants to be exposed to air because they will dry out.
Let the croissants rest in the fridge overnight. It’s important that NOTHING can fall onto the croissants while they in the fridge.
Day 3
Remove the croissants from the fridge and let them come to room temperature, and then proof in a warm place until doubled in size.
Preheat oven as recommended and bake the egg washed croissants in the oven until they are done.
This method cuts down on active time on the third day, but you have to make sure you have enough room in the fridge to store the shaped croissants.

If you liked this recipe, then you may also like
Recipe

Homemade French Croissants (Small Batch)
US based cup, teaspoon, tablespoon measurements. Weight measurements are recommended for accurate results whenever available.
Common Measurement ConversionsVideo
Equipment:
- 1 large parchment paper, enough to cover a 5 x 6.5 inch block (1st parchment paper for the butter block)
- 1 large parchment paper, about 14 x 10 inches, folded in half to form a 7 x 10 inch paper (2nd parchment paper for the dough)
- Plastic wrap
- Heavy rolling pin
- 1 quarter sheet pan
- 1 half sheet pan
- A ruler with cm and inch markings. I like to use a heavy steel ruler with clean, precise edges.
- A sharp paring knife
- A sharp knife or pizza cutter
- Pastry brush (preferably one large, one small)
Ingredients:
Détrempe
- 85 g milk (⅓ cup) lukewarm
- 60 g water (¼ cup) lukewarm
- 6 g active dry yeast (about 2 tsp)
- 5 g honey (1 tsp) malt syrup, OR use sugar if you have neither
- 25 g butter (1 ½ tbsp) melted and cooled
- 20 g white sugar (generous 1 ½ tbsp)
- 250 g AP flour (2 cups, spoon and leveled)
- 5 g salt (about 1 tsp)
Tourrage
- 140 g butter (10 tbsp)
Egg wash – whisk these ingredients until very smooth
- 1 egg yolk
- 2 tbsp milk and/or cream
Instructions:
Détrempe
- Dissolve the honey in the milk in a mixing bowl, and then whisk in the yeast. Set aside for the yeast to activate for about 10 – 20 minutes.85 g milk (⅓ cup), 5 g honey (1 tsp), 6 g active dry yeast (about 2 tsp)
- Add the rest of the ingredients into the bowl in the order listed in the ingredients list. Stir with a spatula or spoon to mix it into a scraggly dough.60 g water (¼ cup), 25 g butter (1 ½ tbsp), 20 g white sugar (generous 1 ½ tbsp), 250 g AP flour (2 cups, spoon and leveled), 5 g salt (about 1 tsp)
- Using your hand, knead the dough for about 1 – 2 minutes until a scraggly dough is formed.
- Take the dough out of the bowl and knead it on a work surface until smooth – about 4 minutes. You shouldn’t have to put too much effort into kneading here because it isn’t a very stiff dough. Place the dough back in the mixing bowl and cover with plastic wrap.
- Keep the bowl in a warm place, and proof until at least doubled in size (this can take about 1 hour).
- After the first proof, turn the dough out onto a lightly floured surface and flatten it to knock out the air. Transfer the dough onto the second (larger) parchment paper and shape it into a rectangle. Fold the other half of the parchment paper over the dough, forming a 7 x 10 inch case. Use a rolling pin to roll out the dough to fit the 7 x 10 inch rectangle. (It doesn’t have to fill the 7 x 10 inch rectangle perfectly, just as closely as possible).
- Cover the parchment paper encased dough well in plastic wrap, and place it in a quarter sheet pan. Freeze for at least a few hours, or overnight.
Tourrage (butter block)
- Slice the cold butter into thin slices.140 g butter (10 tbsp)
- Arrange them on the 1st parchment paper (the smaller one), within the 5 x 6.5 inch marked rectangle (see picture in the post). Fold the parchment paper over to enclose the butter.
- Using a rolling pin, firmly hit the butter to make it more pliable. Then, using the rolling pin, roll out/spread the butter inside the parchment paper.
- Make sure to roll the butter out into the corners, but also keep the butter evenly thick.
- Transfer this butter block into the fridge until completely hardened (or overnight).
Enclosing the butter (click here to see the image)
- IMPORTANT – when laminating the butter and dough, it’s REALLY crucial that they both have similar pliability and are cold. If my dough is frozen solid, I keep it at room temp. for about 30 minutes to let it soften slightly, before starting the lamination process.
- The butter block is removed from the fridge just before lamination, but made pliable by knocking a rolling pin against it repeatedly. It should remain cold.
- Remove the parchment paper from the dough and place it on an un-floured (or very lightly floured) work surface. If it’s not quite a 7 x 10 inch rectangle, roll it out to the correct size, making sure it’s still evenly thick.
- Unwrap the parchment paper from the butter block, but keep the butter still attached to the parchment paper.
- Place the butter block on one half of the dough. There should be a very small border around the butter block and it should still have the parchment paper on top. Once the butter is correctly in place, pat it onto the dough to let it “bind” to the dough. Carefully peel off the parchment paper.
- Fold the dough over the butter, end to end, completely enclosing the butter. Press the edges to seal the butter inside the dough. Pat the dough again to help the butter “bind” to the dough.
- The dough should still be very cold. If it isn’t, wrap it and put it back in the fridge for about 30 minutes.
First lamination – double fold (click here to see image)
- Generously flour your work surface and dough. Place the dough on the work surface and using the rolling pin, gently press, along the length of the dough, to make sure the butter is pliable.
- While maintaining the 5 inch (12.7 cm) width (short end), roll out the dough to a length of approximately 16 inches (40 cm).
- Use flour as needed to make sure the dough doesn’t stick to the counter, and use your hands to keep the width even and straight. (You can also gently lift the dough as you roll to make sure it isn’t sticking to the countertop).
- Work quickly to keep the dough and butter cold. If the butter softens too much, return the dough to the fridge or freezer.
- Brush off excess flour on the work surface using a large pastry brush. Trim just a little piece of dough along the edges, to make the width straight.
- Fold in about 1/8th of the dough towards the middle (about 2 – 3 inches). Bring the other end to meet the folded end. Make sure the two ends are as close together as possible with no gaps. Using a paring knife, make small cuts at the four corners of the folds to release the tension (4 cuts; please see pictures in the post).
- Brush off excess flour on the surface of the dough. Now, fold the dough in half. Firmly tap the dough to keep the shape. Again, make cuts at the corners of the fold (2 cuts).
- Wrap the dough with plastic wrap and refrigerate for at least 30 minutes (60 minutes is even better).
Second lamination – single fold (click here to see the image)
- Generously flour the work surface and place the dough on it. Gently press into the dough with a rolling pin along the length of it to make sure the butter inside is pliable.
- Keeping the short end as the width (4 inches / 10 cm), roll out the dough to 15 inches (38 cm). As you roll out the dough, make sure the final width is kept to about 5 inches. Also make sure the dough isn’t sticking to the work surface, and the width is straight and even.
- Brush off excess flour from the surface of the dough using a pastry brush.
- Fold in ⅓ of the dough towards the center (about 5 inches / 12.7 cm). As before, cut the corners of the fold with a paring knife to release tension.
- Brush off excess flour again, and fold the other edge of the dough OVER the first fold. Cut the folded corners with a paring knife to release tension.
- Wrap the dough in plastic wrap and refrigerate for another 30 minutes (preferably 60 minutes).
Sheeting the dough (click here to see the image)
- Place the dough on a well-floured surface – the edge where you can see all the folds should be facing you.
- Gently press the dough with a rolling pin along the length of it to make the dough and butter pliable.
- Roll out the dough to about a 1 cm thickness (with an 8 – 9 inch width at the edge facing you).
- Wrap the dough and refrigerate for about 30 – 45 minutes to allow the gluten to rest.
- Roll out the rested dough to about a 4 – 5 mm thickness. Use flour to make sure the dough doesn’t stick to the surface.
- I like to keep a width of about 9.5 – 10 inches (23 – 24 cm) and roll it out to a 4 – 5 mm thickness. Again, make sure the dough isn’t sticking to the work surface BEFORE you starting cutting the dough in the next step.
- If, at any point, the dough becomes too soft or starts to shrink, wrap it and return it to the fridge for at least 30 minutes.
Cutting the dough (click here to see the image)
- Cut a very thin strip along the long edges of the dough to have a width of 9 inches / 23 cm. Make sure the edges are straight and even. Use a pizza cutter or a sharp knife. Avoid dragging the knife along the dough as you cut it, as this can distort the dough. Simply press the knife or pizza cutter straight down to cut.
- Along one of the long edges, make 3.5 inch / 9 cm markings. Then make 9 cm markings on the opposite edge as well, BUT these markings will be halfway between the markings along the first edge.
- Use the ruler and a small sharp knife to connect the markings on the two sides with straight lines.
- Using the marked lines as a guide, cut the dough with a pizza cutter or a sharp, long knife. You should end up with about 6 triangles, and a leftover piece.
Rolling up the croissant + proofing
- Brush off excess flour from both sides of the dough triangle and keep it on the work surface.
- Make a 1 cm cut at the mid point along the base of the triangle. Roll up the base, while gently pulling at the two corners to make the base slightly wider. (The cut that was made along the middle of the base helps with this.)
- Once you have rolled up the base once, then you can roll up the croissant the rest of the way more easily. Make sure the tip of the triangle is properly centered the whole way.
- Also make sure not to roll out the croissant too tightly or too loosely.
- Place the rolled up croissant dough on the lined half sheet baking pan (6 on a tray), while making sure the tip of the croissant triangle is placed under the croissant. Gently press on the croissant to seal the tip at the bottom into the dough (take care not to squash the croissant!).
- Cover with plastic wrap, and another half sheet pan on top. Make sure there's plenty of space within the baking pans so that proofed croissants don’t stick to the half sheet pan on top.
- Proof the croissants (somewhere that is about 25°C / 77°F) until doubled in size. The time can vary depending on the weather. I proof mine inside an oven with just the light turned on, and it still takes me between 2 – 3 hours.
- The croissants have proofed if they have doubled in size, look very pillowy, and will jiggle a little when you give the sheet pan a shake.
- Preheat the oven to 375°F /190°C, at least 30 minutes before baking the croissants.
Baking the croissants
- Mix the egg yolk and milk together to form the egg wash.1 egg yolk, 2 tbsp milk and/or cream
- Brush with an egg wash (use a soft, small pastry brush, because the croissants are very delicate at this stage). Bake at 375°F / 190°C (conventional oven) for about 20 – 30 minutes until golden brown. Turn the tray once halfway through the baking time, if needed.
- Remove from the oven and let them cool for a few minutes before transferring the croissants onto a cooling wire rack. Then let them cool down further to allow the insides to set (otherwise the croissants will be too soft).
Recipe Notes
Recipe notes
- There will be some leftover scraps after cutting the croissants. I like to make an additional “misshapen” croissant, OR add a few pieces of chocolate inside and make a pain au chocolat. You can also cut and freeze the leftover scraps for later and use that to make monkey bread.
- If the dough gets too soft at any point, wrap it and put it back in the fridge to chill.
- If the dough resists when you’re rolling it out, wrap it and put it back in the fridge to rest.
- If you’re doubling the recipe, simply make TWO portions of this recipe. This is far more manageable than doubling everything and making dough and butter blocks that are twice as big.
- You can also make pain au chocolat (chocolate croissants) once you’ve made these!
Nutrition Information:
“This website provides approximate nutrition information for convenience and as a courtesy only. Nutrition data is gathered primarily from the USDA Food Composition Database, whenever available, or otherwise other online calculators.”


Leave a Reply