

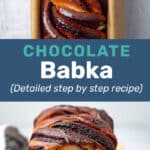
Chocolate Babka is one of my favorites things to bake during the holidays! It’s rich and buttery, with every bite delivering cozy and comforting and chocolatey deliciousness. Having made and perfected babka for years, I’m going to show you how to make PERFECT chocolate babka with a step by step recipe, and a troubleshooting guide.
This perfect chocolate babka is made with a soft, buttery and rich dough, with swirls of fudgy chocolate filling! You can also make cinnamon babka for a different flavor variation.

This chocolate babka recipe has been tweaked and perfected over years, with tender loving care. And here, I’m sharing all my detailed tips on how to make the most amazing babka.
Why I love this chocolate babka recipe
- Made with a soft, rich and buttery bread dough (similar to brioche bread or Hawaiian rolls).
- With an intensely fudgy chocolate swirl filling.
- A cross between a cake and bread (enriched dough bread).
- A foolproof recipe with step by step tips and details!
- Perfect for gift-giving.
- Super versatile! You can add all kinds of different fillings (like this cinnamon babka).
- You could even turn stale babka into brunch deliciousness by making brioche French toast with it.

Equipment you’ll need
As with most bread recipes, equipment is crucial. Since this is an enriched bread recipe with a filling, the equipment that you use will make your job easier, and ensure the best results! After all, you’re here to get the best chocolate babka recipe that is foolproof! So let me share the tools of the trade that will guarantee those results.
Stand mixer
A stand mixer is pretty important to knead the dough. It just makes your life that much easier. The dough is soft and sticky, and hard to knead by hand. It’s important to knead the dough enough to develop gluten, and the stand mixer will do that job for you.
A kitchen scale
If you’ve been following me for a while, you know that I am a huge proponent of using a kitchen scale, especially for baking. Volume measurements are very unreliable, and can and will vary each time you make this recipe. Measuring dry ingredients like flour with a cup is very error-prone, depending on how you fill the cup with flour. While some variation in flour amounts is OK, know that it’ll have an impact on how soft your bread will be.
So, PLEASE invest in an inexpensive kitchen scale if you love baking. It’ll wipe away all those tears of frustration in an instant, as if by magic!
Loaf pans
The pan that I use to make chocolate babka (or any babka) is a 9 x 4 x 4 inch loaf pan. The pan is also called a small pullman loaf pan on amazon. Just make sure that you check the measurements of the pan before you purchase it.
This larger and taller pan allows the babka loaf to hold its shape while baking.
Can I make babka in a standard loaf pan?
Absolutely! it’s about making sure that you portion the dough properly.
With this recipe, you can make FOUR chocolate babka loaves, using a standard 8 x 5 x 2.5 inch loaf pan. However, the loaves won’t be as tall. You could maybe try your luck with THREE loaves, but there is a chance that the bread may spill over when baking, especially if the pan is not taller than 2.5 inches.
The baking time will also be less, so you will have to keep an eye on that.
Rolling pin
A rolling pin will be necessary because you will be rolling out chilled dough portions to uniform thickness, before spreading the filling on the dough.
If you don’t have a rolling pin, you can also use a wine bottle that has flat sides (not sloped), or a different glass bottle with flat sides.
Big bowl (for proofing)
The dough will require proofing. I prefer to do a room temperature proof, and a cold proof in the fridge overnight. To allow the dough to proof properly, make sure the bowl has enough room for the dough to at least double in size.
Spatula or bowl scraper
It’s important to use spatulas or bowl scrapers during the mixing process. This will ensure that the dough will knead properly and mix the ingredients uniformly, and develop the gluten better.
I also use my bowl scraper to cut the dough into portions as well.

How to make Chocolate Babka
There are three parts to this chocolate babka recipe. The dough. The filling, and the glaze.
Ingredients for the dough
- Milk
- Active dry yeast (see recipe notes for substitutions)
- Honey
- Sugar
- Eggs
- All purpose flour
- Salt
- Unsalted butter
Ingredients for the chocolate filling
- Semisweet chocolate (bittersweet for a less sweet, deeper flavored filling)
- Sugar
- Cocoa powder (I prefer Callebaut / cacao barry cocoa powder that is a dutched cocoa powder)
- Unsalted butter
- Heavy cream
- Salt
Ingredients for the glaze
- Sugar
- Water


Making the enriched dough
The day before
To make the enriched dough for my chocolate babka recipe, I use eggs and butter to ensure softness and richness. This also makes my babka dough very soft and sticky to work with.
First, measure all the ingredients needed to make the enriched dough. Make sure all the ingredients (especially the butter) are at room temperature.
Start by activating or dissolving the yeast in warm milk first.
Once the yeast is activated, the rest of the ingredients (except the butter) are added and mixed. Knead the dough for about 5 minutes before adding the butter in 4 portions. Knead the butter in well.
Once the butter has been incorporated, knead the dough for a further few minutes until the gluten has formed and the dough is shiny and cohesive, but still very soft. The dough should form a lovely “window pane” when stretched, and the consistency of the dough should feel like a water balloon when it’s in your hands. This can take about 15 – 20 minutes if the dough is kneaded at the correct speed.
Proof the dough at room temperature as this helps with gluten development of the dough. Then, reshape the dough and allow it to proof overnight in the fridge.


Making the chocolate filling
To make the chocolate filling, place the cream, cocoa powder, sugar and salt in a saucepan and bring the mix to a simmer. Make sure to dissolve the cocoa powder and sugar in the process too.
Remove the saucepan from the heat, and add the butter and chocolate into the hot mixture. Whisk until everything is smooth and melted.
Place the chocolate mixture in a shallow container and let it cool down until it’s thick and has a spreadable consistency. This can take a few hours depending on the container and the weather. You can also let it cool in the fridge, but check on it to make sure the chocolate hasn’t hardened too much.
You can make this filling the day before and store it in the fridge, and then reheat it in small increments until it regains the thick spreadable consistency needed to spread on the dough.

Assembling the babka loaf – The next day
Remove the chilled dough from the fridge. The next step is to roll and shape the dough to make the chocolate babka. Make sure the dough is chilled while you work with it. It’s much easier to handle the dough while it’s chilled. If it gets too soft, I pop it in the freezer for a few minutes, so that it’s nice and chilled again.
Roll out the dough portion into a rectangle shape (10 – 11 x 15 – 16 inches), with a somewhat even thickness. Spread the chocolate filling in a thin layer over the surface of the dough, making sure to leave a 1 inch border along one of the long edges. See pictures below.


Next, roll up the dough towards the 1 inch border with no filling, and seal by pinching the edge. The dough is usually too soft for me by this point, so I carefully place the rolled up dough on a baking tray, cover it with plastic wrap, and freeze it for about 20 minutes until the dough becomes firm again.
When the dough is firm again, it’s ready to be shaped. Trim the edges, and cut the tube of dough in half (lengthwise) with a sharp knife. Twist the two pieces of chocolate babka dough together, and tuck it into the prepared loaf pan.


Baking the chocolate babka
Cover and let it proof again. Proofing time will vary greatly depending on the weather and ambient temperature in your kitchen. The babka loaf should at least double in size before it’s ready to be baked. And because of the filling in the loaf, it’s harder to do the indentation test to check for readiness as well. However, the more you make this recipe, the easier it becomes to tell when the loaf is done proofing.
Preheat the oven while the loaf is proofing. Bake the cake in the preheated oven until the loaf is baked through. I use a conventional oven, and the bake time is around 50 minutes.
If the loaf is browning too much, I place a tented foil on top to stop further caramelization.
Once the babka is baked, while it’s still hot, generously brush the whole babka with the simple syrup.

How to store the chocolate babka for later
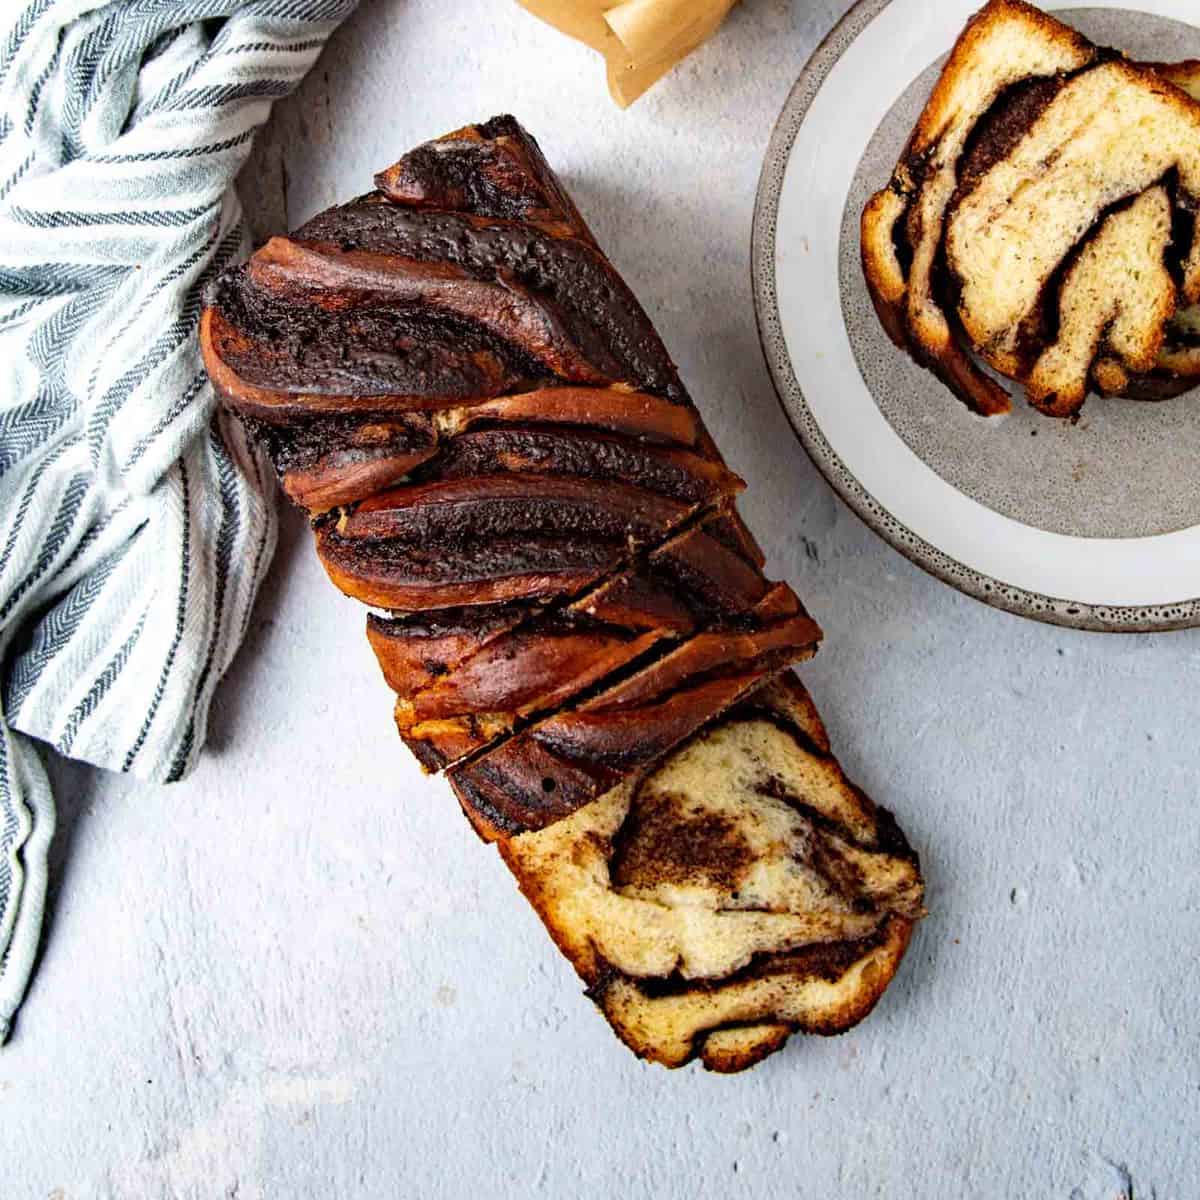
You can serve the babka while it’s still warm. The bread is so soft and rich and buttery, and the chocolate is intensely fudgy! But it’ll be just as good at room temperature too.
This loaf of chocolate babka doesn’t last very long in our house, which is why I always make TWO at a time.
You can keep the loaf in an air-tight container and in the fridge (or a cool, dry area) for about 5 days. However I prefer to store my extra loaf in the freezer. I slice the cooled chocolate babka into thick slices, wrap them well, and place in an air-tight bag / container and freeze for up to 1 month.

Other chocolate babka variations
You can upgrade your chocolate babka with more flavors too! Here are some ideas,
- Chocolate cinnamon babka – Add 1 tbsp ground cinnamon to the chocolate filling. Or see here for my classic cinnamon babka recipe.
- Mocha babka (chocolate and coffee) – Add 1 or 2 tsp instant coffee granules to the chocolate filling.
- Chocolate orange babka (jaffa babka) – Add 2 tsp orange extract or about 2 tbsp finely zested orange peel.
- Spiced chocolate babka – Add a spice mix to the chocolate filling. Spice fillings like pumpkin spice or apple pie spice or my favorite, this chai spice mix.
- Chocolate hazelnut babka – I personally don’t like to use Nutella, so I prefer to spread some chopped hazelnuts with the chocolate spread instead.
- Chocolate peanut butter babka – Add about 1/3 cup of smooth peanut butter to the chocolate filling mix and stir to mix well. Then spread this chocolate peanut butter filling instead.
Tips for perfecting this chocolate babka recipe
- First piece of advice is simple, read the recipe well. It’s long and detailed, but that is so that it’s easy to follow, and will guarantee successful results.
- I recommend using a stand mixer for kneading this dough. Kneading by hand would be too time-consuming and messy (because of the sticky nature of the dough).
- Make sure the ingredients are at room temperature, especially the butter.
- Take your time with kneading the dough. Enriched dough takes time to develop gluten, but it will happen.
- Do not skip the overnight chilling step! It helps to develop flavor, AND it makes the dough easier to handle.
- If at any point, the dough gets too soft and sticky, then place the dough on a baking tray and cover it with plastic wrap and chill in the freezer for a few minutes, until the dough becomes firm.
- Use a 9 x 4 x 4 inch loaf pan. With this pan, you can make TWO loaves.
- If you’re using 8 x 4 x 2.5 inch loaf pans, you will be able to make FOUR smaller loaves. If your loaf pan is higher than 2.5 inches, you’ll get THREE loaves instead of four.
- I use a conventional oven. If you have a convection oven, then you will need to reduce the temperature of the oven by 25 F / 15 C to bake the loaf.
Recipe troubleshooting and commonly asked questions
My dough isn’t coming together
The dough needs to be kneaded further for the gluten to develop. The final kneading process is done at a 5 or 6 speed on a standard kitchen aid mixer. So if you’re going too slow, or if your mixer isn’t kneading efficiently, then it can take longer.
The dough SHOULD be soft and sticky at first, and become soft and tacky afterwards.
I live in a humid, hot climate. Can I still make this recipe?
Yes, you can! BUT you will need to utilize your freezer more often during the shaping stage. The proofing time will also be shorter in a hot climate, so keep an eye on your chocolate babka.
My chocolate babka unraveled while baking
This happens if the dough was too much for the loaf pan that you used. It’s important to have higher sides on the loaf pan to help contain the braided loaf.
Can I use bread flour instead of AP flour?
You can! Since this is an enriched dough, the dough can handle bread flour. The result will be chewier because of the extra gluten / protein in bread flour. I personally prefer the softer texture I get from AP flour.
Can I use a standard loaf pan instead of the pullman loaf pan recommended in the recipe?
You can, but standard loaf pans do not have the height to contain the braided loaf as it bakes. So you can either make 4 smaller loaves, or 3 loaves (this will work if the pan is at least 3 inches in height).
You can also bake the chocolate babka as a free standing braided loaf on a baking tray as well.
Recipe
Chocolate Babka Recipe
US based cup, teaspoon, tablespoon measurements. Weight measurements are recommended for accurate results whenever available.
Common Measurement ConversionsIngredients:
Enriched dough
- 120 mL warm milk ½ cup
- 9 g active dry yeast about 2 ½ tsp
- 10 mL honey about 2 tsp
- 5 large eggs
- 10 mL vanilla
- 100 g granulated white sugar ½ cup
- 575 g AP flour about 4 ⅔ cups (measured by spoon and level method)
- 10 g sea salt finely ground, about 1 ½ tsp
- 226 g unsalted butter very soft and roughly divided into four portions, about 1 cup / 2 sticks
Chocolate filling
- 170 g dark chocolate about 1 cup of chocolate chips. Can be semisweet or bittersweet.
- 100 g white or brown sugar ½ cup
- 30 g cocoa powder I use cacao barry, ¼ cup (measured by spoon and level method)
- 115 g unsalted butter softened, ½ cup
- 120 ml heavy cream ½ cup
- ½ tsp sea salt finely ground
Sugar syrup
- 150 g white sugar ¾ cup
- 150 mL water ½ cup + 2 tbsp
- 1 tsp vanilla optional
Instructions:
Making the dough
- Make the dough the day before.
- Measure out all the ingredients first.
- Add the milk, yeast and honey into the mixing bowl, and gently whisk to combine. Set aside for 10 minutes to allow the yeast to activate.120 mL warm milk, 9 g active dry yeast, 10 mL honey
- Add the eggs, vanilla, sugar, flour and sea salt, and mix to form a scraggly dough.5 large eggs, 10 mL vanilla, 100 g granulated white sugar, 575 g AP flour, 10 g sea salt
- With the dough hook attachment, knead the dough on speed 3 for about 5 minutes. The dough should start to look smooth.
- Roughly divide the butter into 4 portions. Add the first portion of butter, in increments, after the first 5 minutes of kneading. Each butter portion should be mixed in for at least 2 minutes at a time.226 g unsalted butter
- Repeat with the other 3 portions of butter, kneading the dough for about 2 -3 minutes after each addition. Make sure to stop the mixer to scrape down the sides of the bowl (and the bottom if needed) between kneading as well. You will have incorporated all the butter in about 12 – 15 minutes of kneading time.226 g unsalted butter
- Once all the butter is incorporated, scrape down the sides of the bowl (and bottom if needed), and knead the dough for a further 5 – 15 minutes on speed 5 or 6. If you lower the speed, this can take longer, so it’s best to knead until the dough has reached the correct consistency.
- The dough will have been kneaded enough when it can be lifted fairly cleanly off the bottom of the bowl when picked up with the dough hook. It will be very soft and tacky to the touch, but shouldn’t stick to your fingertips. Please note that the dough will still be very soft.
- You can also do the window pane test with the dough to check if enough gluten has developed.
- Flour your work surface lightly, and turn the dough out onto the floured surface. Lightly flour your hands to prevent the dough from sticking to your palms.
- Fold in the edges of the dough towards the middle, and gently press them into the dough to form a smooth ball. Flip the dough over, and then with the heel of your palms, shape the dough to form a tight ball.
- Carefully pick up the dough ball and place it back in the mixer bowl (or another large bowl).
- Let it rise until it has almost doubled in size, in a warm place (72°F), for about 1 hour. It can take longer if your kitchen is colder.
- Turn the dough out onto a lightly floured surface, and press down gently to deflate the dough with your hands. Fold in the edges again as before towards the middle and press them in. Carefully flip the dough over (seam side down now), and tighten the ball of dough to get a smooth taut surface. Transfer the dough into the mixer bowl again.
- Cover and let it chill in the fridge for at least 8 hours, or up to 24 hours. The dough WILL RISE in the fridge, so make sure the bowl is large enough to contain the dough properly.
- The following day, the dough is ready to be used. You will be using the dough while it's chilled, so do not let it come to room temperature before working with it.
The chocolate filling
- This chocolate filling can be made the same day you make the dough, and then chilled overnight. OR it can also be made the day you assemble the babka, but make sure you give the filling enough time to cool down before rolling out the chilled dough. If you chill the filling overnight, then heat it in the microwave in small increments (10 – 30 sec intervals) until you have a thick paste that is spreadable.
- In a saucepan, place the cream, cocoa powder, sugar and salt.100 g white or brown sugar, 30 g cocoa powder, 120 ml heavy cream, ½ tsp sea salt
- Heat over medium / medium high heat, while whisking. Whisk to dissolve the cocoa powder and sugar, until the cream just starts to simmer.
- Remove from the heat, and add the butter and chocolate. Whisk very well until the butter and chocolate have dissolved.115 g unsalted butter, 170 g dark chocolate
- Place the chocolate mixture in a shallow container and let it cool down until it’s thick and spreadable. You can also let it cool in the fridge, but check on it to make sure the chocolate has not hardened.
Assembling the chocolate babka
- Butter and flour TWO 9 x 4 x 4 inch loaf pans. I prefer to butter and line them with parchment paper, but you can do whichever is easier for you. Set aside.
- When the filling is at the correct consistency, remove the chilled dough from the fridge.
- Slightly flatten the dough to remove excess air in the dough.
- Measure the weight of the dough. Evenly divide the dough into TWO portions by weight (to make 2 loaves).
- Return one of the portions back into the bowl, cover, and let it chill in the fridge until you’ve assembled the first portion.
- Place the first portion of the dough on a floured, smooth surface.
- Roll out the dough until it’s a rectangle that is about 10 x 15 inches.
- Spread a layer of the chocolate filling (about ⅓ – ½ of the filling) over the surface of the dough. Make sure to leave a 1 inch border along one of the long edges.
- Roll the dough along the 10 inch side, towards the 1 inch border (so that you end up with a 14+ inch long bread roll).
- Once rolled up, pinch the end into the dough roll to create a seal (see pictures in the post).
- At this stage, the dough can be very soft and sticky and hard to manage. So carefully place the bread roll on a parchment paper-lined baking tray and cover with plastic wrap and freeze for about 20 minutes until the dough is firm. While the dough is firming up in the freezer, you can repeat the whole process with the second dough portion.
- When the dough is firm enough to handle again, remove it from the freezer.
- Trim the two ends of the roll (optional), then slice the roll in half lengthwise.
- Twist the two halves to form a twisted braid (see pictures in the post).
- Carefully place the twisted loaf in the prepared loaf pan, making sure to tuck in the ends.
- Cover the loaf pan with plastic wrap, and let it proof at room temperature for about 1 hour or until it’s about doubled in size. The time for proofing will depend on the ambient temperature in your kitchen. In a cooler place, it could take as long as 3 hours to proof.
- Repeat the cutting and twisting of the babka loaf with the second portion of dough, and let it proof in the second loaf pan.
- While the chocolate babka is proofing, preheat the oven to 325°F / 163°C (conventional oven).
- When the babka has proofed, bake in the preheated oven for about 50 minutes. If the surface is caramelizing too fast, you can tent a foil on the surface to prevent further browning.
- The internal temperature of the dough should reach about 190 – 200°F when it's done baking.
- Remove the pan from the oven, and carefully use a skewer to poke several holes through the loaf from the top.
- While hot, generously brush the babka with the sugar syrup (recipe below) to glaze the top and to allow some of the syrup to be absorbed by the babka as well (optional).
- Let the babka cool down in the loaf pan. Once at room temperature, or only slightly warm, remove the babka loaf from the pan.
- Slice and serve while warm or at room temperature.
Sugar syrup
- Make the sugar syrup while proofing the loaf, or while baking the babka loaf. The syrup can be used warm or hot.
- Add all the ingredients in a saucepan and heat over medium high heat.150 g white sugar, 150 mL water, 1 tsp vanilla
- Stir to dissolve the sugar and bring it to a boil.
- Lower the heat to simmer the sugar syrup for about 5 minutes. Set aside until you're ready to use it.
Recipe Notes
Note about yeast
I prefer to use active dry yeast, and this recipe is designed to use this type of yeast. I use Bob’s Red Mill active dry yeast. You CAN substitute with instant yeast (1:1 substitution by weight), but keep in mind that instant yeast is more active and it can proof much faster. So keep an eye on the dough as it proofs. The bread may also have more oven spring, so the loaf can also be larger. You can also use instant yeast at 75% the amount of active dry yeast to lower the activity level, but you will still need to keep an eye on proofing times.Baking in other loaf pans
If using a standard loaf pan that is 8 x 5 x 2.5 inches, you will have to divide the dough into FOUR portions. The loaves won’t be as tall due to the lack of height in this loaf pan. If you have 8 x 5 inch loaf pans with higher sides (at least 3 inches), then you could make THREE loaves, so divide the dough into three portions instead.Storing the babka loaves for later
Always store the babka in an air-tight container. You can keep it in a cool, dry place for about 4 – 5 days (fridge is fine too). To keep for longer, slice the babka (I prefer thicker slices), and freeze them in an air-tight container or ziploc bag for up to 3 or 4 weeks. To enjoy, allow the bread to thaw out to room temperature, or slightly warm the bread in the microwave.Nutrition Information:
“This website provides approximate nutrition information for convenience and as a courtesy only. Nutrition data is gathered primarily from the USDA Food Composition Database, whenever available, or otherwise other online calculators.”


Leave a Reply