About
My Cookbooks
Work With Me
Contact
  • Facebook
  • Instagram
  • Pinterest
  • X
  • YouTube
The Flavor Bender

Master the Science of Delicious

  • Recipe Index
    • All Recipes
    • Desserts
      • Cakes & Cupcakes
      • Candy & Bite Sizes
      • Chocolate
      • Cookies, Brownies & Bars
      • Frozen Desserts
      • Fruit Desserts
      • Puddings & Custards
      • Dessert drinks
      • No Bake
      • Pastries & Breads
      • Sweet Syrups & Spreads
      • Tarts & Pies
      • Cheesecakes
      • Healthy sweets
    • Breakfasts
      • Tarts, Quiches, & Pies
      • Waffles, Pancakes & Crepes
      • Quick Breads, Scones & Muffins
      • Breakfast Sandwiches
      • Breakfast Pastries
      • Eggs
      • Breakfast & Brunch Drinks
      • Make Ahead Breakfasts
      • Healthy Breakfasts
      • Coffee and Tea drinks
      • Breakfast Smoothies & Juices
      • Breakfast Sides
      • Casseroles
      • Jams & Spreads
    • Courses
      • Main Meals
        • Bread, Sandwiches & Burgers
        • Curries
        • Salads
        • Roasts & BBQ
        • Soups & Stews
        • Casseroles
      • Bread
      • Lunch
      • Beverages
      • Appetizers & Tapas
      • Sides
      • Dips & Condiments
      • Tea Time & Snacks
      • Desserts
      • Meal Prep
      • Cocktails
      • Pet Friendly Recipes
    • Cuisines
      • American
      • European
      • Australasian
      • Sri Lankan
      • East Asian
      • Mexican
      • Middle Eastern
      • South Asian
    • Sri Lankan
      • Main Meals
      • Drinks
      • Desserts
      • Breakfasts
      • Snacks
    • Skill Level
      • Easy
        • Easy Desserts
        • Easy Cooking
        • Easy Breads
        • Easy Breakfasts
        • Easy Dinners
      • Intermediate
        • Intermediate Desserts
        • Intermediate Cooking
        • Intermediate Breads
        • Intermediate Breakfasts
        • Intermediate Dinners
      • Advanced
        • Advanced Desserts
        • Advanced Cooking
    • Recipes by Season
      • Christmas
      • Fall & Winter
      • Halloween
      • Spring & Summer
      • Thanksgiving
      • Valentines Day
    • Recipes by Diet
      • Dairy Free
      • Eggless
      • Gluten Free
      • Paleo
      • Vegan & Vegetarian
    • Recipe Basics
      • Baking Basics
      • Cooking Basics
      • Baking & Cooking 101
  • New? Start Here
  • Measurement Conversions
  • How-To Posts
  • About
  • My Cookbooks
  • Work With Me
  • Contact
The Flavor Bender   ›   Recipes   ›   Delicious Desserts   ›   Cookies and Bar Recipes   ›   The BEST Chocolate Chip Cookies

The BEST Chocolate Chip Cookies

Author:

Dini Kodippili


Jump to Recipe


Updated: 12/15/2019
Total Time50 minutes mins
Quick and Easy Recipes
Cookies and Bar Recipes
BEST Chocolate Chip Cookies - Learn how to make perfect chocolate chip cookies with the most flavor! You can make them your own BEST chocolate chip cookies with all the tips I've shared. #ChocolateChipCookies #EasyChocolateChipCookies #ClassicChocolateChipCookies

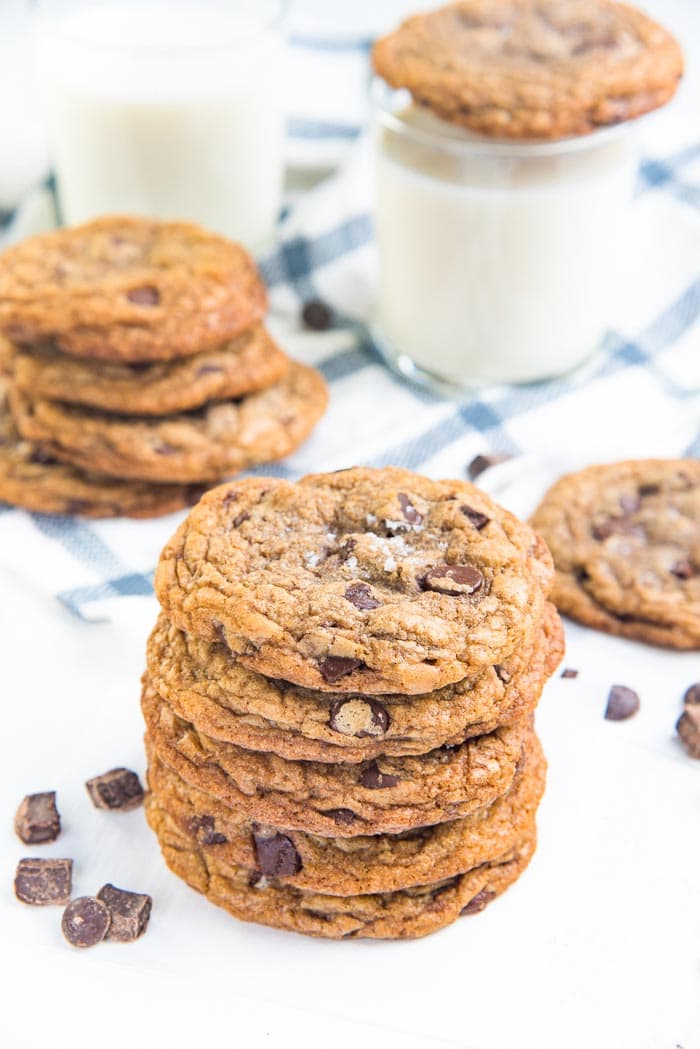
Everyone has their own version of favorite Chocolate Chip Cookies. And with this recipe, I show you how to easily tweak each ingredient to get the BEST flavor and texture profile that YOU love, with your chocolate chip cookies!

These chocolate chip cookies are soft and chewy – just the way I love ’em! For even more chocolate decadence, you can also check out my double chocolate chip cookies recipe.

Stack of chocolate chip cookies with chocolate chips and sea salt flakes on a white table top.

What defines a great chocolate chip cookie?

If baking is a labor of love, then chocolate chips cookies are the ultimate payoff. There’s a reason why classic chocolate chip cookies are one of the most popular cookies and bar recipes in the world! If someone said to me that they didn’t like chocolate chip cookies, I’d snub them. Snub them like a stale cookie. No two ways about it.

Just kidding! Maybe..

But what is it that defines a great chocolate chip cookie recipe? After all, there are dozens and dozens of chocolate chip cookie recipes online. And so many of them claim to be the BEST. So, I went right ahead and did the same.

Overhead view of chocolate chip cookies on a white surface with more chocolate chips sprinkled around them.

The fact though is that, what makes a particular chocolate chip cookie the best for one person, is not the same for another.

Everyone has their own preferences. Even in my home, I LOVE a softer chocolate chip cookie with chewy and crisp edges, while my husband prefers more of the chewy and crisp, and less of the soft.

So given all that, let me just say right off the bat that this right here is the BEST chocolate chip cookies recipe in the world for me! 🙂 And my husband too. Especially him, since he will never stop raving about these! The reason is that these chocolate chip cookies have the best of both worlds – soft AND chewy.

It’s also the best chocolate chip cookie recipe for me because I’ve made these a gazillion times since I was a kid and have tweaked the recipe to a point where I can easily adapt the recipe to suit whatever flavor / texture fancy that we are craving for!

Chocolate chip cookie dough portions placed on a parchment paper lined baking sheet.

I’ve tested variations of my classic chocolate chip cookie recipe (two of my favorite variations are these double chocolate chip cookies and these s’mores cookies!) to find out how to alter the texture and flavor for optimal results. I tested the effect of tweaking each of these ingredients,

  • Butter
  • Chemical leavening agent (baking soda/baking powder)
  • Flour

I opted not to play around with sugar, because I’ve always felt that a balance of both white and brown sugar also gave me a great balance of chewy and crispy texture, and that was non-negotiable for me.

So let’s look at the effects of each of those ingredients.

Chocolate chip cookies made with softened butter vs melted butter

In terms of flavor and texture, there’s no difference. The cookies made with melted butter spread a tad more, but this difference is even less after the dough has been chilled (for a minimum of 1 hour).

Personally though, I prefer making chocolate chip cookies with melted butter, because this gives me the opportunity to do so much more in terms of changing up the flavor. Melted butter can easily be infused with different flavors.

Overhead view of the brown butter, white sugar and dark brown sugar in separate containers.

My favorite ways to infuse more flavor into the butter

  • Making brown butter. This is easily my absolute favorite way of enhancing the flavor of classic chocolate chip cookies. I do the same with this brookies recipe (which is basically a combo of my cocoa brownies and these cookies).
  • Substituting half of the butter with some bacon fat. If you use a nice smoky bacon to render fat, then you end up with a smoky chocolate chip cookie with some amazing umami flavors!
  • Infuse herbs and spices into the butter. This is another great way to elevate the flavor profile of your chocolate chip cookies. I particularly like the combination of rosemary and chocolate.
Brown butter and sugar being mixed in a mixer bowl.
Brown butter and sugar being mixed together.
Brown butter and sugar mixed until creamy to make classic chocolate chip cookies.
Mix the brown butter and sugar until it reaches this creamy stage.

Cookies made with baking soda vs baking powder

A chemical leavener is necessary for chocolate chip cookies. Traditional classic chocolate chip cookies use baking soda, but some other recipes use baking soda as well as baking powder.

Baking soda will give you a more crisp chocolate chip cookie. The cookie will also be flatter, because baking soda doesn’t create the same lift as baking powder.

Baking powder will give you a softer cookie. Baking powder will create more lift and a more cake-like texture which makes the cookie softer. I talk about this in detail in my baking basics article on baking soda vs baking powder.

The combination of both gives you the best of both worlds, and that’s MY favorite version of a chocolate chip cookie. If you prefer chocolate chip cookies that are not too soft, then leave out the baking powder.

Process of making the BEST chocolate Chip Cookies - Eggs added to the chocolate chip cookie dough being made in a glass mixing bowl in the mixer.
Adding eggs to the cookie dough mix.
Chocolate chip cookie dough with the egg mixed in, in a mixer bowl.
Only mix the eggs until just combined.

Cookies made with different flours

I tested the effect of using AP flour vs bread flour to make chocolate chip cookies.

AP flour is predominantly what I’ve used in the past, and will give you the flavor and soft texture profile that you typically associate with chocolate chip cookies.

Bread flour yields a very chewy cookie, so I decided to use a mix of both types of flour, again for the best of both worlds! This is hands down my husband’s favorite, as he much prefers a chewier cookie.

Adding the flour into the cookie dough in the mixer bowl.
Add the flour and stir slowly to combine.
The flour almost mixed in completely with the cookie dough in the mixer bowl.
Mix in the chocolate, while there’s still some flour visible.

Chocolate chips

If you think you’ve added enough chocolate chips to the cookie dough, then add a little more!

For these ultimate chocolate chip cookies, I make sure to use a good quality COUVERTURE chocolate.

A good quality semi-sweet chocolate or bitter-sweet chocolate is best for classic chocolate chip cookies. In Europe and Australasia, semi-sweet and bitter-sweet chocolate are collectively called dark chocolate usually. Use a chocolate with a cocoa content of at least 50%. The higher the cocoa content, the more bitter the chocolate.

I like to use chocolate with 50 – 75% cocoa content for the most perfect chocolate chip cookie, which gives me a great balance of sweetness and a little bitterness. I also prefer to use chocolate chunks over chips, but as long as it’s couverture chocolate, you should be fine.

Adding chocolate chunks and chocolate chips to the cookie dough in a large glass bowl.
Adding chocolate chips to the cookie dough.
Chocolate chip cookie dough mixed and ready to be portioned in a glass mixing bowl.
Chocolate chips mixed evenly in to the cookie dough.

Tips to make the BEST chocolate chip cookies

  • You can use either regular unsalted butter or unsalted brown butter as the first step. Is it worth to take that extra time to brown your butter first for the BEST chocolate chip cookie ever? Well, I think you know the answer. 🙂 But don’t worry, if you don’t have the time, you can use regular melted (and cooled) butter instead.
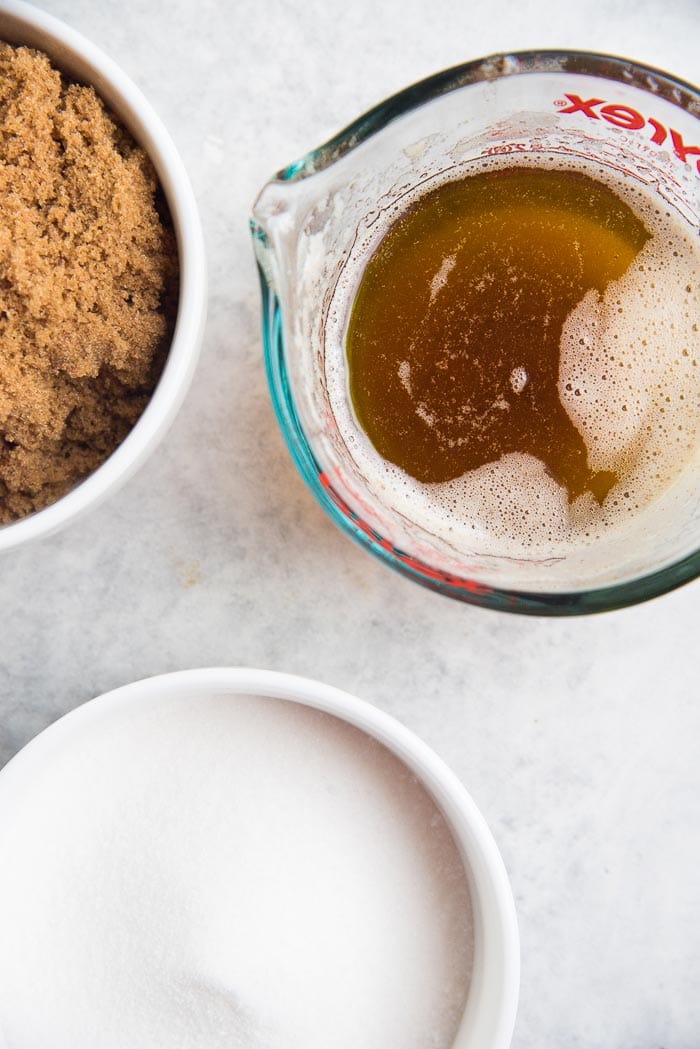
  • A combination of granulated white sugar (for crisp chocolate chip cookies), and dark brown sugar (for soft chocolate chip cookies with great butterscotch flavor) is highly recommended. Regular white sugar has no flavor other than sweetness, but brown sugar is more moist with the added flavor of molasses, and will give you a deeper, richer flavor.
  • Then cream the ingredients together to get a creamy butter + sugar base. But do not over whip to make it airy.
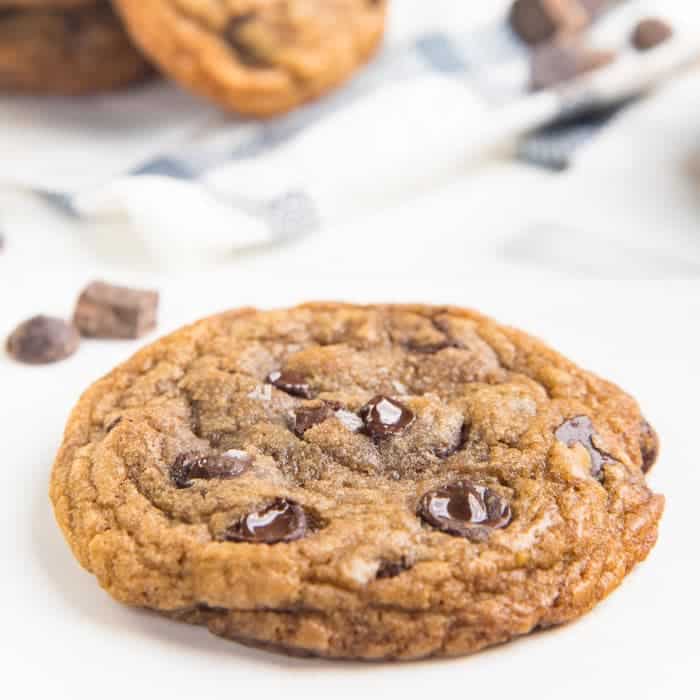
  • I like to add a generous amount of salt (and the vanilla) at this stage too, so that the salt has time to dissolve and season the cookies evenly. DO NOT skip the salt. You can reduce it slightly if you like, but you want to add at least 1/2 tsp of salt to this recipe. It helps balance the sweetness and chocolate flavors. And if you like salted chocolate chip cookies, you can add a little extra salt on top of the cookie dough before it bakes (see pictures in the post).
  • Once you’ve mixed the butter and sugar, it’s time to add the eggs. Use large eggs that are about 2 oz in weight (with shell). If you only have access to small eggs, then WEIGH the eggs first (with shell), and make sure they are at least 4 oz, or slightly more. Mix the dough until the eggs are just mixed through. Adding too much air when mixing in the eggs can interfere with the texture of the baked cookies and cause them to rise too much.
Chocolate chip cookie dough portioned with a cookie scoop and placed close together on a baking tray.
  • Next step is mixing in the flour and chemical leavener together. You can use all AP flour, or a mix of AP and bread flour. Also, you can use both baking soda and baking powder, or just baking soda.
    • AP flour + baking soda + baking powder = softer chocolate chip cookies that are a little chewy at the edges.
    • AP flour + baking soda = More chewy chocolate chip cookies.
    • Bread flour will make the cookies further chewy.
    • My personal favorite is AP flour + bread flour + baking soda + baking powder. This combination produces cookies that have a delightful blend of soft and chewy textures. Irresistible!
  • Next step is the chocolate. I add a very generous amount of chocolate chips to my cookie dough.
  • The final step of course is baking. I HIGHLY recommend that you chill the dough first before baking. At least for 1 hour, or up to overnight, in the fridge. It’s easier to portion the cookie dough on a baking tray first and then chill. This way it’ll chill faster, and it’s easier to store for later too.
  • Then bake the cookies to perfection, and let them cool before devouring! These cookies are best eaten while a little warm, because the chocolate will be gooey and melted inside. But they are just as great at room temp. too.
Chilled cookie dough balls placed on the parchment paper lined baking tray before baking.

How to store unbaked chocolate chip cookies

This chocolate chip cookie recipe makes a total of 21 cookies that are about 4-5 inches in diameter. If you’d like to store the cookies for later, you have three options.

  • Only make 1/2 of a batch.
  • Freeze baked cookies for later.
  • Freeze unbaked cookies for later.

I usually always make a full batch of cookies, and then freeze the unbaked cookies for later. The reason is that baked cookies can go stale pretty fast, and I’d much rather enjoy freshly baked chocolate chip cookies over thawed baked cookies.

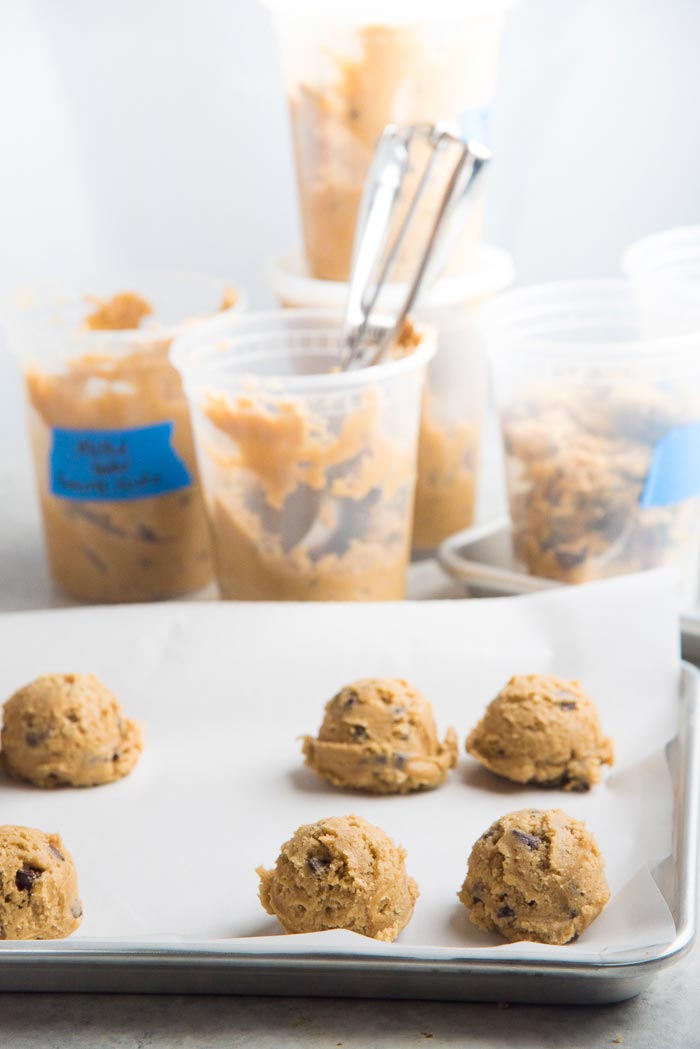
You can portion the cookie dough using a scoop, and store the cookie dough portions in large gallon-size plastic bag in the fridge for up to 3-4 days, or in the freezer for up to 3 months.

Close up of freshly baked, puffed up chocolate chip cookies on parchment paper.
Chocolate chip cookies straight out of the oven. A little puffed up in the center, and the cookie is very soft.
Chocolate chip cookies on a parchment paper lined baking tray, after they have been cooled.
Once the cookie has cooled down, it’ll flatten a bit, and you’ll start seeing more of the characteristic crinkles on the surface.

How to store baked chocolate chip cookies

These cookies can stay fresh at room temp. for up to 3-5 days.

  • Make sure to store the cookies in an air-tight container, at room temperature and NEVER in the fridge.
  • Place a slice of bread OR a few tortillas in the same container along with the cookies, but replace the bread/tortilla every other day. For bread – place 1 slice of bread inside the box. For tortillas – place a tortilla between each layer of chocolate chip cookies in the container.

The reason for bread or tortilla is that their moisture gets absorbed by the cookies, keeping them nice and soft, which prevents them from going stale.

Close up of a single baked and cooled chocolate chip cookie with melted chocolate chips.

Storing cookies in the freezer

  • Layer the chocolate chip cookies in an air-tight container and place parchment paper between each layer of chocolate chip cookies. Then transfer this to the freezer.
  • Then when you’re ready to enjoy the cookies – remove frozen cookies and allow them to soften at room temperature (in a ziploc bag if you can). OR gently reheat the cookie until it’s JUST slightly warm.
Close up of a stack of soft, chewy chocolate chip cookies.

How to maximize your chocolate chip cookie experience!

Maybe it’s because I grew up in New Zealand, but a chocolate chip cookie just isn’t the same for me if it’s not eaten warm! (Nothing like a warm Cookie Time Monster Cookie with gooey chunks of chocolate inside!).

So I ALWAYS warm them in the microwave for about 5-10 seconds first. This makes the cookies a little softer, with lots of melted chocolate chunks inside. That’s my type of chocolate chip cookie.

A chocolate chip cookie on a white surface, with more chocolate chip cookies and chocolate chunks in the background.

Quick recap on how to make the best chocolate chip cookies

Choose your butter 

  • Melted and cooled unsalted butter OR
  • For a nice flavor kick – unsalted browned butter (cooled)

Add your sugar (along with salt and vanilla)

  • Half dark brown sugar (gives the cookies a soft texture and a butterscotch flavor)
  • Half white sugar (for crisp edges)
  • Add the sugar to the melted butter and stir to mix it in. You want to allow the sugar to melt in the butter, and form a smooth emulsified mix, WITHOUT adding any air into the mixture.

Add the eggs

  • Make sure not to over-beat the eggs

Choose your preferred flour mix for your cookies

  • Use all AP flour if that’s what you have at home. The chocolate chip cookies will be less chewy this way.
  • For more chewy chocolate chip cookies, substitute some of the AP flour with bread flour.

Mix leaveners with the flour

  • Use baking soda only, if you like your chocolate chip cookies a little flatter and more chewy.
  • Use baking soda + baking powder, if you prefer cookies that are softer with a cake-like texture in the middle.

I like adding baking powder to mine, along with bread flour to get a nice balance of chewy and soft texture in my chocolate chip cookies.

The dough will come together to form a soft dough at this stage. If it’s not forming a dough, that means the dough is too warm (likely, the butter was not cooled down enough). The dough should be between 70 – 75°F.

Add the dark chocolate to the dough (between 50%- 75% cocoa content)

  • Use store bought chocolate chips for easy to make chocolate chip cookies. However, the melting factor won’t be the same.
  • For best results, use couverture chocolate, a mix of chips and chunks.
  • For even better results, use couverture chocolate blocks that you cut into chunks yourself. (Like Lindt!)

You can also use milk chocolate or white chocolate if you prefer a sweeter chocolate chip cookie.

Let the dough rest for a few minutes (In the fridge if necessary), then portion them out into cookie dough balls, using a 3 tbsp cookie scoop. I like to keep the cookie scoops just as they are with a rough surface, so that the cookies have a beautiful crackly surface when they bake. DO NOT make round smooth balls.

If you don’t have a cookie scoop, you can make smooth round balls (20 of them), and then break the cookie balls in half, turn the two halves around and stick the soft sides back together – so that the rough broken sides are facing out. This way you also get nice and crackly surfaces on your baked chocolate chip cookies.

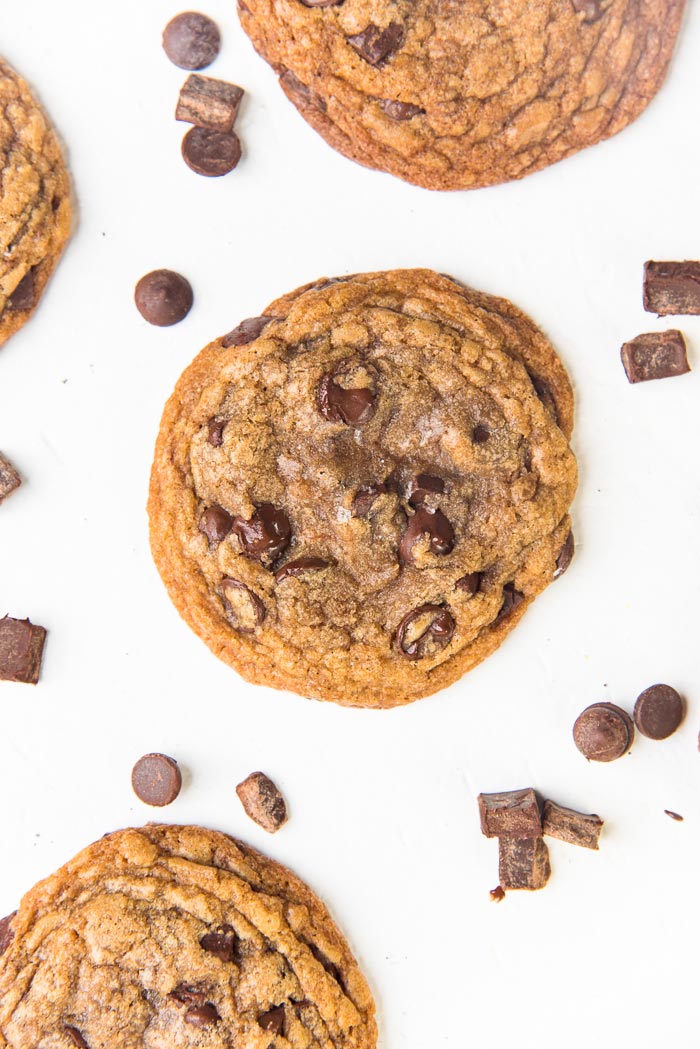
Make it extra gooey. To get the pools of chocolate on top of the cookies, stud the cookie dough portions with chopped chocolate! Use a good quality semi sweet chocolate bar and chop it into pieces. Stud the dough portions (while they are still soft) with these pieces of chocolate and chocolate shavings, and as it bakes it will melt ON TOP of the cookies leaving pools of gorgeous chocolate!

Salt em! Just before baking, sprinkle the cookies with a little finishing salt. I like using Maldon Seal salt flakes, but you can use your favorite finishing salt too. DO NOT use table salt or fine salt.

Chocolate chip cookie halves stacked on top of each other to show the melted gooey chocolate inside.

Recipe

Chocolate chip cookie with melted chocolate chips and sea salt flakes on a white table top.
5 from 27 votes

The Best Chocolate Chip Cookies

Author: Dini Kodippili
Yield: 18 – 20 cookies
Cuisine: American
BEST Chocolate Chip Cookies - Learn how to make perfect chocolate chip cookies with the most flavor! You can make them your own BEST chocolate chip cookies with all the tips I've shared. #ChocolateChipCookies #EasyChocolateChipCookies #ClassicChocolateChipCookies

 Difficulty: 

Easy
Learn how to make the absolute best soft and chewy chocolate chip cookies with nutty, toasty brown butter, PLUS how to easily customize the recipe to your liking! 
Please note that the butter requires time to cool down, and there's a recommended chilling time of at least 1 hour. 

US based cup, teaspoon, tablespoon measurements. Weight‌ ‌measurements‌ ‌are‌ ‌recommended‌ ‌for‌ ‌accurate‌ ‌results whenever available.

Common Measurement Conversions
Prep: 30 minutes mins
Cook: 20 minutes mins
Chilling / Resting time: 2 hours hrs
Total Time: 50 minutes mins
Print Recipe Rate SaveSaved!
Makes: 20 cookies

Ingredients:
 

  • 226 g unsalted butter 2 sticks
  • 200 g dark brown sugar 1 cup
  • 150 g granulated white sugar ¾ cup
  • 1 tsp sea salt use only ½ tsp if you prefer using less salt
  • 1 tbsp vanilla extract
  • 2 eggs Straight from the fridge
  • 1 tsp baking soda
  • ½ tsp baking powder add baking powder if you prefer softer cookies
  • 335 g AP flour 2 ⅔ cups + 2 tbsp, measured by spoon and level method
  • OR
  • 127 g bread flour + 208 g AP flour 1 cup bread flour + 1 ⅔ cup AP flour
  • 340 g chopped semi-sweet chocolate OR chocolate chunks OR chocolate chips or a mix of all. 12 oz
  • Extra sea salt flakes like maldon or sea salt granules

Instructions:
 

  • MAKING BROWN BUTTER – Place the butter in a saucepan over medium heat. (Optional – cut the butter into tablespoon-sized pieces to melt it more easily). Melt the butter in the saucepan while stirring occasionally. When it has melted and starts to bubble, use a spatula to stir the butter mixture more frequently to prevent milk solids from sticking to the bottom of the pan.
  • Keep heating the butter until it stops bubbling. After a while, you will see white milk solids at the bottom of the pan. Keep cooking the butter and stirring, until the milk solids turn a dark golden brown. This will happen very quickly once the milk solids turn light brown in color first, so keep stirring and don’t leave the pan unattended at this stage, to prevent the butter from burning.
  • As soon as the milk solids turn dark golden brown, pour the butter into a measuring cup and let it cool to room temperature (ideally about 75°F)
  • When the butter is at room temp., add just enough water to make 1 cup of liquid. (About 1 – 2 tbsp)
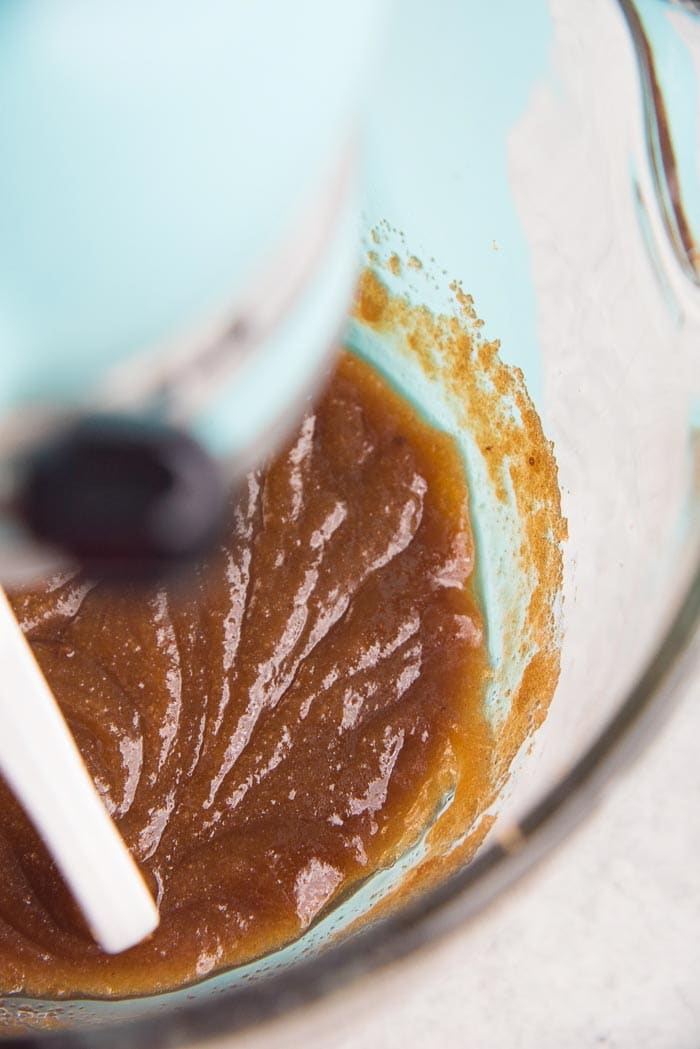
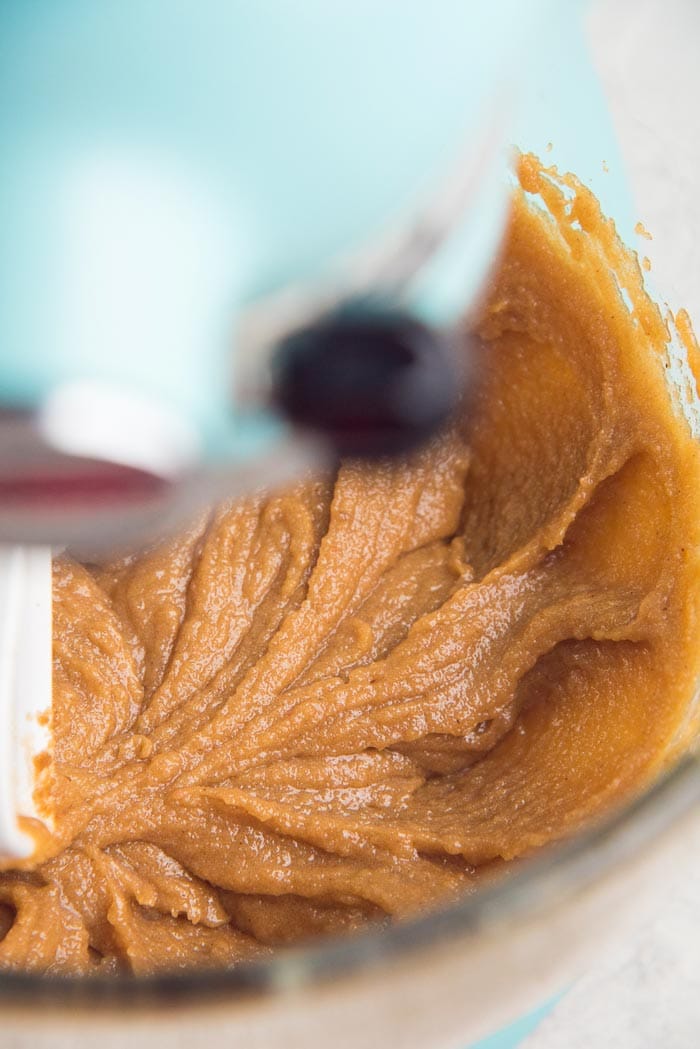
  • Place the melted and cooled butter and water into the bowl of your stand mixer (or a large bowl for a hand-held mixer). Add both sugars, salt and vanilla, and mix on low – medium speed ONLY until the butter-sugar mix becomes emulsified (creamy), smooth, and just a shade lighter (see pictures in post).
    It's important NOT TO INCORPORATE air into the mix, and to have the mixture smooth. DO NOT MIX TOO MUCH, if you add more air, the cookie dough will end up needing more flour and have a cakey texture.
  • If the butter and sugar do not form an emulsified mix, DO NOT WORRY. Adding the eggs will help.
  • Add the eggs, and mix until just mixed through. The cold eggs will bring the temperature of the dough down as well.
  • In a separate bowl – sift the flour, baking soda and baking powder together. Add the flour in two additions while the mixer is on the lowest speed. This is to prevent the flour from flying everywhere and making a mess, and also to prevent the dough from being over-mixed. The flour doesn’t have to be completely mixed in before adding more.
  • When most of the flour is mixed in, add about ⅔ of the chocolate chunks/chips, and mix on low speed until the chocolate chunks/chips are mixed through. Remove the bowl from the mixer, and let the mixture rest for at least 15 minutes, ideally 30 minutes, covered. IF the dough is too soft, let the dough rest in the fridge for a few minutes to firm up a little.
  • Using a 3 tbsp cookie scoop, portion the cookie dough out onto a parchment paper-lined half sheet pan. Don't worry about spacing, as this is just to chill the cookie dough first.
  • Place the remaining chocolate chips / chunks on top of each of the cookie portions. These will give the pools of chocolate as the cookies bake. It's easier for the chocolate to stick to the dough while it's still soft.
  • If you want to bake the cookies right away, you can do so (but the cookies will spread thinner). But for best results, I'd recommend covering the sheet pan with plastic wrap and letting the cookie dough chill overnight (or at least 1 hour).
Baking the cookies
  • Preheat oven to 350°F. Line a half sheet pan with parchment paper. Place 6 cookie dough portions on a half sheet pan, evenly spaced apart.
  • Optional – sprinkle some sea salt flakes on top. (I use Maldon salt flakes)
  • Bake in the oven for 12 – 15 minutes. I like to bake the cookies for 14 minutes for a chewier texture, and 12 minutes for a softer result.
  • Remove the cookies from the oven and let them cool for about 10 – 15 minutes. Then carefully place the cookies on a wire rack and let them cool down more.
  • The cookies are best eaten a little warm, but can be enjoyed at room temperature too.
  • To warm the cookies, put the cookie on a microwavable plate and microwave for 10 – 15 seconds. The cookie should be a touch soft, and just slightly warm (NOT hot!).
To store the cookies
  • Unbaked cookie dough – place the chilled cookie dough portions in a gallon-sized ziploc bag or an air-tight container, and store in the freezer. When you’re ready to enjoy them, remove portions of cookie dough from the freezer and bake for 14 – 17 minutes at 350°F.
  • Baked cookies – place some tortillas on the bottom of an air-tight container. Place one layer of chocolate chip cookies on top, followed by another tortilla, and then another cookie layer. Repeat with all the cookies (using 2 – 3 tortillas). Replace the tortillas every 2 days or so (when the tortillas look like they are drying out). Cookies can be kept up to 5 days at room temperature. For best results, warm the cookies in the microwave a little before eating.

Nutrition Information:

Serving: 1cookie Calories: 309kcal (15%) Carbohydrates: 40g (13%) Protein: 4g (8%) Fat: 15g (23%) Saturated Fat: 11g (69%) Cholesterol: 41mg (14%) Sodium: 200mg (9%) Potassium: 158mg (5%) Fiber: 1g (4%) Sugar: 23g (26%) Vitamin A: 306IU (6%) Vitamin C: 1mg (1%) Calcium: 72mg (7%) Iron: 1mg (6%)

“This website provides approximate nutrition information for convenience and as a courtesy only. Nutrition data is gathered primarily from the USDA Food Composition Database, whenever available, or otherwise other online calculators.”

Tag me on Instagram!I love seeing what you’ve made! Tag me on Instagram at @TheFlavorBender or leave me a comment & rating below.
Dini Kodippili Avatar

About

Dini Kodippili

Dini Kodippili is a professional food writer, recipe developer, food photographer, cookbook author, and baker. Dini has been featured on HuffPost, Cosmopolitan, Forbes, Delish, Food & Wine and more. Learn More

I love hearing from you! Submit your question or recipe review here.

4.97 from 27 votes (2 ratings without comment)

Leave a Reply Cancel reply

Your email address will not be published. Required fields are marked *

Made this? Rate this recipe:


This site uses Akismet to reduce spam. Learn how your comment data is processed.

80 responses

  1. Robin
    July 13, 2020

    5 stars
    I am a terrible baker and I am especially bad at cookies. But thanks to your carefully and thoughtfully written recipe, I’ve finally made a batch of chocolate chip cookies that look and taste exactly how they are supposed to! Thank you so much!!!

    Reply
    1. Dini
      July 14, 2020

      I’m so happy to hear that the recipe and instructions helped Robin! 🙂 Thanks so much for letting me know!

      Reply
  2. Timmy
    July 6, 2020

    Hi Dini. Can you double this recipe in one go?

    Reply
    1. Dini
      July 6, 2020

      Hi Timmy
      If your mixer can handle the dough, yes it can be doubled. This entirely depends on the size and ability of the mixer you own.
      I hope that helps!

      Reply
  3. iNham
    June 10, 2020

    After chill over night, Can I put into oven right away or should i rest it in room tempt a bit before put it into oven?

    Reply
    1. Dini
      June 11, 2020

      Hi,
      The dough is chilled so that it can hold its shape better as it bakes. So, it’s recommended to bake them while they are still chilled. I often bake them from frozen too.
      I hope that helps!

      Reply
  4. Kris
    June 5, 2020

    Hi. When browning the butter, does it matter that you lose a bit of water in the process? Do I just leave it at that or top if off with something to maintain the 226g of butter required in the recipe?

    Thanks!

    Reply
    1. Dini
      June 5, 2020

      Hi Kris
      The butter will only brown once the water has evaporated. The spluttering and bubbling you see are the result of water boiling and evaporating – so it is absolutely normal for the water to be lost in the process.
      Depending on the butter quality, you will have more water (lower quality butter), or less water (better quality butter) evaporate as you make brown butter.
      Whether you should add water to compensate will depend on the recipe. If you’re not sure, you can add about 1 – 2 tbsp of milk or water to compensate for the water loss for every 226 g of butter turned into brown butter.
      With my Brown butter chocolate chip cookies, I do require that some water to be added to the brown butter before being used in the recipe. However, I don’t require additional water when I use brown butter to make butterscotch sauce.
      I hope that helps!

      Reply
      1. Kris
        July 4, 2020

        5 stars
        Great! I made it and it was soooo good! Just a few more questions though. Can this recipe be doubled to make 40 cookies – with no adjustments. Also, how long does it take you to achieve that emulsified stage with your butter and sugars? I’ve tried mixing it a medium speed with a kitchen aid and somehow 5 mins doesn’t cut it. It comes together but not like your picture. It still looks a bit grainy. Is the sugar supposed to melt? I only achieve that light brown caramel look when i add the eggs.

        Reply
  5. Mitzy
    May 24, 2020

    5 stars
    Thank you for the recipe. Finally I’ve found the best chocolate chip cookies recipe.

    Reply
  6. Patti moye
    May 1, 2020

    Great recipie, have u discovered Reeses pieces and chochips in bag already mixed, then add more choc. Chunks

    Reply
  7. Celine Saki
    April 16, 2020

    5 stars
    I made these last week and without a doubt the best chocolate chip cookie recipe!

    I’m happy I froze half before I baked them because I’m sure I would’ve polished them off in no time.
    (they are now completely gone haha)

    I really like the detailed information and I finally understand the reasoning why certain ingredients will alter the result.

    Can’t wait to try another recipe!

    Reply
    1. Dini
      April 17, 2020

      Thank you Celine, I’m so glad! I’m also happy that the information helped! 🙂

      Reply
  8. Jbree
    April 16, 2020

    5 stars
    Sadly I can’t eat dairy, so I would have to use a butter alternative – keen to hear your thoughts on what the best replacement is!

    I made this for dairy-eating friends and they absolutely loved it, and I’m jealous.

    Reply
    1. Dini
      April 16, 2020

      Hi Jbree
      My sister is lactose intolerant and makes this recipe with vegan butter.
      You will still have to melt the butter for the recipe, but you won’t be able to make brown butter (which adds a lovely nutty depth of flavor) with a vegan alternative. The cookies are a little flatter made with vegan butter, but she said they were really good! If you like, you can add about 1/3 cup of hazelnut flour to help mimic the brown butter flavor, but that’s not necessary.
      I hope that helps!

      Reply
  9. Jen
    February 7, 2020

    5 stars
    This is the BEST chocolate chips recipe I’ve come tried! The texture is perfect, crispy yet chewy <3 You really make heaven exist for me 😀

    Reply
    1. Dini
      February 7, 2020

      Haha, thank you so much for the review Jen! I’m so glad you enjoyed the cookies. 😀

      Reply
  10. Maria
    January 27, 2020

    5 stars
    I’m not exaggerating a bit. I found this recipe almost 2 months ago and i have made, eaten & share over a hundred cookies. I just cant stop LOVING THEM. The smell of the toasted butter OMG!! All my family love them and think I should open a cookie shop :p hahaha THANKS FOR SHARING <3 they are delicious…

    Reply
  11. Alaunda P Gilmore
    January 19, 2020

    5 stars
    Awesome recipe and instructions! Thank you!

    Reply
  12. GregM
    January 18, 2020

    Very good flavor. I did not want to break out the mixer so I mixed by hand. The dough seemed right. I weighed the dough and divided by 20, which came out to be about 67.5 grams per cookie.

    I found that I needed to bake these longer than the recommended time.

    Do you use convection (fan) ovens in NZ? Here in the US, fan ovens are less common. Fan ovens tend to cook faster. Is this the case here?

    Next time I may try increasing the oven temp a bit.

    Reply
    1. Dini
      January 18, 2020

      Hi Greg
      Thank you! I am glad that you liked the flavor 🙂
      I was living in the USA at the time of sharing this recipe (now in Canada), so all specifications are US based.
      These may take longer depending on the temperature of the dough initially, and density of the dough as well (especially if they were rolled into a tight ball, vs scooped with a cookie scoop). But baking them in a slightly hotter oven is perfectly alright if that works for you better!
      I slightly undercook these so that they will still be soft and gooey in the middle and chewy and crunchy at the edges.
      I hope that helps!

      Reply
  13. Elba
    December 28, 2019

    5 stars
    Cookies are great! I got a lot of foam making the brown butter so it was impossible to tell at which stage it was anyhow it turn out DELICIOUS!!

    Reply
  14. Fatima
    November 28, 2019

    Love that you used browned butter in the recipe! I will definitely try it.

    Reply
  15. Ivy
    November 11, 2019

    Hello i wanna ask, what if i use salted butter? Thank you

    Reply
    1. Dini
      November 26, 2019

      Hi Ivy,
      I personally prefer unsalted butter as it has a lower water content. But you can use salted butter in a pinch too. I wouldn’t add more than 2 tbsp of water if you decide to turn it into brown butter. Also, I would cut down the amount of salt used in the dough too.

      Reply
  16. Syafa
    October 28, 2019

    Hi, I’m Syafa from Indonesia. I love to use melted brown butter too. It makes my cookies more delicious! So, how to reduce the brown sugar and white sugar? Because I want my cookies become less sweet. Should I reduce the amounts of the butter too? Thanks for your sharing. 🙂

    Reply
  17. Vanessa
    October 26, 2019

    Why does the recipe ask for water to be added to the butter? I already thought that was unusual but I did it anyway because those were the directions and the cookies turned out to be a complete fail.

    Reply
    1. Dini
      October 26, 2019

      Hi Vanessa,
      The water that’s added here is to replace the water that evaporates when the 1 cup of butter is heated and converted into brown butter. How much water is added depends on the butter you use. Usually for me, it’s only about 2 – 3 tbsp of water to make up for the amount that evaporates from the butter.
      If you add too much water, or if you add the brown butter when it’s too hot, then the cookies won’t turn out properly. I’d love to help you figure out what may have gone wrong, could you please let me know how they turned out? Thank you!

      Reply
  18. maya
    August 28, 2019

    4 stars
    these are very delicious cookies! but one problem i encountered is that my cookie dough turned out a bit runny and as a result the cookies were thinner than i anticipated. Any reasons why it turned out like this?

    Reply
  19. Jassica
    June 18, 2019

    5 stars
    Hello,
    The BEST chocolate chip cookie recipe! I have been trying so many different recipes to find the best one. My boys ate them up as soon as I made them. They didn’t last long. I followed the recipe exactly and used honey. Thank you for posting!

    Reply
    1. Dini
      June 19, 2019

      Thank you so much for letting me know Jassica! I’m so glad you and your boys enjoyed the cookies! 🙂

      Reply
  20. Kristin
    January 8, 2019

    5 stars
    I seriously cannot believe there hasn’t been a comment on these delicious cookies! Being a detailed person, I can certainly appreciate the details of your chocolate chip cookies and creating them the way you and your family prefers them. We chose to make the recipe like your husband prefers and found them to be quite delectable. I am so glad I stumbled upon your blog because I can tell I love your style of baking! The fudge brownies recipe?? Holy cow!! OUT OF THIS WORLD!! This recipe gets 2 thumbs up from our family!

    Reply
    1. Dini
      January 8, 2019

      Yaaay, so happy that you and your family enjoyed the cookies and brownies Kristin! 🙂 That’s always the best part about sharing these recipes! Thank you so much for letting me know!

      Reply
1 2 3
Newer Comments→

Hey There!

Hi! I’m Dini, a third culture kid by upbringing and a food-geek by nature. I was born in Sri Lanka, grew up in New Zealand and lived in Australia, and then the US, before moving to and settling down in Canada. My food is a reflection of those amazing experiences!

Read More
Front cover of the Secret Layer Cakes cookbook by Dini Kodippili.

The Flavor Bender

Cookbook

Buy now on Amazon!

Recipe Basics

  • How To Make Perfect Choux Pastry

    How To Make Perfect Choux Pastry

  • Flaky All Butter Pie Crust Recipe

    Flaky All Butter Pie Crust Recipe

  • How To Make Homemade Marshmallows (Foolproof Guide)

    How To Make Homemade Marshmallows (Foolproof Guide)

  • The Best Homemade Bread (White Bread Recipe)

    The Best Homemade Bread (White Bread Recipe)

  • Homemade French Croissants (Step By Step Recipe)

    Homemade French Croissants (Step By Step Recipe)

  • The BEST Pavlova Recipe (Step by step recipe and video)

    The BEST Pavlova Recipe (Step by step recipe and video)

Featured On

Master the science of baking!

Get my FREE Printable Cake Pan Conversion Chart!

So you’ll know how to substitute cake pans of different shapes, sizes & volumes in a pinch!

A must have resource for all pro bakers, novice bakers, and aspiring bakers alike!

Download now!

Reader Faves

  • How to make the Best Instant Pot Short Ribs

    How to make the Best Instant Pot Short Ribs

  • Perfect Quick and Easy Rough Puff Pastry

    Perfect Quick and Easy Rough Puff Pastry

  • The Best Spicy Sweet Chili Sauce (Easy Recipe!)

    The Best Spicy Sweet Chili Sauce (Easy Recipe!)

  • The Best Homemade Bread (White Bread Recipe)

    The Best Homemade Bread (White Bread Recipe)

The Flavor Bender

I love baking, cooking, experimenting with flavors and ingredients, and passing on all my tips and tricks to you!

Read More

About

Meet Dini
My Book
Work With Me
Contact

Browse

Recipes
Measurement Guide
Baking How-To’s
Shop My Faves
Privacy
Disclosure
Terms

Branding by MRD

Theme by OC

Back to Top
  • Facebook
  • Instagram
  • Pinterest
  • X
  • YouTube
1598 shares

Rate This Recipe

Your vote:


A rating is required
A name is required
An email is required

Recipe Ratings without Comment

Something went wrong. Please try again.