



Here’s how to make the most crisp, buttery, delicious phyllo cups (phyllo shells) at home! You only need 2 ingredients and a mini muffin pan, and they are the perfect base for so many sweet or savory appetizers or bite-sized desserts!
Cheaper than store-bought, and great for holiday entertaining, parties, potlucks etc.
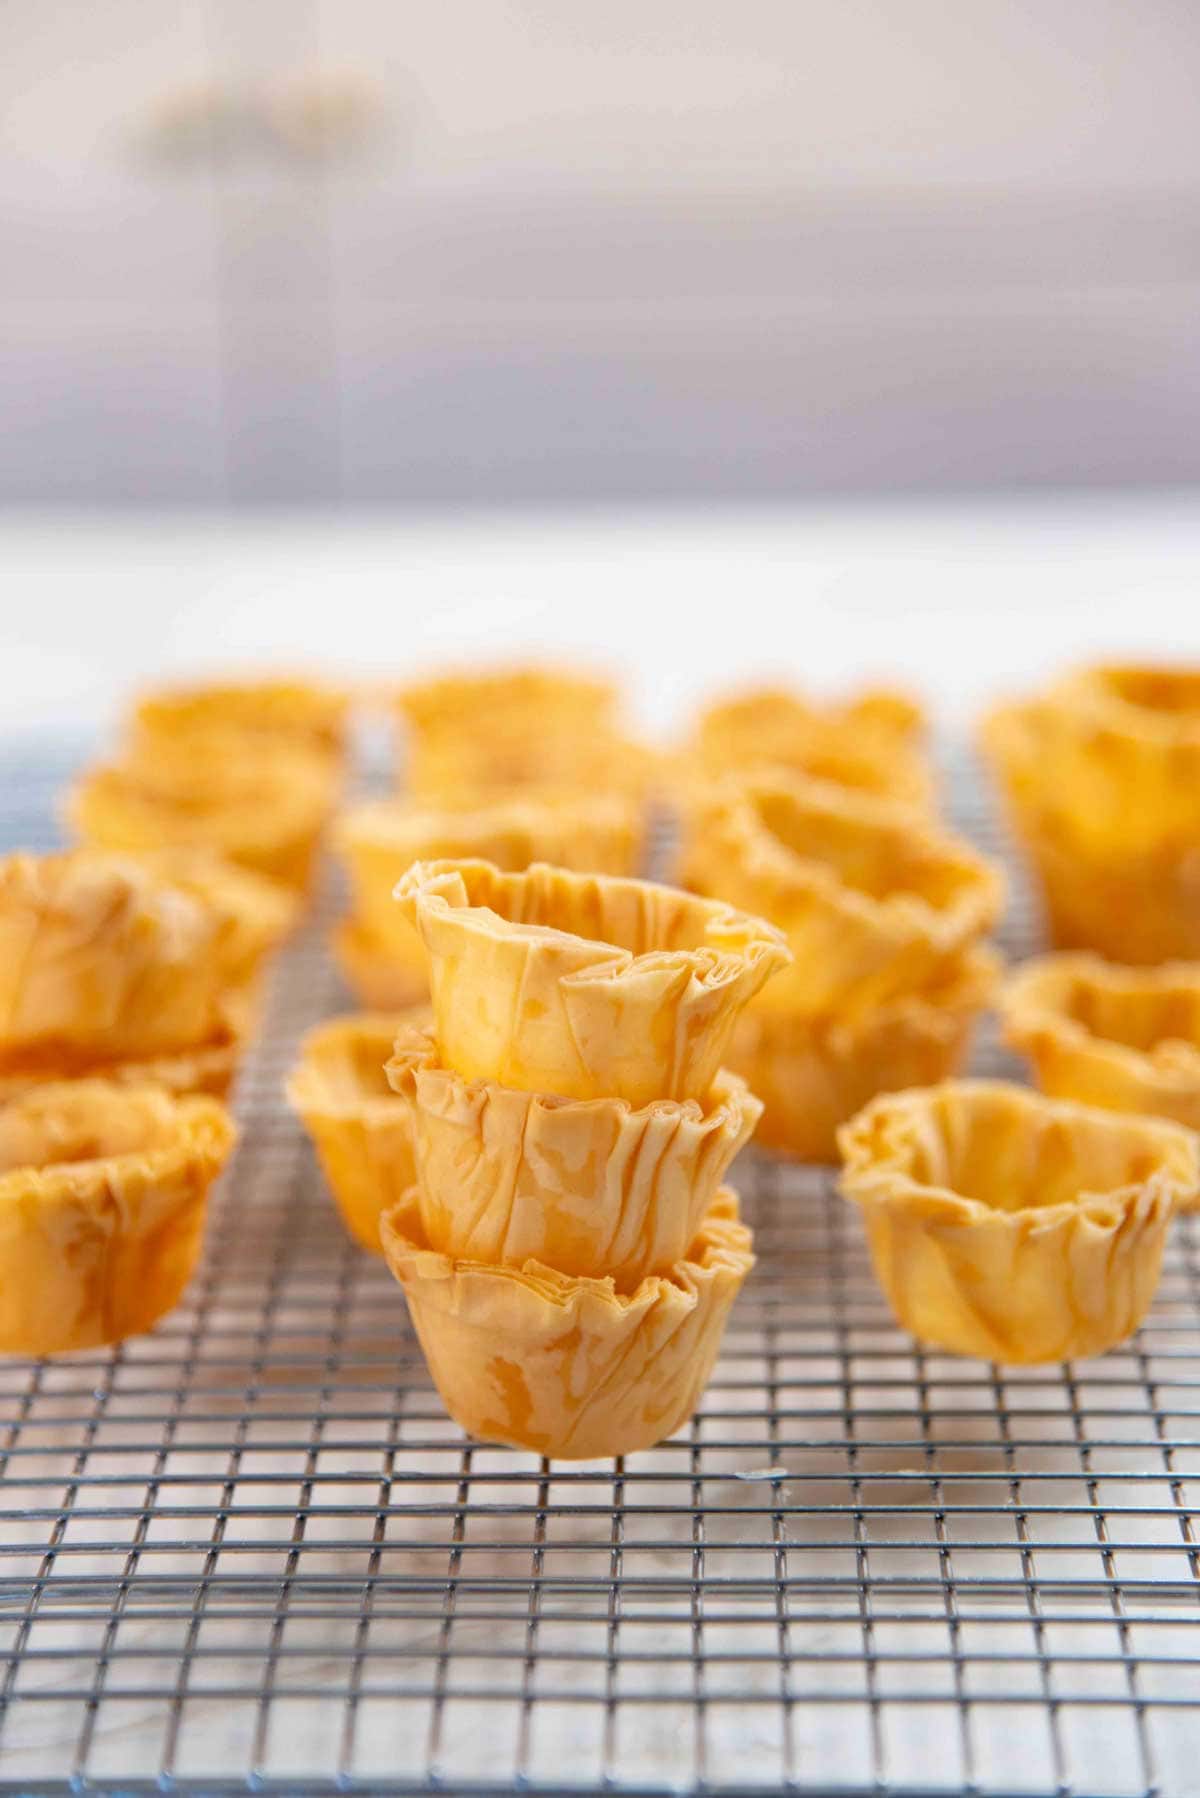
I’m a sucker for bite-sized treats, whether sweet or savory! And I really wanted to share this recipe because phyllo cups (phyllo shells) are such a splendid way to make mini appetizers and desserts.
I’ve found that these are surprisingly harder to find in grocery stores here in Ottawa. But here’s the thing; they are ridiculously easy to make, and cheaper than buying from the store too!
So, I’m going to show you how to make these super easy and delicious homemade phyllo cups (i.e. mini phyllo shells) with a simple step by step tutorial.
Why this recipe works

- If you can’t find ready-made phyllo shells in the supermarket, this is an even better alternative to make with regular phyllo dough!
- SO easy to make.
- Cheaper than store bought! Yes, store-bought is convenient, but you can make more tart shells with 1 package of phyllo dough.
- You can make this with just 2 ingredients!
- The phyllo cups are crisp, buttery, and delicious.
- There are SO versatile. So many ways you can use these shells.
What are phyllo cups?
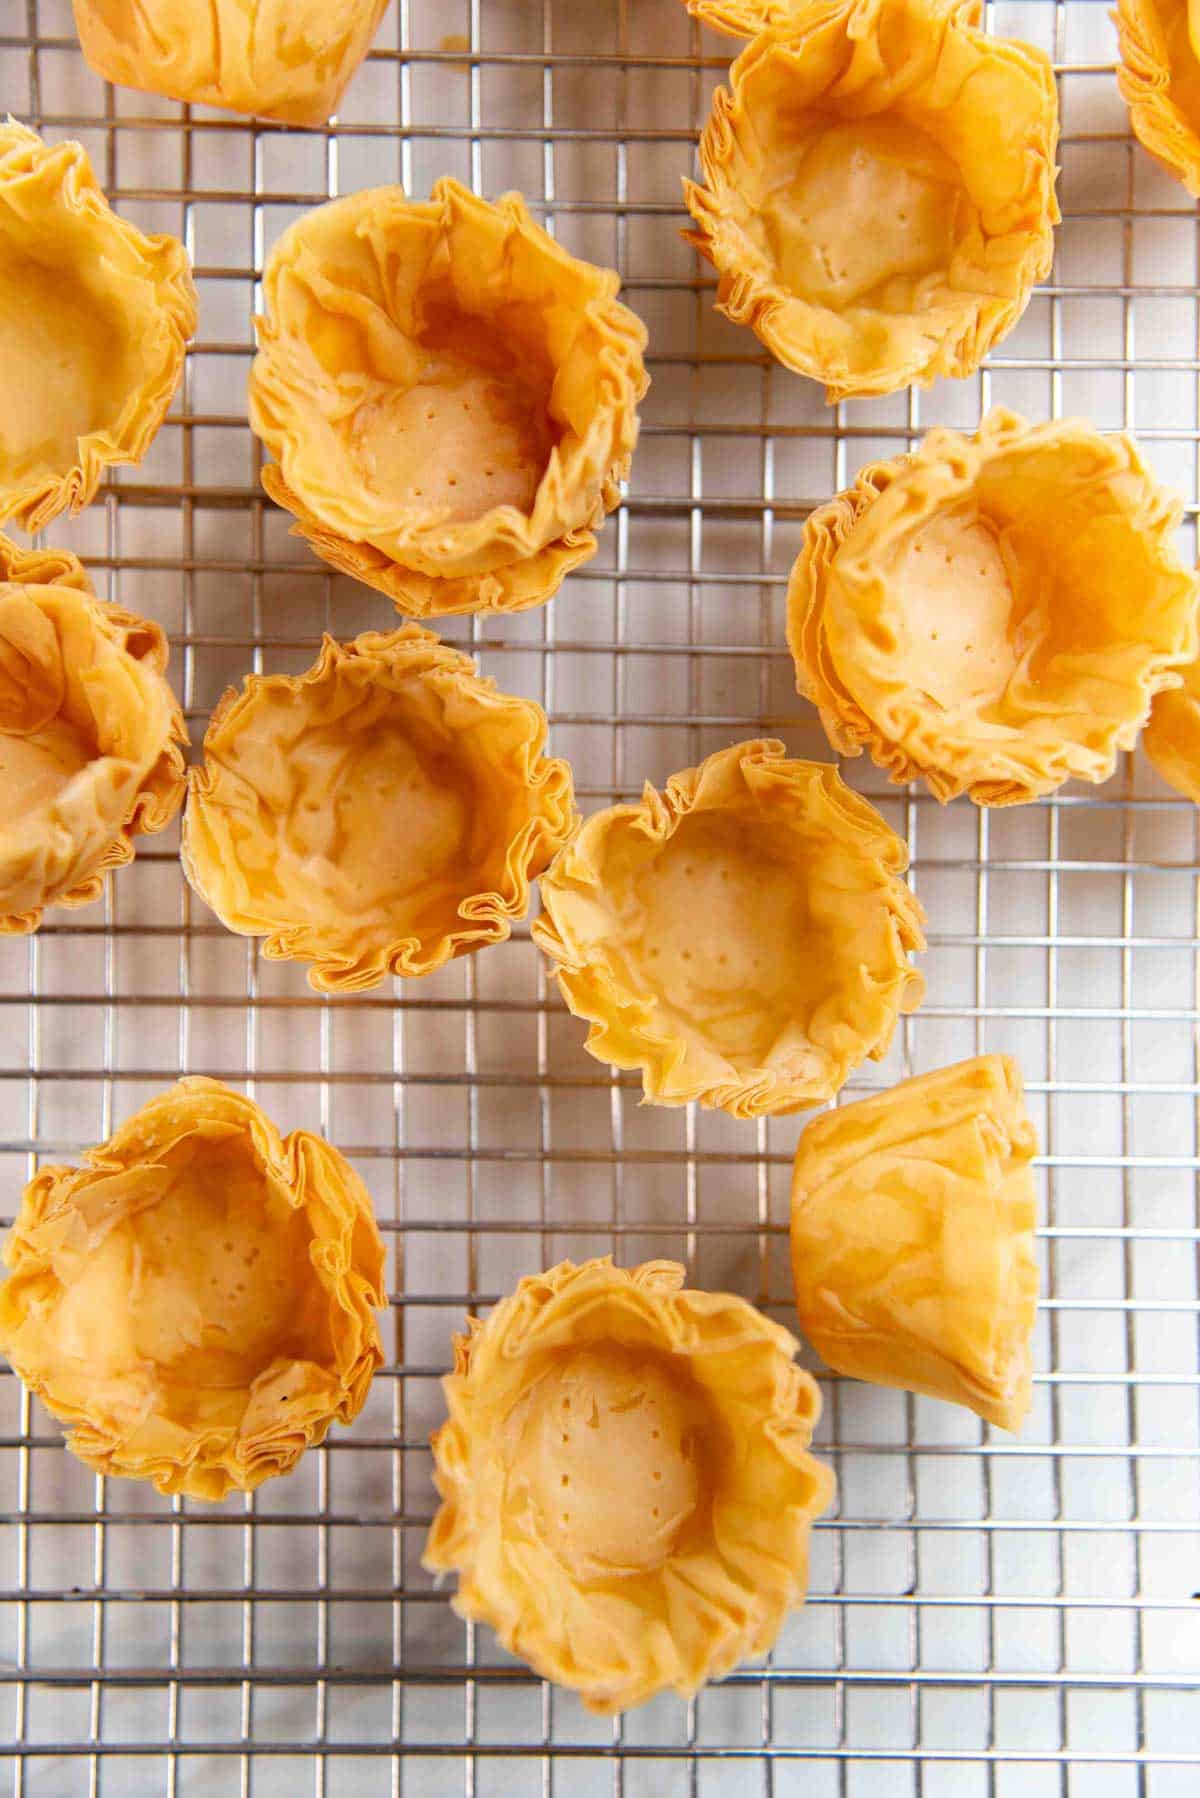
Phyllo cups (also spelled filo) or phyllo shells are mini cups made out of phyllo pastry dough.
You can find these in the supermarket (except in my area, apparently!), and is such an easy and popular option to make mini appetizers and starters, or bite-sized desserts for guests, entertaining, parties, holidays etc.
How to make phyllo cups (step by step method)
Step 1 – Get the equipment ready
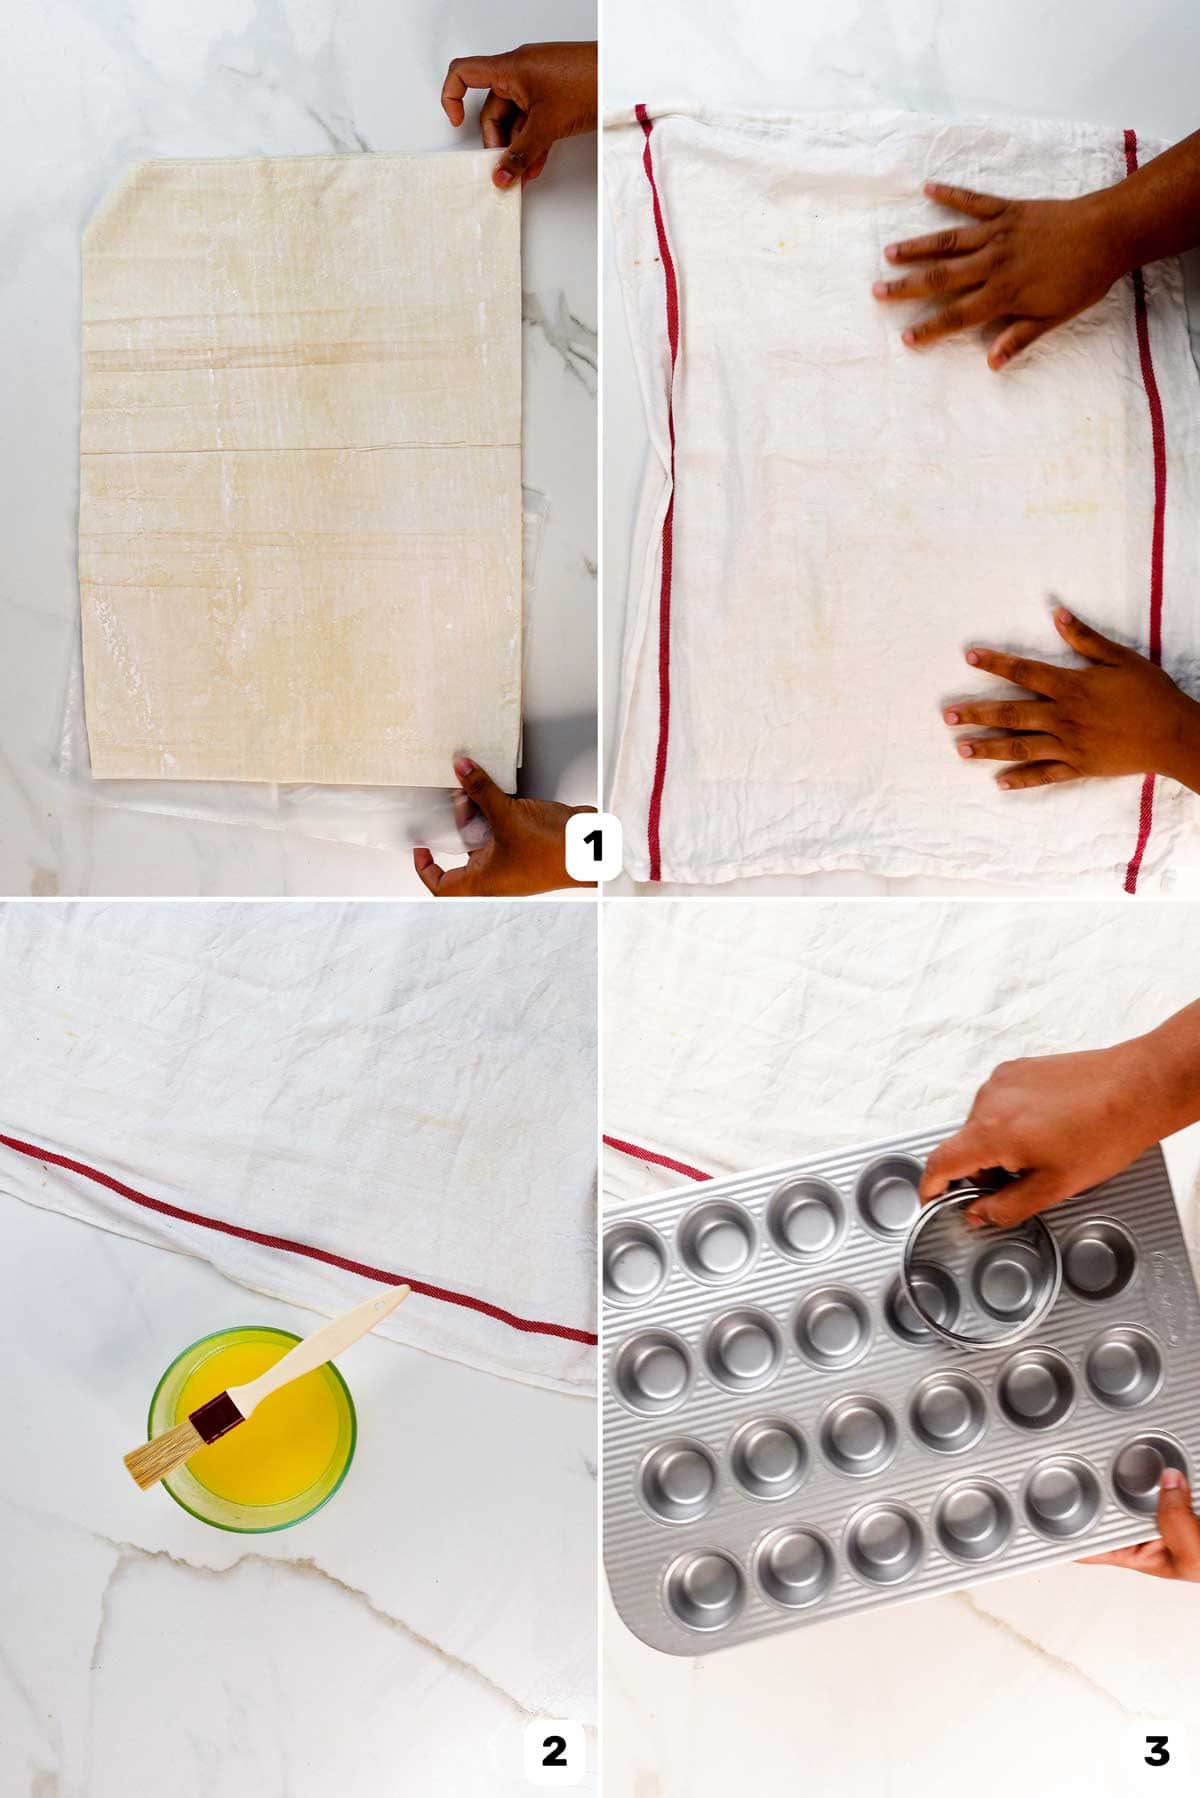
You’ll need a mini muffin pan (mini cupcake pan), and a large round cookie cutter (image 4). I use one that’s about 4.5 – 5 inches wide. The smaller the circles, the smaller the phyllo dough shells will be.
Step 2 – Prepare the phyllo and butter
Phyllo pastry usually comes frozen. Let this thaw out in the fridge overnight, or at room temperature for a few hours.
Since phyllo pastry is very delicate, unroll the pastry very carefully (image 1). If it tears a little, that’s OK! We can put it back together like puzzle pieces, but we need to avoid multiple tears.
Take a clean, large cloth napkin, or paper towels (about 3 layers), and wet them with room temperature water and wring out the excess. Place this napkin / towel over the phyllo dough and cover it. This prevents it from drying out (image 1).
Next, melt the butter in the microwave and have a pastry brush ready to brush it on the phyllo pastry (image 3).
Step 3 – First layer of phyllo
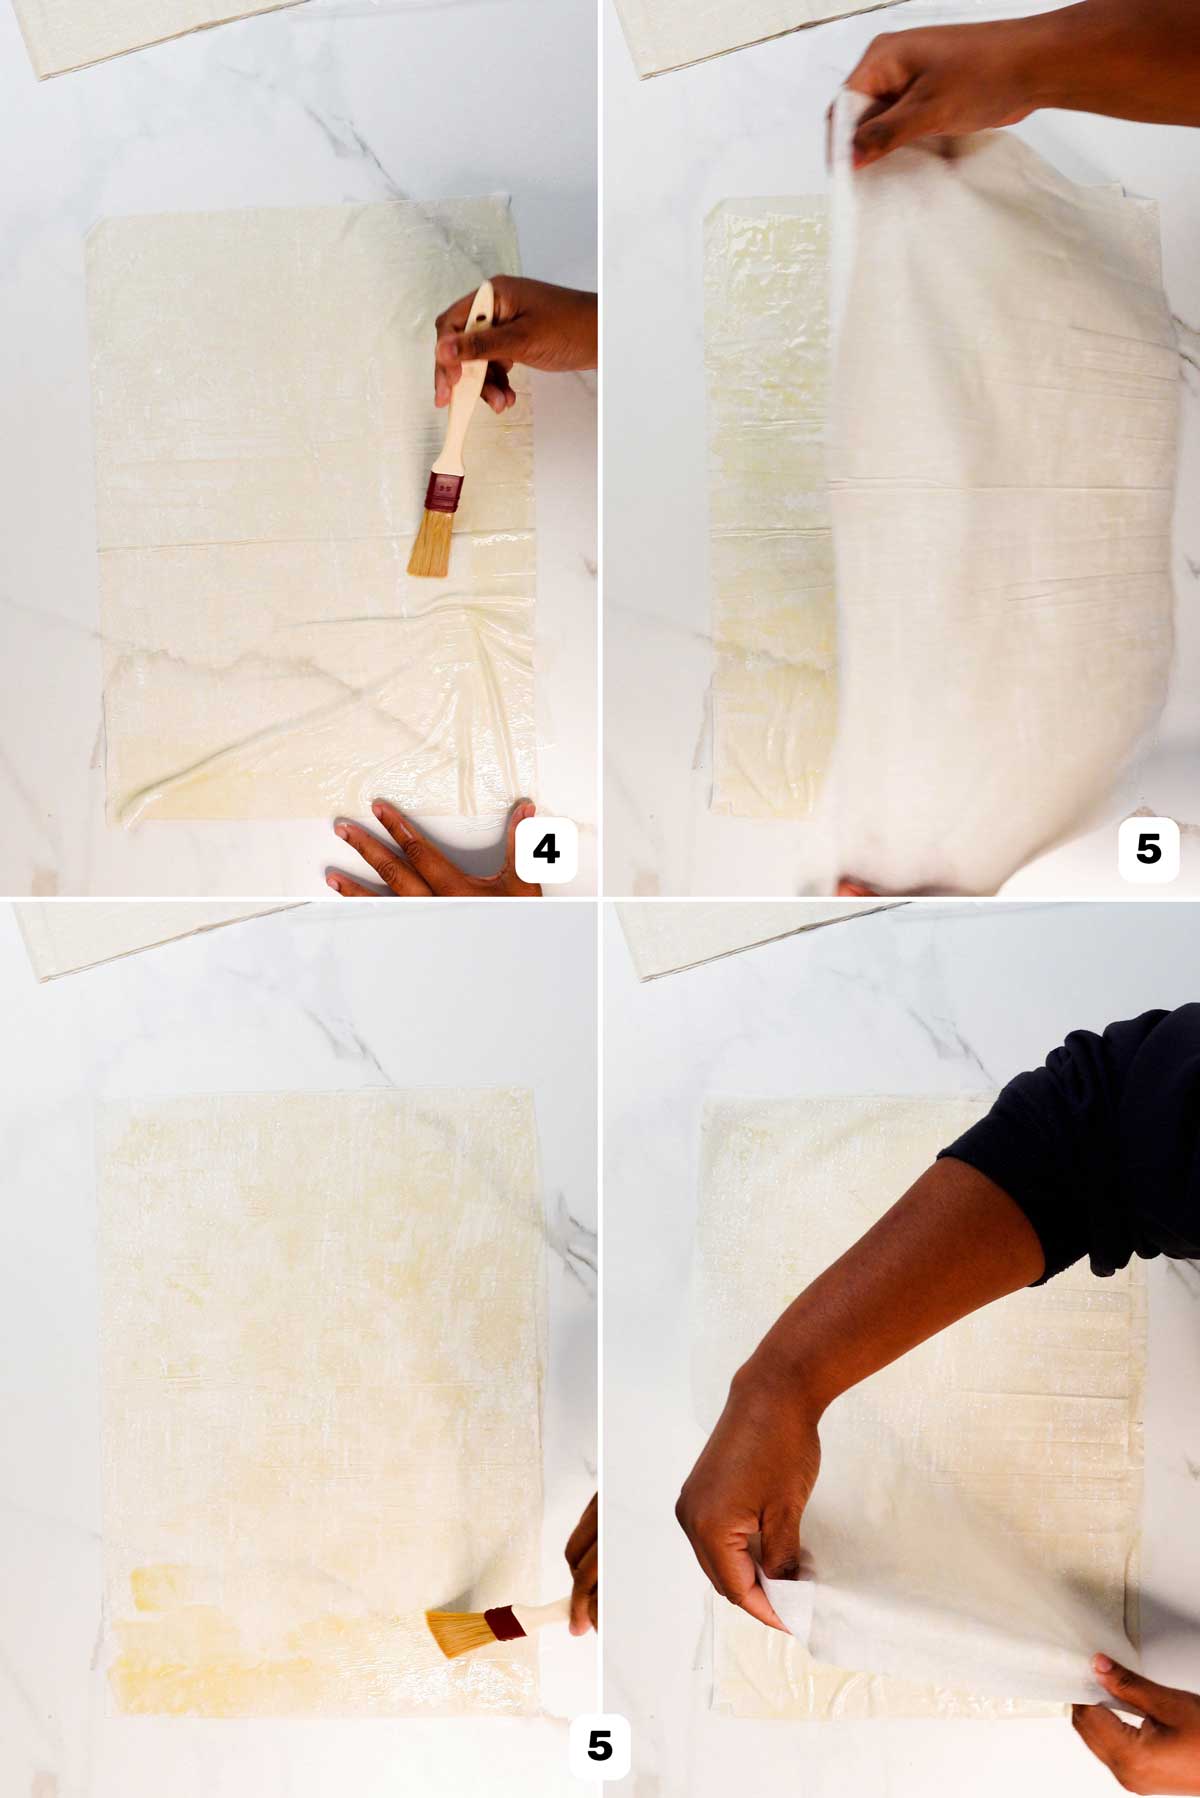
Place 1 sheet of phyllo dough on your work surface. Brush it with a layer of butter (image 4), making sure to get the whole surface.
The pastry will want to bunch up and tear when brushing it with butter, so be careful.
After you brush the butter on the whole surface, layer another sheet of phyllo dough on top (image 5). Try to align the edges of the phyllo sheets to make sure it’ll all be evenly thick throughout.
If the pastry sheets tear, you can use the next layer to stick it back together.
Step 4 – Repeat the layering
Repeat the process by brushing butter on the surface and layering with another sheet (images 5 and 6), until you have about 4 sheets of phyllo dough layered together with butter in between.
Step 5 – Cut out circles
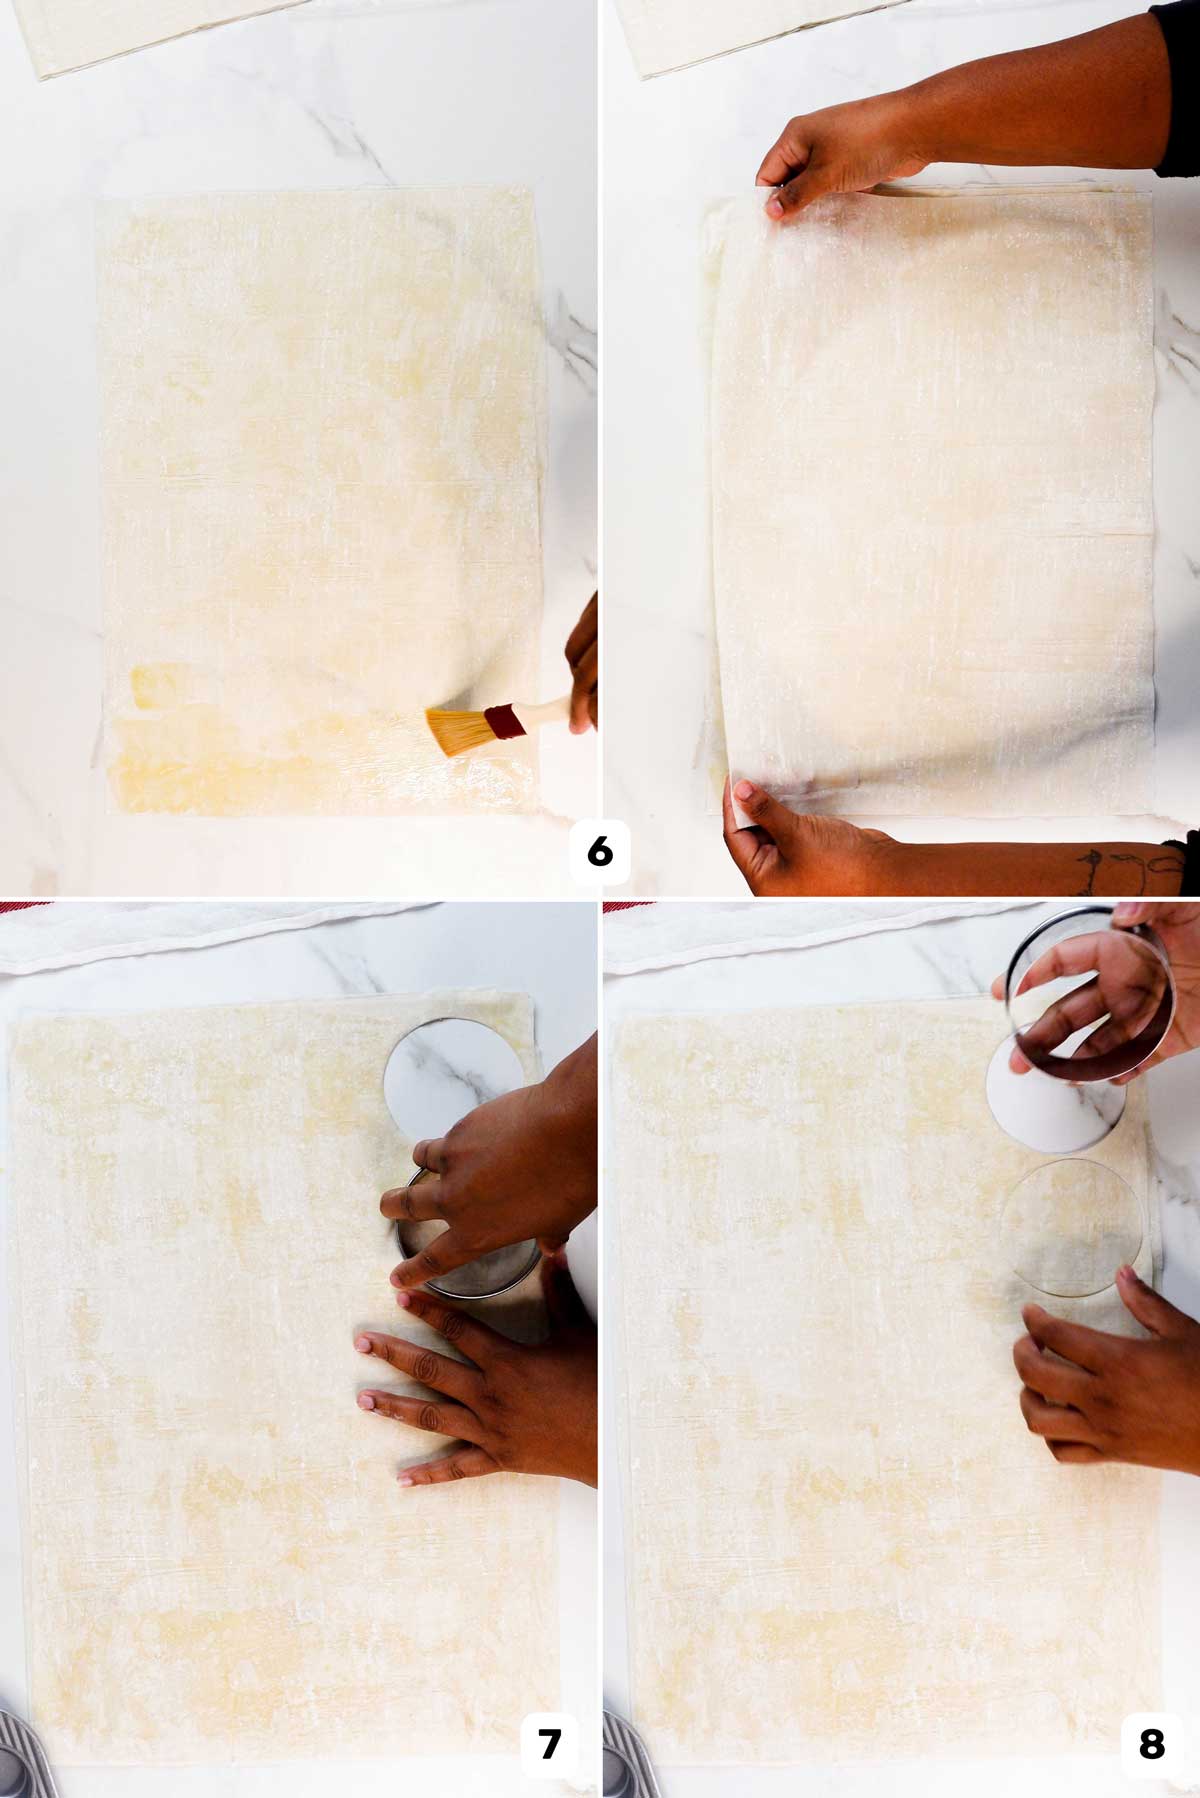
Use a sharp round cookie cutter to cut circles out of the filo sheets. You can also cut it into squares to make it easier, but I like the neatness of round pastries.
To cut the circles, wipe the sharp edge of the cookie cutter, making sure it’s clean. Place it on the layered phyllo sheets and press down, into the sheets.
While pressing it down, rotate the cookie cutter clockwise and counter clockwise, to let the cutter cut through the phyllo dough (image 7). If the cookie cutter isn’t too sharp, it will not cut through cleanly, and the rotating movement will help it cut through the pastry sheets with clean edges without tearing.
Carefully remove the cut pastry circle (image 8). If the sheets are separating, use some melted butter to stick the layers back together.
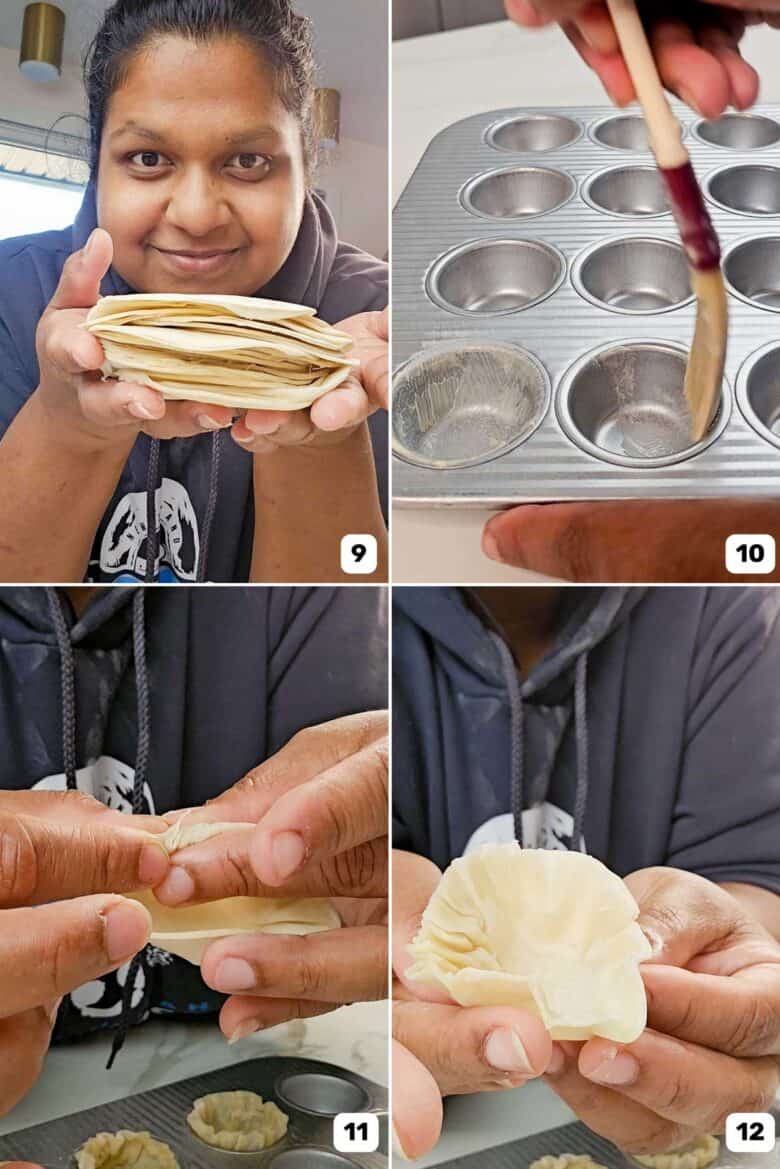
Repeat until you have cut as many circles from the pastry sheets as possible (image 9).
Keep the cut pastry circles under a moistened napkin / towel to prevent them from drying.
Step 6 – Prep the muffin pan
Brush the mini muffin pan wells with melted or softened butter (image 10). This is to prevent the phyllo from sticking to the pan cavities.
I also used a jigger as a mini tart tamper to help press the pastry into the bottom of the wells. The opening of the jigger perfectly fits in the bottom of the muffin pan well.
Also, preheat the oven.
Step 7 – Easy method to shape the cups
There are two ways to shape the pastry into the muffin pan wells. Here’s the easiest way.
Place the cut circle over the muffin pan well. Using the mini tart tamper (or use anything similar – I use my jigger), gently push the pastry into the buttered well. Gently press it into the bottom to take the shape of the muffin pan cavity, and then remove the tart tamper. Press the sides of the pastry onto the sides of the well to lay it flat.
This method is easy and fuss-free, but the sides and edges of the phyllo cups will have random folds and look uneven. This doesn’t affect the final flavor, but won’t look as neat.
Step 8 – My preferred method of shaping phyllo cups (neater and more even)
My preferred method includes an extra step for each cup. It’s an optional step but results in more even and neat phyllo shells.
Take each circle and make small folds along the edge – like an accordion (image 11). The pastry will cup as you do this, but that’s what we want! The folding will simply leave the creases of the folds, and you don’t have to hold these folds together.
Once you have done this all along the edge, you will end up with a loosely shaped phyllo dough cup that has mini folds all along the edge (image 12).
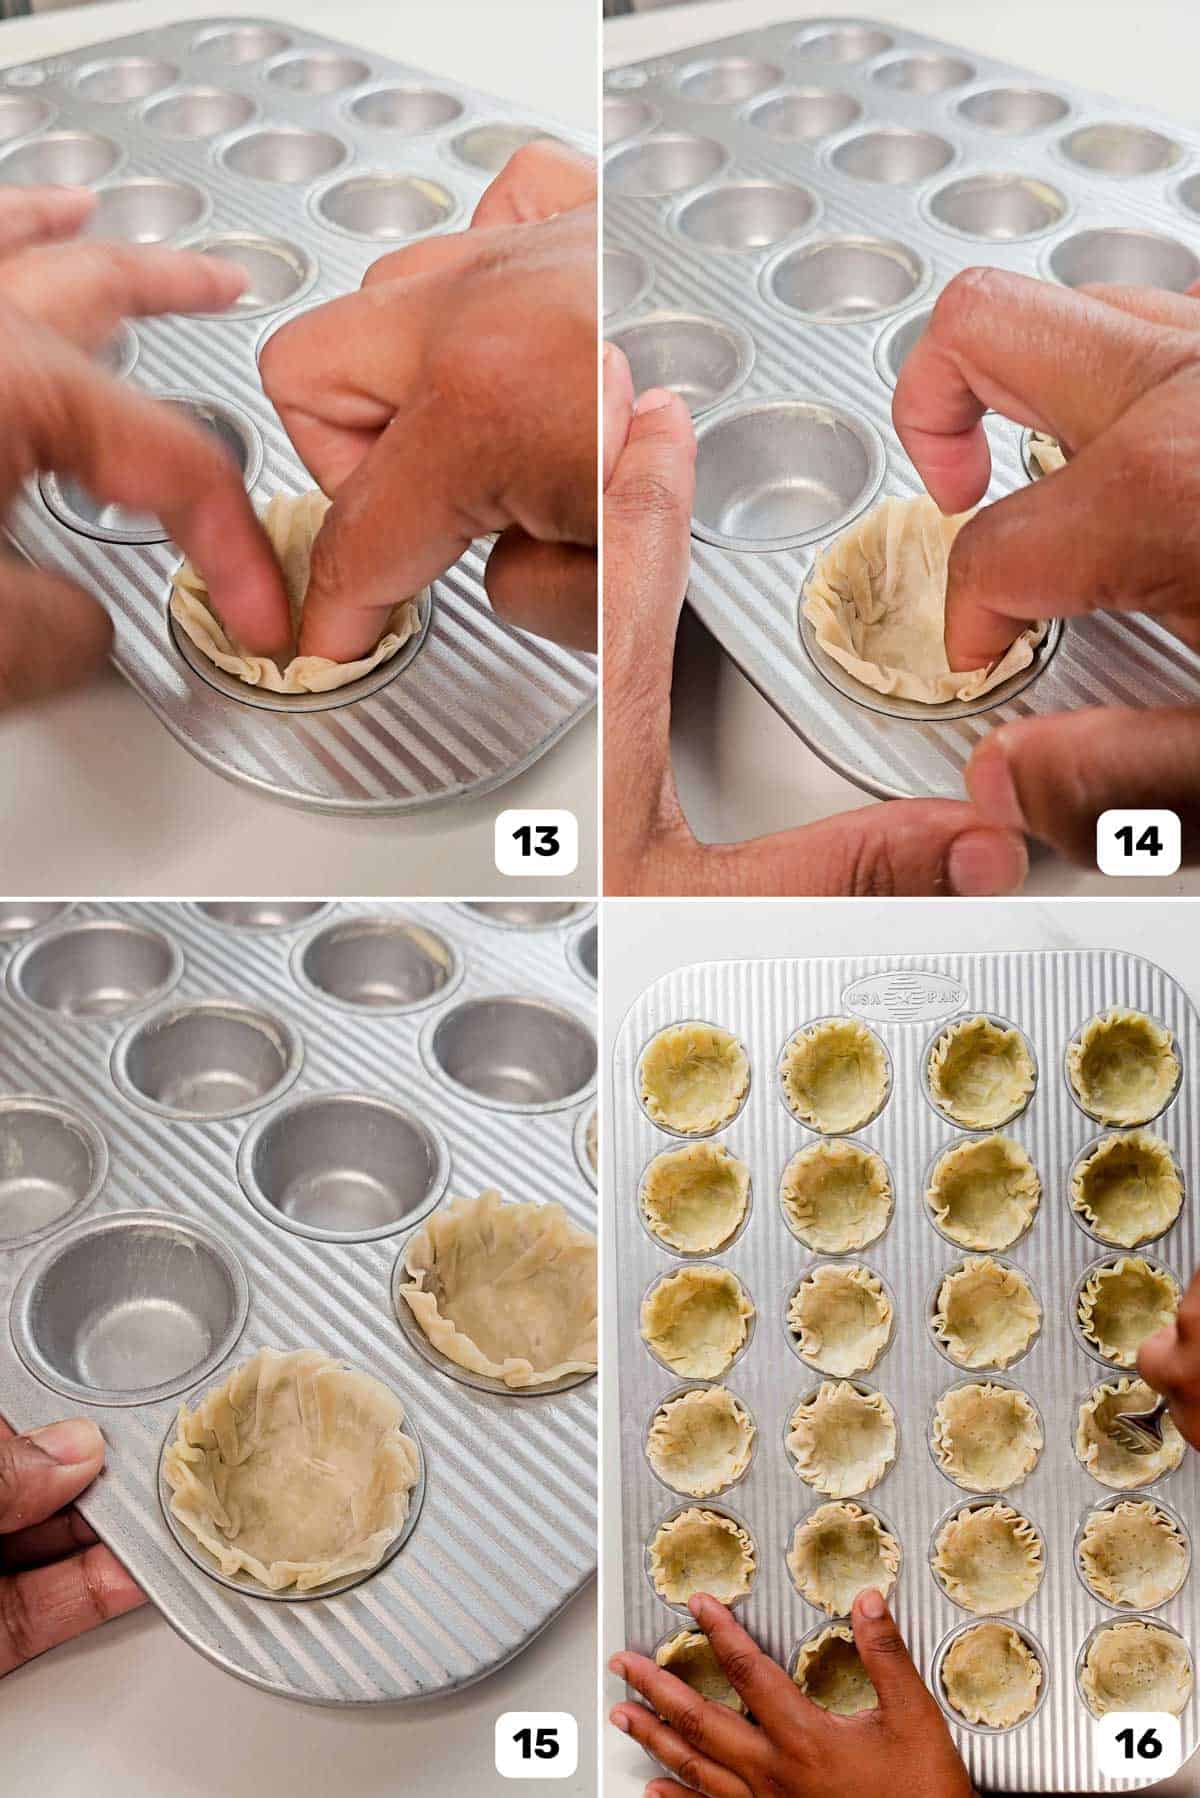
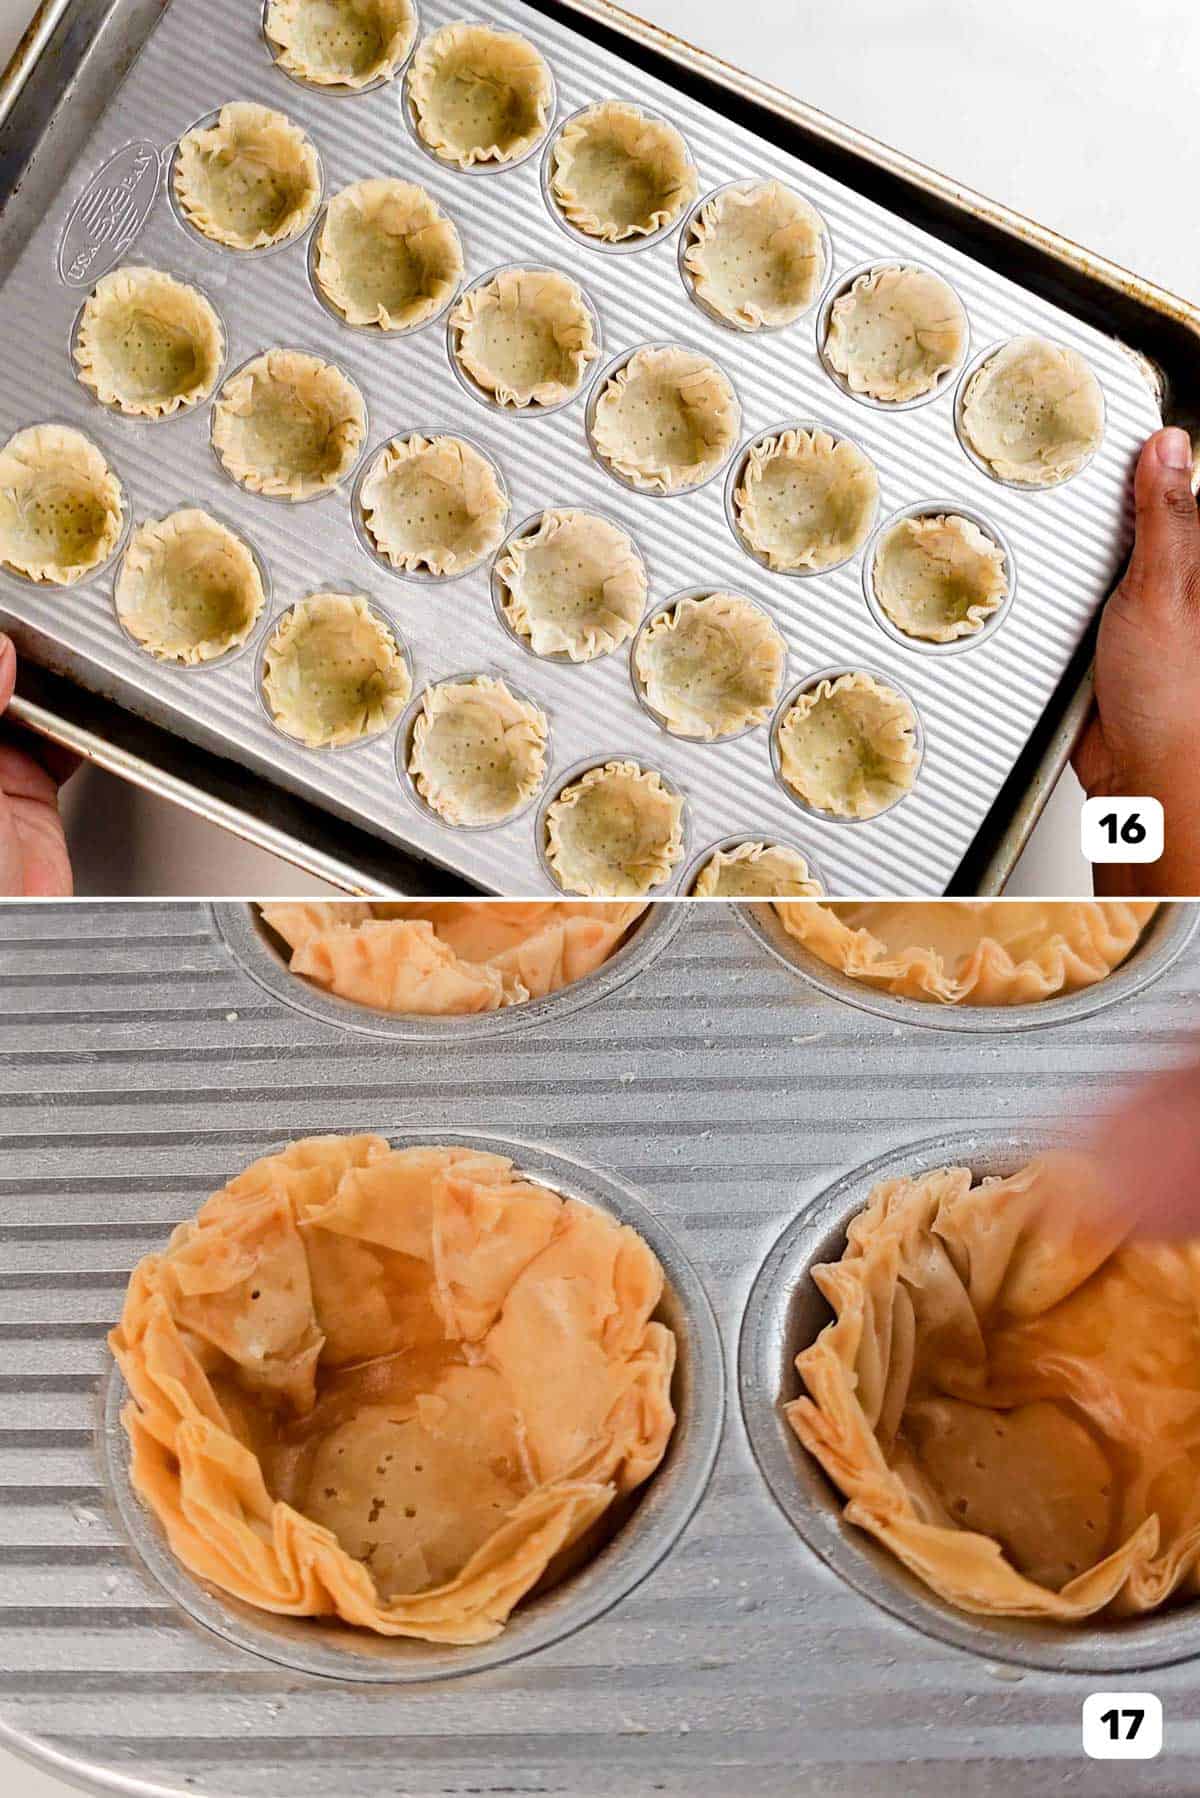
Now, place this in the mini muffin pan well and use a tamper (or your fingers) to tamp it into the bottom (image 13). Use your fingers to press the pastry into the sides of the muffin pan wells (image 14). The pre-formed folds will form more even and neat sides and edges.
Make sure each cup is properly pressed into the bottom and edges of each well. And that the pastry is flattened onto the sides (image 15).
Repeat with all the pastry circles, or until the muffin pan is filled.
Then prick the bottom of the shells with a fork (image 16).
Step 9 – Bake the phyllo cups
I like to place my mini muffin pan over another half sheet pan before baking them (image 17). The half sheet pan will catch any butter that leaks out, AND it makes it easier to pull out the pan from the oven without damaging the phyllo shells.
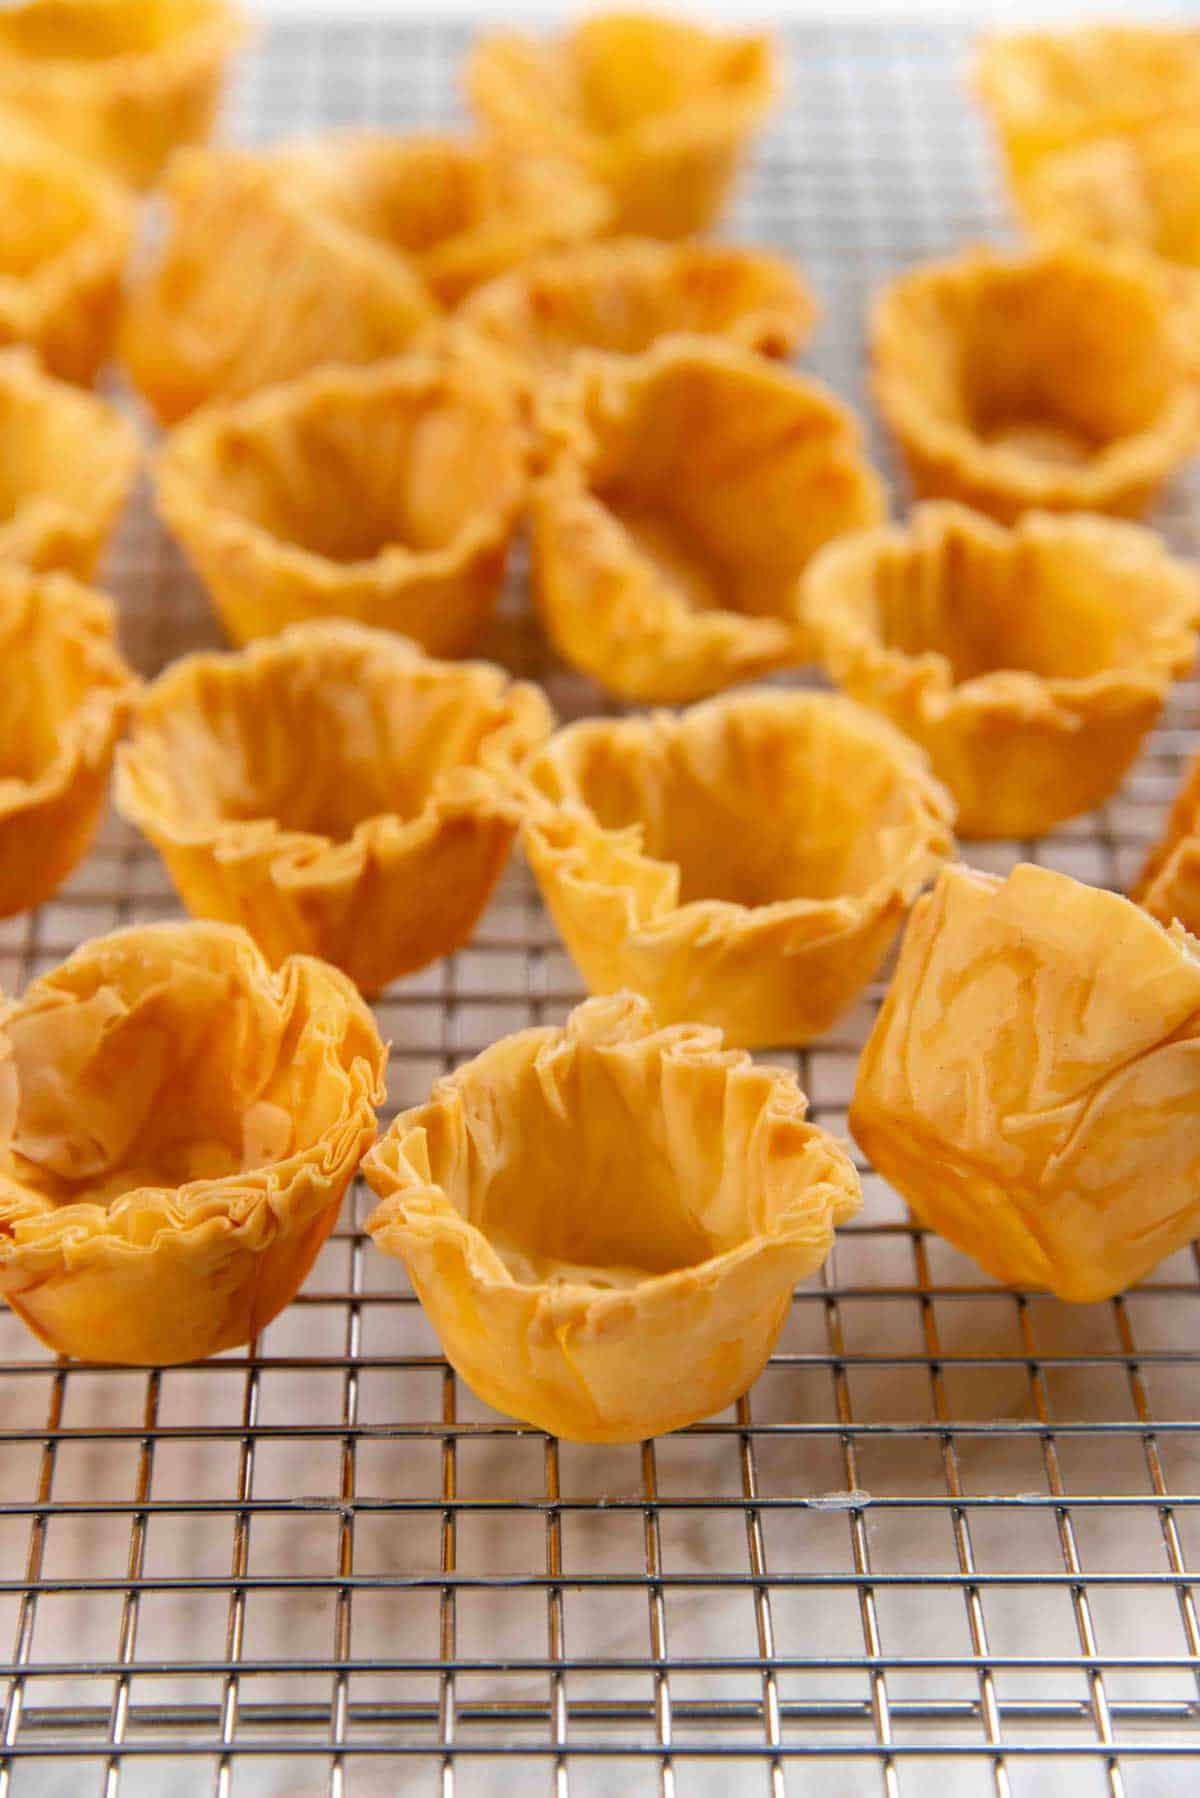
Bake in the preheated oven until the shells turn a beautiful golden brown (image 18).
Step 10 – Let the phyllo cups cool
Once baked through, remove from the oven and let it cool for just a few minutes.
While the phyllo cups are still warm, carefully remove them and place them on a wire rack to cool down completely.
Now they are ready to be used!
Storage tips
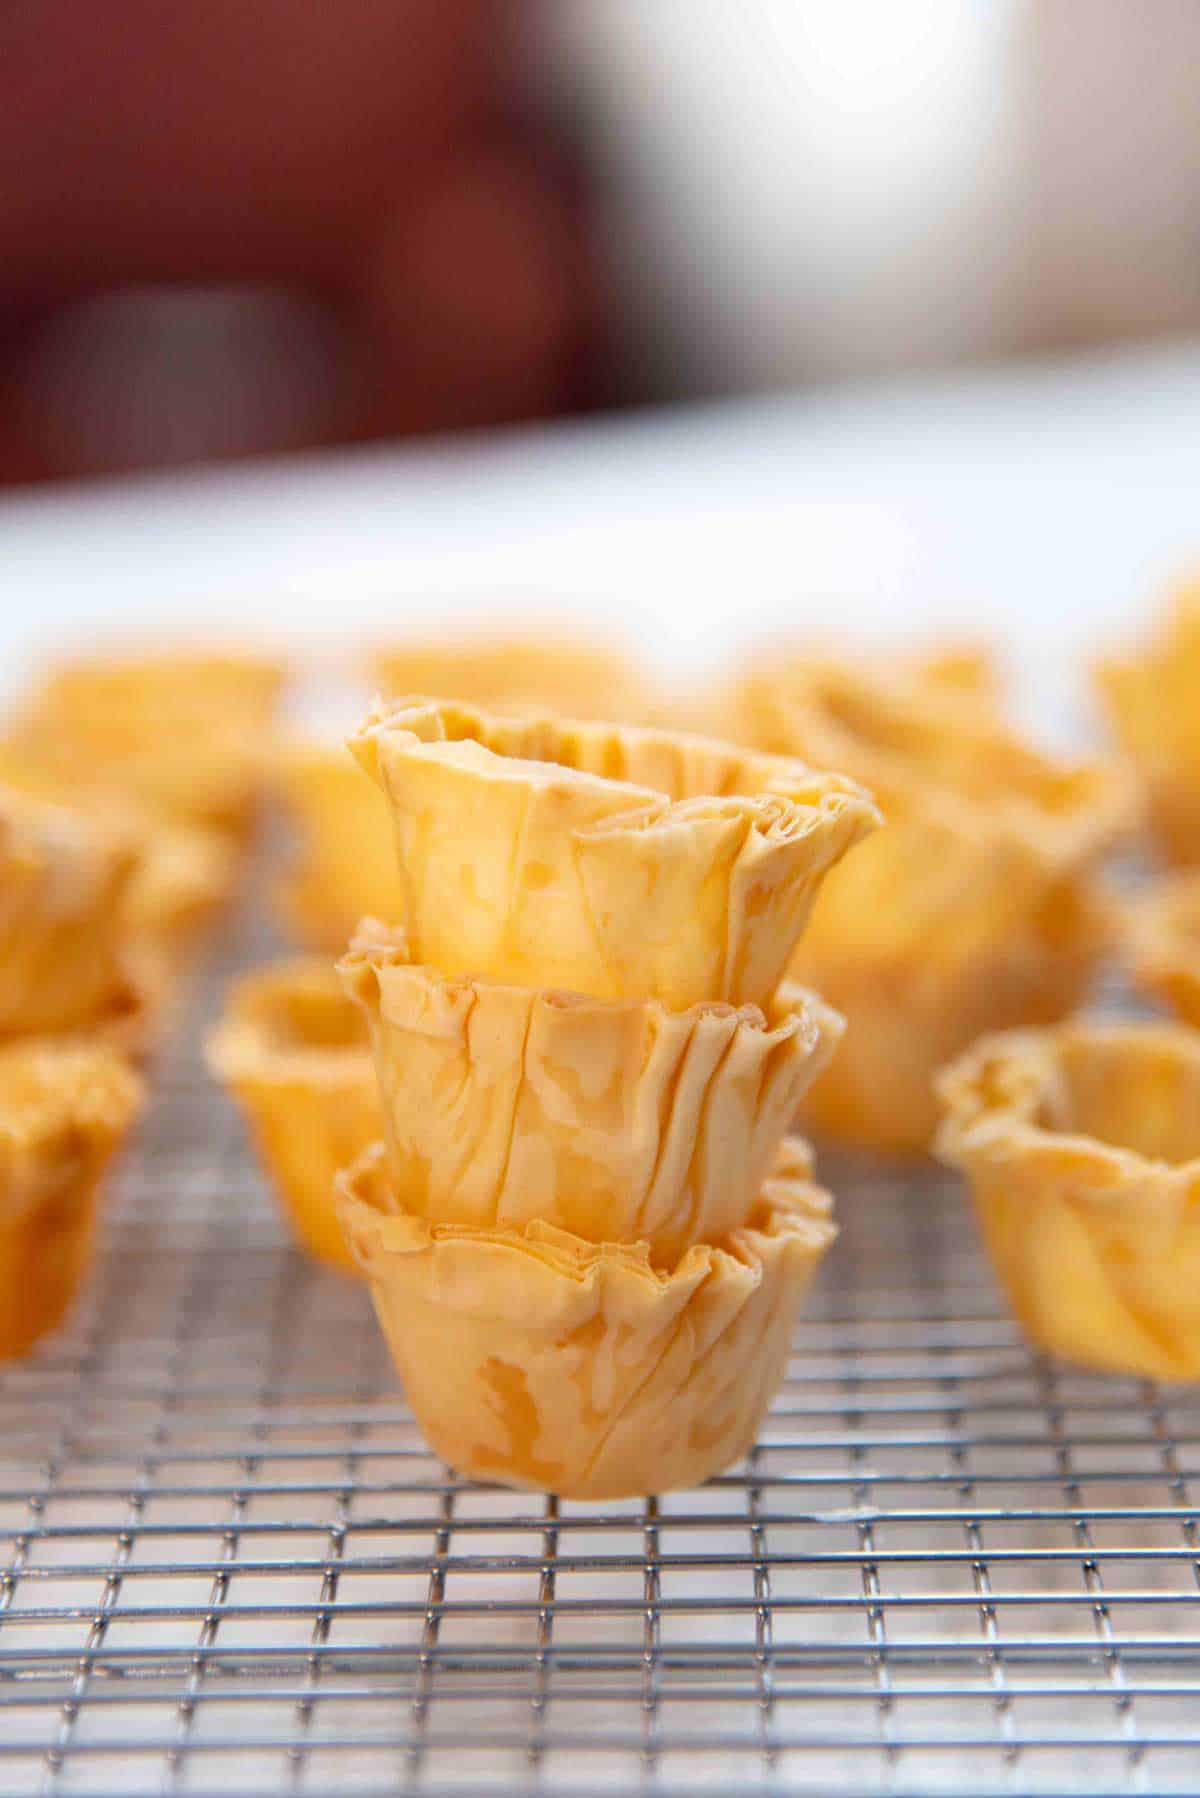
You can store these mini phyllo shells in an airtight container and at room temperature for about 1 day.
You can store them for longer in the fridge or freezer.
- Fridge – In an airtight container for about 5 days.
- Freezer – In an airtight container for about 1 month.
Make sure the cups are carefully stored, as they can easily break! You can reheat them at a low temperature in the oven to make them crisp again.

My best tips for handling phyllo dough
- Phyllo dough is very delicate and tears easily, so it’s important to handle it with care.
- Since phyllo dough is thin, it can dry out quickly too. So, it’s important to cover the phyllo dough with a moistened napkin or towel.
- Be gentle when brushing it with melted butter. The dough can drag with the pastry brush and tear. So, I like to hold down the pastry while brushing it with butter.
- If the dough tears, you can stick another layer of phyllo on top to keep it together.
- When cutting the dough, be gentle but firm with the cookie cutters to prevent the dough from tearing.
- By folding the edges before shaping it into muffin pan wells, you can get neater, more even phyllo cups.
- Prick the bottoms of the phyllo cups before baking to prevent the dough from collapsing while it bakes (by creating holes for air to escape).
How to serve phyllo cups
Oh boy!, there are so many different fillings you can use to fill these and make phyllo cup appetizers! You can make them sweet or savory, and serve either as appetizers or bite-sized desserts.
You can even serve these warm / hot with warm fillings! Filling can be baked inside the phyllo shells, or filled hot.
And you can also serve them with cold or chilled fillings.
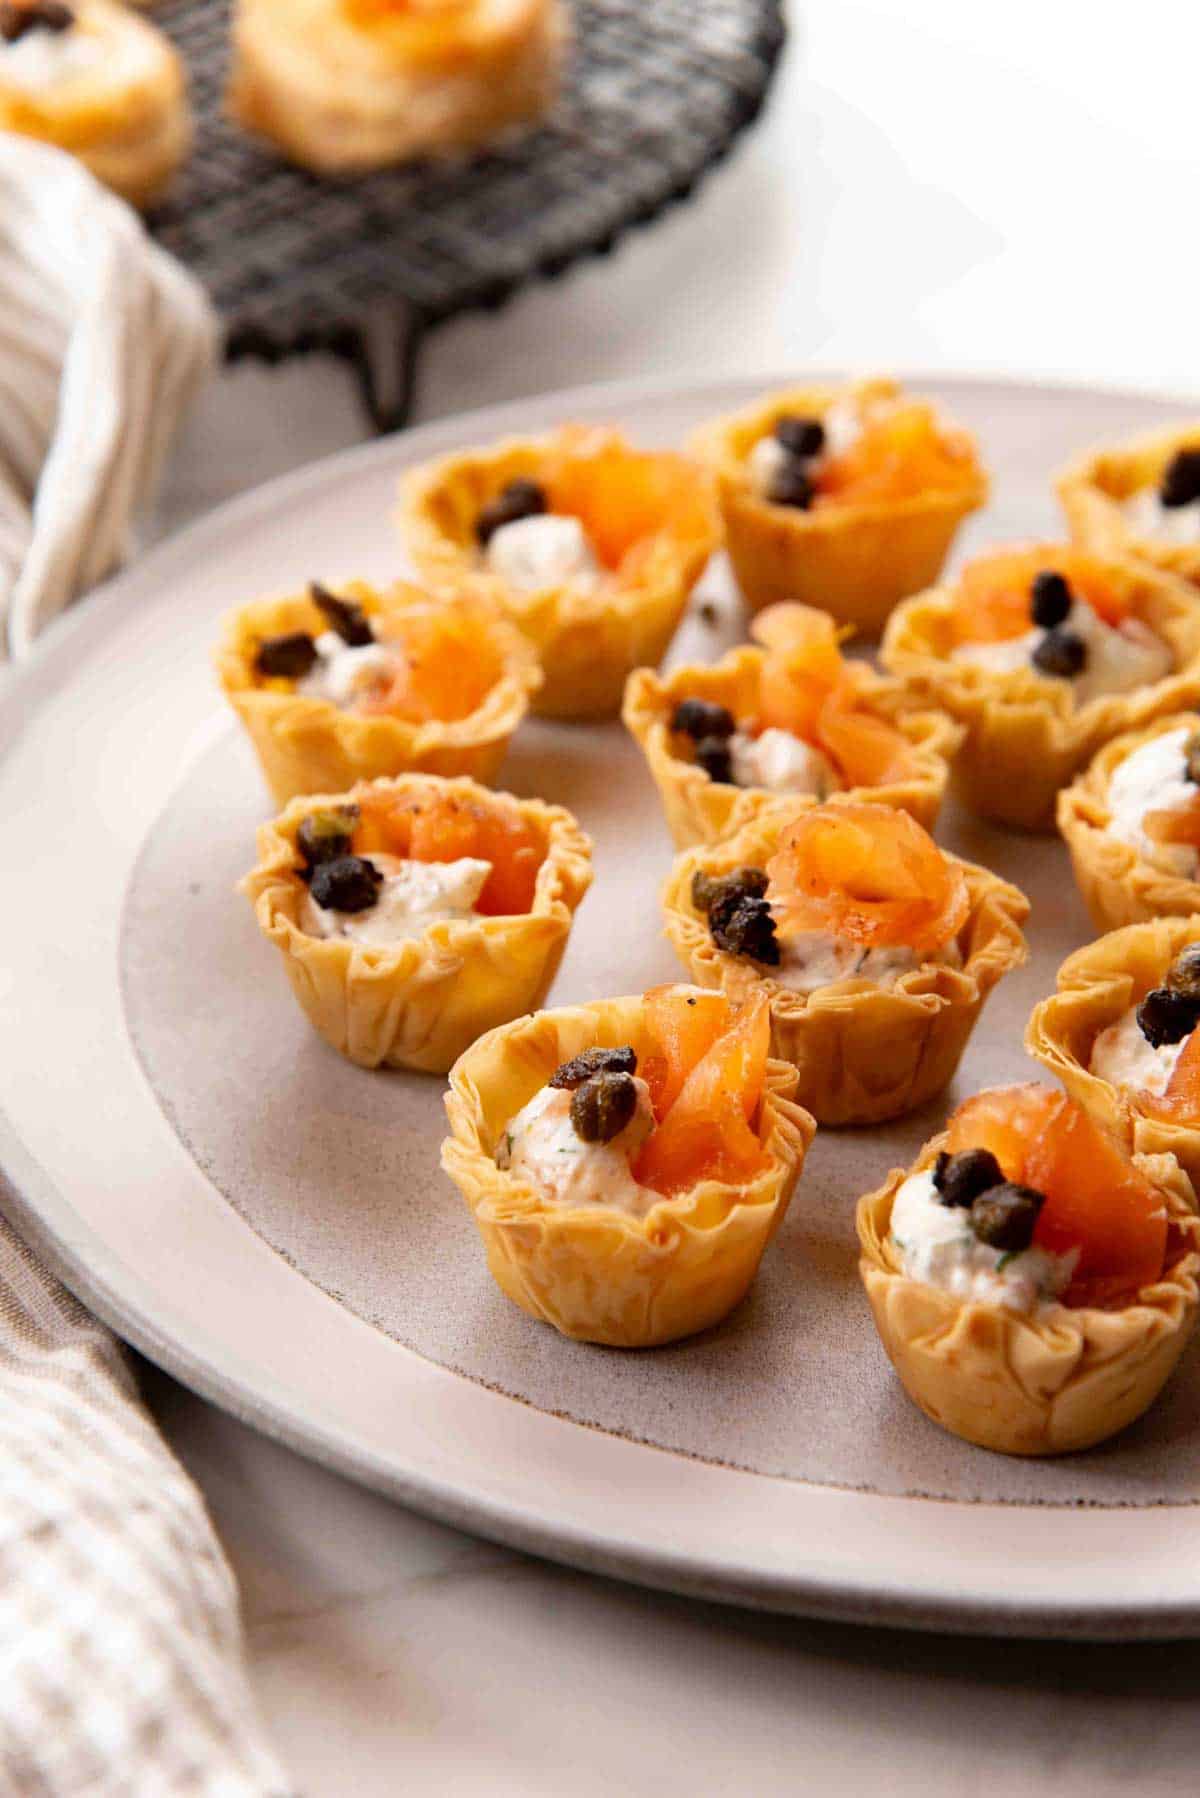
Savory options
- Goat cheese
- Chicken salad
- Creamy chicken filling (from my chicken puffs recipe or these chicken hand pies)
- Tuna
- Chutney and cheese (like this peach chutney or mango chutney)
- Mango and shrimp (like these mango and shrimp appetizers but with phyllo shells)
- Mini quiches (like these tuna melt mini quiches)
Sweet options
- Sweet cream cheese filling
- Mousse (chocolate mousse or butterscotch mousse)
- Pastry cream (vanilla pastry cream or chocolate pastry cream)
- Chocolate ganache
- Whipped cream filling (stabilized whipped cream or chocolate whipped cream or even coffee whipped cream)
- Fruits and whipped cream (or fruit-flavored whipped cream like this strawberry whipped cream)
Recipe FAQs
What’s the best way to defrost phyllo dough?
The best way is to defrost it in the fridge overnight, while the dough is in its original packaging. This way the dough thaws out more evenly.
I do not recommend thawing out frozen phyllo dough rapidly. While you could thaw it out at room temperature within 2 hours or so, it’s NOT recommended to keep the dough somewhere warm to accelerate the thawing process.
Heat can make the dough more fragile and even dry it out.
How do you keep phyllo dough from drying out?
Phyllo dough that’s out of the box must be covered with a damp towel or napkin to prevent it from drying out.
Use room temperature water to soak a cloth napkin or towel, OR several layers of paper towels. Then wring out the excess water and place it over the exposed phyllo dough. This will keep the phyllo dough pliable while you work with it.
How to keep phyllo shells from getting soggy?
It’s important to remove the pastries from the muffin pan while they are still warm, so they can cool down completely on a wire rack.
If the cups are cooled down in the muffin pan, there’s a chance it can become soggy due to condensation.
Once the shells are cooled, place them in an airtight container to keep them crisp for as long as possible.
Can I repurpose phyllo dough scraps?
It’s not possible to make phyllo cups from the scraps, without piecing them together like puzzle pieces.
However, you can use these scraps to make other phyllo dishes! Shredded phyllo cakes or pies are the best option!
You can also bake the leftover scraps with a sprinkling of cinnamon and sugar to make cinnamon chips. That’s what I usually do!
Recipe
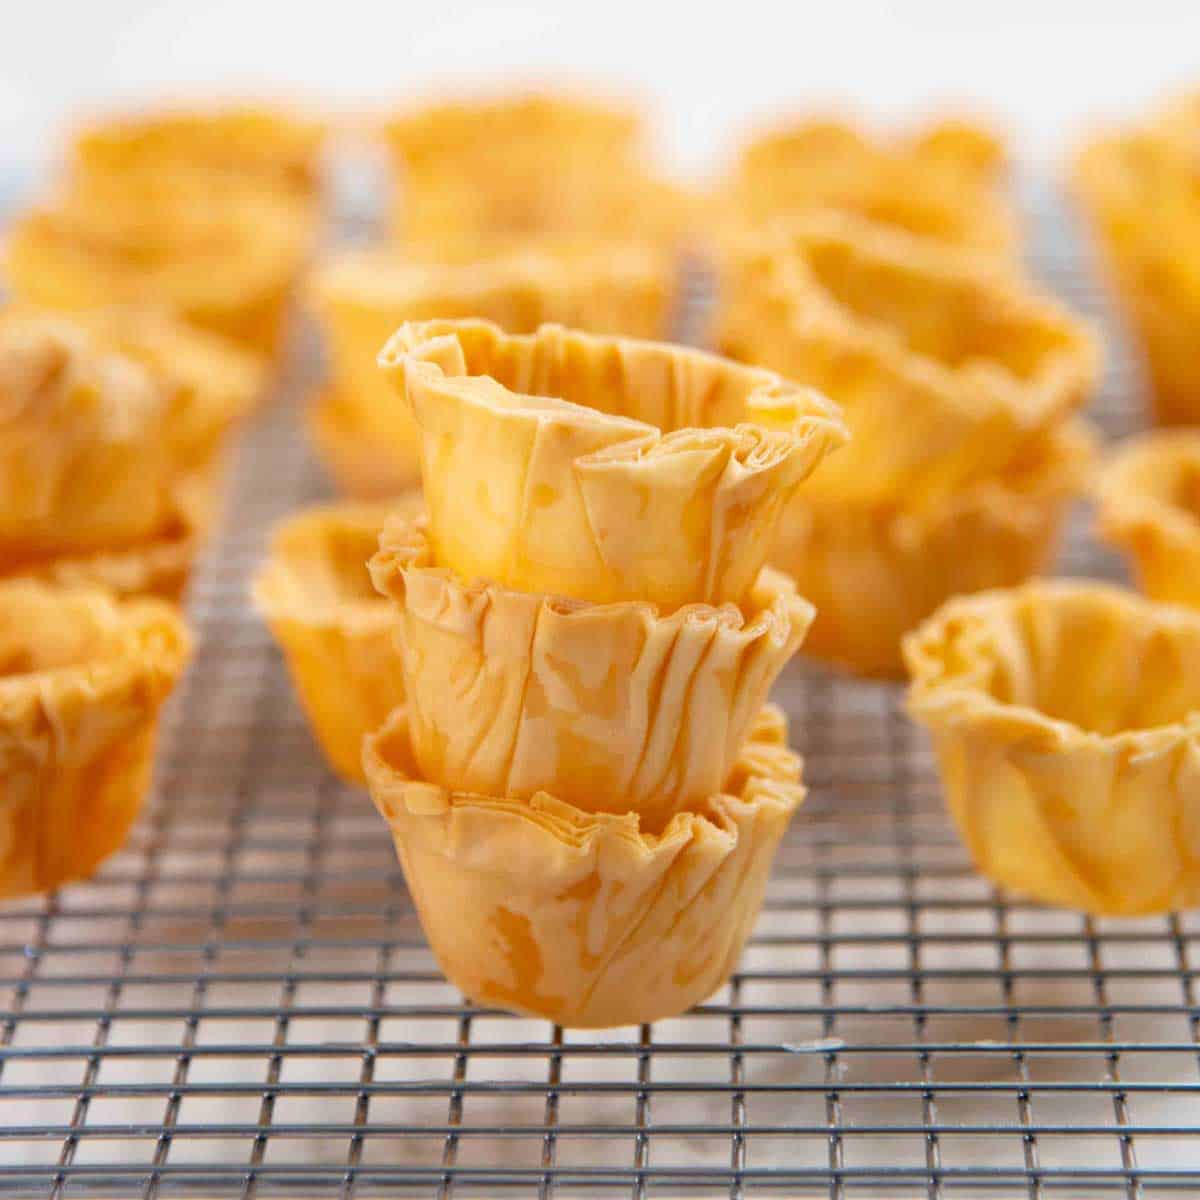
Homemade Phyllo Cups (Phyllo Shells)
US based cup, teaspoon, tablespoon measurements. Weight measurements are recommended for accurate results whenever available.
Common Measurement ConversionsEquipment:
- 2 mini muffin pans (or just 1 is fine too)
- Pastry brush
- 1 x round cookie cutter about 5 inches in diameter (between 4.5 – 5.5 inches)
Ingredients:
- 1 lb phyllo dough package this contains about 18 sheets of phyllo
- 226 g unsalted butter warm and melted (for the sheets and the mini muffin pan)
Instructions:
- Thaw out the frozen phyllo dough overnight in the fridge.
- Prepare a cloth napkin that's large enough to completely cover the phyllo dough (at least 12 x 16 inches), by soaking it in room temperature water. Then wring out the excess and keep it aside until needed.1 lb phyllo dough package
- Carefully unravel the phyllo dough on your countertop or a tray.
- Place the damp napkin over the dough and set it aside. Make sure the dough is always covered with a damp napkin or towel to prevent it from drying out.
Yield of shells
- Four sheets of phyllo layered on top (12 x 16 inches) can be used to cut out 12 – 15 circles to make that many phyllo shells.
- With one phyllo pastry dough package, you should be able to get 48 – 66 phyllo shells.
- You can make as many or as little as you need. Place the remaining dough sheets in the original plastic packaging and wrap it with plastic wrap. It can be stored in the fridge for a couple days.
Layering the phyllo dough
- Carefully remove 1 sheet of phyllo and place it on your countertop.
- Carefully brush the phyllo sheet with melted butter. Gently but firmly hold down the phyllo with one hand while brushing it with butter to prevent tearing. If the butter becomes thicker, or hardens, melt it in the microwave again, as it will be easier to brush on.226 g unsalted butter
- Lay the second sheet of dough on top. Try to align the edges of the two sheets to make sure the whole surface is evenly layered.
- Repeat this process (brush with butter, then layer the next phyllo pastry sheet) about 2 more times. You should end up with 4 sheets of phyllo layered with melted butter. You can do another layer if you like, but I find four sheets is more than enough.
- Repeat this whole process with the remaining phyllo dough. If you started with 18 total sheets of dough, there'll be 2 sheets remaining (after using up 16 sheets). These two sheets can be buttered and folded in half, and then layered together with melted butter to make a 4 sheet phyllo stack that is half the size.
Cutting the phyllo dough
- Make sure to have the phyllo dough stacks under a damp napkin, and have another damp napkin to keep the pastry circles under as well.
- Use a sharp round cookie cutter that's between 4.5 – 5.5 inches in diameter. Mine is about 4.75 – 5 inches.
- Cut out circles from the phyllo dough sheet stacks. To prevent the dough from tearing, slowly rotate the cookie cutter clockwise and counter clockwise, while gently but firmly pressing it down on the dough. This will help you cleanly cut through the dough without tearing.
- Repeat until you have cut enough circles through the whole sheet of dough. If any of the circles have loose dough sheets, stick them back together using a bit of melted butter. I'm able to cut about 15 circles from one stack.
- Make sure to keep the dough circles under a damp napkin to prevent them from drying.
- Repeat with the remaining phyllo dough stacks as well.
Shaping phyllo cups
- Preheat the oven to 350°F / 180°C.
- Brush the mini muffin pan wells with butter. Take each phyllo dough circle and make mini accordion-style folds along the edge (see pictures in the post for reference). Once you’ve done this, the cut phyllo circle will form a loose cup shape, with folded lines along the side.226 g unsalted butter
- Use your fingers or a tart tamper to gently push down the circle into the well. Press it down to the bottom so that the pastry sits flush with the bottom of the muffin pan well.
- Then use your fingers to flatten the sides against the walls of the well, using the fold creases to fit the pastry in the well.
- Repeat to fill the mini muffin pan. Keep any unused pastries covered with a damp towel.
- Prick the bottom of each shell in the muffin pan with a fork.
Baking the phyllo shells
- Place the muffin pan on a half sheet pan, so that it's easier to remove the pan from the oven.
- Bake this in the preheated oven for about 15 – 20 minutes, or until the shells turn a golden brown in color. The time can vary, depending on your oven and the baking pan, so keep an eye on them.
- Once baked, remove from the oven and let the phyllo cups cool slightly. Then while it’s still warm, remove the cups from the muffin pan and let them cool completely on a wire rack.
- Repeat with the remaining phyllo dough circles.
Recipe Notes
Storage
These will keep in an airtight container for about 24 hours (maybe up to 48 hours) at room temperature. If you want to keep it for longer, store them in the fridge for a few days or in the freezer for a month or so. Make sure the container is air-tight. These can crumble if stacked or crushed, so store them carefully.Nutrition Information:
“This website provides approximate nutrition information for convenience and as a courtesy only. Nutrition data is gathered primarily from the USDA Food Composition Database, whenever available, or otherwise other online calculators.”













Leave a Reply