

Your complete guide on how to blind bake pie crust perfectly, so you’ll never have trouble with shrinking, burnt, or collapsed crusts ever again!
I share all my tips and best techniques for everything from lining your pie crust to choosing pie weights, sealing the pie crust, why and when to blind bake or par bake your pie crusts, and baking time and temperatures too.
Now that we know how to make buttery, flaky homemade pie crust, here’s everything you’ll need to know about blind baking pie crust! This step by step guide shows how to blind bake pie crust perfectly, eliminating all the guesswork with the most foolproof technique.
- No more burnt crust
- Or unevenly baked pie crust
- Or pie crust that collapses as it bakes
This method gives you perfectly blind baked or par baked pie crusts that keep their shape, and are evenly baked throughout.
Why this recipe works

- Step by step instructions and guide, so you know all the common pitfalls to avoid.
- If you have trouble with collapsed, burnt, or shrinking pie crust, then this guide will explain why that happens, and how to avoid those issues.
- I share the best technique for choosing pie weights, and the correct oven temperatures for foolproof results.
- This recipe also shows you different ways to seal the pie crust to prevent it from ever getting soggy.
What is blind baking?
No, it’s not baking with your eyes closed. (Sorry, I just had to!)
Blind baking is simply baking the pie crust dough that’s lining a pie plate or deep tart pan, without any filling. You’re only baking the crust, so it’s crucial that the crust keeps its shape and doesn’t collapse or deform as it bakes.
And when we talk about blind baking, we also have to talk about par-baking (or partially baking).
Difference between blind baking and par baking
They’re both the same process, but blind baking is a fully baked empty pie crust, whereas a par baked pie crust is only partially baked (as the name suggests).
A par-baked crust is baked fully AFTER you add a filling to the pie crust that also requires baking. Then they are both baked fully in the oven.
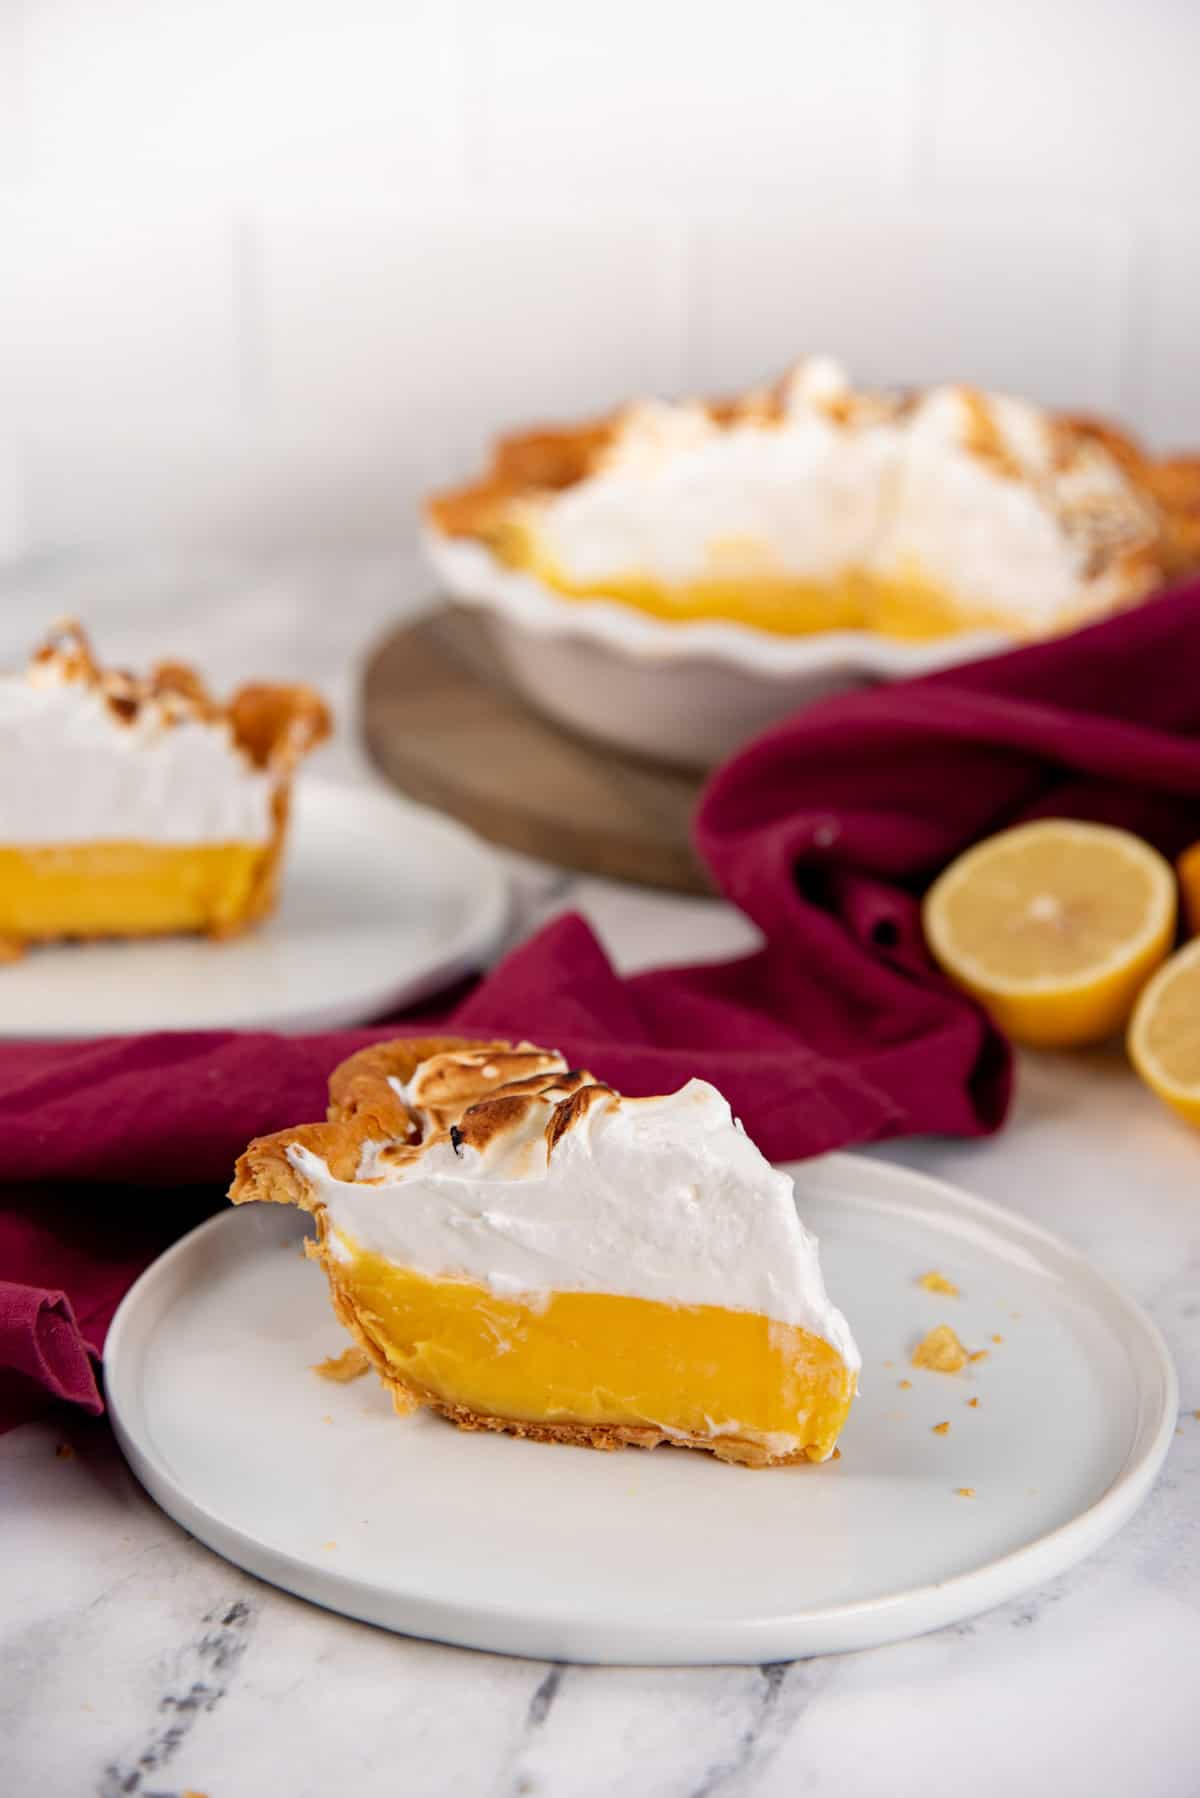
A custard pie or a pumpkin pie or even a lemon meringue pie are examples of pies that can utilize a par baked crust to prevent a soggy bottom crust.
Why and when to blind bake pie crust?
Blind baked pie crusts are perfect for fillings that require no cooking.
As the crust is already fully baked, the filling should be already cooked, or be a no-cook or no-bake filling. The filling will either thicken as it cools, or has a setting agent such as gelatin to keep its shape and set.
Here are some examples of pies with a fully cooked pie filling that you can easily pair with a blind baked crust.
- Chocolate pudding pie (like the filling I use in this no bake chocolate pudding pie)
- Ice cream pie
- Chocolate mousse pie

Examples of pie fillings that do require baking, so these can be paired with par-baked pie crusts.
- Lemon meringue pies (with lemon fillings that require baking)
- Old fashioned custard pie
- Quiches (like this classic quiche lorraine)
- Crumble pies (with no top crust)


How to blind bake pie crust (step by step)
Step 1 – Roll out pie crust
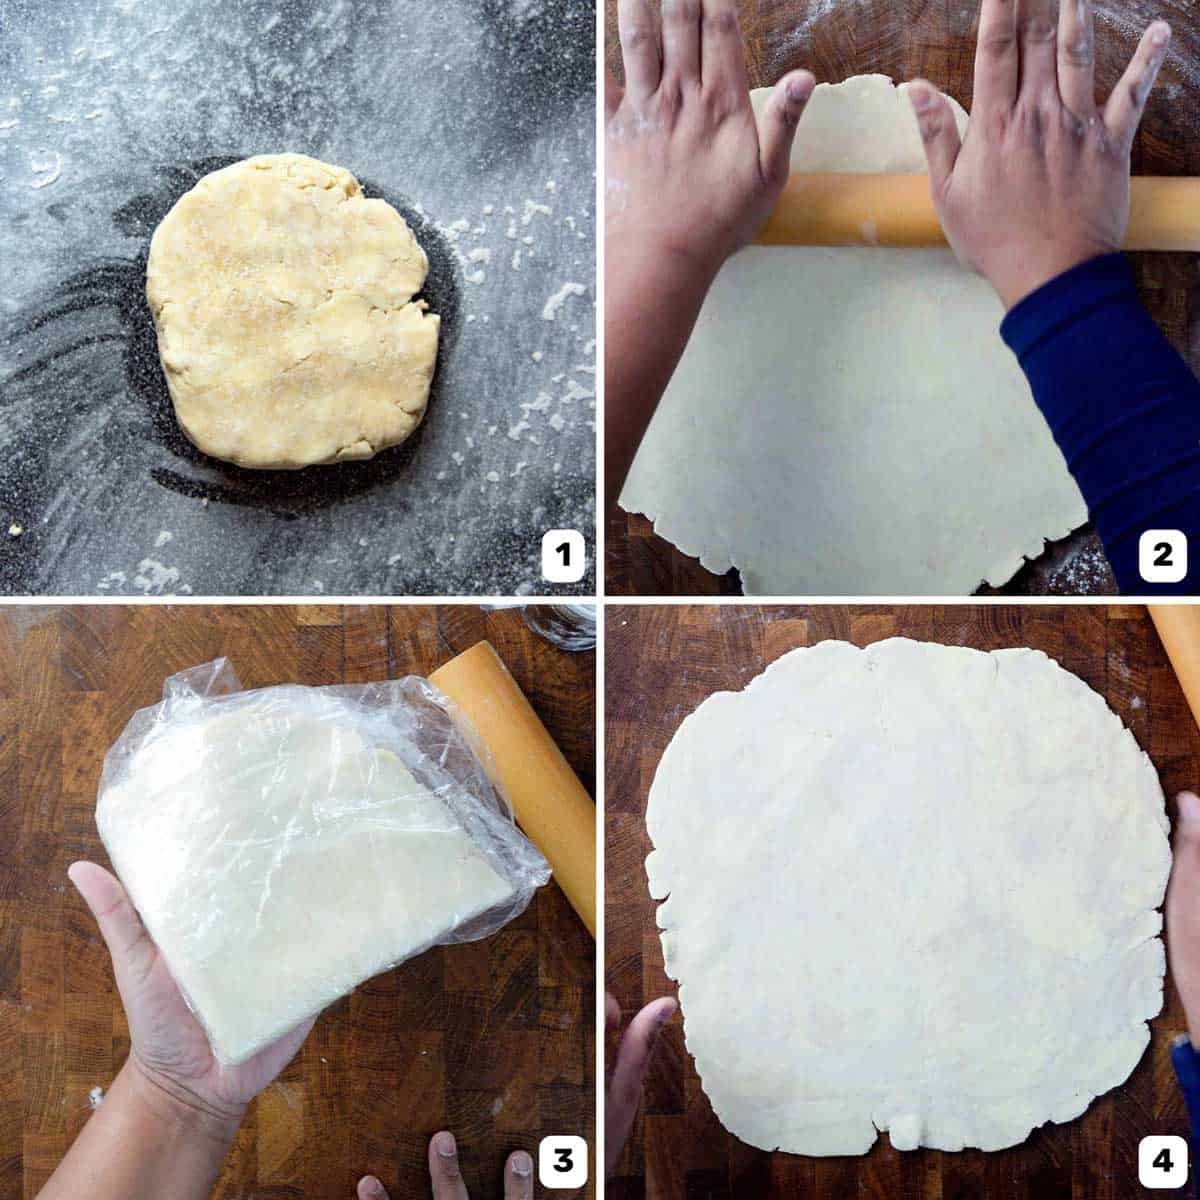
First, make the pie crust dough and roll it out. You can buy pre-made pie crust too. Here, I’m using my favorite homemade all butter pie crust recipe.
Roll out your chilled pie crust (images 1 and 2), so that it’s large enough to line a 9 inch deep pie plate. The dough should be about 3 mm in thickness.
Tips for rolling out pie crust
- The dough should be chilled and rested before rolling out.
- If the dough starts to shrink as you roll it out, wrap the dough in plastic wrap and let it rest for about 20 – 30 minutes in the fridge, before rolling it out again (image 3).
- If the dough is shrinking, it’ll be harder to roll it out to get the correct thickness.
- Shrinking dough will shrink even more as it bakes. So, it’s best to let the dough rest first so that it maintains its shape properly.
- Roll out the dough while maintaining a round shape, so that it fits in the pie plate (image 4).
- Make sure to only add a light dusting of flour to prevent the dough from sticking to the countertop.
- Flip the dough over and roll it out on both sides.
- You can fix any tears in the dough by pinching the dough together, or by overlapping some of the dough to seal the tear.
Step 2 – Line the pie pan
Standard pie plates are usually between 9 – 10 inches. You can also find shallow pie plates that are just over 1 inch in depth, but I like to use the deep pie plates that are about 2 inches in depth. I only use the shallow pie plate for fillings that are very rich and dense.
This dough will easily cover a standard deep pie dish without having to stretch the dough. If you use this crust to line a shallow pie dish, there will be some pie crust left over.
Because of the butter content in the pie dough, you don’t need to butter or line your pie plate.
To transfer the rolled out pie dough into the pie dish, you can either,
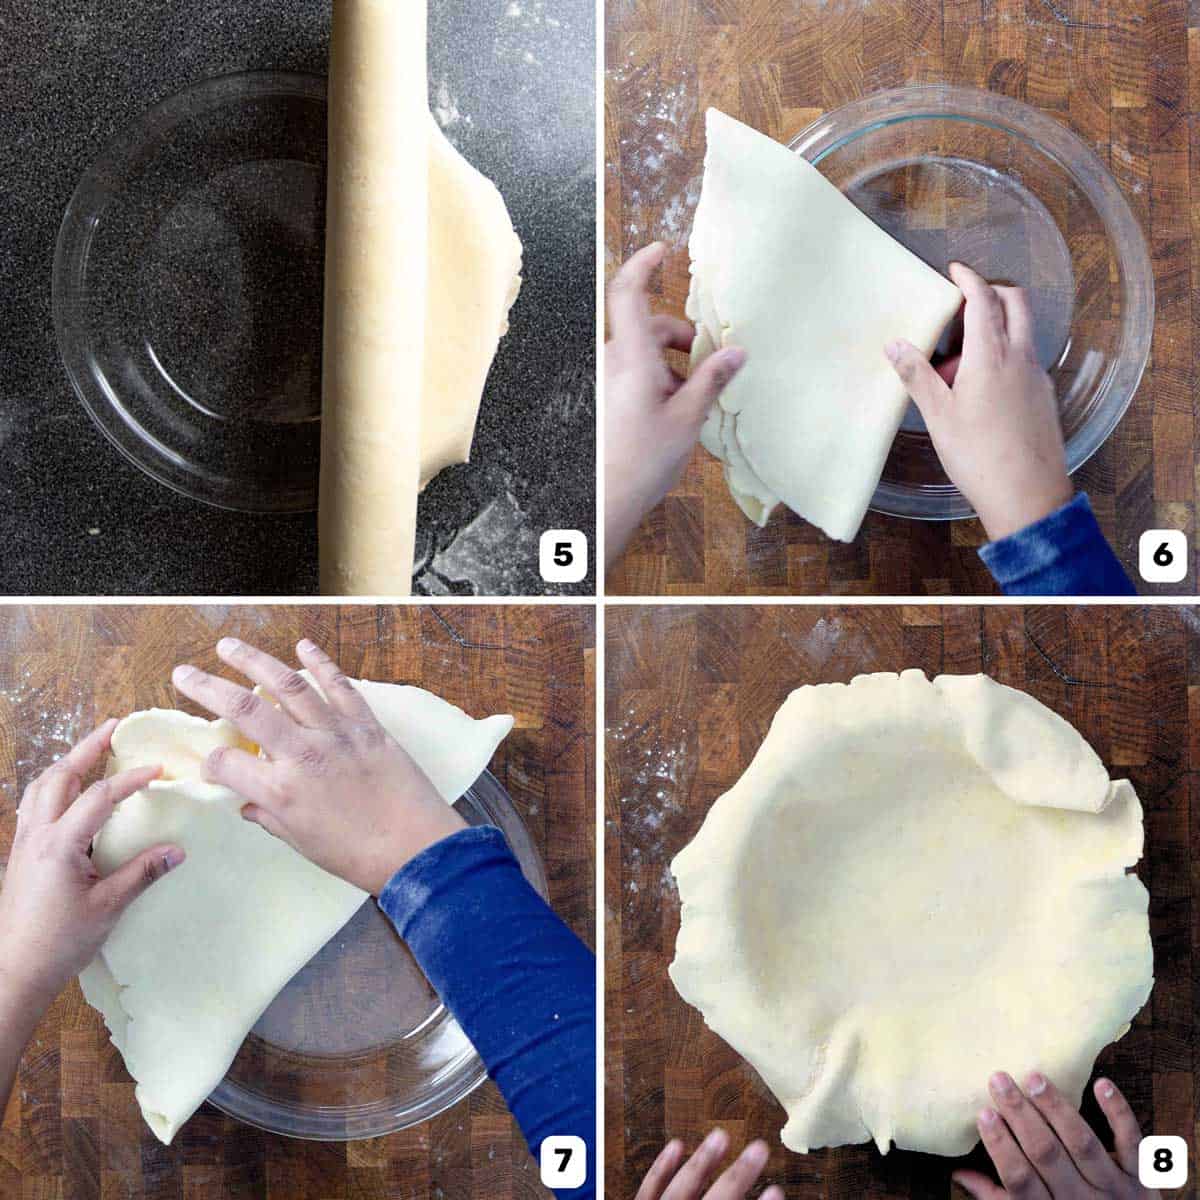
- Roll the dough on the rolling pin, and then gently unroll the dough from the rolling pin onto the pie dish (image 5), OR
- Fold the dough into quarters and transfer it to the plate and gently unfold it in there (images 6 – 8).
Tips for lining the pie dish with the pie crust
- DO NOT stretch the dough to fit it inside in the pie dish. Especially to fit the bottom of the pie plate, as this will cause the crust to shrink as it bakes.
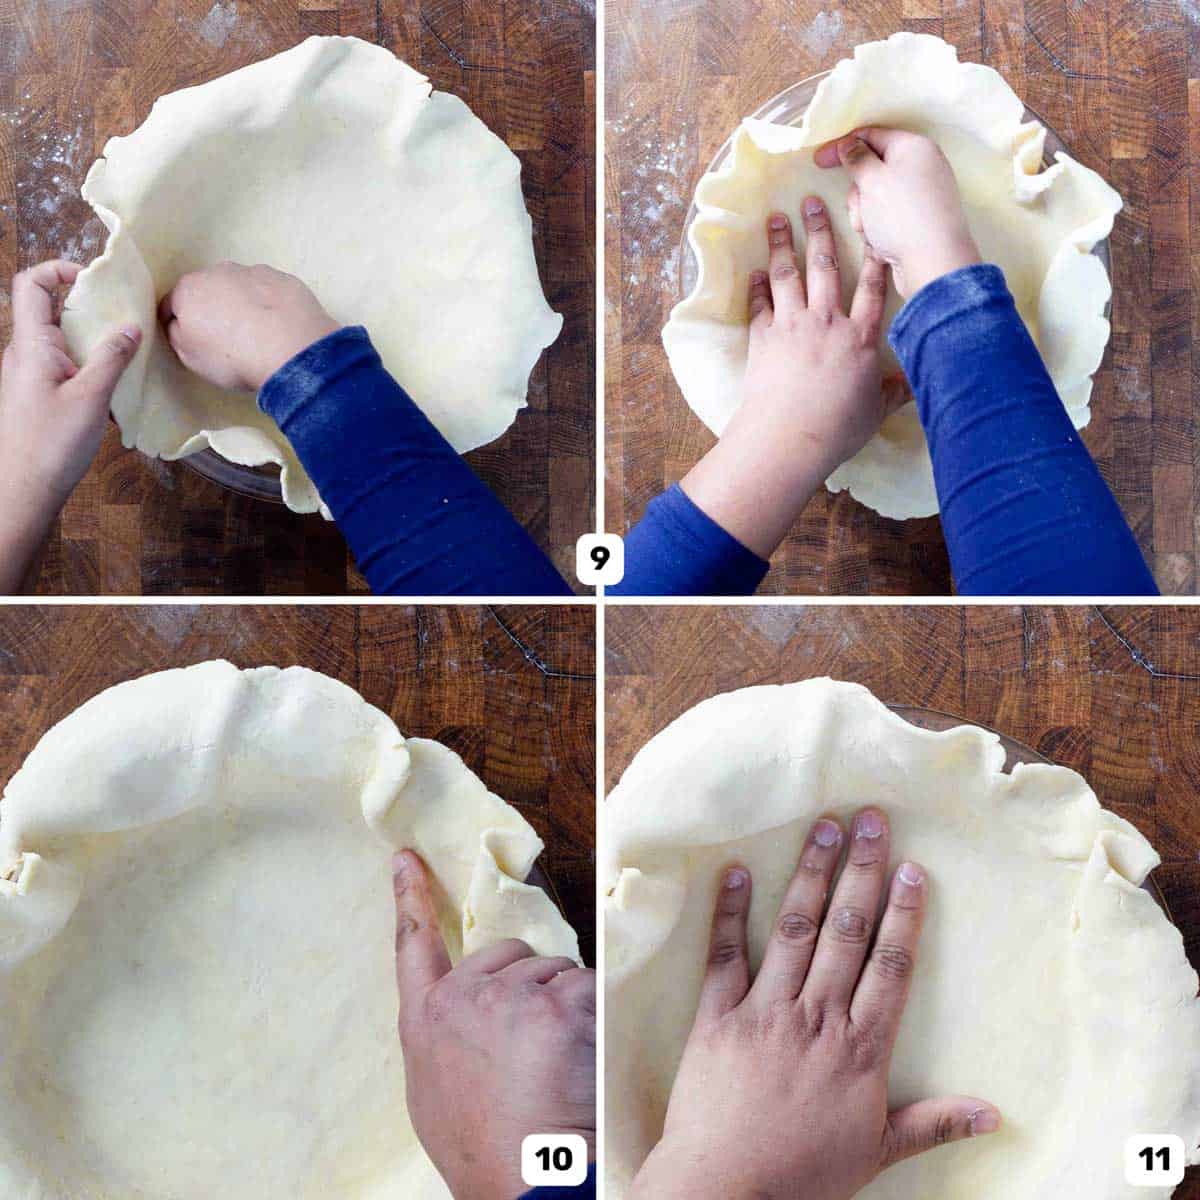
- Instead, gently lift the dough and lay it inside the pie dish, using your hands to fit the dough into the bottom of the pan first, WITHOUT stretching the dough. Then use the back of your fingers to gently press the dough into the bottom edge of the pie dish, while draping the excess dough over the sides of the pan (image 9).
- The dough along the sides of the pie plate will have folds. Gently press the dough into the sides, while removing any folds in the dough. If you press the dough in WITH the folds, you will end up with unevenly thick pie crust that won’t bake evenly (images 10 – 11).
Step 3 – Trim the pie crust overhang
Now, you’ve got a pie plate lined with pie crust dough with even thickness. The bottom isn’t stretched out, and there are no folds on the sides of the pie crust either. But there should be an excess overhang over the edges of the pie plate.
This excess is trimmed off. Measure about 1/2 – 1 inch of overhang from the edge of the pie plate.
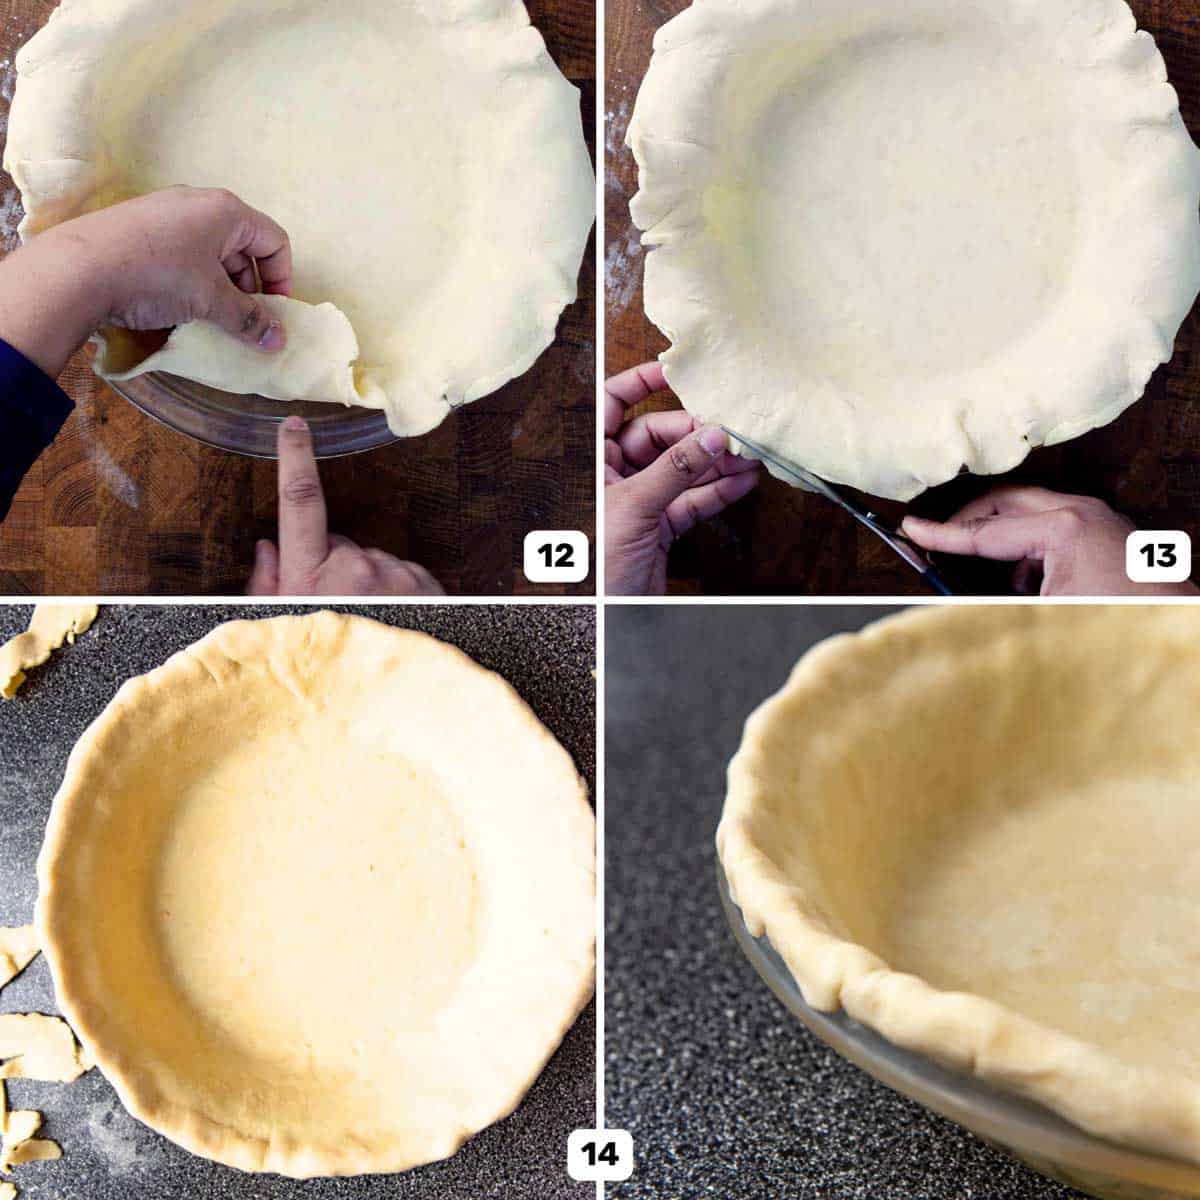
The overhang should be measured from the edge of the pie plate rim (image 12). Some pie recipes recommend a ½ inch overhang. However, I recommend leaving a 1 inch overhang for a thicker crust, as it helps prevent the crust from sliding down the sides as it bakes.
For double crusted pies, I only leave a 1/2 inch overhang, but for blind baked / par-baked / single crust pies, I prefer to leave a larger overhang.
Cut the excess using scissors or a knife. Be careful not to pull the pie crust as you trim the excess (image 13).
Step 4 – Form the pie crust edge
If the butter or dough gets too soft or sticky at ANY POINT, please refrigerate or freeze the crust for a few minutes to let the butter or dough harden.
Roll the overhang under the crust to form a thick border that’s flush against the edge of the pie pan (image 14). If you roll the overhang on top, it can easily unroll as it bakes. That’s why the crust is rolled up under the crust instead.
Now, you can use your fingers to ensure the rolled crust has an even thickness all around the pie edge.
If the pie crust is still firm, then we’re ready to flute or crimp the edge. A heavier pie crust edge will grip onto the pie plate better and prevent slipping as well.
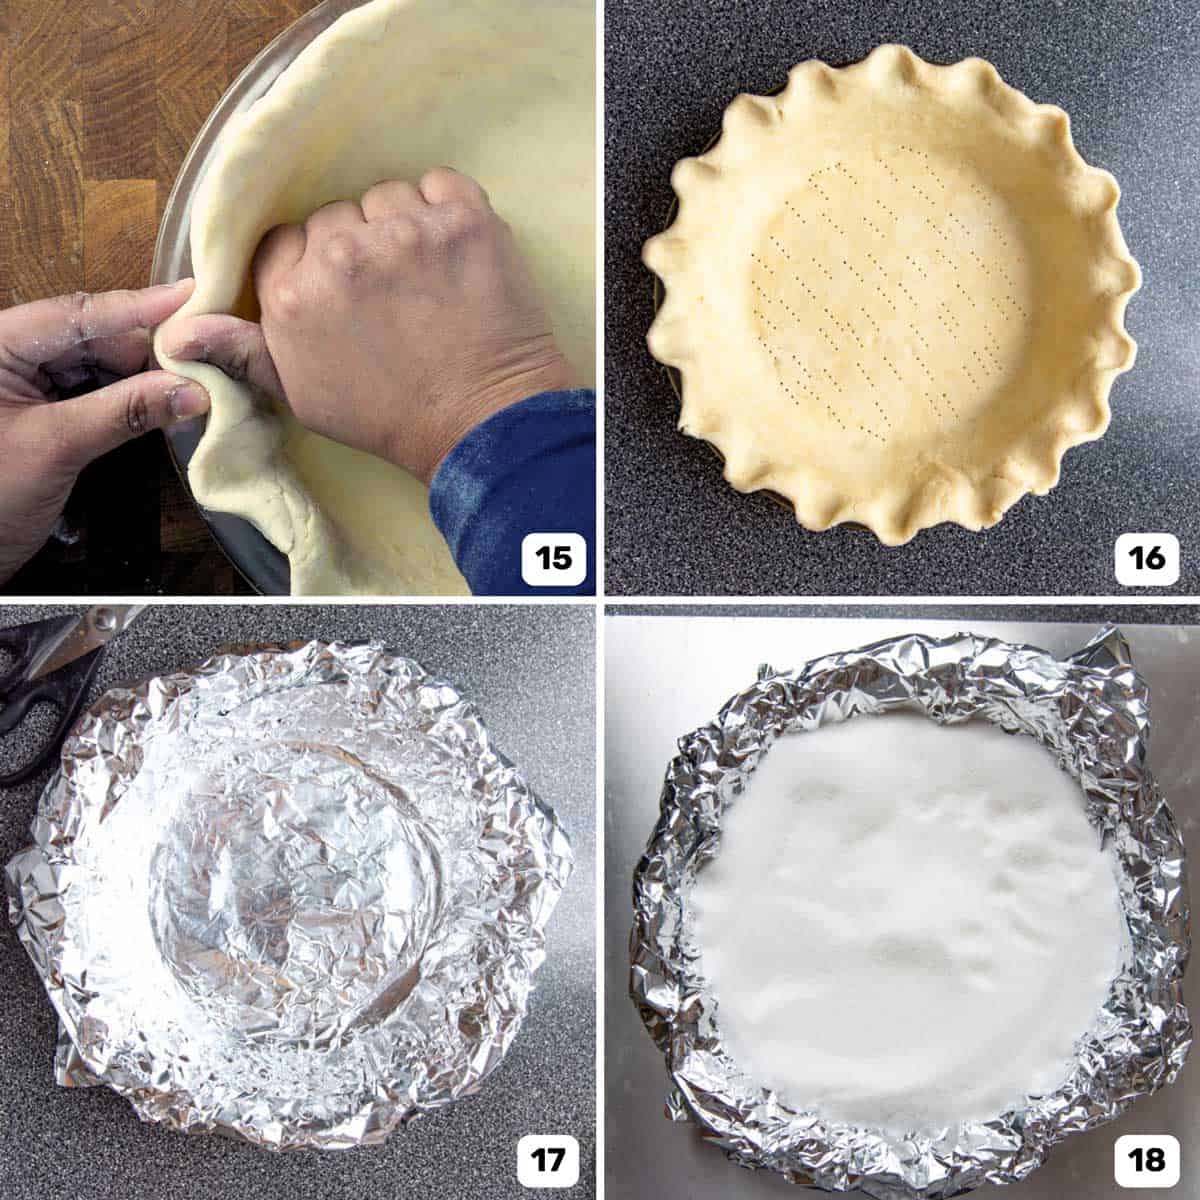
The easiest option is to crimp the edge with a fork. I like to create a fluted edge instead, but you can choose any option that’s easier for you! (image 15 – 16)
Now freeze or refrigerate the pie crust for at least 30 minutes before baking it. This allows the gluten to relax, and for the butter to become firm again. This will help prevent the pie crust from shrinking AND produce a nice flaky crust!
Step 5 – Baking temperature and time
Preheat the oven properly before blind baking your pie crust. I also like to keep my pie plate on a half sheet pan. The sheet pan catches any melted butter, and makes it easy to move the pie plate in and out of the oven.
Preheat the oven to 350 F / 180 C. The pie crust will be blind baked at this temperature for about 60 – 70 minutes, or par baked for about 50 minutes.
Why longer baking time?
Classically, pie crusts are blind baked at a high temperature for a relatively short time. For years, this was the technique that I followed.
However, I found that high heat causes rapid steam release, which in turn causes the pie crust to lift and collapse as it bakes.
The lower baking heat creates steam more slowly as the crust bakes through slowly. This helps the pie crust retain its shape, and prevents collapsing.
I learned this technique from Stella Parks. Once I tried her method for blind baking pie crust, I never looked back.
Neither will you!
Step 6 – Line and weigh down the crust
Before adding pie weights to your crust, it’s important to line your pie dough first. Then it becomes easier to lift the weights out of your pie once the crust is baked.
I’ve seen some who have forgotten to do so, or thought they did not need to. This will result in the weights sticking to the crust, and making it super difficult to remove.
Foil
I like to use foil to line the crust (image 17). Foil will conduct heat better, and aid in blind baking the pie crust more evenly.
But you do have to be careful not to tear the foil. Take care to press the foil into the pie crust, without any air pockets. Since the pie crust is hardened, this will be easy. And since it’s foil, it’ll easily flatten against the crust when pressed and smoothed out. The foil should sit flush against the whole crust.
Parchment paper
With parchment paper, you can lightly crumble the paper first, so that it’s easier to mold the paper against the pie crust. With foil, crumbling it can lead to tears.
Once the pie crust is lined with foil or parchment paper, fill the crust with pie weights. You can read more about the different types of pie weights you can use here. But I like to use sugar, because the results are always perfect, as the sugar helps to weigh down the crust with even pressure throughout.
Fill the lined pie crust with sugar about 3/4 of the way (or at least 1/2). Press down the sugar to make sure it’s weighed down properly (image 18).
Step 7 – Bake the pie crust
As mentioned earlier in this post, the pie crust will be baked at a lower temperature for more foolproof results.
Place the pie plate on the sheet pan and bake for 45 – 50 minutes. The crust will just start to turn a very light golden color / blonde color.
Step 8 – Par baked pie crust
After the initial 45 minute bake time, the crust should be mostly baked through, with minimal color on it.
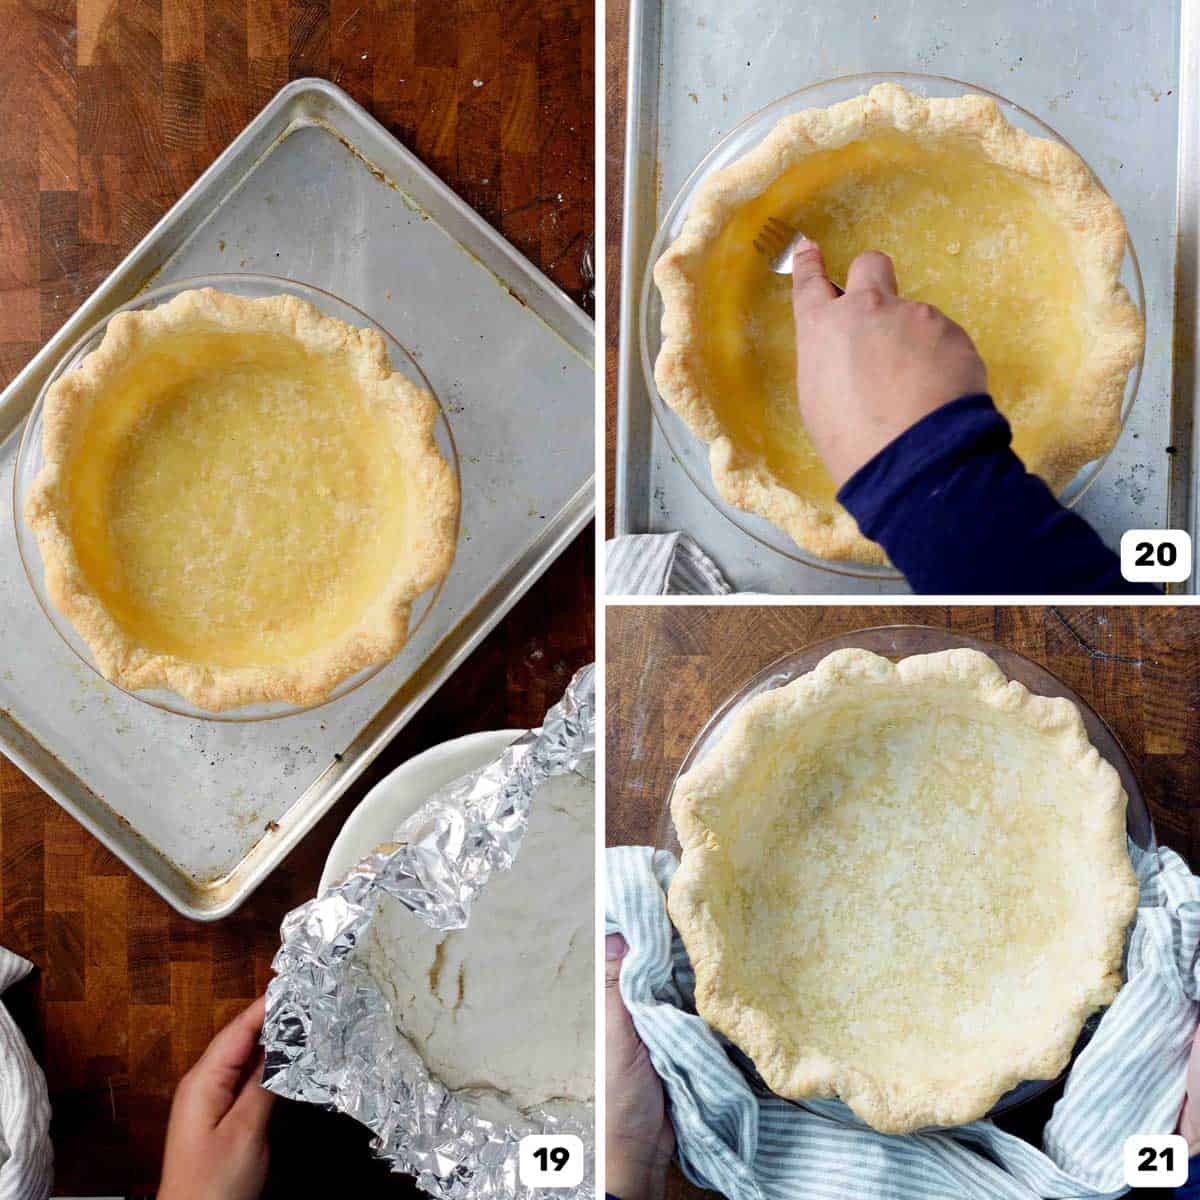
Remove from the oven, and then carefully remove the pie weights. Because of the weight, the lining can tear easily, so be careful (image 19)!
The pie crust should be partially baked through, and the bottom of the crust will look oily or shiny. Prick the bottom of the pie crust with a fork all over (image 20). Then place the pie crust back in the oven for about 5 minutes to dry out the shiny surface.
At this stage the pie crust is par baked (image 21). You can fill the crust with any pie filling that requires cooking and baked further in the oven, until the filling is baked through.
For a fully blind baked crust, follow the following steps.
Step 9 – Blind baked pie crust
After the initial 45 – 50 minutes of baking, remove the pie crust from the oven.
Then very carefully lift out the weights along with the lining, being careful not to tear the lining (image 19).
Now prick the bottom of the pie crust with a fork all over (image 20).
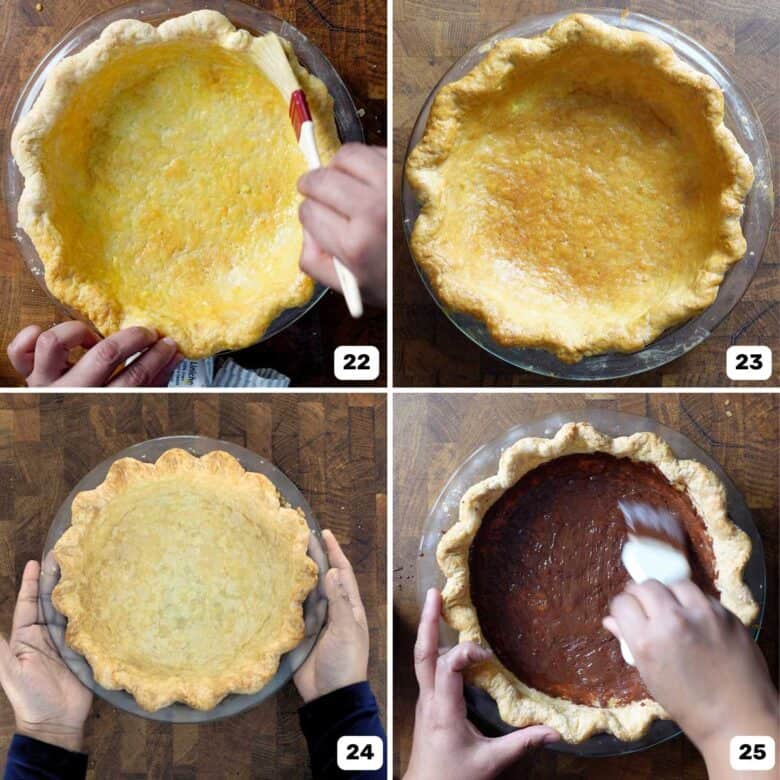
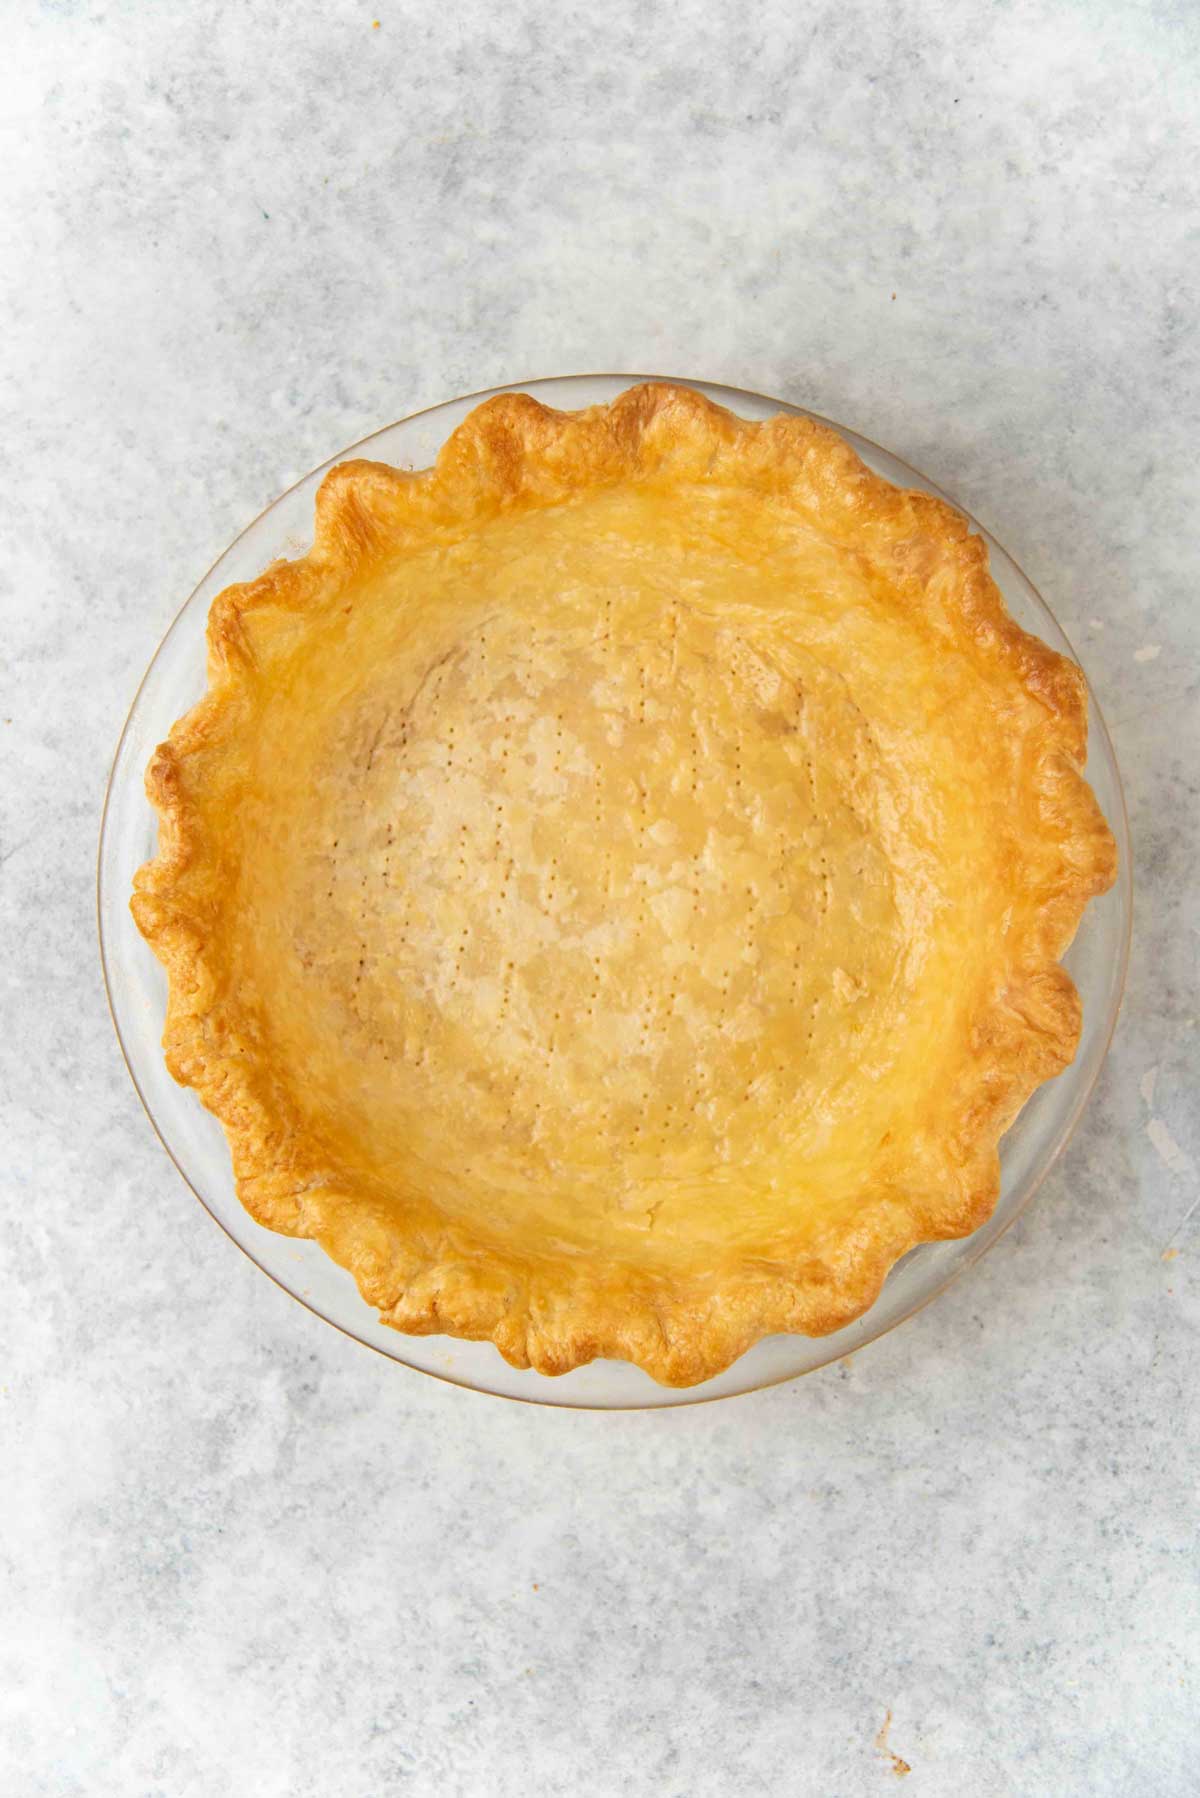
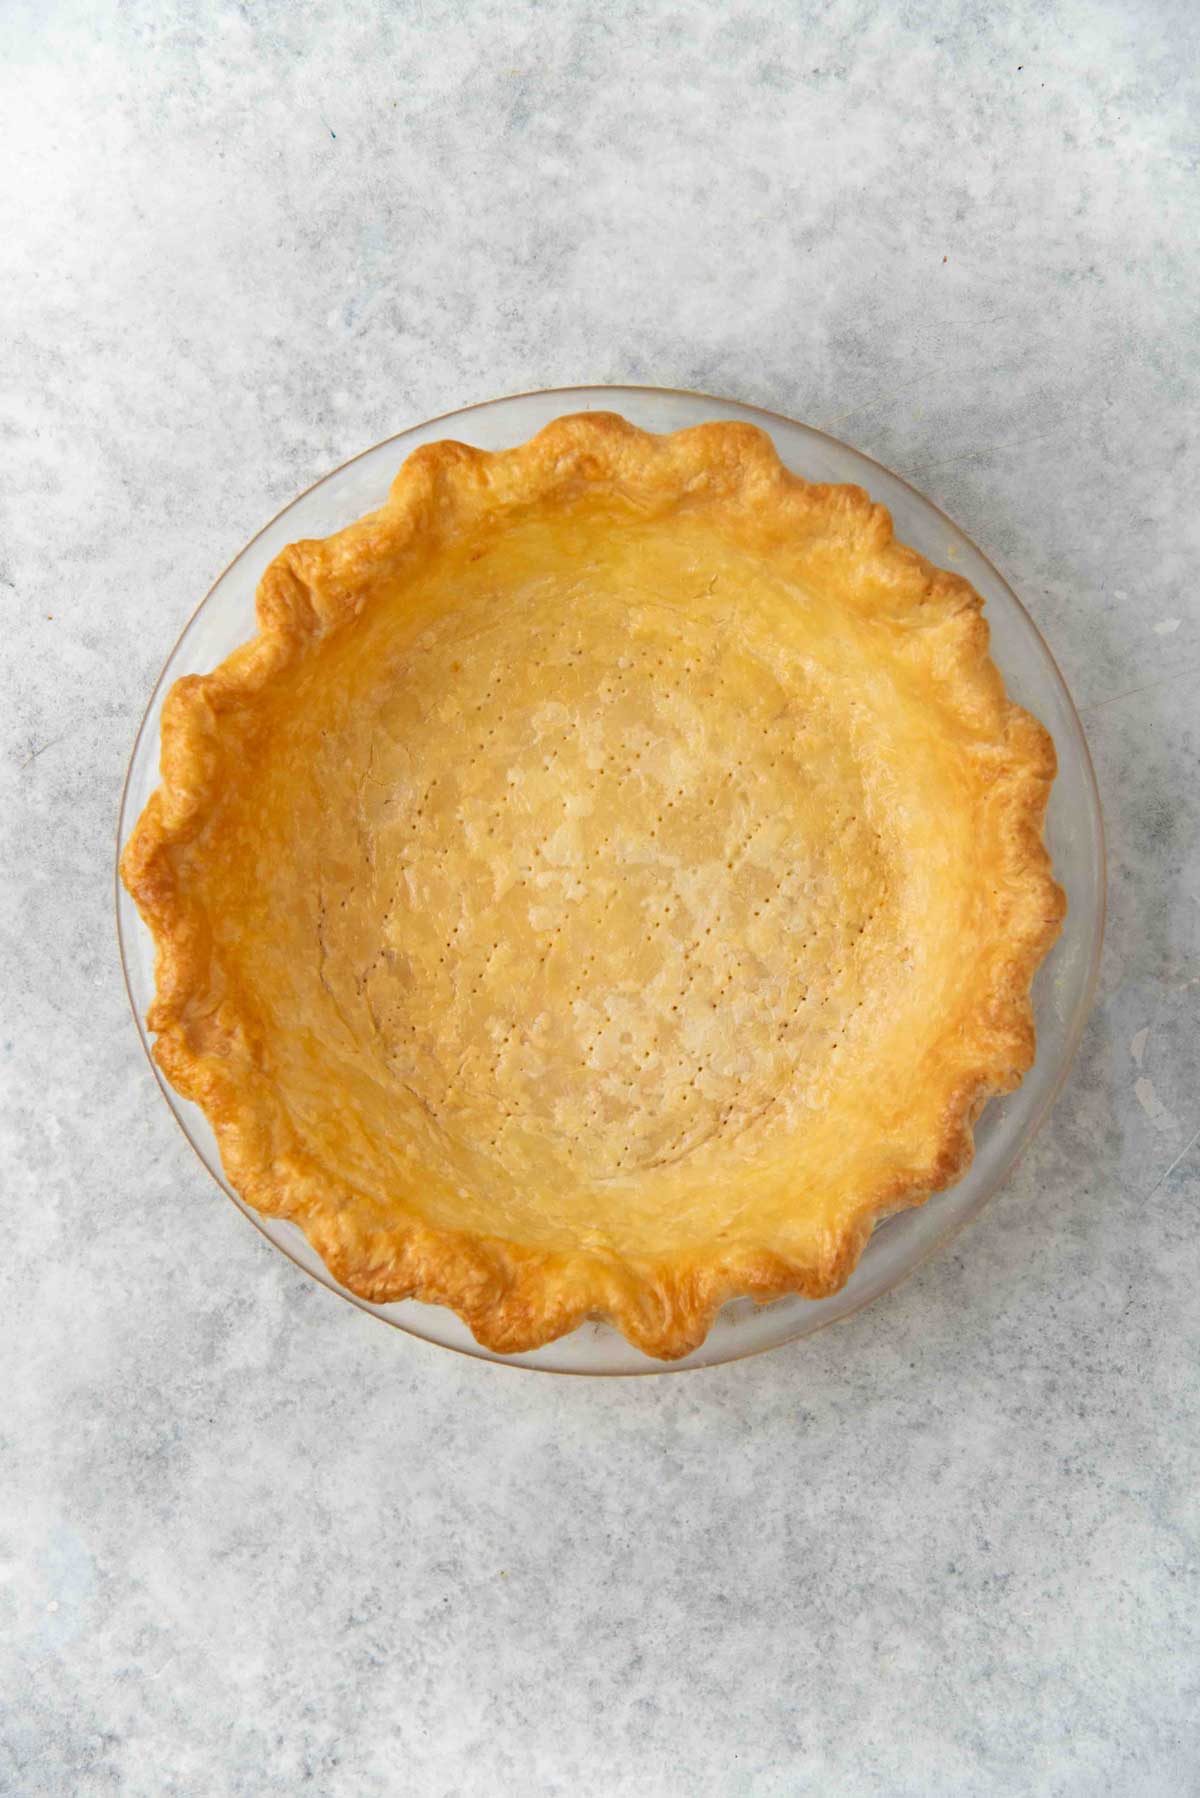
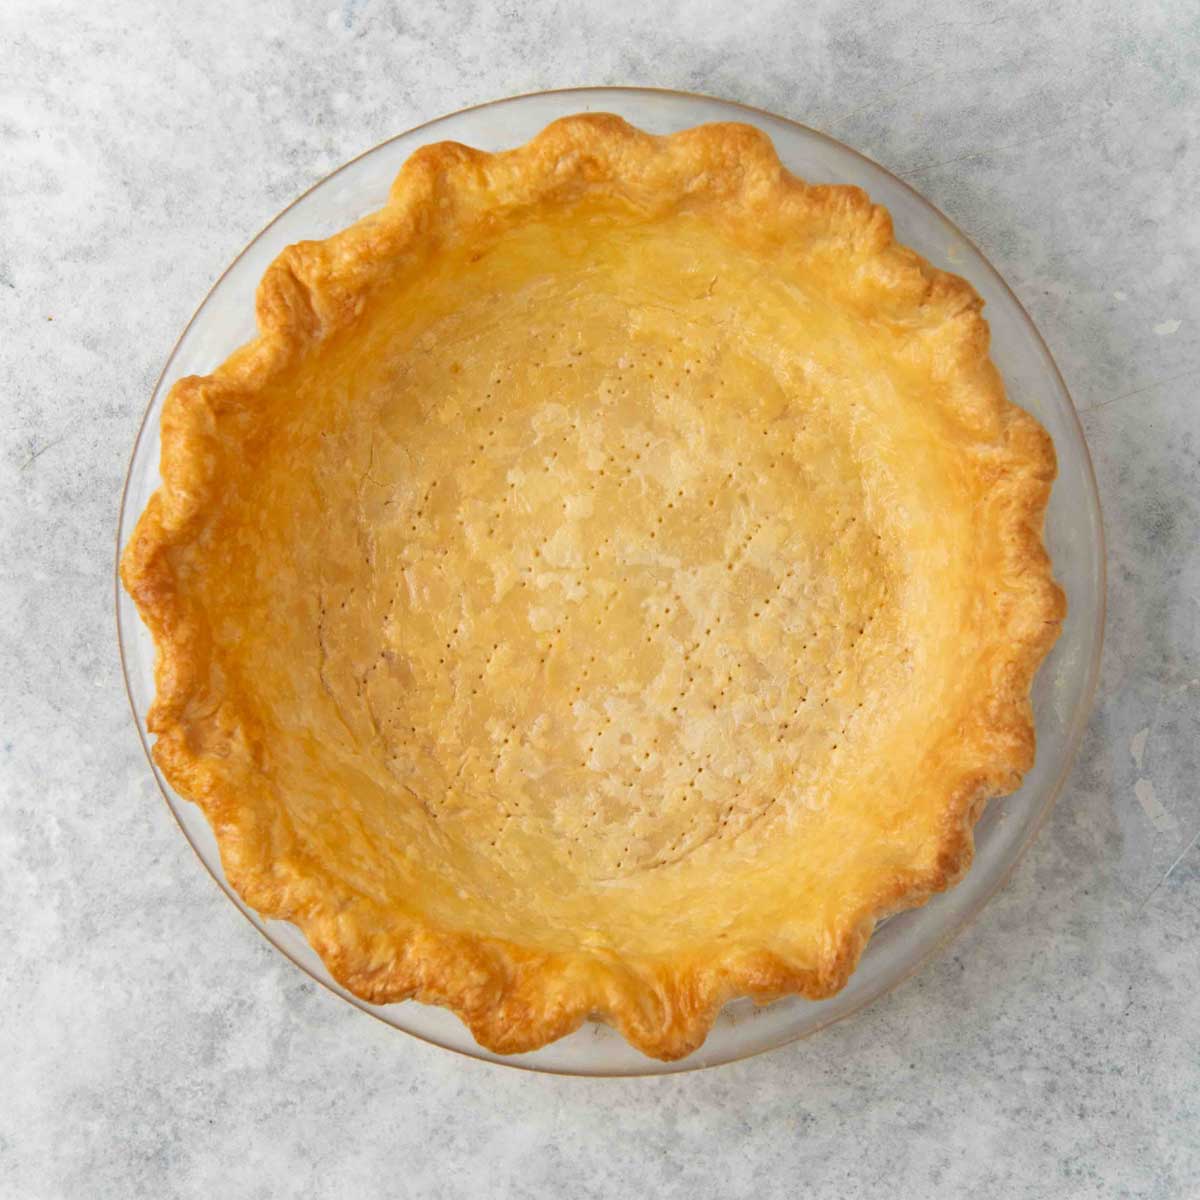
To fully bake the pie crust, place the crust back in the oven to bake for a further 15 – 20 minutes or so, until the crust has turned a beautiful golden brown in color (image 24).
OPTIONAL – During the last 5 minutes, brush the whole crust with an egg wash to get a beautiful sheen on the crust (images 22 – 23).
If the crust is browning too much or unevenly, you can cover the edges with foil, or a silicone crust cover as well. However, this should be less common of a problem with my recipe since the pie is baked at a lower temperature.
Step 10 – Seal the crust
This is an optional step.
If you’re worried about the blind baked crust becoming soggy because of the filling, then you have the option of sealing the pie crust to create a barrier between the crust and the filling.
The egg wash that’s baked into the crust during the last few minutes of baking is one option for sealing the crust. There are a few other options you can use as well.
- Egg wash – Whole egg or egg yolk wash. Creates a golden sheen on the crust (images 22 – 23).
- Egg white wash – Must be baked in as well. Doesn’t add much of a sheen.
- Melted cocoa butter – Food grade cocoa butter brushed onto the cooled down pie crust. Adds very little flavor.
- Melted chocolate – Same as brushing the crust with cocoa butter, but adds the flavor of chocolate (image 25).
Now your blind baked pie crust is ready!
You can fill the crust with any kind of filling and serve.
Which pie weights are best for blind baking?
Blind baking requires you to weigh down the crust while it bakes. This helps the crust keep its shape as it bakes and “sets”. Otherwise, the crust will lift off of the pie plate as it bakes.
There are many ways to weigh down the pie crust. All pie weights require you to line the crust with parchment paper or foil first, before filling it with the weights.
Many people only add enough weight to cover the bottom of the pie crust, like a single layer of ceramic pie weights. However, this is not the correct method. The pie weights should weigh down the bottom AND the sides of the pie crust!
Ceramic pie weights – Specifically made for blind baking pie crust. However, these are pricey, especially if you need to buy enough to at least fill the crust HALF-WAY up the sides.
Other cheaper options
- White sugar – My favorite option. Sugar can be pressed in, so that it holds the crust flush against the pie plate as it bakes. You can also reuse it a few times, and this sugar can still be used for other recipes too. As a bonus, you will end up with sugar that also toasts in the oven, which will add more flavor to your baked goods! But do keep in mind that this sugar will get some butter in it, so it will NOT be suitable to make meringue.
- Uncooked rice – My second favorite option. It’s also reusable.
- Dried beans – Another good option. However, use these beans (and grains) just as pie weights, because they may not cook properly afterwards.
My favorite way to blind bake pie crust is with white sugar with extra wide foil as a lining.
Best tips for blind baking pie crust
- Keep the pie dough cold.
- Do not stretch the dough when placing it in the pie plate.
- Let the pie dough rest and chill, so that the pie crust won’t shrink as it bakes. Plus, cold butter will lead to a flakier pie crust.
- Make sure to line the pie crust with foil or parchment paper to prevent pie weights from sticking to the crust. The foil or parchment paper should also sit very flush against the pie crust.
- Make sure the pie weights fill up to at least half way inside the pie crust. With rice and sugar, I prefer to go almost to the top.
- Bake the pie crust at a lower temperature for a longer time. This helps to retain the pie crust shape and prevents collapsing.
- IF the pie crust edge is browning too fast, use a silicone pie crust shield, or one made with foil to cover the crust.
- To prevent the crust from getting soggy with the filling, seal the crust with an egg wash or melted chocolate.
Recipe FAQs and troubleshooting
How do I prevent my pie crust from shrinking?
Pie crusts shrink as they bake for a few reasons.
If the dough is elastic when you roll it out (where it tries to spring back), then it will shrink as it bakes. To prevent this, let the dough rest in the fridge for at least 30 minutes to let the gluten network relax.
Another reason why the dough shrinks is if the dough was stretched to fit the pie pan. Avoid stretching the dough when lining the pie dish with the crust.
Why is my pie crust getting soggy?
If the pie filling is very wet and has water seeping out from it, this can make the pie crust soggy.
To prevent this, you can seal the blind baked pie crust using any of these methods outlined here.
How to prevent my pie crust from burning?
Pie crust is more likely to burn if you blind bake at a high oven temperature.
With this recipe, the pie crust is blind baked at a lower temperature. So it’s less likely for the crust to burn at all, and you’re more likely to end up with an evenly baked, caramelized pie crust.
However, the pie edge can darken faster, since it’s exposed to the heat more. To prevent this, you can shape a foil ring to cover the outer edge of the pie crust, or use a silicone pie shield.
My pie crust is puffing up in the oven
Since the pie crust is weighed down during the blind baking process, it should not be puffing up.
If the crust is puffing up while baking without the weights, it’s usually because the steam that’s created has no way to escape.
So, make sure to prick holes in the crust with a fork before baking.
Can I make pie crusts ahead of time?
Yes, you can.
Pie crusts can be baked ahead of time. You can store baked crusts in the fridge for about 3 – 4 days, but they will get stale fast. But they will last longer in the freezer.
Whether you’re storing the crust in the fridge or freezer, make sure to wrap it well in plastic wrap or place in an air-tight container.
Recipe
Blind Baking Pie Crust
US based cup, teaspoon, tablespoon measurements. Weight measurements are recommended for accurate results whenever available.
Common Measurement ConversionsEquipment:
- 9 or 9.5 inch pie plate (1 – 2 inches deep)
- Foil or parchment paper
- Sugar or rice to use as pie weights
- Rolling Pin
Ingredients:
- 300 g unsalted butter preferably chilled
- 120 mL iced water
- 30 mL chilled vodka optional (substitute with the same amount of iced water, if you prefer)
- 400 g all purpose flour spooned and leveled when using cup measurements
- 30 g sugar
- ¾ tsp fine sea salt
Instructions:
Making the dough
- Make the pie crust dough according to the instructions in my homemade pie crust recipe linked here. Make sure that the dough rests for a few hours before rolling out.300 g unsalted butter, 120 mL iced water, 30 mL chilled vodka, 400 g all purpose flour, 30 g sugar, ¾ tsp fine sea salt
Rolling out the dough
- Take one portion of the pie crust dough. Unwrap the plastic wrap and place it on a floured surface.
- Since the butter will be very firm, it'll be hard to roll out the dough right away at this point. Strike the dough disc a few times with a rolling pin, on both sides, to make it more pliable and easy to roll out.
- Roll out the dough while maintaining a round shape as best you can. Pinch or squeeze any cracked dough areas together to seal. Turn the dough a quarter turn after each roll, to ensure that the dough maintains a round shape and also doesn't stick to your work surface. Use a light dusting of flour as needed, and also remember to flip the dough over so that you roll it out on both sides.
- Roll the dough until it’s about 3 mm in thickness. The diameter could vary, but it should definitely fit a 9.5 inch diameter, deep pie dish.
- If the dough starts to shrink as you roll it, lightly flour the dough surface and either fold it into quarters OR roll it onto a rolling pin, and then cover it with plastic wrap. Let this dough rest in the fridge for at least 30 minutes, and then proceed with rolling it out again.
- After rolling out the dough to the correct thickness, transfer the dough onto the pie dish. You can do this by rolling up the dough on a rolling pin and then carefully unrolling it over a pie dish (see pictures in the post for guidance).
- Do NOT stretch the dough to fit it inside the pie dish. This is crucial and a common beginner mistake. Instead, carefully lift the pie crust and let it gently fall onto the pie dish. Use the back of your fingers to gently press the dough into the bottom of the pie dish, so that it fits neatly in the dish.
- There should be an overhang over the pie dish rim. Using scissors or a sharp knife, cut the excess pie crust, leaving at least a 1 inch (or up to 1.5 inches) overhang for single crust pies. The overhang should be measured from the inner rim of the pie dish and not from the pie pan ledge (if your pie dish has one).
- Roll the overhang dough under the pie crust edge to form a thick border. This should be flush against the inner rim of the pie dish.
- For a fluted or crimped edge – Hold your thumb and index finger on one hand parallel to each other, and rest the tips of those fingers against the outside edge of the pie border. Then using the index finger or thumb on the other hand, gently push the inside edge of the pie border between the two fingers on your other hand. Repeat this all along the pie border to form a fluted pie crust edge. (See pictures in the post or recipe video for reference.)
- Crimped edge – Alternatively, you can use a fork to flatten the pie crust edge to create a crimped edge.
- Loosely cover the pie crust with plastic wrap and let it rest in the fridge for at least 45 minutes. If the butter softens at any stage, refrigerate the crust.
Blind baking pie crust
- Preheat the oven to 350°F / 180°C (conventional oven). Let the oven preheat for at least 30 – 45 minutes.
- Take a large piece of foil or parchment paper. I like to use extra wide heavy duty foil. If you're using parchment paper, gently crumple it and then unravel and smooth it out (to make it easier to mold it into the shape of the pie plate). Foil can be crumpled too, but it can also tear easily, so take more care with foil.
- Place the parchment or foil inside the chilled pie crust. Carefully shape it to fit the pie crust. Press it against the crust to make the surface of the foil / parchment paper smooth and flush against the crust. Make sure the foil / parchment paper is touching the whole surface of the pie crust, and loosely covers the border of the pie crust as well.
- If needed, use 2 – 3 pieces of foil (overlapping) to make sure the bottom and sides of the pie crust are fully covered. If the foil / parchment paper doesn't cover the whole pie, I like to use 3 pieces. One in the middle and two on either side of it, broadly overlapping. This makes it easier to remove the pie weights with the lining later on.
- Fill the pie plate with sugar or rice (not both!), or ceramic pie weights. Make sure the weights are filled about ¾ of the way up the pie dish.
- Transfer the pie plate onto a half sheet pan. Then place both in the preheated oven. Rotate the plate once half way through baking IF needed. Bake the pie crust for about 45 – 50 minutes.
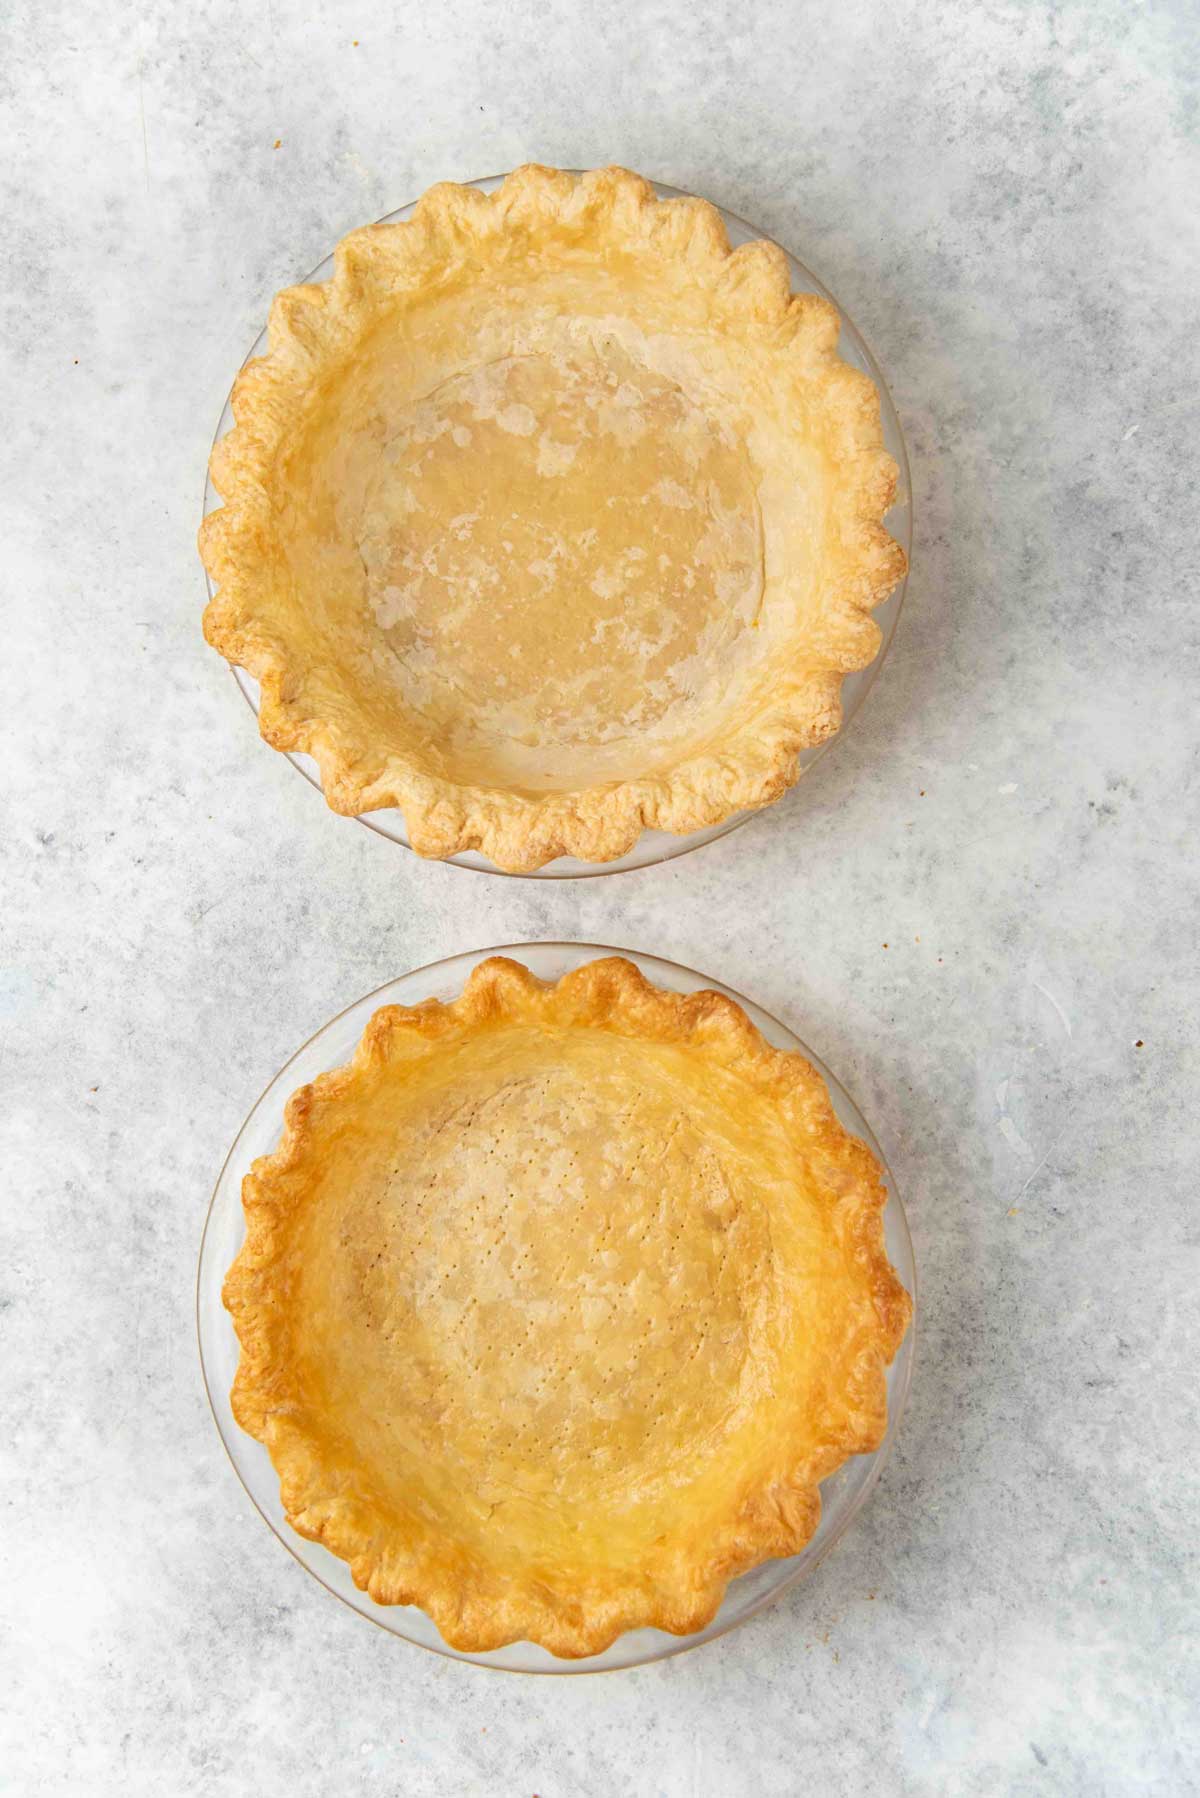
- After 50 minutes, the bottom of the crust should start to caramelize and turn light golden brown in color. The sides and top of the crust will still be very blonde in color (i.e. only have a little bit of color).
- Remove the pie plate from the oven and then VERY CAREFULLY remove the foil / paper from the pie plate along with the baking weights (making sure not to spill anything!). Immediately transfer the weights into an empty bowl or plate. Be careful with this step since the foil will be hot, and you need to hold it firmly to prevent any tearing and spilling of contents.
- Prick the whole bottom of the pie crust with a fork. This is to dock the crust to finish baking.
- For par baking pie crust – Return the blind baked pie crust into the oven and bake for a further 5 – 10 minutes until the bottom of the crust looks matte or dry. Remove from the oven. The crust is ready to be filled and baked with the filling now.
- For a fully blind baked pie crust – Return the blind baked pie crust to the oven and bake further for about 15 – 20 minutes, until the crust turns golden brown. For a shiny finish, brush an egg wash all over the pie crust before the last 5 minutes of baking. Then bake for the last 5 minutes, until the crust is golden in color and shiny.
- If the pie crust edge is browning too quickly, use a silicone pie crust shield or shape a piece of foil to cover the crust.
- OPTIONAL (to seal the crust) – If you prefer not to brush with an egg wash, you can also brush the pie crust with the following options to seal the crust AFTER baking and cooling the crust. Melted cocoa butter or melted chocolate (white, milk, or dark chocolate).
Recipe Notes
All butter pie crust dough
Follow the step by step instructions in my all butter pie crust recipe for perfect, tender, flaky pie crust.How to bake a double pie crust
See my double pie crust recipe post for baking temperature and detailed step by step instructions on how to bake a filled double crusted pie (with a solid top crust).Nutrition Information:
“This website provides approximate nutrition information for convenience and as a courtesy only. Nutrition data is gathered primarily from the USDA Food Composition Database, whenever available, or otherwise other online calculators.”


Leave a Reply