About
My Cookbooks
Work With Me
Contact
  • Facebook
  • Instagram
  • Pinterest
  • X
  • YouTube
The Flavor Bender

Master the Science of Delicious

  • Recipe Index
    • All Recipes
    • Desserts
      • Cakes & Cupcakes
      • Candy & Bite Sizes
      • Chocolate
      • Cookies, Brownies & Bars
      • Frozen Desserts
      • Fruit Desserts
      • Puddings & Custards
      • Dessert drinks
      • No Bake
      • Pastries & Breads
      • Sweet Syrups & Spreads
      • Tarts & Pies
      • Cheesecakes
      • Healthy sweets
    • Breakfasts
      • Tarts, Quiches, & Pies
      • Waffles, Pancakes & Crepes
      • Quick Breads, Scones & Muffins
      • Breakfast Sandwiches
      • Breakfast Pastries
      • Eggs
      • Breakfast & Brunch Drinks
      • Make Ahead Breakfasts
      • Healthy Breakfasts
      • Coffee and Tea drinks
      • Breakfast Smoothies & Juices
      • Breakfast Sides
      • Casseroles
      • Jams & Spreads
    • Courses
      • Main Meals
        • Bread, Sandwiches & Burgers
        • Curries
        • Salads
        • Roasts & BBQ
        • Soups & Stews
        • Casseroles
      • Bread
      • Lunch
      • Beverages
      • Appetizers & Tapas
      • Sides
      • Dips & Condiments
      • Tea Time & Snacks
      • Desserts
      • Meal Prep
      • Cocktails
      • Pet Friendly Recipes
    • Cuisines
      • American
      • European
      • Australasian
      • Sri Lankan
      • East Asian
      • Mexican
      • Middle Eastern
      • South Asian
    • Sri Lankan
      • Main Meals
      • Drinks
      • Desserts
      • Breakfasts
      • Snacks
    • Skill Level
      • Easy
        • Easy Desserts
        • Easy Cooking
        • Easy Breads
        • Easy Breakfasts
        • Easy Dinners
      • Intermediate
        • Intermediate Desserts
        • Intermediate Cooking
        • Intermediate Breads
        • Intermediate Breakfasts
        • Intermediate Dinners
      • Advanced
        • Advanced Desserts
        • Advanced Cooking
    • Recipes by Season
      • Christmas
      • Fall & Winter
      • Halloween
      • Spring & Summer
      • Thanksgiving
      • Valentines Day
    • Recipes by Diet
      • Dairy Free
      • Eggless
      • Gluten Free
      • Paleo
      • Vegan & Vegetarian
    • Recipe Basics
      • Baking Basics
      • Cooking Basics
      • Baking & Cooking 101
  • New? Start Here
  • Measurement Conversions
  • How-To Posts
  • About
  • My Cookbooks
  • Work With Me
  • Contact
The Flavor Bender   ›   Recipes   ›   Recipes by Course   ›   Main Dish Recipes   ›   Best Roasts Recipes   ›   How To Sous-Vide Rump Roast or Chuck Roast

How To Sous-Vide Rump Roast or Chuck Roast

Author:

Dini Kodippili


Jump to Recipe


Updated: 7/17/2023
Total Time10 minutes mins
Quick and Easy Recipes
Best Roasts Recipes
How to Sous-vide rump roast or chuck roast- succulent, tender slices of sous-vide steak and eggs. Perfect for breakfasts or brunch for a crowd. #SousVideRecipes #SteakandEggs #SousVideBeef

Sous-vide is the only way to transform a tough cut like bottom round roast or chuck roast or rump roast into a tender, succulent, juicy roast, while still cooking it at rare or medium rare! This sous-vide rump roast (or chuck roast) is perfect for dinner, for lunch sandwiches, and even for steak and eggs breakfast for a crowd!

A plate with a hash browns, topped with two slices of sous-vide rump roast and a sunny side egg and chopped parsley.

I’ll be sharing a special tutorial with you guys today – here I’m going to show you how to make an INCREDIBLE roast, with cheaper beef cuts like a chuck roast, bottom round roast or a rump roast! Specifically, this post is a step by step tutorial on how to sous-vide rump roast (or bottom round roast) or chuck roast, for deliciously tender results every time!

Sous-vide is a simple yet intuitively clever method of cooking. I jumped on the sous-vide bandwagon a long time ago, and got hooked right from the start! I never cook my steak any other way now. It gives perfectly succulent, tender, tasty steak every time, without hassle.

Apart from steak, I also use my sous-vide to cook chicken, pork, turkey (like this sous vide turkey roulade), and even fish. But it’s not just the proteins. Getting perfectly cooked vegetables, eggs, and even dessert is easy with a sous-vide (like this fantastic sous vide creme brulee!). Yes, it’s a slow cooking process that tests your patience at times, but the results make it worth your while! 🙂

As a sous-vide enthusiast, there’s another kitchen appliance that I cannot do without – a vacuum sealer! I’ve used a number of vacuum sealers before because it’s a great way to save money, eliminate waste and make sure my food lasts longer. And I can happily say that of all the vacuum sealers that I’ve used before, FoodSaver® V4440 2-in-1 Automatic Vacuum Sealing System is hands down my #1! So I’m not surprised that it’s even the #1 vacuum sealing system in the US as well! 🙂 You can get your hands on one of these incredible sealers by clicking on the image above!

A sous-vide anova cooker in a water bath, with the temperature set at 138°F.
A 12 qt tub filled with water, with the vacuum packed rump roast submerged in it, and the sous-vide cooker attached to the tub.

Why FoodSaver® V4440?

The FoodSaver® V4440 comes with a FoodSaver® 3PK 11″ Vacuum Seal Roll, PLUS pre cut vacuum bags AND resealable zipper bags. The FoodSaver® vacuum seal rolls and bags are safe for microwave, freezer, and refrigerator use. So you can pop them straight from the freezer or fridge into your sous-vide!

With FoodSaver® V4440, I’m able to use the traditional method of vacuum sealing my food, plus I have options for dry and moist vacuum sealing too. The wand vacuum sealer however, is a game changer for me! I can easily vacuum pack cheese or lunch meats in FoodSaver® zipper bags and reseal the bags after every time I open them. The FoodSaver® V4440 system is the perfect complement for a sous-vide.

A raw cut of rump roast beef steak sits on a white cutting board, with a vacuum sealer machine in the blurred background.
Sprinkling a salt and pepper crust over the raw rump roast cut.

To sous-vide chuck roast or bottom round roast or any meat, I use the traditional method of vacuum sealing. It not only allows for an air-tight seal, but since ALL the air is sucked out, there’s even contact between the water and the meat.

Plus the FoodSaver® vacuum seal rolls are heat-resistant and boast of multi-layer construction, so that the powerful heat-seal provides excellent durability to resist punctures and tears during cooking.

A rump roast beef cut covered with a salt and pepper crust on a white cutting board.
A vacuum sealer sealing a salt and pepper-seasoned rump roast steak with butter in a plastic bag.

Why sous-vide is the BEST way to cook deliciously tender beef roast

It’s simple – the even, slow cooking ensures that your cut of beef NEVER overcooks! The longer you cook the beef, the more tender the meat becomes, without ever overcooking. This also means that the beef is never dry. Making beef roasts in the oven or instant pot certainly yields quicker results, but there’s a high chance that you may end up with unevenly or overcooked meat, resulting in stringy, dry roasts.

You can sous-vide rump roast or chuck roast at medium, medium rare or rare with the help of a sous-vide. The vacuum packing allows the cut of meat to marinate at the same time that it cooks as well!

A cooked rump roast, in the vacuum packed bag,
Sous-vide cooked rump roast with a caramelized crust on a white cutting board.

For rare sous-vide rump roast or bottom round roast

The sous-vide temperature should be 130 – 134°F  (55 – 57°C).

The minimum cook time to sous-vide bottom round roast or rump roast is 24 – 48 hours. I would recommend 24  hours, to get an even more tender roast.

For medium sous-vide bottom round roast or rump roast

The sous-vide temperature is 138 – 145°F (59 – 63°C).

The minimum cook time to sous-vide bottom round roast or rump roast is 12 – 36 hours. I would recommend going up to 20 hours, to get an even more tender roast.

A medium cooked sous-vide rump roast (bottom round roast), with two slices cut, on a white cutting board.

For rare sous-video chuck roast

The sous-vide temperature is 130 – 134°F  (55 – 57°C).

The minimum cook time to sous-vide chuck roast is 18- 48 hours. I would recommend 24 hours, to get an even more tender roast.

For medium sous-vide chuck roast

The sous-vide temperature is 138 – 142°F (59 – 61°C).

The minimum cook time to sous-vide chuck roast is 18 – 36 hours. I would recommend going up to 20  hours, to get an even more tender roast.

If you prefer your cut of meat be well done, but still juicy and tender –

The sous-vide temperature should be 155 – 158 °F (68 – 70 °C).

The minimum cook time is 12 – 18 hours. The roast will be done faster, as it’s a higher cooking temperature.

How can I add flavor to sous-vide rump roast (or bottom round roast) or chuck roast?

My favorite way to add flavor to this roast is to create a spice crust! You can use your favorite spices or herbs for this, and you can be creative with it too.

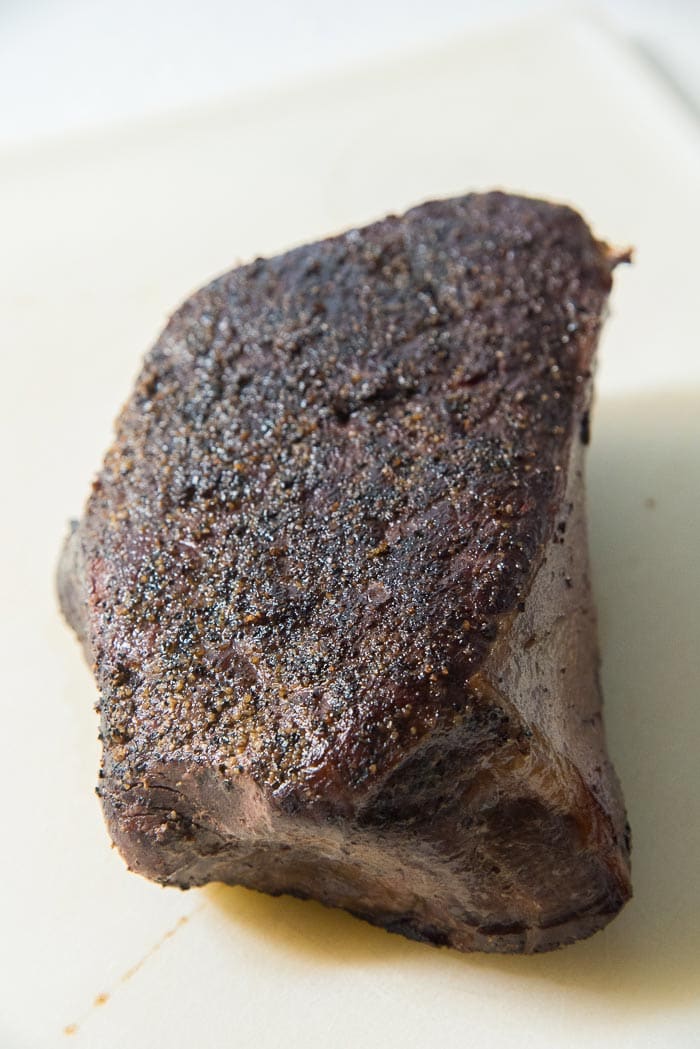
A salt and pepper crust is the simplest way to introduce flavor to the roast, and that’s what I did here.

A plate with a hash browns, topped with two slices of sous-vide rump roast cooked to medium, and a sunny side egg.

But here are some other spices and herbs I love to add,

  • Thyme
  • Paprika
  • Cayenne pepper
  • Oregano
  • Mustard (spicy brown or dijonnaise or whole grain)
  • Garlic
  • Parsely
  • Dry BBQ rub
  • Cajun spices
  • Fajita spices

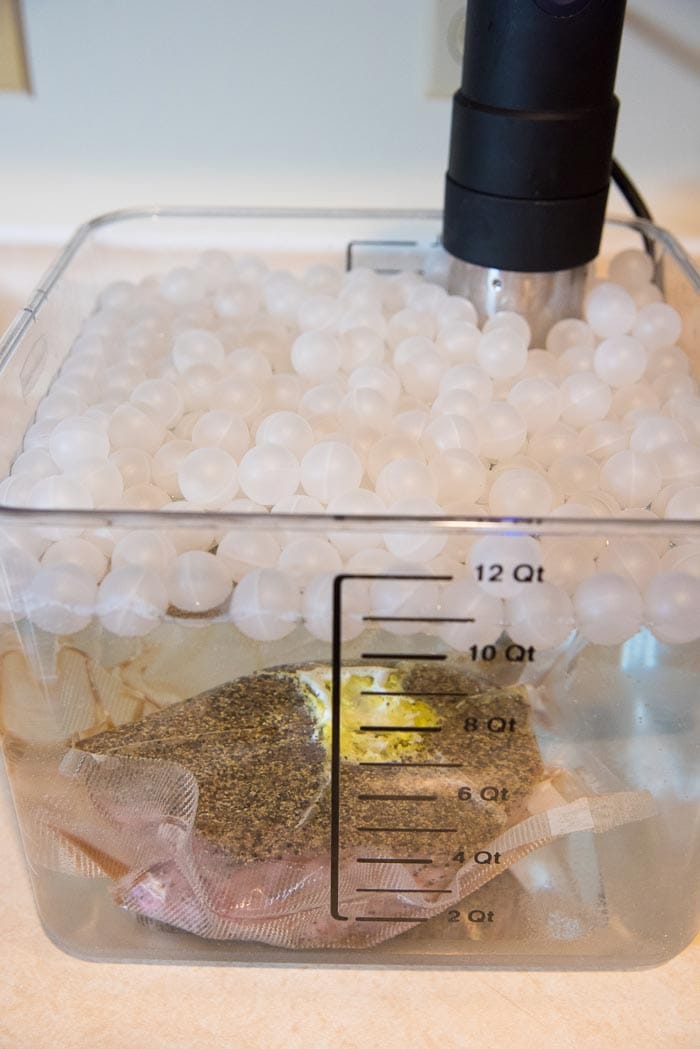
Once you’ve sealed the beef cut in a vacuum pack bag, make sure the beef is completely submerged in the preheated sous-vide tub.

When it’s ready, you’ll find that the beef roast is perfectly cooked with a lot of juices in the bag. Just snip the corner of the bag and drain jus to a separate bowl or jug. This jus is PERFECT to pour over your slices of roast, or to make a gravy! I like to cook my rump roast or chuck roast to a nice pink medium, but sometimes I would even cook it at medium rare (higher temperature than rare, but lower than medium). 

Overhead photo of a plate of sous-vide rump roast (bottom round roast), with an egg on top, and hash brown potatoes on the bottom.

The roast is then seared in a hot cast-iron pan for 45 secs to 1 minute on each side to get a nice caramelized crust. Allow the roast to rest, and then cut into slices to serve.

Serving suggestions

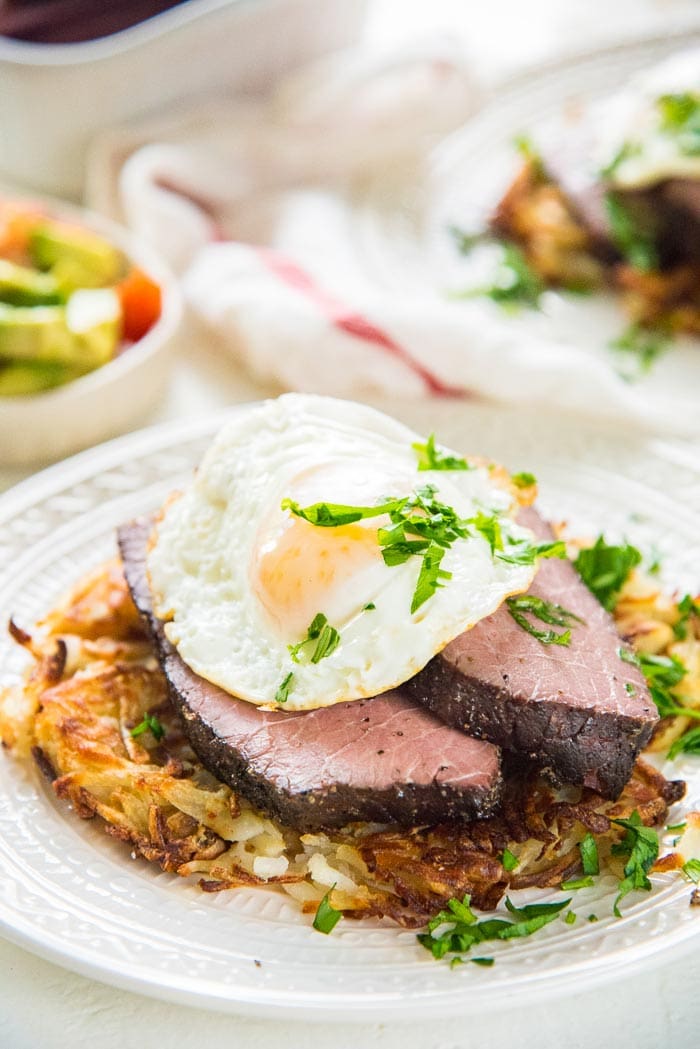
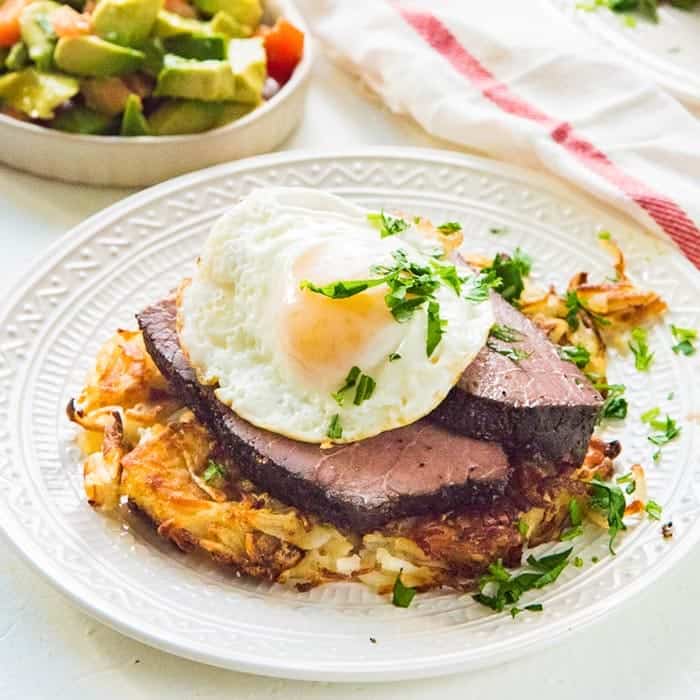
The roast is incredibly tender, moist and packed with flavor! While it’s perfect for dinner with some roast vegetables, or sliced thinly for sandwiches for lunch (like this perfect steak sandwich), I LOVE this for breakfast or brunch – steak and eggs with potatoes, like this steak and sweet potato hash, topped with an egg?

It’s perfect for a crowd, since you can cook a large roast at once! No one will ever never know that you transformed a tough cut of beef like bottom round roast or chuck roast into this succulent, juicy, tasty roast! 🙂 Sous-vide is the only way you can do that, while still cooking your roast at rare or medium rare.

You can top it with fried eggs, or poached eggs and serve it with hash browns or breakfast potatoes. You can also serve this steak with a side of these oven roasted potatoes and eggs!

Close up of medium cooked sous-vide steak, with a cut piece on a fork, and an egg yolk dripping over the piece of steak.

If you liked this recipe tutorial on how to sous-vide rump roast or chuck roast, don’t forget to subscribe for new (and free) recipes by entering your email address on the side bar (and get all these recipes delivered straight to your inbox), so you don’t miss out on a thing. You can find me on FACEBOOK, INSTAGRAM, PINTEREST, YOU TUBE and GOOGLE-PLUS too.

Recipe

A breakfast dish featuring sliced sous-vide rump roast beef on crispy hash browns, topped with a sunny-side-up egg on a white plate.
5 from 12 votes

Succulent Sous-vide Rump Roast or Chuck Roast

Author: Dini Kodippili
Cuisine: American
How to Sous-vide rump roast or chuck roast- succulent, tender slices of sous-vide steak and eggs. Perfect for breakfasts or brunch for a crowd. #SousVideRecipes #SteakandEggs #SousVideBeef

 Difficulty: 

Easy
If you own a sous vide, this is the perfect way to transform a tough cut like bottom round roast or chuck roast or rump roast into a tender, succulent, juicy roast! Perfect for steak dinner, for sandwiches, or even for breakfast and brunch with an egg.
Active time – 10 minutes.
Inactive sous vide time – 24 – 36 hours

US based cup, teaspoon, tablespoon measurements. Weight‌ ‌measurements‌ ‌are‌ ‌recommended‌ ‌for‌ ‌accurate‌ ‌results whenever available.

Common Measurement Conversions
Prep: 5 minutes mins
Cook: 5 minutes mins
Sous-vide: 1 day d
Total Time: 10 minutes mins
Print Recipe Rate SaveSaved!
Makes: 6

Ingredients:
 

Sous-vide rump roast
  • 2.5 lbs rump roast or chuck roast
  • 1.5 tbsp kosher salt
  • 2 tbsp freshly cracked pepper do not use finely ground pepper
  • 2 tsp sugar
  • 3 tbsp unsalted butter or vegetable oil or olive oil
To Serve
  • 6 eggs fried or poached
  • 6 servings hash brown

Instructions:
 

Sous-vide rump roast or chuck roast
  • Pat dry the roast cut with a paper towel. 
  • Mix the salt, pepper and sugar together in a bowl. Sprinkle the spices over the roast, and press it into the meat to form a crust. 
  • Cut a bag from the FoodSaver® Vacuum Seal Roll – large enough to hold the roast. Seal one edge of the bag and place the beef roast in the bag. Add the butter over of the roast and vacuum seal the bag. 
  • Fill a 12 qt container with water, and attach the sous-vide circulator. Set the temperature to the the right value, depending on whether you want a rare or medium roast. I set mine to 138°F for a medium rump roast. Cover the sous-vide with water to prevent evaporation. 
  • When the water reaches the right temperature, submerge the vacuum packed rump roast (or chuck roast) in the water.  Note the time, and allow the rump roast to cook for at least 18 hours (but can be kept upto 36 hours). 
  • When the roast is done cooking, remove the bag from the water and allow the roast to rest for a few minutes. Snip the edge of the bag and pour the jus into a bowl. 
  • Heat a cast-iron pan over medium-high heat. Pour a little oil to coat the bottom of the pan. Sear the roast in the hot pan – 45 sec to 1 minute per side, until the surface is caramelized. 
  • Slice the sous-vide rump roast into thick or thin slices and serve with the jus. 
To Serve
  • Serve with hash browns, or breakfast potatoes with eggs, for breakfast or brunch. 

Recipe Notes

Serving ideas – thinly slice the sous-vide rump roast for sandwiches, or for roast dinner with roasted vegetables. 
 
Note on cook times – cook times were derived from several sources and articles on food safety and sous-vide cooking. 
Source 1

Nutrition Information:

Calories: 505kcal (25%) Carbohydrates: 14g (5%) Protein: 56g (112%) Fat: 23g (35%) Saturated Fat: 9g (56%) Cholesterol: 271mg (90%) Sodium: 1869mg (81%) Potassium: 659mg (19%) Sugar: 1g (1%) Vitamin A: 335IU (7%) Vitamin C: 5.8mg (7%) Calcium: 36mg (4%) Iron: 5.7mg (32%)

“This website provides approximate nutrition information for convenience and as a courtesy only. Nutrition data is gathered primarily from the USDA Food Composition Database, whenever available, or otherwise other online calculators.”

Tag me on Instagram!I love seeing what you’ve made! Tag me on Instagram at @TheFlavorBender or leave me a comment & rating below.
Dini Kodippili Avatar

About

Dini Kodippili

Dini Kodippili is a professional food writer, recipe developer, food photographer, cookbook author, and baker. Dini has been featured on HuffPost, Cosmopolitan, Forbes, Delish, Food & Wine and more. Learn More

I love hearing from you! Submit your question or recipe review here.

5 from 12 votes (4 ratings without comment)

Leave a Reply Cancel reply

Your email address will not be published. Required fields are marked *

Made this? Rate this recipe:


This site uses Akismet to reduce spam. Learn how your comment data is processed.

28 responses

  1. Luke
    February 26, 2026

    Hello,

    I love the recipe,

    Can you do a reverse sear in the oven instead of using a pan to sear at the end?

    Cheers

    Reply
    1. Dini Kodippili
      February 26, 2026

      Hi Luke
      Yes you can!
      I hope that helps

      Reply
  2. Biran Farwahl
    June 7, 2025

    5 stars
    I pre-rub the roast with tallow or bacon grease since the rump and chuck roasts usually have so little marbling. Coat that with the rub of your choice, sous vide, sear and prepare for a delicious meal.

    Reply
  3. Karla Joy
    May 5, 2024

    5 stars
    Wonderful recipes! Thank you. My sister recommended your Turkey breast roast very highly, and now I’ve found roasts for port and beef as well.

    Reply
  4. Daniel F
    March 31, 2023

    Love the recipe and the roast turns out awesome everytime.

    I’d love to add some garlic to the rub, so, my question is:

    Fresh or granulated garlic?
    How much for this particular recipe?

    Reply
    1. Dini
      April 2, 2023

      Hi Daniel
      You can absolutely add garlic!
      Either fresh or granulated is fine, but I do prefer fresh garlic. And how much garlic will depend entirely on your preference! For me, the more the merrier, because we love garlic 🙂
      But 5 or 6 cloves would be the minimum for us. I hope that helps

      Reply
  5. Jeff W
    April 20, 2022

    5 stars
    First time cooking a rump roast, I cooked the whole lump for 24 hours/55° C and it was great until a slice about 2” from the first cut —THAT slice had a leathery texture. Twelve more hours in the bath tamed those tough fibers. Every cook since then has been for 36 hours but in smaller chunks than 3” with the best outcomes.
    We don’t buy pricey beef anymore.

    Reply
  6. Nick Wade
    January 6, 2022

    5 stars
    This turned out very, very good. Cooked a 3 lb roast at 138 for 24 hours. Perfect pink middle. Had plenty of au jus, but really didn’t need it.

    Reply
  7. Doreen Henry
    November 30, 2021

    5 stars
    I made a 2 1/2 pound eye roast. Cooked it 19 hours at 136 degrees.
    It was fabulous. My husband and son
    were “on the fence” about sous vide, but they now are getting very excited. This roast was in my opinion medium rare. It was a lovely pink all through, with no raw meat in the center. It was extremely tender. The juice and 2 ends will be used for soup.

    Reply
  8. Craig P Williams
    November 7, 2021

    5 stars
    First time doing a soue vide roast it was perfect. Wondering if if I could brown the roast before the cook instead of after?

    Reply
    1. Sue V.
      May 25, 2022

      That’s called a “reverse sear” and it works beautifully 🙂

      Reply
  9. Jimmie Paulk
    December 6, 2019

    How would I do a 16lb botton round roast medium for church?

    Reply
    1. Ron B
      May 26, 2023

      Your best bet for a big cook like this is to use a cooler as your water bath vessel. I’d go 48 hours for a cut that big, just to be on the safe side, and make sure you scald the surface by either submerging the bag in boiling water or searing the outside before bagging.

      Reply
  10. Erika Hannemann
    May 28, 2019

    Pot roast looks great, I will cook it soon. Thank you for the recipe.

    Reply
  11. Mindy Hove
    December 28, 2018

    Your recipe is for 2.5lb roast. What family does that feed? I have never cooked a roast smaller than 4lbs. How do i adjust this recipe for larger cuts of meat?

    Reply
    1. Dini
      December 28, 2018

      Hi Mindy,
      This 2.5lbs roast feeds my family. That being said, this recipe should in theory work fine for 4lbs as well, but personally, I would recommend 24 hours at 138°F. Hope that helps!

      Reply
      1. Mindy
        December 28, 2018

        Thank you, i will give it a try. This is all new to me. I have only cooked one thing so far, one steak. It was delish.

        Reply
    2. Joan D
      December 14, 2020

      Its not the poundage its the thickness. 3″ plus thick, 131 degrees for 24 hours, bottom round roast 4 lbs was perfect.

      Reply
    3. LauraM
      July 7, 2025

      Cut your roast in half. Bag each half. Sous vide both bags at the same time. Enjoy dinner with your whole family.

      Reply
  12. Linda
    December 24, 2018

    Great sous vide recipe. I cannot get/ find the subscribe box on my phone. I tried to just click on the “subscribe” below the comment section but it disallowed that unless I entered a comment, so here you go. Merry Christmas Eve and a great Sous Vide to one and all.

    Reply
  13. MIKE MCHENRY
    December 23, 2018

    5 stars
    I did a bottom round roast for 32ish hours at 56C. This is a cut of meat I have a hard time with and the last one I made turned to leather in our crock pot. I had a spare roast of identical cut and weight to spare so I thought I’d try this. I used a crock pot on low hooked up to a PID controller and a SSR relay to achieve sous vide.

    It was amazing. I’ve never had a roast like this. It made it taste so buttery, so amazing. Will be doing again. And again.

    Reply
  14. Mary Beth
    September 12, 2018

    What temp does it need to be cooked for falling apart roast like a slow cooker?

    Reply
    1. Michael Powell
      October 28, 2018

      it’s not the temp, its the time. 24hrs or longer for roasts in sous vide. I have a sousvidesupreme. This chart is spot on, hope this helps 😉 https://cdn.shopify.com/s/files/1/2406/9297/files/times_and_temps.pdf?8858685877917332741

      Reply
  15. Dylan. F
    August 9, 2018

    5 stars
    Thanks for sharing awesome roast with beef recipe. Looks very delicious. I’ll try it out soon once i get the lid for container or ping pong balls. Which one works better to retain heat or prevent water evaporate?

    Reply
    1. Dini
      August 10, 2018

      Hi Dylan!
      The lid or the sous vide water balls will both work equally well for water evaporation and to retain heat. The only reason I didn’t get a lid is because I wasn’t sure how big the hole in the lids were to fit my sous vide. Plus I can change the sous vide container and use the water balls in any container too. However the lid would be easier to clean than the sous vide water balls. 🙂

      Reply
      1. Becky W
        February 14, 2020

        I have that same container and there is a lid specifically made with a hole for your sous vide. They’re on amazon.https://www.amazon.ca/Cellar-Made-Gourmia-Rubbermaid-containers/dp/B06ZY2LSTS/ref=sr_1_6?keywords=sous+vide+lid&qid=1581695264&sr=8-6

        Reply
  16. Sandy
    June 15, 2018

    Can u use tin foil if u don’t have vaccumm machine

    Reply
    1. Dini
      June 15, 2018

      Hi Sandy!
      Tin foil isn’t a good option because the water from the sous vide will get inside the foil and ruin the cut of meat.

      However, if you don’t have a vacuum machine, you can use the immersion method to seal the beef in a large ziploc bag.
      To do this, place the piece of meat in a ziploc bag, but don’t close the bag. Then slowly lower the bagged food into the sous vide water container, letting the pressure of the water press the air out through the top of the bag. When the meat is completely immersed in water and most of the air has been pushed out, tightly seal the zip lock bag, making sure no water has entered the bag. Then you can proceed with recipe.

      I hope that helps!

      Reply

Hey There!

Hi! I’m Dini, a third culture kid by upbringing and a food-geek by nature. I was born in Sri Lanka, grew up in New Zealand and lived in Australia, and then the US, before moving to and settling down in Canada. My food is a reflection of those amazing experiences!

Read More
Front cover of the Secret Layer Cakes cookbook by Dini Kodippili.

The Flavor Bender

Cookbook

Buy now on Amazon!

Recipe Basics

  • How To Make Perfect Choux Pastry

    How To Make Perfect Choux Pastry

  • Flaky All Butter Pie Crust Recipe

    Flaky All Butter Pie Crust Recipe

  • How To Make Homemade Marshmallows (Foolproof Guide)

    How To Make Homemade Marshmallows (Foolproof Guide)

  • The Best Homemade Bread (White Bread Recipe)

    The Best Homemade Bread (White Bread Recipe)

  • Homemade French Croissants (Step By Step Recipe)

    Homemade French Croissants (Step By Step Recipe)

  • The BEST Pavlova Recipe (Step by step recipe and video)

    The BEST Pavlova Recipe (Step by step recipe and video)

Featured On

Master the science of baking!

Get my FREE Printable Cake Pan Conversion Chart!

So you’ll know how to substitute cake pans of different shapes, sizes & volumes in a pinch!

A must have resource for all pro bakers, novice bakers, and aspiring bakers alike!

Download now!

Reader Faves

  • How to make the Best Instant Pot Short Ribs

    How to make the Best Instant Pot Short Ribs

  • Perfect Quick and Easy Rough Puff Pastry

    Perfect Quick and Easy Rough Puff Pastry

  • The Best Spicy Sweet Chili Sauce (Easy Recipe!)

    The Best Spicy Sweet Chili Sauce (Easy Recipe!)

  • The Best Homemade Bread (White Bread Recipe)

    The Best Homemade Bread (White Bread Recipe)

The Flavor Bender

I love baking, cooking, experimenting with flavors and ingredients, and passing on all my tips and tricks to you!

Read More

About

Meet Dini
My Book
Work With Me
Contact

Browse

Recipes
Measurement Guide
Baking How-To’s
Shop My Faves
Privacy
Disclosure
Terms

Branding by MRD

Theme by OC

Back to Top
  • Facebook
  • Instagram
  • Pinterest
  • X
  • YouTube
2983 shares

Rate This Recipe

Your vote:


A rating is required
A name is required
An email is required

Recipe Ratings without Comment

Something went wrong. Please try again.