


Chocolate choux pastry is just as easy to make as classic choux pastry with this step by step guide. And pair these deeply chocolatey, light, crisp choux puffs with a simple, delicious chantilly cream filling!
Learn how to make foolproof chocolate choux pastry with this detailed, step by step recipe!

My classic choux pastry is one of the most popular posts on the blog. With over 1000 reviews (and counting) across my social media accounts and the blog, it’s a well-loved recipe by my readers.
So by popular demand, and after many many (many) hours of recipe testing, I’ve got another doozy to share with you guys today. Chocolate choux pastry.
Classic cream puffs are an incredibly delicious, crowd-favorite, nifty little dessert to make. But their chocolate counterpart made with chocolate choux pastry is a whole other level of fun.
The deep cocoa flavor from the choux pastry is perfectly complemented by the chantilly cream filling here. And if you’re a chocolate superfan, you can also make double chocolate cream puffs filled with a luscious chocolate whipped cream filling too!
Why this recipe works

- This is based on my extensively tested and rated, popular classic choux pastry recipe, and just as foolproof.
- After making many (too many!) batches of chocolate choux pastry, I can say for sure that this recipe is going to make you choux aficionados very happy!
- The deep chocolate flavor perfectly complements the sweet, creamy, light chantilly filling.
- These are so easy to bake and elegant.

Difference between regular choux pastry and chocolate choux pastry
The best way to add chocolate flavor to the pastry dough is to add cocoa powder. However, the addition of cocoa powder changes the consistency of the dough.
Cocoa powder will dry out the dough and make it heavy. This will obviously affect how much the choux pastry is going to puff up in the oven.
But with a few adjustments, you can still get perfect results! Also, since the choux pastry dough is dark in color, it’s harder to monitor the consistency of the dough, unlike with classic choux pastry.
However, if you’re familiar with classic choux pastry, and how to get the right consistency – this recipe will be very easy for you as well! And I help you get there with this step by step guide.

How to make chocolate choux pastry (overview)
Step 1 – Making the water dough
The first step of making chocolate choux pastry is to measure out all the ingredients needed to make the dough. I always prefer to use weight measurements to guarantee consistent results.

The water, salt, sugar, and butter are heated in a saucepan over medium heat. Make sure to stir the mixture to allow the salt, sugar, and butter to melt before the water comes to a boil.
If your cocoa powder and/or flour has any lumps, it’s very important to sift it to remove all the lumps. Whisk the cocoa powder and flour together so that it’s mixed well too.
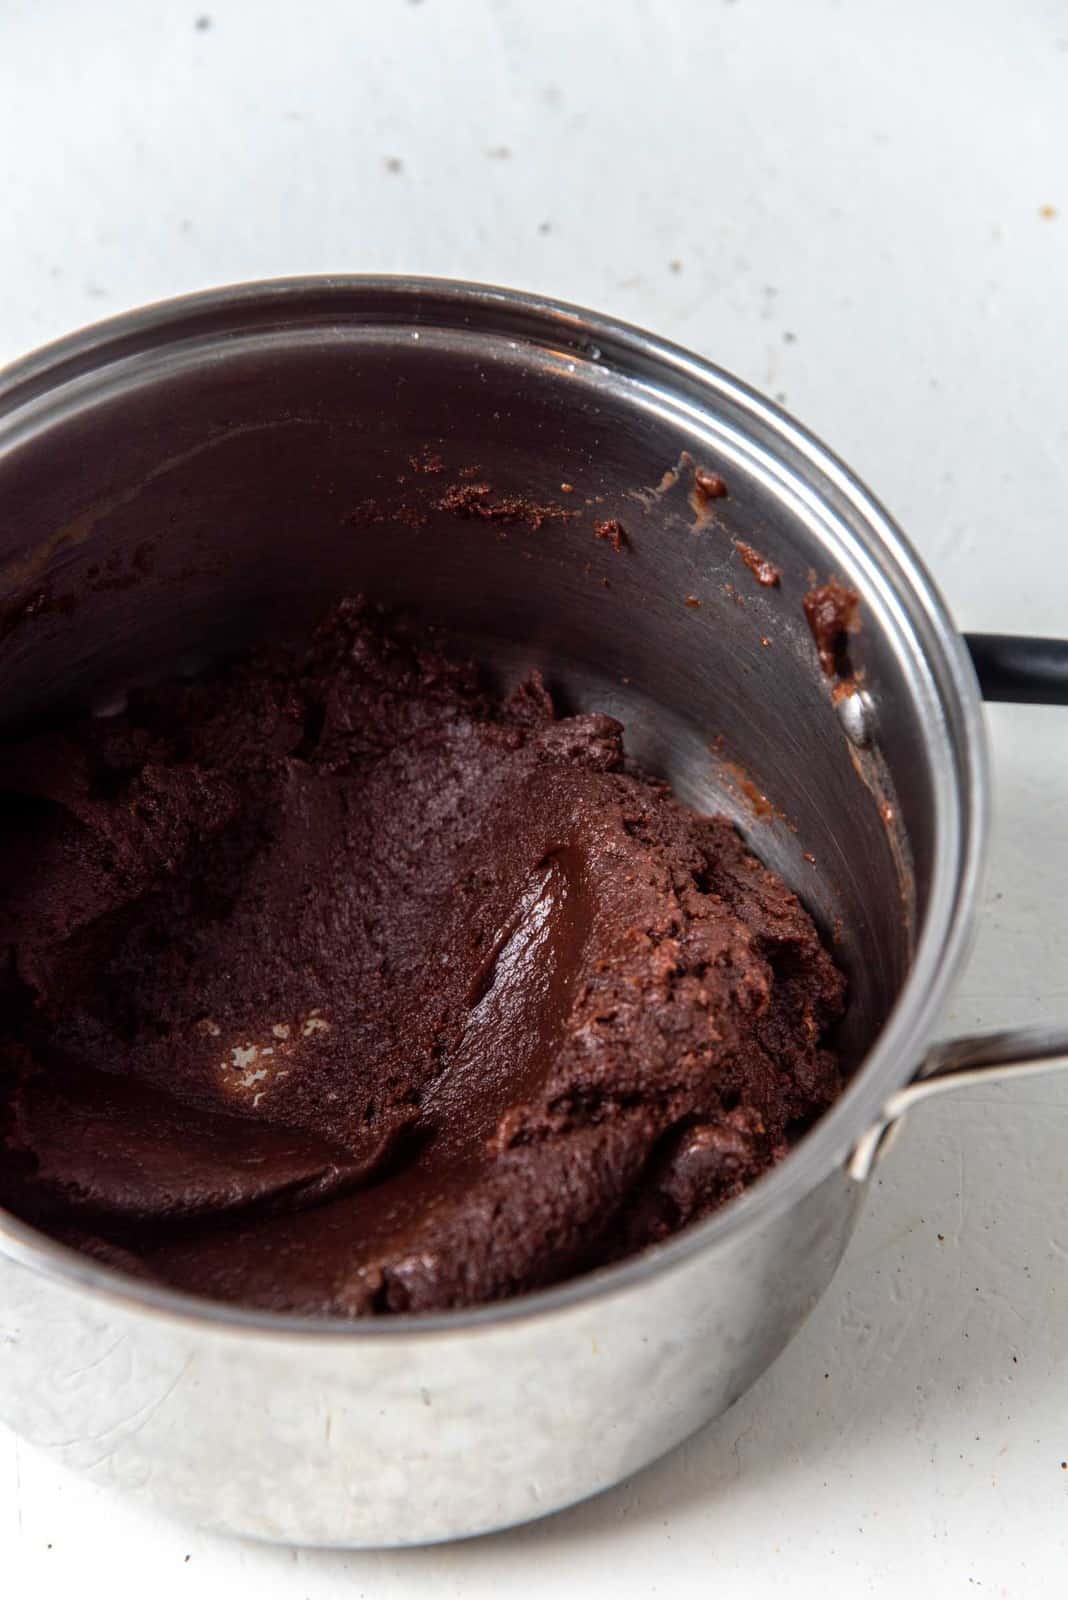
When the butter has melted, and the water has come to a boil, remove it from the heat. Immediately add all of the flour and cocoa powder mixture and stir it in really well. Allow all of the flour and cocoa powder to absorb the water, and make sure there are no lumps in the dough.
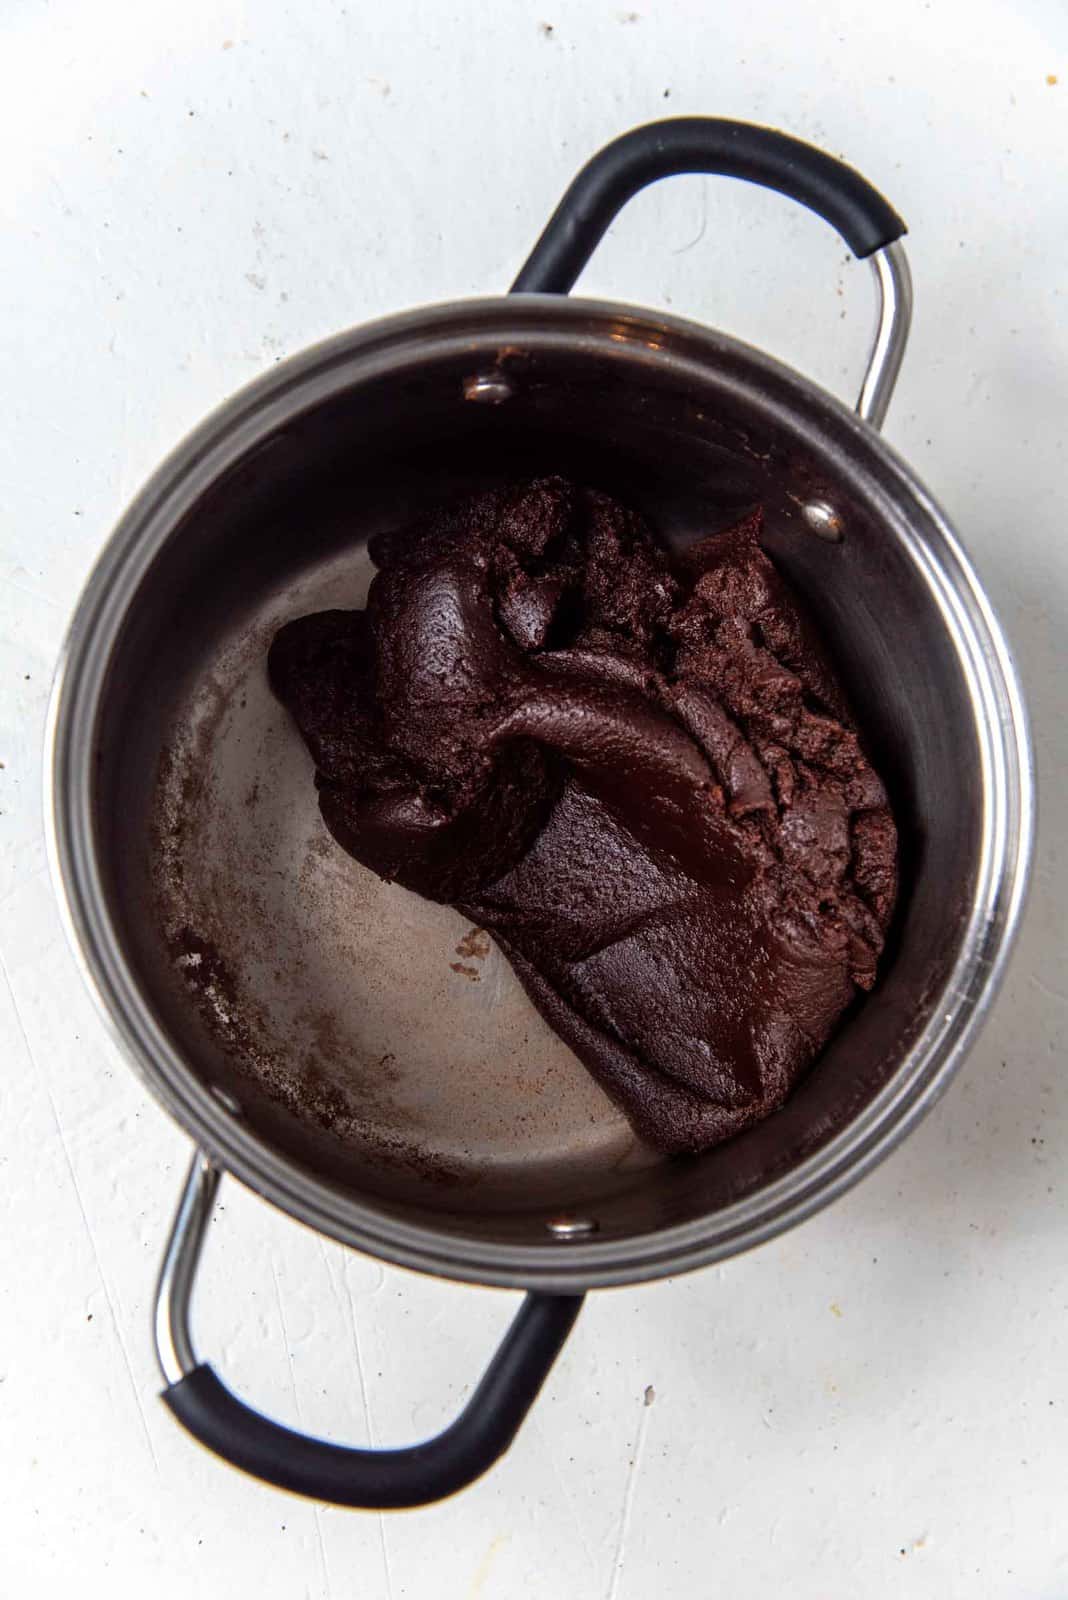
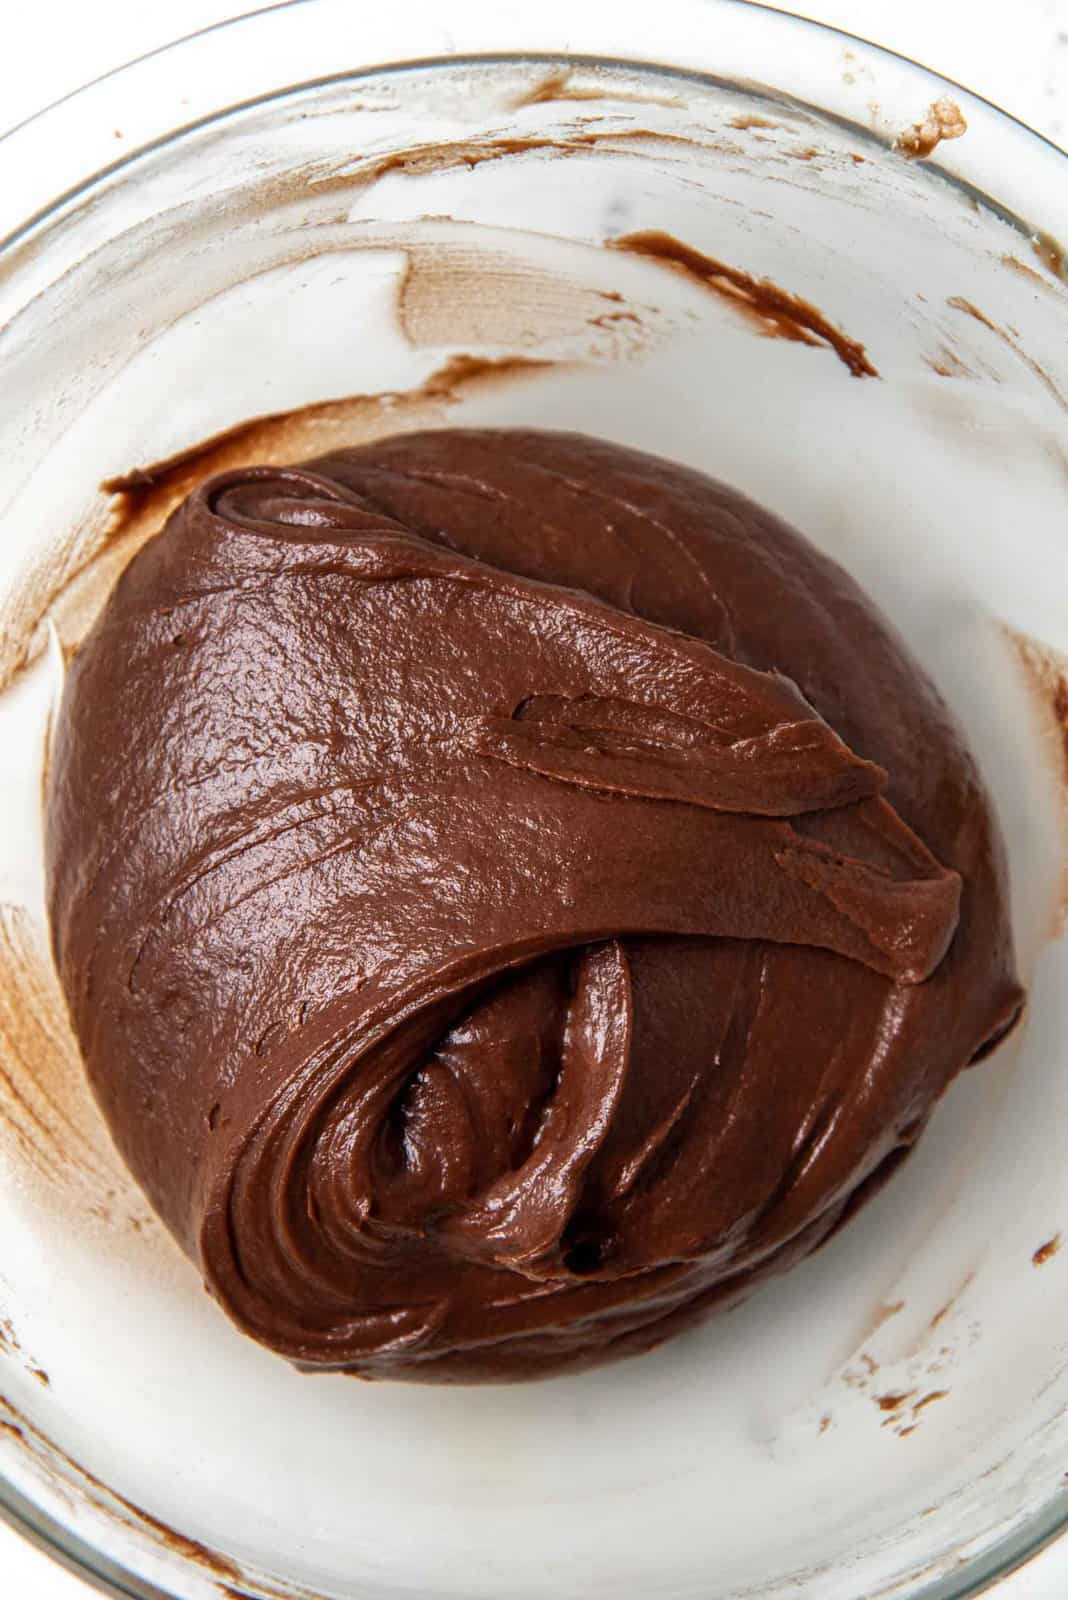
You should get a dough that resembles wet mashed potatoes at this point. Return the pot to the heat (on medium-low heat), and cook the dough for a further 30 sec – 1 minute while constantly stirring and moving the dough around in the pot.
This is where you need to gauge how long to cook the dough. The dough needs to,
- have the consistency of mashed potato (before adding milk and butter),
- form a ball when mixed (not sticking to the sides of the pot),
- if you’re using a stainless steel pot, the dough will form a film at the bottom of the pot.
If the dough splits and forms pools of butter and lumps of dough, you have heated it too far.
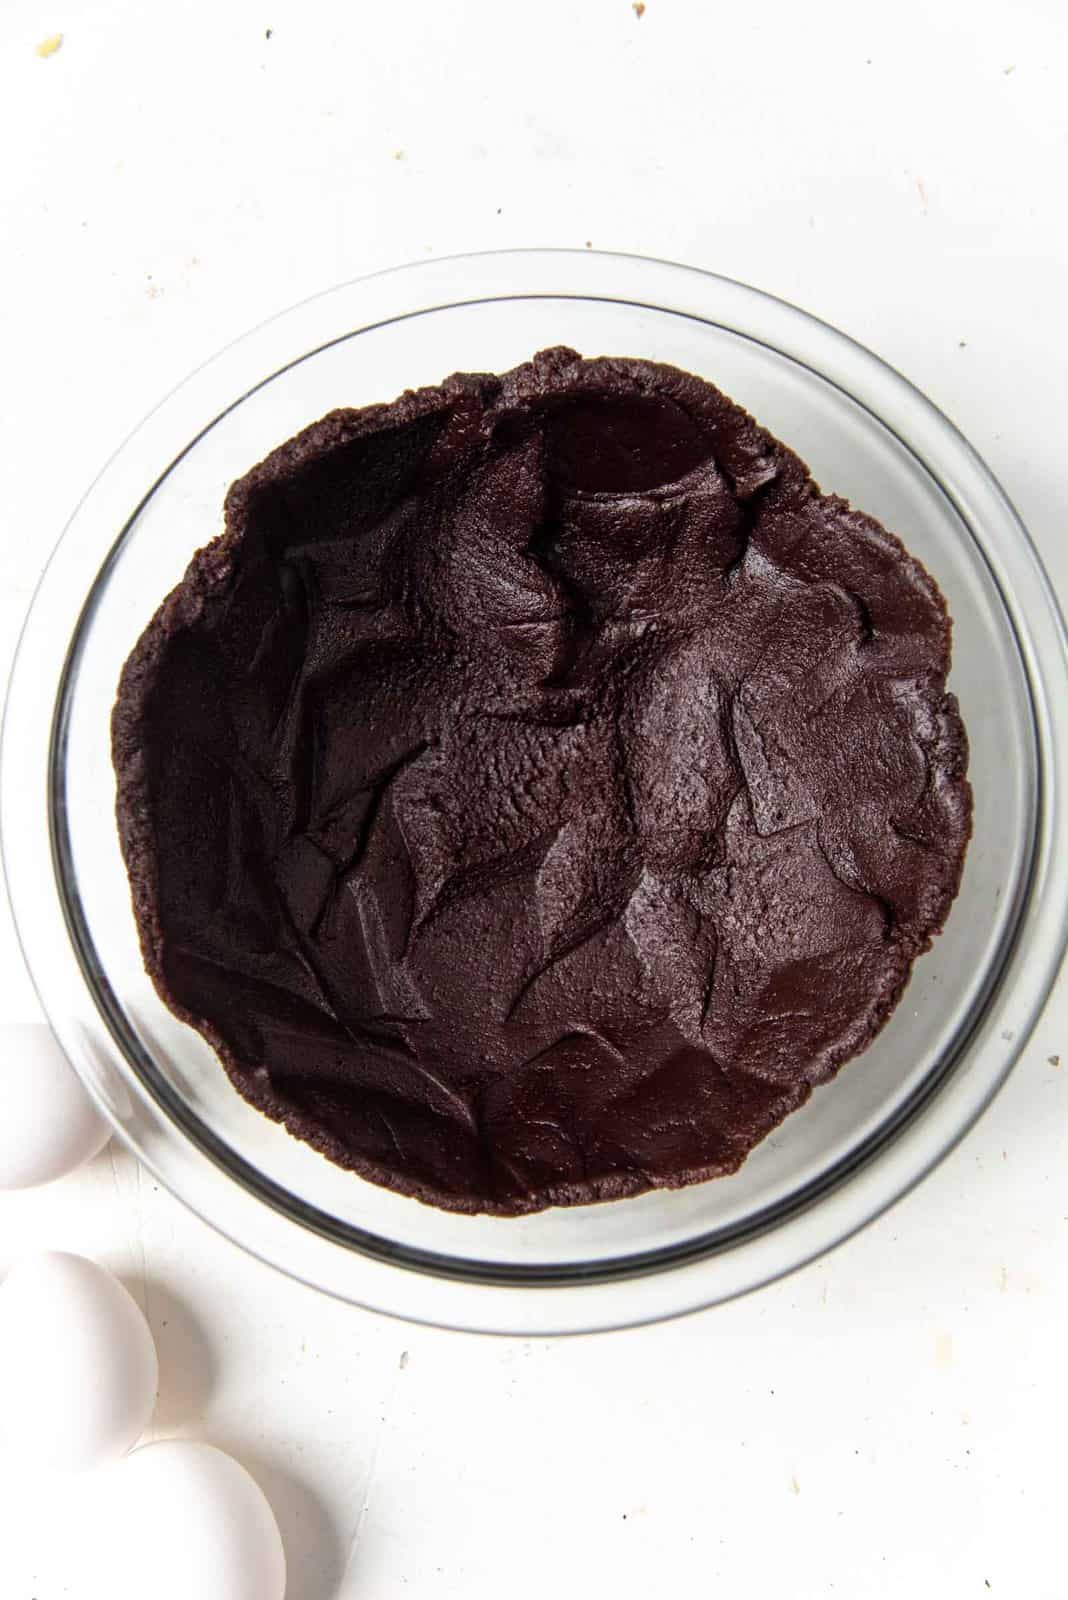
Let this dough cool down for just a few minutes in a bowl before adding the eggs.

Step 2 – Adding eggs to the choux pastry dough
Once the dough is cooled down a little, the eggs are added. Just like with classic choux pastry, it’s crucial to check the consistency of the dough as you mix in the eggs.
You may find that the dough here needs to be a little more loose compared to classic choux pastry. This is because of the cocoa powder, which makes the dough heavier, thus needing maybe a little more egg / liquid to help the pastries puff up properly when baking.
Whisk each egg and add it to the dough, mixing it in well before adding the next egg. The last egg should be added in increments (I add about 1/3 – 1/2 at a time), each increment mixed in well before adding the next.
Just like with classic choux pastry, it’s important to add JUST ENOUGH eggs to get the right consistency!

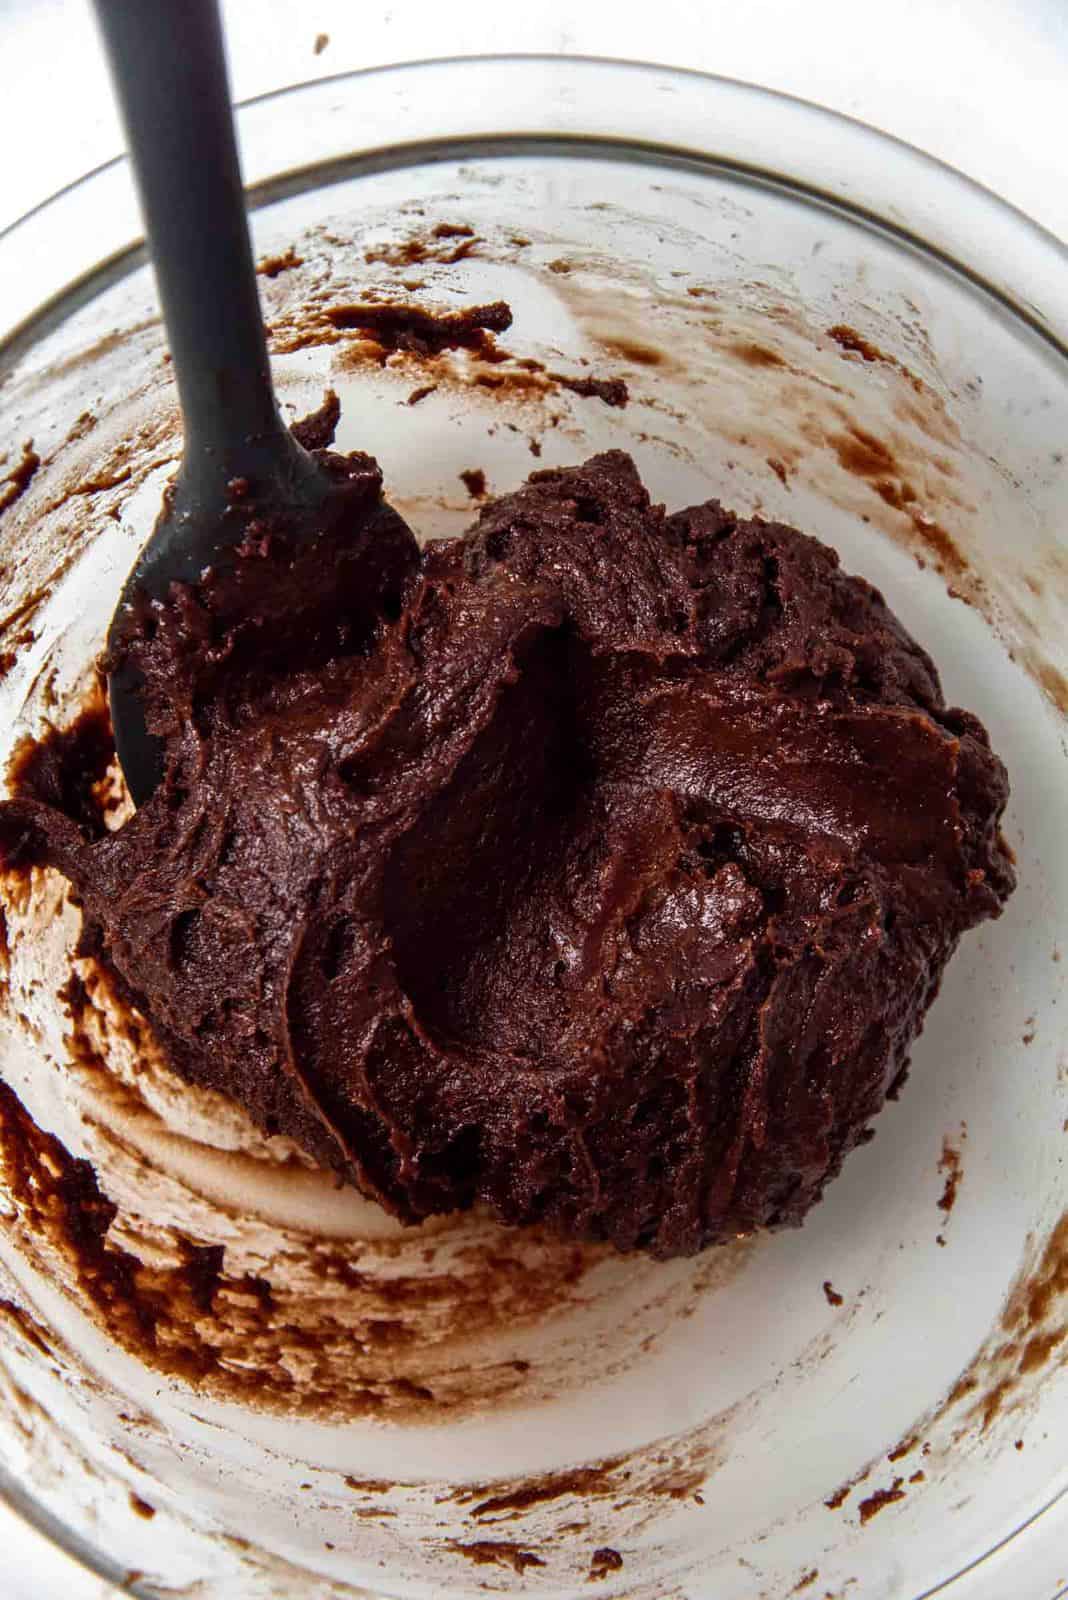
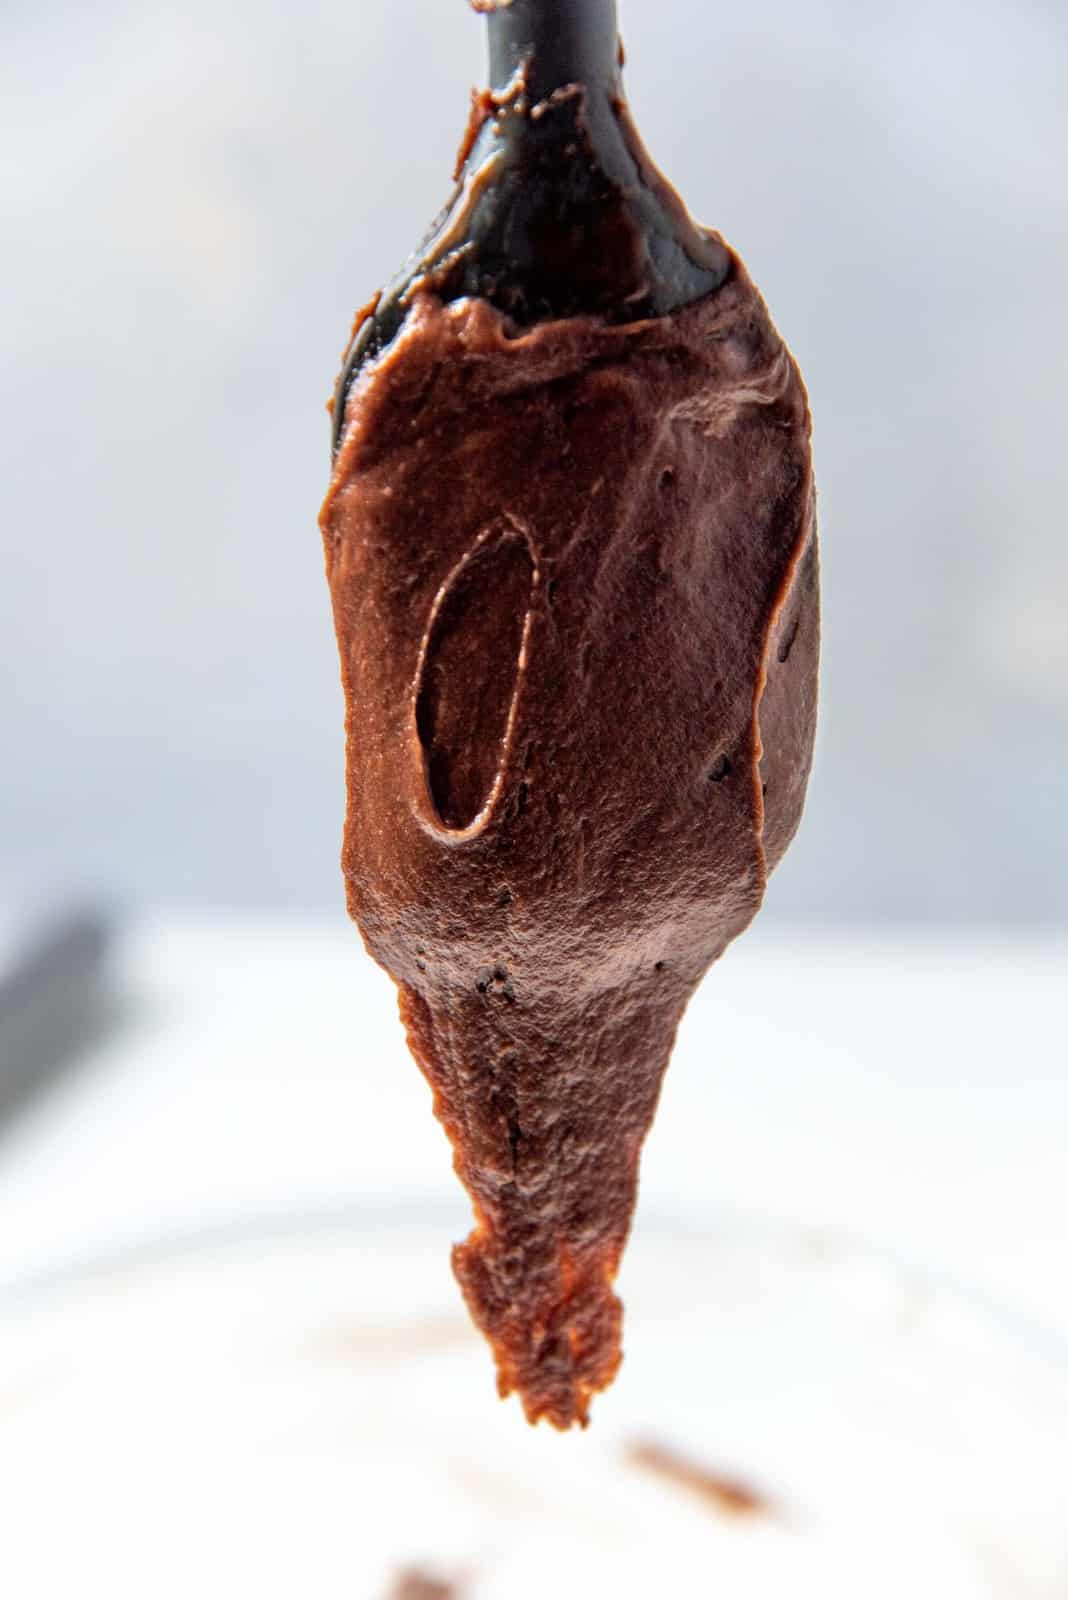
How to check the right dough consistency
- The V test – When you lift the dough with your spatula, the dough should form a “v” shape at the end of the spatula. See photo above.
- Sheen test – The dough should have a lovely sheen to it, instead of being matte-colored.
- Flow test – Usually with classic choux pastry, you can run your finger through the dough, making a trough that will hold its shape. If you do this with chocolate choux pastry, you may notice that the dough tends to flow more because the dough is relatively more soft/wet. This is OK though, since the dough will firm up more as it cools down.
Once you’ve achieved the right consistency, the dough is almost ready to be used. This step is critical to ensure great results.
Place the dough in a container or bowl and cover it with plastic wrap to make sure it’s not exposed to air. I personally prefer to transfer the dough into an uncut or sealed pastry bag, and keep it well wrapped in there, to prevent any contact with air.
Now let the dough rest. It’s important that the dough is cooled to room temperature so that it can be piped properly and still hold its shape. I like to let it rest for at least 1 hour at this point.
Step 3 – Piping the chocolate choux pastry
After the chocolate choux pastry has rested and cooled to room temperature, you’re ready to pipe and bake chocolate cream puffs! Attach to your pastry bag a round pastry tip or French star tip, with a diameter of about 1/2 inch.
Preheat the oven to 400 F. Unlike with classic choux pastry, you will have to bake these at two different temperatures. 400 F for 5 minutes, and another 25 – 30 minutes at 375 F (depends on how big you piped the pastry).
This initial high heat will give the puffs an evaporation boost, helping to expand the pastries.
Pipe the choux pastry dough onto a parchment paper lined baking tray. These choux pastries will expand by at least 1.5 times, so keep that in mind when you pipe the dough.
Pipe the dough at a 90° angle to the baking tray. That is, the piped dough mounds should be straight, and not be at an angle.

Also, make sure the tip of the pastry bag is always just below the tip of the dough mound as you’re piping. Then slowly move the tip up to create a nice and tall pastry mound.
This motion will help prevent “ripples” from forming on the piped dough mound, which will result in misshapen puffs. The taller dough mounds will also make puffs that are more round, while flatter dough mounds will not surprisingly result in deflated puffs.
Keep the remaining dough in the piping bag until you’re ready to pipe the next batch (i.e. prevent contact with air).
Optional step – Dust the chocolate choux pastry with confectioner’s sugar OR spray the tray with water. Not both. The sugar will make the baked puffs a little sweeter.
The water will help create puffs that are a little bigger. I usually don’t do either of these things for chocolate choux puffs, but you can choose to, if you like.

Step 4 – Baking the pastries
Place the choux pastry in the middle of the oven where it gets even heat from the top and bottom elements. In my conventional oven, that’s the middle rack. I also only bake one tray at a time, so that the pastries bake and brown evenly.
Bake the chocolate choux pastry at 400 F for 5 minutes, and then lower the heat to 375 F. After 20 minutes at 375 F, rotate the tray for even baking. This will depend on your oven, as some ovens will bake evenly without needing rotation.
After a further 5 – 7 minutes, when the choux pastry tops are crisp, quickly prick each of the choux cases. Bake them for a further 5 minutes. This will make the shells crisp and prevent them from deflating once taken out of the oven.
Once the chocolate choux pastry is removed from the oven, prick them again to allow the rest of the steam to escape, and to cool down.
Remember to preheat the oven back to 400 F before baking the next batch.

Step 5 – Filling the chocolate choux pastry
To make cream puffs with this chocolate choux pastry, you need to make a chantilly cream for the filling. You can either make easy whipped cream that is not stabilized, or stabilized whipped cream that is more stable due to the addition of a stabilizer such as gelatin.
If you prefer chocolate profiteroles, then you can make my vanilla pastry cream or chocolate pastry cream as the filling.
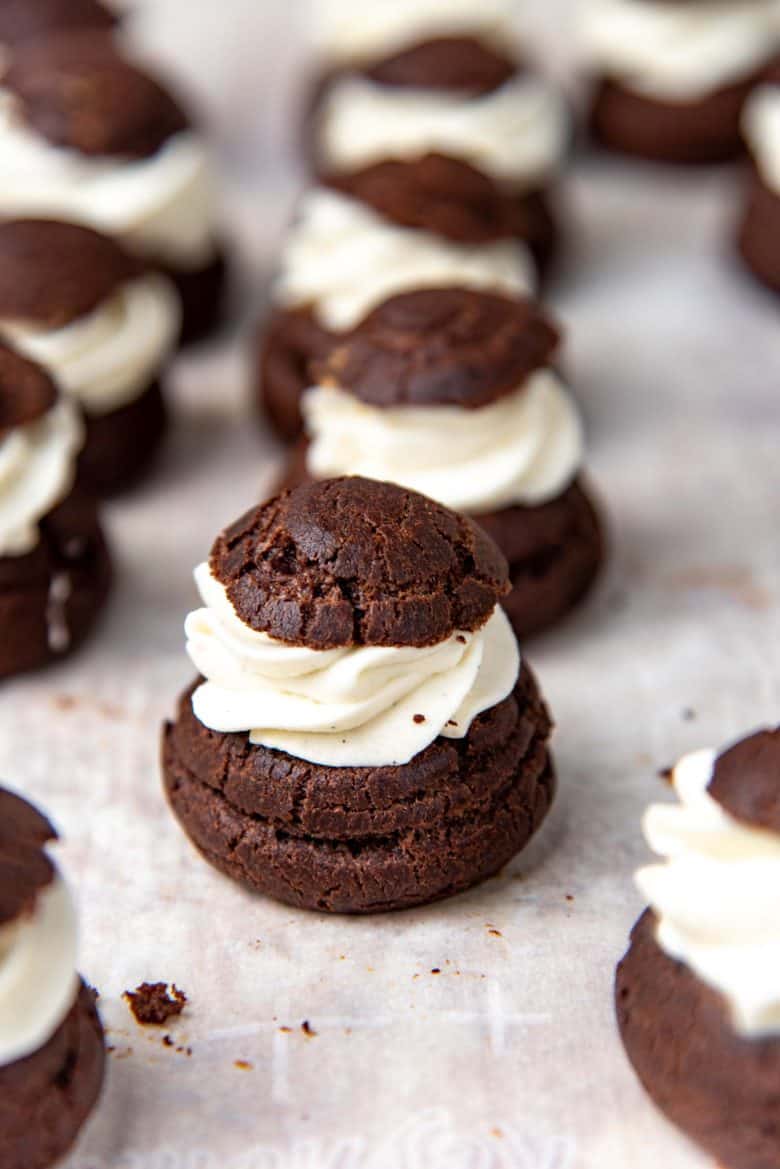
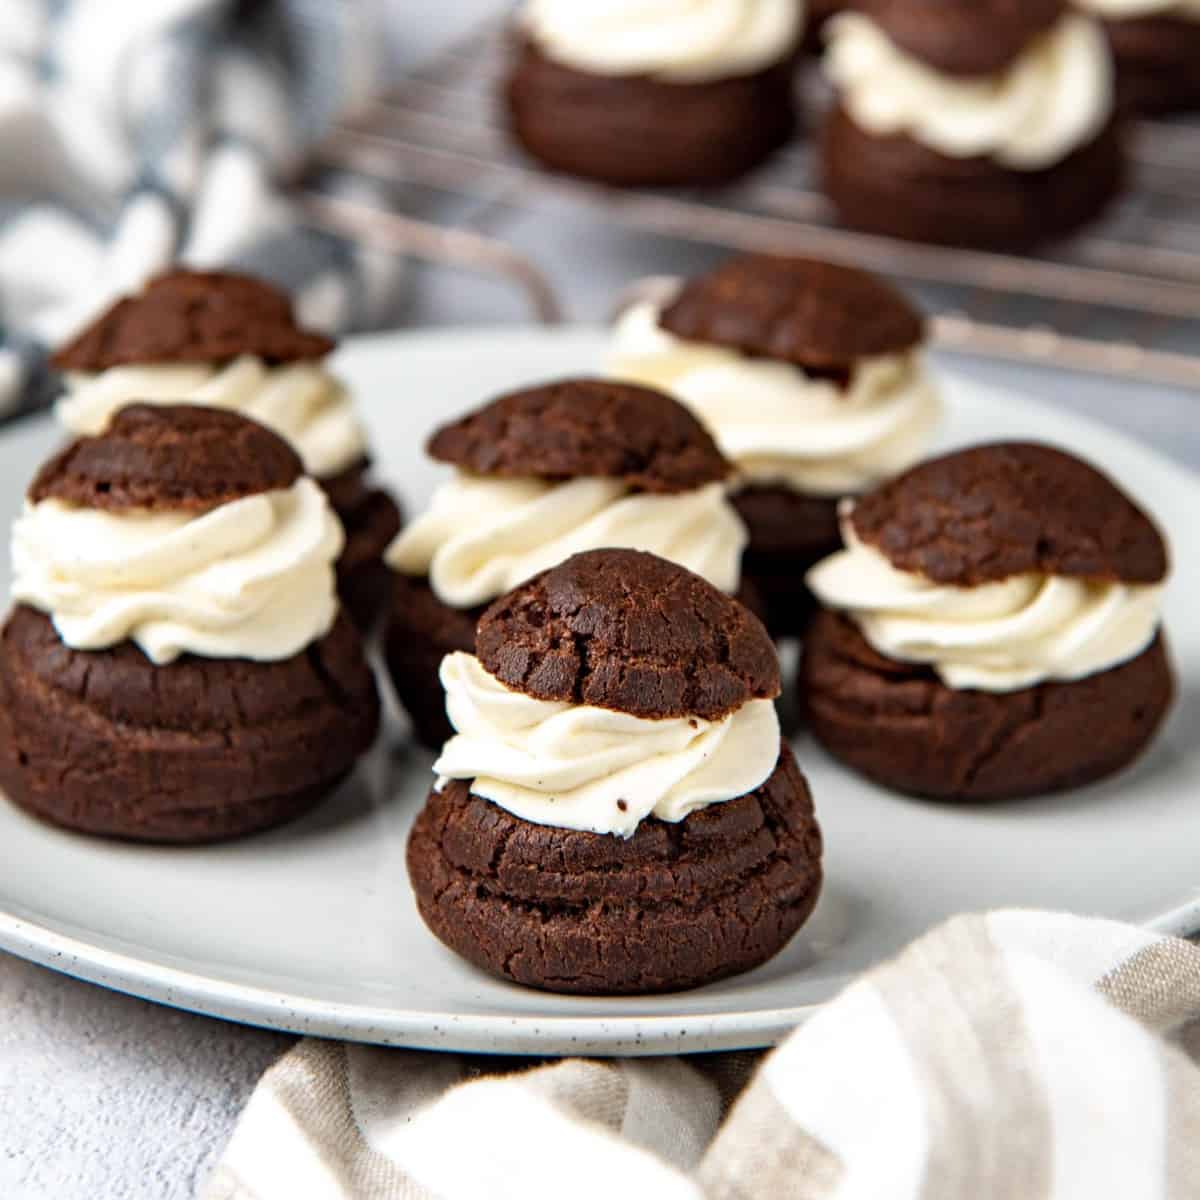
In this post, I make simple cream puffs filled with chantilly cream. The sweetness of the chantilly cream is perfect with the extra chocolatey choux puff pastry.
I personally LOVE the flavor pairing of the slight bitterness you get from the cocoa, and the sweet and creamy whipped cream. Plus that color contrast between the dark brown pastry shell and the white filling is gorgeous too!
You can simply slice the upper third of each pastry shell and then fill the bottom with the whipped cream. Swirl some of the chantilly on top to slightly overfill the bottom half, and replace the cut pastry “lid” on top. See pictures in the post.


What to expect with this recipe
These chocolate choux pastry puffs may not puff up as much as the classic choux pastry. But they still do expand while baking. The insides will still be very airy, but they will also have more “webbings” inside.
If you’re slicing the pastry shells, you can remove the webbings with your finger before filling the shells. You can also make a hole in the bottom and fill the puffs using a pastry bag and tip.
How to store these for later
You can store baked and unfilled chocolate choux pastry cases in an air-tight container. They can be left at room temperature for 24 hours, or in the freezer for longer.
To re-use them, simply warm them in a preheated oven (about 250 – 300 F) for a few minutes. This will make them nice and crisp again on the surface.
I usually store unused choux pastry dough in an air-tight container and in the fridge overnight. However, I prefer not to do this for this chocolate version, since this can affect how much they expand during baking.
Recipe FAQs and troubleshooting tips
Why did my chocolate choux puffs deflate?
Choux pastry deflates for several reasons.
The dough had too much liquid.
Oven was opened too early, and deflated the puffs before they could bake properly and form a crust.
The choux pastry was removed from the oven too early and/or not pricked to allow steam to escape.
Why didn’t my choux pastry puff up?
The dough was too dry (not enough eggs).
Oven was not hot enough (you may need to increase the oven temperature).
Why did my choux puffs bake lopsided?
If you piped the dough at an angle, they will bake at that angle as well.
Some fan forced ovens may create lopsided puffs, so make sure to rotate the tray.
Why do you bake these at 400 F, but only bake the classic choux pastry at 375 F?
I do still recommend baking classic choux pastry at 400 F at the start, IF you’re making larger puffs. But due to the cocoa powder making the dough heavier here, it’s important to bake the chocolate choux pastry at a higher temperature at first, so that they puff up better.
Can I make eclairs with this recipe?
Yes, you can! But I recommend making these cream puffs first. I haven’t tried making eclairs with this chocolate choux pastry recipe yet, but I’ll add any tips to this post once I do.
Do you use natural cocoa powder or dutch cocoa powder?
I use dutch cocoa powder, because I love the flavor of callebaut cocoa powder! I use this brand of cocoa powder for almost all of my baking. However, if you only have natural cocoa powder, you can use that instead. Make sure to weigh the cocoa powder because volume measurements between natural cocoa and dutch cocoa powder can be very different.
What adjustments could I make for different dietary needs?
Unfortunately, I haven’t made gluten free or vegan chocolate choux pastry, so I don’t know how to adjust this recipe for those dietary needs. However, you can make this dairy free by subbing the butter with vegan butter or dairy free butter.

Recipe
Chocolate Choux Pastry
US based cup, teaspoon, tablespoon measurements. Weight measurements are recommended for accurate results whenever available.
Common Measurement ConversionsIngredients:
Chocolate choux pastry
- 30 g dutch cocoa powder about 3 tbsp
- 140 g all purpose flour about 1 cup + 1 ½ tbsp (measured by spoon and level method)
- 236 g water 1 cup
- 115 g unsalted butter 1 stick (cut into cubes)
- 50 g white sugar about 3 tbsp
- ½ tsp sea salt less if using table salt
- 4 large eggs you may not use all of the eggs
Chantilly cream (stabilized, sweetened whipped cream)
- 1 tsp powdered gelatin
- 2 tbsp water
- 1 tbsp heavy cream or milk
- 360 mL chilled heavy cream 1 ½ cups. 35% fat
- 60 g confectioner’s sugar ½ cup
- 2 tsp good quality vanilla extract or vanilla bean paste
- ¼ tsp sea salt less if using table salt
Instructions:
Chocolate choux pastry
- Preheat oven to 400°F / 204°C.
- Measure out all the ingredients.
- Sift the flour and cocoa powder together and set aside in a small bowl.30 g dutch cocoa powder, 140 g all purpose flour
- Place the salt, water, sugar, and butter in a saucepan, and heat over medium heat, while stirring occasionally. Make sure that the butter, salt, and sugar melt before the water comes to a boil.236 g water , 115 g unsalted butter, 50 g white sugar, ½ tsp sea salt
- When the water comes to a boil, remove the pot from the heat and immediately add the cocoa powder and flour mix, in one go. Vigorously mix in the flour mixture so that it absorbs all of the water (use a wooden spoon or silicone spatula to do this). When the flour has absorbed the water and it's forming a dough, return the pan to the stove (medium heat).
- Cook the dough for about 1 minute (over medium heat) while mixing and moving it around in the pan, until you get a dough that pulls away from the sides of the pan and resembles dry mashed potato. You should also notice a dough film formed at the bottom of the pan. The cook time will vary depending on your stove, and pot size.
- Transfer the dough into a bowl and let it cool down slightly for a few minutes.
- Lightly whisk one egg in a small bowl and add it to the dough. Mix it well into the dough until thoroughly mixed in. Then add the second and third egg, mixing in the second well before adding the third.4 large eggs
- Now whisk the final egg, and add it in increments, until you get the right consistency. This is a crucial step, so take care not to add too much egg as this will result in flat/deflated puffs.
- The correct dough consistency is when the dough has a sheen to it, and has pipeable consistency, and the dough will form a “V” shape at the end of your spatula when lifted from the bowl. You may or may not use up all of the four eggs. This is why the fourth egg is added in increments.
- Prepare a baking tray with parchment paper.
- Pipe the desired shape onto the baking sheet – either using a piping bag fitted with a large tip (I use Wilton 1A, or you can cut the pastry bag opening instead). Then with a damp finger, flatten the apex and any sharp points on the dough mounds. Make sure to leave at least 1 – 1.5 inches between the piped mounds.
- Bake in the oven preheated at 400°F / 204°C, for about 5 minutes.
- Reduce the heat to 375°F / 190°C, and let the choux pastry cook for a further 20 minutes. DO NOT open the oven door during this step.
- After 25 minutes of total cook time, the choux pastry shells should have puffed up. Quickly open the oven door and rotate the baking sheet. If you piped very large choux pastry mounds, then let them cook a little bit longer before opening the oven door.
- Cook the choux puffs for another 5 minutes. At this stage, the choux pastries should have a hardened top. Quickly prick each of the cases with a toothpick.
- Bake the choux pastry for another 3 – 5 minutes, to allow the pastries to dry out a little.
- Remove from the oven, and prick the pastries one more time. Let the choux pastry cases cool completely in a draft-free area, preferably somewhere that is not cold.
- Preheat the oven to 400°F / 204°C again for the next batch. Once preheated, pipe and bake the second tray of choux pastry.
- Fill the choux cases with stabilized sweetened whipped cream as soon as they are at room temperature, and serve immediately. OR you can store cooled choux pastry shells in an air-tight container for up to one day. To store them for longer, keep in the freezer in an air-tight container.
- You can either cut the top of the pastry and fill the bottom half with whipped cream, OR make a hole at the bottom of the shell and fill with a pastry bag.
Stabilized chantilly cream
- In a small microwave-safe bowl, place the water, and sprinkle the gelatin over the surface of the water. Make sure all the gelatin is saturated with water, and then let it sit for at least 10 minutes to bloom.1 tsp powdered gelatin, 2 tbsp water
- In a large bowl, place the heavy cream, confectioner’s sugar, vanilla, and salt. Stir to combine. Have it ready to be whisked with an electric hand mixer or stand mixer by the time the gelatin is ready.360 mL chilled heavy cream, 60 g confectioner’s sugar , 2 tsp good quality vanilla extract, ¼ tsp sea salt
- After 10 minutes, microwave the gelatin in 10 second intervals to dissolve it. Do NOT let the gelatin mixture boil.
- Stir in the 1 tbsp of cold cream or milk to temper the gelatin mixture.1 tbsp heavy cream
- Start whisking the heavy cream mixture on high speed, and add the gelatin mixture into it. Do NOT add the gelatin directly onto the whisk. Instead, add it where the cream is moving quickly due to whisking action. Alternatively, as soon as you add the gelatin, move the mixer around in the cream to make sure that the gelatin is mixed in well. The idea is to get the gelatin mixed into the cream as fast as possible, without it touching the whisk when added.
- Lower the mixer speed to medium (or medium high), and whisk the heavy cream until you have stiff peaks. Keep a close eye on it since the cream can go from stiff peaks to broken in a matter of seconds.
- Place the whipped chantilly cream in a large pastry bag, attached with a star tip (to create swirls), or with a round tip / bismarck tip (to fill).
Recipe Notes
A note on the chantilly cream filling
This recipe makes enough for about 20 – 25 cream puffs, IF you fill them the way I have in the pictures in this post (swirled filling). But if you’re only filling the cream puffs from the bottom, then you will need a lot less filling. Any leftover whipped cream can be served with fruits.How far in advance can I make cream puffs?
Cream puffs are best served within a few hours of being filled. You can make the choux puffs a day ahead, and then re-crisp them in a warm oven (about 250 – 300 F) before filling with the chantilly cream. Stabilized whipped cream can also be made a day ahead, but may need to be re-mixed with a dash of cream to make it smooth again. I make the stabilized chantilly cream while the choux pastry is cooling down.Storing choux pastry / cream puffs for longer
The best way to store choux pastry is to freeze baked and UNFILLED cases in an air-tight container. When you’re ready to fill them, reheat the cases in the oven to make them crisp again. Once cooled, they can be filled and served. If you do have filled cream puffs that are leftover, these can be placed in an air-tight container and frozen too. I find that they become stale in the fridge very quickly, so I always prefer to store leftovers in the freezer. Since the filling is so light, the cream puffs de-frost at room temperature pretty quickly.More choux pastry related recipes
Classic choux pastry, Perfect cream puffs recipe, Perfect chocolate profiteroles, Chouquettes (French sugar puffs), Choux au craquelin, Classic chocolate eclairs, Earl grey eclairs, Chicken bouchees (chicken puffs) See here for a list of the BEST French pastry recipes and desserts.Nutrition Information:
“This website provides approximate nutrition information for convenience and as a courtesy only. Nutrition data is gathered primarily from the USDA Food Composition Database, whenever available, or otherwise other online calculators.”


Leave a Reply