


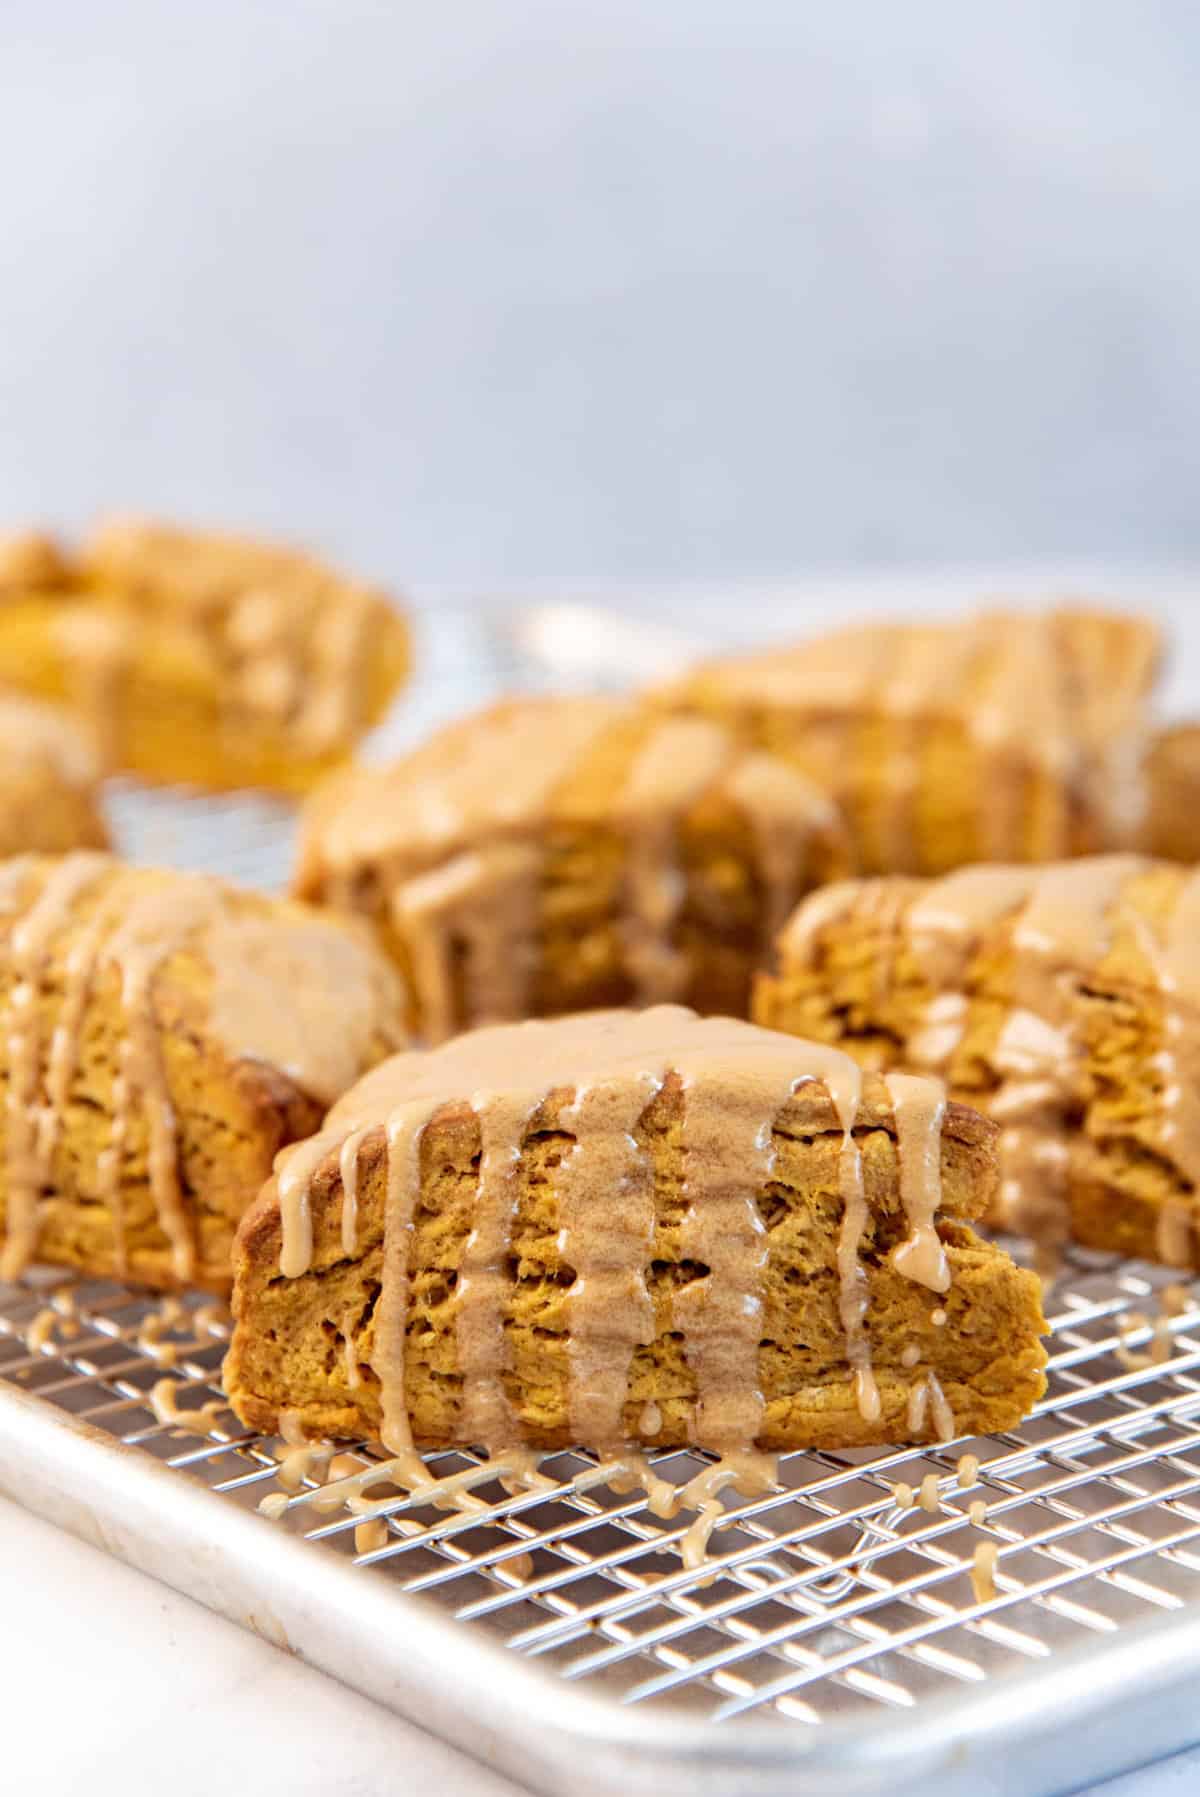
These Classic Pumpkin Scones are perfectly spiced, sweet, buttery, soft, and incredibly delicious! Can be made ahead of time, and frozen for later too. Make wedge scones, round scones, or square scones with this recipe, with ideas for flavor variations and different glazes too.
The only easy, foolproof recipe you’ll need for soft pumpkin scones!

And just like that, summer gives way to fall (aka pumpkin season). So brace yourselves for all the pumpkin recipes! From pumpkin spice lattes and pumpkin spice coffee creamers to pumpkin pie, pumpkin pancakes, pumpkin roll cake, pumpkin cheesecake, crustless pumpkin pie, pumpkin rice krispie treats, and of course these amazing pumpkin scones! 🙂
I made these pumpkin scones last year, but never got around to publishing it. But here they are at last. While I had perfected this recipe for a while, this time I gave them an upgrade with a delicious brown butter glaze.
Why I love this recipe
- This recipe is so easy, and makes foolproof, soft pumpkin scones every time.
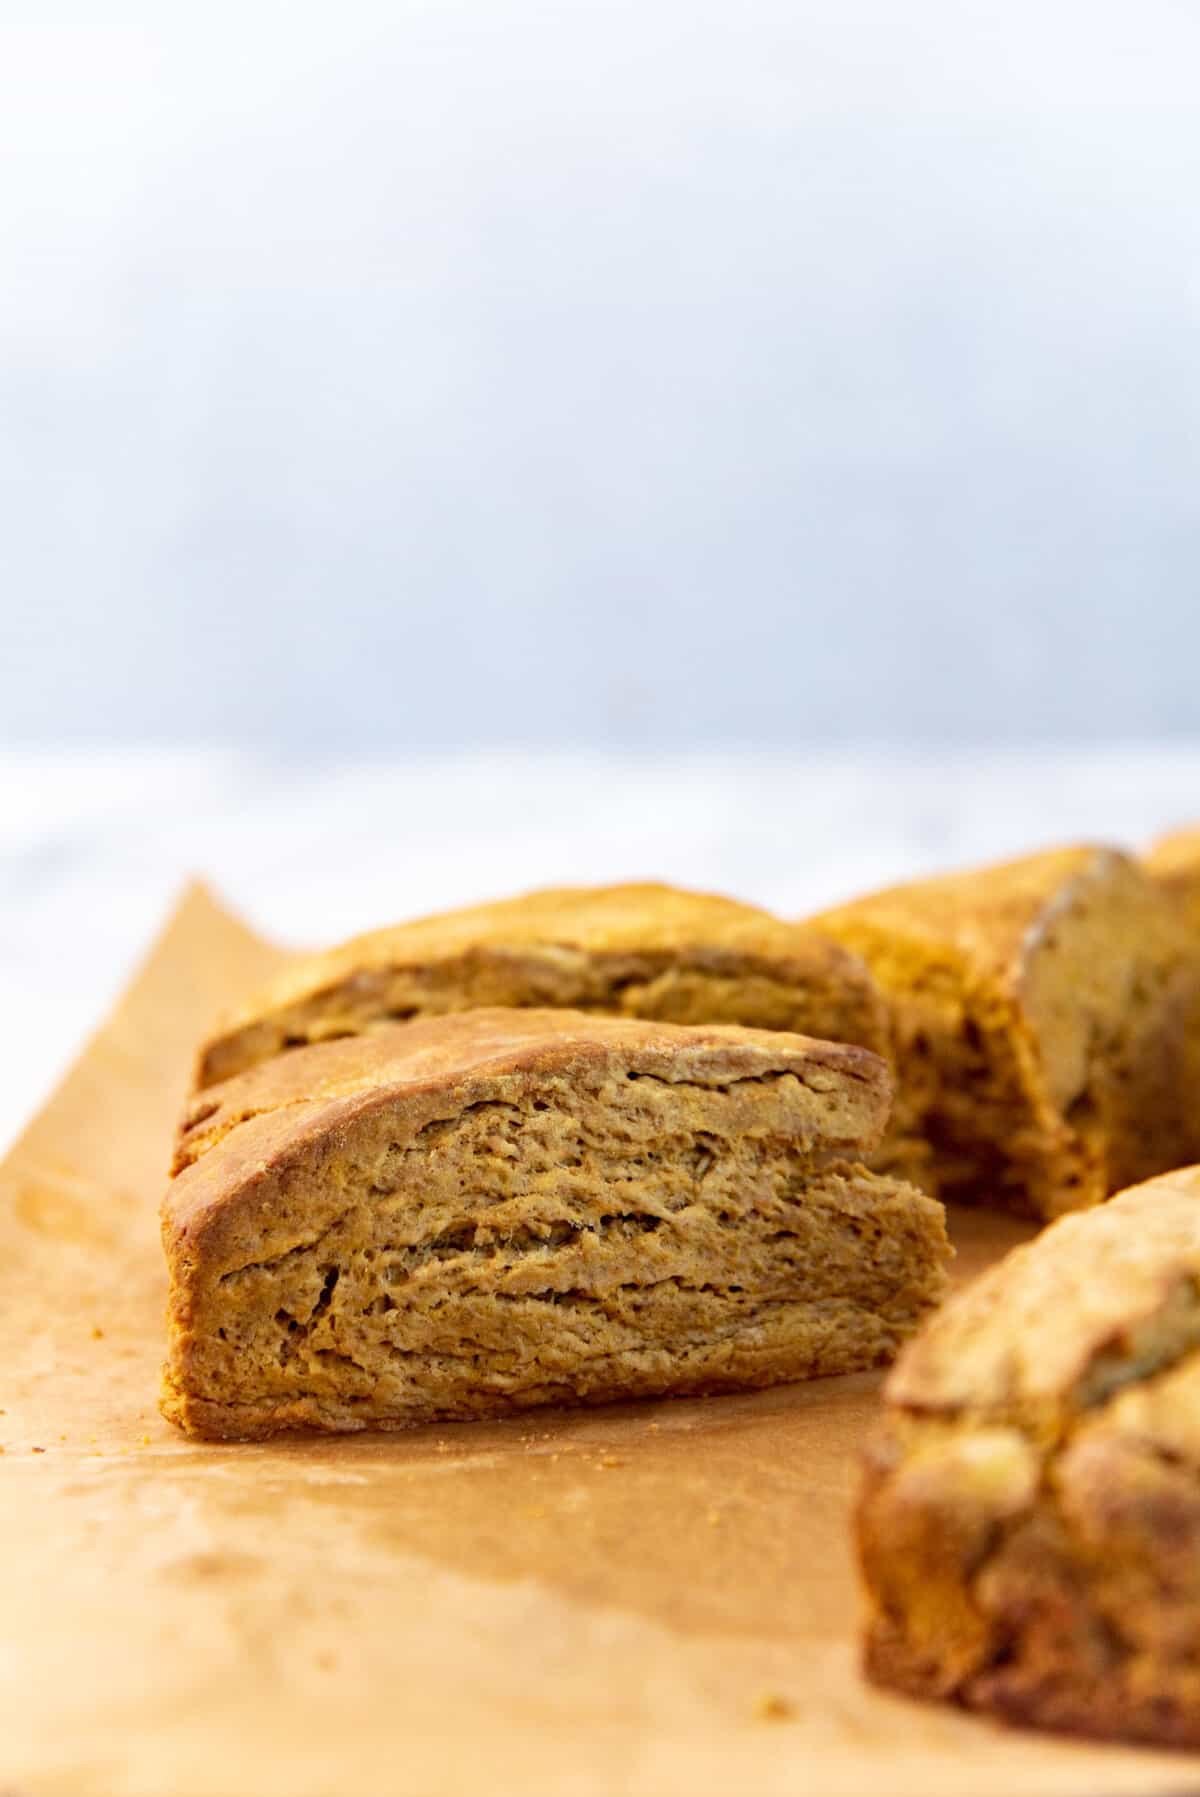
- These pumpkin scones are tall, soft, and buttery. Just like my classic cream scones.
- Great pumpkin flavor (with cinnamon and nutmeg too!).
- A great recipe to make for, and to make with kids.
- Can make these scones ahead of time and freeze for later.
- They can be baked from frozen, whenever you crave a delicious, soft pumpkin scone!
- I also show you how to cut them into different shapes, and how to make different flavor variations as well!
This really is a foolproof pumpkin scones recipe, and I’m going show you all the ins and outs. But the recipe is so easy anyway, even a novice baker could nail it, every time.
You can check out my archive of muffins and scones for more delicious scones recipes.

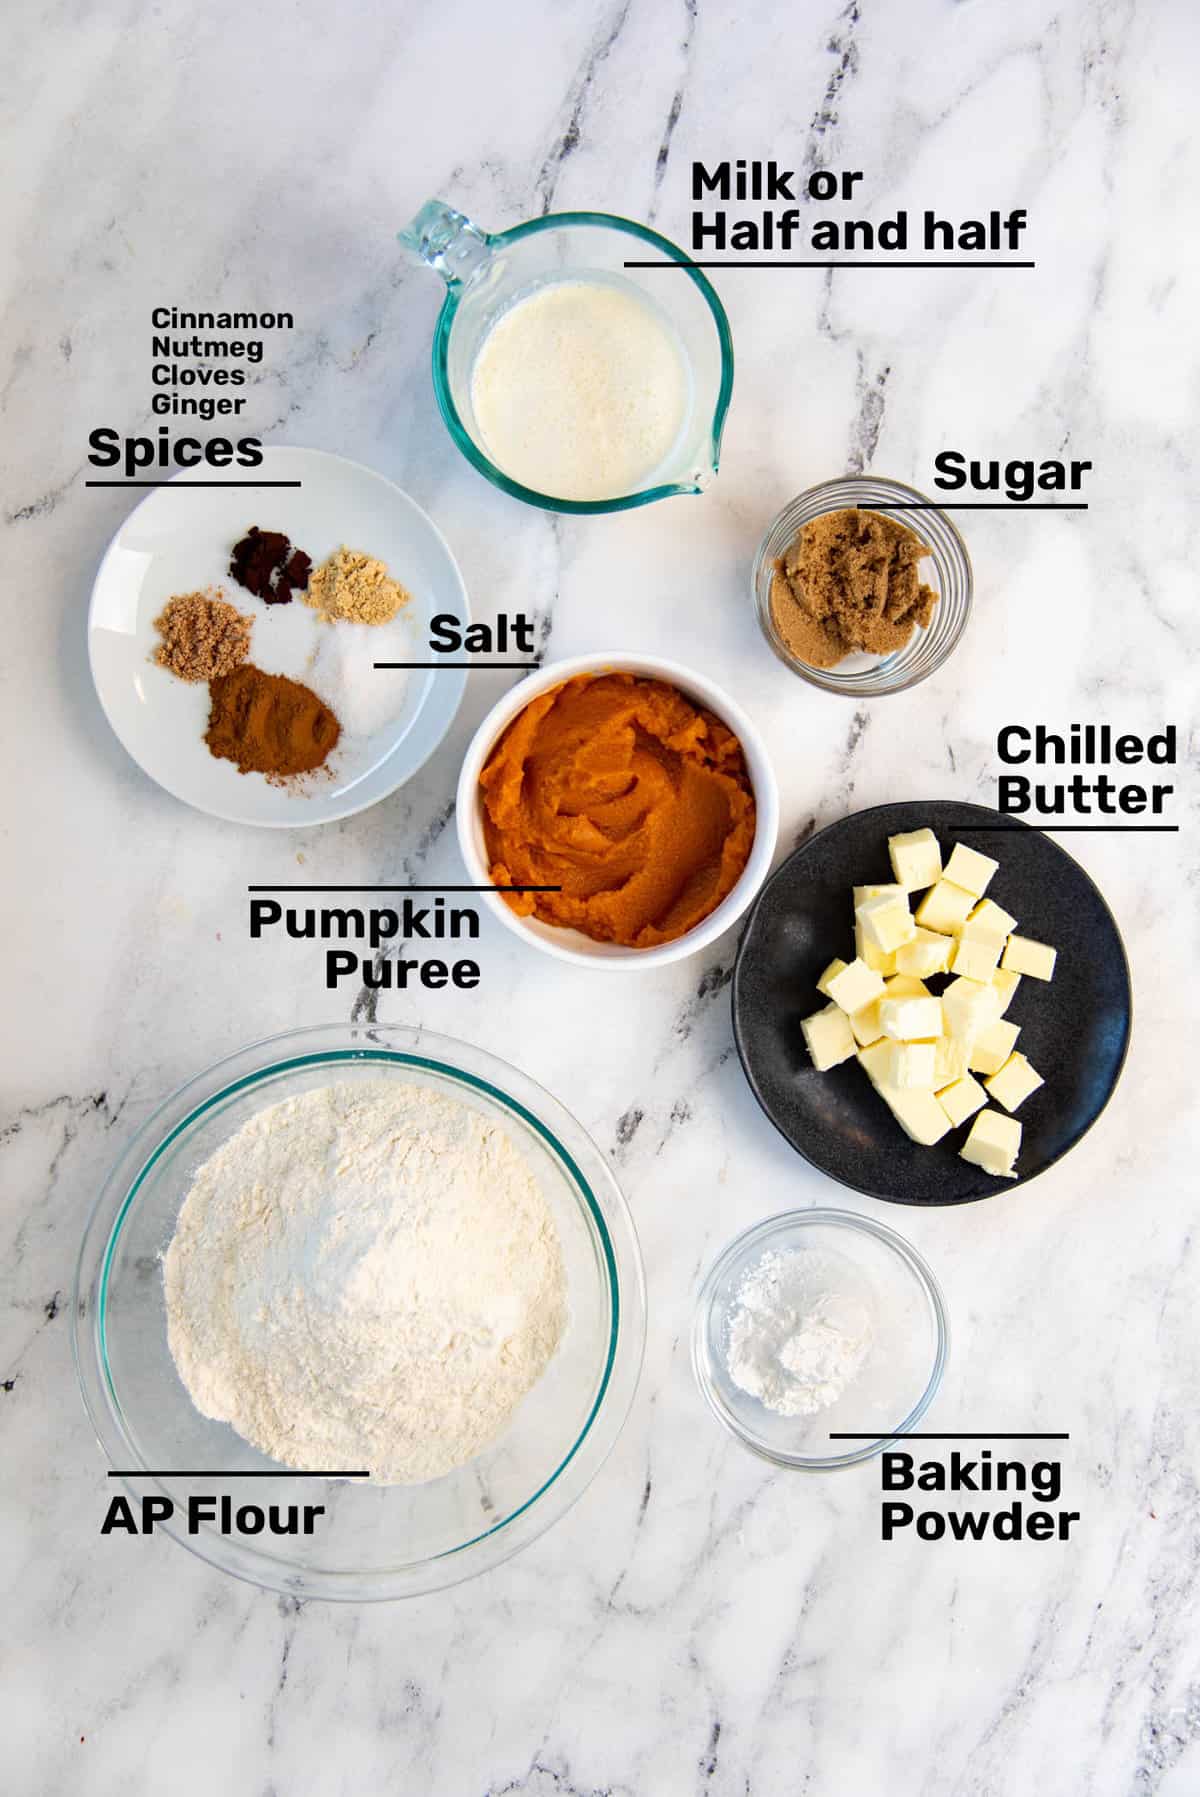
Ingredients
Pumpkin purée
You can use canned pumpkin puree or fresh pumpkin puree for this. If you’re using canned pumpkin puree, make sure to buy the 100% puree and not the pumpkin pie filling, which is already sweetened.
AP flour
All purpose flour has a moderate gluten amount, so it’s great to use in many applications. Scones should not have a lot of gluten to keep them soft, so make sure to not over-work the dough. DO NOT use bread dough for this recipe.
Unsalted butter
Make sure the butter you use is chilled and cubed. Cold butter will ensure buttery, flaky layers in your pumpkin scones. I use unsalted butter, so that I can control the salt in my dough, but you can use salted butter too. You may need to reduce the salt in the recipe if you use salted butter.
Half and half
I use half and half (10% fat) in this recipe as the liquid, which brings the dough together. You can also use full fat milk (3% fat) or even table cream (18% fat) or whipping cream (35% fat). The higher the fat content, the richer and softer the scone will be. I would avoid using anything less than 2% milk.
Sugar
I have used granulated white sugar and brown sugar to make these scones. So you can use,
- Granulated white sugar
- Caster sugar
- Dark brown sugar
- Light brown sugar or
- Muscovado sugar
See my comprehensive guide to types of sugar to learn about the differences between them and how to use them in your baking.
This pumpkin scone is not very sweet. The glaze adds sweetness to the scones, making it perfect to eat as a sweet treat. But I can just add butter and cheese and have this as a savory scone too! So if you want the scone to be sweeter, feel free to add more sugar.
Salt
Salt helps to balance and bring out all the flavors in the scone. Do not leave it out, otherwise these will taste very bland.
Spices
I use a combination of cinnamon, nutmeg, ginger, and cloves. You can also use store-bought pumpkin pie or apple pie spice too.
How to make pumpkin scones
Making the dough
First, have all the ingredients measured and ready to go. The butter and milk MUST be chilled, but chilling other ingredients are optional. If it’s a hot day, it’s better to have all the ingredients chilled for best results.
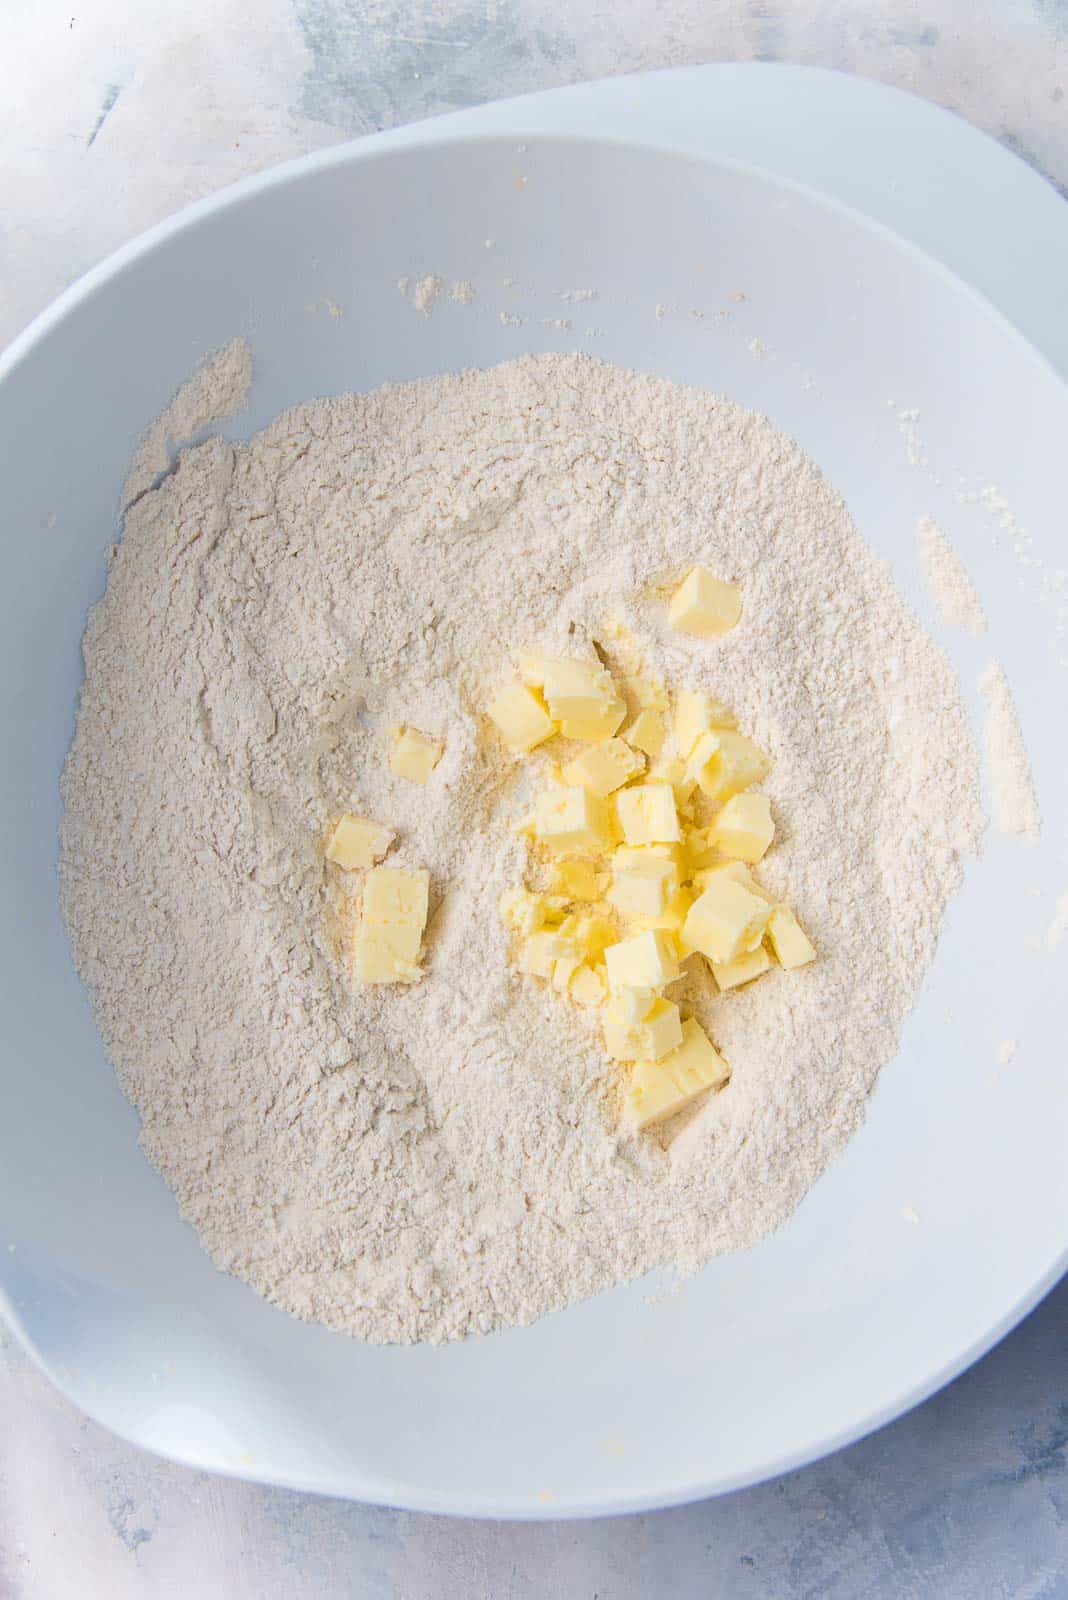
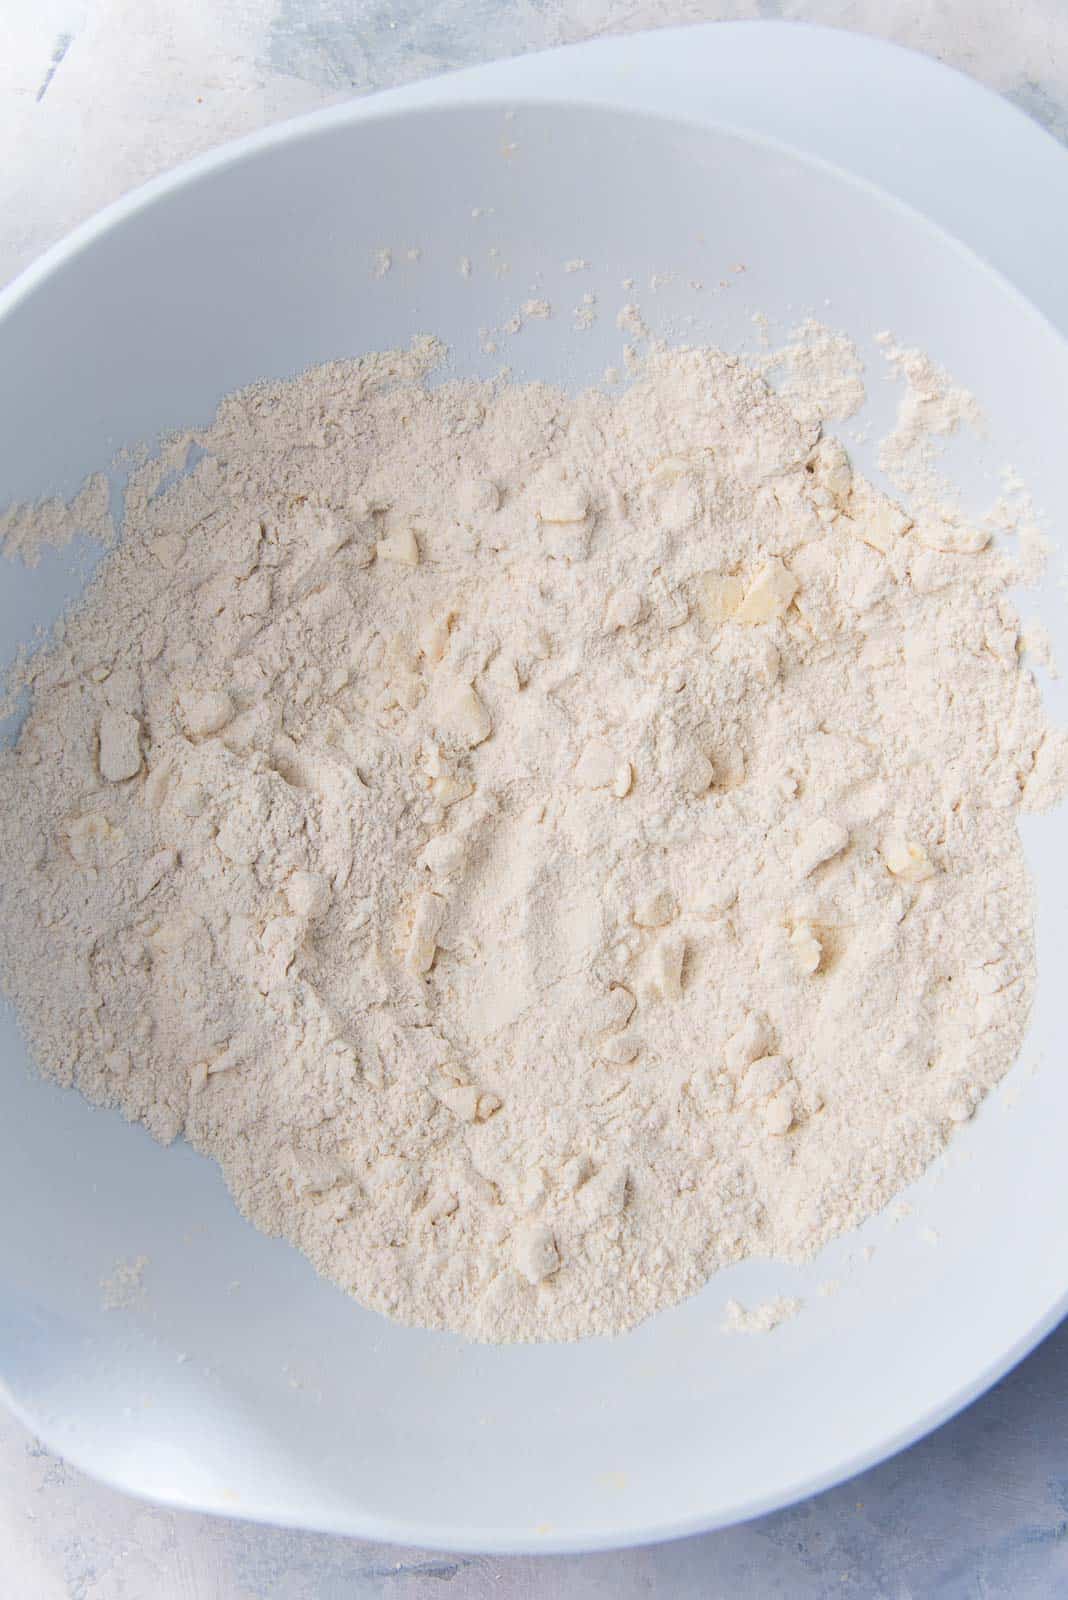
Cut the butter into 1/2 inch cubes, OR freeze the butter and then grate. If the butter is in cubes, you will need to rub the butter into the flour to create flour/butter crumbs. If the butter is frozen and then grated, then you only need to toss it in the flour.
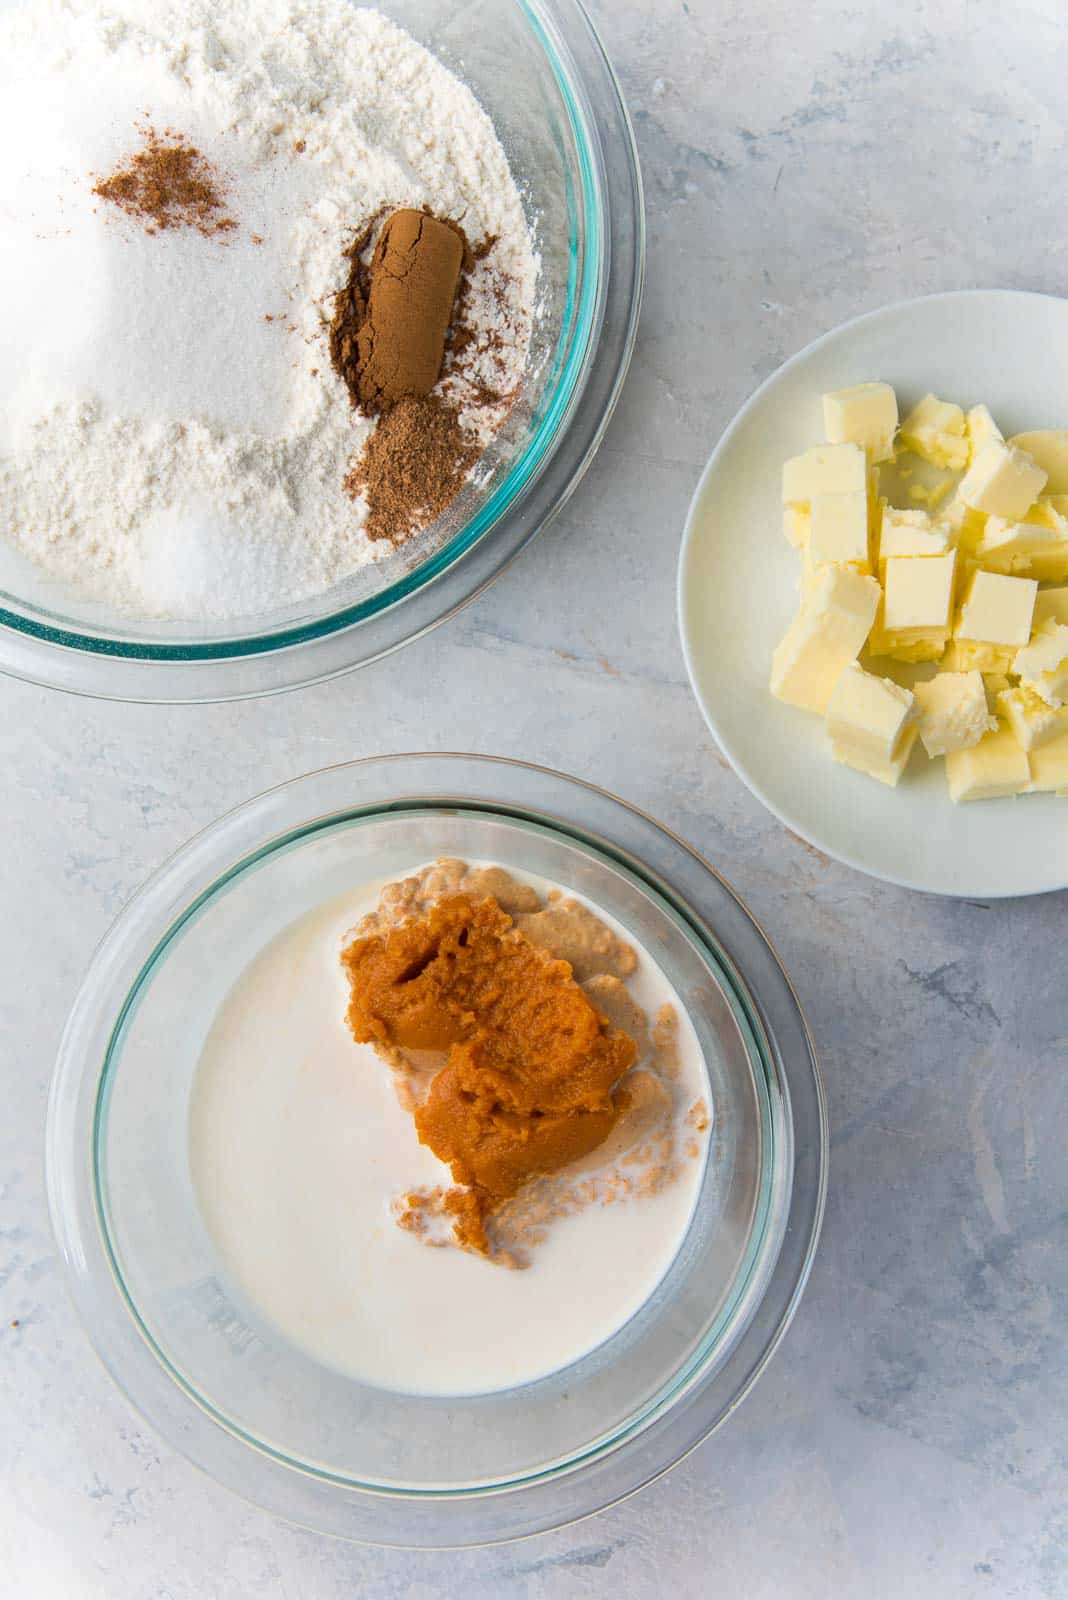
Mix all the dry ingredients together in a large bowl so that they are well combined. Add the cubed butter into the dry ingredients, and cut the butter into the flour. The butter should resemble coarse bread crumbs, with some butter being hazelnut-sized. If you grated the butter, then you just need to toss the butter in the flour.
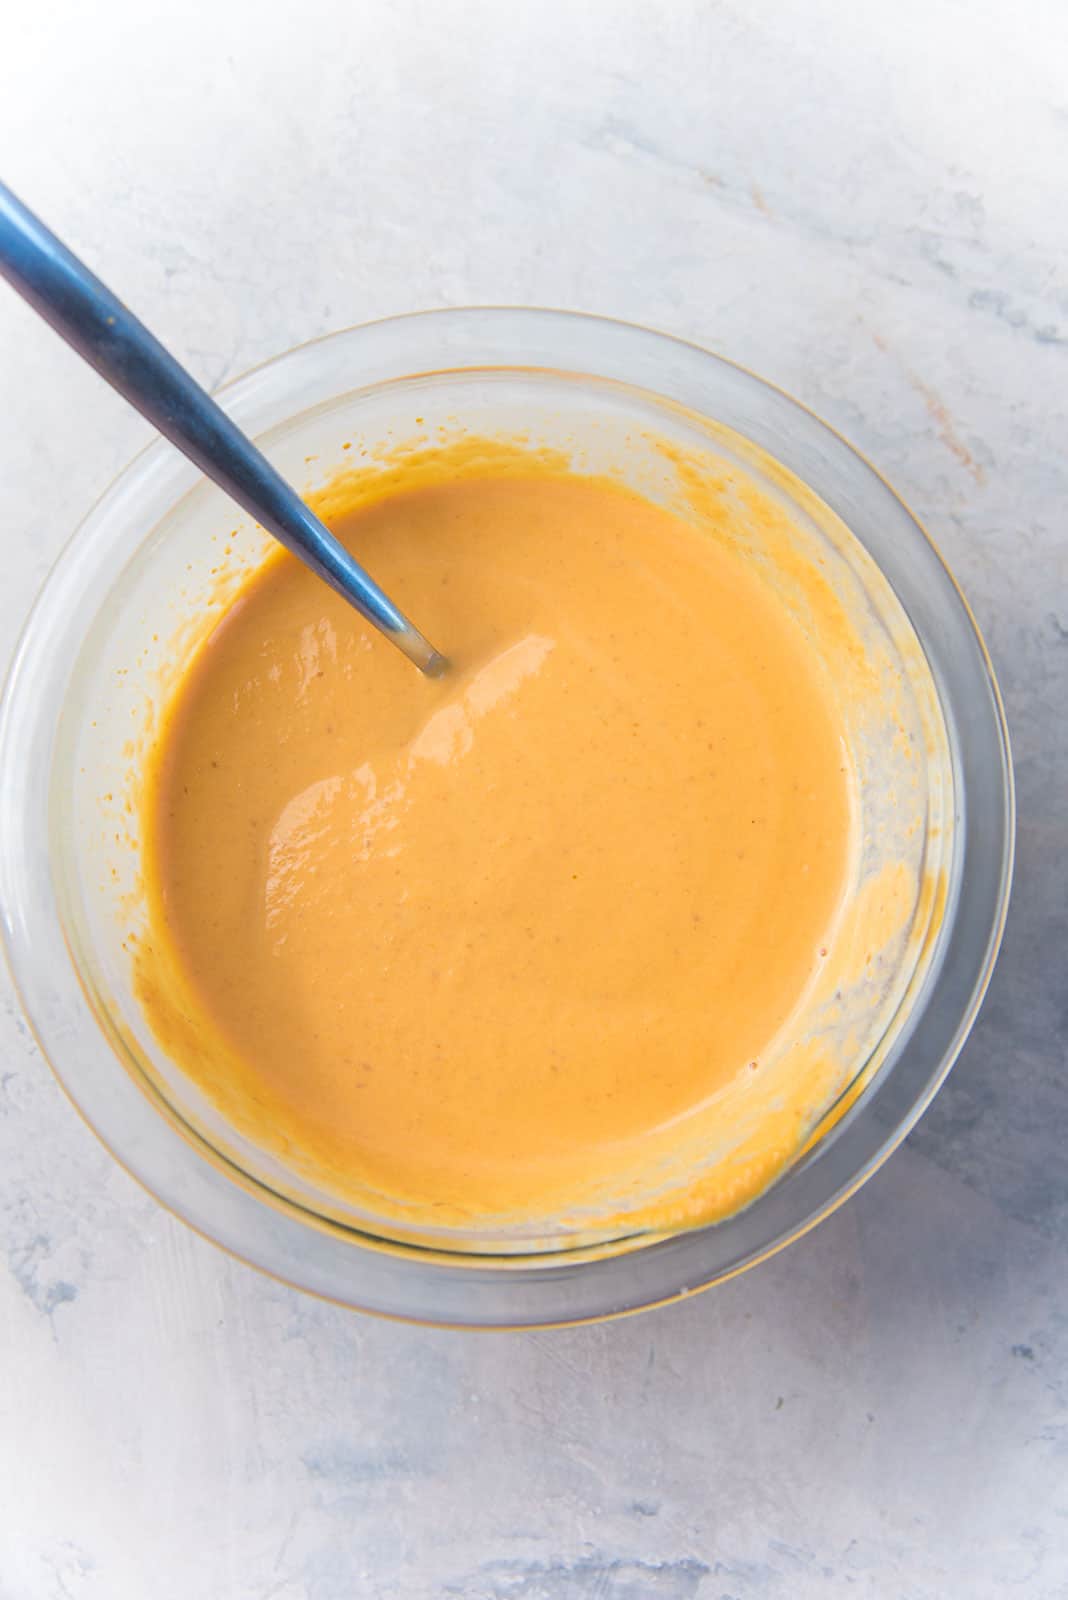
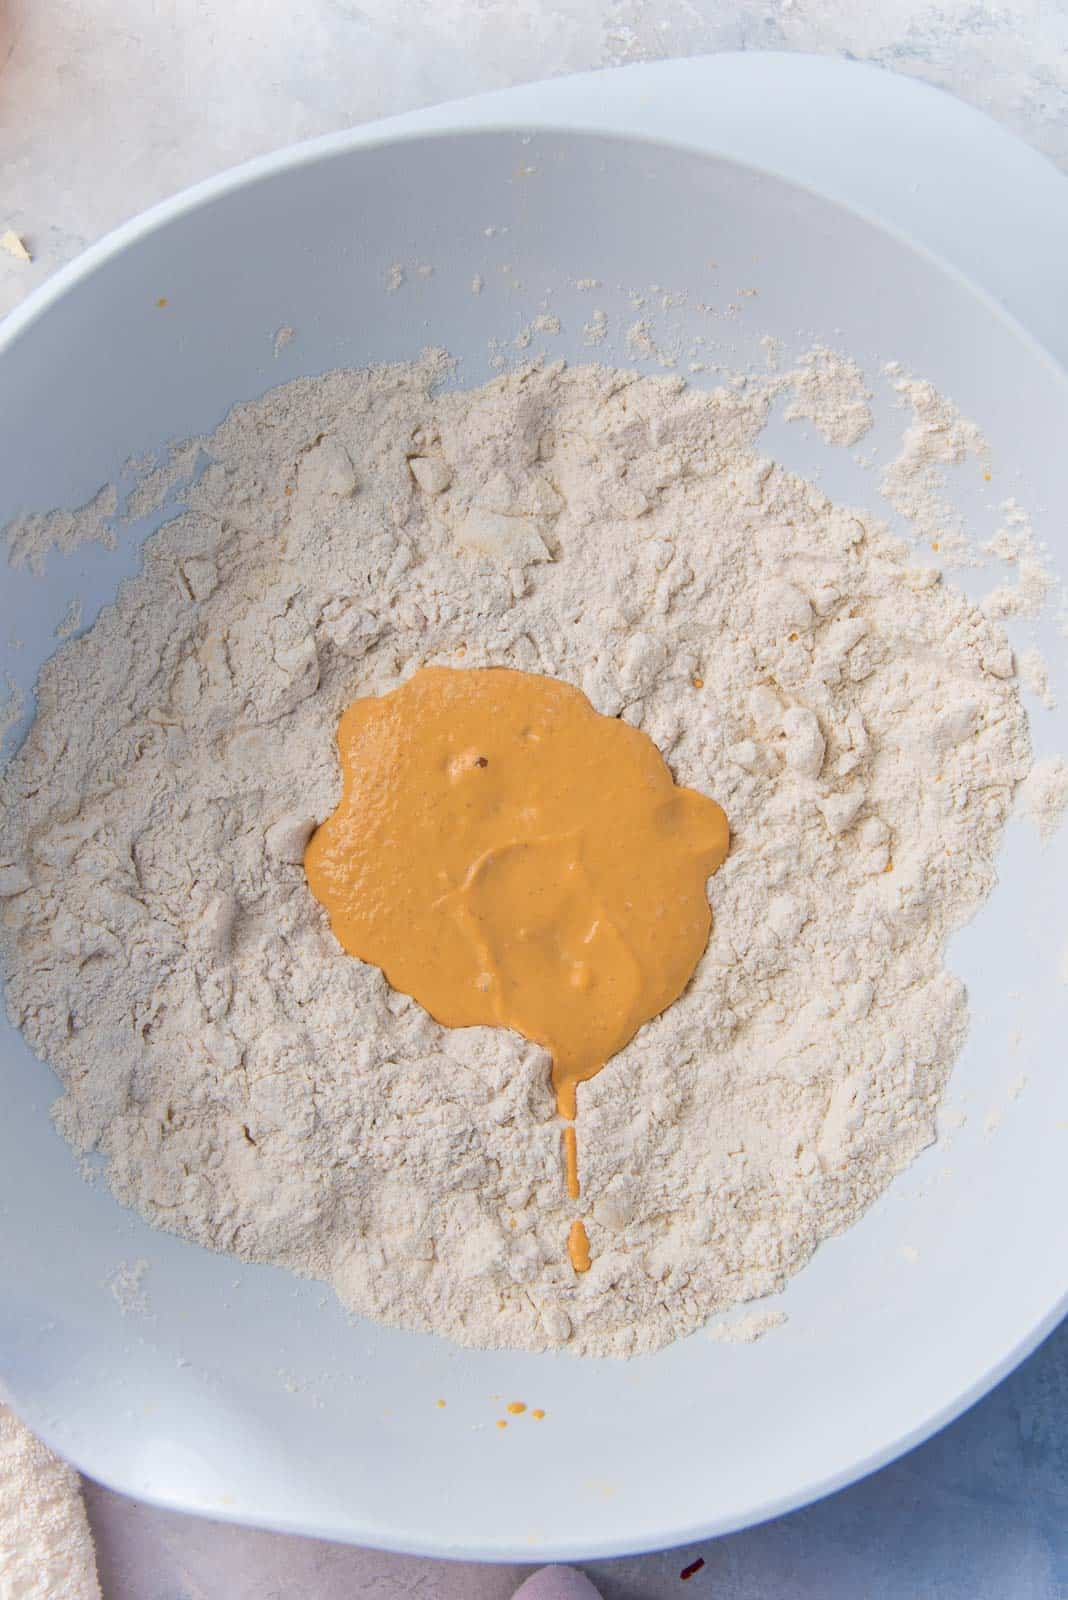
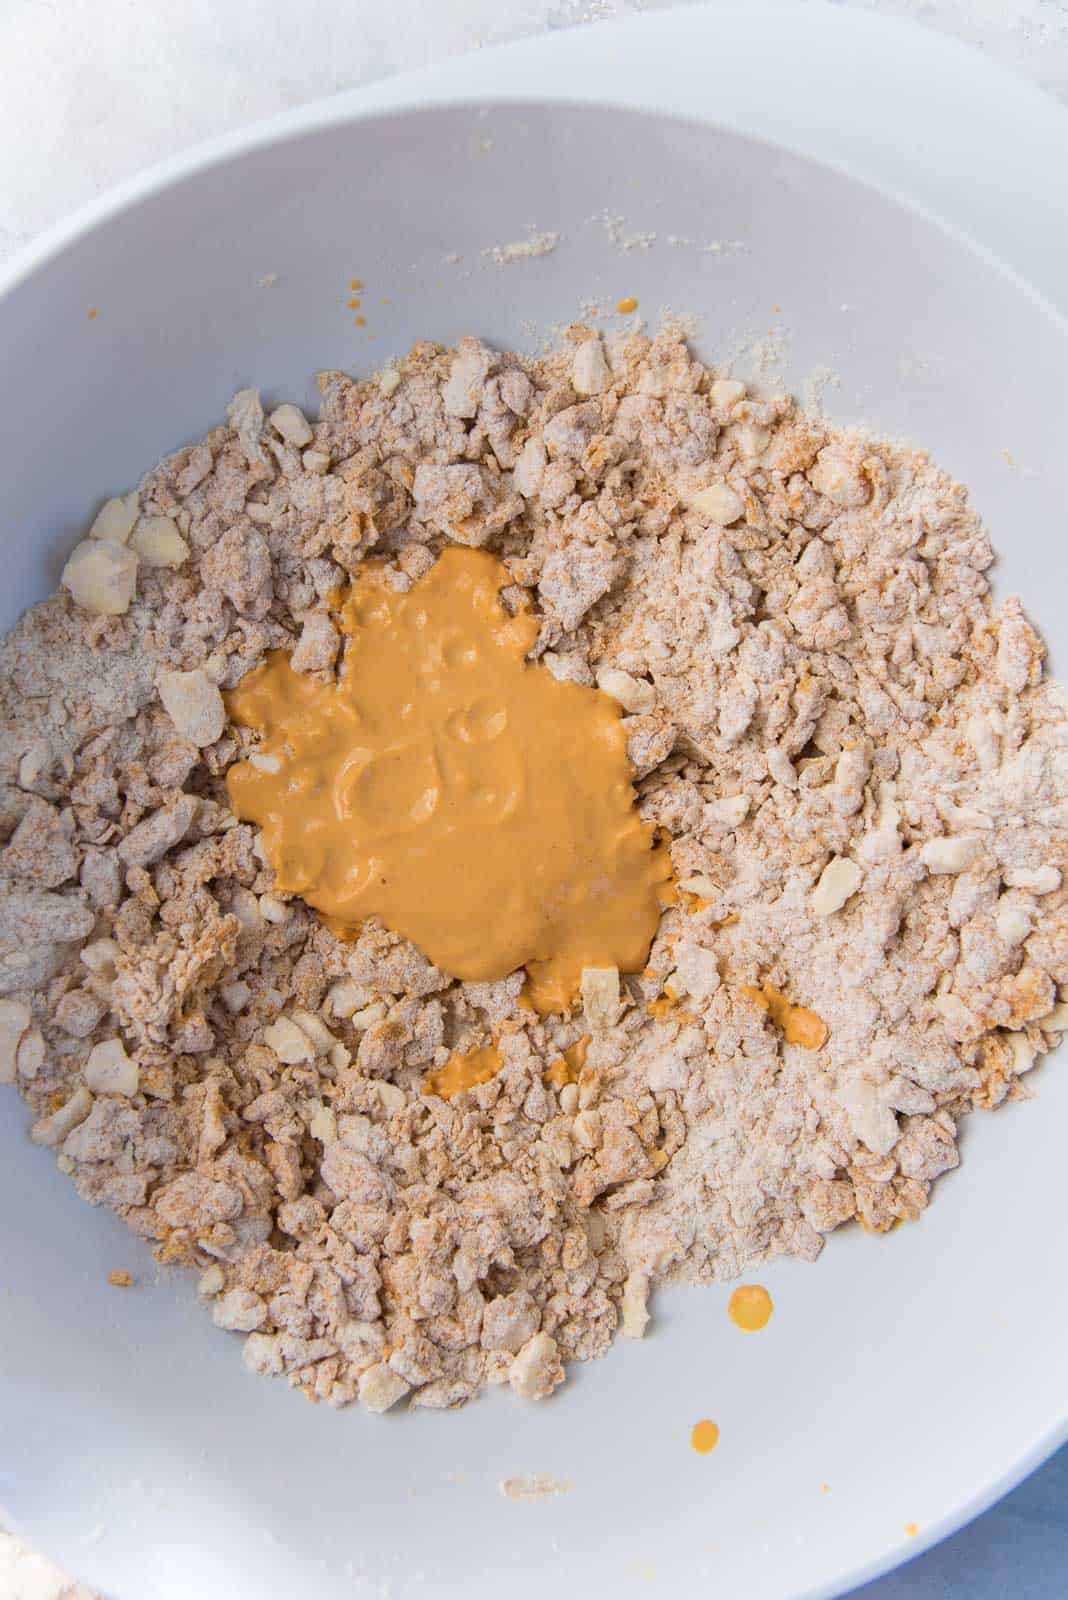
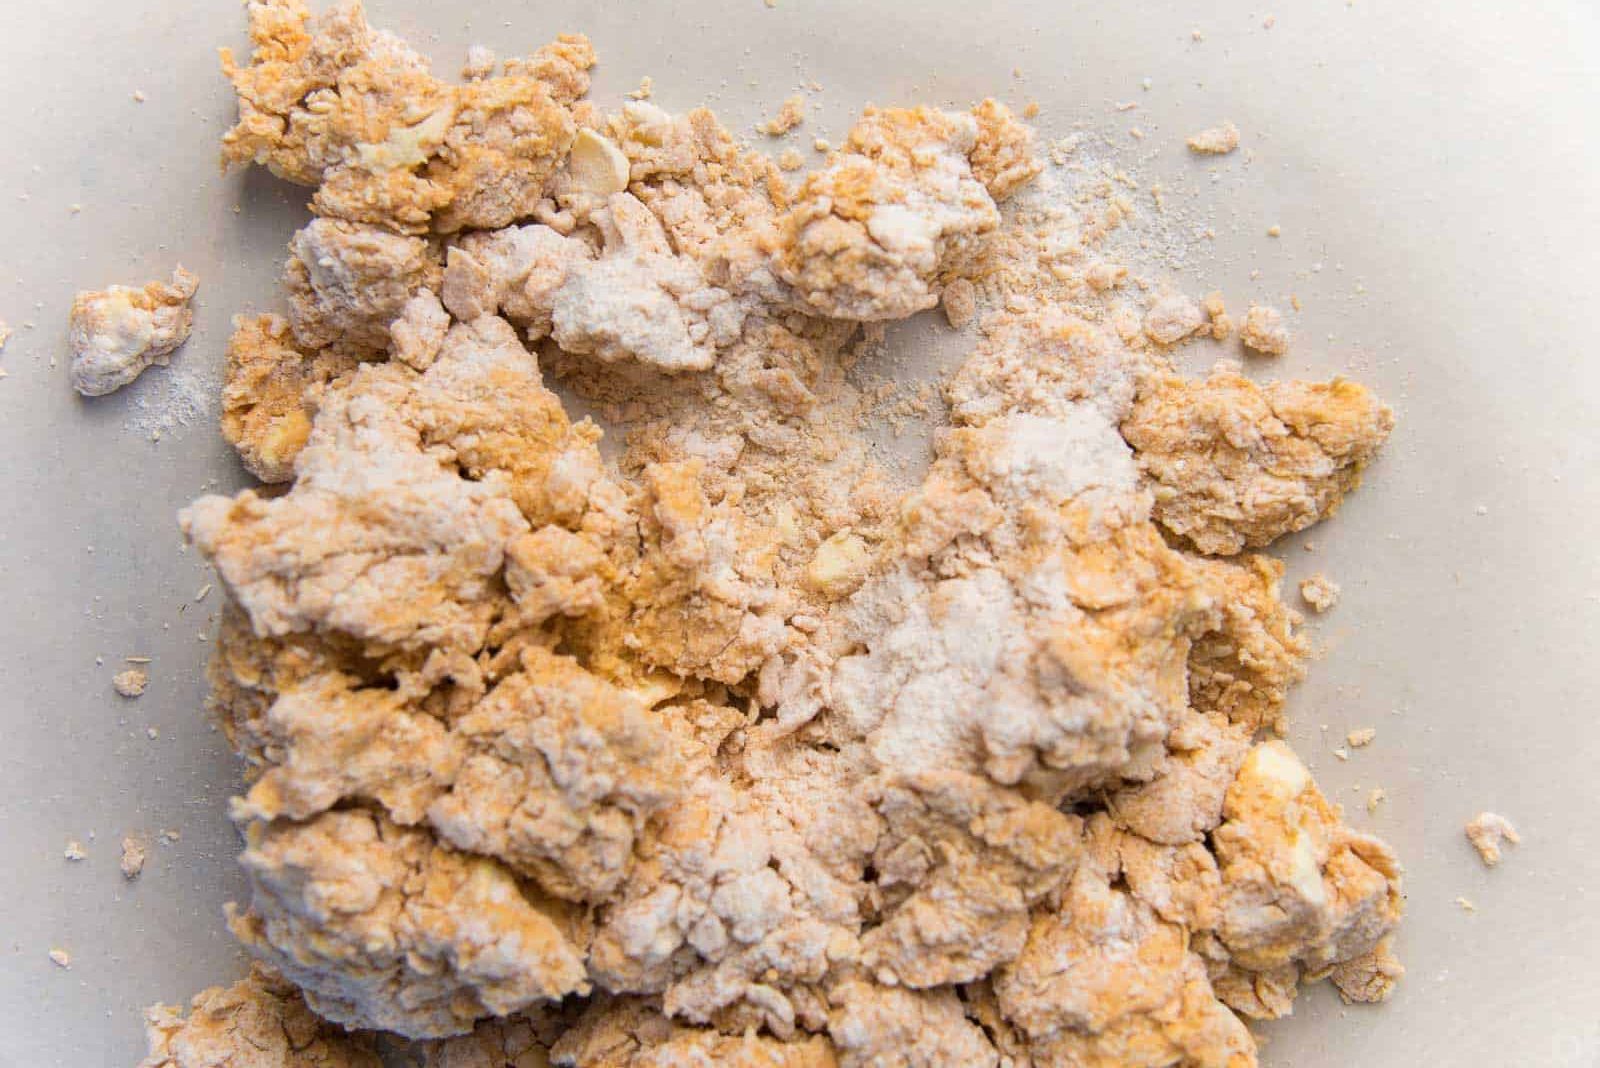
Stir the pumpkin and milk together until smooth, and add it to the pumpkin scone flour mix in two additions. After adding half of the pumpkin-milk mix, stir it into the flour using a fork. Repeat with the second addition. This will create clumps of pumpkin, butter and flour with lots of dry flour spots. But not to worry! The dough will come together next.

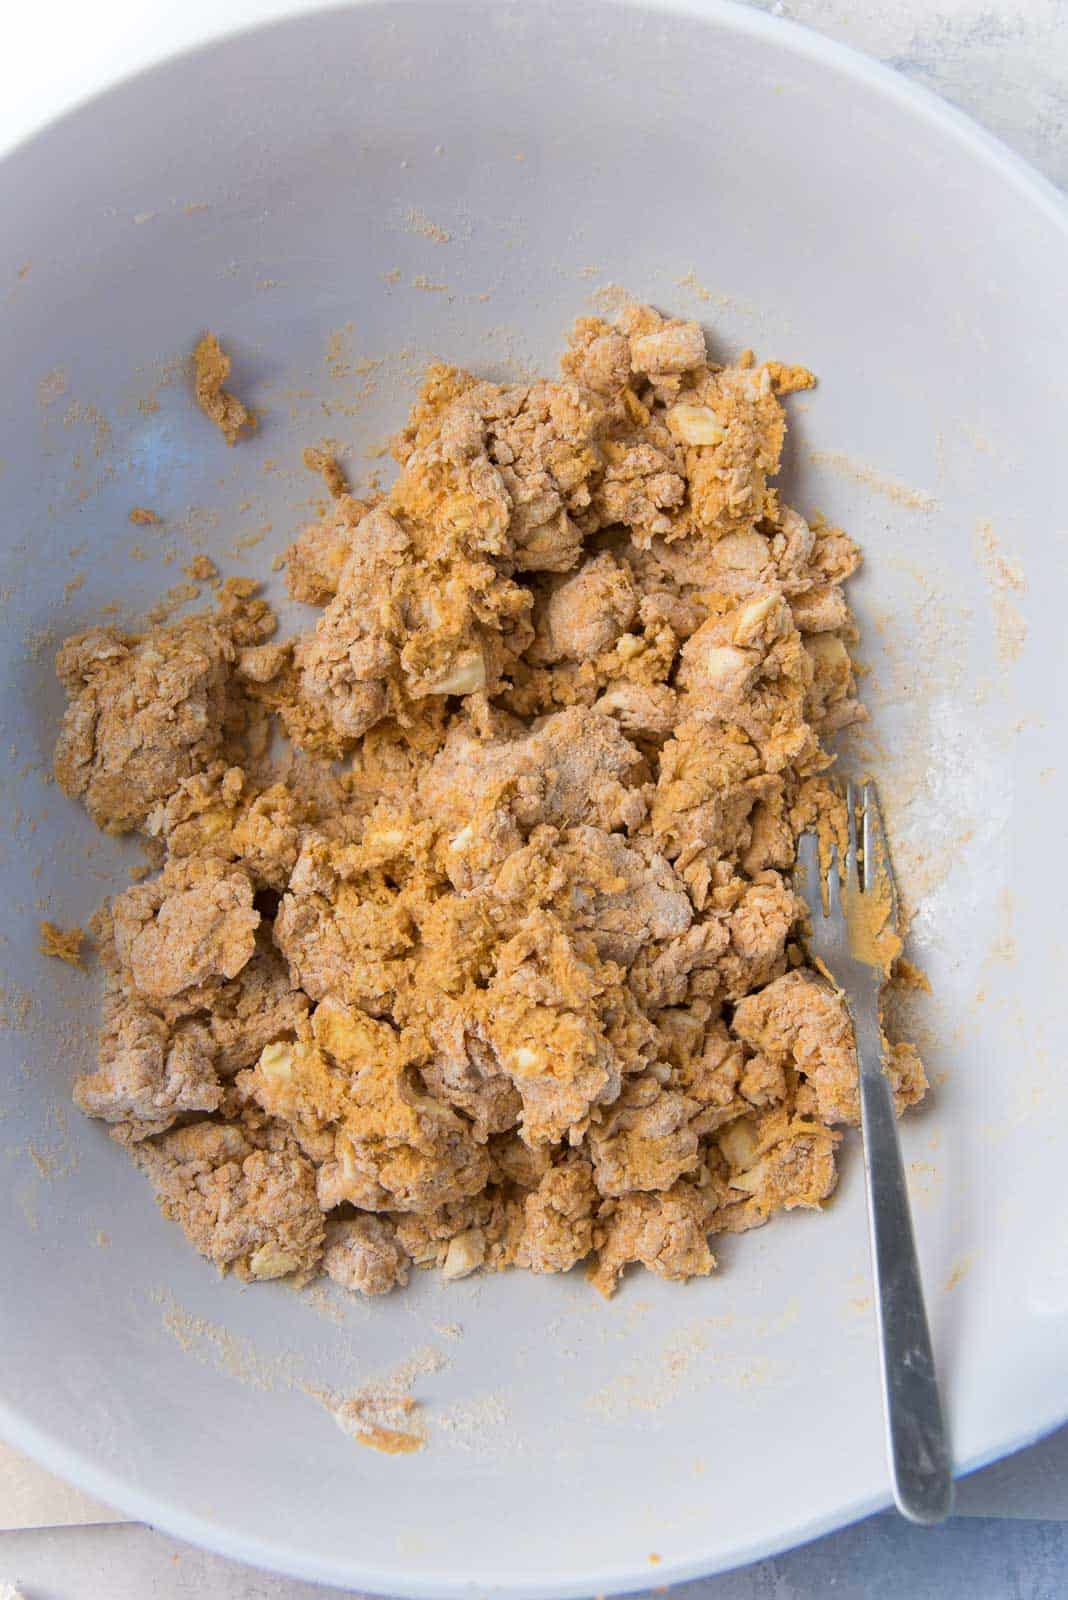
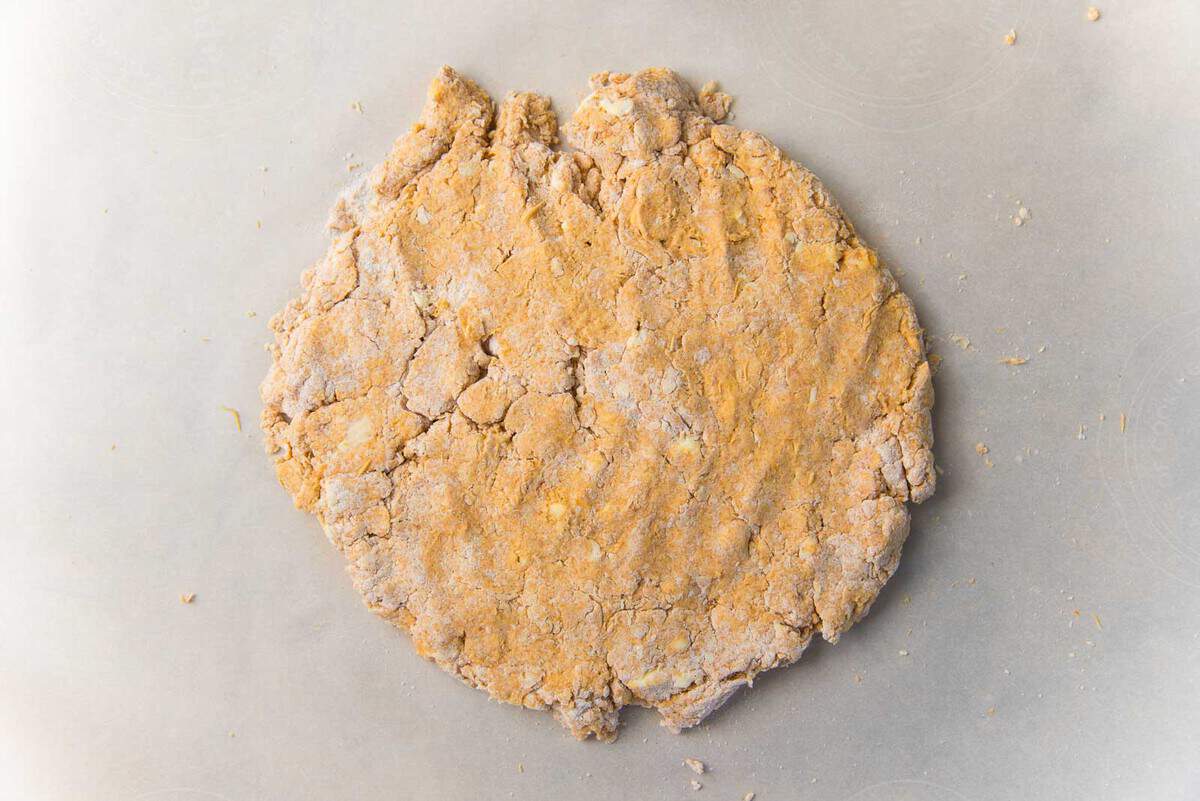
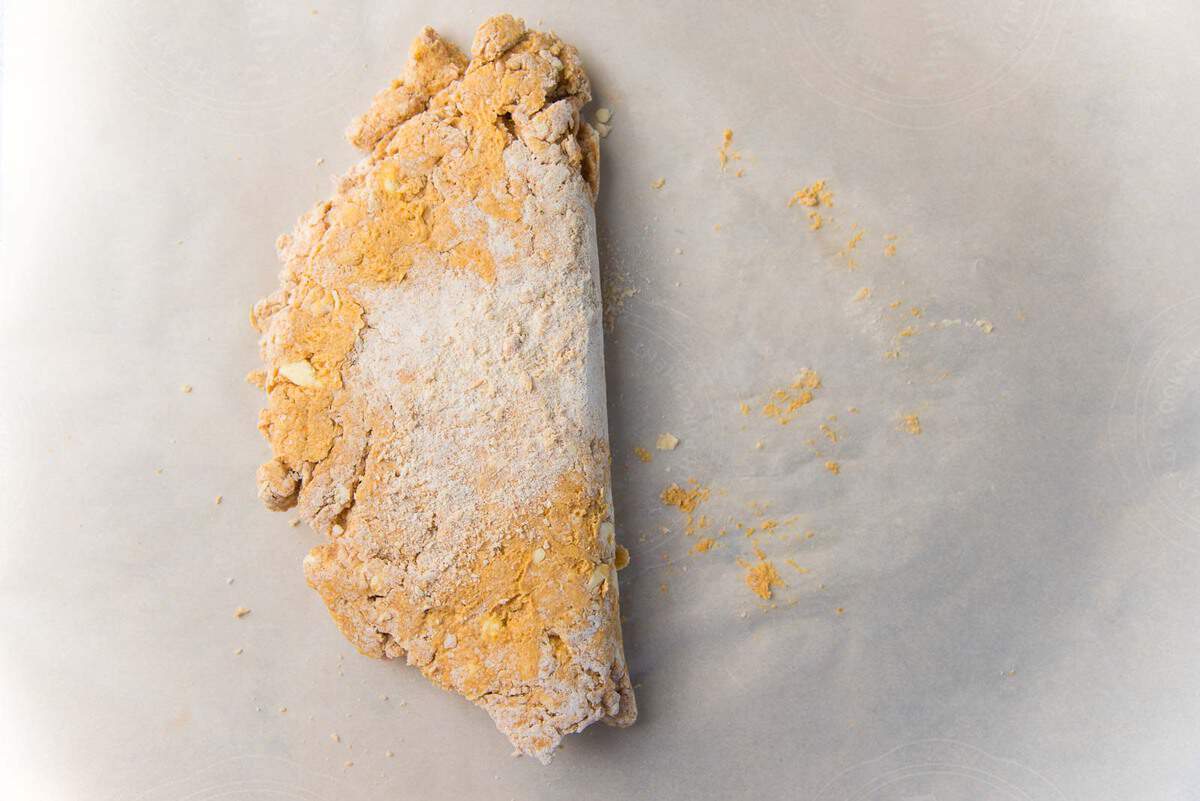
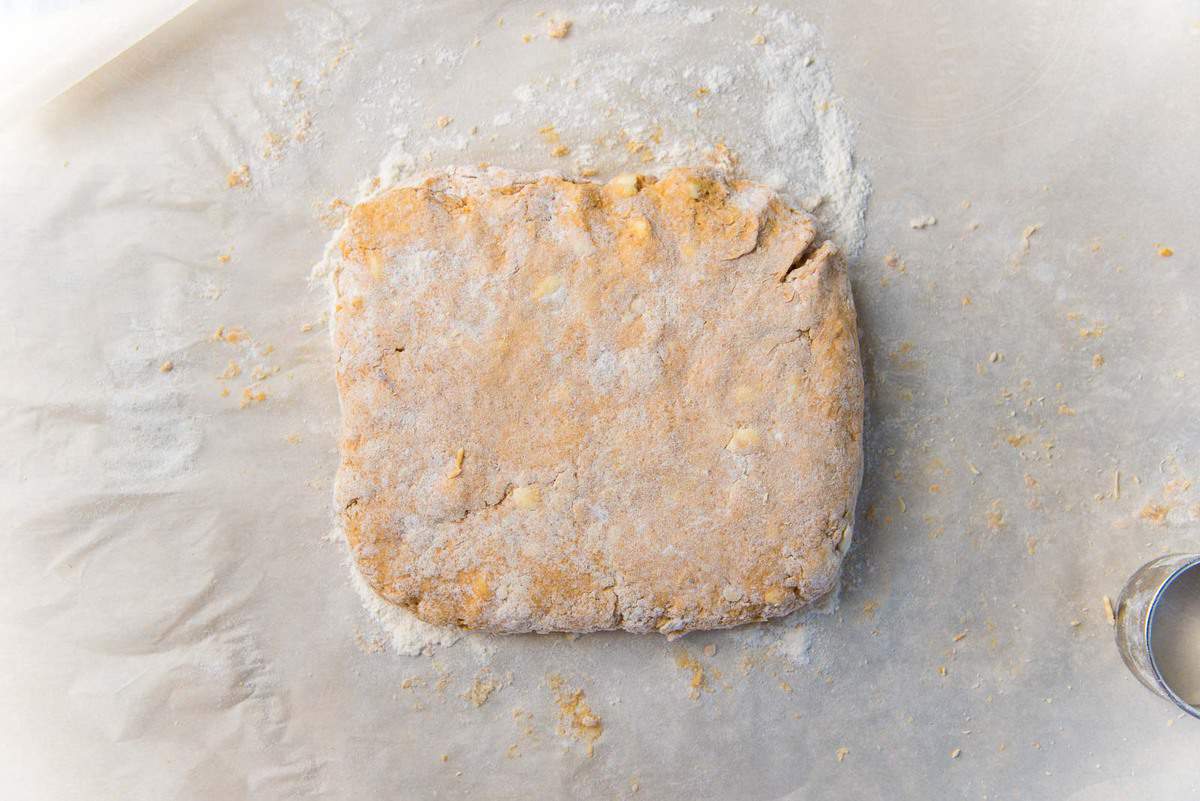
Tip all of the dough out onto a parchment paper. Lightly bring the dough together to form a rough dough slab on the parchment paper. Fold the parchment paper over, so that the dough slab also folds over itself. Then gently pat it down. Repeat, to fold the dough over again. The dough should come together as you do this.
If the dough is too wet and sticky, use a lightly floured surface. Repeat the gentle flattening and folding over of the dough another 2 – 4 times. Take care to be gentle with the dough and use the parchment paper to fold and pat down the dough.
You’ll end up with a dough that’s soft and a little sticky. Pat this down to a rectangle of about 6 x 9 inches.

Cutting the pumpkin scones
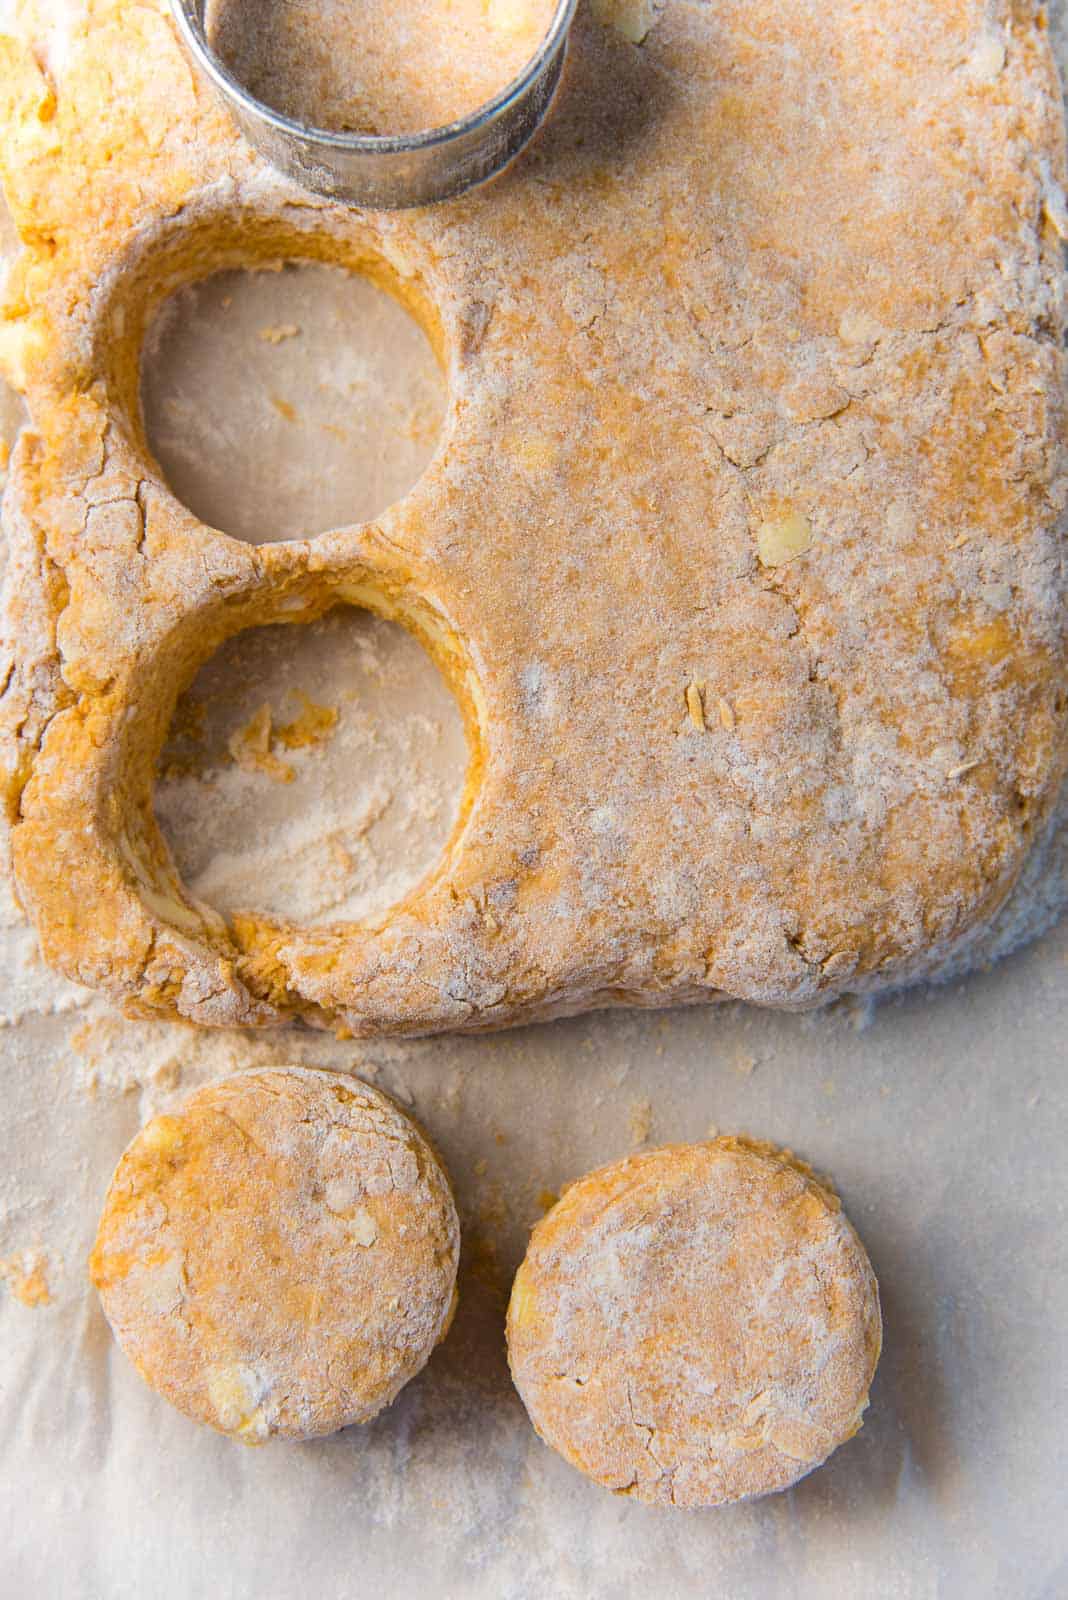
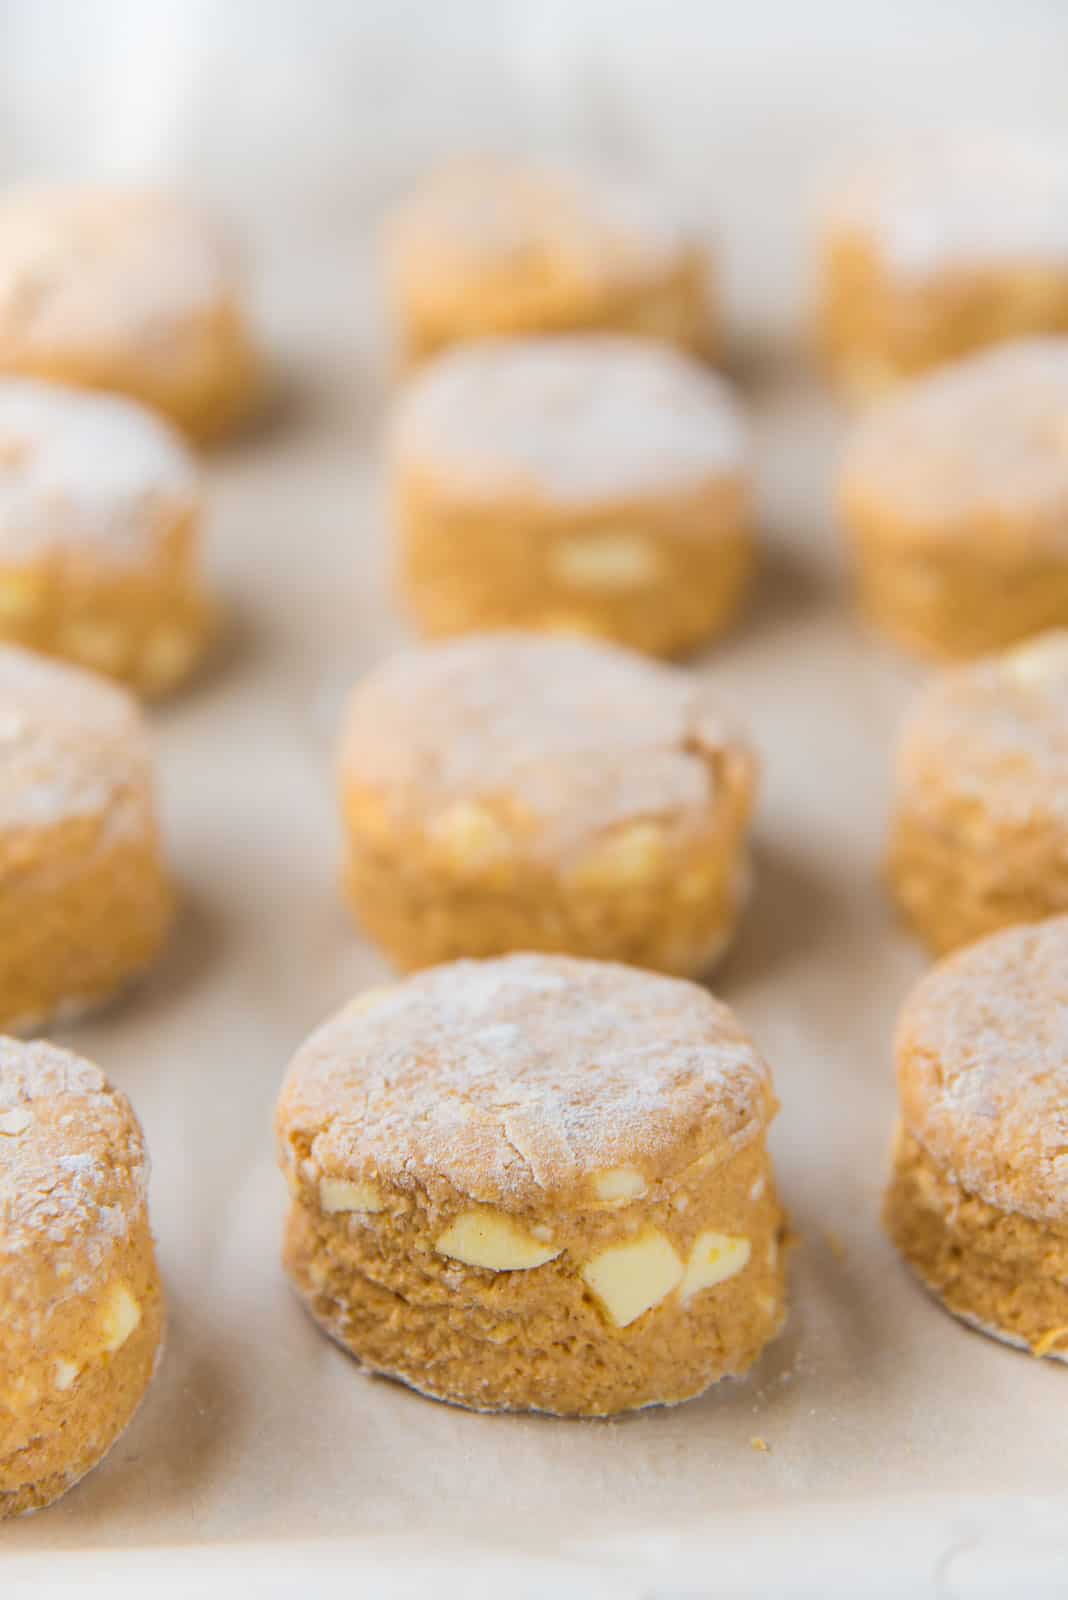
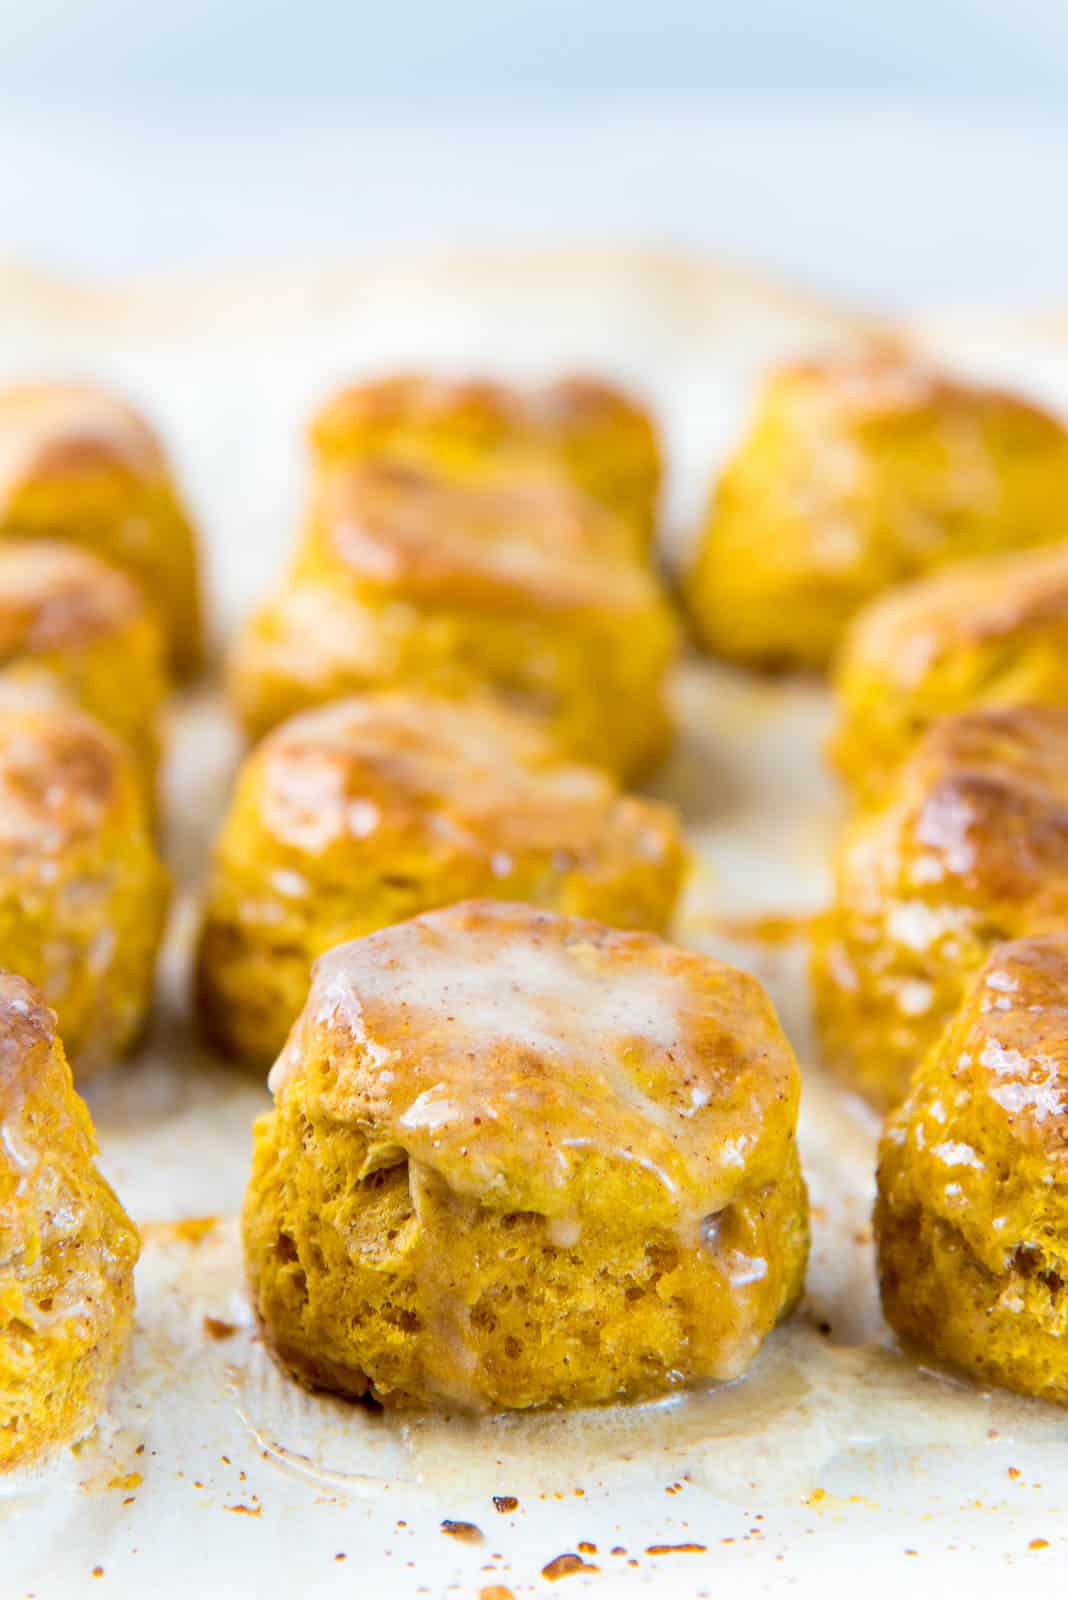
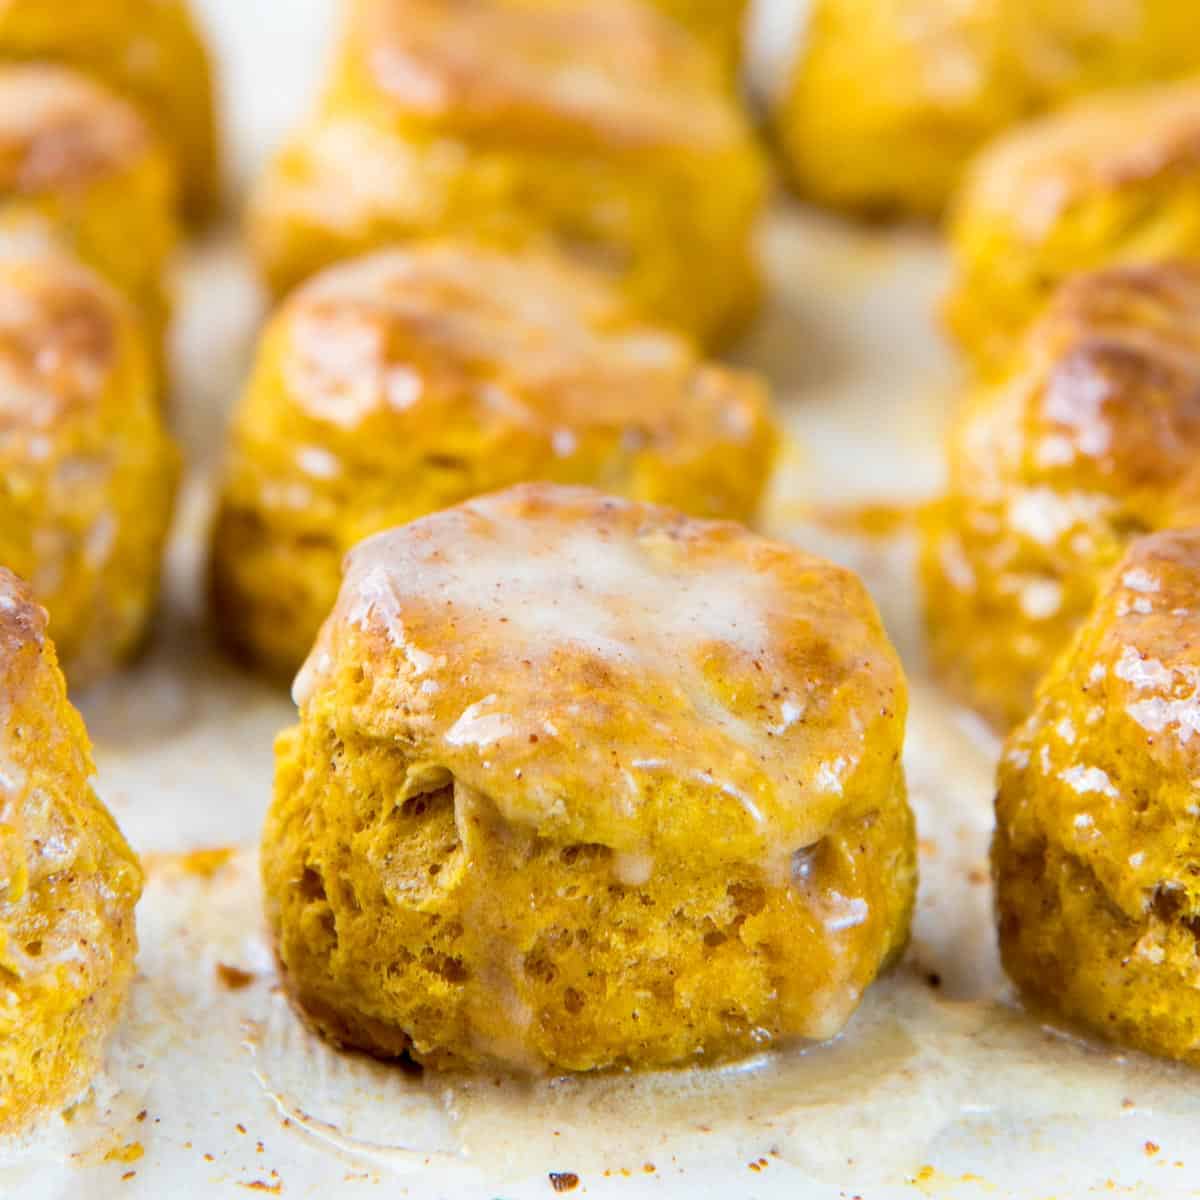
Next, using a floured cookie cutter, cut out rounds from the dough. You should be able to get 6.
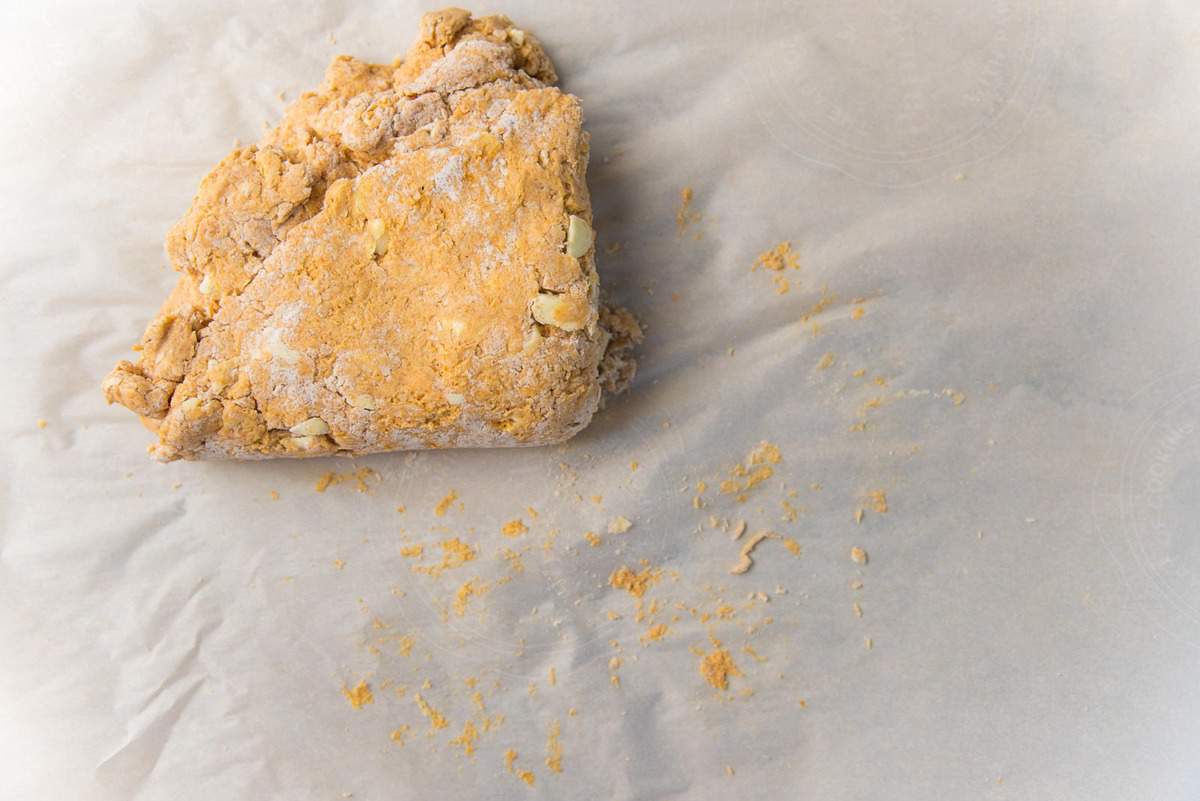
With the leftover dough, gently bring it together and flatten it to make a cohesive dough. Fold the dough over itself, and gently flatten it again (using the parchment paper). Flatten this to about a 6 x 4 to 5 inch rectangle (same height as the cut scones). Now cut 3 scones out of this dough.
Finally, repeat this process again with the remaining dough, and cut out 2 more scones, and repeat one last time to cut the last scone.
You should end up with 12 round pumpkin scones.
Easy method to cut square and wedge scone shapes
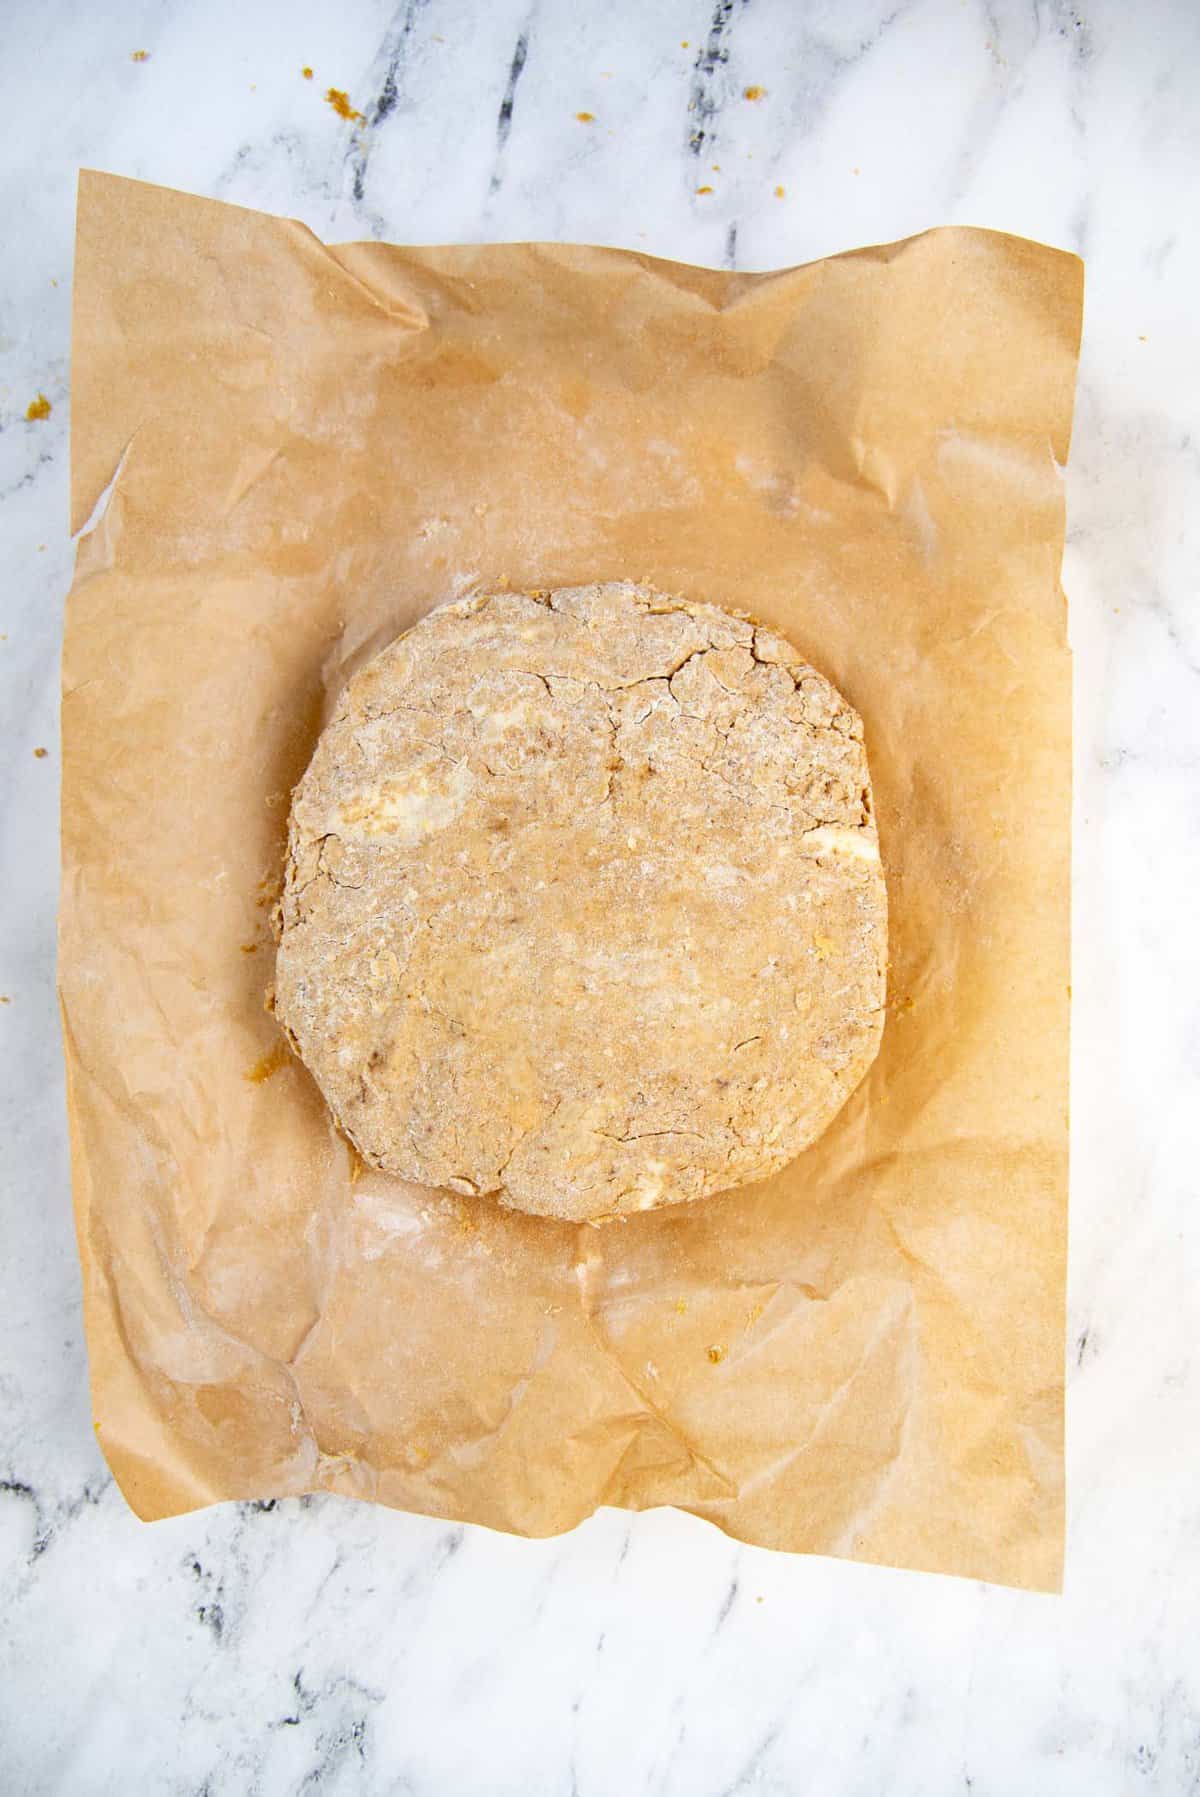
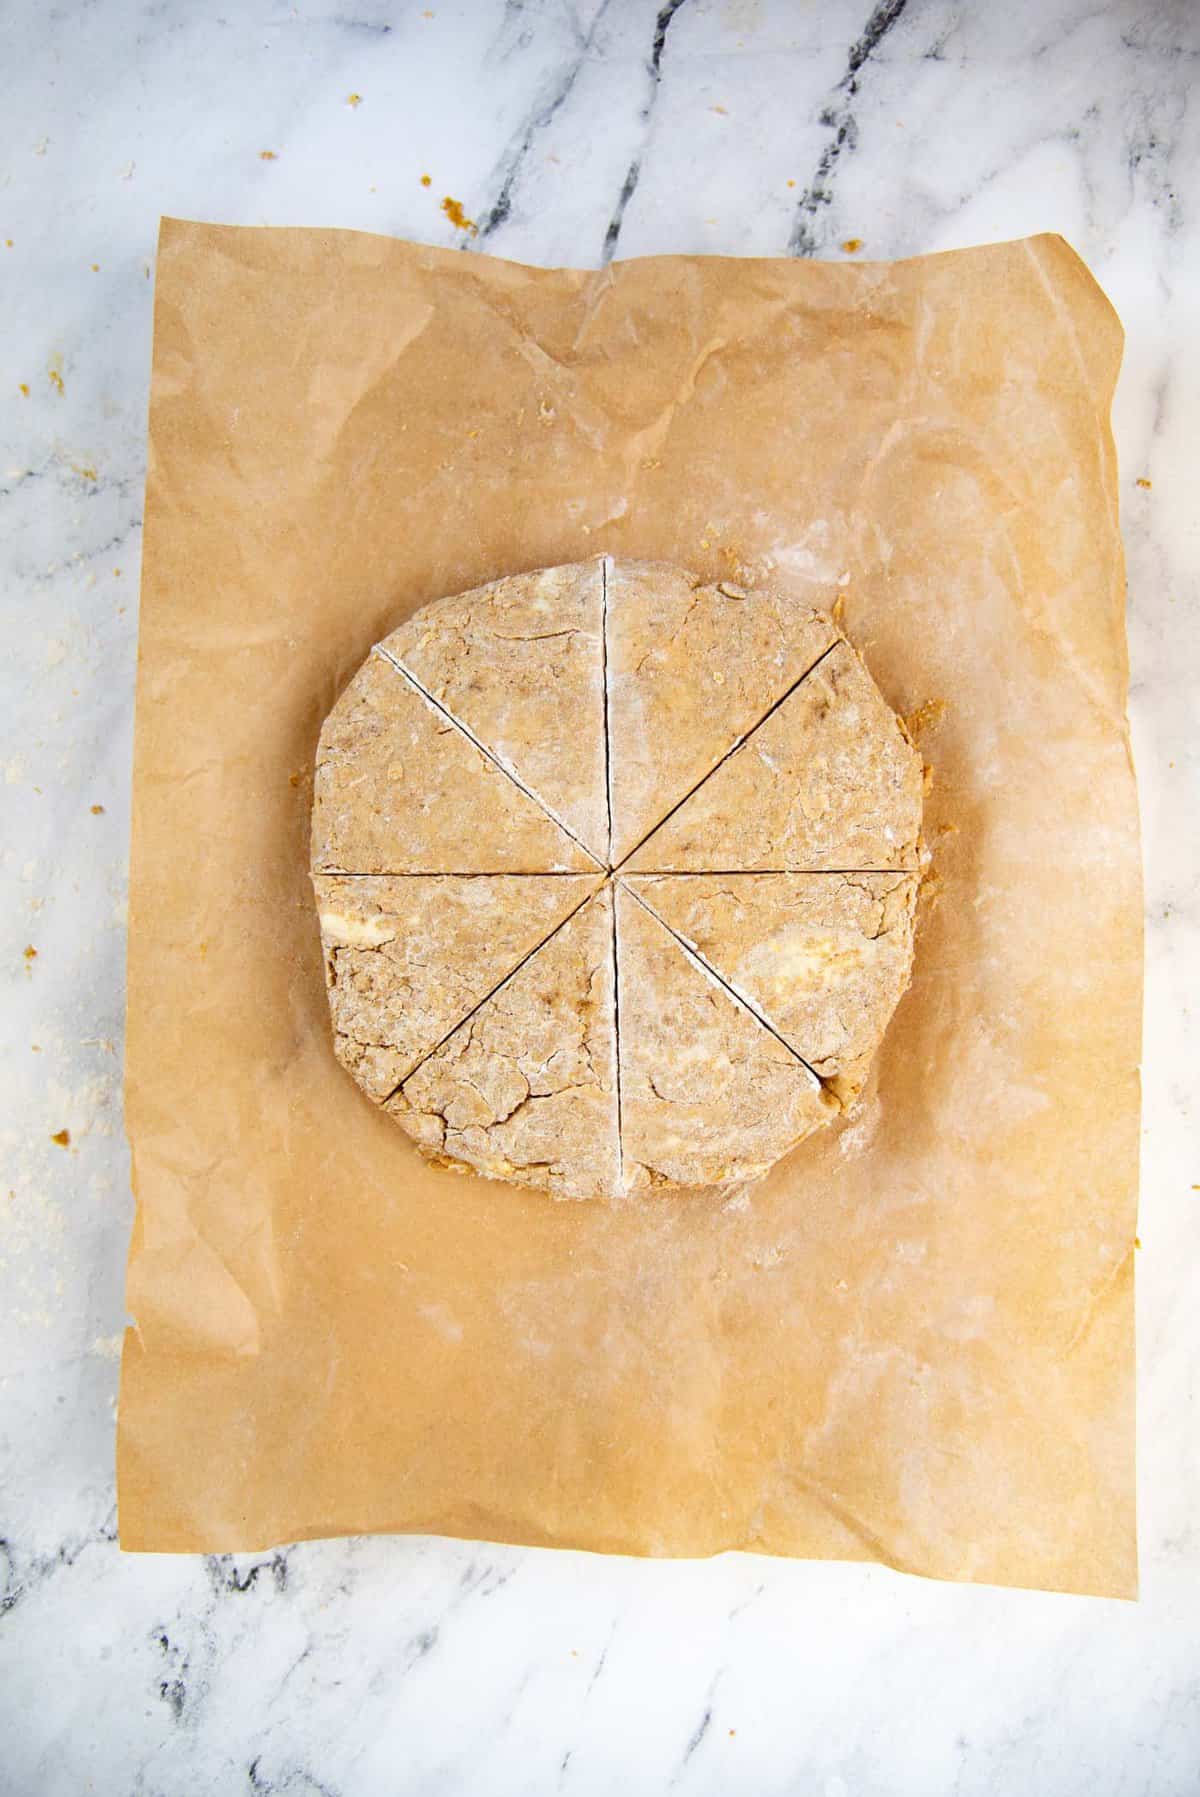
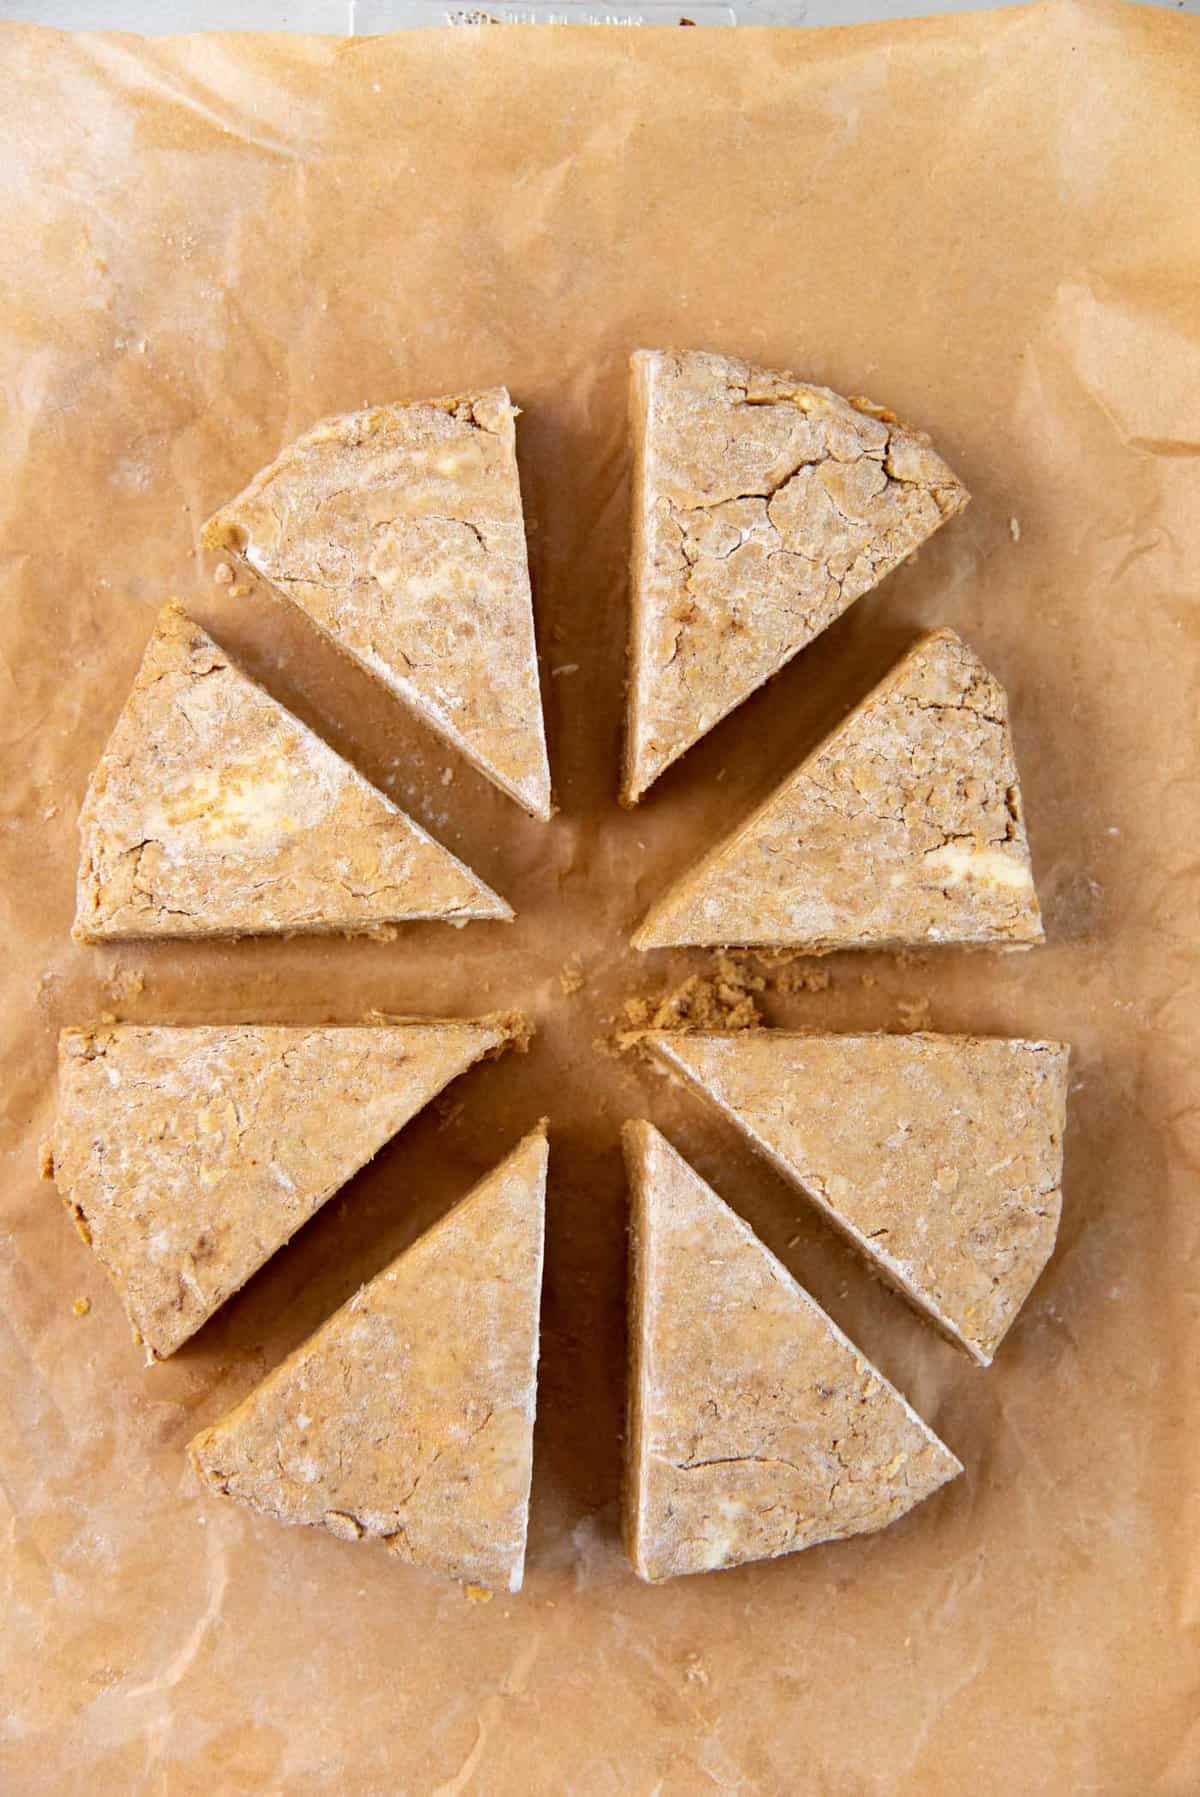
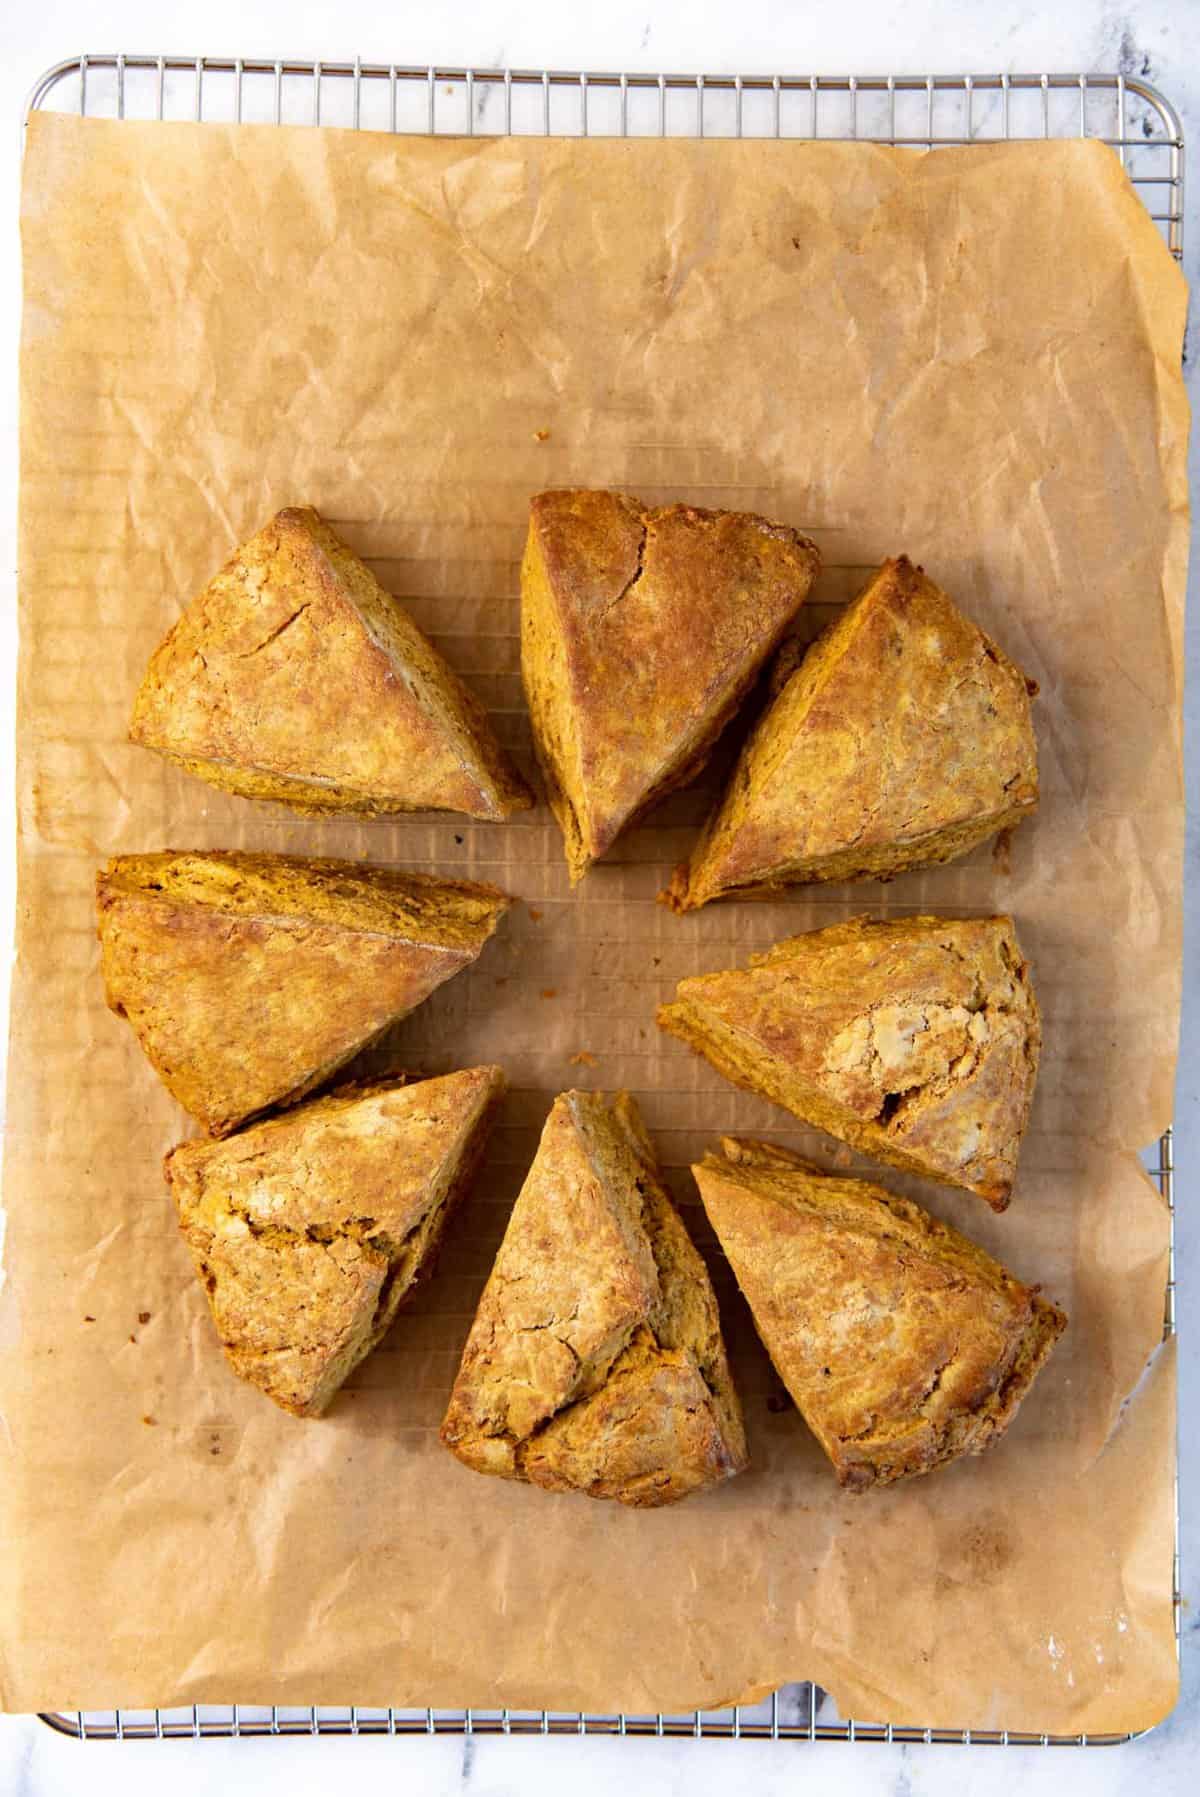
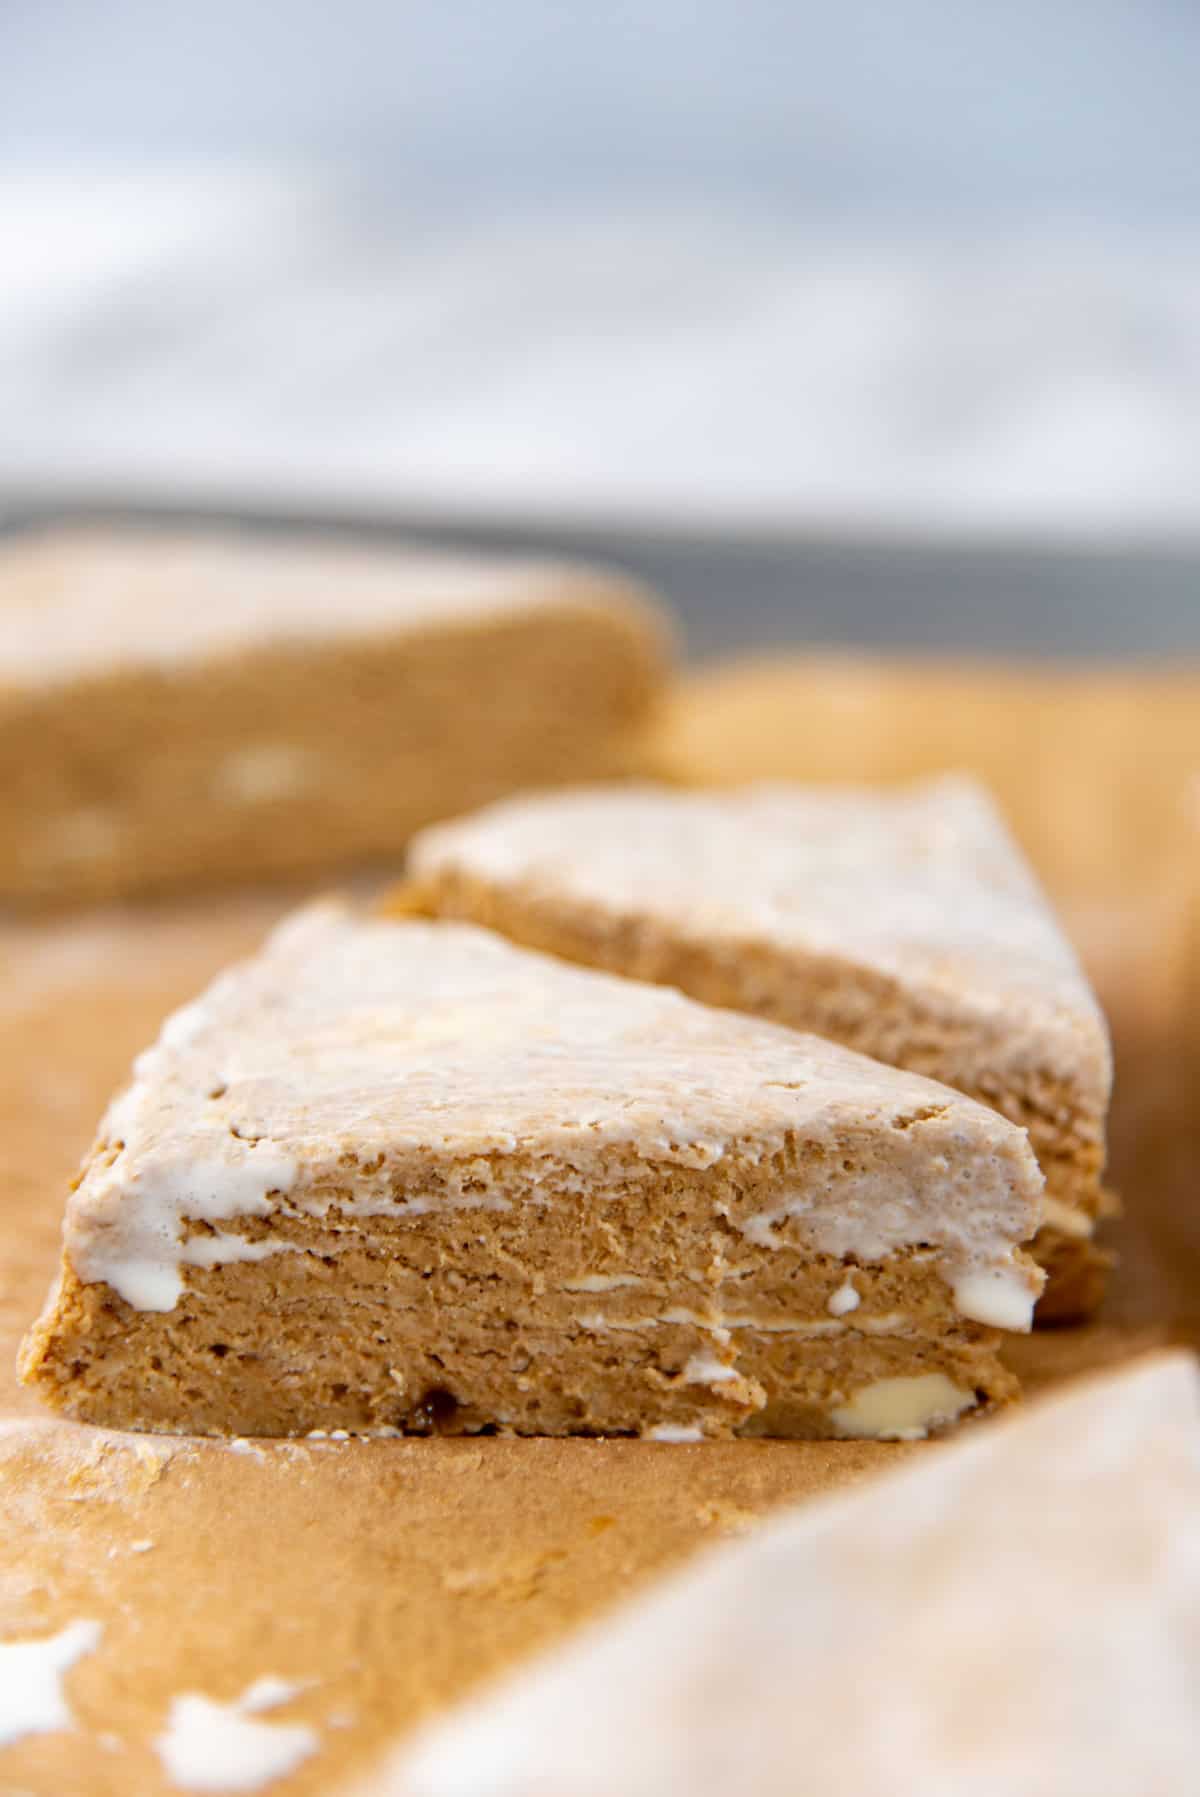
Wedge scones – After folding the dough to form a layered dough, shape it into a circle that’s about 7 inches in width. Cut the circle into 8 wedges, to get 8 large scones.
Square scones – Instead of a circle, shape the dough into a 7 inch square. Cut the square to get 12 small scones, or 9 medium scones.
Then place the cut scones on a parchment paper-lined baking sheet, and let ’em chill for at least 30 minutes before baking. I like to keep them in the freezer, so that I can freeze them if I don’t want to bake them on the same day. Plus you can bake these scones from frozen too, so it’s easier to simply freeze them right away.
Baking the scones
Preheat the oven to 400°F / 200°C. Bake these classic pumpkin scones in the preheated oven, after glazing them with a little milk OR sprinkling them with some raw sugar.
- For small scones (12) – bake for about 15 – 20 minutes (20 minutes if you’re baking from frozen).
- Medium scones (9 – 10) – baking time will still be similar, maybe a few minutes extra.
- For large scones (8) – bake for about 20 – 25 minutes.
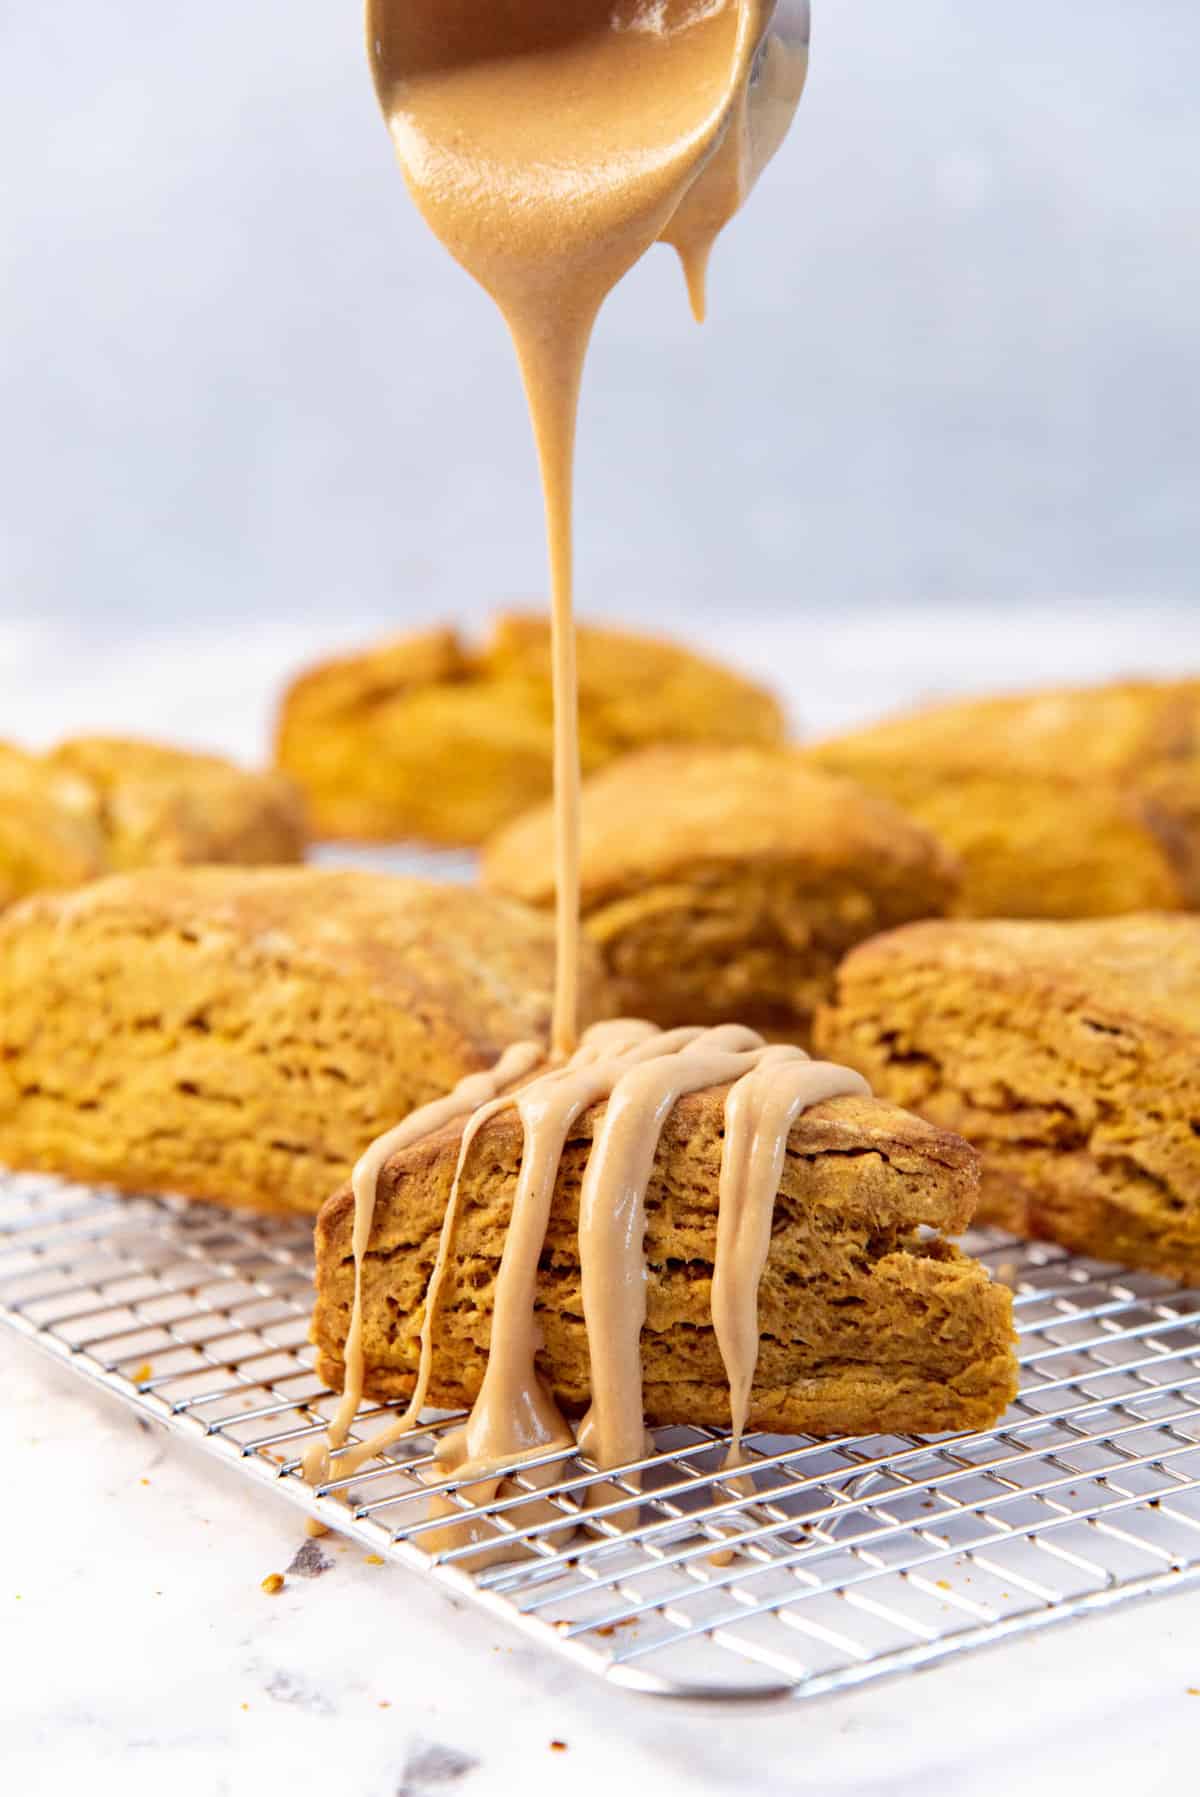
Once the pumpkin scones are baked, top them with the brown butter glaze to let the glaze get absorbed by the scones, OR let them cool down first before glazing, so that you can keep the glaze from melting.
How to make pumpkin scone variations
- Chocolate chip pumpkin scones – Add 1/2 cup of mini chocolate chip cookies, or 1/2 cup of finely chopped chocolate (about 1/2 cm pieces) to the flour mixture before you add the pumpkin/dairy mix.
- Pumpkin spice latte scones – Dissolve 2 tsp instant coffee granules in the dairy, before stirring in the pumpkin puree. The scones will be a little less sweet because of the coffee, so you could increase the sugar content. Add 1 – 2 tsp or instant coffee to the glaze to make a coffee glaze to top your pumpkin spice latte scones.
- Pecan pumpkin scones – Use brown sugar instead of white sugar, and add 3/4 cup of chopped pecans to the flour mixture before adding the pumpkin/dairy mix.
- Pumpkin feta scones – Reduce the sugar to 1 tbsp. Add 1 1/2 tsp chopped thyme (fresh), and gently stir in 4 oz of feta, cubed into 1/2 inch pieces, before adding the pumpkin/dairy mix. Brush the freshly baked scones with salted brown butter.
Serving suggestions
These classic pumpkin scones are great just the way they are with the brown butter glaze on top. But if you’re wanting to serve them for breakfast or tea, they are perfect with a hot cup of coffee or tea. You could even make a batch of this pumpkin spice coffee creamer to go with your coffee!
Another great way to serve these scones is to top them with some whipped cream or creme fraiche.
Or a drizzle of maple syrup on top. Or maple pecan topping that I shared in my pumpkin pancakes recipe for something a touch more decadent.
Perfectly spiced, perfectly sweet, buttery, soft, and delicious, this classic pumpkin scone recipe is a delight no matter how you enjoy it!


Pro tips to make the best pumpkin scones
Start with chilled butter. Better yet, start with all chilled ingredients. Chilled butter will create flaky layers in your scones. And to make sure that the butter doesn’t melt into the dough, keep all the other ingredients chilled too. This is especially important if the weather is warm.
Do not over handle the dough. For buttery and soft pumpkin scones, you want to make sure you don’t develop the gluten in the flour. The more you handle or knead the dough, the more gluten you develop. This will result in chewy scones.
Use the parchment paper to gently fold over the dough. This will help create layers in the dough that will give your0 scones that characteristic tall, layered look as they bake.
Make sure the cookie cutter or knife that you’re using is sharp when cutting out scones. Flour the knife or cookie cutter lightly to make sure it doesn’t stick to the dough. Push the cookie cutter straight down into the dough, and avoid twisting the cutter. Clean cuts also help the scones rise tall as they bake.
Want flakier scones? Reduce the dairy to 1/2 cup. The wetter the dough, the softer the scones. So if you add less liquid, the dough will be drier, and you end up with more distinct layering in your scones.
Refrigerate or freeze the scones before baking. The chilled butter chunks will melt and evaporate as the scones bake, resulting in tall, flaky, soft scones.
Frequently Asked Questions
How to make sure my scones are nice and fluffy
There are two ways to make scones; flaky and fluffy.
Flaky scones have less liquid, and the folding process makes a slightly drier scone (that is still soft), with discernible layers.
However, if you want to have a fluffier, even softer scone, then the scone dough should be very wet, with a high milk ratio.
This will make the scone more like an American drop biscuit though. So the dough will not be easy to shape or cut. “Dropping” the dough onto a baking sheet and then baking them will work better. The chemical leaveners also help to make the scones rise, which will result in a fluffier scone as well.
This pumpkin scone is the best of both worlds. It is still very soft, and fluffy, and has very soft layers.
How to make sure my scones rise well
There are three tips to ensure that your scones rise well.
1) The chemical leavener used
2) Cutting method
3) Baking method
The chemical leavener is key for a good rise in your scones.
Some recipes use baking soda, others use baking powder, and some use both, and some recipes use self raising flour. If you’re using baking soda, there HAS to be an acidic ingredient in the recipe to react with the baking soda to make the scone rise. Otherwise the scones will end up being salty.
I use baking powder in this recipe.
Make sure that your chemical leavener is fresh and active. Check my Baking 101 article on chemical leaveners to find out how you can test your baking powder and/or soda to test for freshness.
When cutting the scones, make sure that you use a sharp knife or cutter to get nice, clean lines. If needed, wipe the cutter / knife between each cut to make sure it’s clean for each cut. The cut sides of a scone rise more readily due to the layering that is formed in the mixing stage.
Scones are baked at a high temperature. The initial high temperature ensures that all the chemical leaveners activate quickly, so that the scones rise fast. The closer the scones are placed together when they are baked, they will rise higher as they have “support” from the other to stay upright.
You can either have them touching before baking, or leave a small gap between them, so that they expand and then come into contact with each other and rise.
Scones that bake while the sides are in contact will need to bake for longer, so the baking temperature and time should be adjusted. They will also have softer sides.
Can I make gluten free pumpkin scones?
Yes you can make this recipe gluten free. I trust Bob’s red mill 1:1 gluten free flour for any substitutions because it gives the best results for baked goods.
Alternatively, you can use any trusted brand of 1:1 gluten free flour. I would also reduce the amount of half and half to 1/2 cup. The texture will be different of course, but they’ll still be delicious.
Can I make vegan pumpkin scones?
I haven’t tried to make this recipe vegan before, but you can use a plant-based butter instead of regular butter. But remember plant-based butter is softer than regular butter, so freeze it for a few minutes so that it’s firmer than usual.
Also, use a creamier plant-based milk along with the pumpkin puree. Like coconut milk or cashew milk.
Can I make these scones ahead of time?
Absolutely! This classic pumpkin scones recipe is fantastic to make ahead. They can be frozen and stored in the freezer for up to 2 months. Simply arrange the scones on a lined baking tray, then cover with plastic wrap. Place the covered tray in the freezer for about 1 hour, or until they are frozen solid.
Then transfer the scones into a sealable freezer bag or container, and keep in the freezer until needed.
Then when you’re ready to bake them scones, arrange the scones on a parchment paper-lined baking tray, and bake in the preheated oven until they are tall, buttery, and golden brown on top.
How can I store leftover scones?
Leftovers only keep for about 1 day. These pumpkin scones taste best the day they are baked. If you do have leftovers, store them in an airtight container at room temperature for up to 1 day. They taste stale afterwards.
Another idea is to crumble the scones and toast them in a pan. These crumbles are PERFECT to top fruit crumbles or parfaits (like this pumpkin pie chia pudding parfait!).
If you like scones and biscuits, then you may also love,
Recipe
Classic Pumpkin Scones
US based cup, teaspoon, tablespoon measurements. Weight measurements are recommended for accurate results whenever available.
Common Measurement ConversionsEquipment:
- Graduated Cookie Cutters
- Silpat Pastry Mat (optional)
- Parchment paper
Ingredients:
Pumpkin Scones
- 400 g AP flour about 3 ⅓ cups
- 1 ½ tsp ground cinnamon
- ½ tsp ground nutmeg
- ¼ tsp ground cloves
- ½ tsp ground ginger optional
- 20 g baking powder 4 tsp
- 1 tsp sea salt
- 50 g white sugar ¼ cup. Brown sugar can be used as well. (see notes)
- 115 g unsalted butter 8 tbsp / 1 stick – chilled and cut into ½ inch cubes
- 185 g pumpkin puree ¾ cup. Chilled
- 180 mL half and half ¾ cup. Chilled
- Extra half and half to brush the tops of scones
- Raw sugar to sprinkle on top
Brown Butter Glaze
- 50 g unsalted butter 4 tbsp
- 115 g confectioner’s sugar 1 cup
- Pinch of salt
- 45 – 60 mL cream 3 – 4 tbsp
Instructions:
Pumpkin scones
- Line a half sheet pan with parchment paper and set aside.
- Place the flour, cinnamon, nutmeg, cloves, ginger, baking powder, salt and sugar in a large bowl. Whisk to combine.400 g AP flour, 1 ½ tsp ground cinnamon, ½ tsp ground nutmeg, ¼ tsp ground cloves, ½ tsp ground ginger, 20 g baking powder, 1 tsp sea salt, 50 g white sugar
- Add the cubed and chilled unsalted butter and toss to coat the butter pieces in flour.115 g unsalted butter
- Next, either cut the butter into the flour using a pastry cutter, or rub the butter into the flour. There should be some chickpea-sized pieces of butter coated in flour in the mix, and some coarse breadcrumb-sized pieces.
- In a separate bowl, mix the pumpkin puree and half and half together until smooth. Add half of the liquid into the flour-butter mix, and use a fork to mix the liquid into the flour. There will be big clumps of wet dough.185 g pumpkin puree, 180 mL half and half
- Add the rest of the pumpkin mixture and stir it into the flour using a fork. When all the pumpkin mixture has been stirred in, there'll be a lot of wet clumps of dough. But there also may be some dry spots of flour too.
- Turn the dough out onto a lightly floured parchment paper. Bring the dough pieces together to form a rough dough in the shape of a large circle or rectangle.
- Use the parchment paper to help fold the dough over in half. Repeat again to fold the dough into quarters.
- Then use the parchment paper to gently pat down the dough into a square or rectangle. Fold over in half again.
Cutting the scones (see recipe notes for scone wedges or squares)
- Lightly flour the dough, and flatten it out into a 6 x 9 inch rectangle.
- Dip a sharp cookie cutter (2.5 – 3 in in diameter) in flour and cut out 6 scones from the dough. Clean and flour the cutter every time you cut out scones, so that you make nice and clean cuts. (To cut out scones, press the cookie cutter straight down into the dough without any twisting motion.)
- Place cut scones on the parchment paper-lined baking tray.
- Gather the dough scraps together, and gently pat it to form a dough that sticks together. Fold the dough over in half, and pat it again to a 6 x 4 – 5 inch rectangle. Cut out 3 scones from this, and place the scones on the parchment paper-lined baking tray.
- Again, gather and pat the dough as before, then fold it over, and pat it to form a dough large enough to cut 2 more scones. Repeat again with the remaining dough scraps to cut one more scone. You should end up with a total of 12 scones.
- Cover the baking tray with plastic wrap and freeze or refrigerate for at least 15 minutes. You can keep the scones in fridge overnight, OR keep them in the freezer for up to 3 months (see recipe notes on how to store them).
- While the scones are chilling in the fridge / freezer, preheat oven to 400°F / 200°C.
- Brush the tops of the scones with milk. You can also sprinkle the tops with raw sugar if you like.Extra half and half, Raw sugar to sprinkle on top
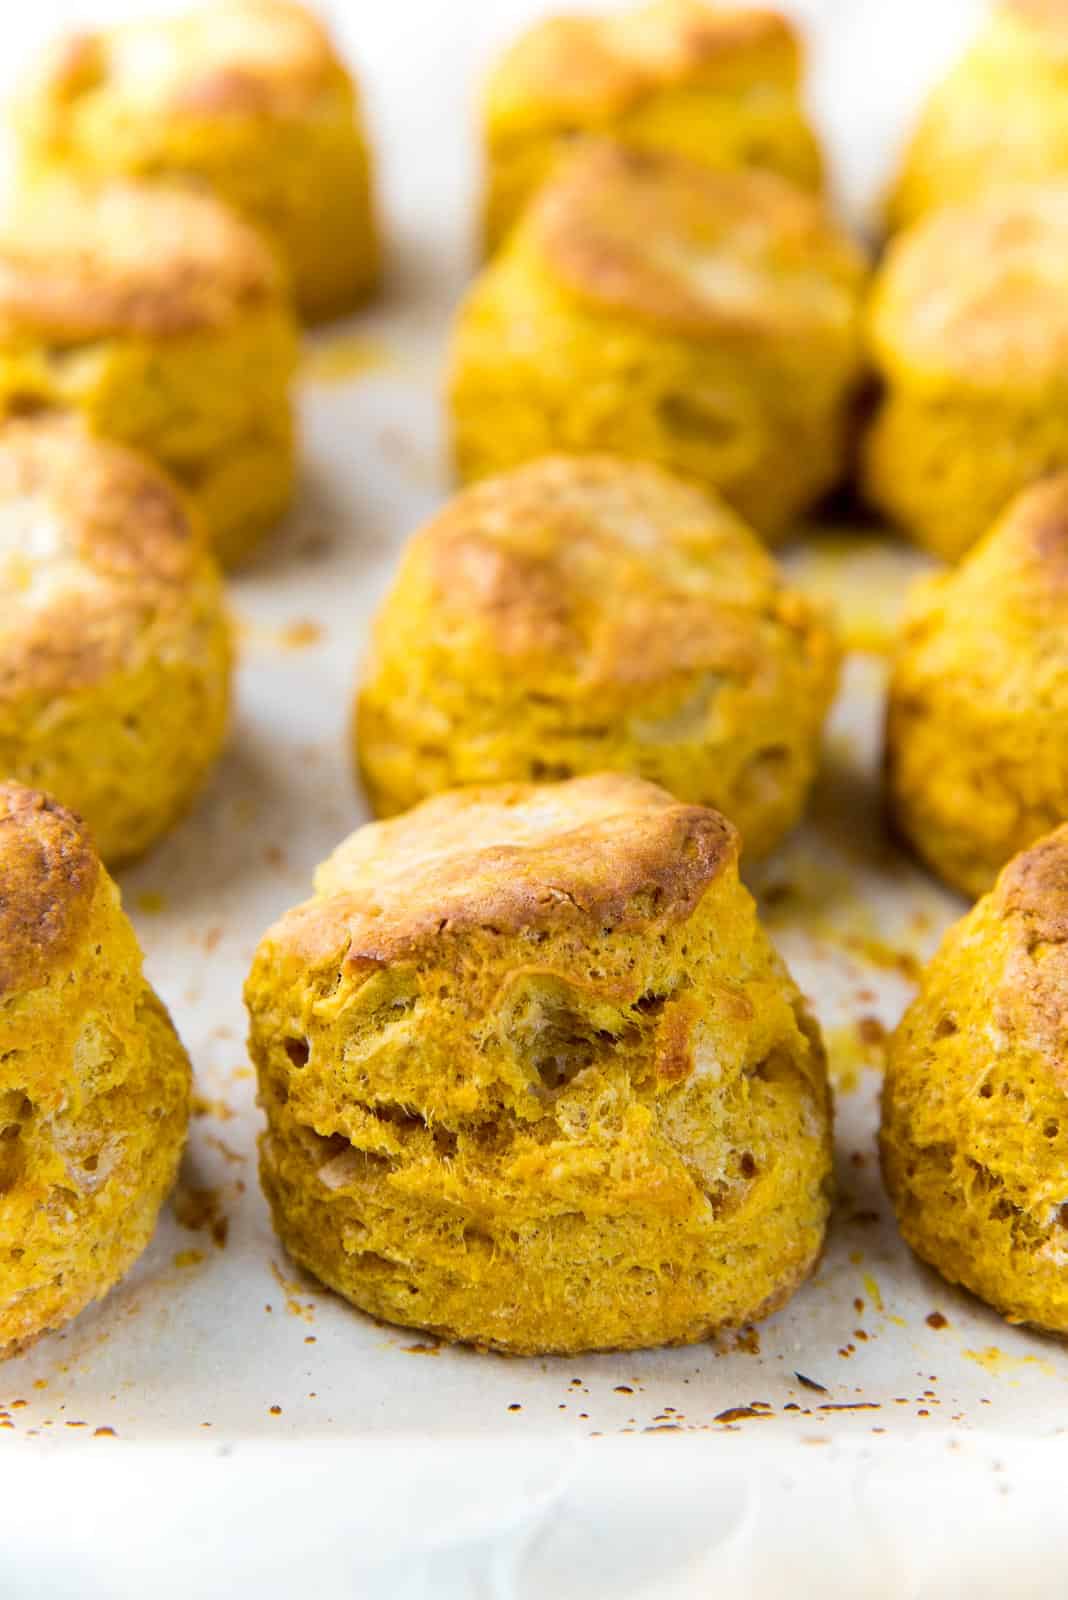
- Once the oven is preheated, remove the scones from the fridge/freezer, and bake in the preheated oven for 15 minutes, or until the tops are golden brown in color (20 minutes if baking from frozen).
- Brush baked scones immediately with the brown butter glaze to let the glaze melt into the scones. OR let the scones cool down slightly first, if you'd like a glaze topping that doesn’t melt.
Brown butter glaze
- Place the butter and salt in a saucepan. Heat to melt the butter, and then continue cooking the butter while stirring, until the milk solids turn dark golden in color. Remove from the heat immediately and pour the butter into a bowl along with the milk solids. Stir in the salt to dissolve, and let it cool down.50 g unsalted butter, Pinch of salt
- Place the confectioner’s sugar in a bowl and add 3 tbsp of the browned butter (with the milk solids) and whisk it into the confectioner’s sugar.115 g confectioner’s sugar
- When you have a smooth paste, add another 3 tbsp of cream to form a thick glaze. Add another tbsp of cream to thin out the glaze if you like, or add more confectioner’s sugar to make it thicker.45 – 60 mL cream
- Set aside until needed.
Recipe Notes
Note about sugar
This pumpkin scone by itself is not very sweet. It’s a lightly sweetened scone. This is because the glaze adds enough sweetness to the scone when eaten together. The scone without the glaze can also be eaten with soup or cheese, as a savory snack! If you want to make a sweet pumpkin scone without the glaze, increase the sugar up to 50 g / ¼ cup more. You may need to adjust the amount of liquid added slightly.Other ways to cut pumpkin scones, and baking time adjustments
Wedge scones – After folding the dough to form a layered dough, shape it into a circle that’s about 7 inches in width. Cut the circle into 8 wedges to get 8 large scones. Baking time will be about 20 – 25 minutes in a 400°F oven. Turn off the oven and leave the scones in there for a further 5 – 10 minutes before removing. Square scones – Instead of a circle, shape the dough into a 7 inch square. Cut the square to get 12 small scones, or 9 medium scones. Baking time will still be similar, maybe a few minutes extra.Pumpkin scone variations
Chocolate chip pumpkin scones – Add 1/2 cup of mini chocolate chip cookies, or 1/2 cup of finely chopped chocolate (about 1/2 cm pieces) to the flour mixture before you add the pumpkin/dairy mix. Pumpkin spice latte scones – Dissolve 2 tsp instant coffee granules in the dairy, before stirring in the pumpkin puree. The scones will be a little less sweet because of the coffee, so you could increase the sugar content. You can also add 1 – 2 tsp of instant coffee to the glaze to add more coffee flavor as well. Pecan pumpkin scones – Use brown sugar instead of white sugar, and add 3/4 cup of chopped pecans to the flour mixture before adding the pumpkin/dairy mix. Pumpkin feta scones – Reduce the sugar to 1 tbsp. Add 1 1/2 tsp chopped thyme (fresh), and gently stir in 4 oz of feta, cubed into 1/2 inch pieces, before adding the pumpkin/dairy mix. Brush the freshly baked scones with salted brown butter.Nutrition Information:
“This website provides approximate nutrition information for convenience and as a courtesy only. Nutrition data is gathered primarily from the USDA Food Composition Database, whenever available, or otherwise other online calculators.”


Leave a Reply