


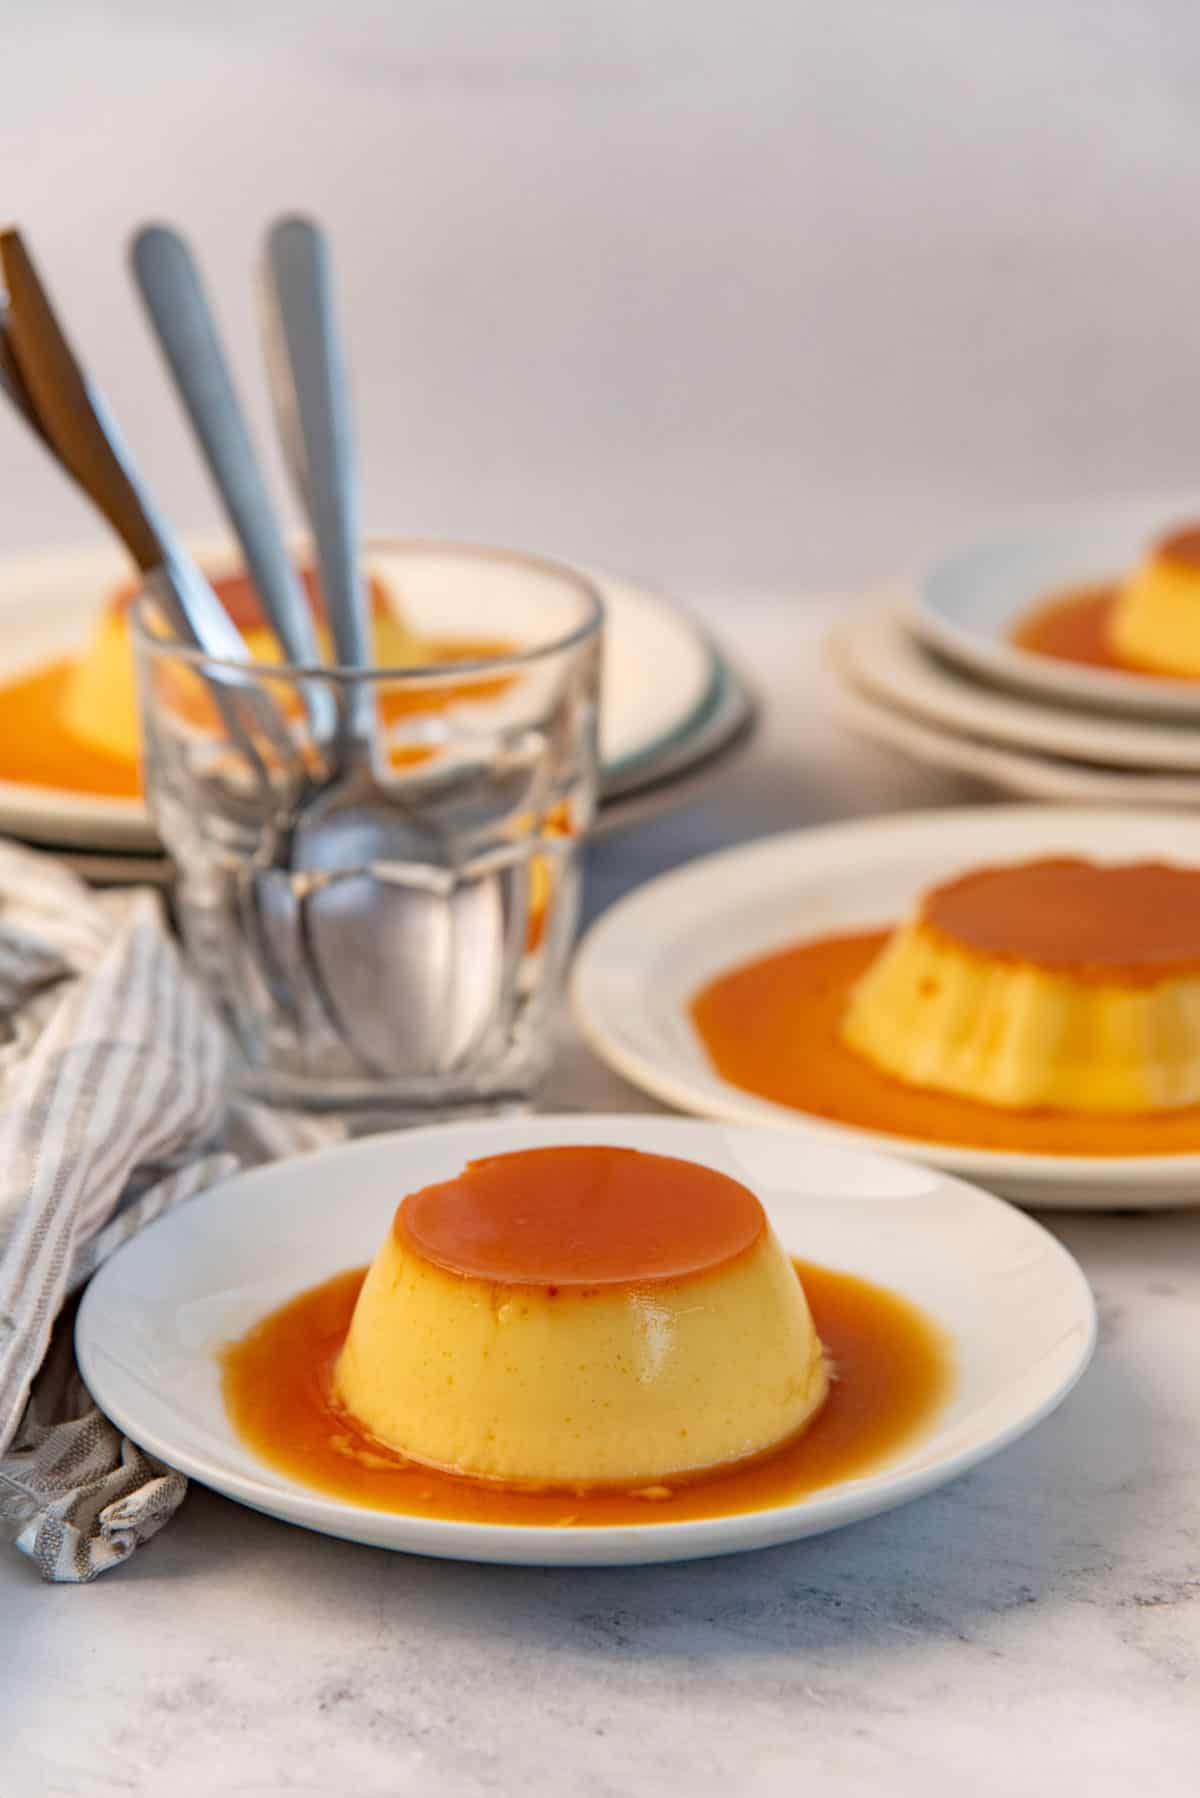
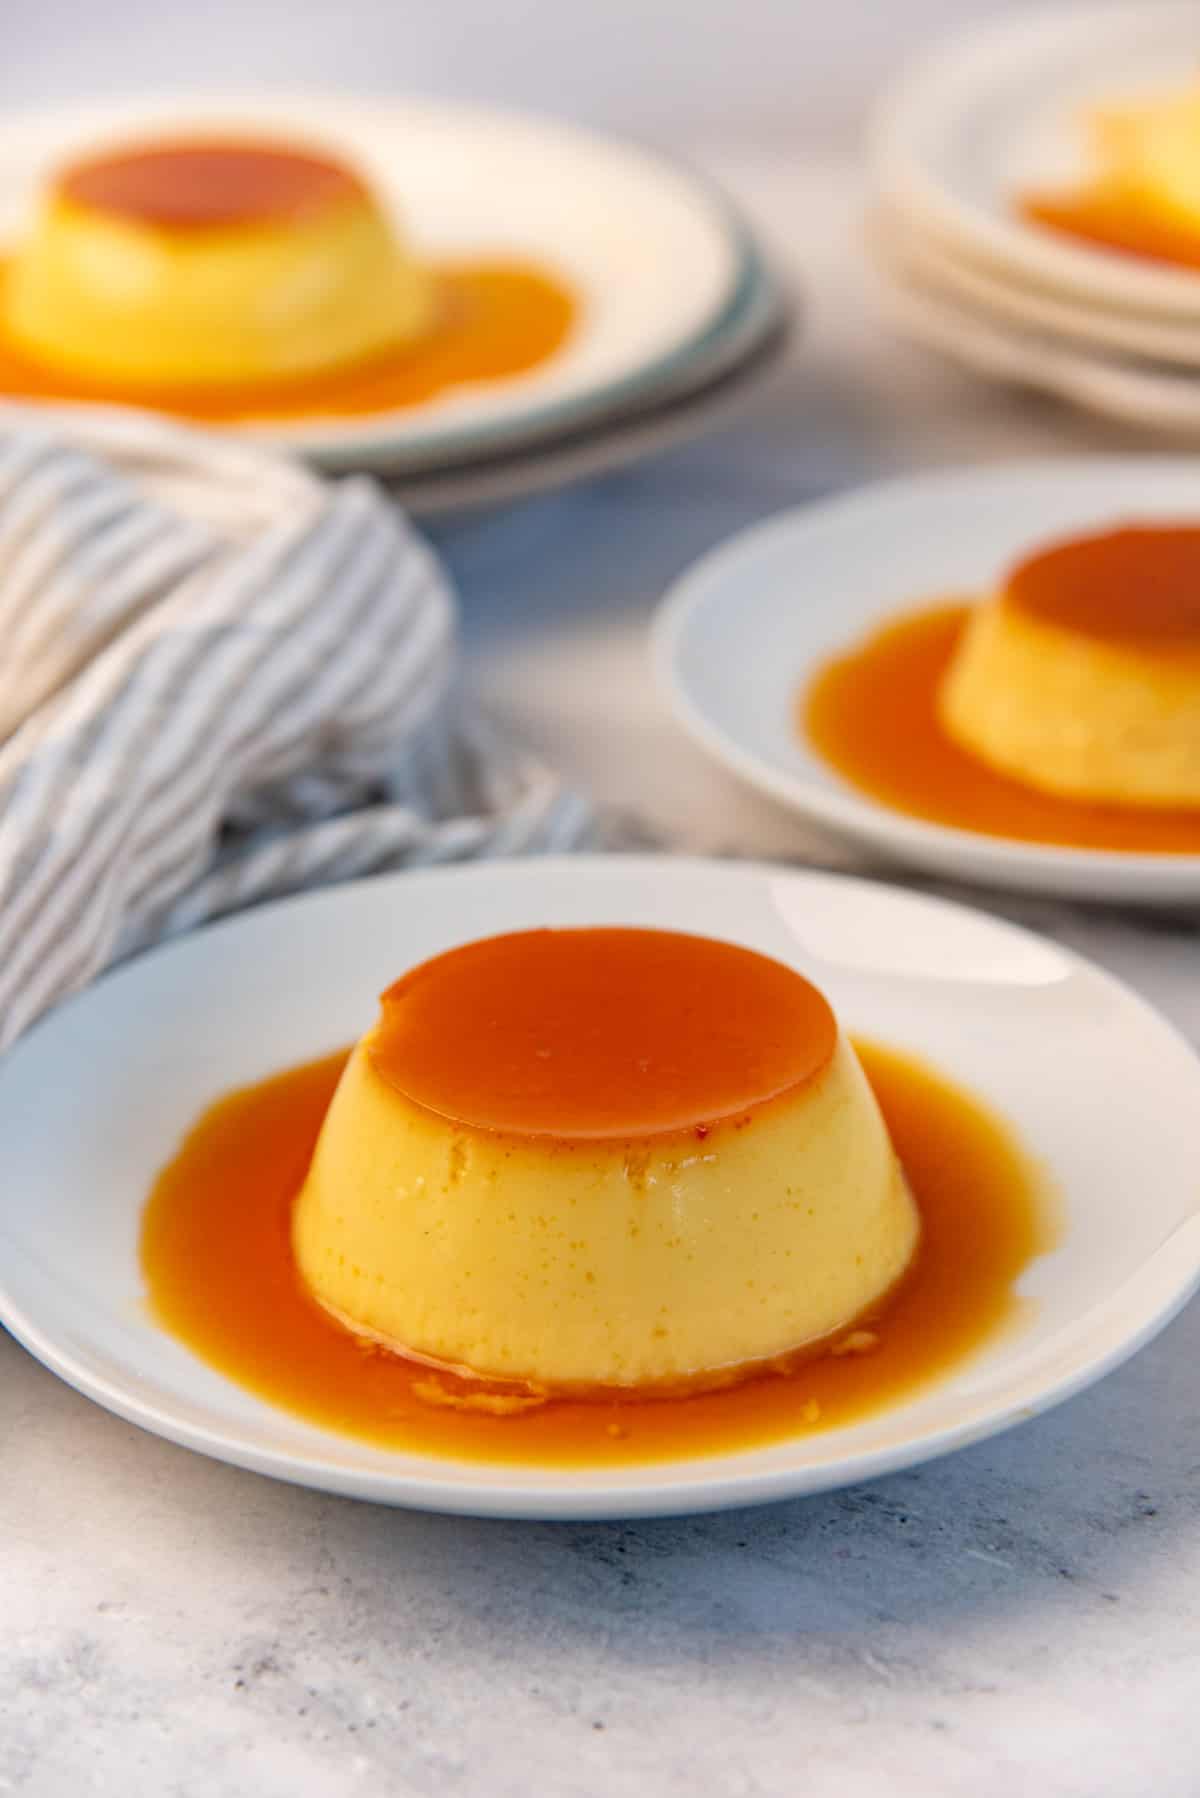
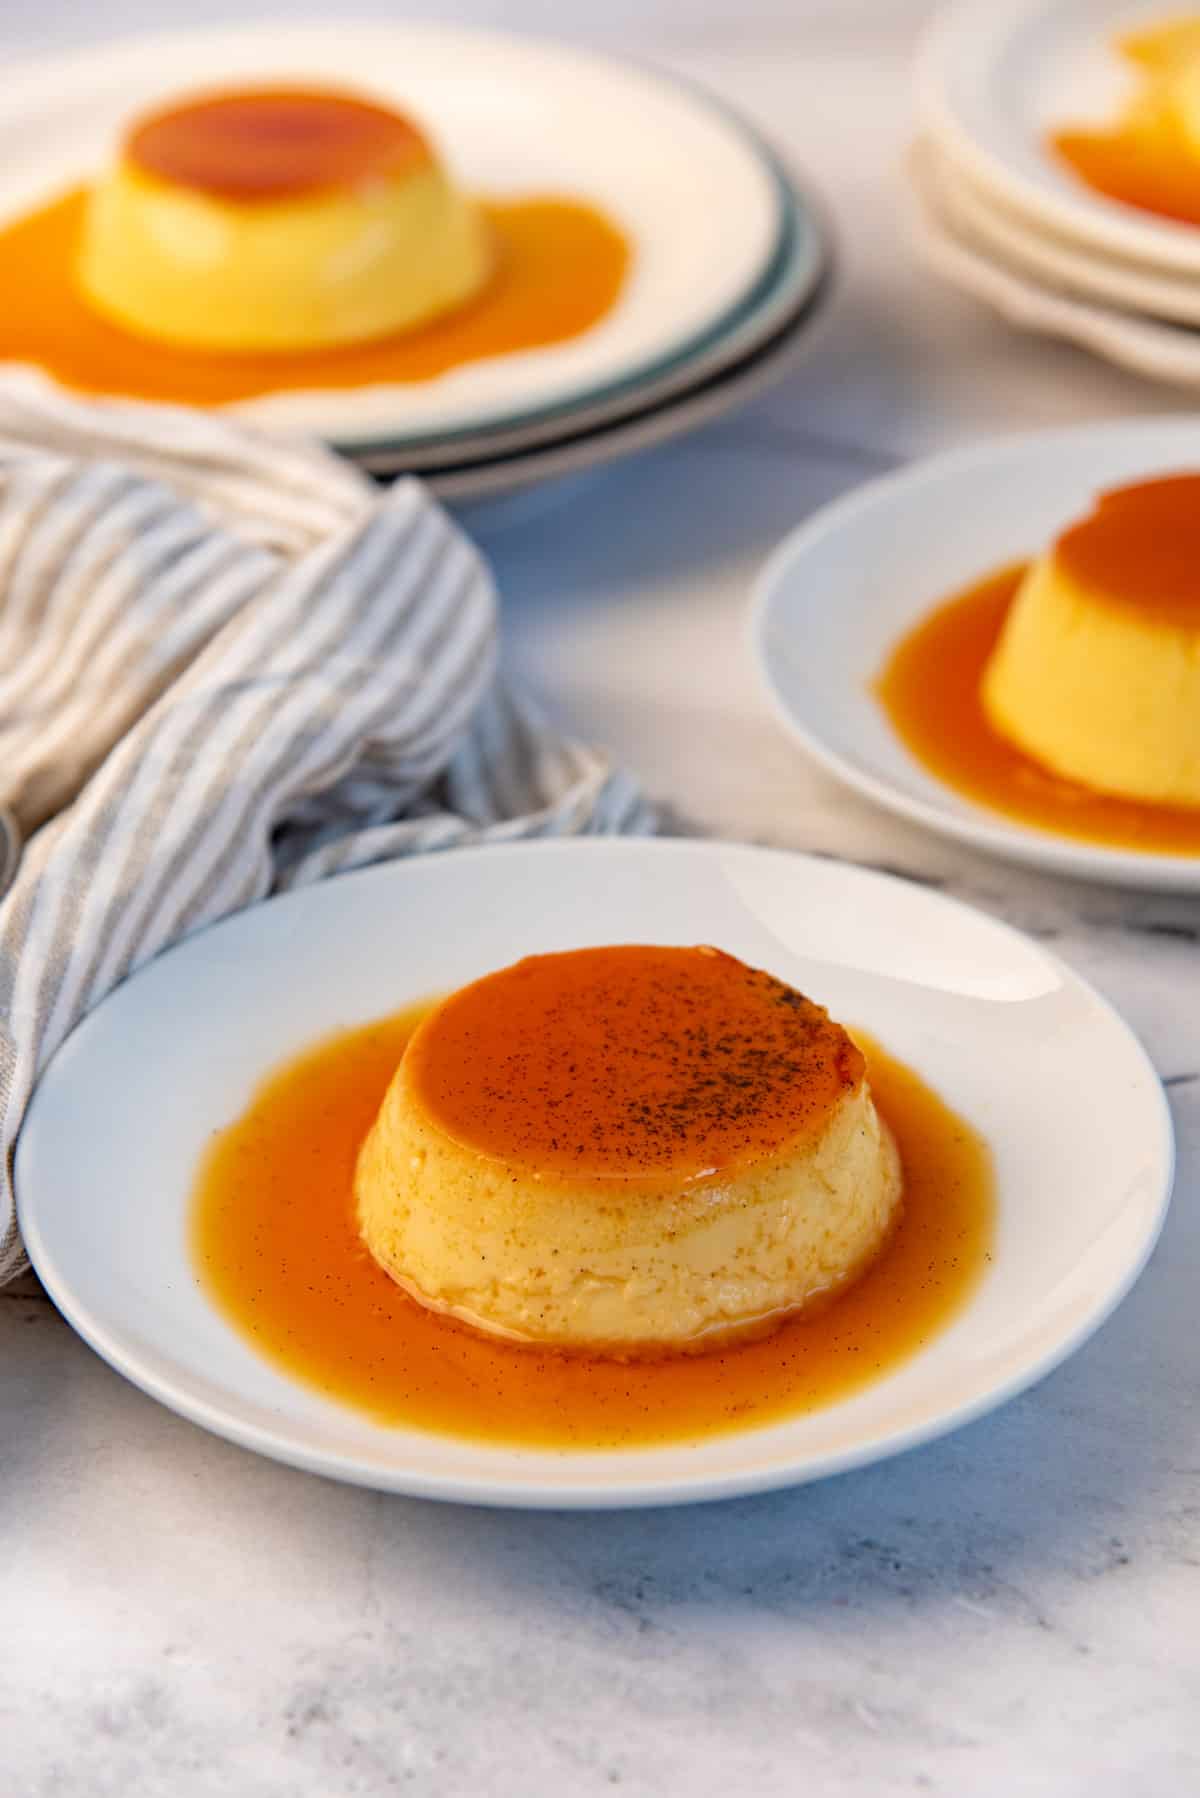
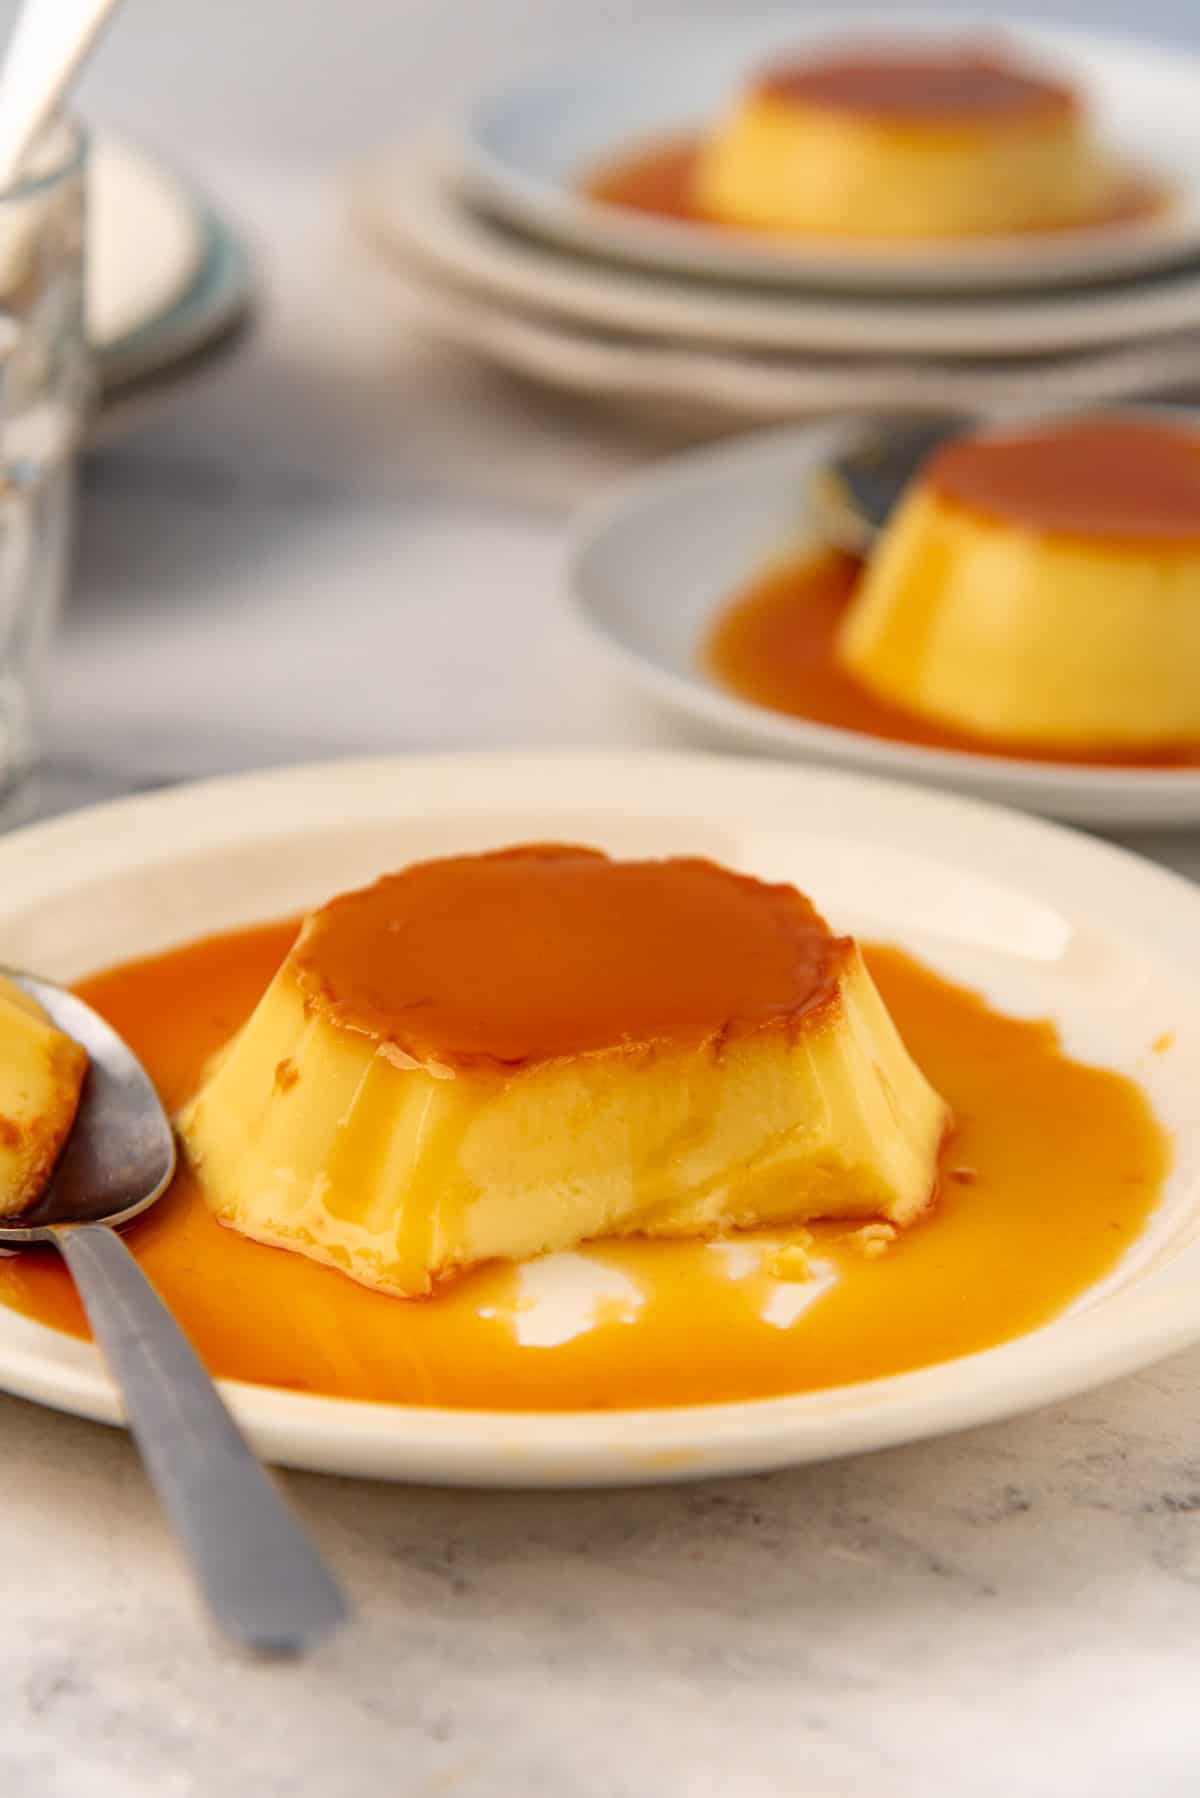
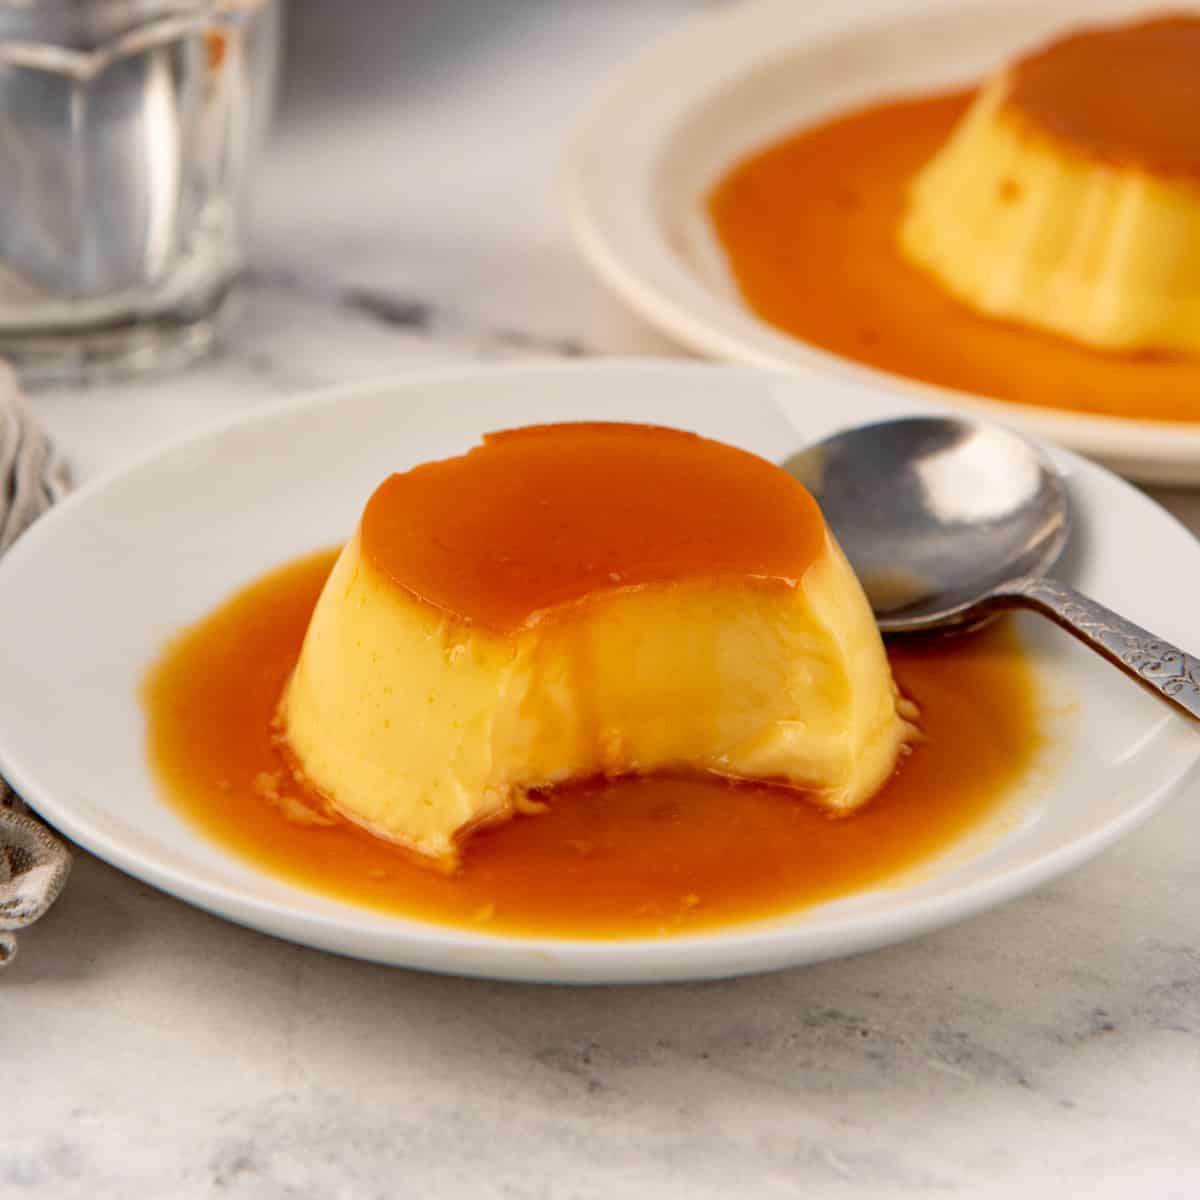
Silky smooth, irresistibly creamy, delicious Crème Caramel is just as easy to make with simple ingredients.
Perfectly sweet, milky, creamy custard with a velvety texture, and a lovely caramel flavor with just a hint of caramel bitterness. This perfect crème caramel is a simple yet impressive dessert, great for parties, gatherings, and potlucks!
Why this recipe works

- This is such an easy recipe to follow, even for beginner bakers!
- Step by step instructions for perfect results, so you know what to look out for at each step.
- I include different baking times for a few different baking dishes, but also provide tips on how to get the perfect texture with any dish!
- Pro tips for getting perfect results that look and taste incredible, plus tips on how to improve the flavor further.
- I share the recipe for making rich crème caramel that is popular in Parisian restaurants (Crème caramel à la Parisienne), but also share a version you can easily make with whole eggs so you don’t have to worry about any leftover egg whites!

What is crème caramel?
“Crème” in this context means custard. And caramel is the caramelized sugar. So, this is a creamy refreshing baked custard, topped with a layer or deeply caramelized sugar.
While this crème caramel recipe originates from France (it’s one of the more popular classic French desserts), it’s also very common in many other parts of the world.
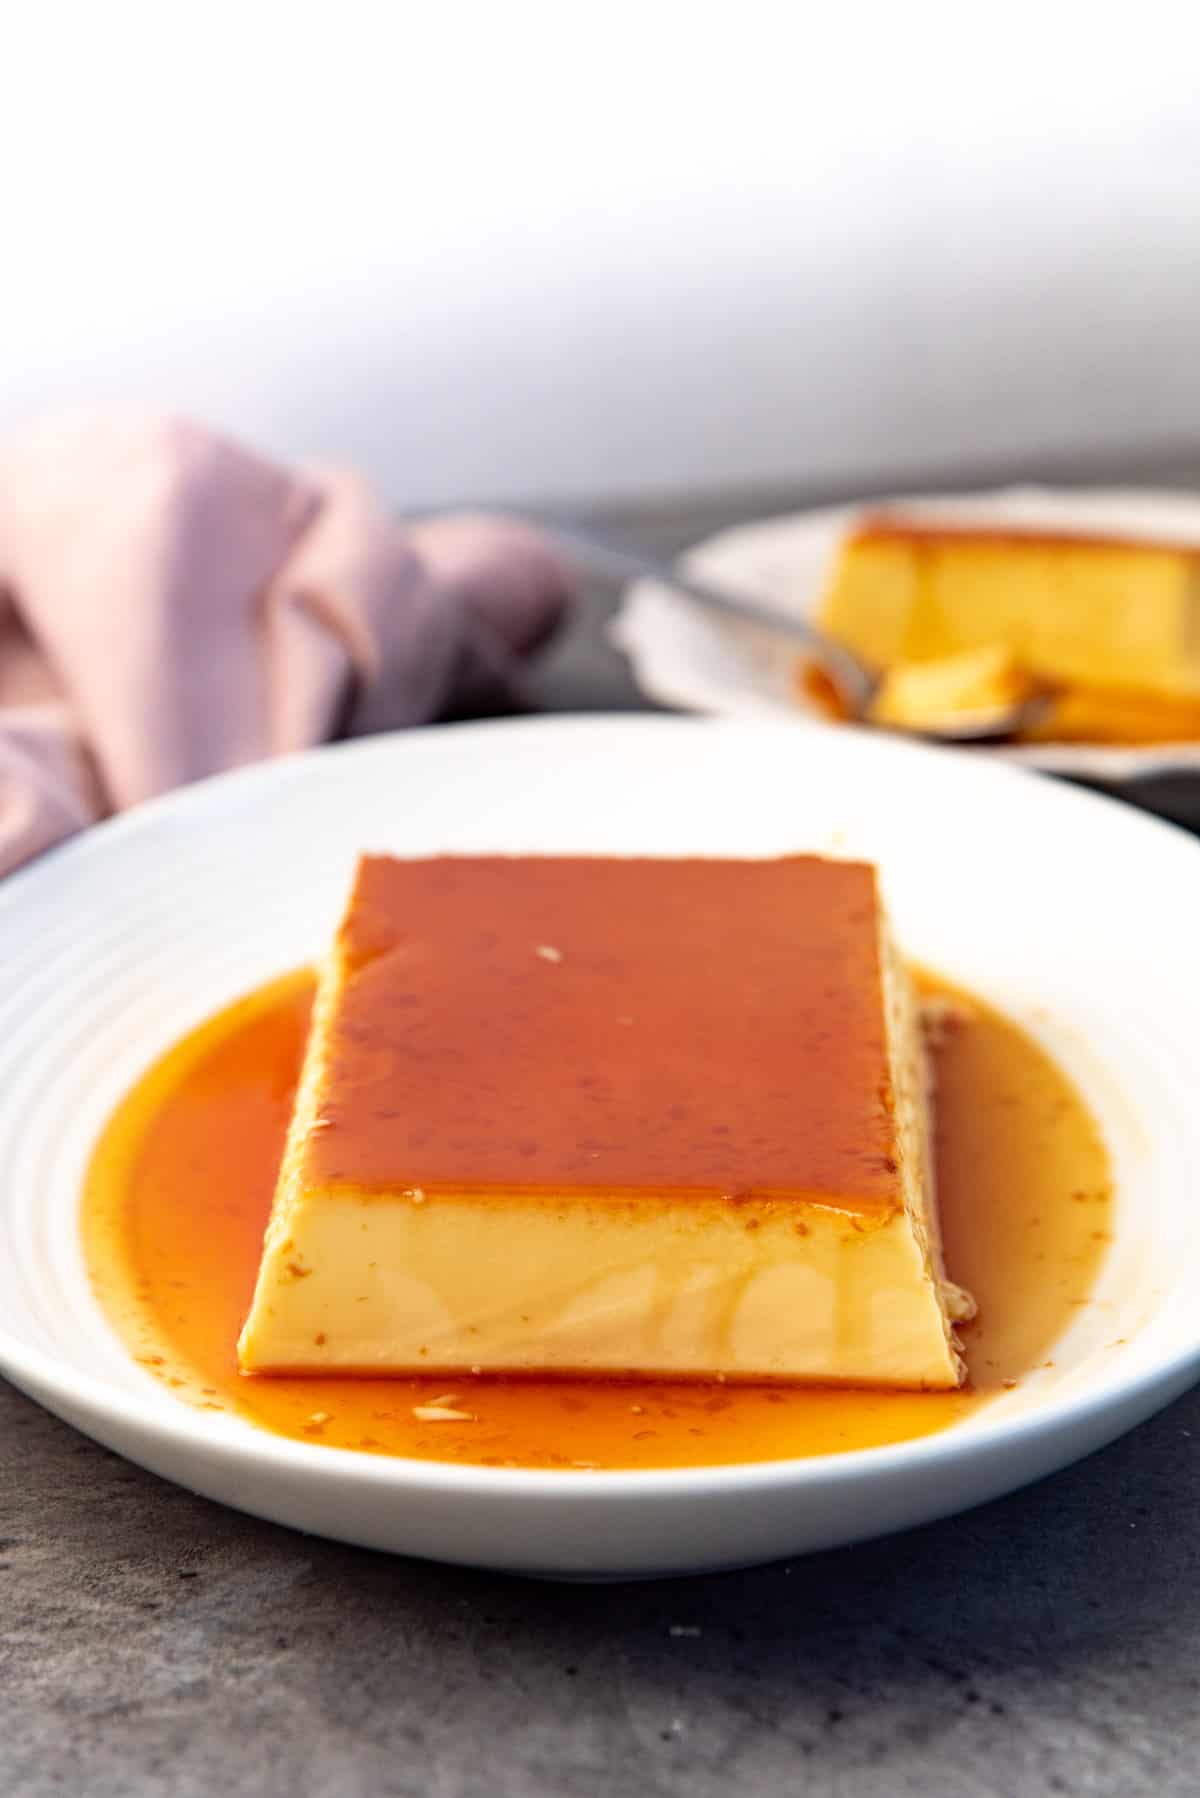
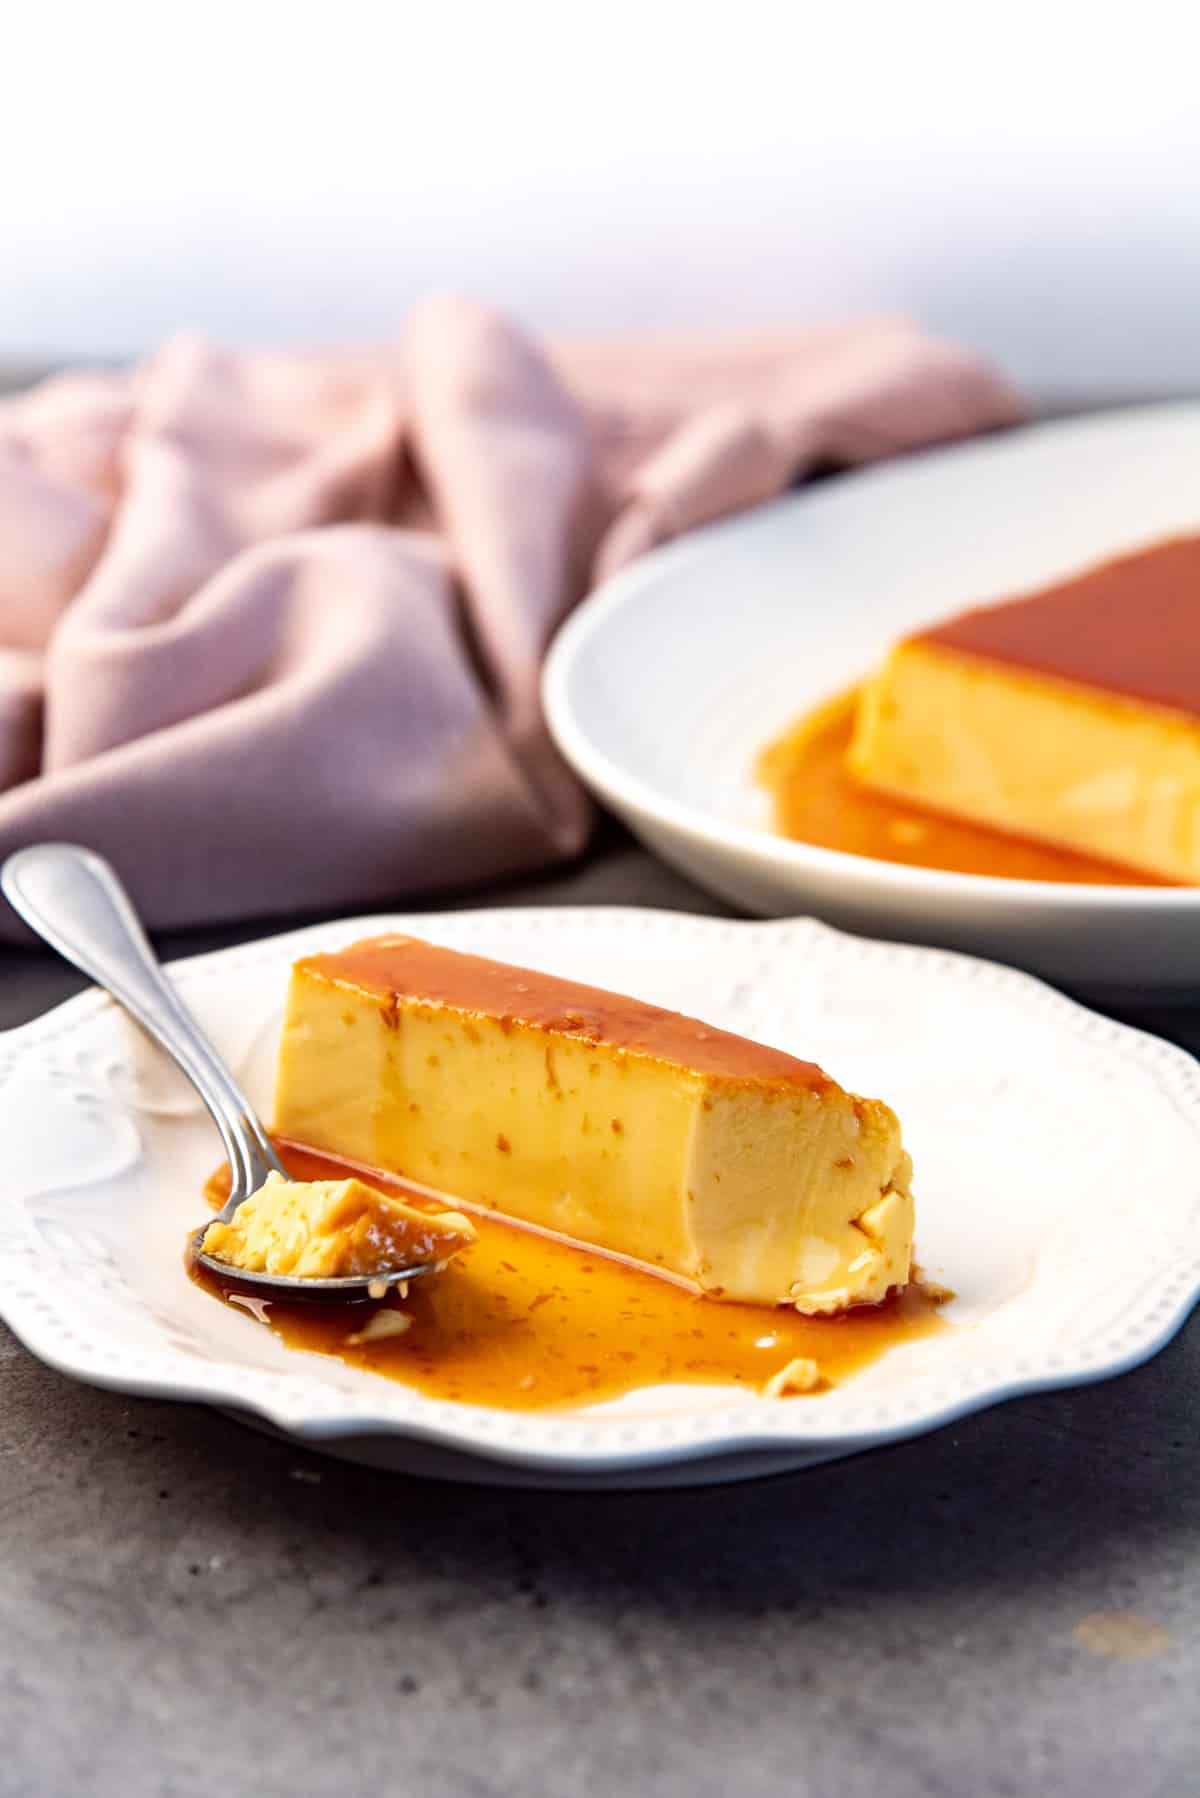
Creme caramel is made in ramekins (small or large), with a layer of caramel in the bottom, with custard baked on top. The dessert is then inverted onto plates, so that the custard is presented with a beautiful amber colored caramel flavored top and caramel flavored “syrup.
Creme caramel is also referred to as “Flan” (pronounced flaan) in some parts of the world. Particularly, in Latin American countries, since this dessert was introduced to the region by the Spanish, i.e. Spanish Flan.
The biggest difference between creme caramel and flan however, is in how it’s made and which country introduced the dessert to the region.
Ingredients you’ll need
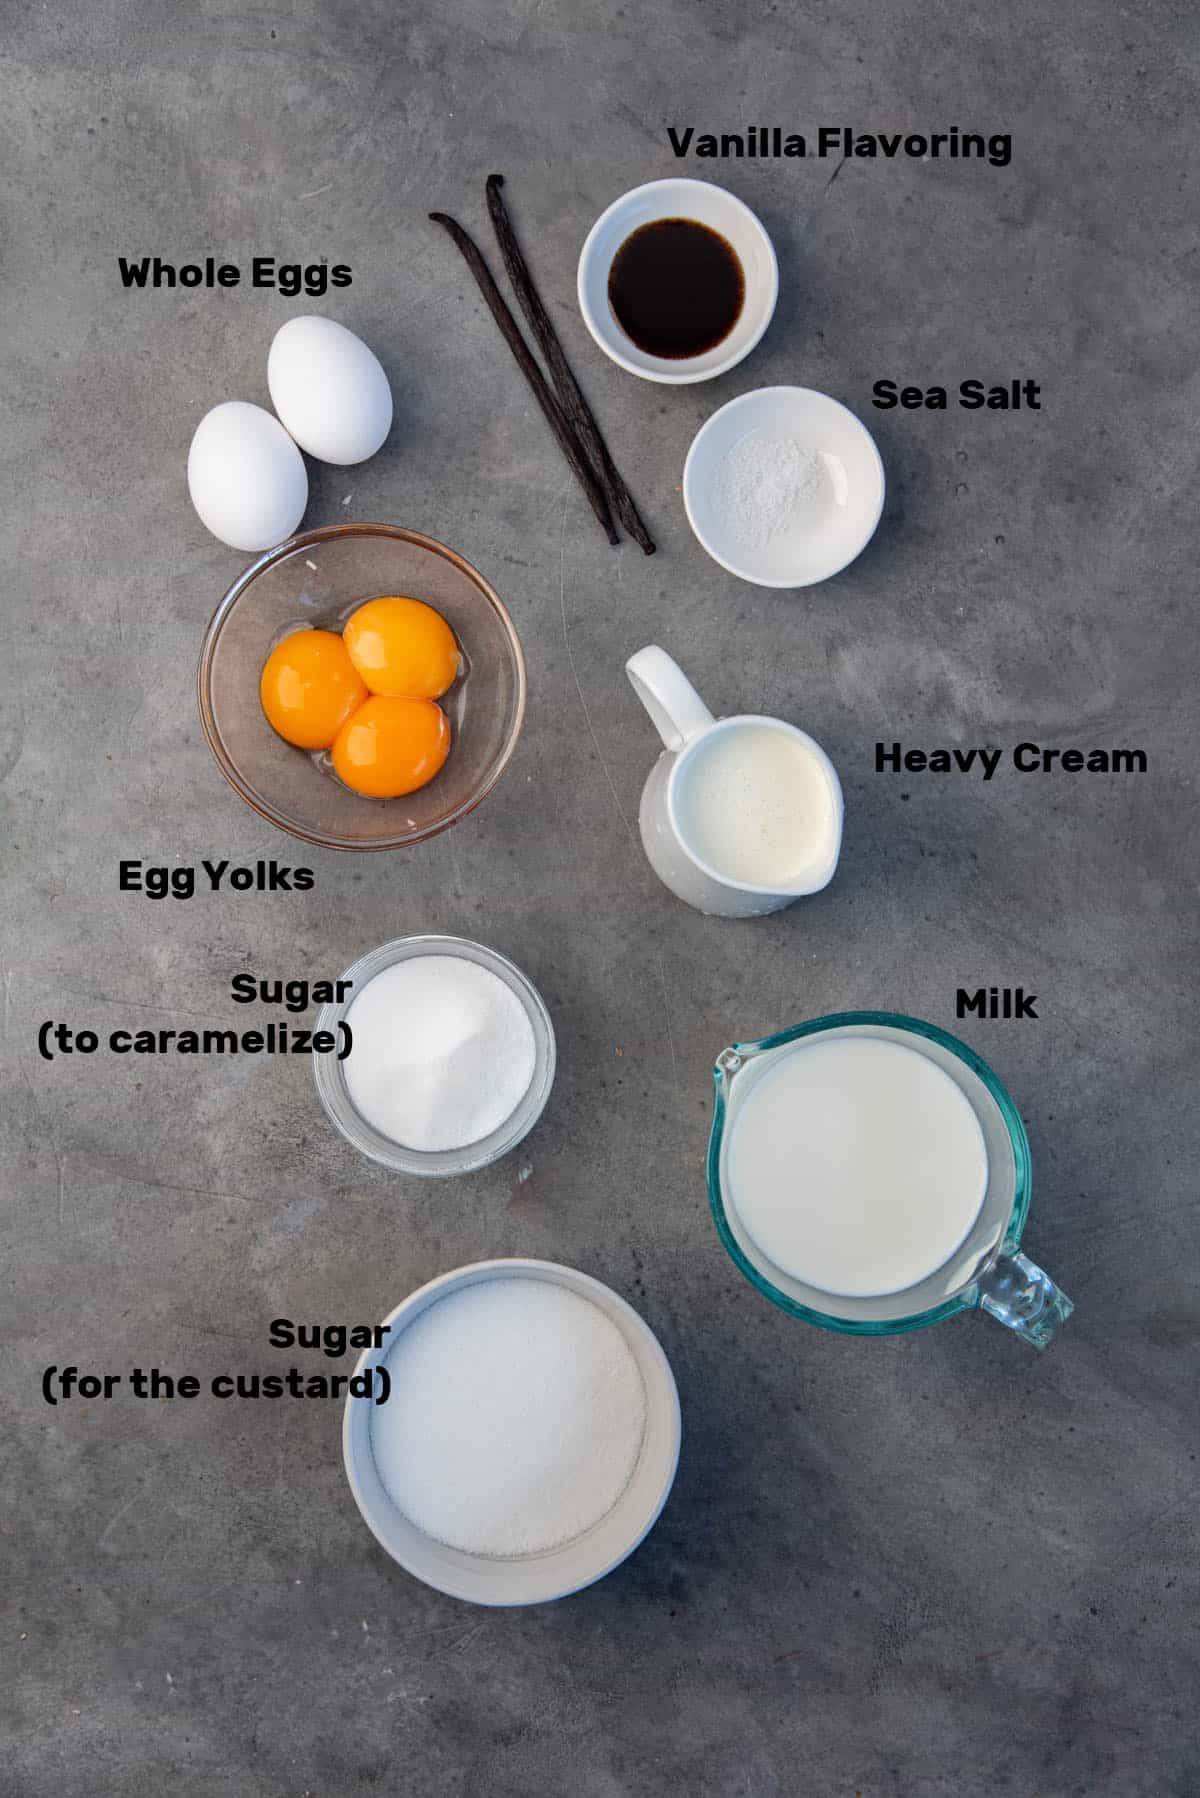
Milk and cream
Classic creme caramel is made with whole fat milk. However, you can substitute half of the milk with heavy cream.
Creme caramel made with all milk has a cleaner texture and flavor. However, if you add cream to the mixture, it transforms the dessert with a richer, creamier flavor and texture.
Sugar
You can find sugar at two different stages in a creme caramel.
- The caramelized sugar on top.
- Sugar to sweeten the custard for the creme caramel base.
White sugar is the recommended sweetener to use in a classic crème caramel recipe. It’s easier to caramelize (to see the stages clearly), and adds no extra flavor to the custard. However, you can choose to use brown sugar instead as well. I find that the ideal amount of sugar for this custard is between 15 – 20% sugar to the amount of milk.
Eggs
Eggs are what help the custard to set as it bakes. Some recipes call for whole eggs, but I prefer to use a combination of whole eggs and egg yolks.
The purpose of adding egg yolks to the creme caramel is to increase the rich taste of the custard as well. The combination of whole eggs and egg yolks provides enough thickening power to set the caramel, while also adding the maximum amount of flavor and richness.
However, you can also easily make creme caramel with whole eggs only. The ratio for this is 2 large eggs per 1 cup of milk (about 240 – 250 mL).
Vanilla
Vanilla is the flavoring extract that you add to the caramel base. A flavor extract is absolutely essential for creme caramel, and vanilla is the most commonly used flavor extract. Vanilla extract, whole vanilla beans, or even vanilla bean paste is acceptable for this recipe. However, you can absolutely switch this out for other flavor extracts as well.
- Orange blossom water (which was used in very old recipes for custard when vanilla wasn’t widely available).
- Rose water
- Citrus extracts
- Almond extract
Salt
Just a touch of salt prevents the creme caramel from tasting bland. But in this case, you only need to add a little because you don’t want the salty flavor to overpower the sweetness at all.
Optional ingredients
These are optional ingredients that I personally love to add to my crème caramel recipe.
Spices – Cinnamon stick, cardamom pods etc. Adding whole spices to the milk will add just a lovely undertone of these spices to the custard. It’s not necessary or required for a classic caramel, but I love the added flavor dimension in my creme caramel recipe.
Citrus zest – If not spices, I add some lemon zest, or orange zest, or lime zest. Whichever citrus fruit I have available at home. This step achieves two things. It adds a lovely citrus undertone to the creme caramel, without it being sour or overly citrussy. It also helps reduce any “eggy” smell that some people might be more sensitive to.
How to make crème caramel (step by step overview)
Step 1 – Prepare the milk
Decide if you’re making one large crème caramel pudding or small individual-sized puddings. Then clean and dry the dish or dishes you will be using.
Older recipes for cream caramel may call for scalding the milk. Technically, this is not necessary anymore. However, I do like to heat the milk anyway.
Should I scald the milk for creme caramel?
Scalding the milk was more common when milk was not pasteurized. These days, the milk we buy is already pasteurized, so you don’t need to scald the milk for dessert recipes. However, scalding the milk will denature the proteins. This is beneficial for homemade bread recipes, where the milk proteins can interfere with gluten development.
But this does not have an impact on desserts such as creme caramel. So we don’t have to scald the milk at all. But I do still recommend heating the milk to a simmer or until it steams. This helps with infusing flavors, and also to shorten the cooking time.
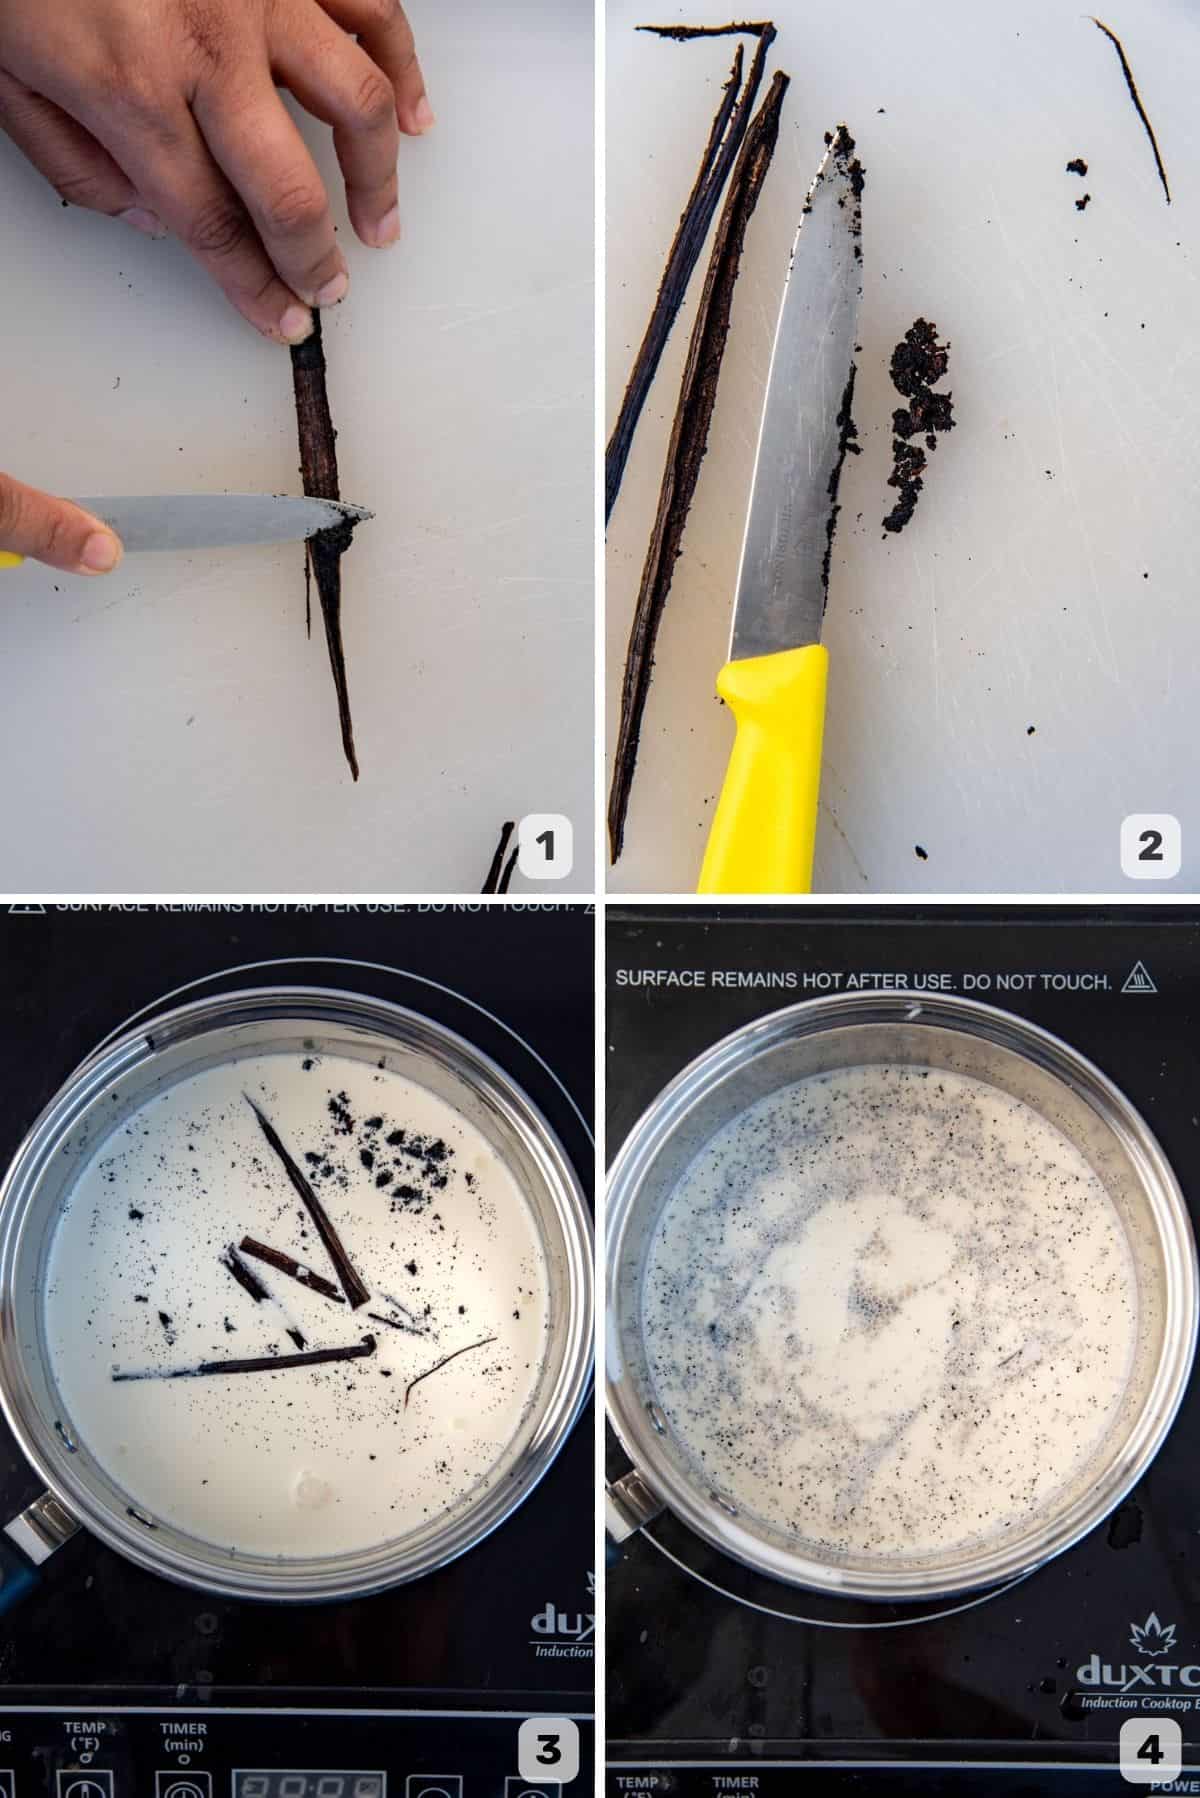
Place the milk in a small saucepan (along with the cream, if using). If you’re using vanilla beans, split the bean and scrape out the caviar using the back of a knife blade (images 1 – 3). I also like to add any citrus zest or spices at this stage, so the milk has time to infuse with the flavors.
Then add the caviar and the pod to the milk and let it heat to a gentle simmer (image 4). If you don’t need to infuse any flavors into the milk, you can make the caramel first.
When the milk mixture comes to a simmer or is steaming well, remove it from the heat and let it infuse for a few minutes. The milk should be around 160 F / 71 C or lower before adding it to the eggs.
Step 2 – Prepare the the baking dishes
While the milk is infusing, the next step is to make the caramel for the bottom of the dishes. This caramel can be made as a wet caramel or a dry caramel. Whichever is easier for you.
Also heat the oven to 350 F / 180 C, and also take a large baking tray to use as a water bath. The water bath should be big enough to comfortably accommodate all the baking dishes with the creme caramel, with at least an inch of space between them.
Place a kitchen towel on the bottom of the water bath dish. This will prevent the dishes from slipping around. You will also need to use hot water to add to the dish.
Step 3 – Make the caramel
I personally prefer the dry caramel method because there is less of a risk of recrystallization. To make the caramel, place the sugar in a wide pan where the sugar will be in a thinner layer. A wider bottom will ensure that the sugar dissolves quicker and caramelizes easily, but make sure you can see the color of the caramel (i.e. not dark colored pans).
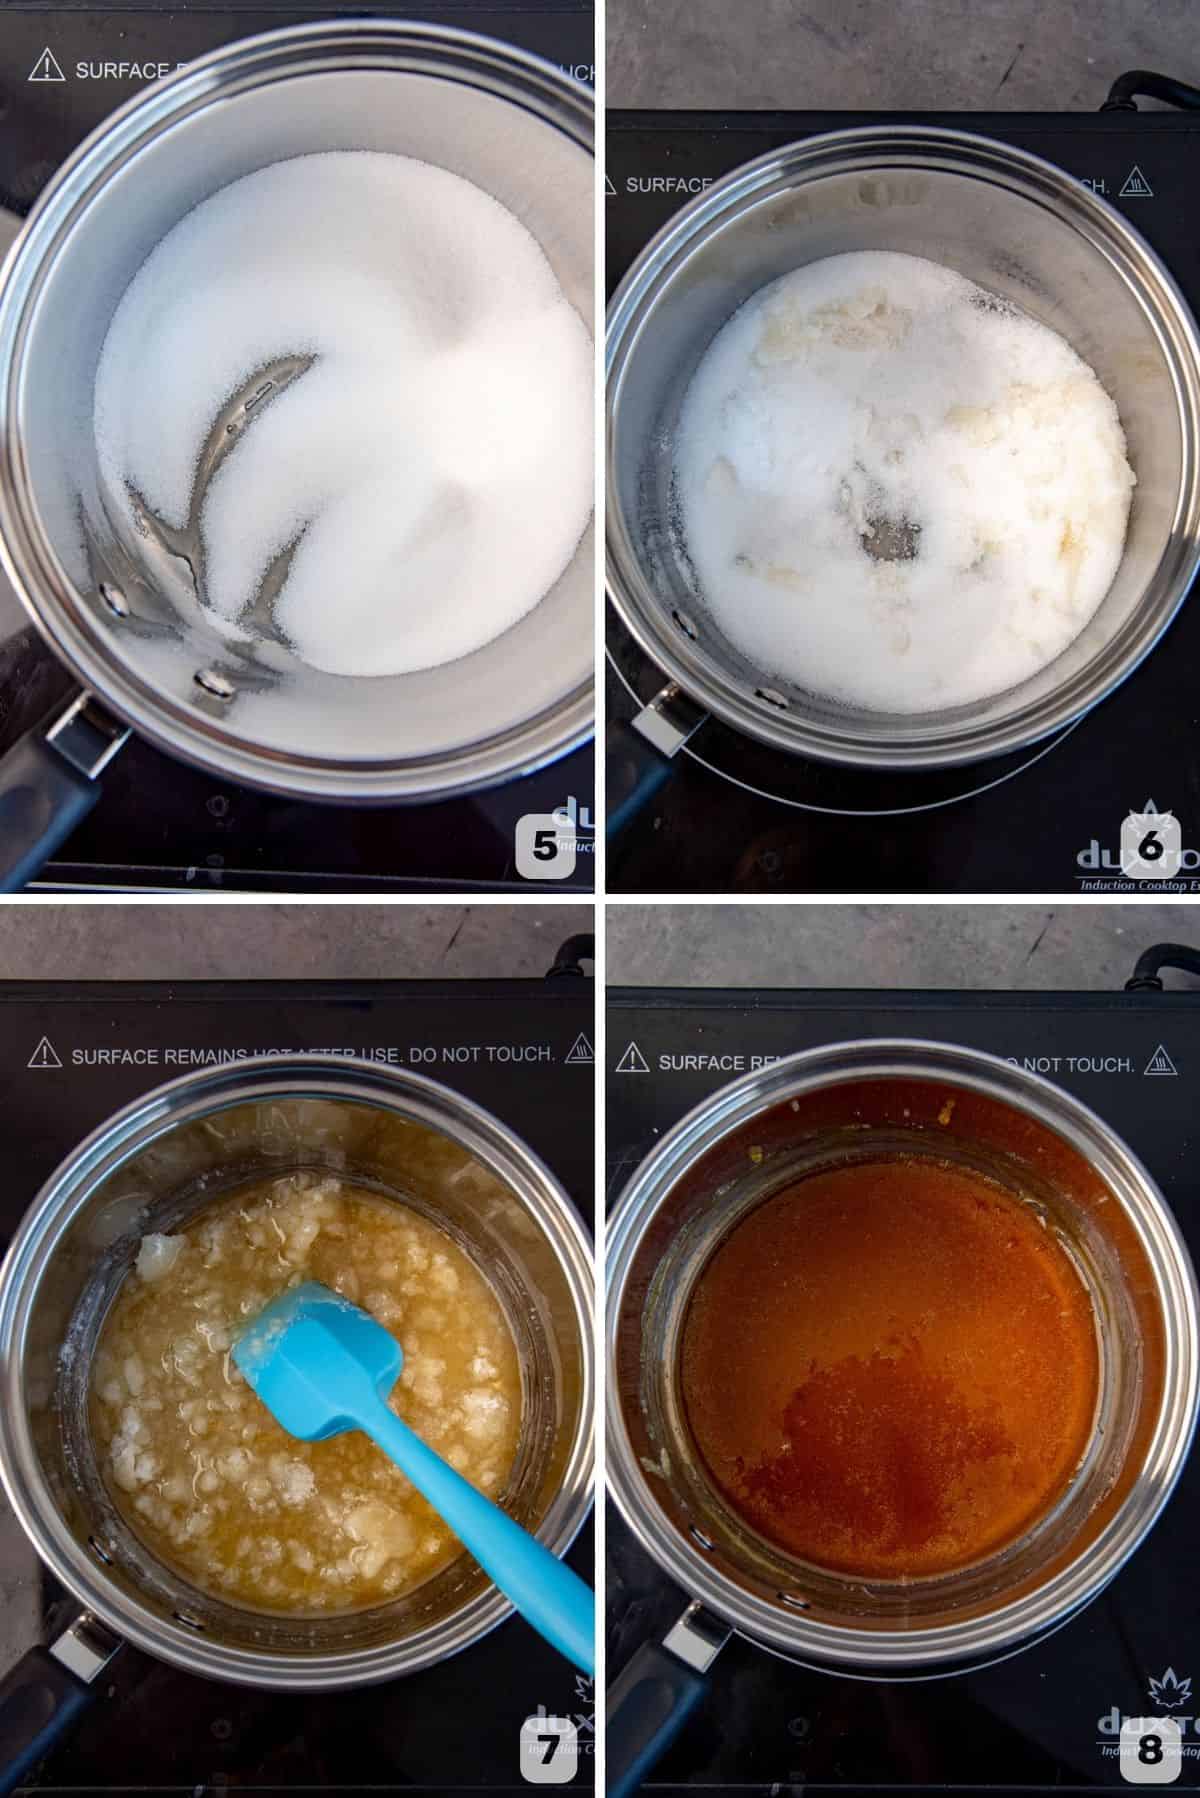
Heat the sugar over medium high heat. When the sugar at the bottom of the pan starts to melt (image 5), move it aside with a spatula so that the rest of the sugar can make contact with the bottom of the pan and start to melt (image 6).
The sugar will melt and start to change to a light yellow color. Mixing the caramel will make it a little lumpy too (image 7). This is OK! At this stage, if the lumps are big, remove the pan from the heat while the caramel is a light yellow color, and stir the mixture to break the clumps and melt them. Then return the caramel back to the stove.
Lower the heat to medium or medium low to caramelize the sugar a little slower, as this will happen quite quickly.
As soon as the caramel turns an amber color (image 8), remove it from the heat. You can use the caramel while it’s an amber color, or let it darken a little more for a slightly bitter caramel.
Remember the caramel will darken with the residual heat, so you have to work quickly and carefully.
Caramel is VERY HOT, so you could burn yourself if it gets on your skin! Please handle the caramel carefully. The caramel will heat the metal cups you put the caramel into as well, so handle carefully.
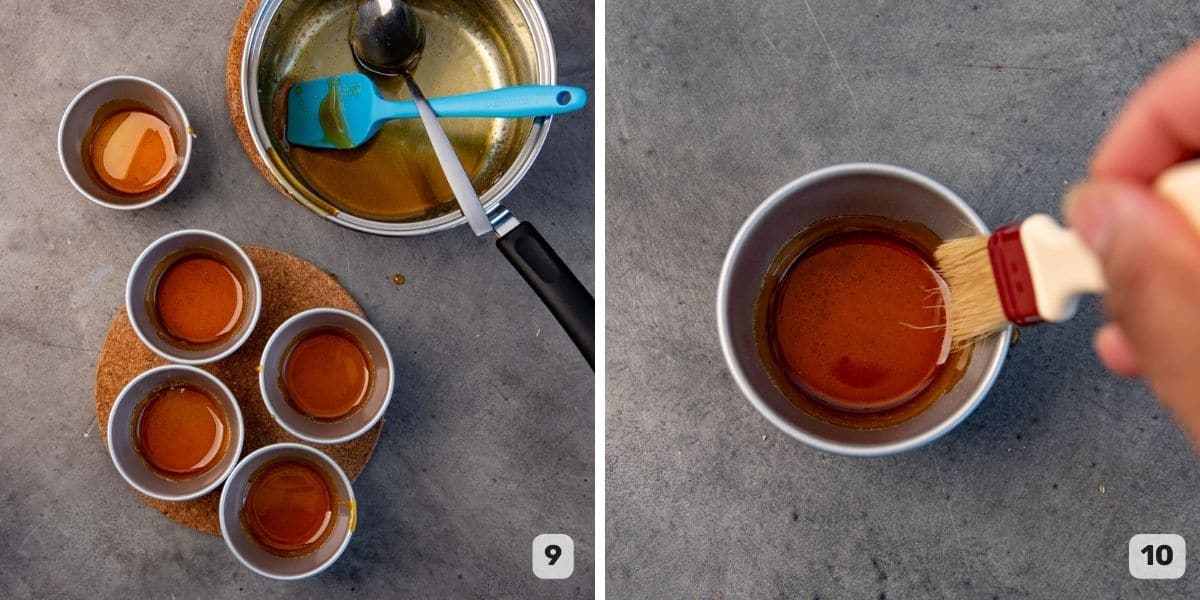
Pour the caramel carefully into the baking dishes (image 9). There needs to be a minimum of a thin coating of caramel at the bottom of the baking dish, BUT I like to add a little more than a thin coating, roughly about 5 mm thickness (it’s hard to measure this, so just eye-ball it).
Set the dishes aside, while you make the custard. Alternatively, you can also brush the sides of the ramekins with a little butter to make it easier to release the custards later – but this is not necessary (image 10).
Step 3 – Tempering the eggs
With this recipe, I do prefer to use a combination of whole eggs and egg yolks, but I also share how to make creme caramel with only whole eggs! This will result in a thinner, more jello-like consistency that still tastes delicious!
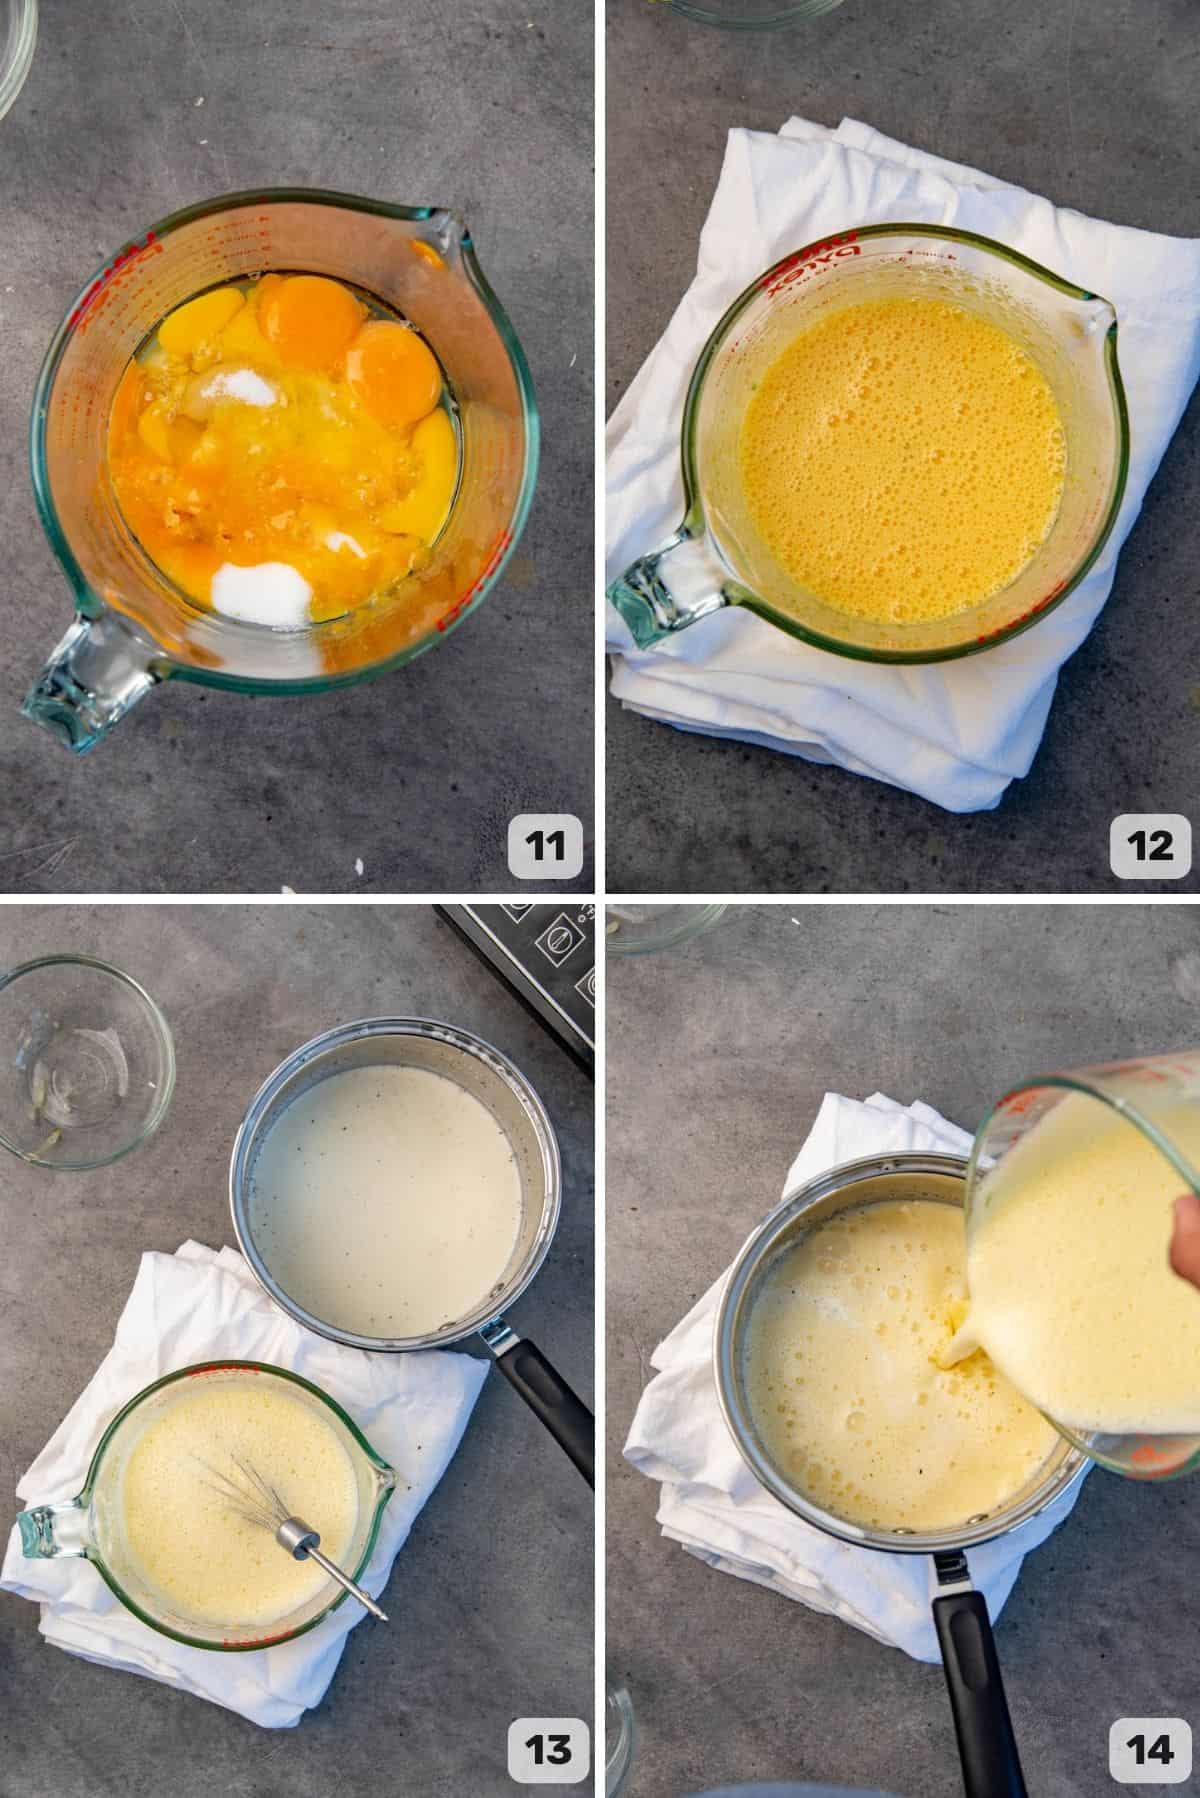
In a large jug or bowl, place the eggs and egg yolks along with the white sugar (image 11). Whisk very well. The egg mixture should not have any clumps of eggs, and be slightly frothy (image 12). If you’re using egg yolks, make sure to store the egg whites in the freezer, so you can use them for another recipe later.
While still whisking the egg mixture, add the hot milk in a thin stream. It’s very important to keep mixing the eggs while adding the warm milk, slowly, to prevent the eggs from curdling. This is called “tempering the eggs”, because the egg temperature is being tempered to match the temperature of the milk (image 13).
Once the egg mixture has been warmed up with the milk, add all the milk into the eggs and mix to combine (image 14). Then strain the mixture to remove any lumps or spices that were used to infuse the milk (image 15).
Step 4 – Preparing for baking
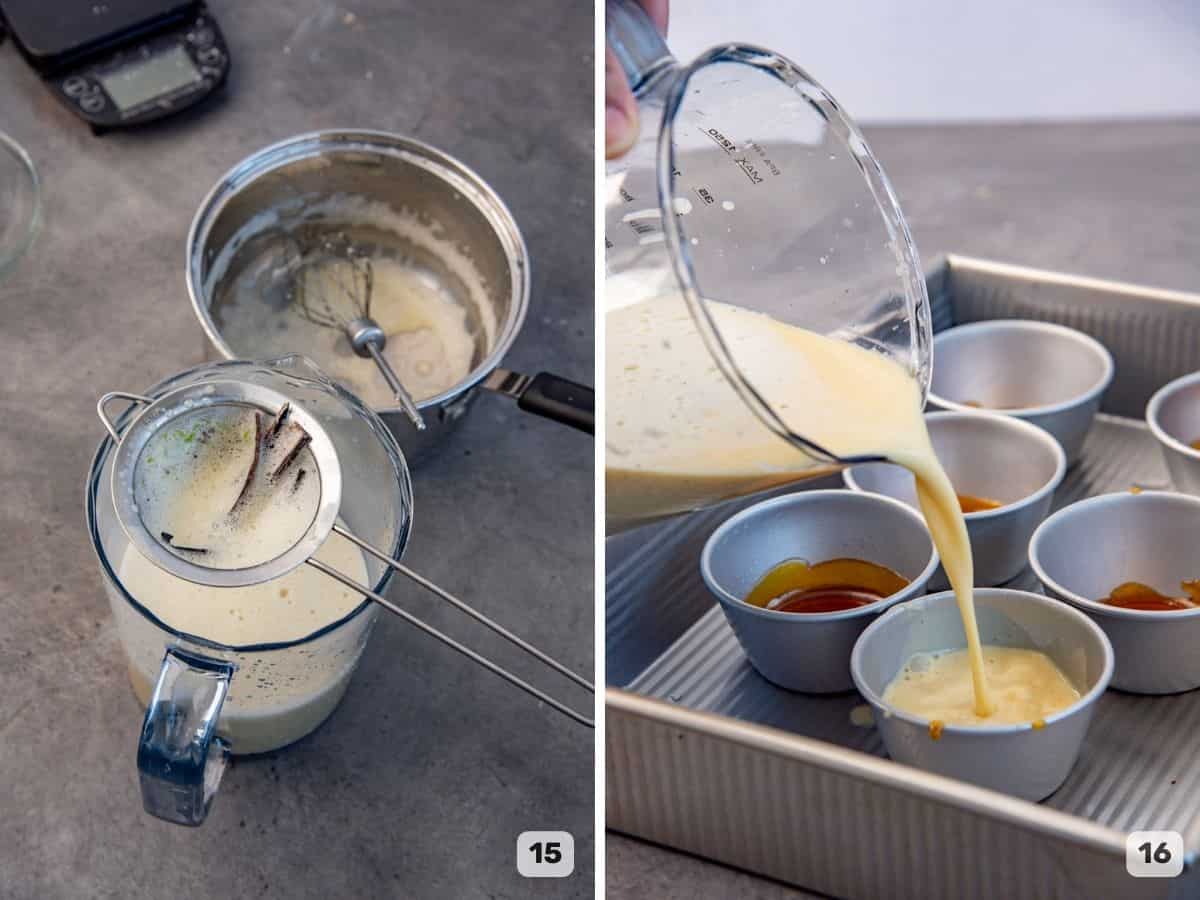
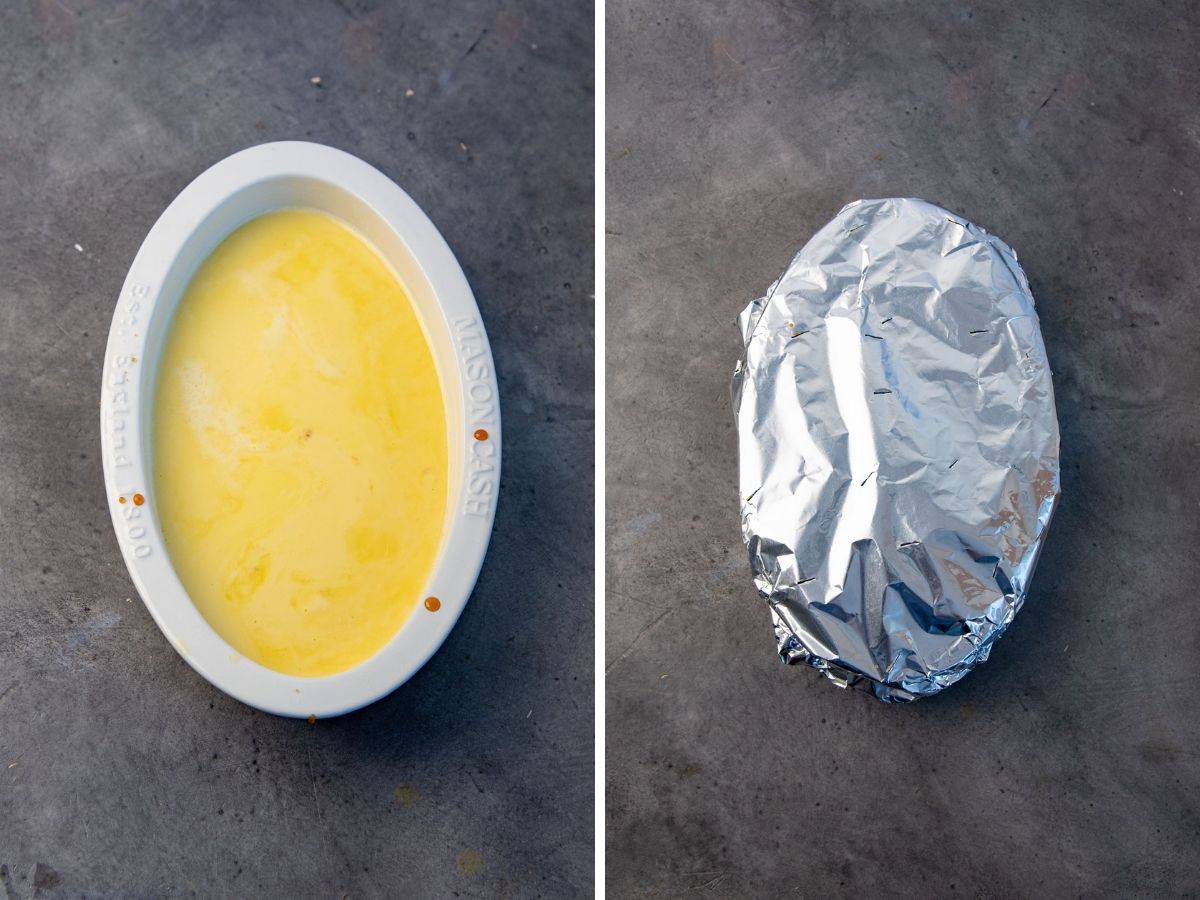
Pour the custard mixture into the dish or dishes with the caramel at the bottom (image 16). Then place all of them in the bigger baking dish that will be used as a water bath. Since there is a dish cloth at the bottom of the water bath, the creme caramel dishes should not slip or move around.
Place this in the preheated oven, and carefully pour hot water into the water bath dish. Be careful not to splash water into the custards.
Then cover the dish with foil, with some holes for ventilation. Allow the creme caramel to bake.
Step 5 – Baking the custards
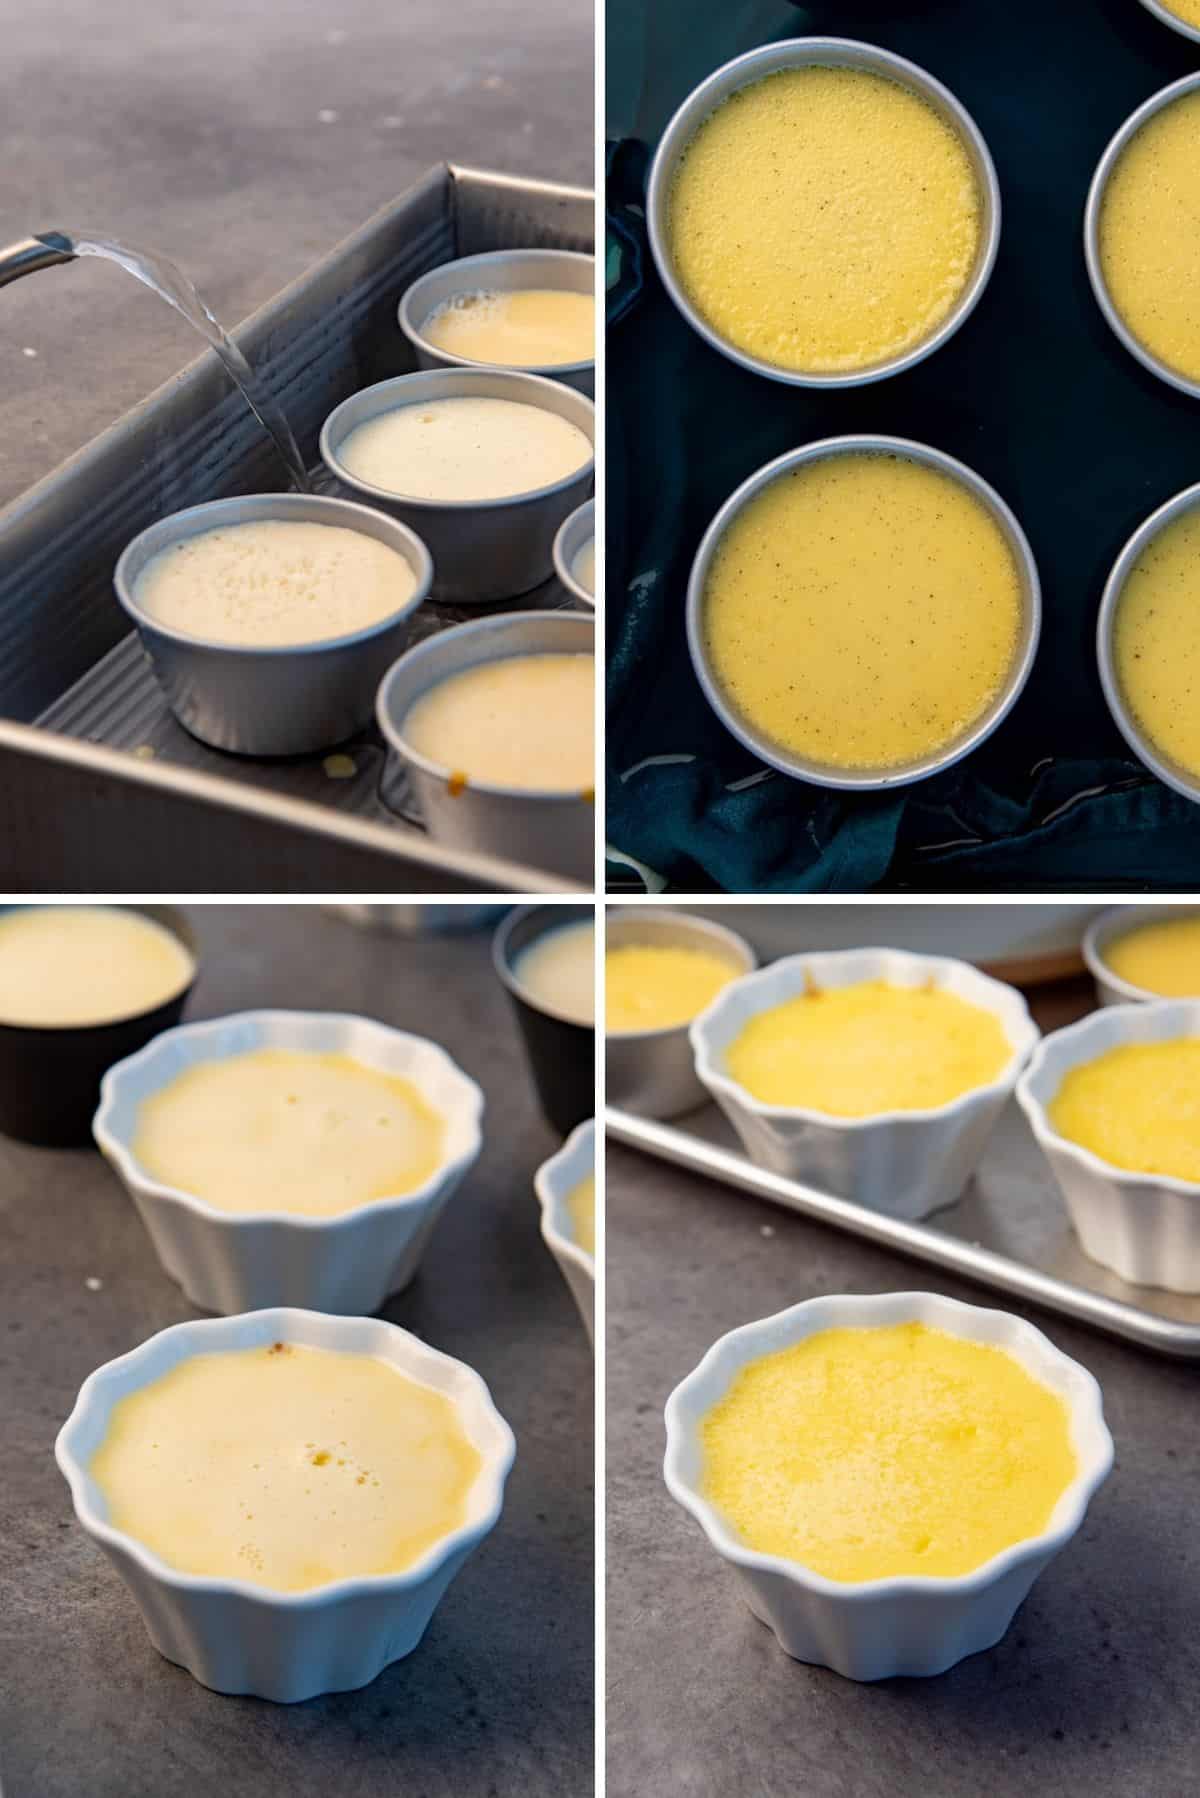
Bake the custards until the custards are set, but wobbly. The time it takes to bake will vary on a number of variables.
- The dish that you use – Metal vs porcelain. Metal cooks the custard faster than porcelain.
- The size of the dish – Smaller dishes will cook faster than larger baking dishes. How thick the custard will be in the dish will also have an impact on the baking time.
- Starting temperature of the custard – If the custard is warm, the baking time will shorten. If the custard is at room temperature or cooler, it will take longer.
The best and foolproof way to know when the custard is baked through is to check the texture,
- Custard is baked and set, but very wobbly when you shake it.
- The internal temperature should be between 78 – 80 F. The higher the custard temperature is from 80 F, higher the chances of the eggs overcooking. I personally prefer this method because it prevents over-baking.
Once the custard is baked, remove it from the oven and the water bath. Let it cool to room temperature and then transfer to the fridge to chill overnight.
Step 5 – Serve
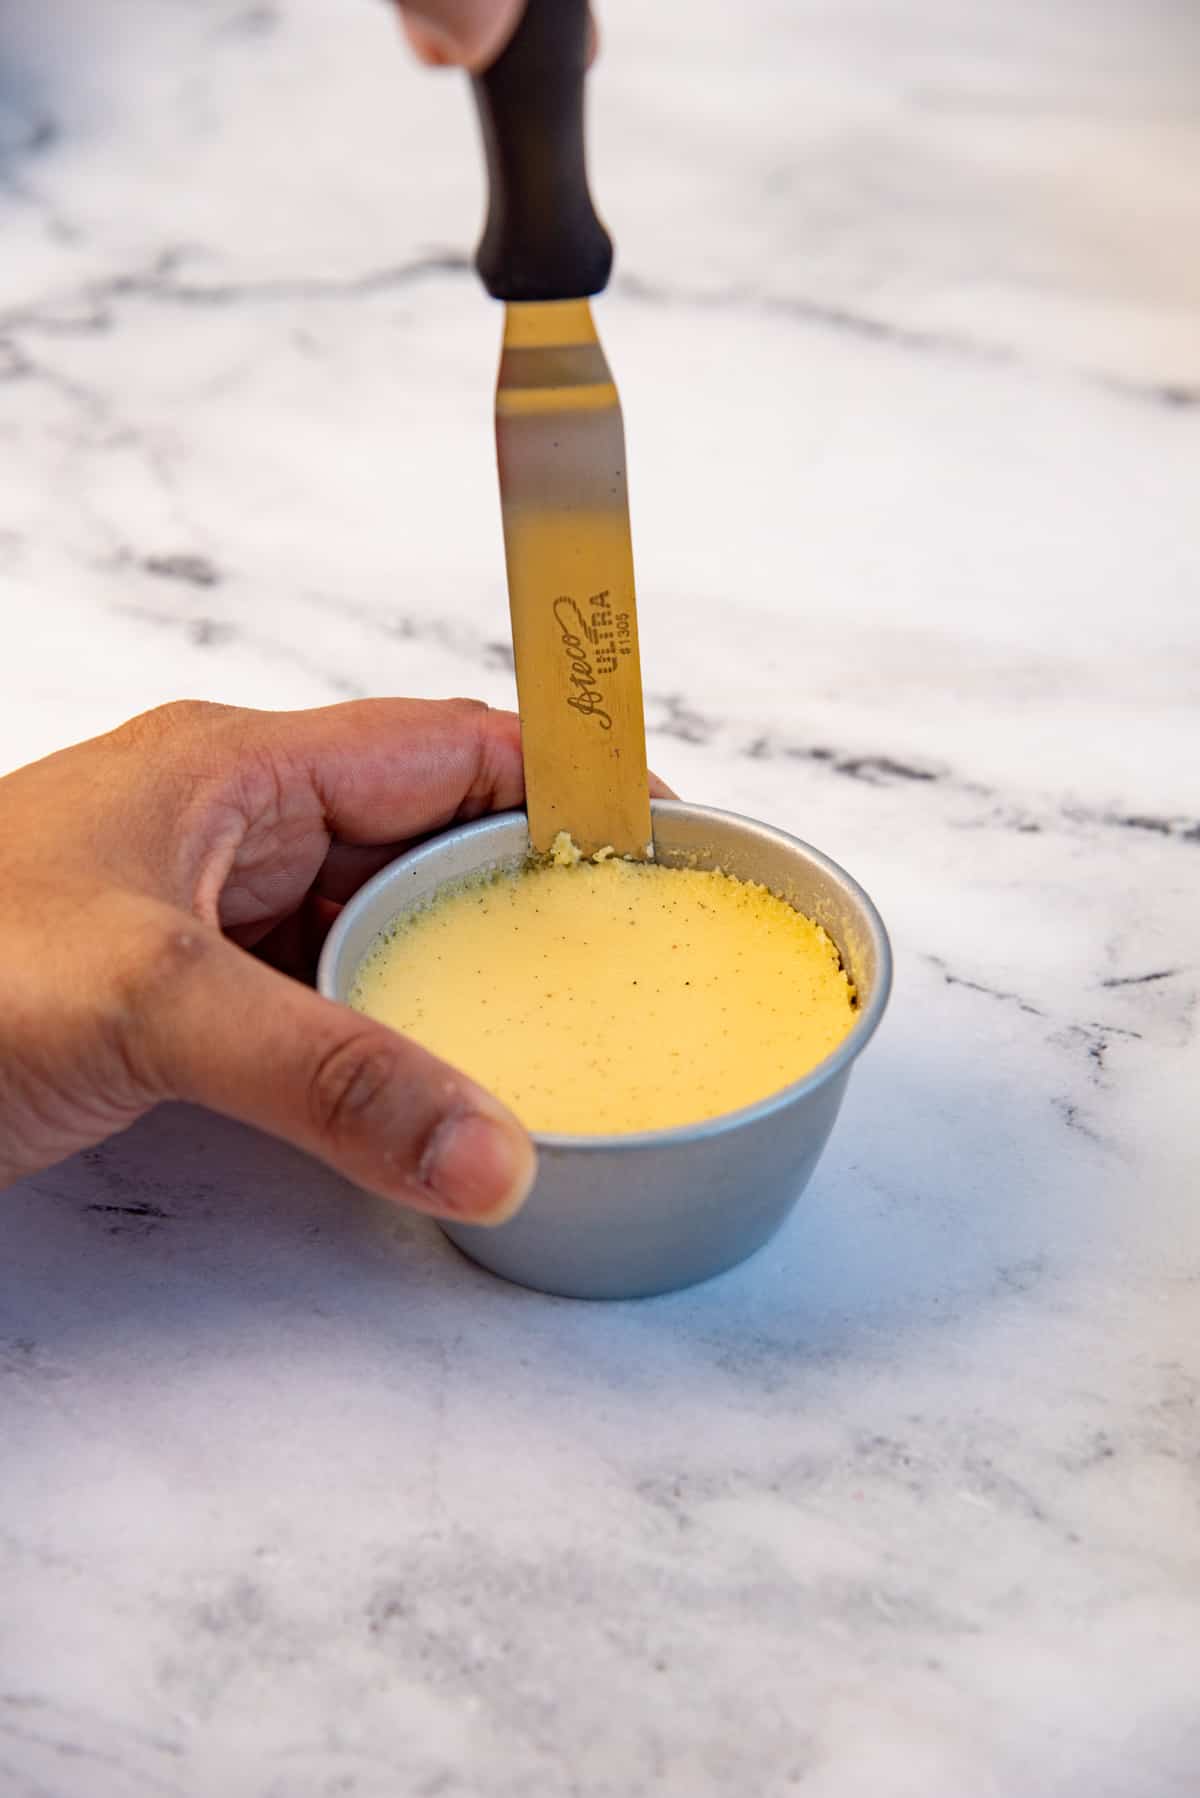
Before serving the creme caramel, it must be turned out onto a dish. To do this, release the edges of the custard in the baking dish.
You can use a thin blade, or clean fingers to slightly push down the edges to “break the seal”. Then warm up the dish by placing it in a bowl of really hot water for a few seconds. You can alternatively use a blow torch too.
Turn the dish over onto a small plate or your serving platter. Then while holding the serving dish AND the over-turned baking dish in your hands, firmly shake the two dishes together in a downward motion a few times. You will hear a “plop” sound when the custard releases.
Carefully remove the baking dish. The caramel-topped custard should be ready to serve now on your serving platter!
Recipe tips (and how to elevate the flavor)
- Make sure the caramel layer is smooth inside the baking dish. Since the caramel cools and hardens quickly, it’s very important that you don’t try to move the caramel around while its hardening. Bumps and uneven caramel layers will cause dips and cracks on top of the creme caramel.
- Use a few strips of lemon or orange peel in the milk. This will help eliminate any eggy smells even further and add a lovely flavor that isn’t overpowering at all.
- Let the caramel caramelize! Most of the time, the caramel is only cooked until it’s a golden brown. However, the creme caramel tastes better when the caramel is cooked until it’s amber in color. The slight bitterness from the caramel really makes the pudding taste even better.
- Cook in a water bath. This will help cook the custard more evenly and prevent overcooking.
- Let the creme caramel chill overnight. This will make the custard taste even better.
- If you’re afraid of the custard getting stuck to the dish, lightly butter the sides of the dish before adding the custard.
- Use heat (hot water or blow torch) to loosen up the caramel custard.
- For a richer, creamier texture and flavor, use half heavy cream and egg yolks. For a cleaner, more jello-like texture, use milk and whole eggs.
Variations
- Add instant coffee to the milk mixture to make coffee creme caramel! I love this variation because coffee and caramel pair so well together.
- Instead of just plain caramel, you can add thinly sliced caramelized apple to the bottom of the dishes. This will impart a lovely apple flavor to the creme caramel too (like this poached apple and cinnamon creme caramel).
- Instead of white sugar, you can use brown sugar. This version will have a rich molassy flavor thanks to the brown sugar.
- For a dairy free creme caramel, use coconut milk instead of regular milk. To make this even more flavorful, substitute the sugar with muscavado sugar, and add some cardamom to the custard too. This is the base for the very popular Sri Lankan custard dessert Watalappan.
- Add cinnamon for a Mexican flan version made with milk instead of condensed milk.
- Substitute the sugar with dulce de leche for even more flavor.
Serving suggestions
Creamy crème caramel covered in liquid caramel is such a perfect dessert, it does not need to be served with anything else, really!
However, regional variations may serve cream caramel differently.
- Whipped cream will be a lovely addition for creme caramel.
- In some South American regions, it is served with dulce de leche.
- In Cuba, creme caramel (or in this case, Flan) is served with ice cream (like a delicious vanilla ice cream).
- Creme caramel in some regions of France is made with a splash of apple brandy, and in the French region Brittany, it’s made with salted butter which adds a buttery, sweet, salty flavor!
- In Vietnam, creme caramel is added to an iced coffee drink, where coffee is poured over the creme caramel and served with ice.
- In South Asia, creme caramel is served with a cup of milk tea or black tea! In India, this would be masala chai.
Storage instructions
- This dessert can be made and stored in the fridge for about 4 – 5 days. Make sure to keep it covered with plastic wrap, or in an airtight container.
- If you have leftovers, then cover the dish with plastic wrap or place the leftover pudding in an airtight container.
- Freezing and thawing creme caramel may change the creamy texture of the pudding, so I don’t recommend doing this.
Recipe FAQs
Why are there air bubbles in my creme caramel?
These custards are baked in a water bath to help prevent overbaking. HOWEVER, if they do overbake, the liquid starts to create air bubbles which will cause “holes” in the custard. This excess heat causes the eggs to overcook and create a curdled texture as well.
However, some bubbles can occur on the outside of larger crème caramels, but the inside will still be silky, velvety, and smooth.
As long as there are no air bubbles or holes throughout the whole custard, you’re OK!
Can I reduce the sugar amount?
For the best flavor of creme caramel, I recommend using between 15 – 20 % sugar. In this recipe, we use 500 mL, and the amount of sugar for this custard base should be between 75 – 100 g.
If you reduce the sugar even less than 75g, you do so at your own risk! The sweetness level will likely be too low for a classic crème caramel, and too little sugar might interfere with the texture too. But you can absolutely try it and see if you prefer it that way!
Why does my creme caramel taste or smell eggy?
If the eggs are overcooked, this can lead to an eggy smell and flavor.
To prevent this from happening,
1 ) Do not overcook the custard. Check the internal temperature and make sure it doesn’t exceed 80 F.
2 ) Add good quality vanilla to the custard.
3 ) Add a large piece of lemon peel into the milk.
4 ) Make sure to use fresh eggs.
What can I do with leftover egg whites?
Egg whites can be frozen in the freezer for up to 2 months!
But you can also make an egg white omelet, OR mix in 1 whole egg with the egg whites and make a protein heavy omelet instead!
With egg whites, you can also make swiss meringue or Swiss meringue buttercream or pavlova and meringue cookies (kisses) as well.
However, this recipe also includes a version that you can make with whole eggs, so you do not have to worry about extra egg whites at all.
Recipe
Easy Crème Caramel Recipe
US based cup, teaspoon, tablespoon measurements. Weight measurements are recommended for accurate results whenever available.
Common Measurement ConversionsIngredients:
For the caramel
- 120 g white sugar ⅔ cup
- 3 tbsp water optional
- 2 tbsp corn syrup optional
For the custard
- 500 mL whole fat milk 2 cups, substitute 250 mL / 1 cup of milk with 250 mL / 1 cup of heavy cream (optional; see recipe notes)
- 2 pieces of lemon peel or orange peel
- 2 whole eggs
- 3 egg yolks see recipe notes below for how to use only whole eggs
- 2 tsp vanilla extract or vanilla bean paste (see recipe notes)
- 100 g white sugar ½ cup
- ¼ tsp sea salt
Instructions:
- For individual portions, wash and dry the baking dishes. If you’re using a larger dish to make one big pudding, wash and dry the dish as well. See recipe notes for the number of the portions you can make with this recipe. Here, I’m using 6 or 7, 4 oz baking cups.
- Preheat the oven to 350°F / 180°C.
- Prepare a large baking tray that you can use as a water bath. The ramekins / baking cups should be able to sit in the water bath with at least 1 inch space between them (they should not be touching). Place a kitchen towel at the bottom of the water bath tray. Set aside until you need it.
Making the caramel
- For this recipe, I make a dry caramel, as I find it easier to caramelize that way because the risk of recrystallization is lower. But you can also make a wet caramel as well.120 g white sugar
- See recipe notes for wet caramel instructions. Water and corn syrup will be added to the sugar. The corn syrup helps to prevent crystallization.3 tbsp water, 2 tbsp corn syrup
- Place the sugar in a stainless steel skillet. The sugar should form a fairly thin layer on the base of the skillet for quick and even melting. Make sure the skillet is clean and dry before you add the sugar.
- Place the skillet over medium heat. Make sure not to leave the sugar unattended while you make the caramel.
- The sugar that is in contact with the bottom of the skillet will start to melt first. Use a silicone spatula to push the melted sugar aside, and gently shake the pan to evenly melt the rest of the sugar.
- As the sugar melts and is stirred, the caramel will turn a light yellow color and will form lumps of undissolved sugar.
- Remove the pan from the heat and stir the mixture and break up the lumps, until most of the sugar is dissolved.
- Return the caramel to the stove and cook the caramel while frequently stirring. The caramel will turn dark yellow and then a golden color. Finally, it will turn an amber color.
- As soon as the caramel turns amber in color, remove the pan from the heat and switch off the stove.
- VERY CAREFULLY pour the caramel into the ramekins (metal or porcelain). Only add enough caramel to coat the bottom of the baking dishes / cups. At most, 5 mm thick (just eyeball it). Make sure the caramel layer is smooth and doesn’t have any thick streaks.
- Set aside until the custard base is ready.
Custard
Infuse the milk
- The first step of making the custard is to infuse the milk (if needed). If using fresh vanilla beans, or adding the lemon peel, this step is necessary.500 mL whole fat milk
- Place the milk (and cream, if using) in a saucepan.
- Cut the vanilla bean in half and scrape off the caviar. Place the caviar and the vanilla bean in the milk mixture. Also add the lemon peel in the milk, if using.2 pieces of lemon peel or orange peel, 2 tsp vanilla extract
- Heat the milk over medium heat, while stirring occasionally. Heat until the milk is steaming, or is at a light simmer.
- As soon as the milk is heated, remove it from the stove and let the milk infuse for at least 30 minutes.
- When the milk temperature comes down to about 160°F / 71°C or lower, it's ready to be used.
- This step can be done first, and the caramel can be made while the milk is infusing as well.
Making the custard base
- If the milk does not need to be infused, heat the milk until it’s just starting to steam over medium heat. This will be about 150°F / 65°C.
- Remove the milk from the heat and set aside.
- In a large jug or bowl, place the eggs and egg yolks, vanilla extract (if you’re not using vanilla beans), salt, and sugar.2 whole eggs, 3 egg yolks, 2 tsp vanilla extract, 100 g white sugar, ¼ tsp sea salt
- Whisk until the eggs are mixed very well and the mix is slightly frothy. There should be no egg lumps in the mixture.
- Temper the eggs with the warm milk mixture (infused or not infused). This is done by streaming the hot milk very slowly into the egg mixture while constantly whisking the egg mixture. If the warm milk is added too fast or not mixed well, it could scramble the eggs – so add the milk slowly, a little at a time.
- Once the egg mixture has warmed up to almost the same temperature as the milk, the eggs have been tempered.
- Add the tempered egg mix into the remaining milk in the saucepan, and whisk to combine. Now you have the custard base.
- Strain the custard base using a sieve, into a jug. This will remove any lumps, and vanilla beans and lemon peel. The jug will make it easier to pour the custard into the baking dishes.
Baking the crème caramels
- Carefully pour the warm custard into the baking ramekins with the caramel layer at the bottom.
- Place the baking dishes in the water bath tray, on top of the kitchen towel. This will prevent any slipping. Have a piece of aluminum foil ready to cover the baking dishes as well.
- Place the water bath baking tray with the creme caramel ramekin / ramekins inside the preheated oven. Carefully pour very hot water into the water bath tray, so that the water comes about halfway up the ramekins.
- Cover with foil, and poke holes in the foil for the steam to escape.
- Bake the creme caramels until the custard is set. This will take about 30 minutes for 4 oz portions, and up to 60 minutes for larger portions. Check the dishes after 20 minutes, and every 5 – 10 minutes afterwards.
- The custard should set, but look wobbly in the middle. The best way to tell when the custard is done is to check the internal temperature of the custards. When the internal temperature registers at 175 – 176°F / 79 – 80°C, the custard is perfectly cooked.
- Remove the baking tray from the oven and carefully remove the ramekins from the water bath and let them cool to room temperature.
- Then transfer the ramekins to the fridge and let them chill overnight, or for at least 6 hours until they are completely chilled.
Serving
- Release the edges of the custard in the ramekins by using a thin blade to run it along the edge of the custard. Or you can use clean fingers to gently push the custard to release it from the sides of the ramekin.
- Then place the ramekins in very hot water (hot tap water is fine), for a few seconds to loosen the creme caramel. Alternatively, you can use a kitchen blow torch on the outside of the ramekins.
- Finally, place the serving plate over the ramekin and flip them both over, while holding them together.
- Firmly shake the ramekin a few times (NOT back and forth, just a sudden sharp shake downwards should do the trick), to help release the creme caramel from the ramekin. You will hear a plop sound when the custard is released.
- Serve immediately as is. You can also serve it with a dollop of whipped cream.
Recipe Notes
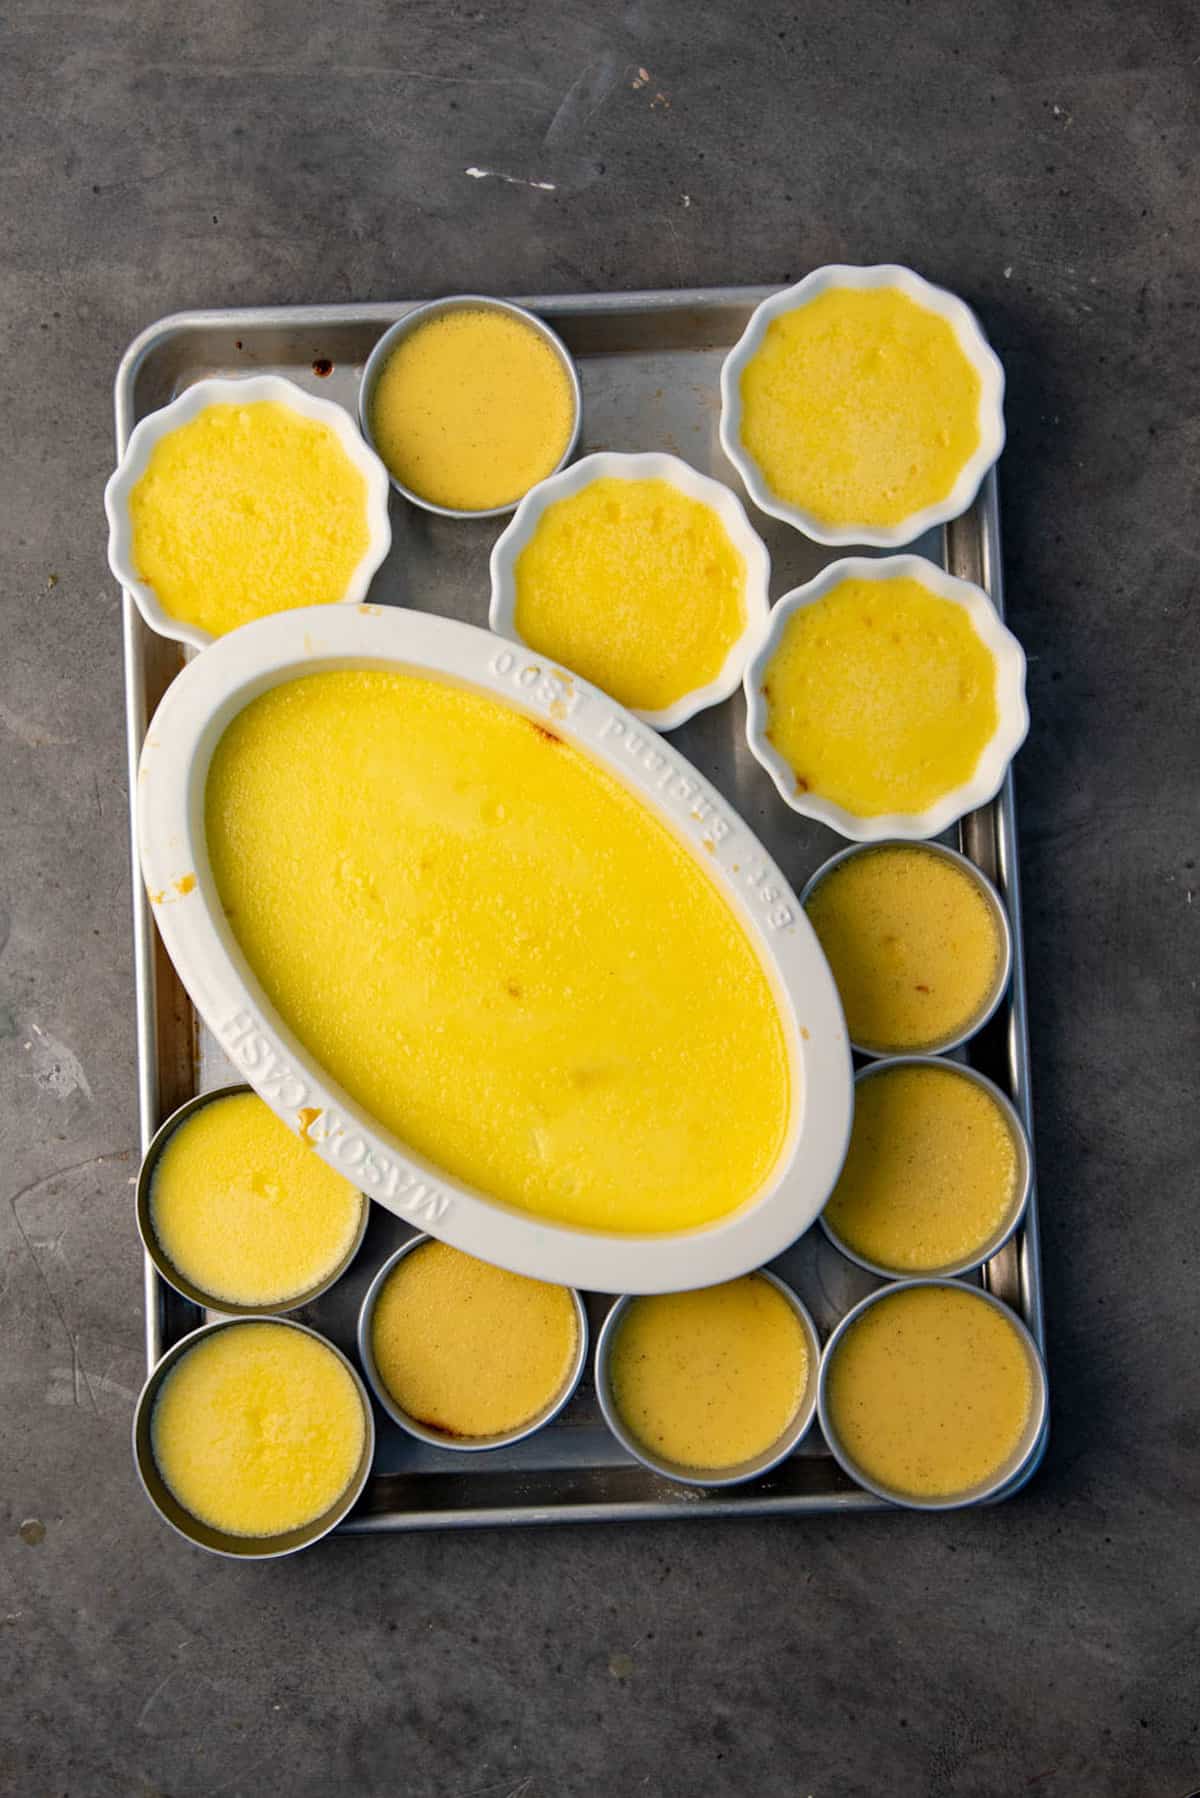
Crème caramel portion sizes
I have made this recipe in 4 fl oz cups, 6 fl oz cups, and in 8 x 4 inch loaf pans for a larger pudding. The baking times will vary depending on the material of the baking dish and the starting temperature of the custard. If the custard base is warm to start with, then these are the approximate baking times.- 4 oz metal ramekins = 25 – 30 minutes
- 6 oz metal ramekins = 30 – 35 minutes
- 6 oz porcelain ramekins = 30 – 37 minutes (depends on the shape of the ramekin).
- Loaf pan (roughly 35 square in area size) = 50 – 60 minutes. The custard layer is about 1.5 in thick. The thinner the custard layer, the faster it will bake in the oven.
How to make the creme caramel taste richer and creamier
Substitute half of the milk with heavy cream, or use 10 % fat cream (table cream or half and half).How to use whole eggs to make creme caramel (instead of egg yolks)
Instead of 2 eggs and 3 egg yolks, use 4 or 5 whole eggs. For every cup of dairy, use 2 – 2.5 eggs. By weight, For every 500 mL or grams of dairy, use 190 – 220 g whole eggs.To make wet caramel instead of dry caramel
- Place the sugar, water, and corn syrup in the pot. Make sure the pot has a lid that fits as well. Gently stir the ingredients to fully saturate the sugar with the water.
- Place the pot over medium heat and heat until the water comes to a boil and the sugar dissolves. DO NOT stir the water-sugar mixture. Instead, swirl the pot gently to help dissolve the sugar as the water heats up.
- When the sugar syrup comes to a boil, place the lid on the pot. Lower the heat a little and let it simmer for about 2 minutes. The goal of this step is to use the water condensation to wash the sugar crystals on the side of the pot back into the sugar mixture.
- You can also use a clean pastry brush that is dipped in cold water to brush the sides of the pot, to re-dissolve the sugar crystals into the sugar syrup.
- Once the sugar crystals on the side of the pot have been re-dissolved, allow the sugar syrup to continue to cook until it turns into caramel.
- Swirl the pot to evenly heat and cook the sugar syrup. The sugar syrup will be clear at first, and then the bubbles will become larger, and the syrup will start to turn light yellow in color.
- Continue to cook until the caramel turns an amber color. Remember to swirl the pot to evenly caramelize the sugar syrup.
- Pour the caramel into the baking dishes as per the recipe.
Storage
Once the crème caramels are baked, they can be left in the fridge for up to 4 – 5 days. But they are best eaten the day after they are baked. Leftovers can also be stored for about 3 days (provided it was baked only up to 2 days prior). Keep the pudding in an airtight container, and avoid prolonged temperature fluctuations.Nutrition Information:
“This website provides approximate nutrition information for convenience and as a courtesy only. Nutrition data is gathered primarily from the USDA Food Composition Database, whenever available, or otherwise other online calculators.”


Leave a Reply