


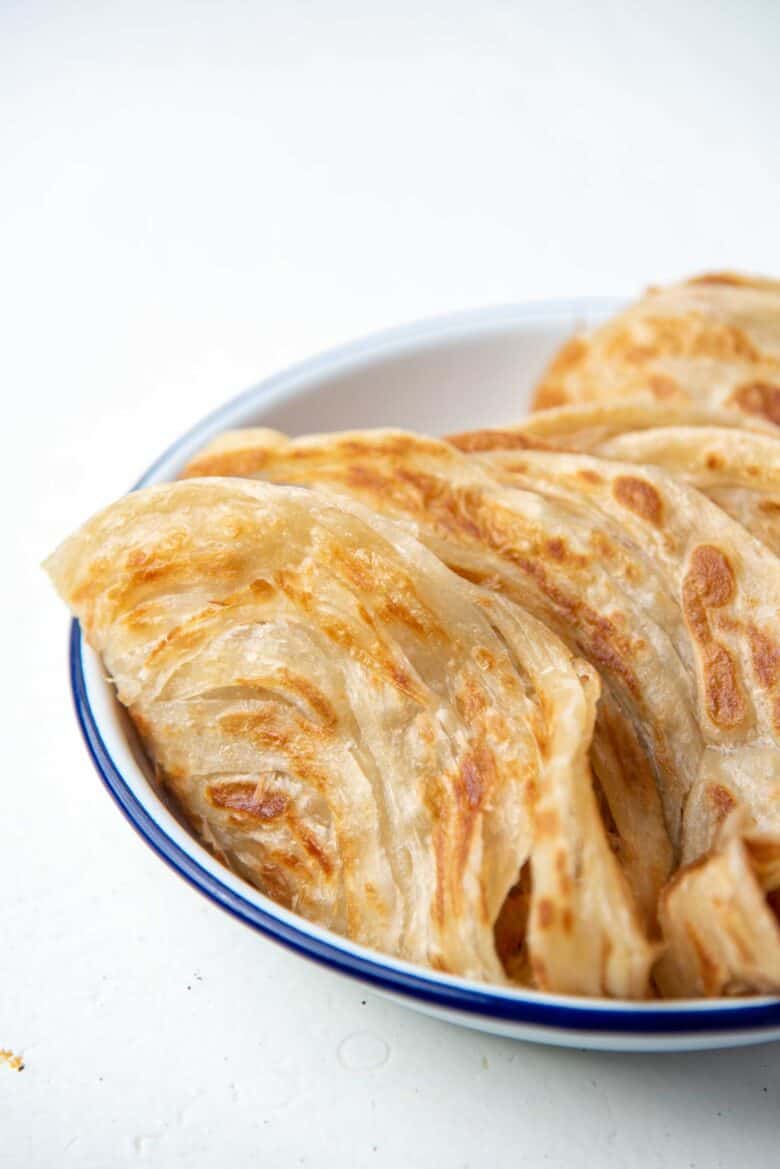
Roti Canai (Roti Paratha) that is guaranteed to give you layers and layers of flaky deliciousness! An easy to follow, foolproof recipe. Soft and flaky roti with a side of curry is my kind of comfort meal! 🙂
Step by step recipe to make Authentic Roti Canai, that guarantees perfectly flaky, delicious results, every single time!

I was in grade school when I first learned to make this flaky roti. It’s a recipe that was passed from generation to generation for so many years before me, and I’ve been making this for almost 30 years!
In Sri Lanka, it’s usually called roti paratha when it has flaky layers, and the more traditional Sri Lankan version of this particular roti known as godhamabara roti, is made without any flaky layers. I make this roti whenever I make vegetable roti for my family. You can check out my beef version right here.
I’ve made so many different variations of this roti canai over the years as well. So much so that it’s become muscle memory now, and I had to make it a couple of times specifically to measure the ingredients so that I can share it with you, my dear reader! 🙂
Roti Canai vs Roti Paratha vs Godhambara Roti
All these types of roti use the same dough.
Roti Canai (roti cha-nai) is known by various names in different parts of the world. It first originated in India as Roti Paratha. A simple dough, rolled out paper thin, and then rolled or folded to create multiple flaky layers. The different names come mainly from the method in which the roti is made, and the geographical location that it hails from.
In India, as already mentioned, this roti is known as Roti Paratha (or Roti Prata) – the OG version! The dough is stretched until paper thin, and then rolled (or folded), and coiled to create layers. Roti Paratha can be used to make kathi rolls, which are ridiculously delicious, and they are one of my favorite ways to enjoy paratha.
In Malaysia and Singapore, this is known as Roti Canai. The dough is rolled out very thin and is then either rolled or folded to make the flaky layers.
In South Asia, the roti is stretched by flinging the dough while holding on to one end, and then slapping it on a surface. Along with submerging the dough in oil, this results it very large roti!
In Sri Lanka, it’s known as Godhambara Roti (or Godhamba Roti). Or Lensu Roti. Lensu translates to handkerchief, because the roti is shaped like a large handkerchief! The dough in this case is usually not folded (unless filled), and is cooked as a large roti.
When I first learned how to make Godhambara roti, I’d submerge the dough balls in oil overnight.
Why I don’t submerge dough in oil anymore.
- I don’t want to waste that much oil for a small batch of roti!
- The oil makes the godhambara roti very pliable and soft, which is important and helps make very large roti. But it’s hard to make large roti at home. So I always default to paratha or roti canai. These do not need to be stretched as large as godhambara, so do not need to be submerged in oil.
- It makes my kitchen countertop super oily and messy.
But for godhambara roti, the dough is cooked in one layer, or it can be filled with an egg or a savory filling and then folded over – like vegetable roti or fish roti or beef roti.
Another variation of this roti is the scallion pancake that you can find in some parts of China.
So with this same dough recipe that I’m sharing with you guys today, you can make ANY of these variations! And I’ll show you how to do that too!

What you need to make roti canai
Making roti canai is super easy.
All you need is,
- All purpose flour – you do not need to use a flour with higher protein content, but you’re welcome to use a high protein flour / bread flour if you like. I’ve always used standard wheat flour, and always have great results with proper resting.
- Salt
- Hot water – helps keep the dough soft.
- Room temperature water – you could also just use room temperature water, without the hot water mentioned above.
- Oil / Butter / Ghee – the amount of oil (or fat) will vary depending on the size of the roti. I like to make sure that I’ve got enough.
Some online roti recipes use eggs, and maybe a little condensed milk or sugar too. I prefer not to use these ingredients because they are not needed. These ingredients are not traditional, simply because the addition of eggs / condensed milk would make the roti more expensive. This is a roti that is meant to be enjoyed by anyone and everyone, so it’s made with simple ingredients.
That being said, adding condensed milk or sugar will obviously make the roti a little sweeter, and would be a good addition if you want to make a dessert.
How to make roti canai dough
You can make this dough by hand or with a mixer. Whichever is easier for you.
Making the dough by hand
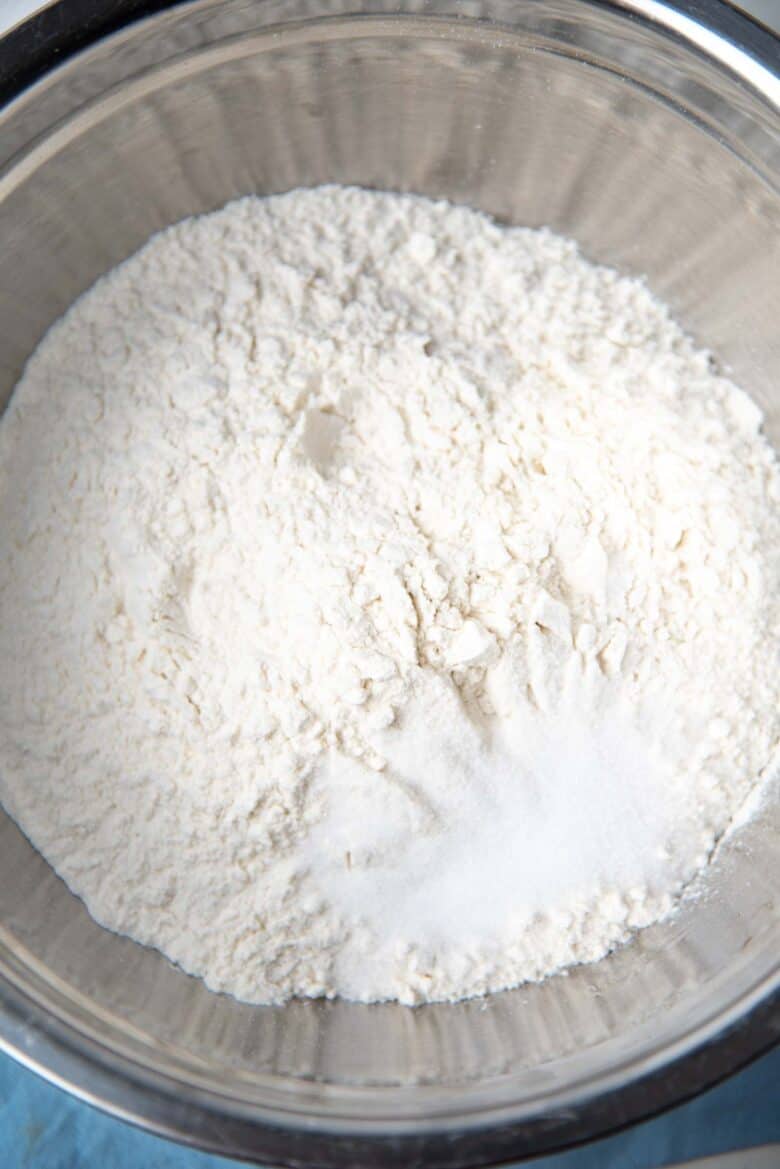
Place the flour in a large bowl (large enough to knead the dough). Mix in the salt.
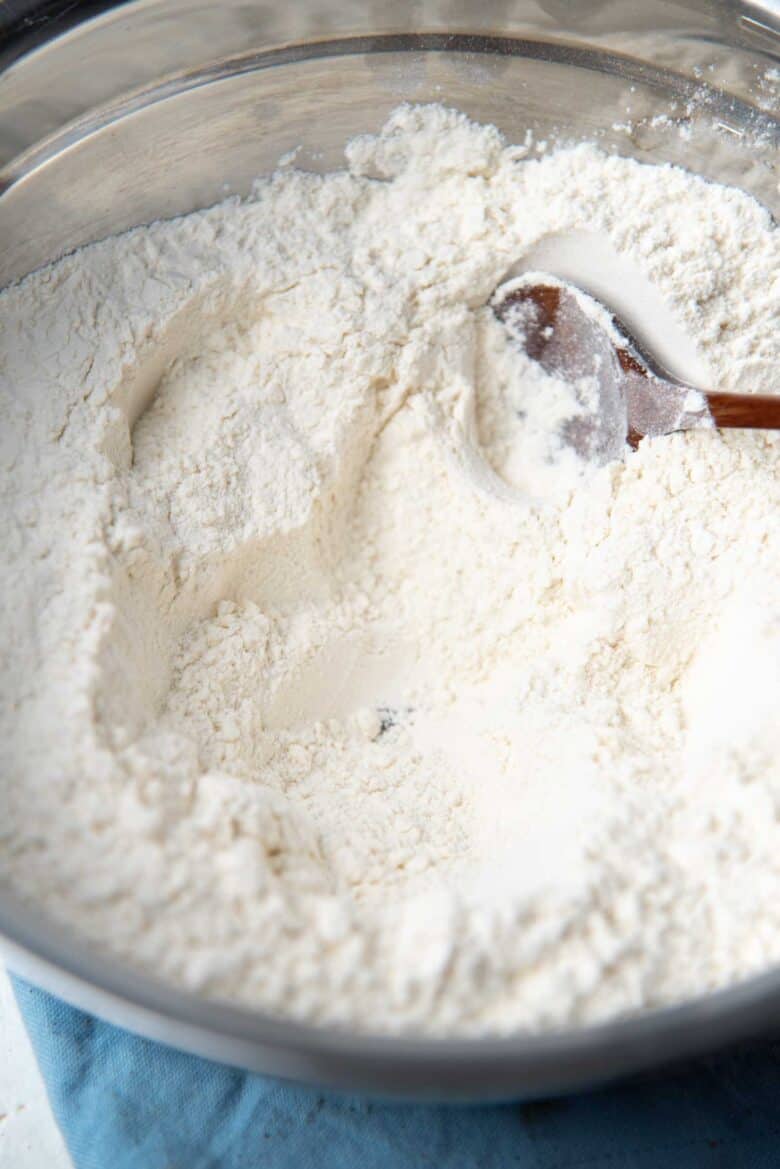
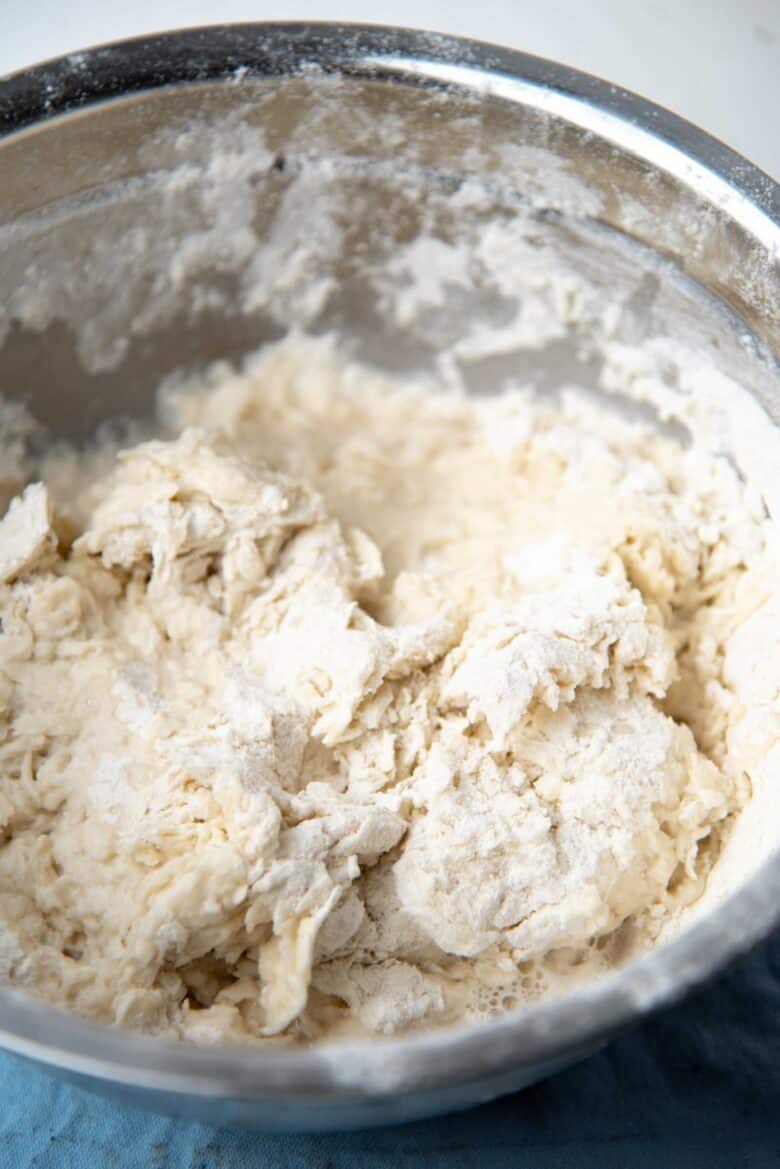
Add the hot water and stir it in using a spoon or fork. The hot water will form clumps in the dough. Use your fingers to stir and mix the dough.
Add the room temperature water into the dough while stirring / mixing. Add the water to form a dough that is slightly soft, and scraggly. Cover the bowl and let the dough rest for about 20 – 30 minutes. This will develop the gluten, and also soften the dough a little. If you like, you can skip the step of resting the dough, and just knead the dough until it’s smooth (about 5 – 7 minutes).
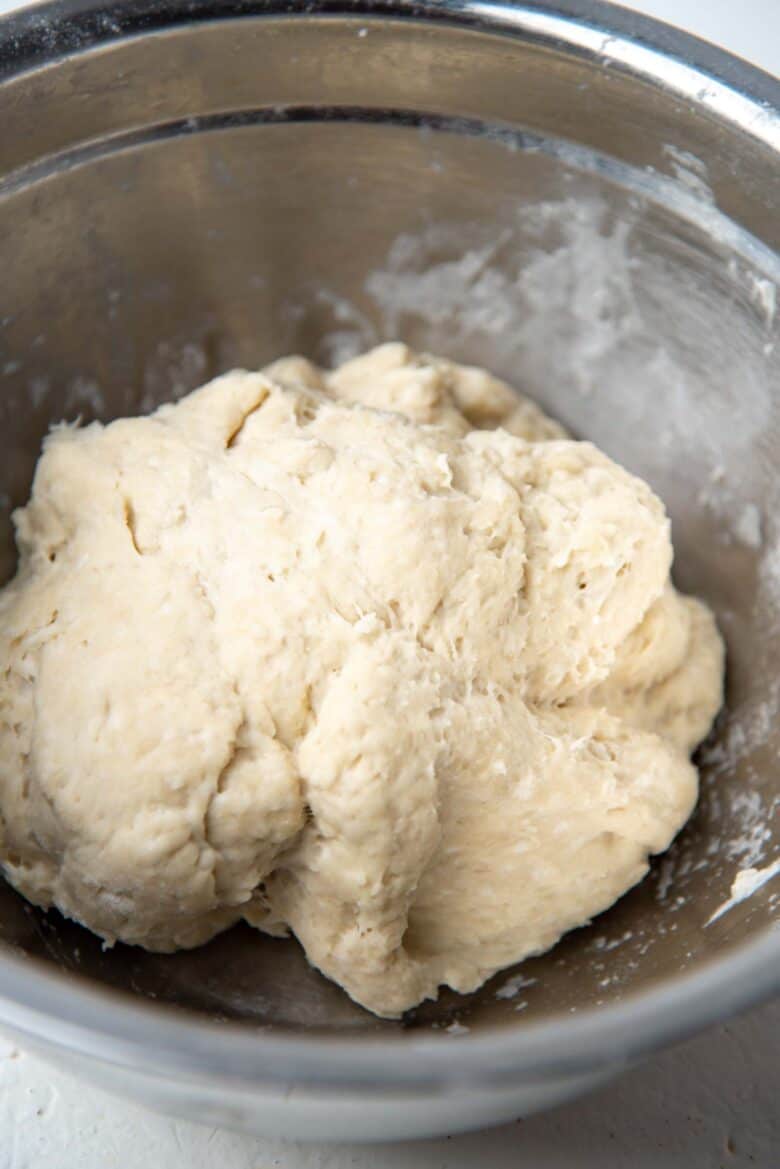
After resting the dough, knead the dough for about 1 – 2 minutes until your roti canai dough is nice and smooth.

Flour + salt Make a well in the flour Add the hot water and stir Form clumps in the dough Add room temperature water to form a dough A soft dough that is not sticky

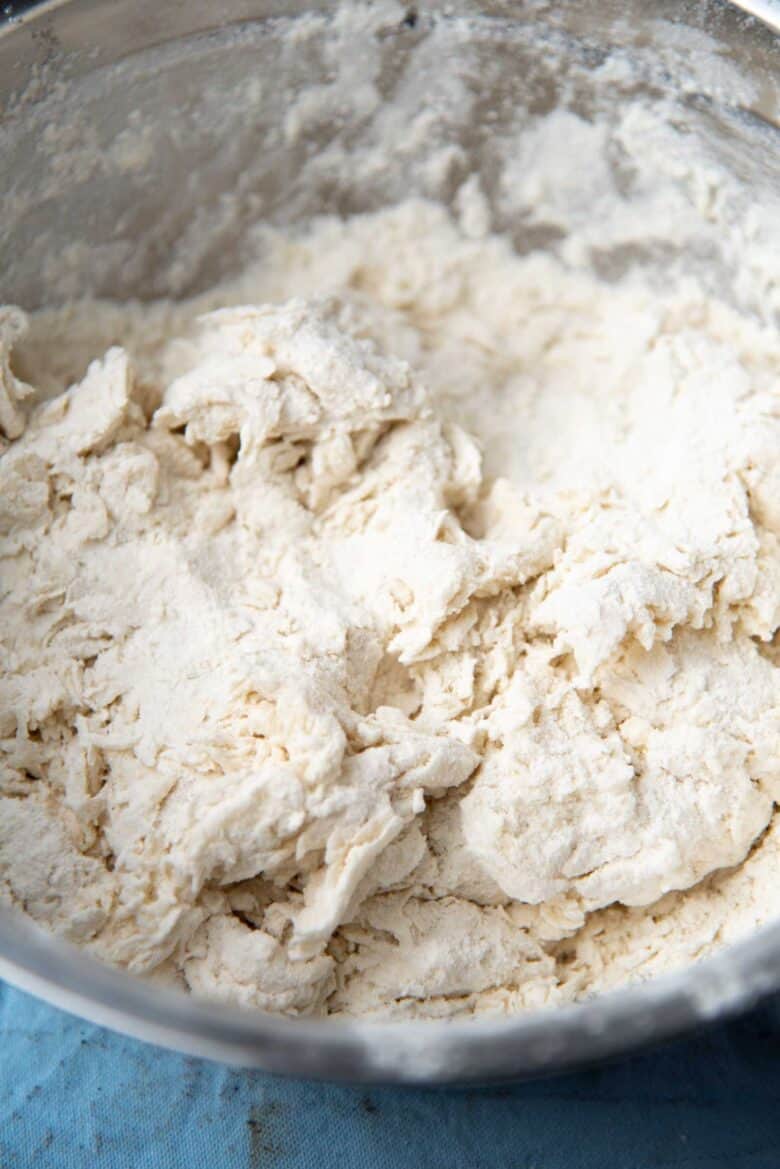
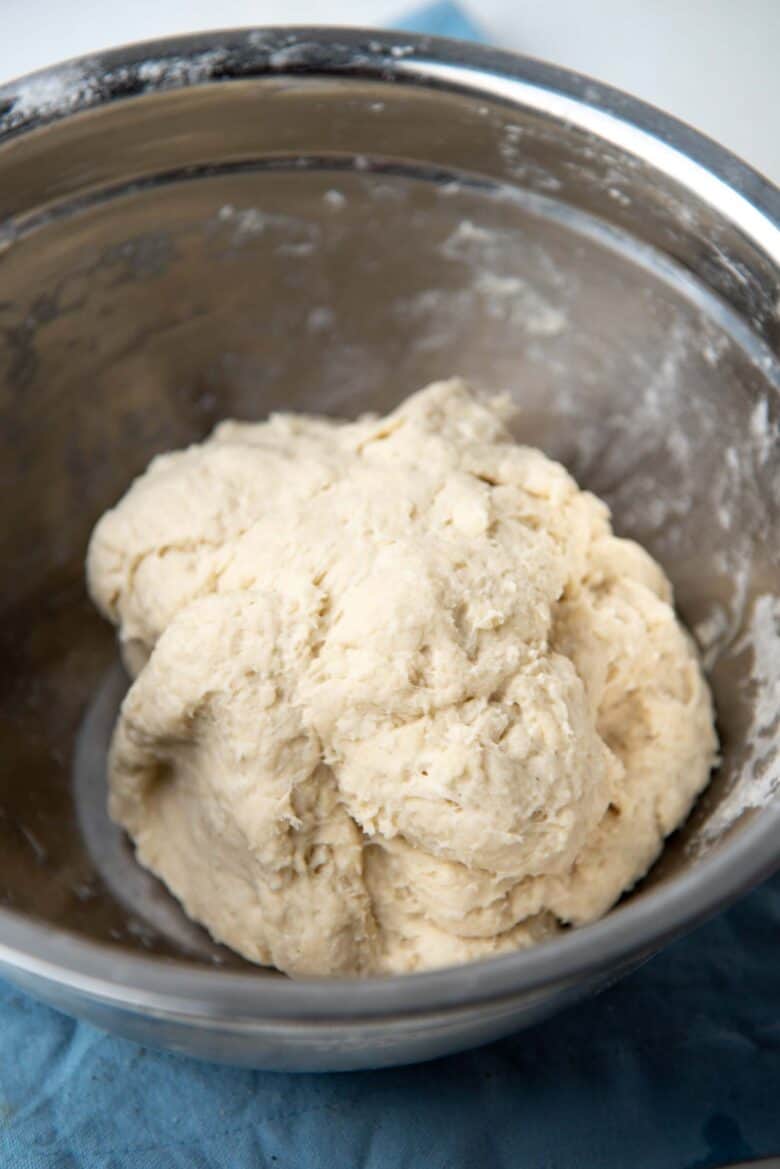
Before resting the dough After resting + kneading the dough
Making the dough with a stand mixer
Place the flour and salt in the mixer bowl. With a kneading hook, mix the dry ingredients, while adding the hot water. The hot water will form clumps in the dough.
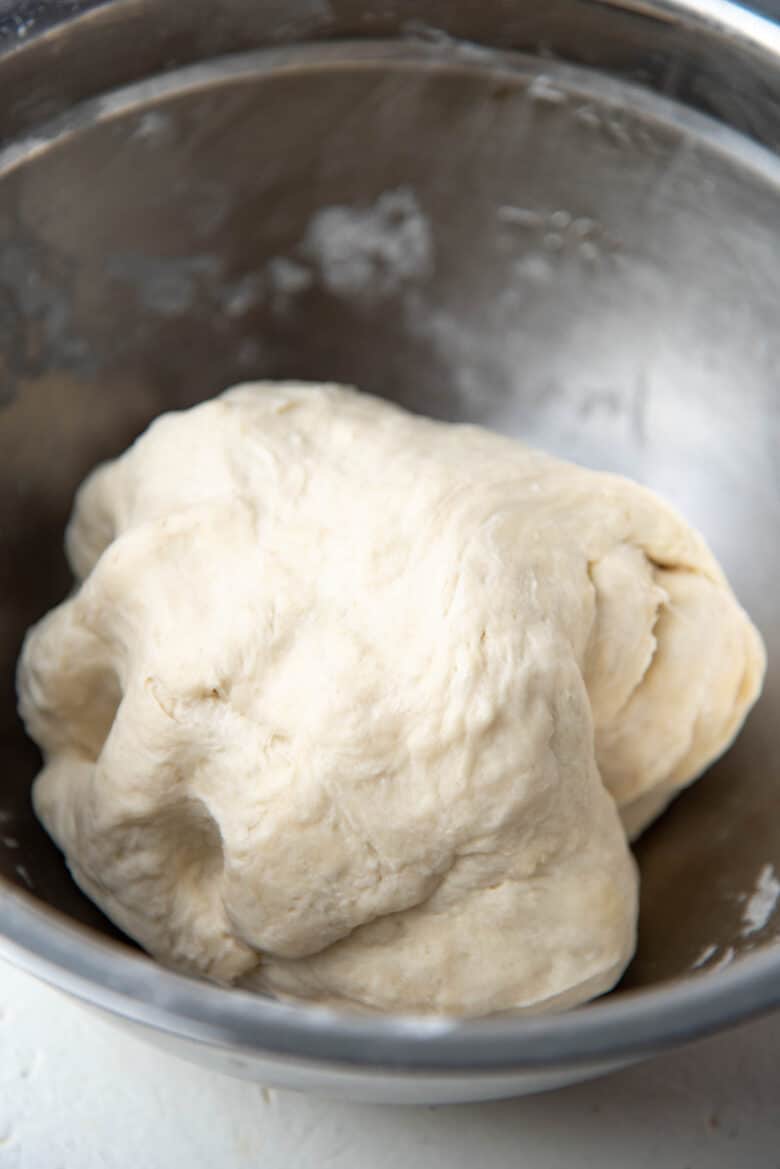
Now add the room temperature water to form a dough. This dough should be a little soft, but not sticky. You should be able to make an indentation in the dough with your fingertip without too much difficulty, and the dough shouldn’t stick to your hand either.
Knead the dough until smooth. This will take about 2 – 4 minutes, depending on the speed of your mixer. If the dough is too wet and sticky, add more flour. And if the dough is too dry, add just a little water to get the right consistency.
You don’t HAVE to use both hot water and room temperature water to make roti canai. You can make this dough with just room temperature water too. I find that the addition of hot water makes the dough a little more tender, which is what I personally prefer.
How to make roti canai
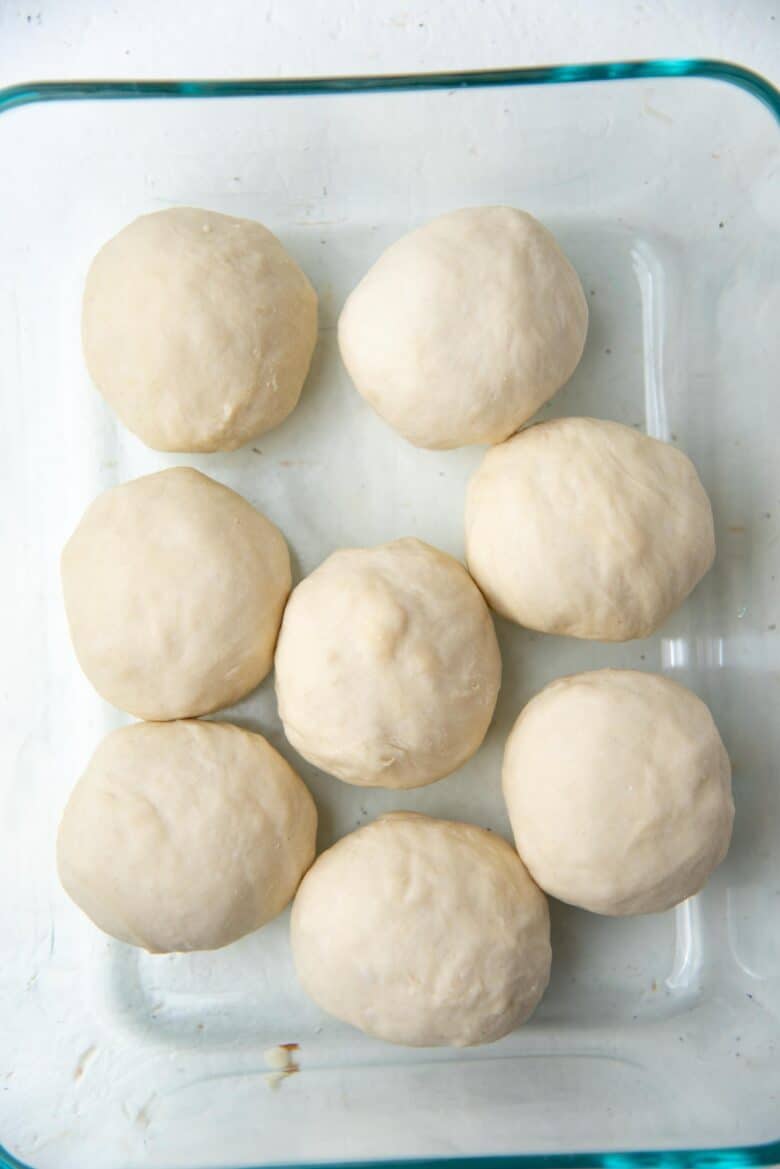
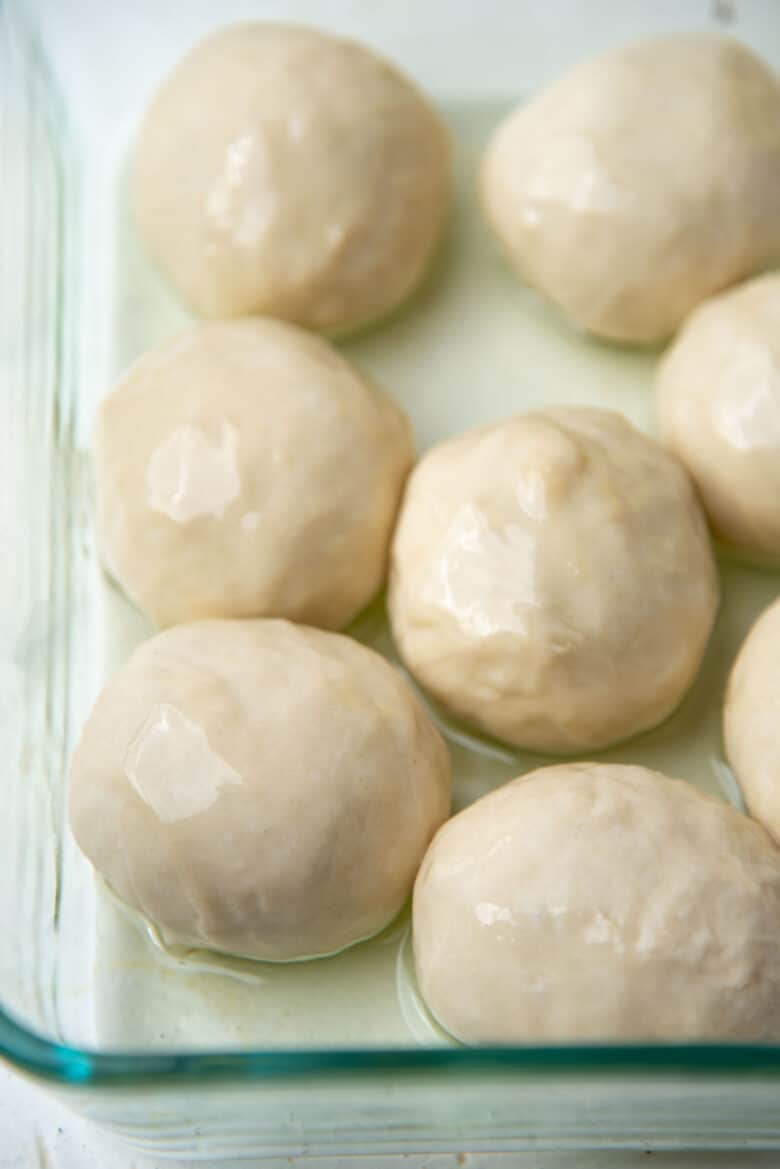
Divide the dough into 8 equal portions. Roll each portion into a smooth dough ball. Pour a little oil into a small bowl, and roll each dough ball in the oil to coat well. Make sure the dough balls aren’t touching each other if possible, to prevent them from sticking together. It IS okay even if they do stick each other, it’s just easier to handle if they don’t.
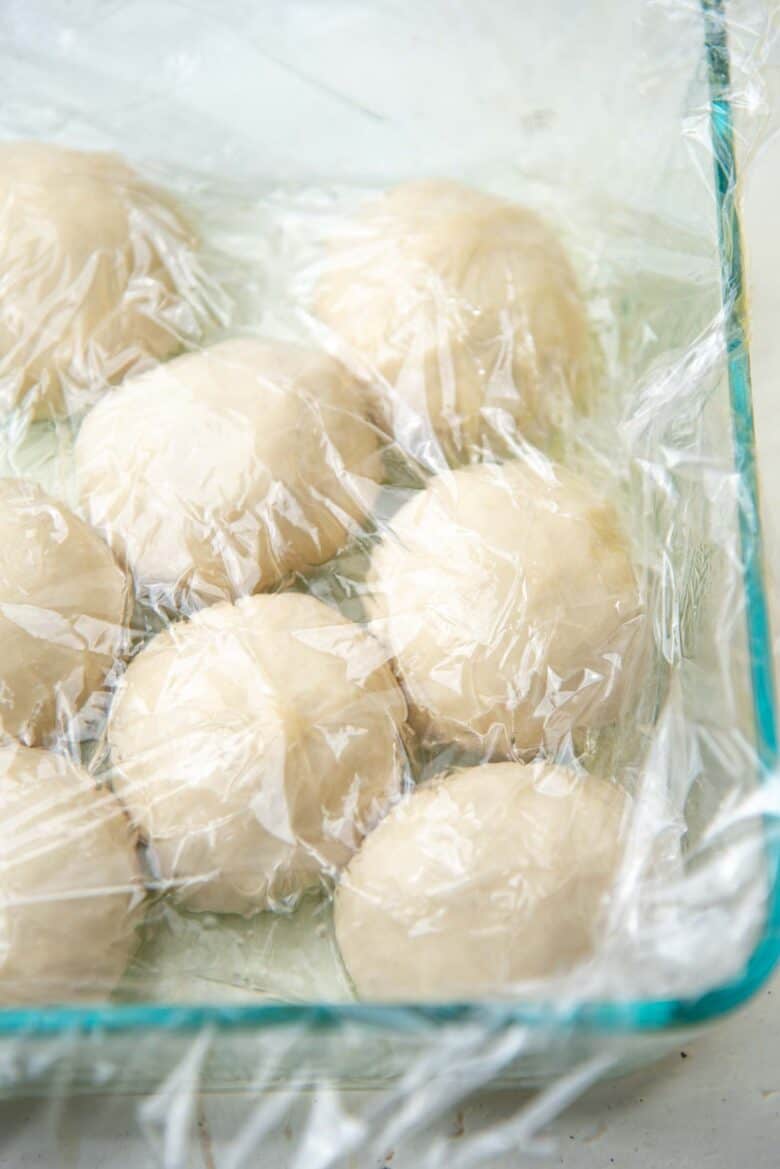
Place the oil coated dough balls on a plate. You can also add a very thin layer of oil onto the plate. Cover the plate with plastic wrap and let it rest for at least 1 hour. I usually make this about 8 – 10 hours ahead of time.
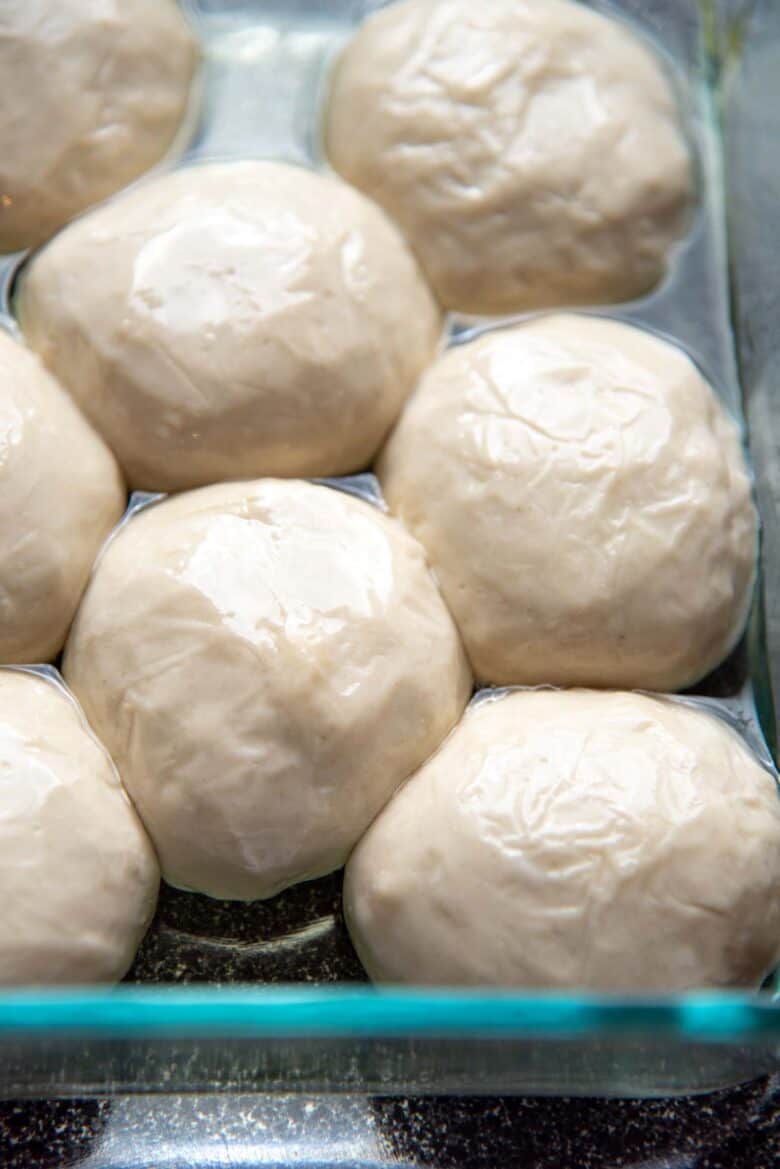
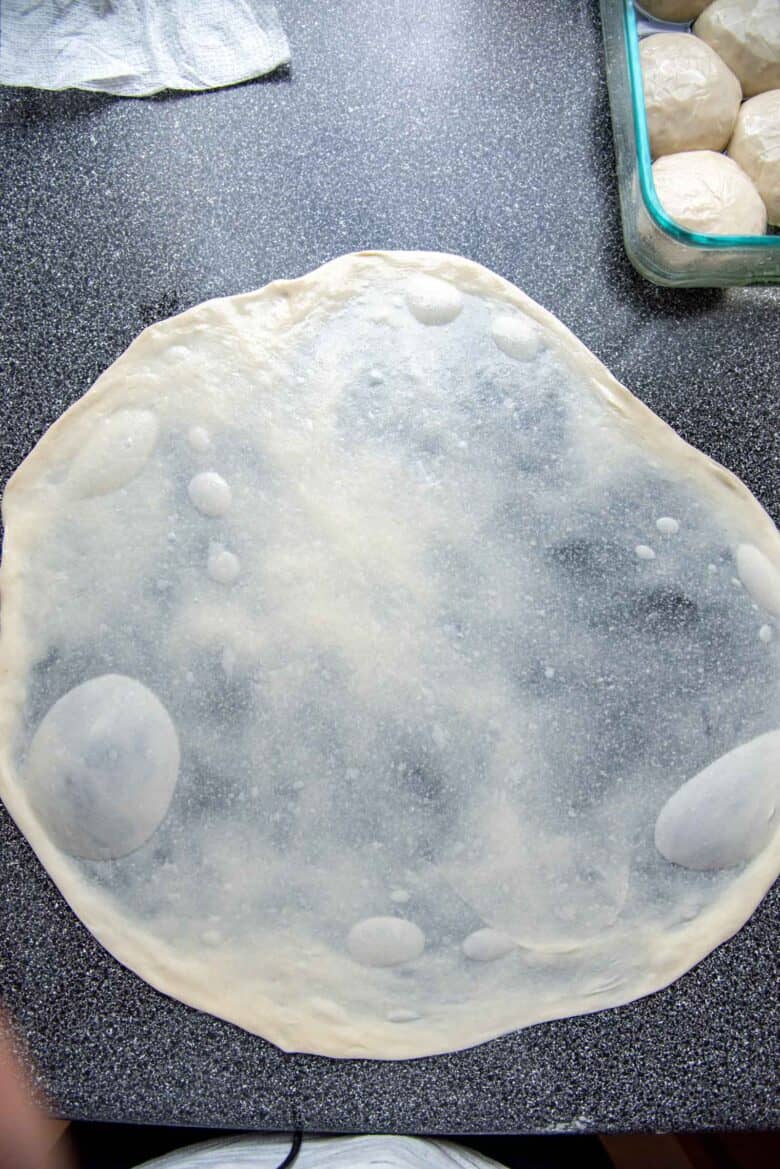
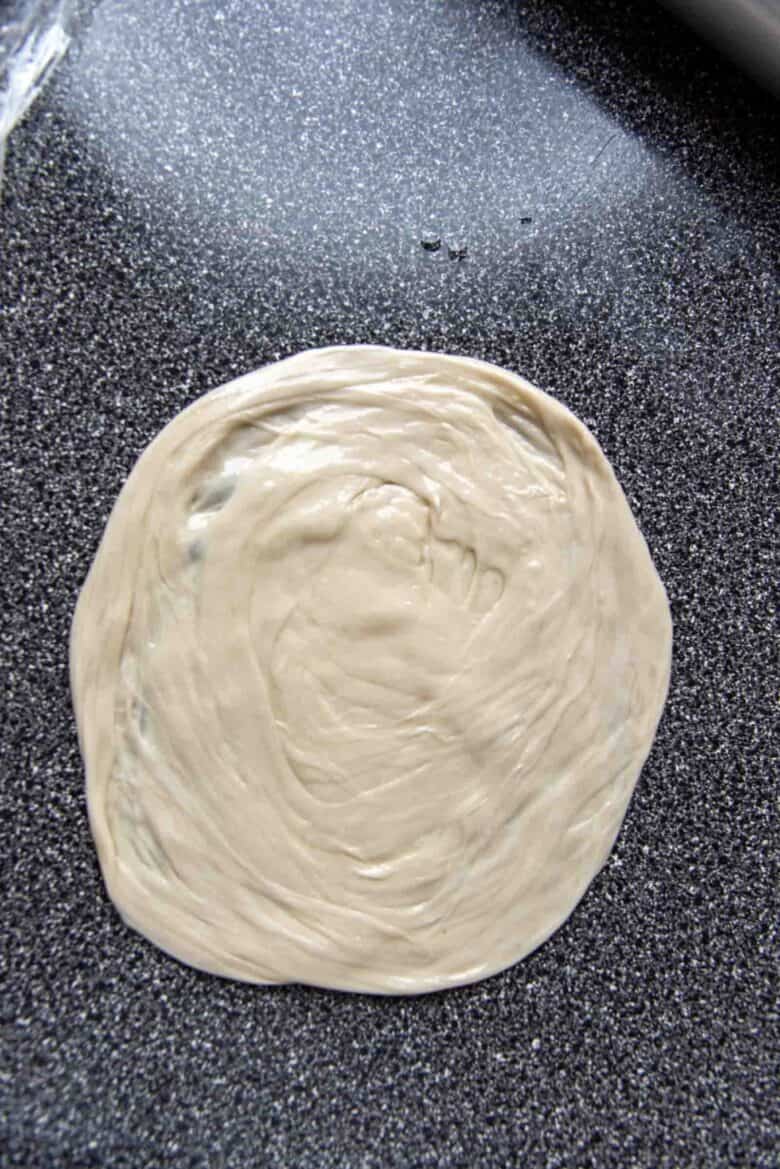
Once rested, place a ball of dough on a clean, smooth, flat surface. Apply a little bit of oil on your working surface. Use your palm to flatten out the dough ball. It should flatten out very easily. Then gently stretch the dough. I prefer to use my hands to do this, but you can also use a rolling pin.
I grab the edge of the dough and gently stretch it out, all the way around. The dough can be stretched out paper-thin without tearing (like with the window pane test). It can be a circle or square in shape.
Divided dough Coat generously with oil Cover and let them rest Rested dough
How to shape Godhambara Roti
Godhambara roti does not need to be rolled up to create layers. Instead, the dough is stretched out, and cooked very quickly on a flat cook top. The roti isn’t meant to be crisp, but is rather flexible and soft. The roti will have a thick edge, and a thin center, and is usually quite large.
You can also fold the roti (by folding the edges towards the middle to form a square or rectangle), and then cook it that way as well.
How to create layers
The flaky layers in the roti canai / roti paratha are created by a “laminating” process. It is easier than making croissants or puff pastry though. To create the flaky layers, it’s very important to add just a thin layer of fat on the surface of the stretched dough. You can use different types of fat for this step,
- The traditionally used fat in Sri Lanka is vegetable oil.
- In India, ghee is used instead.
- I also like to use butter sometimes.
- For scallion pancakes, an oil + flour paste is used.
For this recipe, you can use oil or ghee or softened butter. Whichever you prefer.
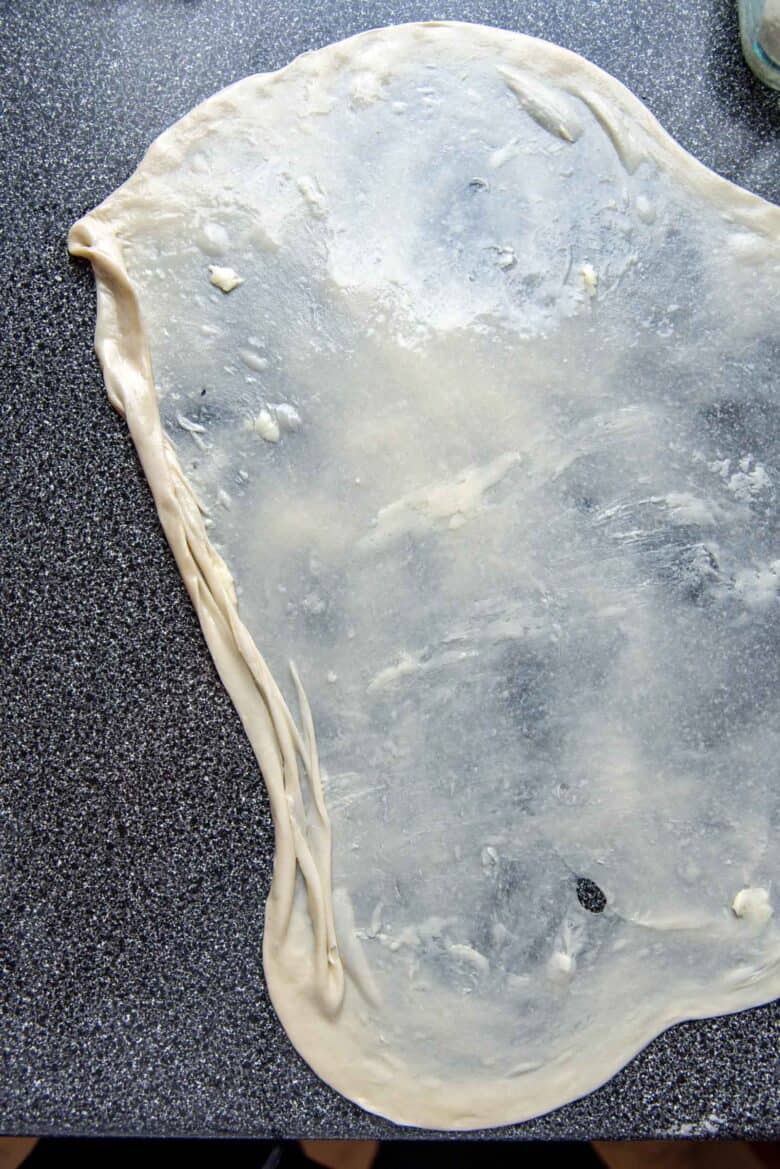
Spread a thin layer of the fat of your choice. Do not spread it thick, as this will make it harder to work with.
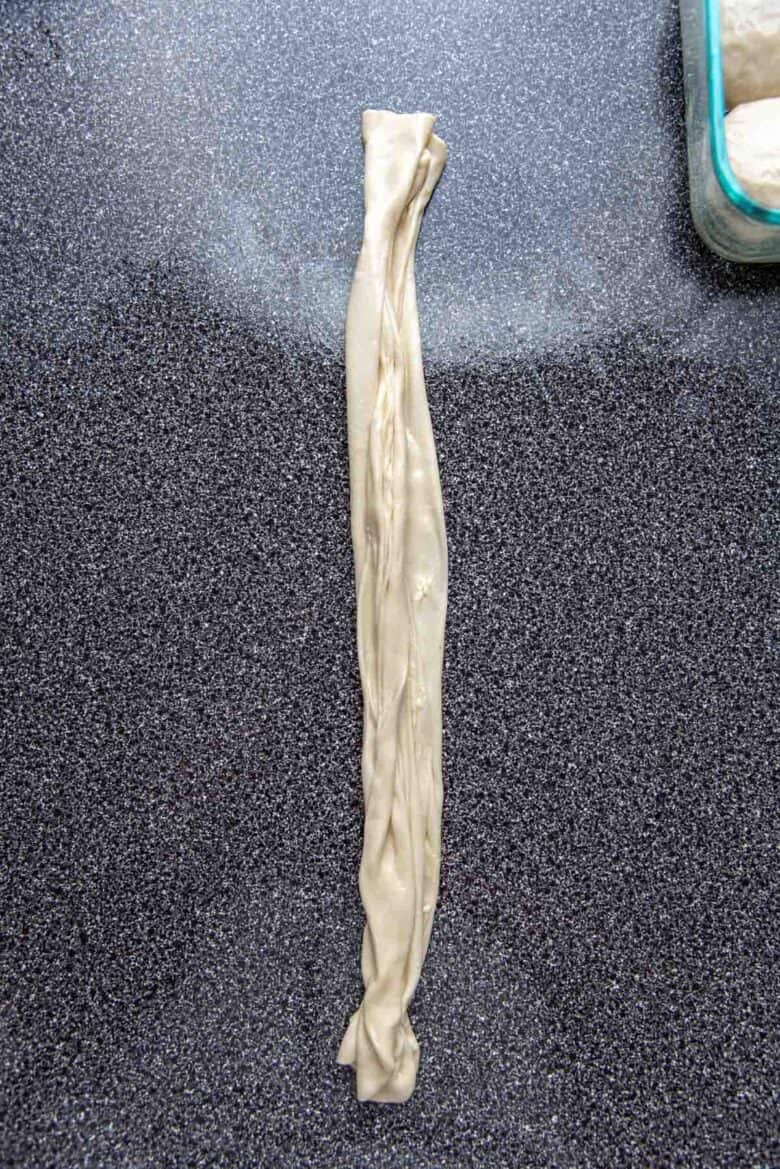
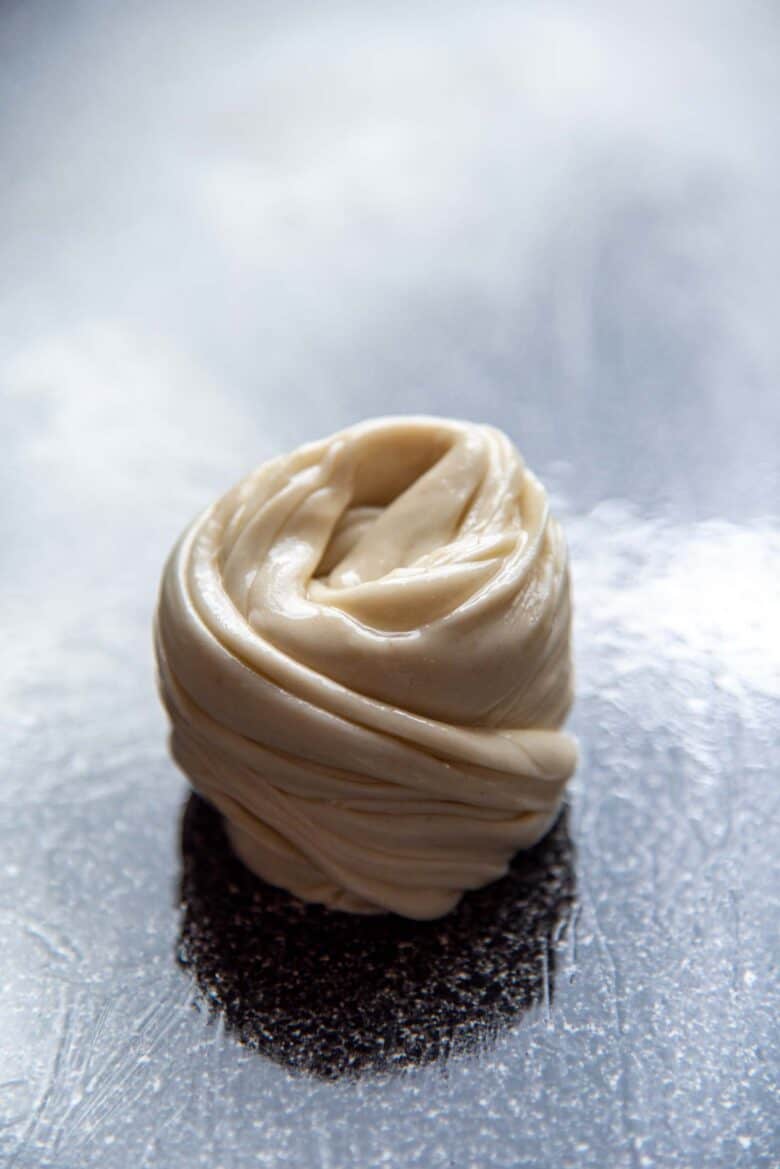
Roll up the roti to form a tube, and then roll up the tube into a fairly tight spiral. Make sure to tuck the ends under the spiral, so that it maintains its shape.
The other method to create flaky layers is to lay the stretched out roti on your work surface, and then fold the roti in a way that creates 0.5 – 1 inch folds (see panel of photos below). Then you can create a spiral as described above.
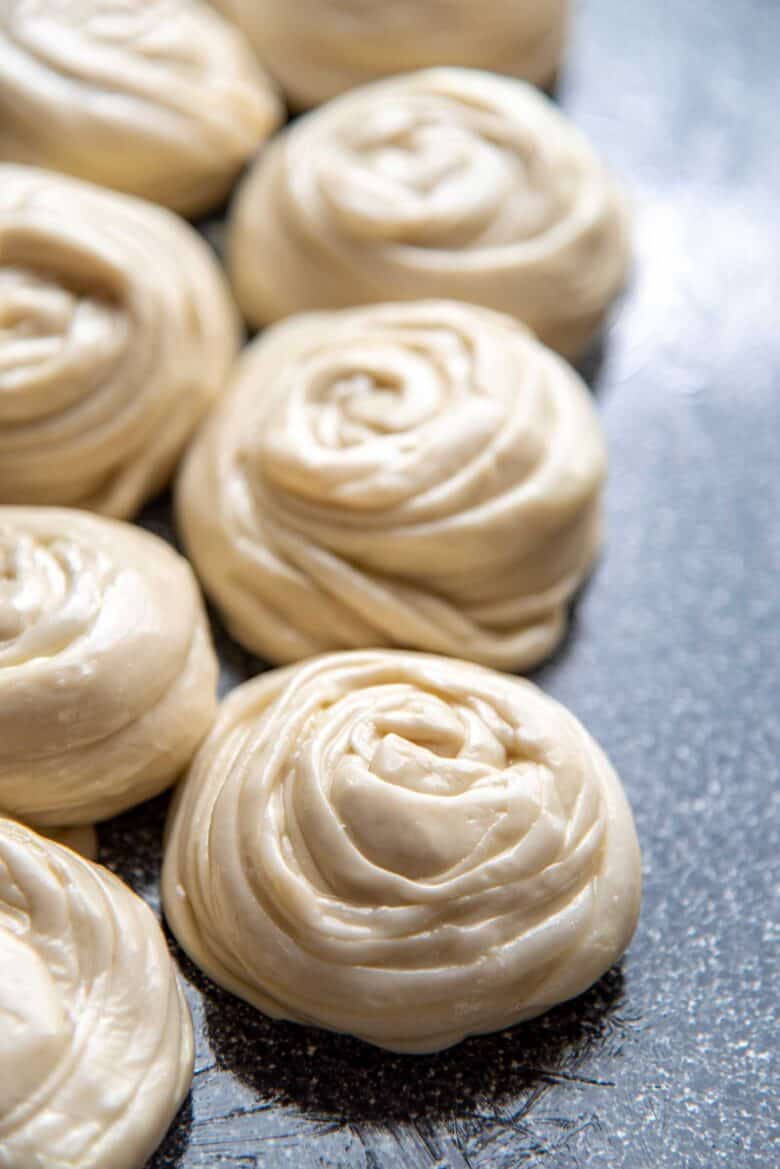
Repeat with all the dough balls, and then place them on the same plate. Cover with plastic wrap, and let them rest for about 30 minutes.
Flatten the dough out into a circle Dough stretched out and brushed with oil Starting to fold the roti to form layers The roti after folding Forming a coil shape with the roti
How to cook the roti
Heat a tawa, or non-stick pan, or crepe pan over medium / medium high heat. While the pan is heating, flatten out the roti.
Take each portion of the dough and place it on a smooth work surface. Press it down with the palm of your hand and flatten it out to about a 6 – 7 inch roti. You can also use a rolling pin, but it might be a bit slippery on the dough. I have more control using my palms.
Add just a little bit of oil into the pan before cooking the roti. You can also cook the roti in a dry pan, but I prefer to lightly oil it for better taste and better texture.
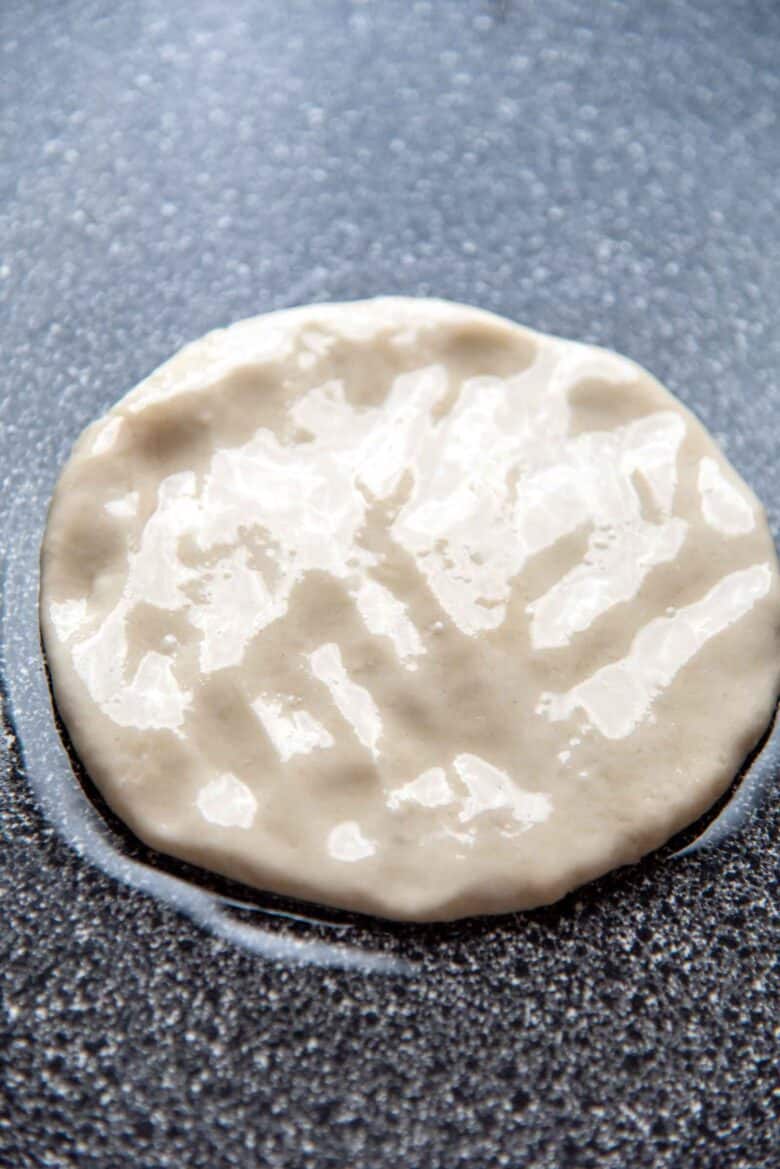
Cook the dough in the preheated pan, until it turns golden brown on each side, and the layers of the roti are cooked through. The cook time will change according to the heat of your stove, the pan that you’re using, and the thickness of the roti. But make sure the roti doesn’t cook too quickly either.
You should have a gorgeous crispy roti that is golden brown on both sides. Then take it off the heat, and place it on a cooling rack. Use your hands to squish the roti twice to separate the layers.
Serve the roti while warm, with any side dishes you like!

Serving Suggestions
As breakfast
Egg roti canai – Once you’ve cooked the roti, remove it from the heat. Break an egg into the pan, and break the yolk and mix it lightly. Sprinkle a little salt and pepper on top. Place the cooked roti over the egg and cook until the egg is cooked through. This way the roti will have one egg side, and one plain side.
Breakfast roti roll – Place leftovers or cooked veggies on the egg side and roll it up. You could even add some cheese if you like.
Egg kotthu – This is a Sri Lankan classic. Cut up leftover roti canai into small pieces. Make some scrambled eggs with onion and sliced green chili (or bell peppers). Add the cut up roti to the eggs and stir fry until the eggs are dry and sticking to the pieces of roti. BONUS – serve with leftover curry on the side.

As a main meal
Serve roti canai with almost any type of curry! Here are some options – chicken curry, beef curry, crab curry, mushroom curry, jackfruit curry, or any of these delicious curries.
You can also shred leftover (or freshly made) roti canai to make the ever famous Sri Lankan Kottu Roti. This can be made with chicken curry, beef curry, or you can keep it vegetarian as well.
Make herbed spiced roti canai. Flavor the roti with herbs by adding finely chopped herbs and spices into the oil when making layers in the roti.

As dessert
You can even enjoy roti canai as a dessert!
Add some sugar to the dough if you like (to make it a little sweet). Then serve roti canai with a scoop of ice cream and chocolate fudge sauce on top. I had a friend who LOVED eating it this way, so I can confirm that it’s actually really good! 🙂
You can also sprinkle some cinnamon and sugar when making the layers, to make sweet cinnamon roti canai. It’ll be delicious with some fruits and whipped cream. Just like cinnamon toast!

Recipe

Roti Canai Recipe
US based cup, teaspoon, tablespoon measurements. Weight measurements are recommended for accurate results whenever available.
Common Measurement ConversionsIngredients:
- 500 g all purpose flour about 4 cups of flour, measured by spoon and level method
- 1 tsp sea salt
- 180 mL boiling water ¾ cup
- 180 mL room temperature water ¾ cup
- Oil for coating, layering, and cooking
- Butter or ghee optional
Instructions:
About 10 hours before you want to cook the roti (or at least 3 hours)
- In a large bowl, place the flour and salt. Stir to combine.500 g all purpose flour, 1 tsp sea salt
- While stirring the flour with a fork or spatula, add the hot water to form clumps in the flour. Stir until the water is dispersed throughout the dough (forming smaller clumps).180 mL boiling water
- Add the room temperature water while mixing (preferably with your hands), until you form a scraggly dough. The dough should be fairly soft, but not sticky.180 mL room temperature water
- Once you form a rough dough, cover the bowl with plastic wrap and let it rest for about 30 minutes. This helps to develop gluten, so you can also leave covered upto 1 hour for more gluten development.
- After 30 minutes, the dough should have absorbed all of the water well, and softened a little bit. Knead this dough for about 2 – 3 minutes to form a dough with a smooth, satiny surface. Knead longer if needed until the dough has a smooth surface.
- Weigh the dough, and divide it into 8 equal portions (about 90 – 100 g per portion). Shape each dough portion into a smooth dough ball. Cover with plastic wrap and set aside.
- Keep a small bowl and a large plate (or flat container) ready. Place some vegetable oil in the bowl. Spread some oil on the bottom of the large plate / flat container as well.Oil
- Roll the dough balls in the oil to coat. Place each coated dough ball on the plate. Make sure there is at least ½ inch space between the dough balls if possible (otherwise they will stick to each other).
- Cover with plastic wrap, and let the dough rest for at least 2 hours, or up to 12 hours. I prefer to let the dough rest for at least 2 hours (they are more pliable this way) if I'm in a hurry, OR overnight whenever possible.
Shaping the roti canai
- Place some oil (or butter and ghee) in a bowl.Oil, Butter or ghee
- Take one dough ball and flatten it out on a smooth work surface. Use your hands to stretch out the dough until they are paper thin, and you can see through the dough.
- TIP – To stretch the dough, flatten the dough with your palm to get a circle / square shape. Press one end of the dough onto your work surface, so that it lightly sticks to the surface. Then gently stretch the opposite end of the dough. Repeat all around, so that you stretch out the dough evenly. It can be a circle or rectangle in shape. Try your best not to tear the roti. This takes practice, but with more experience, you will get fewer and fewer tears.
- Spread some oil (or butter or ghee) on the surface of the roti. Don’t make this layer of fat too thick.
- Roll up the dough into a tube. Make sure you roll up the dough firmly into a log. Alternatively, you can gather the dough from either end in 0.5 – 1 inch folds that are on top of each other (see the panel of images in the post – "the roti after folding").
- Once you have rolled up / folded the dough, coil the dough into a spiral (see pictures in the post). Make sure the spiral is tightly coiled. Also make sure to tuck the ends of the dough under the spiral, and then press down the spiral with your palm. This should hopefully help seal the spiral/coil.
- Place this on the plate again (with some oil at the bottom). Repeat with the rest of the dough portions.
- Cover the dough with plastic wrap, and let it rest for at least another hour.
Cooking the roti canai
- Please note that the heat recommended for cooking the roti can vary from stove to stove. So adjust the heat accordingly.
- Use at least an 8 inch non-stick pan (or tawa). Heat over medium heat.
- Once the pan is heated, place one portion of the coiled roti on your work surface and flatten it out into a 6 – 7 inch roti using your hands. You can use a rolling pin as well, but I personally prefer to use my hands.
- Add a few drops of oil into the pan, or brush the surface of the pan with some oil. Place the roti in the pan and cook until golden brown. Flip the roti and cook until the other side is also golden brown and cooked through. The total cook time (for me) is about 4 minutes per roti. I flip the roti throughout the cooking process to ensure even browning on both sides.
- Place the cooked roti on a cooling rack. While it’s still hot, use your hands to squash the roti (kind of in a clapping motion). This helps separate the layers in the cooked roti.
- Repeat with all of the dough portions.
- Serve while warm, with curry, or however you like!
Recipe Notes
Note about measuring the flour
I recommend using weight to measure the flour in this recipe. If you’re using cup measurements, please note that there will be significant variations in how much flour you end up with. Often times, cup measurements lead to the addition of more flour than intended. The amount of water needed will also vary, if the flour measurement varies. So remember to go by the consistency of your dough.To make the dough using a stand mixer
Place the flour and salt in the mixing bowl. Stir to combine. With a kneading hook, mix the flour while adding the hot water to form flour clumps. Next, stream the room temperature water in to form a scraggly dough, that is a little soft, but not sticky. Knead the dough for about 5 – 7 minutes until the dough is smooth. Divide the dough into 8 portions, and then proceed with the recipe.Note about serving sizes
Two rotis should be enough for a serving, if there are other curries or sides to go with the roti. But honestly, we could easily put away 3 or 4 if we are hungry! So I prefer to make extra, since leftovers never go to waste.Recipe variations
Scallion pancakesNutrition Information:
“This website provides approximate nutrition information for convenience and as a courtesy only. Nutrition data is gathered primarily from the USDA Food Composition Database, whenever available, or otherwise other online calculators.”


Leave a Reply