

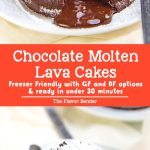
These Molten Chocolate Lava Cakes are one of the most decadent and easy chocolate desserts ever! A soft and delicious chocolate exterior, with a mouthwateringly gooey liquid chocolate center.
These lava cakes are an impressive Valentine’s day recipe too. You can prep these cakes in just 15 minutes, only using one bowl, and these cakes can be made ahead too! The recipe can also be adapted to be made gluten free, sugar free, and dairy free. What’s not to love?
February also happens to be my birthday month, and I’m down for some luscious chocolate deliciousness, from chocolate cake, chocolate cupcakes and chocolate torte to chocolate crepes, chocolate truffles, chocolate marshmallows, chocolate cream puffs, chocolate tarts and more!
This chocolate molten cake is a foolproof recipe, mostly because it’s foolishly simple. I’ve made it hundreds of times, and it comes out perfectly every time. And now I want to share it with you guys too!
This divine chocolate dessert has a prep time of just 15 minutes, and you can get it on the table (or in your mouth) in under 30 minutes, from start to finish.
Or if you’d like to, you could even pour the batter into the ramekins and freeze them for later.
What is molten chocolate lava cake?
This cake goes by many names. Chocolate lava cakes, molten lava cakes, molten chocolate cakes, chocolate fondant cakes, they all refer to these delightful mini chocolate cakes.
They are made with a chocolate cake batter, then poured into mini pans or ramekins (or even a muffin pan / cupcake pan), and baked until the outside is set, with a divine, luscious liquid center.
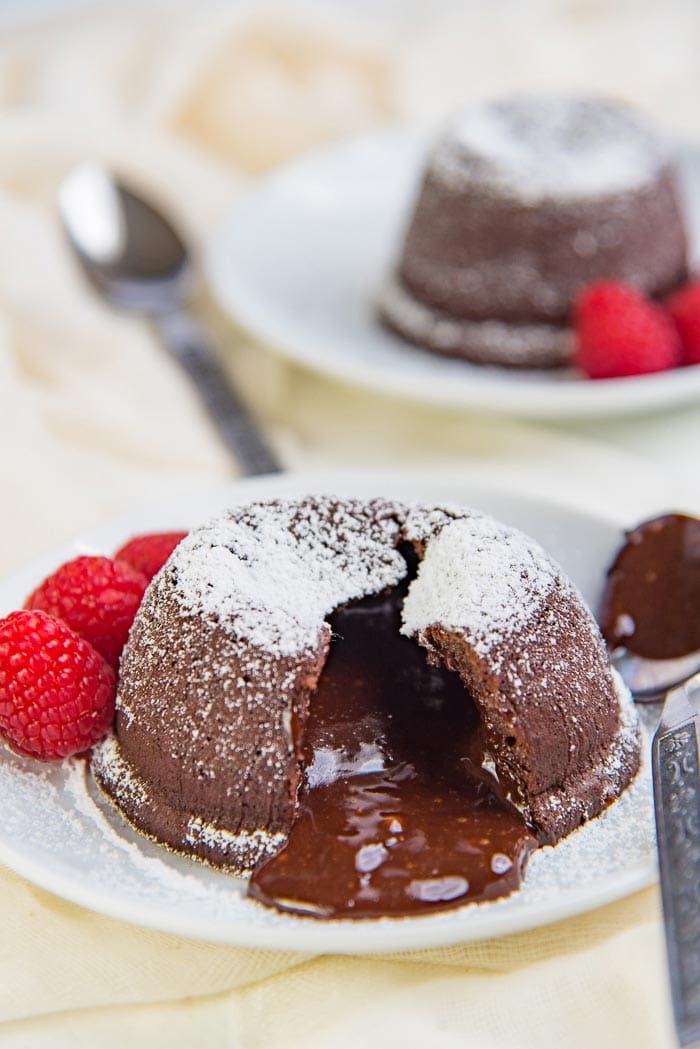
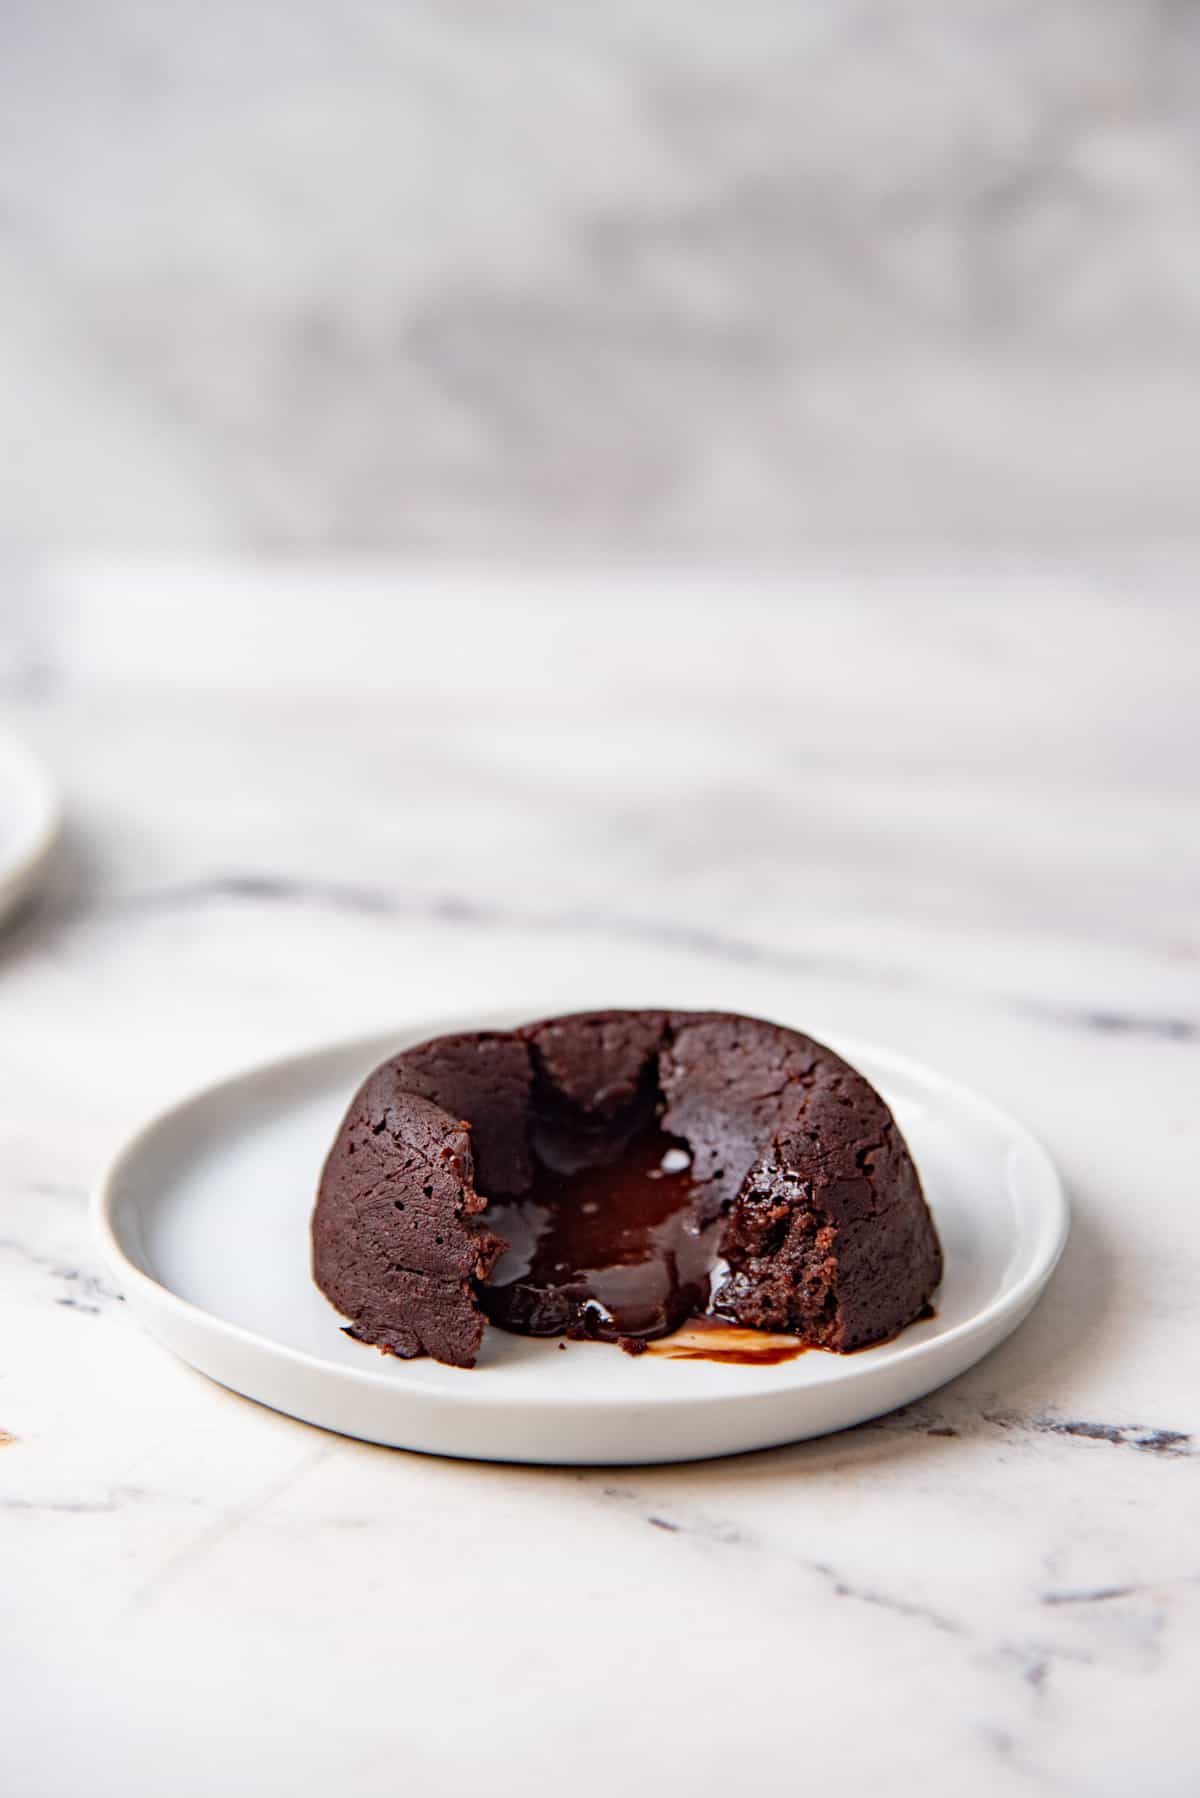
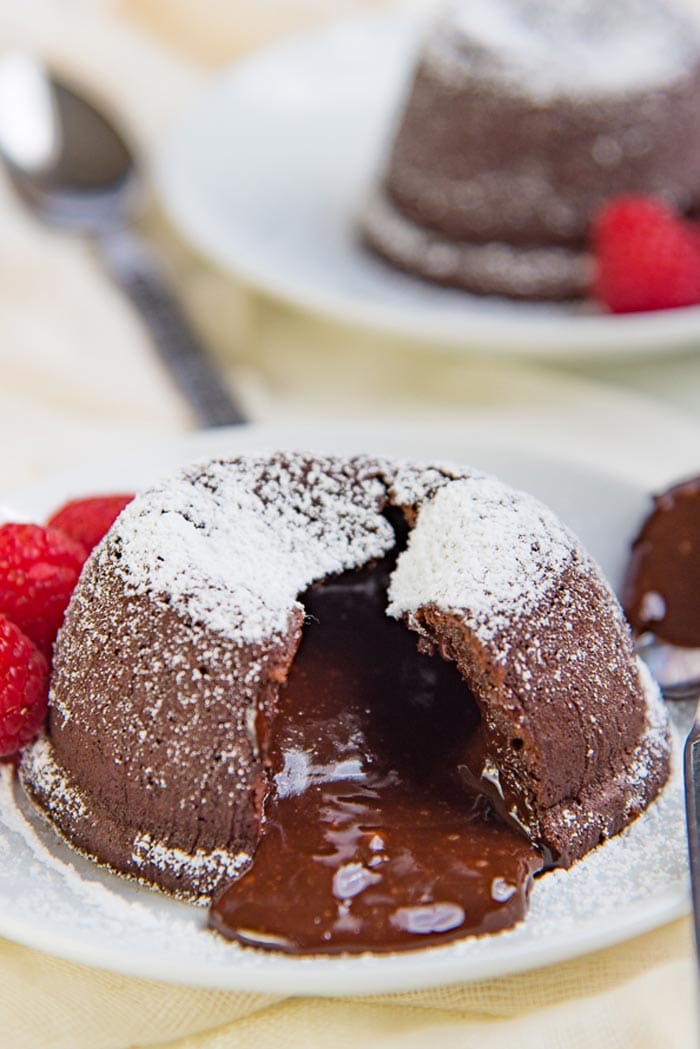
The gooey liquid center oozes out (like molten lava!) when you cut into the chocolate fondant cake. They are a stunningly impressive and delicious chocolate dessert, but here’s the kicker – they are also ridiculously easy to make!
Really. As far as easy dessert recipes go, it’s nigh impossible to beat this.
Why you’ll love this recipe
- So easy. They are truly one of the simplest chocolate recipes to make.
- Since you make individual portions, these lava cakes are perfect as a valentines day recipe for a romantic dinner, or to be made as a quick sweet treat for yourself whenever you get a craving.
- Amazingly deep and luscious chocolate flavor.
- This recipe takes less than 30 minutes from start to finish.
- Can be made ahead of time too!
- Freezer friendly recipe, and can be stored in the fridge.
- I’ve even tested this chocolate lava cake recipe with cupcake pans with perfect results, so that you can make mini chocolate lava cakes.
Chocolate lava cake ingredients
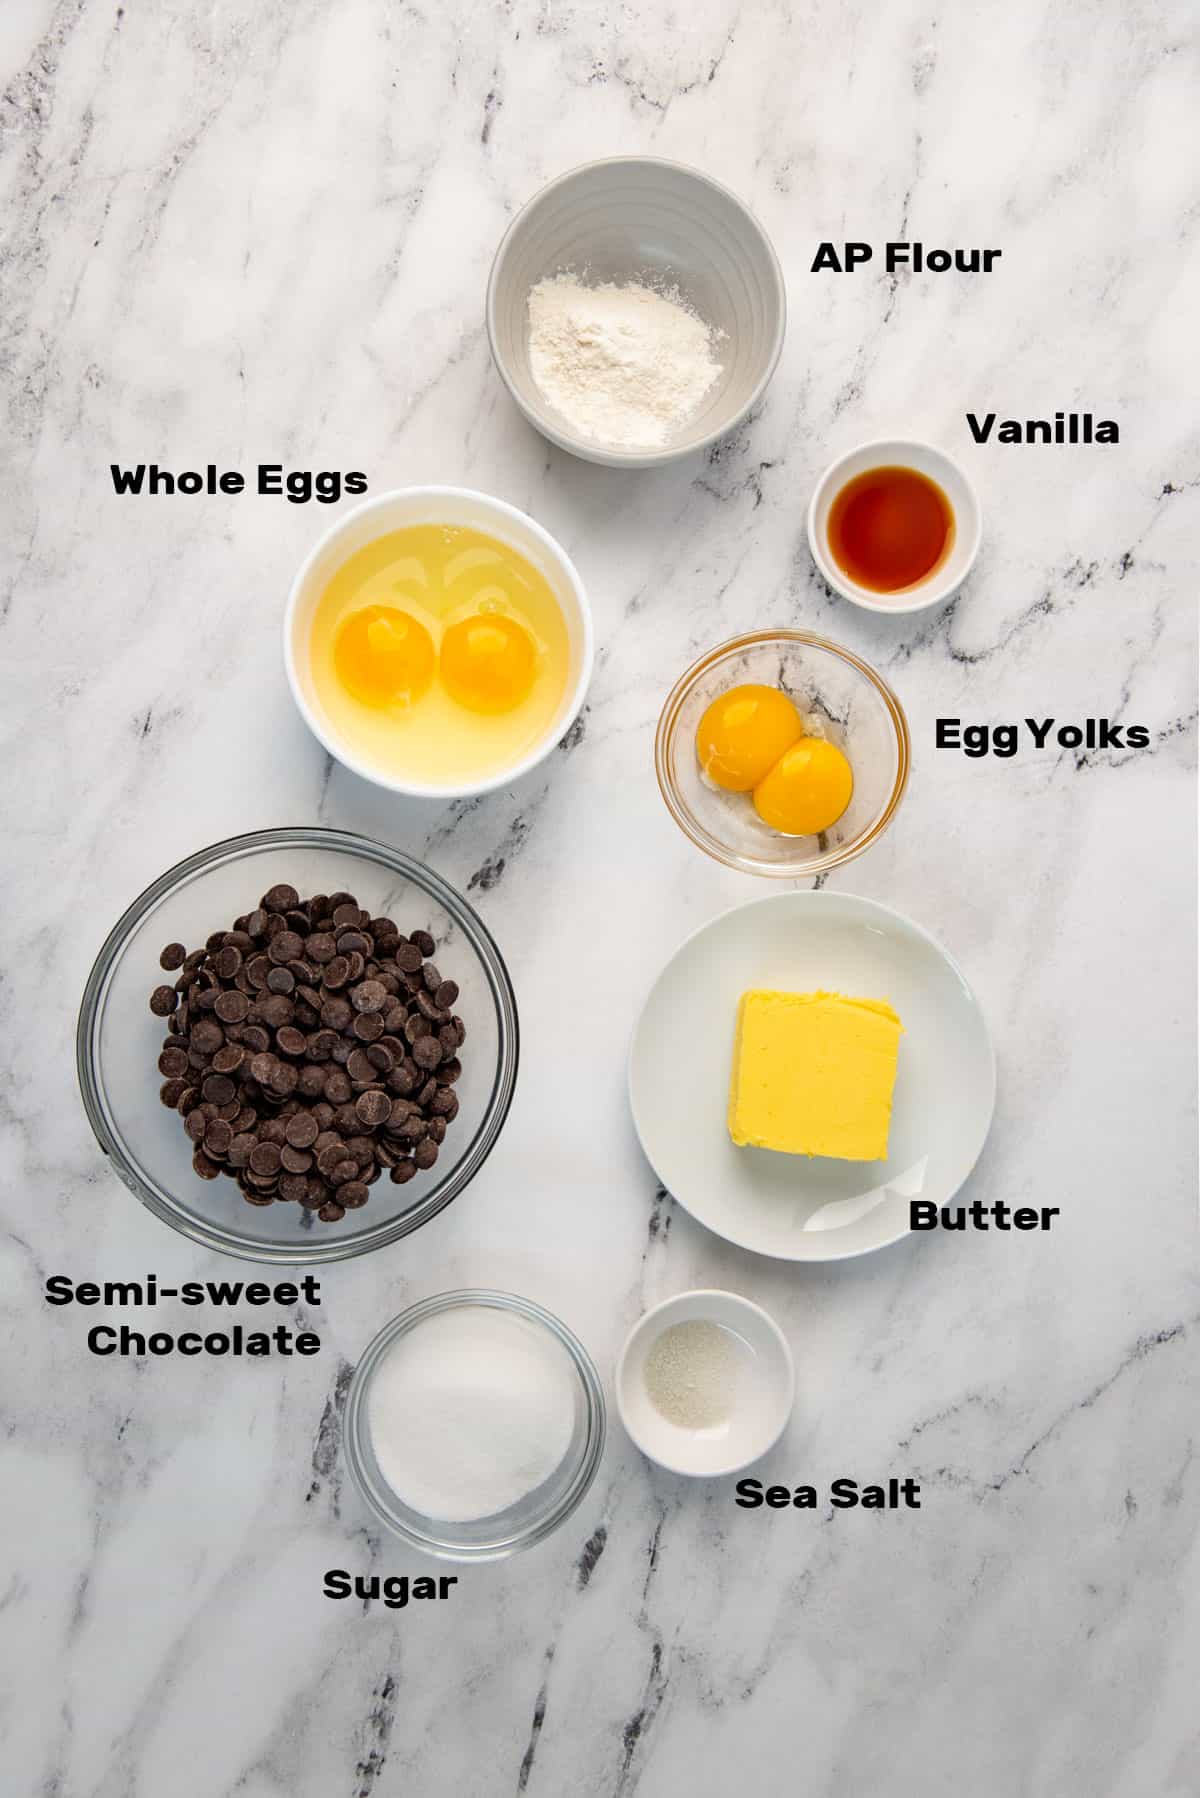
Semisweet chocolate
I use semisweet chocolate chips for this recipe. This gives me the best balance between chocolate flavor and sweetness for my taste.
However, if you’d like your molten chocolate cakes to have an even deeper flavor of chocolate, you can use bittersweet chocolate instead.
Semisweet chocolate usually contains about 40 – 65% cocoa content. I use 55% semisweet chocolate here.
Bittersweet chocolate contains between 65 – 80 % cocoa content. Usually around 70%.
Butter
For this recipe you can use unsalted or salted butter. This adds the rich flavor for the cake and the molten center. Plus, it contributes to the silky mouthfeel of the chocolate center.
In a pinch, you can absolutely use a vegan butter to make this a dairy free lava cake instead of regular butter too.
Vanilla extract and salt
Both vanilla extract and salt are added to enhance the flavor of the cakes.
However, vanilla extract is optional. You can also add coffee extract (or water + instant coffee), for some coffee flavor. Or, for an adult version, add some bourbon or rum!
Salt is absolutely necessary in my opinion. Add just a little to give your lava cakes more depth of flavor. Add a little extra to give your chocolate cakes a little sweet and salty treatment.
Sugar
While sugar adds sweetness to the recipe, it also helps with the texture of the cake. Even if you use bittersweet chocolate, do not skip the step of adding this small amount of sugar to these cakes.
Eggs
Eggs play an important role. As there is very little flour, the eggs provide structure to the cakes. The egg yolks add flavor and richness as well.
Flour
The small amount of all purpose flour provides a little structure to the cakes. Since the sides of the cakes must set, the flour (and eggs) provide that structure as the cake bakes.
How to make chocolate molten lava cake
From prepping your baking ramekins, to getting them in the oven, it only takes 15 minutes to make these chocolate fondant cakes! Here’s how it works.
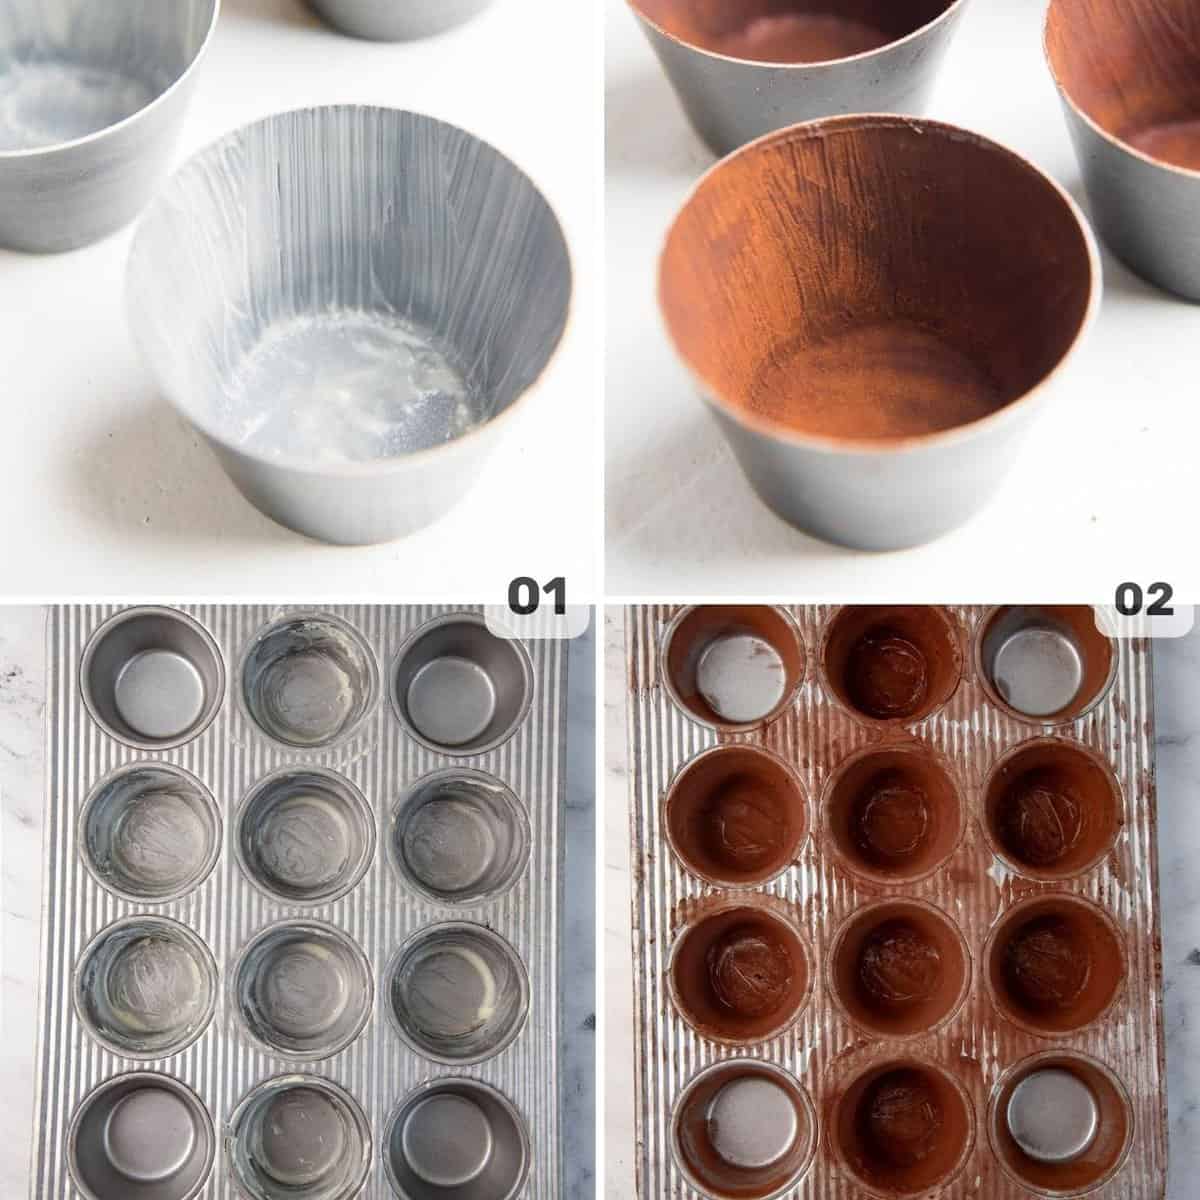
Step 1 – Prep the baking ramekins first
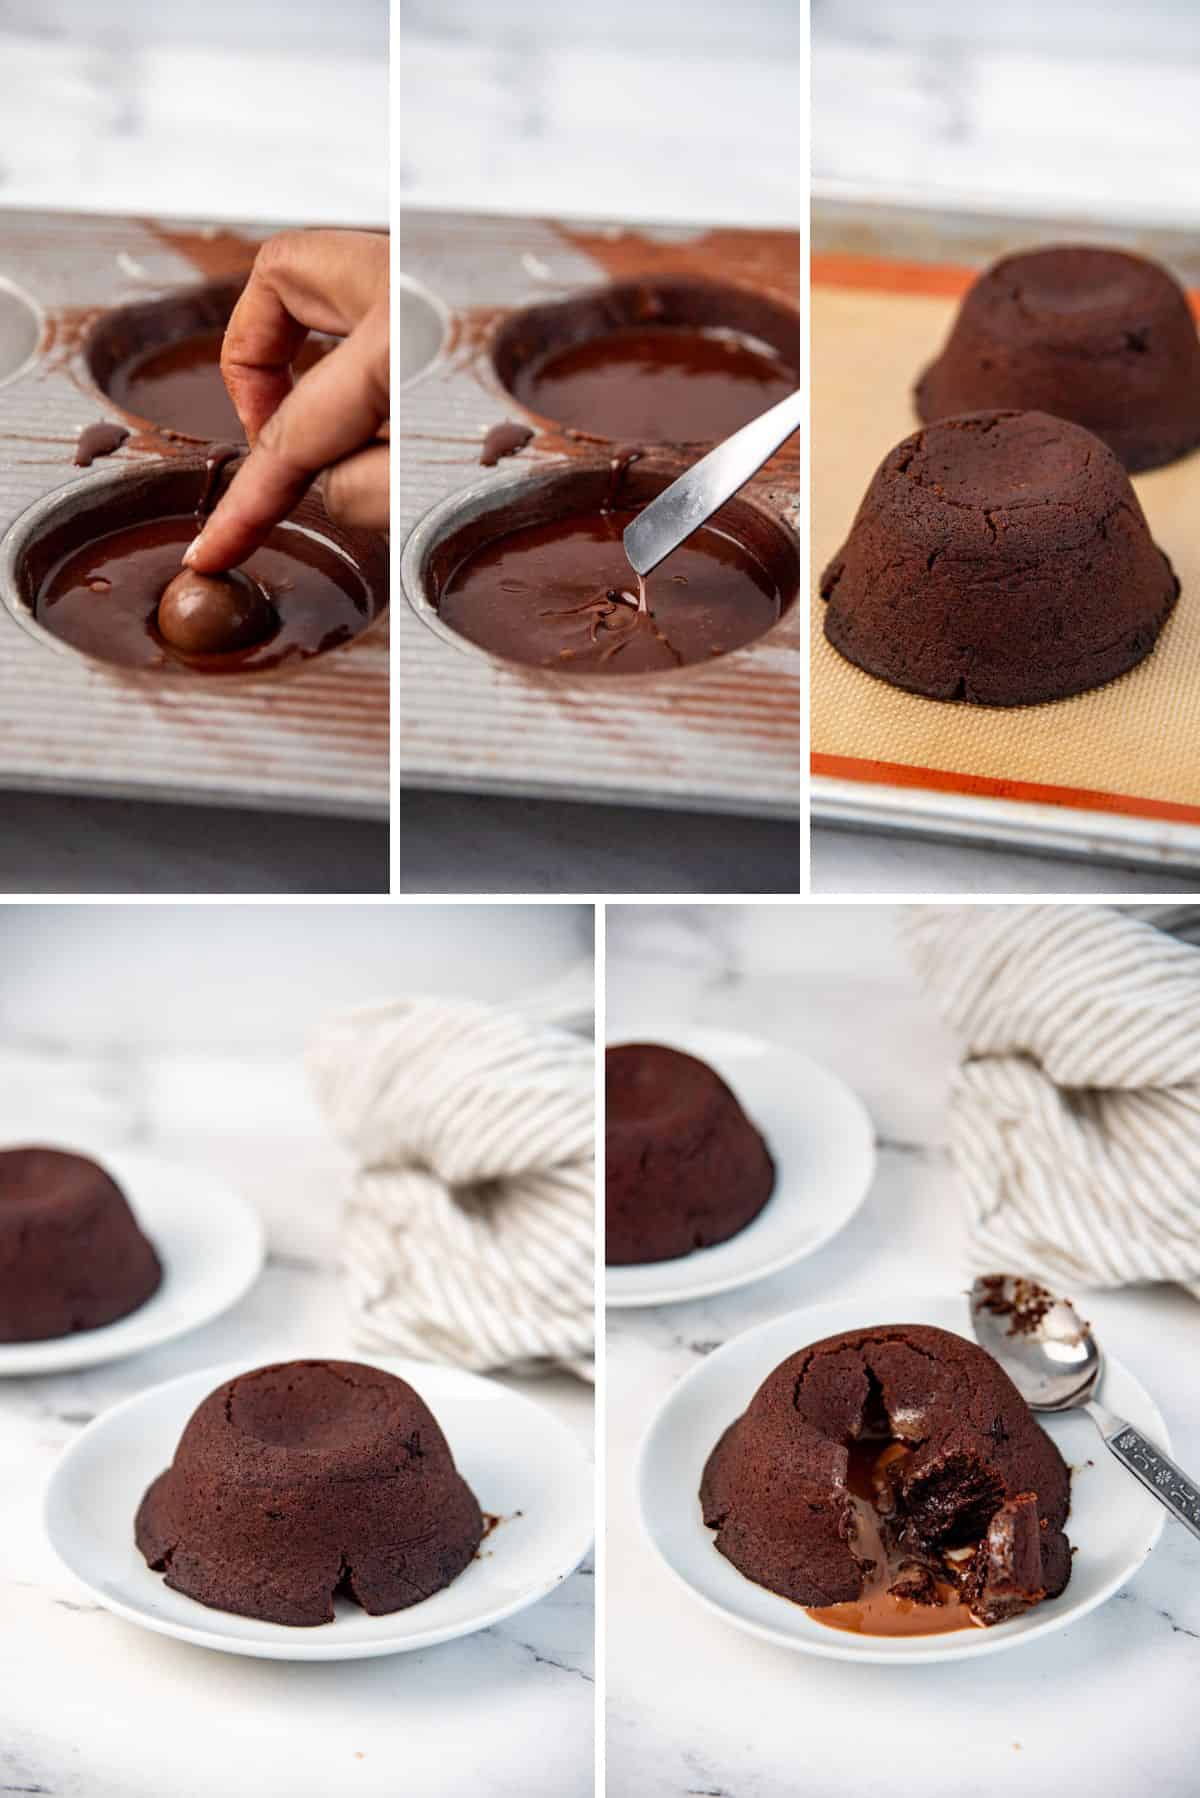
Use your fingers, or a pastry brush or even butter wrappers to coat the 6-ounce ramekins with butter. I like to use softened butter, because that way I can get a generous coating of butter on the ramekins. This helps the cakes slide right off when they are done baking.
Step 2 – Dust each ramekin with cocoa powder instead of flour
So that you don’t end up with nasty white streaks on your finished chocolate molten lava cakes.
Step 3 – Make the cake batter using just ONE BOWL
Simply, place the bowl on a weighing scale, and weigh the ingredients directly into that bowl as you go.
You can use a microwave to melt the chocolate and butter, so you don’t have to mess around with a double boiler. Melt the butter chocolate mixture in a microwave-safe bowl in 30 second increments.
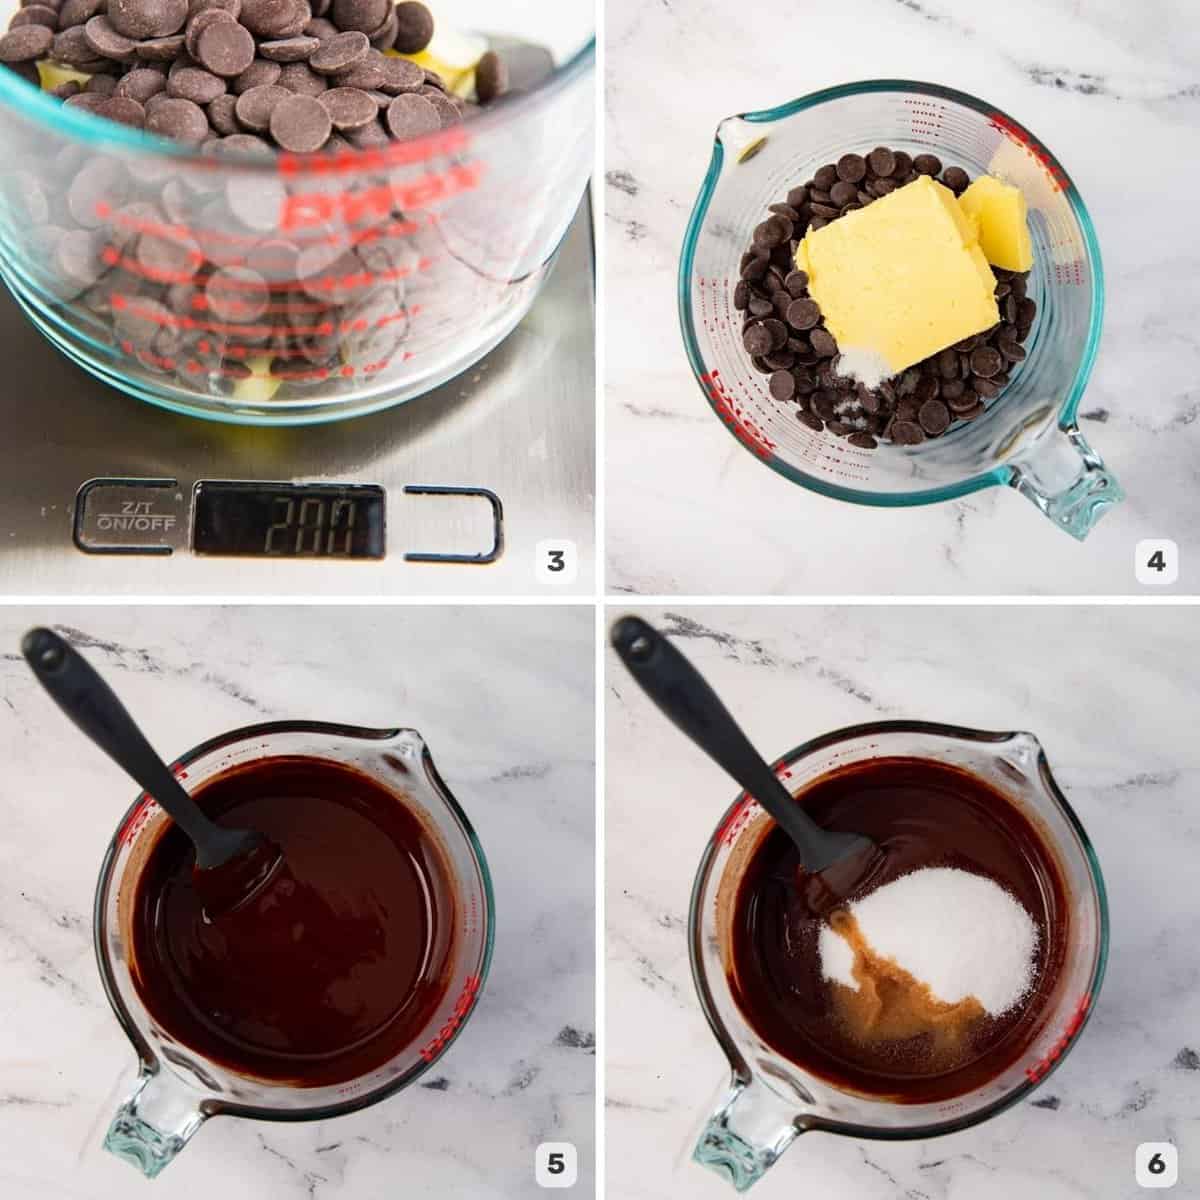
Step 4 – Add the sugar and eggs straight into the melted chocolate
You don’t have to whisk egg whites and yolks separately using another bowl.
Step 5 – Add the flour
This recipe uses only 2 tbsp of flour, just to give the chocolate lava cakes some structure as they bake.
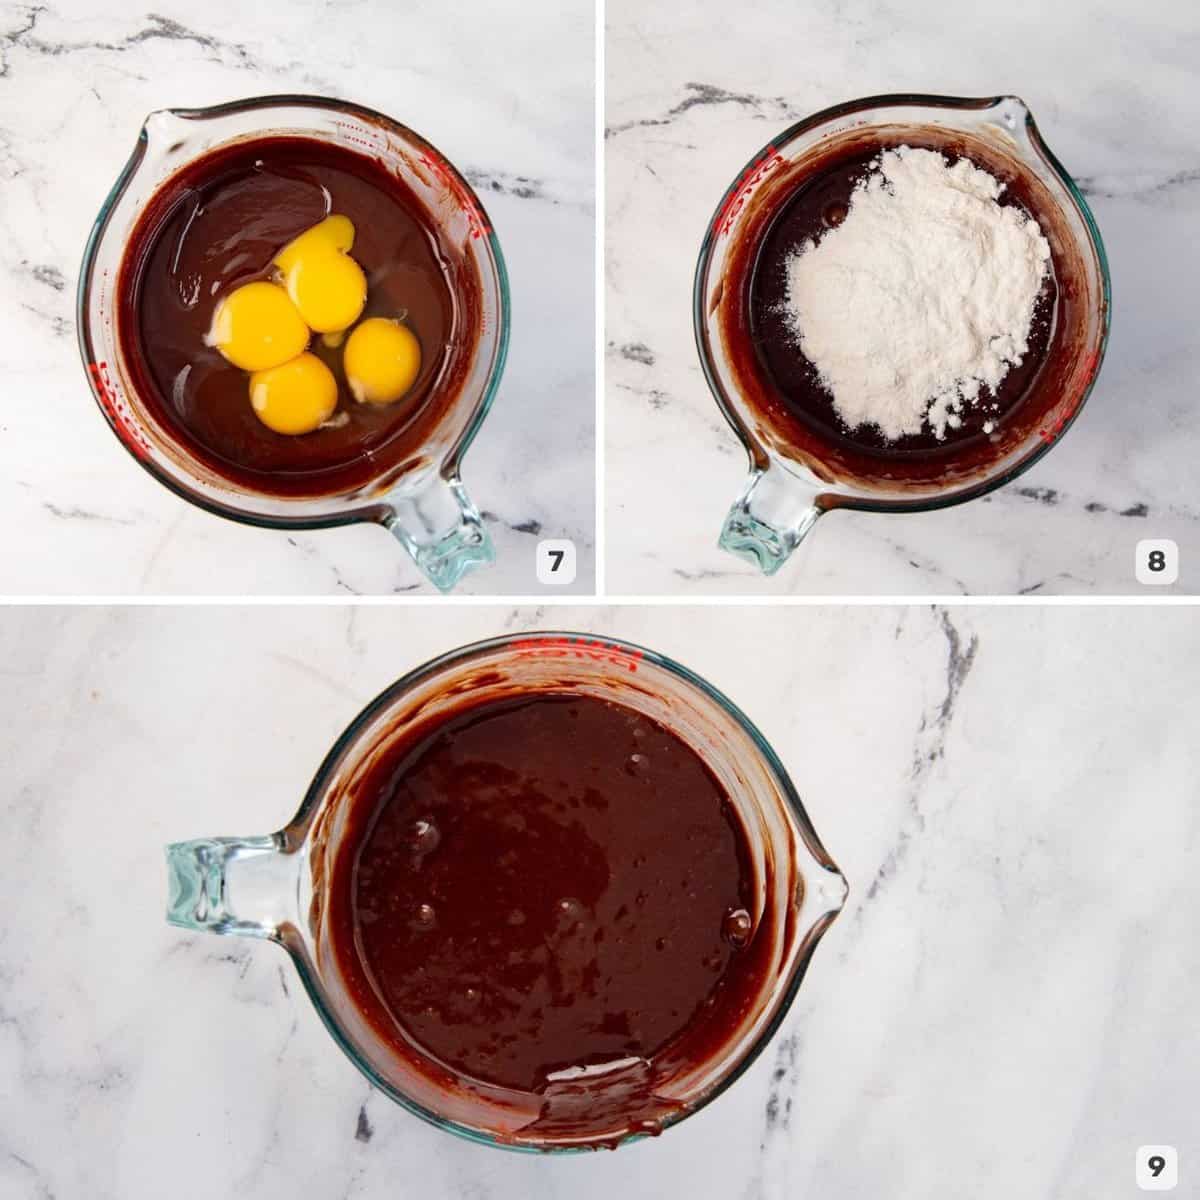
Step 6 – Pour the batter into the prepared ramekins and bake
The batter will still be runny, and will thicken as it cools down further. So, it’s easy to pour it into the ramekins. Just divide the batter between 4 ramekins, and then these decadent chocolate molten cakes are ready to be baked!
All this takes just 15 minutes! You don’t have to place extra chocolate truffles in the middle, or whisk eggs separately, or other cumbersome steps that most other chocolate molten lava cake recipes use. All you’d have to clean afterward is the bowl, a spatula, and the whisk.
However, please note that if you do use volume measurements, or like to have the ingredients pre-weighed (like I have done for the recipe video in this post, just for presentation purposes), then you will be using more dishes.
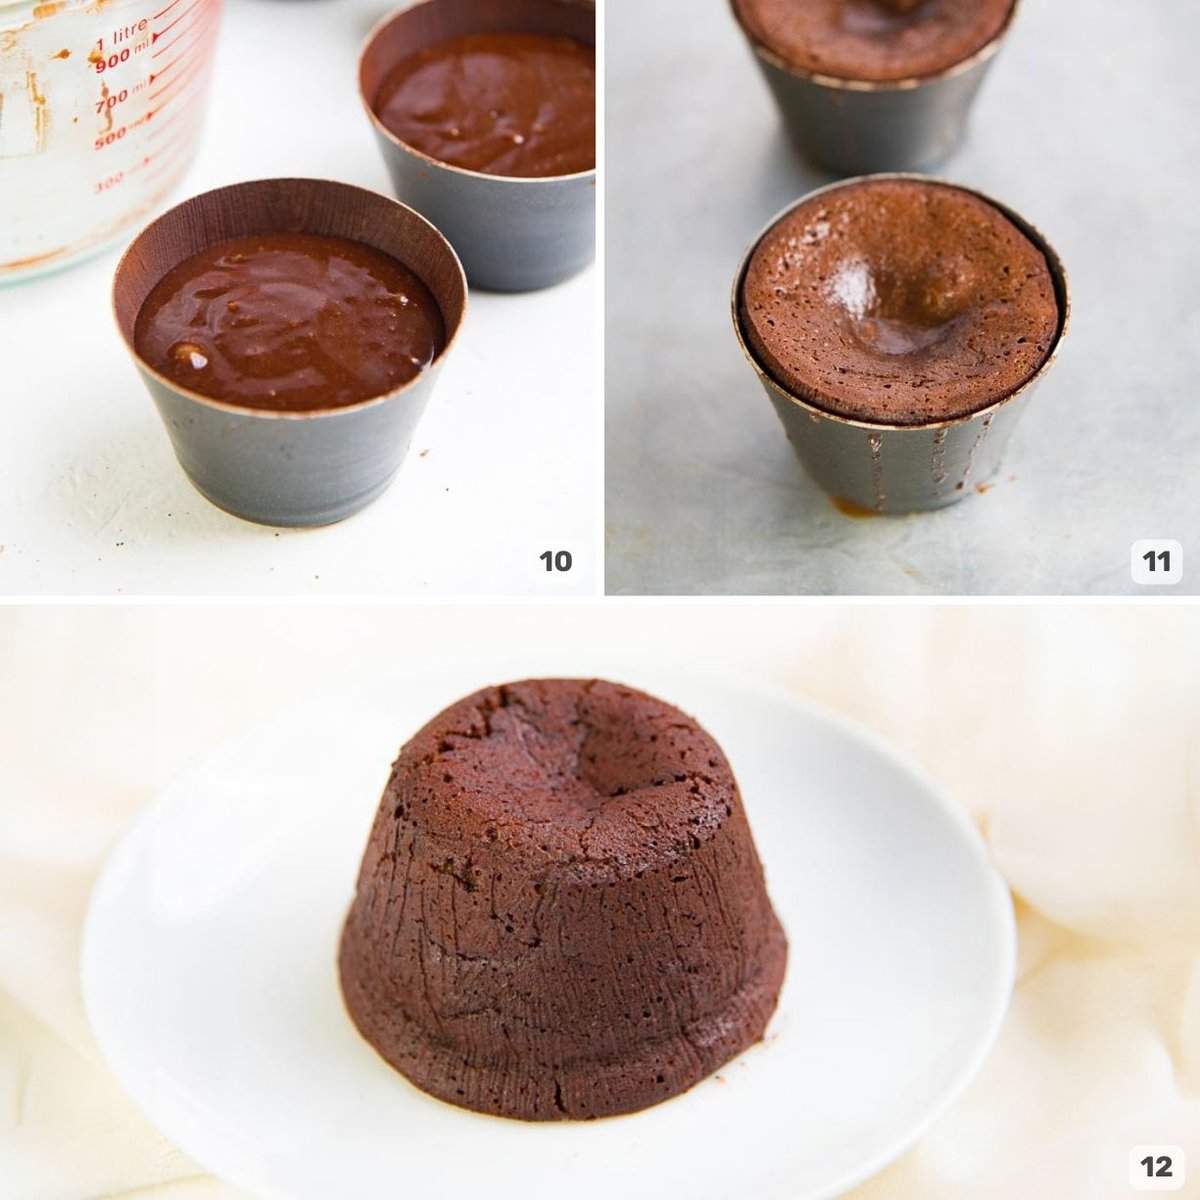
And with a baking time of 11-12 minutes, this delicious chocolate dessert will be ready in under 30 minutes!
How to make lava cakes in cupcake pans / muffin pans
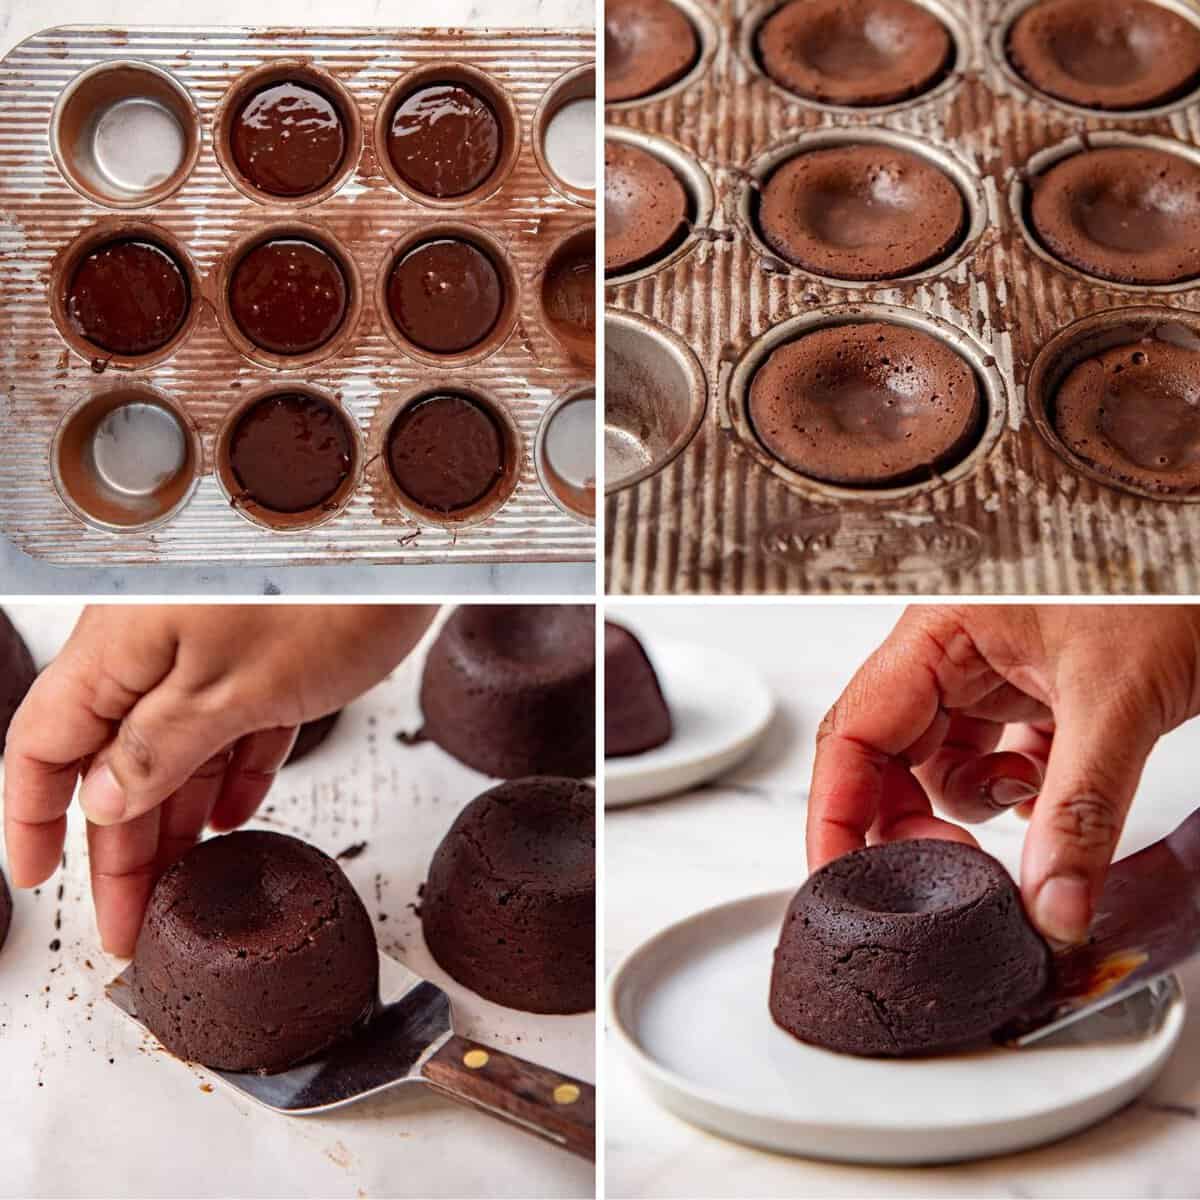
- Prepare the cupcake pans the same way as you would prepare individual ramekins. Butter liberally so that there will be a nice layer of cocoa powder attached to the sides of the cavities. This will ensure that the cakes slide out easily after baking.
- Pour the batter into each cavity as evenly as possible. By my calculations, this is about 70 – 72 g per standard cupcake or muffin cavity. This will give you between 7 – 8 mini lava cakes.
- Bake the cakes for 7 – 8 minutes. No more than 8 minutes. If your cupcake pans are darker in color, or made with glass or cast iron, the bake time will likely change. These times are for standard metal cupcake pans.
- While the cakes are baking in the oven, place a silpat or parchment paper on a half sheet baking tray.
- When the cakes are ready, remove the cupcake pan from the oven. Place the parchment paper over the cupcake pan, followed by the baking sheet.
- Using gloves to hold onto both the baking tray and cupcake pan, flip the cakes over. The lava cakes should easily fall onto the parchment paper. You don’t need to let the cakes rest, since they will have some resting time as you transfer the cakes onto individual serving plates.
- Use a thin metal spatula (a brownie spatula or large angled spatula or fish spatula), and carefully slide it under a lava cake, and transfer the cake onto the serving dish and serve.
It’s crucial to serve the cakes while they are still fairly hot, so that the chocolate center flows out when cut open.
Can I double this recipe (or make half a batch for two)?
This recipe makes four portions. It can be halved so you can make lava cakes for two, or it can be doubled for a crowd. It’s very versatile.
I make these chocolate molten lava cakes in these metal ramekins that you can buy here. I like the shape of these, and because they are metal, they conduct heat more evenly, for more consistent results.
But you’re welcome to make these in glass or porcelain ramekin dishes too if that’s what you have.
However, you will need to increase the baking time by 1-2 minutes, because glass/porcelain ramekins are thicker than these metal ones.
How to make this recipe ahead of time (storage instructions)
If you’re making these chocolate lava cakes for a romantic dinner or for special occasions, I assure you this dessert is not something you will have to stress about.
You can make these cakes a day ahead of time, or a week, or even a month! You can freeze these chocolate molten cakes for up to a month in the freezer, or refrigerate them for up to 3 days.
The cakes are best stored before baking.
Pour the batter into the individual ramekins and then cover with plastic wrap or foil.
Fridge
Place the covered cake batter in the fridge for up to 3 days.
Freezer
Place the lava cakes in the freezer for up to 1 month.
Baking cakes from fridge or freezer
These cakes can be baked from frozen or from the fridge.
Add about 30 – 60 seconds more bake time for cakes that are being baked from the fridge.
Add 60 – 75 seconds extra for cakes that are being baked from frozen.
However, these times will vary depending on the size of the cakes (cupcake vs regular), and if the cakes are wider or taller, or if they are baked in metal ramekins vs glass ramekins.
Reheating already baked cakes
You could reheat them in the microwave just until they are hot enough, but NOT to cook the cakes further.
To do this, you will need to heat the cakes in 5 – 10 second intervals (depending on how powerful your microwave is), until the cake is warm and still soft to the touch when you squeeze it gently.
HOWEVER, in my experience, it’s kind of hit or miss to get the reheating time just right, so I wouldn’t recommend doing this. It’s much easier and more reliable just to freeze unbaked cakes, and then bake them fresh when you need them.
More expert tips for this recipe
- Use a chocolate that you love to eat to make these cakes. Since the cake flavor is dependent on the chocolate, make them with a chocolate you like.
- Metal baking cups are better than glass ramekins. Metal pans conduct heat better and set the outsides better than glass pans.
Serving suggestions
These chocolate lava cakes are perfect just as they are! Perfectly sweetened, with a deep, decadent chocolate flavor, these are a great after-meal chocolate dessert, or for celebratory occasions.
But if you’d like to dress them up some more, here are a few simple options.
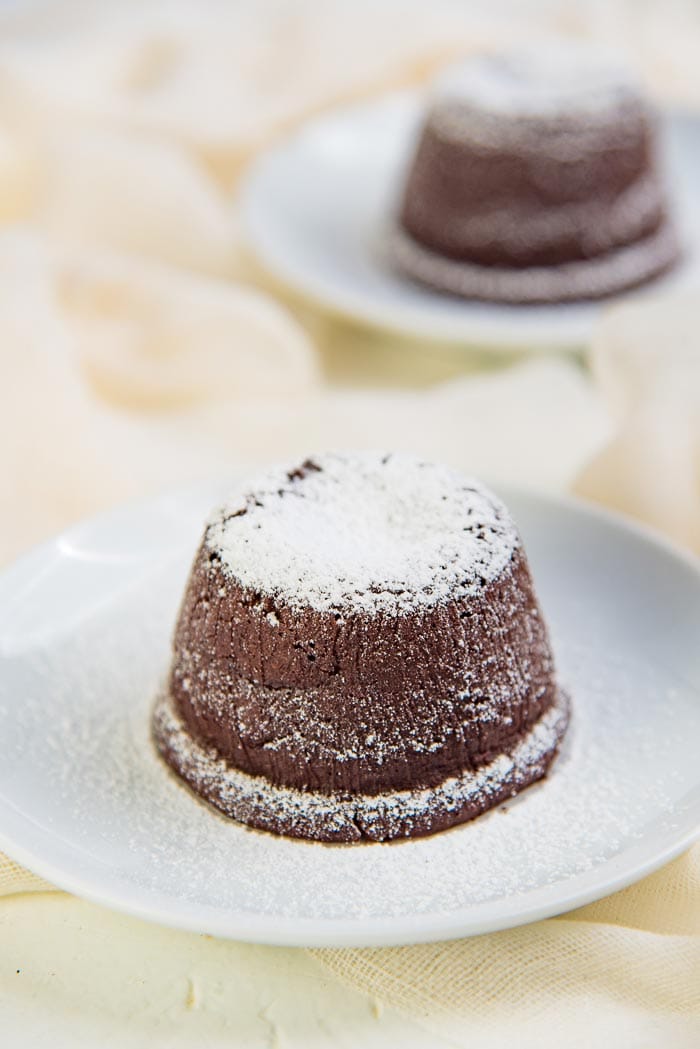
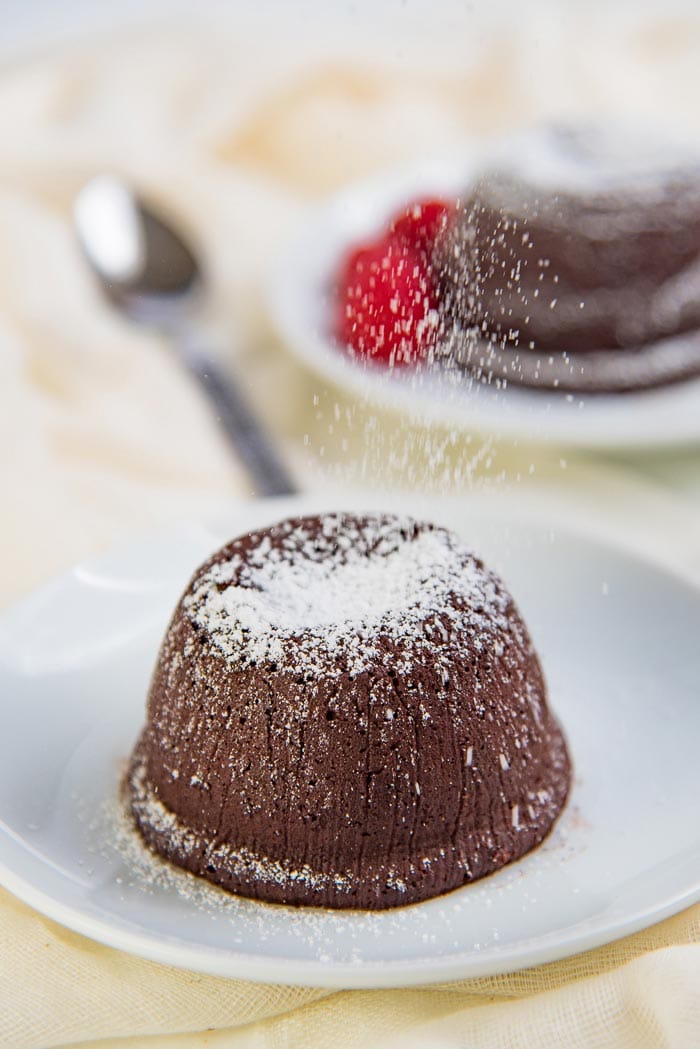
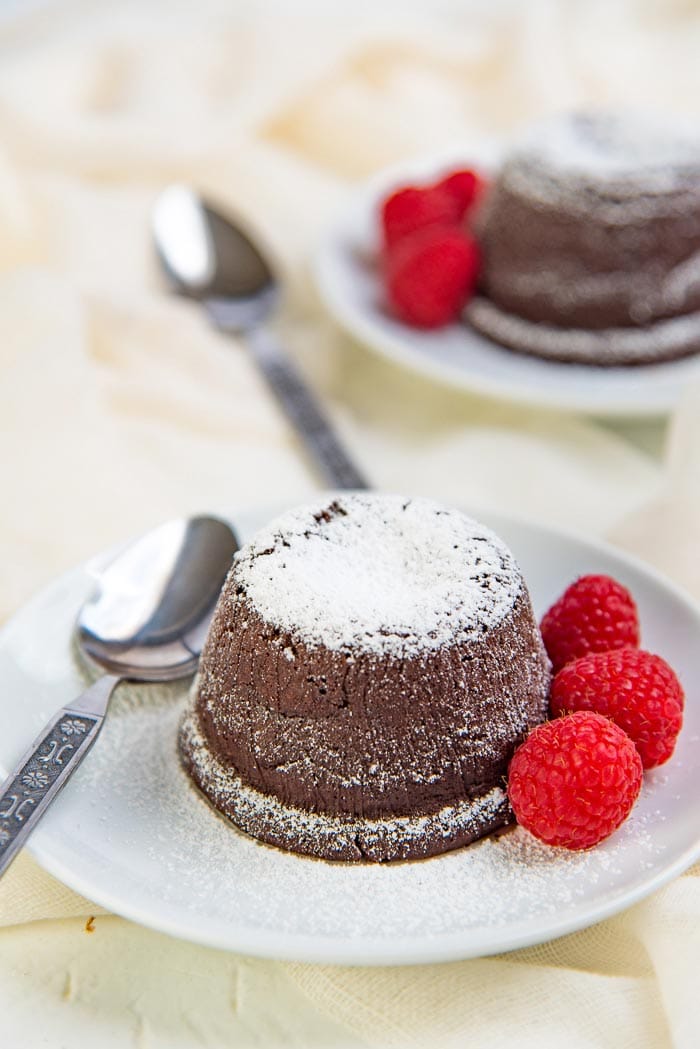
- Dust them with confectioner’s sugar.
- A dollop of whipped cream or clotted cream.
- Serve with some fresh strawberries or raspberries.
- A scoop of ice cream (vanilla ice cream, cereal milk ice cream, strawberry shortcake ice cream, lemon ice cream, butterscotch pecan ice cream are all great choices!).
- A drizzle of chocolate sauce, berry sauce, or peanut butter sauce.
- Pair this dessert with my butter lobster risotto or Maine lobster rolls or cajun chicken sausage pasta or a dressed up shoyu chicken ramen for a romantic and scrumptious dinner for two.
Chocolate lava cake recipe video
Tools I use for this recipe
- Metal ramekins – I like to make these chocolate molten lava cakes in these metal ramekin dishes. You’re welcome to make them in porcelain/glass ramekin dishes too.
- Kitchen scale – Makes the process of prepping these molten cakes so easy and quick.
- Large pyrex jug – I make the batter in the large pyrex jug from this set, so that I can pour the batter easily into the ramekins, and there’s less cleaning and washing to do after.
- My favorite chocolate – You can use supermarket chocolate to bake this recipe too. I used this particular callebaut chocolate, and it’s one of my favorite chocolates.
- Spatulas – I love this set, and I have it in two sizes. They are perfect for different baking/cooking needs.
- Whisks – A good set of whisks is a must for all your baking needs.
Frequently asked questions
What is the filling made of in lava cake?
A traditional chocolate lava cake is made with batter where the cooked middle is with the same batter as the rest of the cake. The outside is set, but the inside is still gooey and liquid (i.e. molten lava).
Can I make a cheat’s lava cake with chocolate truffle in the center?
Absolutely, I’ve tried this and it’s possible. A cheat’s lava cake is achieved by adding a truffle in the middle.
The truffle in the middle does not bake solid, and will ensure a liquid center even if the cakes are overbaked. You can add a Lindt truffle to your lava cakes to achieve this as well.
How to make this recipe gluten free
Use 1 tbsp of cornstarch instead of flour, OR use 2 tbsp of gluten free baking flour.
Can I make sugar-free chocolate lava cake?
You will need to use sugar free dark chocolate, and use a 1:1 sugar free sugar substitute. I made these with this sugar brand, and they turned out great!
I wouldn’t recommend using a sweetener like stevia, because the sugar in this recipe is not only a sweetener, but it also helps make the batter loose.
Adding a few drops of stevia may sweeten the cake, but the batter might be too thick then. But you can experiment and see if this works for you (and if it does, I’d love to know!)
Can I make this recipe dairy free?
Butter adds a lot of flavor to this chocolate molten lava cake recipe.
You can substitute it with a dairy free butter, or margarine or coconut oil (which will have an impact on the flavor).
Also make sure that the chocolate you’re using is dairy free as well.
Is this molten chocolate lava cake raw in the middle? (Is it safe to eat?)
No, the cakes are not raw in the middle! The cakes are still cooked to 160 F, but the center isn’t “set” and remains gooey.
They are absolutely safe to eat.
How do you know when the lava cake is done baking?
The sides of the cake will rise and be clearly set. The middle of the cakes will be more sunken and look more gooey.
Why is my lava cake sinking?
Because the edges of the cakes rise and set, the middle of the cakes are a little sunken due to the gooey center. This is normal!
With cupcake lava cakes, this sunken middle is more prominent than with regular ramekin lava cakes.
Can I microwave chocolate lava cakes?
If the cakes cooled down too much before you were able to serve them, then the middle will not be gooey. This can be disheartening!
The good news is that you can microwave the cakes to reheat them. However, you must be careful not to overcook the cakes.
With my microwave, I reheat the cakes between 20 – 30 seconds at 40 – 50% power (or 15 seconds with mini lava cakes baked in cupcake pans). This reheats the cake and makes the center gooey again without overcooking.
Recipe

Chocolate Molten Lava Cakes (Chocolate Fondant Cakes)
US based cup, teaspoon, tablespoon measurements. Weight measurements are recommended for accurate results whenever available.
Common Measurement ConversionsIngredients:
- 7 oz semisweet chocolate chips 55% cocoa content, approximately 1 cup + 3 tbsp
- 4 oz unsalted butter 1 stick of butter, see DF substitutions in recipe notes below
- ½ tsp sea salt or just ¼ tsp if you don’t like a hint of saltiness in your cakes
- 1 tbsp vanilla extract or bourbon or rum
- 2.3 oz white sugar about ⅓ cup
- 2 whole eggs large
- 2 egg yolks from large eggs
- 0.7 oz AP flour or 2 tbsp, see GF substitutions in recipe notes below
- Extra butter and cocoa powder to dust ramekins I use 6 oz ramekins here
- Confectioner’s sugar and berries to serve
Instructions:
- Preheat your oven to 400°F / 205°C.
- Generously butter four, ½ cup ramekins, and dust them with cocoa powder. Set aside until needed.Extra butter and cocoa powder to dust ramekins
- Place the butter, chocolate, and salt in a large microwave-safe bowl.7 oz semisweet chocolate chips, 4 oz unsalted butter, ½ tsp sea salt
- Melt the ingredients in the microwave in 30 second increments, while stirring in between. This should take approximately 60 – 90 seconds. You can also melt the butter and chocolate in a double boiler.
- Stir the sugar and vanilla into the warm butter-chocolate mixture.1 tbsp vanilla extract, 2.3 oz white sugar
- Next, add the eggs and yolks, and whisk them in well. You should end up with a “gloopy” chocolate batter.2 whole eggs, 2 egg yolks
- Whisk in the flour.0.7 oz AP flour
- Pour the batter into the prepared ramekins. Make sure they are no more than ¾ of the way full, since they will rise as they bake. If you're not baking the cakes right away, cover the ramekins with plastic wrap and freeze / refrigerate for later.
- Place the ramekins on a baking tray and transfer the tray into the preheated oven. The cakes will take about 11 minutes to bake in metal ramekins. In glass / porcelain ramekins, they may take about 12 minutes. (See recipe notes below for baking times for frozen cakes.)
- When the cakes are done, remove them from the oven, and let them rest for about 30 seconds (no more than a minute).
- Using a towel / cloth napkin, turn the cakes out onto serving plates (be careful, as the ramekins will be very hot, and may be slippery too). Tap the top of the ramekin with a spoon to loosen the cake, and gently remove the ramekin to reveal the cake underneath. Serve immediately while the cakes are still warm.
- Dust the cakes with confectioner's sugar, and serve with raspberries or strawberries (or other toppings of your choice).Confectioner’s sugar and berries to serve
To make lava cakes in a cupcake pan
- Butter and dust cocoa powder in 7 to 8 cupcake cavities. Make sure that they are well coated so that the cakes come out easily and cleanly.
- Pour about 70 – 72 g of batter into each cavity (or until 3/4 of the way full).
- Bake in preheated 400°F / 205°C oven for 7 – 8 minutes.
- While the cakes are baking, get a parchment paper (to fit the half sheet baking pan), and the half sheet baking pan ready.
- Once the cakes are baked, remove them from the oven. Place the parchment paper over the cakes, followed by the baking pan (upside down).
- Using oven mitts, carefully flip over the cupcake tray and baking tray together. Then carefully remove the cupcake tray, and the cakes should now have been transferred onto the parchment paper.
- Use a thin metal spatula (large angular spatula, brownie spatula, or fish spatula) and slide it under a mini lava cake and carefully lift it off the parchment paper.
- Immediately transfer to your serving plate. Repeat with all the cakes.
- Serve immediately while still warm.
Recipe Notes
Ingredient substitutions
DAIRY FREE – use vegan butter or a dairy free margarine instead of regular butter. GLUTEN FREE – replace the 2 tbsp flour with 1 tbsp cornstarch OR 2 tbsp gluten free flour (1:1 gluten free flour substitute).Baking times
- Refrigerated chocolate molten cakes – Metal ramekins take about 11 ½ minutes. Refrigerated porcelain ramekins with thicker walls will take about 12 ½ minutes.
- Frozen chocolate molten cakes – Metal ramekins take about 12 – 12 ½ minutes. Porcelain ramekins with thicker walls will take about 13 – 13 ½ minutes.
Instructions to reheat the cakes in the microwave if necessary
Set microwave power to 40% or 50%. Heat the cake in the microwave for 15 seconds (at a time) until it feels warm to the touch (this should prevent the cakes from getting overcooked). For mini cupcake lava cakes, 15 seconds is usually enough. For regular-sized lava cakes, you may need up to 30 seconds (i.e. two 15 second increments).See here for a list of the BEST French dessert recipes.
Nutrition Information:
“This website provides approximate nutrition information for convenience and as a courtesy only. Nutrition data is gathered primarily from the USDA Food Composition Database, whenever available, or otherwise other online calculators.”


Leave a Reply