




A lattice pie crust is a delightfully decorative and impressive way to top your double crusted pie! And if you think it’s too hard or involved, this lattice pie crust tutorial is for you!
With step by step instructions, photos, and video, I’ll show you how easy it is to make a woven lattice pie top with a flaky, buttery pie crust. You can make it directly on the pie, or make it separately and then transfer it onto your pie. And there are SO many lattice designs you can make with it too!
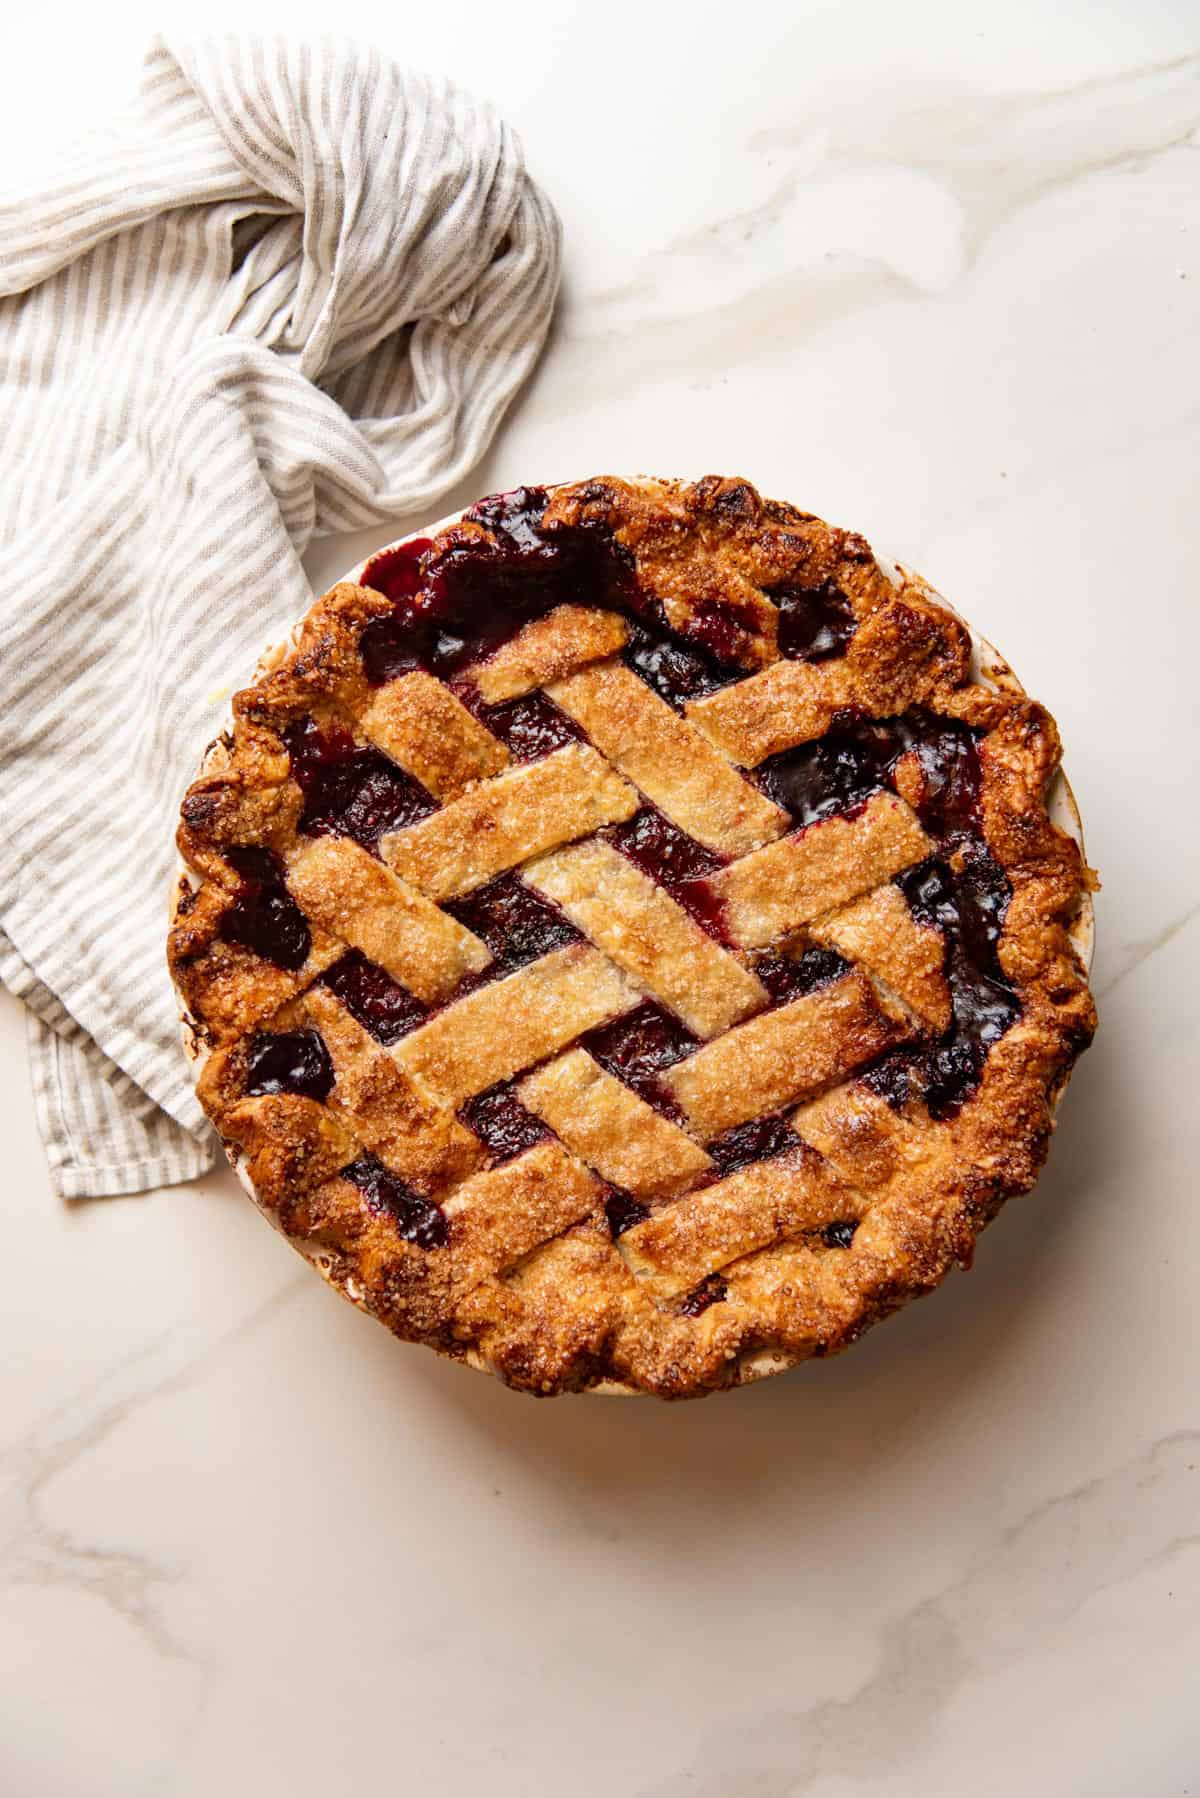
Another pie lesson, and this time, it’s all about that gorgeous lattice crust! A lattice top crust makes double crust pies that much more impressive to serve. But here’s the thing. Most people think a woven lattice pattern is really difficult to pull off.
And I’m here to tell you that it couldn’t be further from the truth! A lattice crust is so so easy to do, and if you’re nervous about making it directly over the pie filling, I’ll even show how to make it separately on a parchment paper-lined tray and simply transfer it onto the pie.
Previously, I’ve shared my tried and true homemade all butter pie crust, and double pie crust recipe, as well as how to blind bake pie crust. Here, I’ll show when to use a lattice crust, and how to get the most perfect, flaky, buttery lattice crust!
Why this recipe works

- Step by step, detailed instructions and recipe video so that even novice bakers can perfect a lattice crust!
- I cover the basics, and share two methods to prepare the lattice, depending on your preference.
- I also share lots of tips on how to get the perfect texture for your lattice top crust!
What’s a lattice pie crust?
A lattice is simply something arranged in a repetitive crisscross pattern. Lattice pie crusts are created with strips of pie crust. You weave the pie crust strips together to create a pattern, usually a square or diamond pattern on top of the pie.
The gaps between the pattern can be as wide or as narrow as you prefer, and the strips can also be as narrow or as wide as you like. These variables allow you to create all kinds of decorative lattice pie crusts for your pies!
While lattice crusts are a wonderfully decorative way to top pies, they also serve a more important purpose than simply being decorative.
The open structure of the lattice allows more water to evaporate, so it’s typically used for pies that have very juicy fillings!
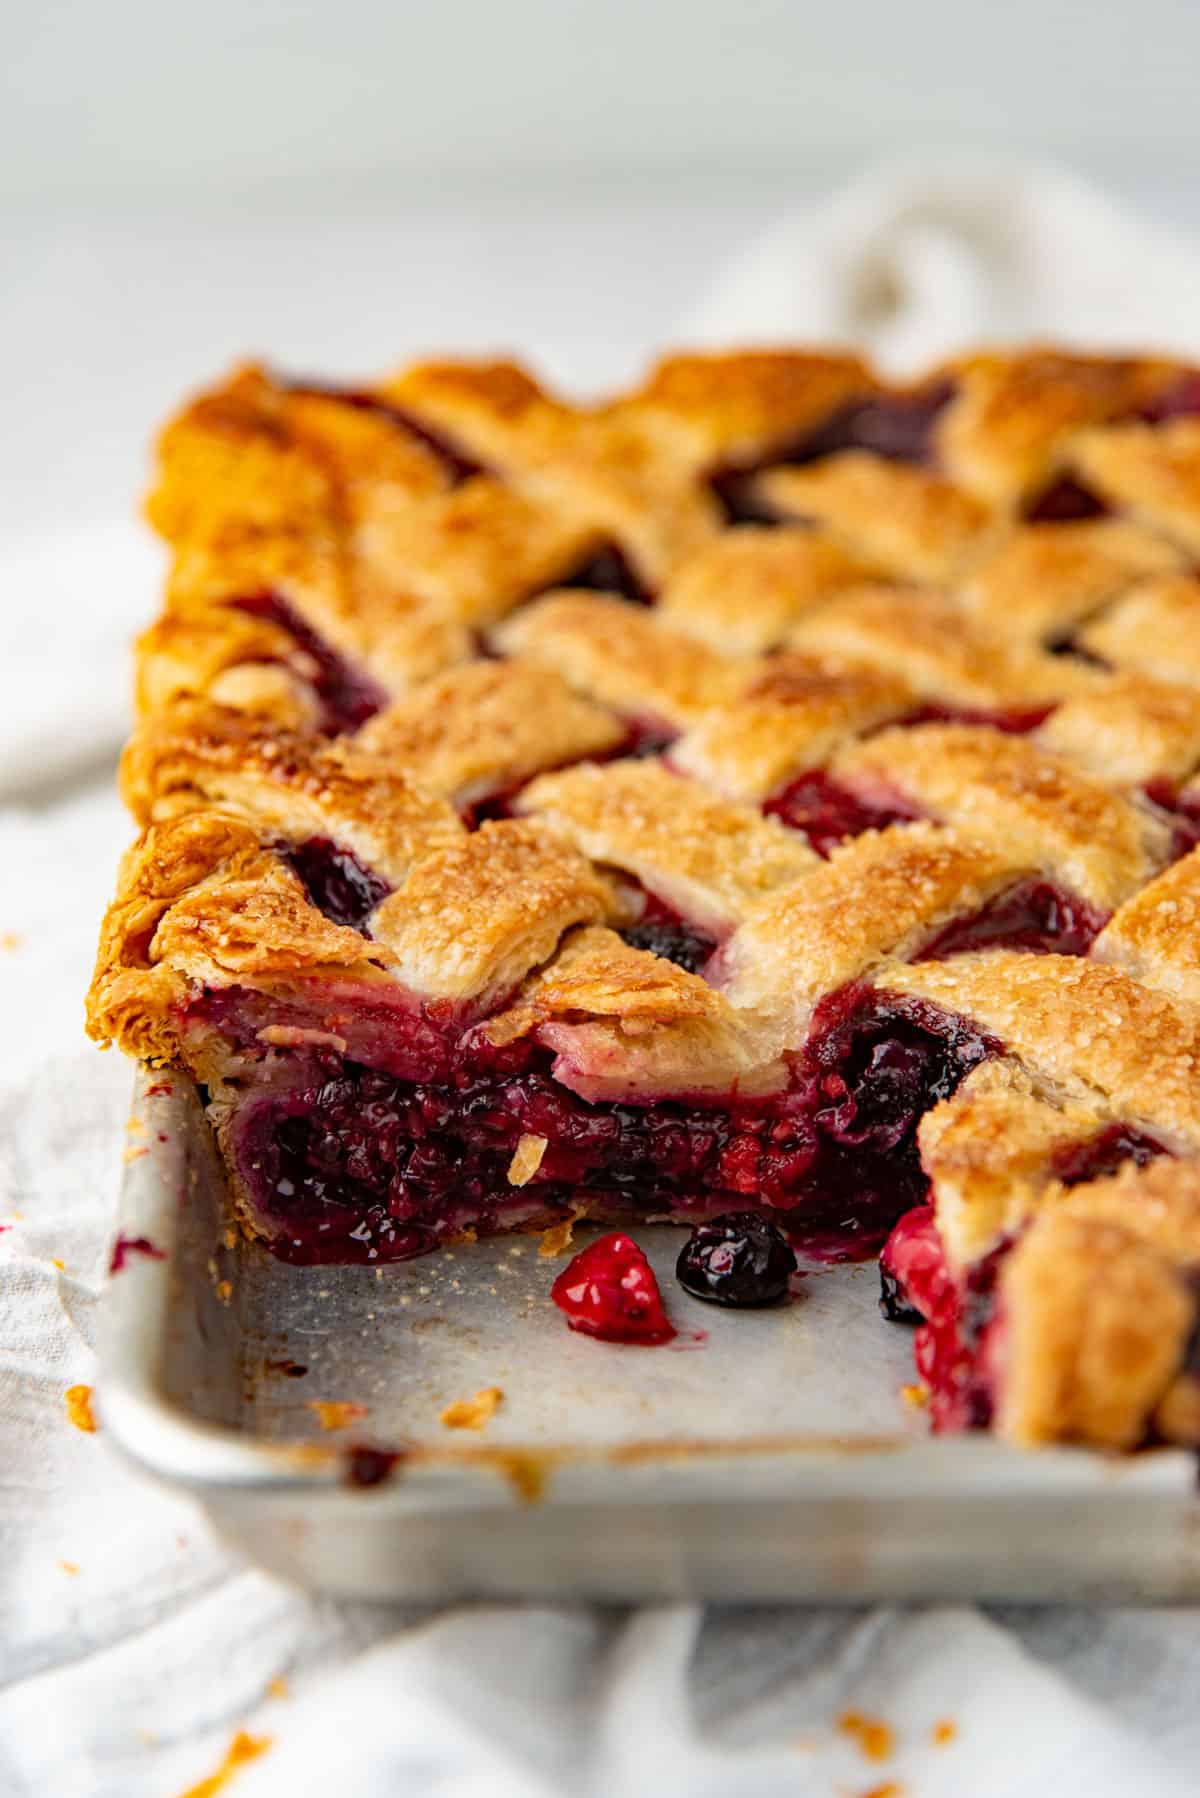
Venting is important for these types of pie, and cutting holes in the top crust is the main way these venting holes are created for pies. A lattice crust allows for multiple “holes” that will help the liquid in the pie filling to bubble and let steam escape, so that the filling thickens more.
Pies such as my,
all have super juicy fillings that can benefit from a lattice crust.
However, you can put a lattice crust on ANY kind of pie you like too. The “rule” is more of a suggestion, really.
You can also assemble a lattice crust in two different ways.
- Directly on top of the pie.
- On a separate surface (parchment paper-lined tray), and then transferred onto the pie.
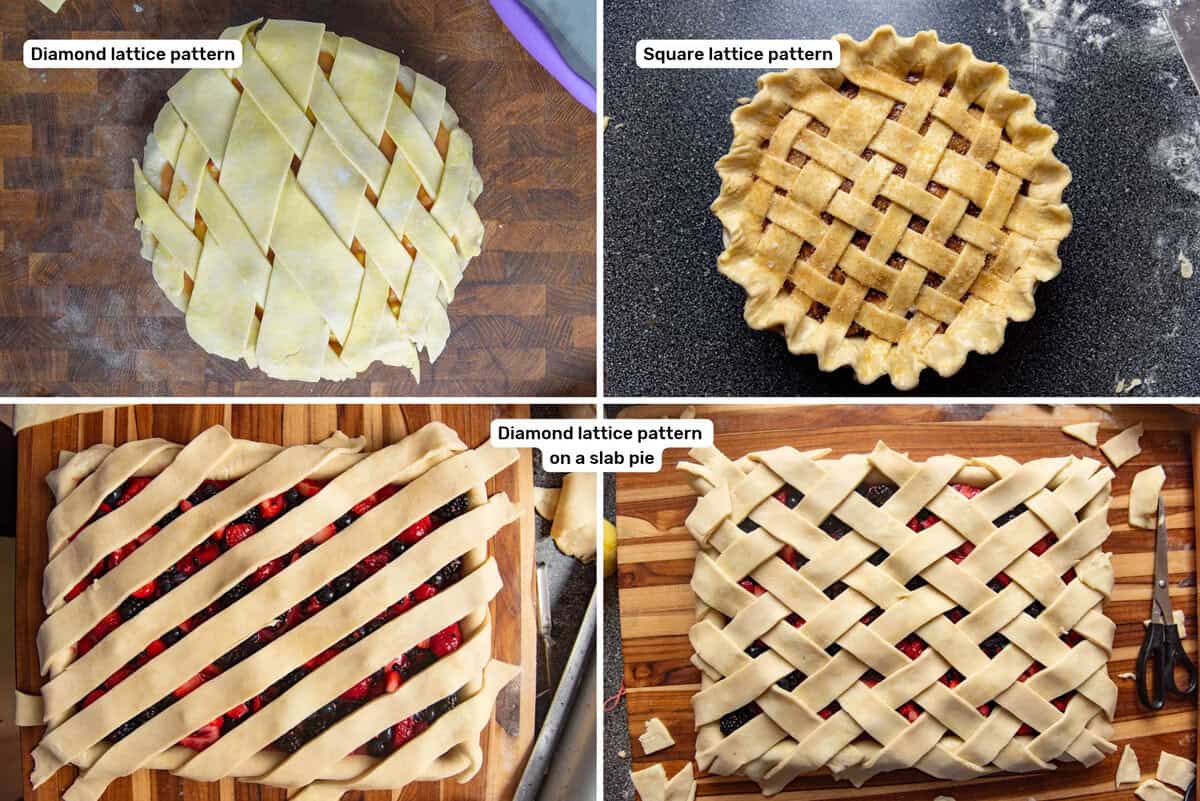
You can also make lattice crust with different patterns and variations too.
- Diamond shaped lattice
- Square lattice
- Thick strips
- Thin strips
- Straight edged strips
- Wavy edged strips
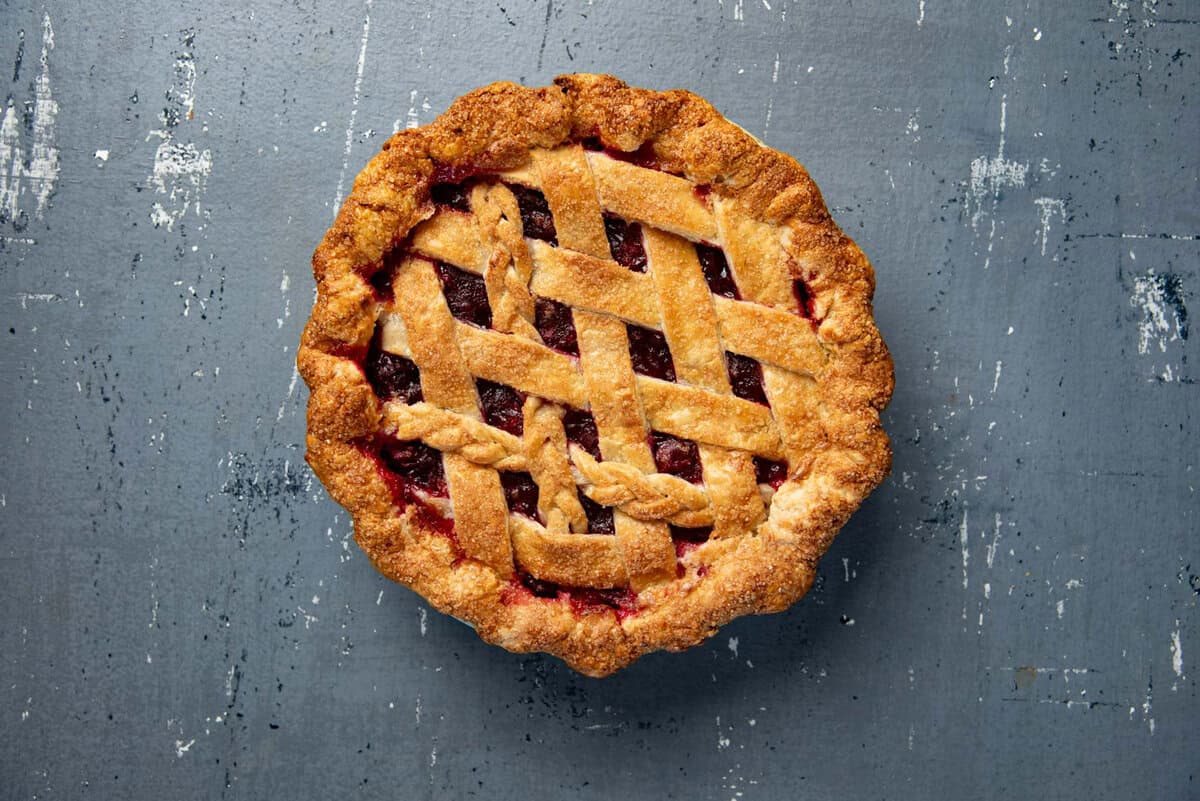
- Braided strips
- Lattice with spacing
- Lattice without spacing
- Even strips or even spacing
- Uneven strips or uneven spacing
Here’s what you will need
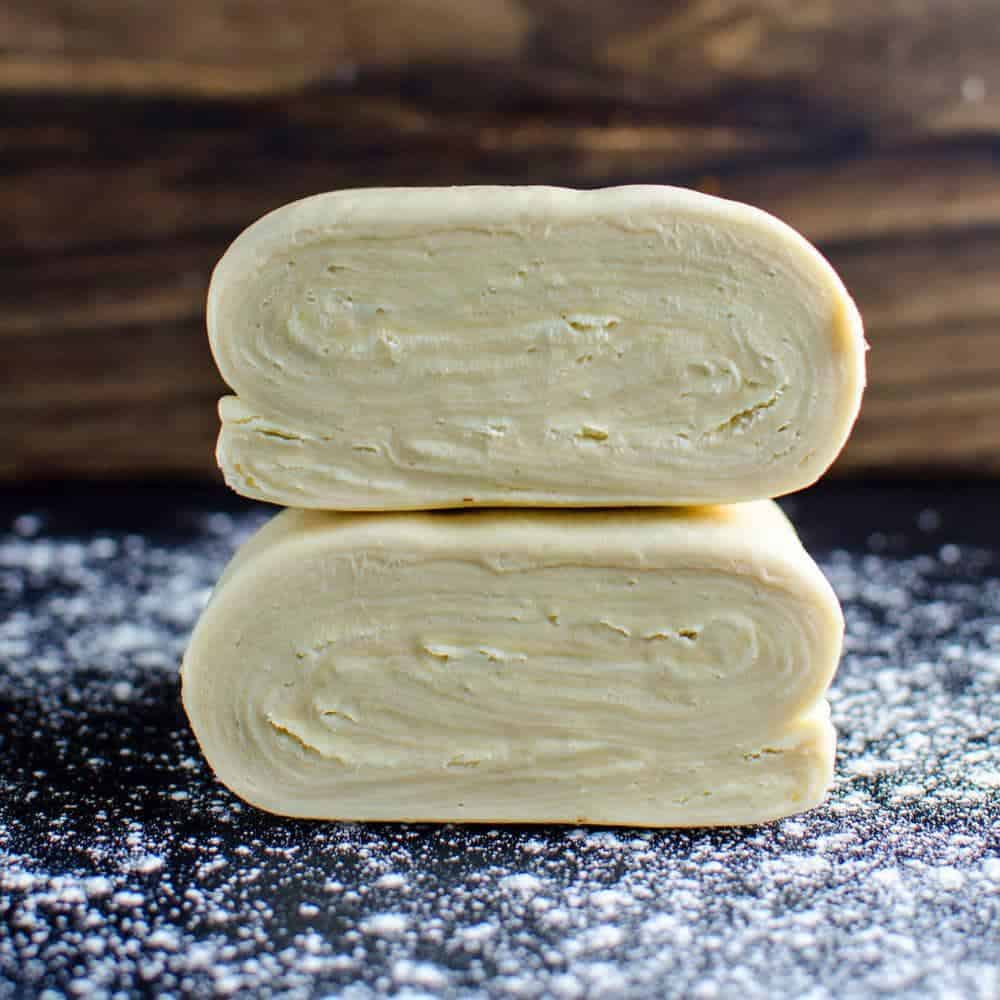
In my opinion, the best lattice crust is made with a buttery, flaky pie crust dough. There’s nothing quite like a lofty, flaky, super buttery crust on top of a pie! My all butter pie crust is absolutely perfect for a lattice!
To get the flakiest lattice crust, and to make it easier to make it and manage it, it’s best to keep the dough cold at all stages.
How to make a lattice pie crust (step by step guide)
Step 1 – Roll out the dough
The first step is to roll out the pie dough.
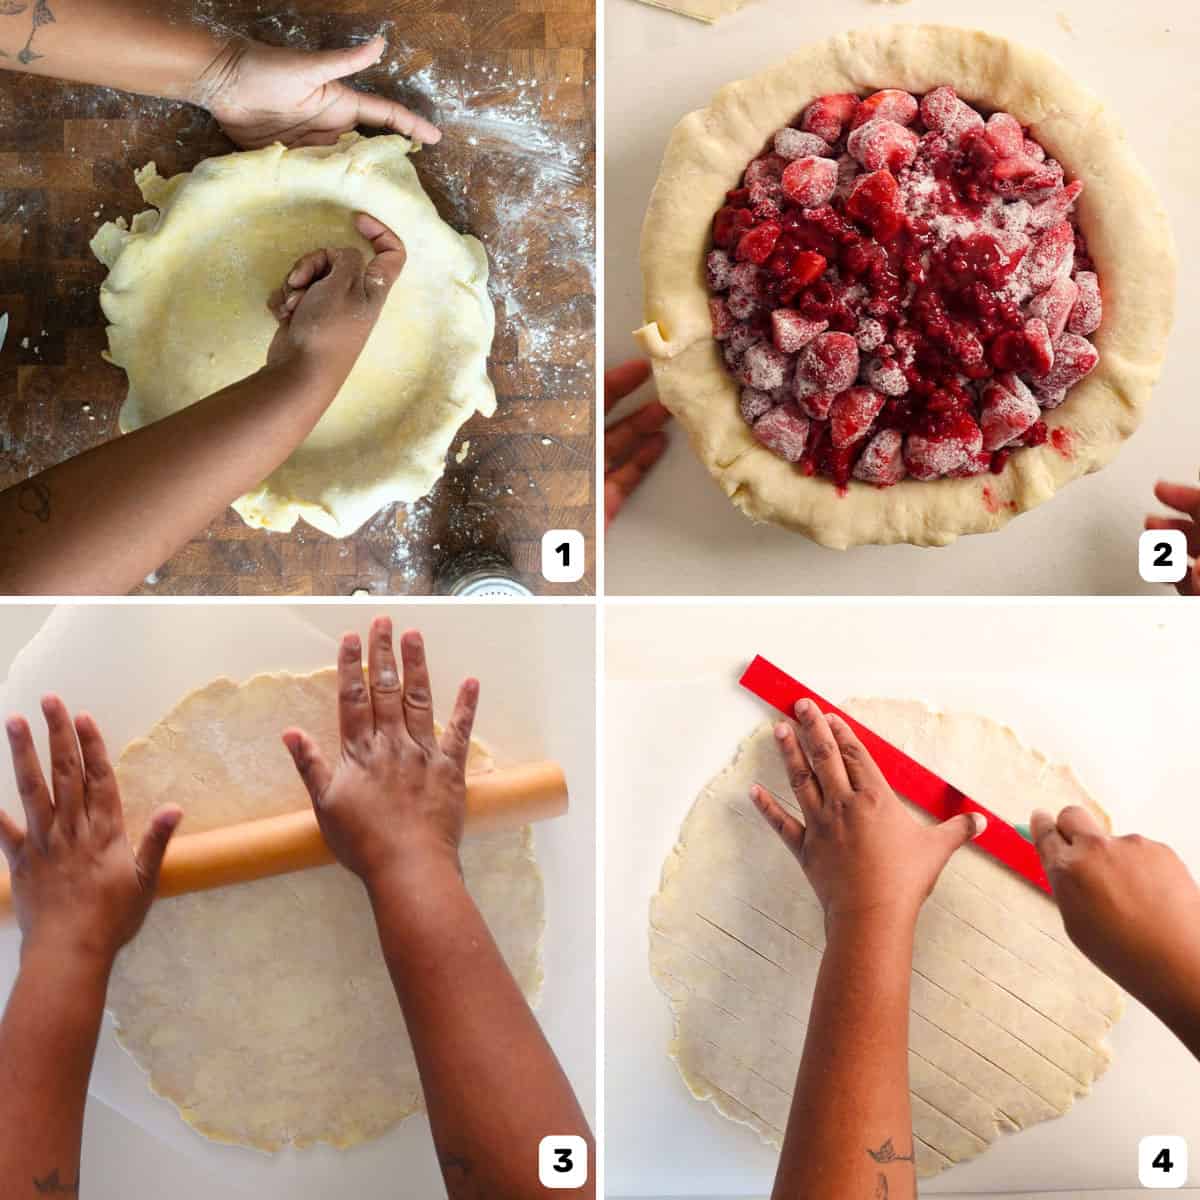
We’ll use one portion to line the pie plate, which is then filled with the desired pie filling (images 1 – 2). Make sure there’s a 1/2 – 1 inch overhang on the bottom pie crust (I prefer a larger crust edge, so I like to keep it at about 1 inch).
The second dough portion will be rolled out to create the lattice pie top (image 2).
Make sure the dough is rolled out to about a 3 – 4 mm thickness, and in the shape of the pie dish. For example, roll out the dough to resemble a circle for a round pie dish, or large enough to generously cover the surface area.
If I’m making a lattice crust for a sheet pan pie, then I make sure the dough is rolled out to a rectangle or oval shape that is generously large for the pie top.

If the dough resists when you’re trying to roll it out (becomes springy or elastic), then it’s important to wrap the dough with plastic wrap and let it chill and rest in the fridge or at least 30 minutes before continuing to roll it out again.
It’s also important to wrap and chill the dough any time the dough softens and the butter starts to melt, and the dough gets sticky.
Only lightly dust the dough with flour as needed to prevent it from sticking to the counter.
Step 2 – Cut strips
Once the dough is rolled out, it’s time to cut it into strips.
There are lots of different lattice pie crust designs and ways to make them. This will depend on what kind of pattern or look you want for your pie!
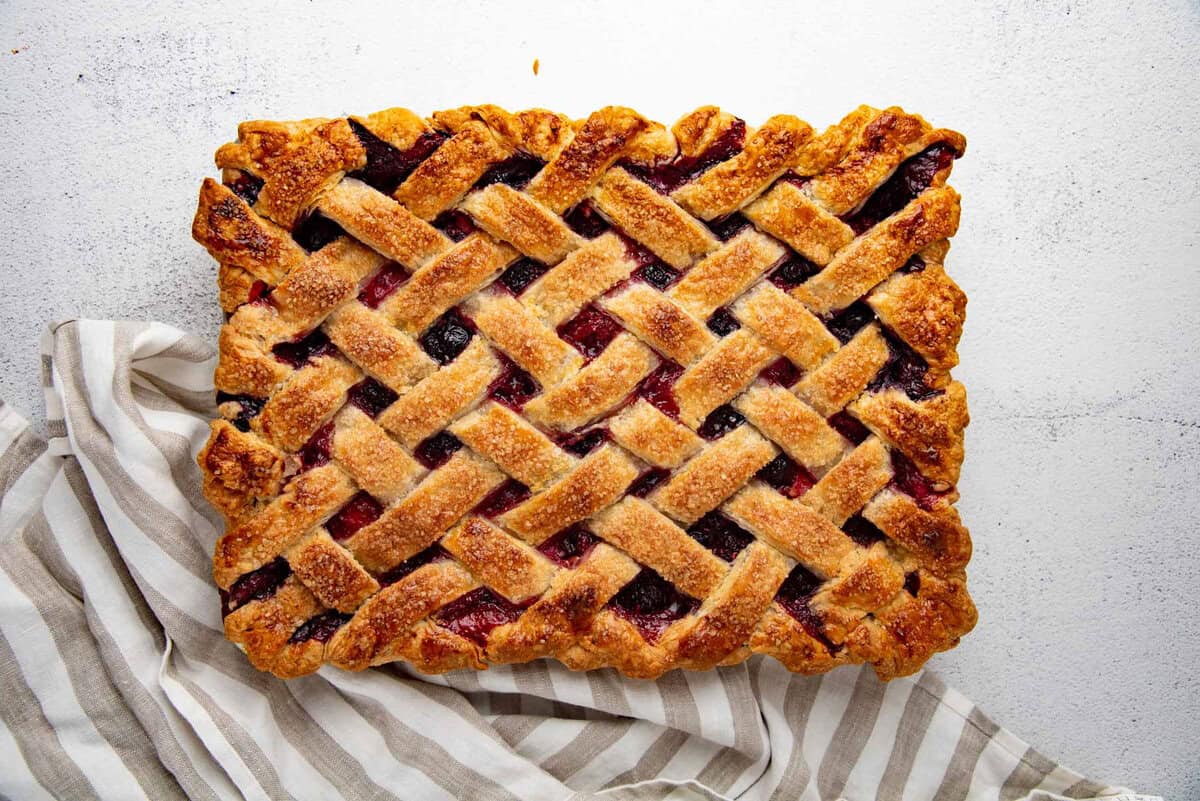
For a circle pie, it doesn’t really matter in which direction the strips are cut. But, if you’re making a slab pie like this berry pie, it’s important to cut the dough rectangle in the direction in which you’ll be laying down the strips on the pie.
The width of the strips can be any thickness you prefer. I like to use my dough spacer to cut evenly wide strips (image 4). You can use something similar to easily cut even strips that are evenly spaced out.
Since my dough spacer strip is 1 inch wide, I can easily cut 1 inch thick strips, AND 2 inch strips. I can also cut the 1 inch thick strips in half lengthwise to make 1/2 inch strips.
Once the strips are cut (image 5), transfer them onto a parchment paper and cover with plastic wrap. These strips can be used to make a lattice crust right away, or stored in the fridge for later.
Step 3 – Make the lattice crust
You can also decide if you want to assemble the lattice crust ON THE PIE directly, which is the standard way of making a lattice pie top. The strips do get the pie filling on them as you weave them.
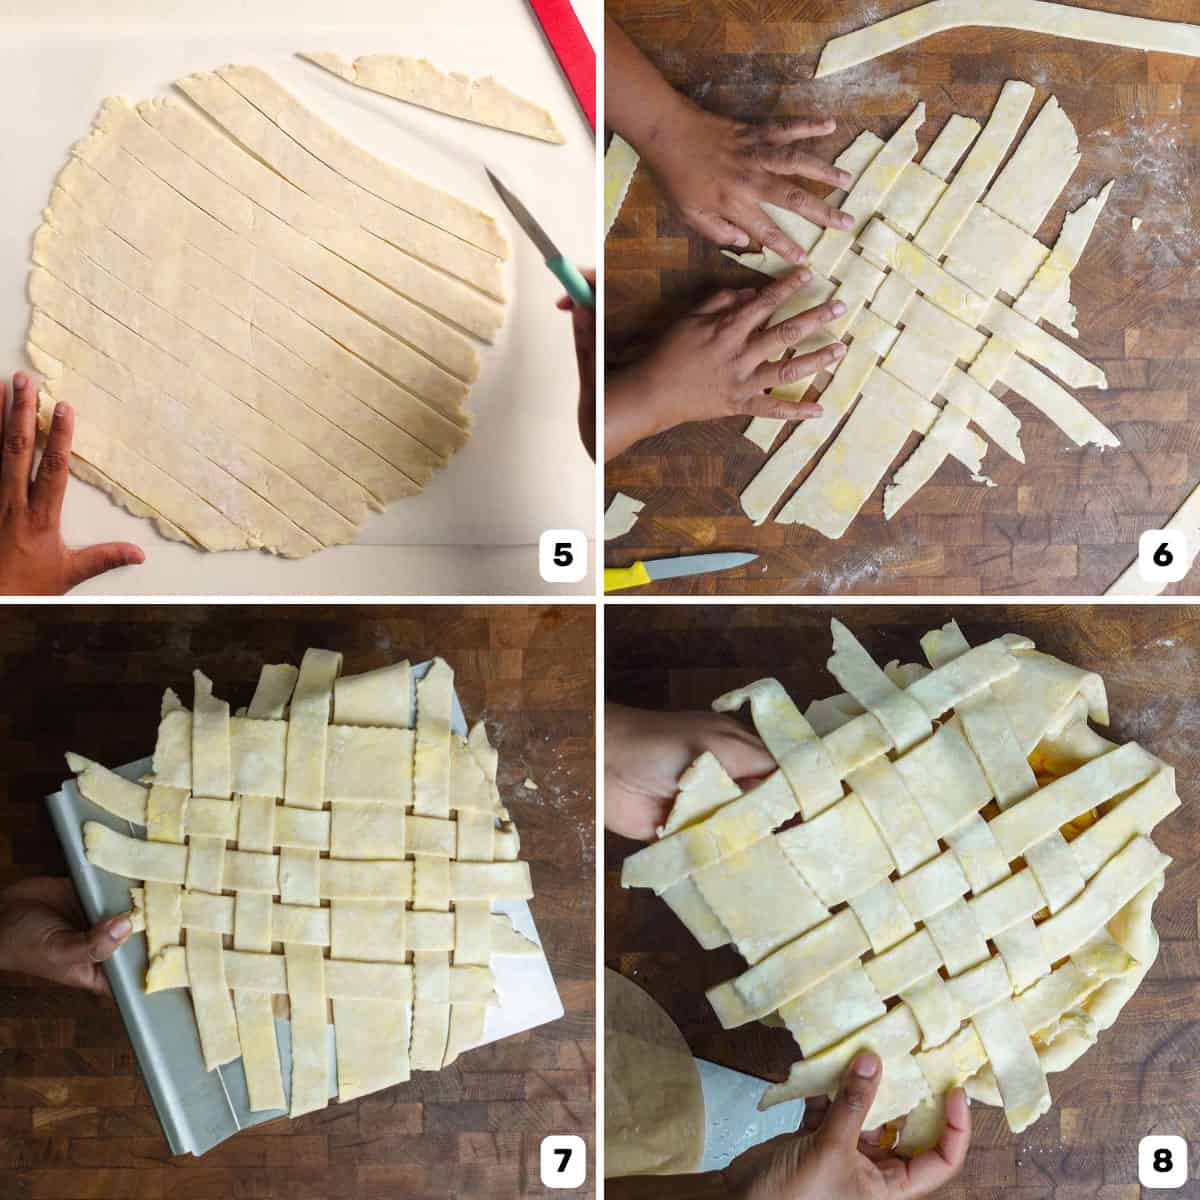
OR you can form the lattice on a separate parchment paper-lined tray to form the crust too (images 6 – 7). This method is great for beginners, if you want to practice making the lattice without getting pie filling juices on them as they figure out the weaving pattern. You can then directly place this on the pie surface (image 8).
I like to cut my dough sheet into at least 11 – 12 strips.
It’s important to choose the right length of strips for your pie. The longer strips for the center or the pie (or the longest length of your pie).
Then shorter strips towards the sides. IF your dough strips aren’t long enough, then simply stick two pieces together and you can hide the seam under a lattice weave.
Place 5 – 6 strips of dough in one direction, parallel to each other, either directly on the pie, or on a parchment paper (image 9). Make sure the edges are long enough to reach the edges of the pie plate (and bottom pie crust). In the images below, I’ve numbered and color coded the strips so it’s easier to follow along.
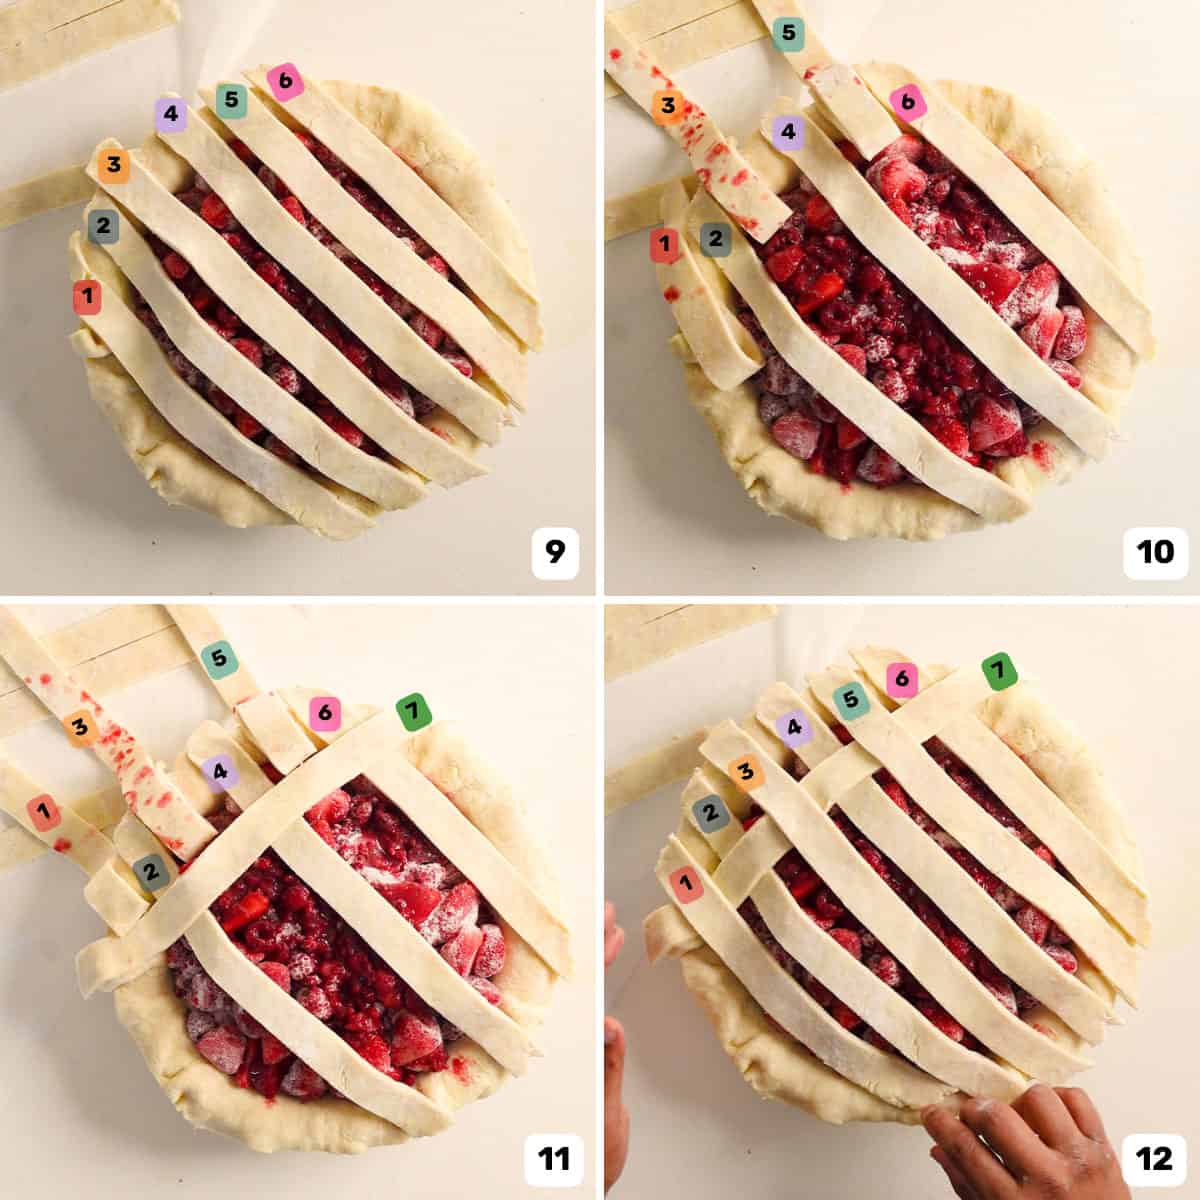
Now, start placing the next set of dough strips in the other direction (either at 90 degrees for a square lattice, or at an angle for a diamond lattice pattern).
To create the woven pattern in the lattice, gently fold back the odd numbered strips from the first set (image 10) (alternating strips), and place the new dough strip (strip 7) underneath (image 11). Then fold over the first set of dough strips on top of the newly placed strip (strip 7) (image 12).
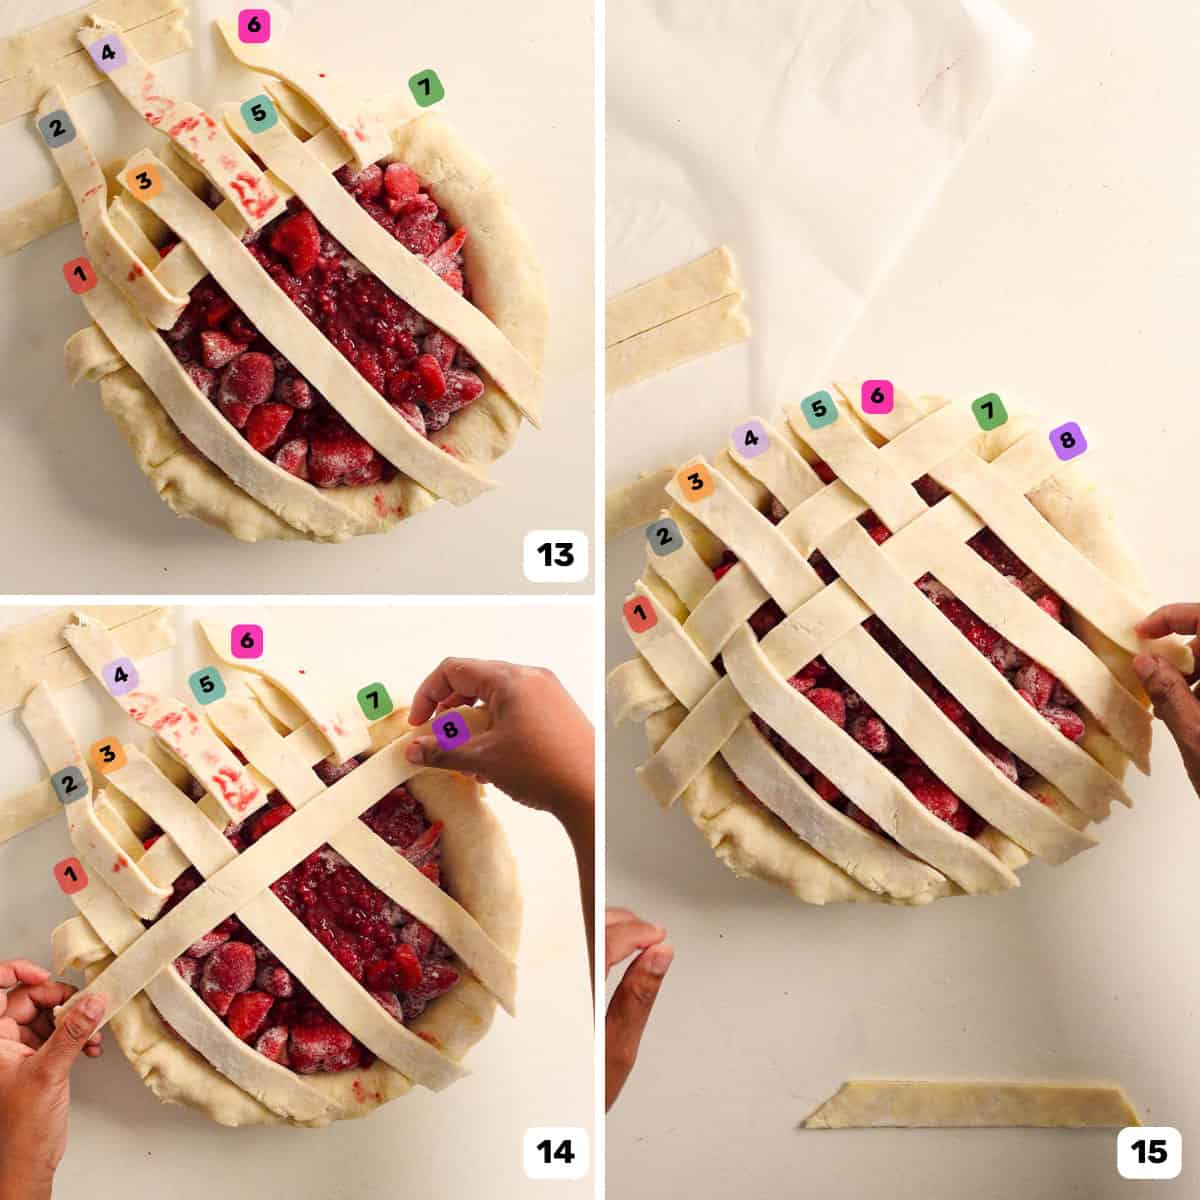
Now fold back the even numbered strips (strip 2, 4, and 6) (image 13), before placing the new strip (strip 8) (image 14). Then when the even numbered strips (4 and 6) are folded back, strip 8 looks like it was woven through the opposite way to strip 7 (image 15).
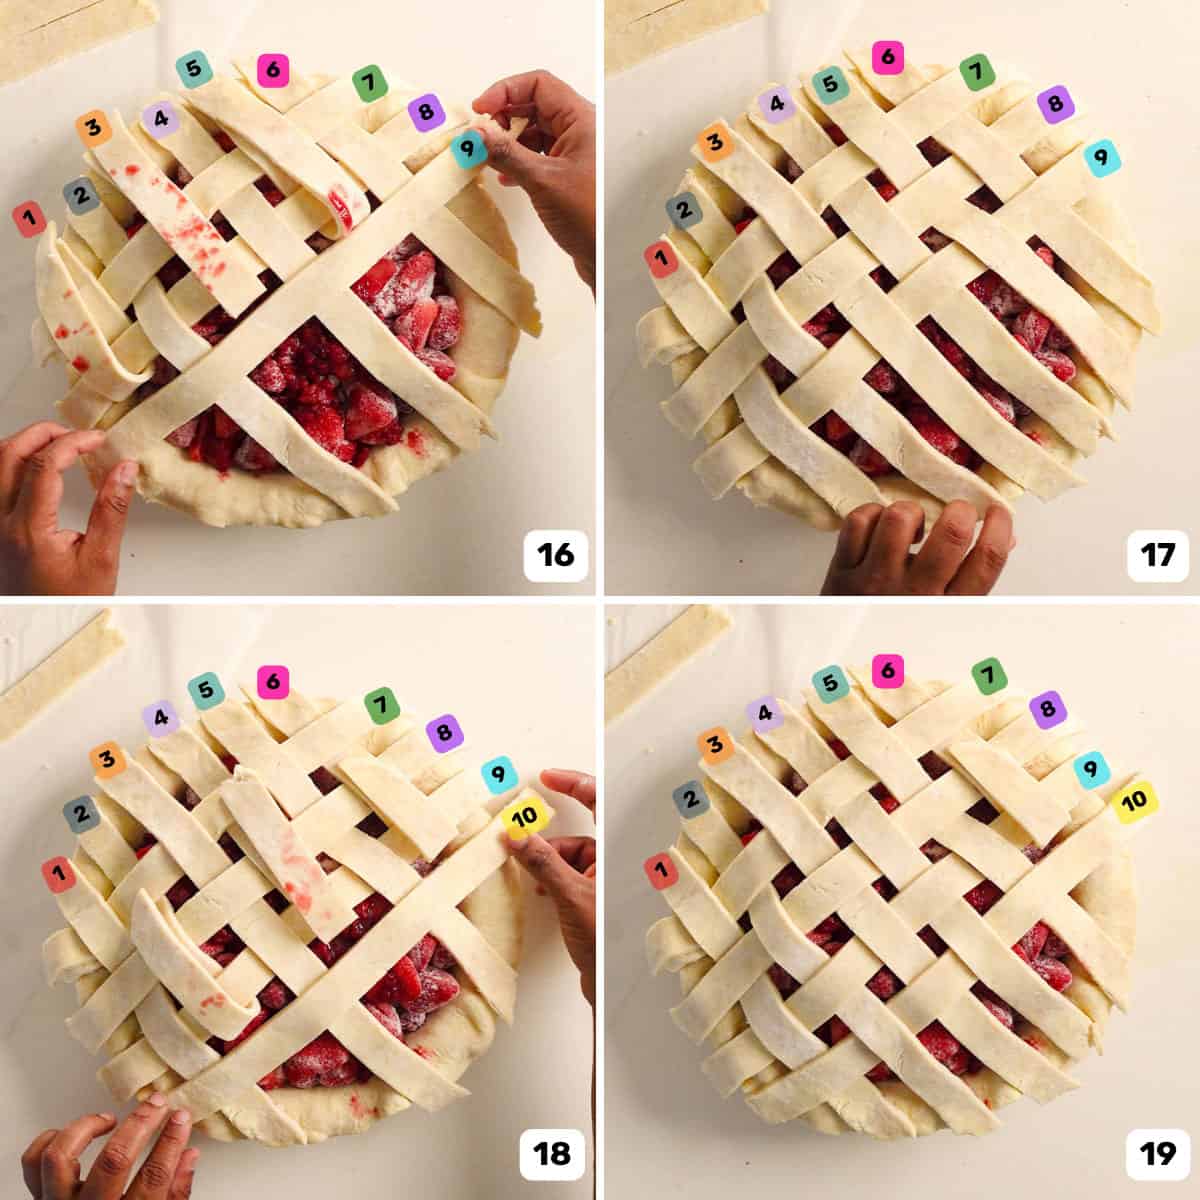
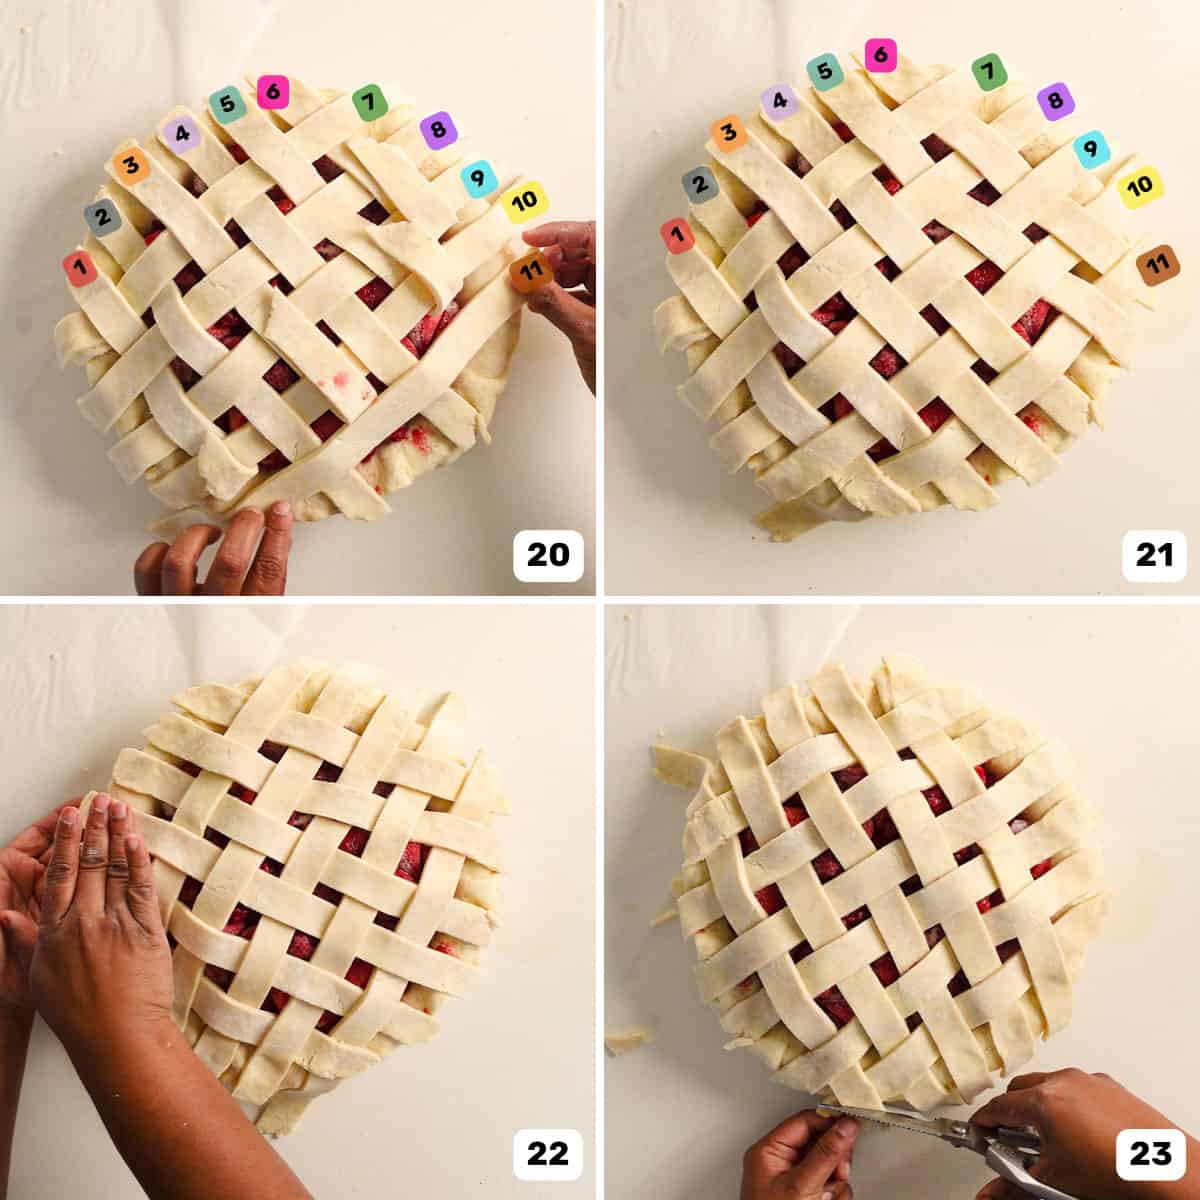
Now, fold back the odd numbered strips again, and continue with another dough strip (strip 9) (images 16 – 17), and then with the even numbered strips (images 18 – 19). Continue this pattern (images 20 – 21), until you have covered the surface of your pie with woven dough strips, with even spacing between them (image 21).
Step 4 – Seal and trim the lattice
Once the lattice is completed on the pie, press down the edges to seal them with the bottom crust (image 22). If the dough is a little dry, then use just a little water to help seal them together, but I don’t find that necessary with homemade pie crust.
Then trim off the excess to match the overhang of the bottom crust (image 23).
Step 5 – Form the crust
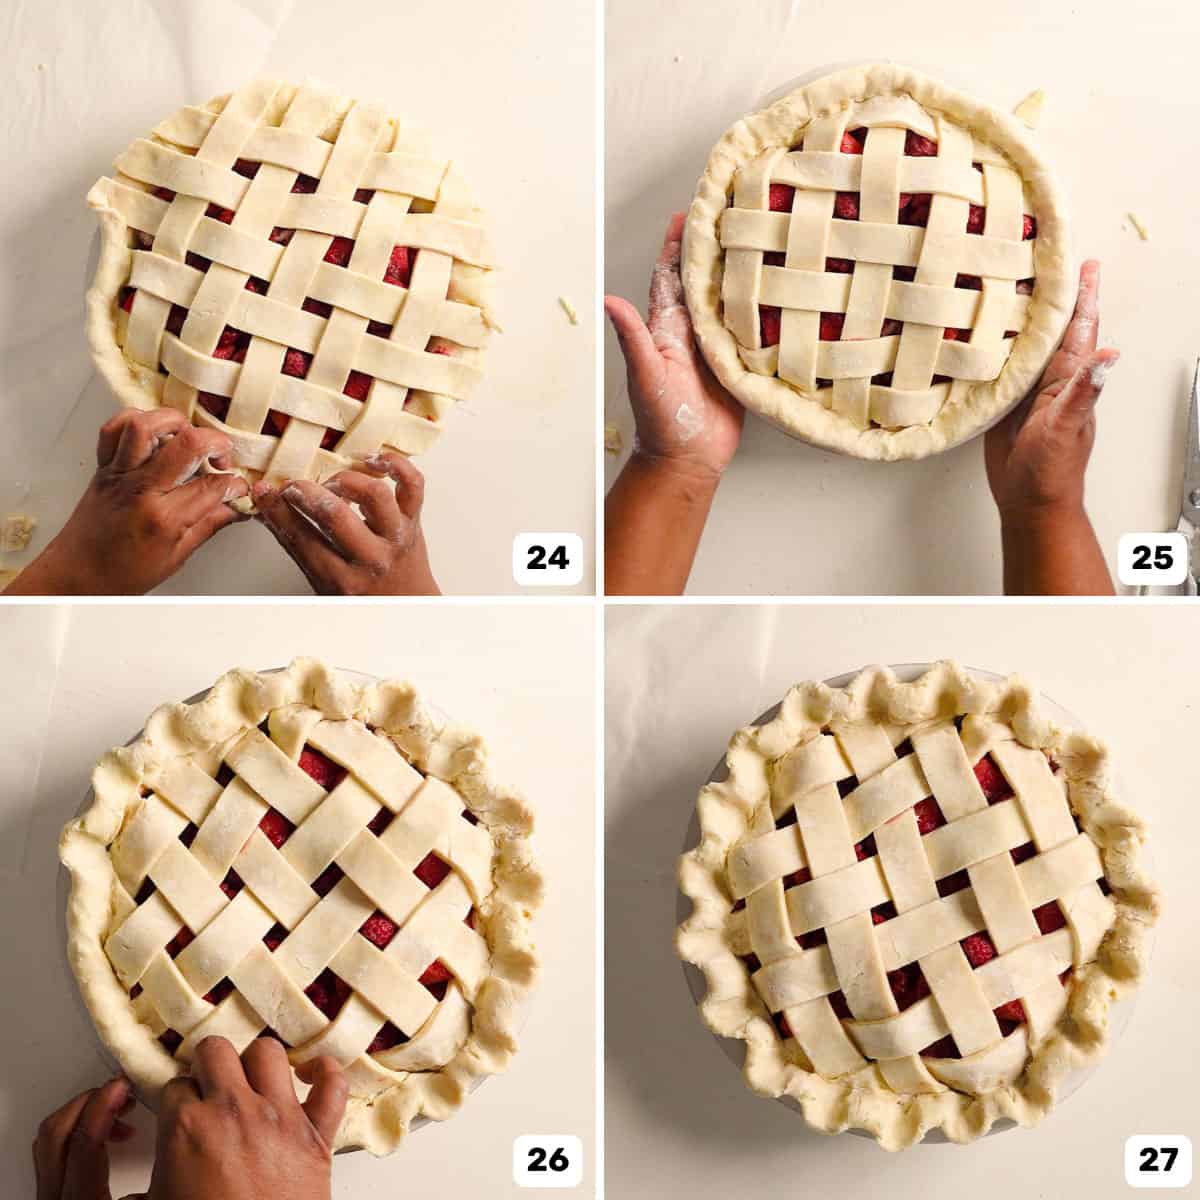
Start rolling up the overhang to form the crust along the edge (image 24). Roll up the crust until you reach the edge of the pie plate. Then continue to roll up the edge to form an even border along the edge of the pie (image 25).
Create a fluted edge (images 26 – 27), and then transfer the pie into the fridge to chill for at least 30 minutes. You can also create the fluted edge AFTER the pie has chilled for 30 minutes, especially if the crust is soft and sticky.
Step 6 – Bake
Chilling the pie before baking helps to reharden the butter to create flaky layers as the pie bakes, AND for the dough to rest so it won’t shrink in the oven.
The oven should be preheated for at least 45 – 60 minutes. Which is why I like to turn on the oven when I start to form the lattice crust.
A half sheet pan will be placed on the lowest rack of the oven, so it can preheat along with the oven.
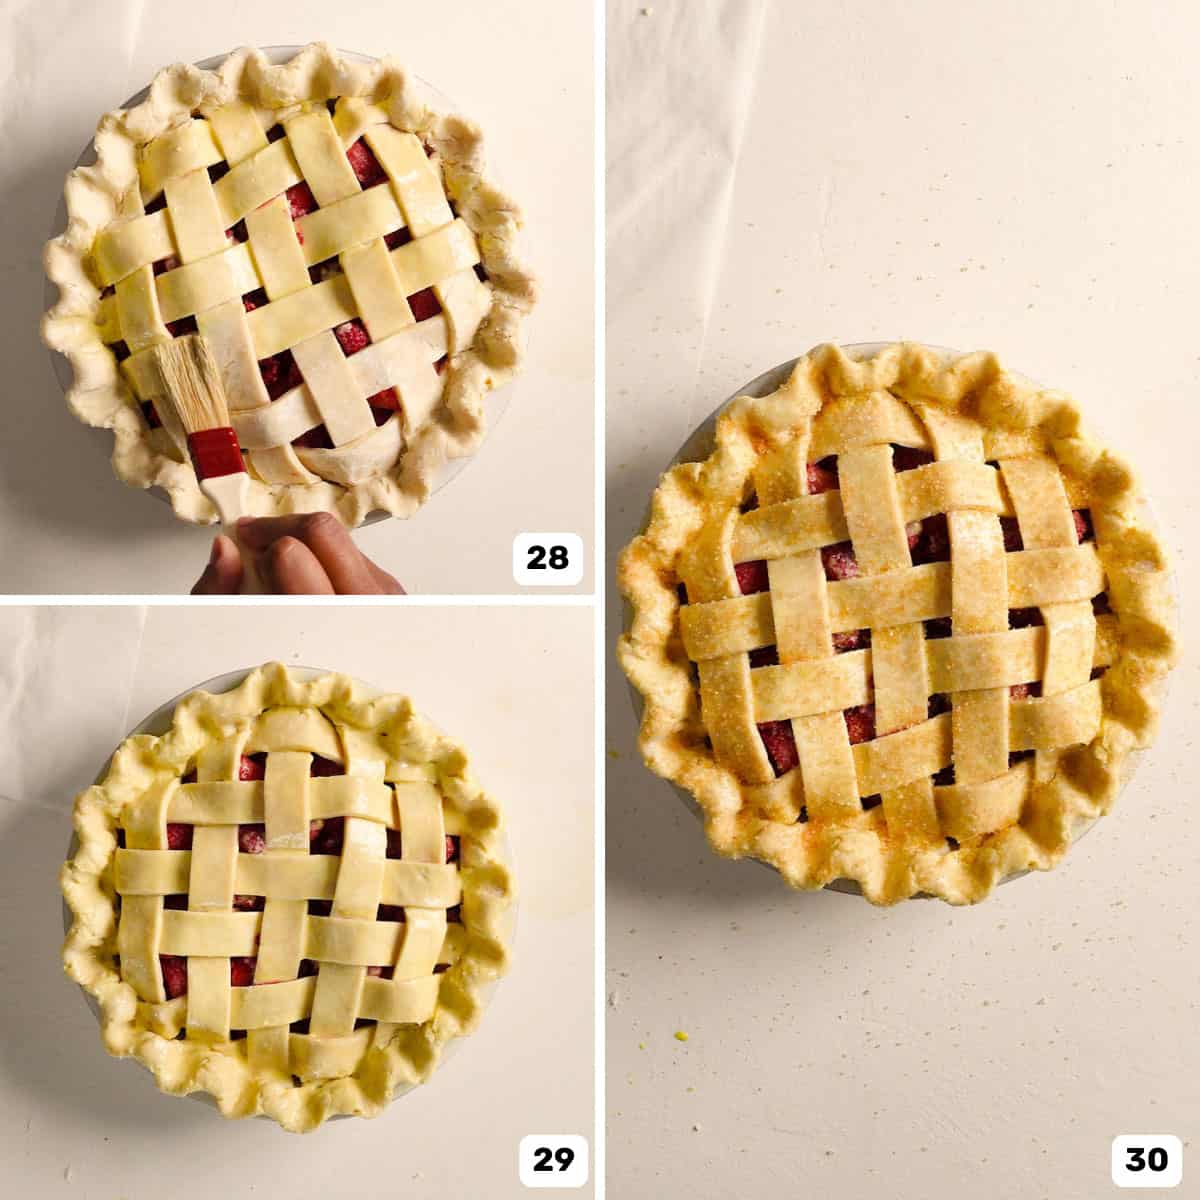
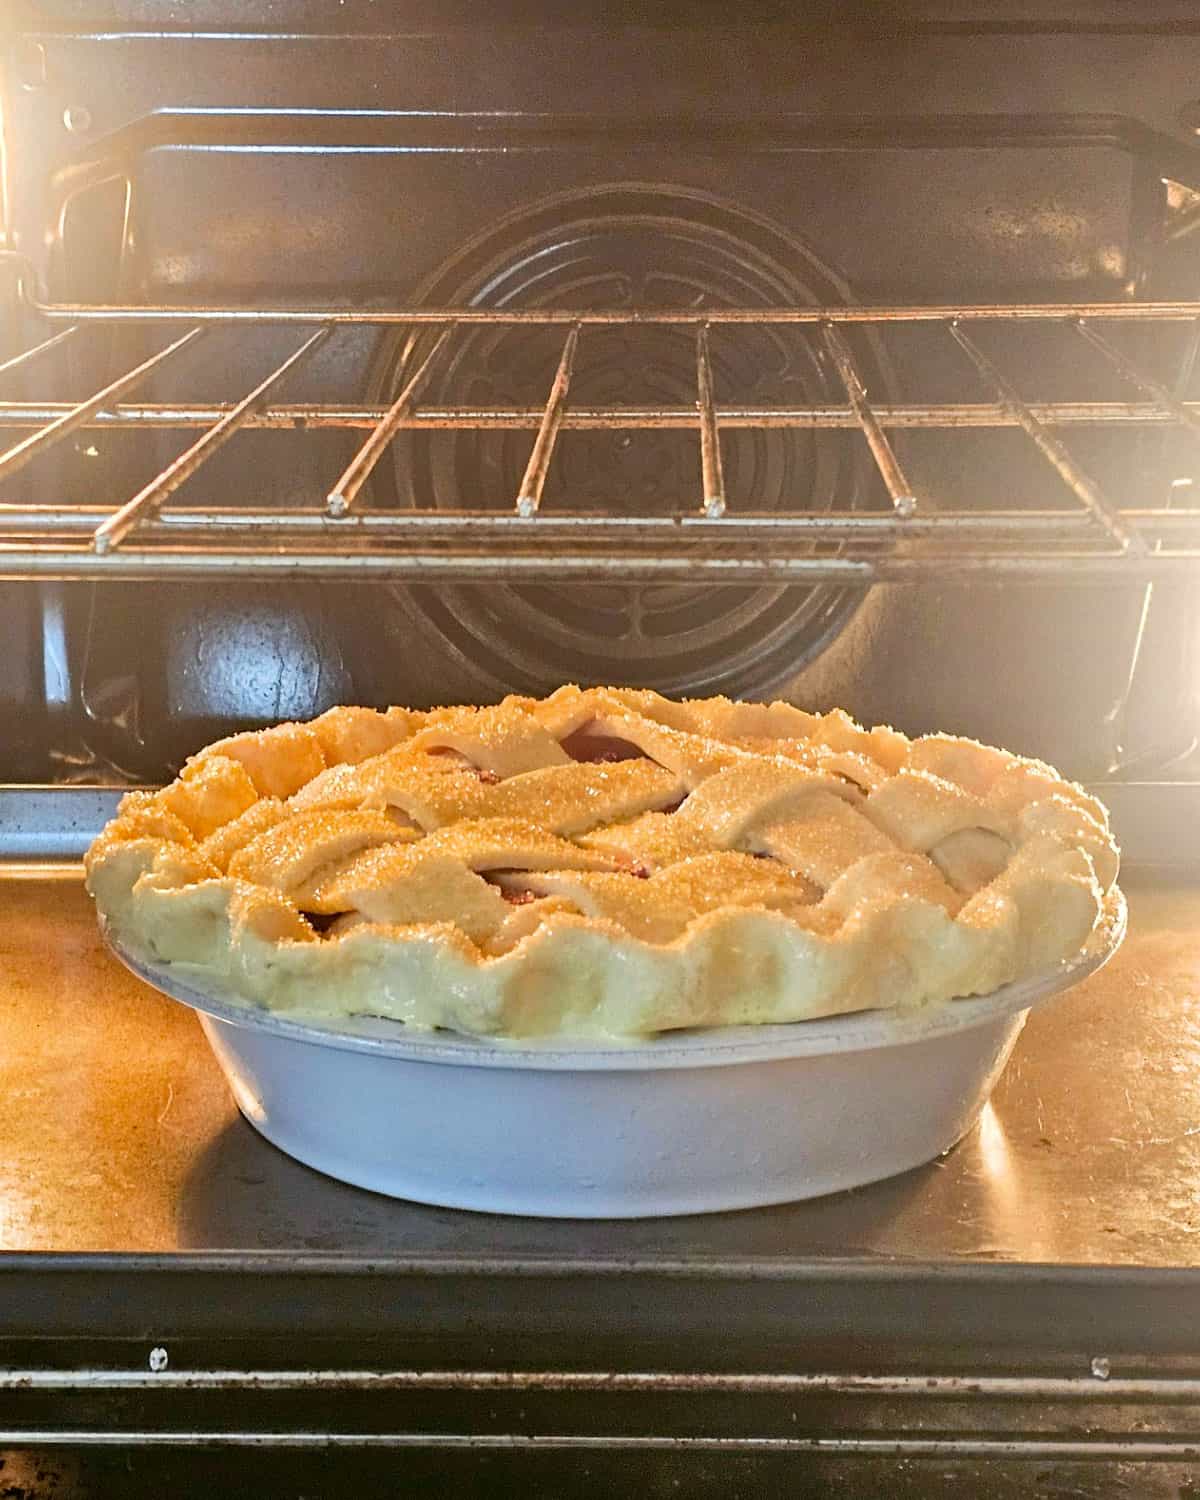
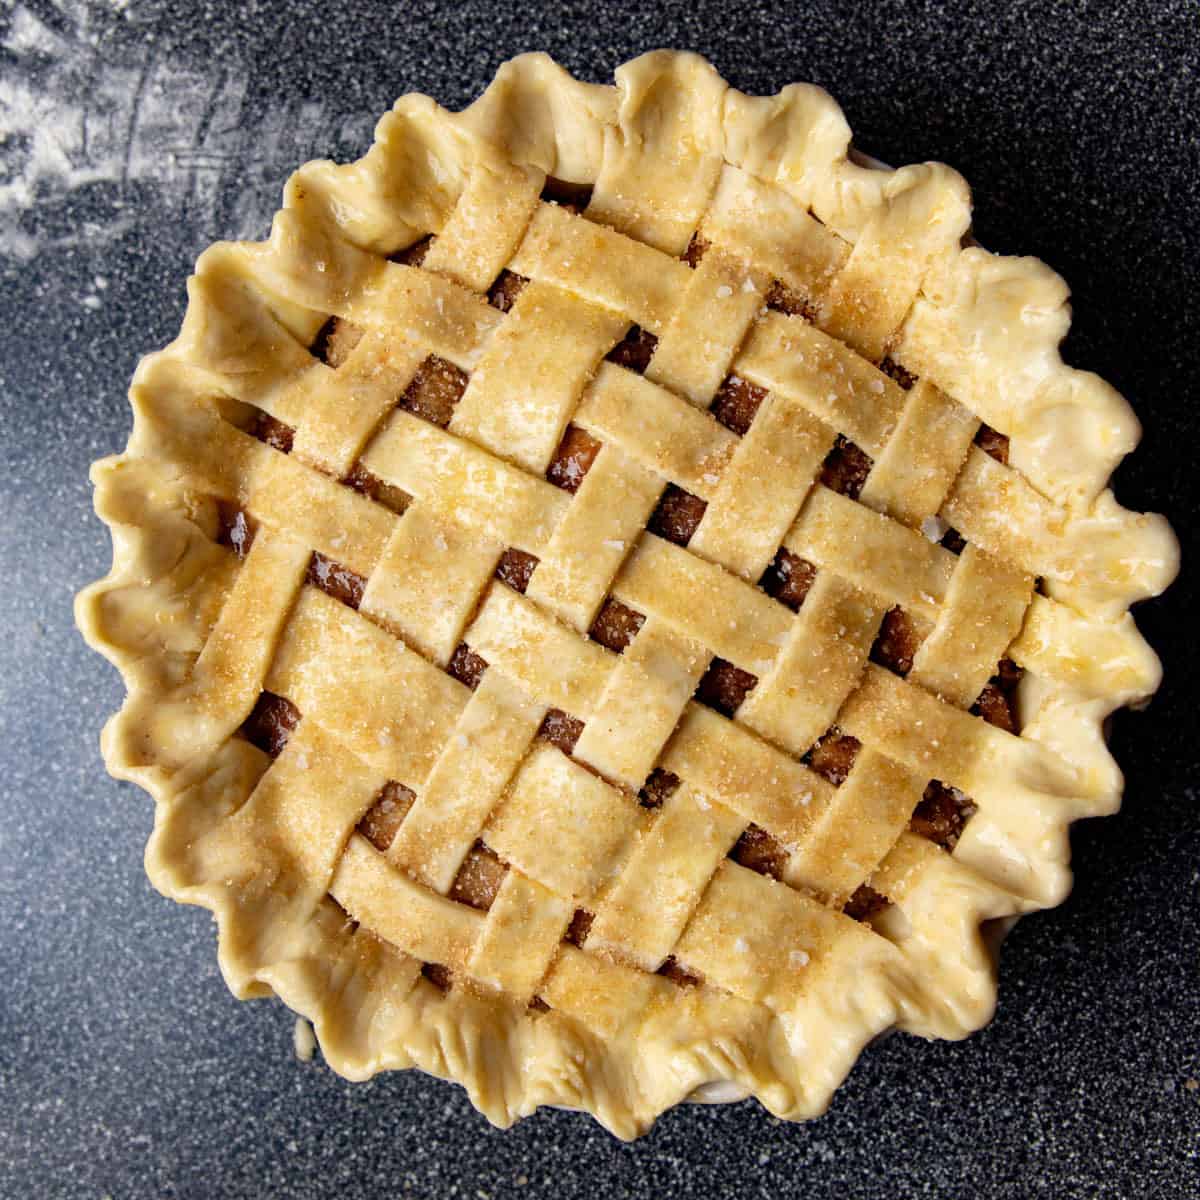
Once the pie is chilled, brush the surface with an egg wash to get that shiny surface, and sprinkle the surface with raw sugar (images 28 – 30).
Then place it on the preheated baking tray and bake for about 60 minutes, or according to your pie recipe instructions.
Step 7 – Cool and serve
The hardest part of making a pie is probably waiting for the pie to cool down before cutting into it!
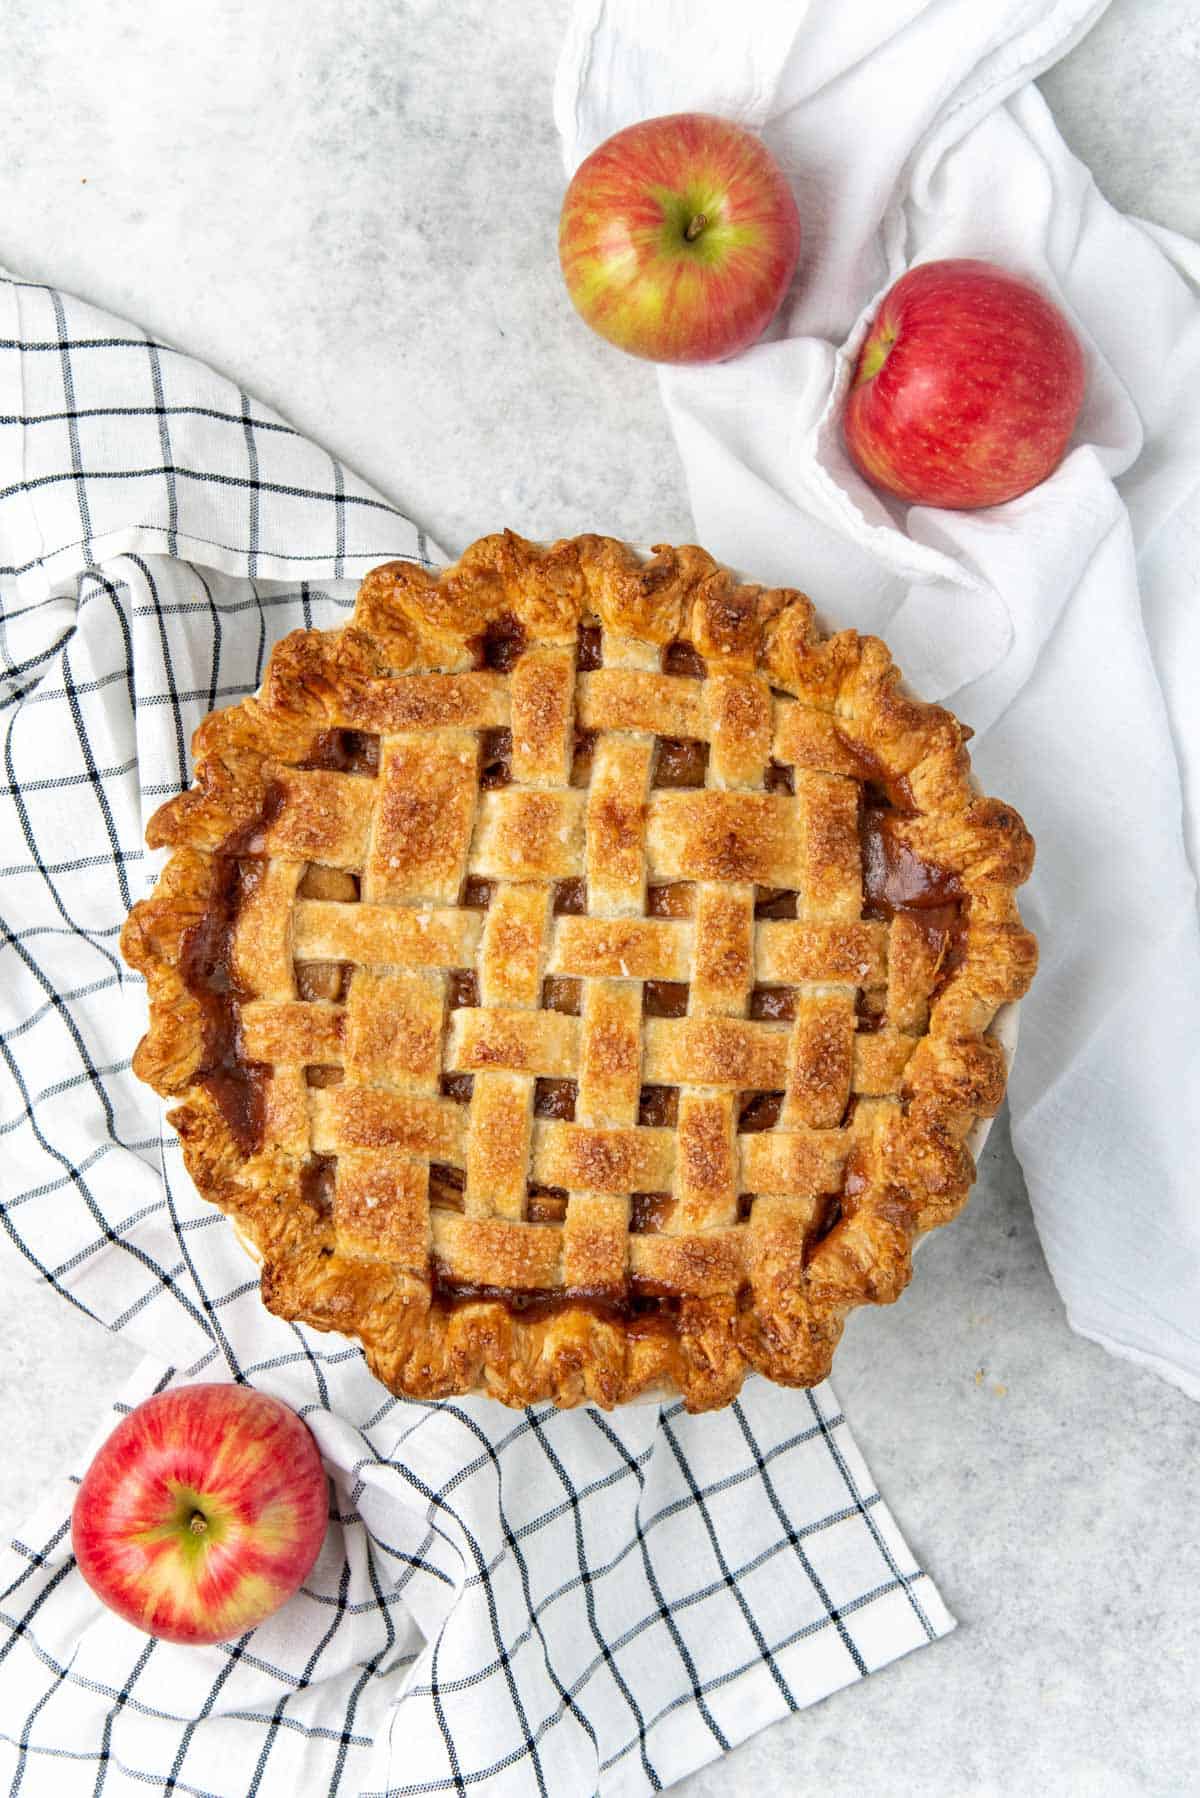
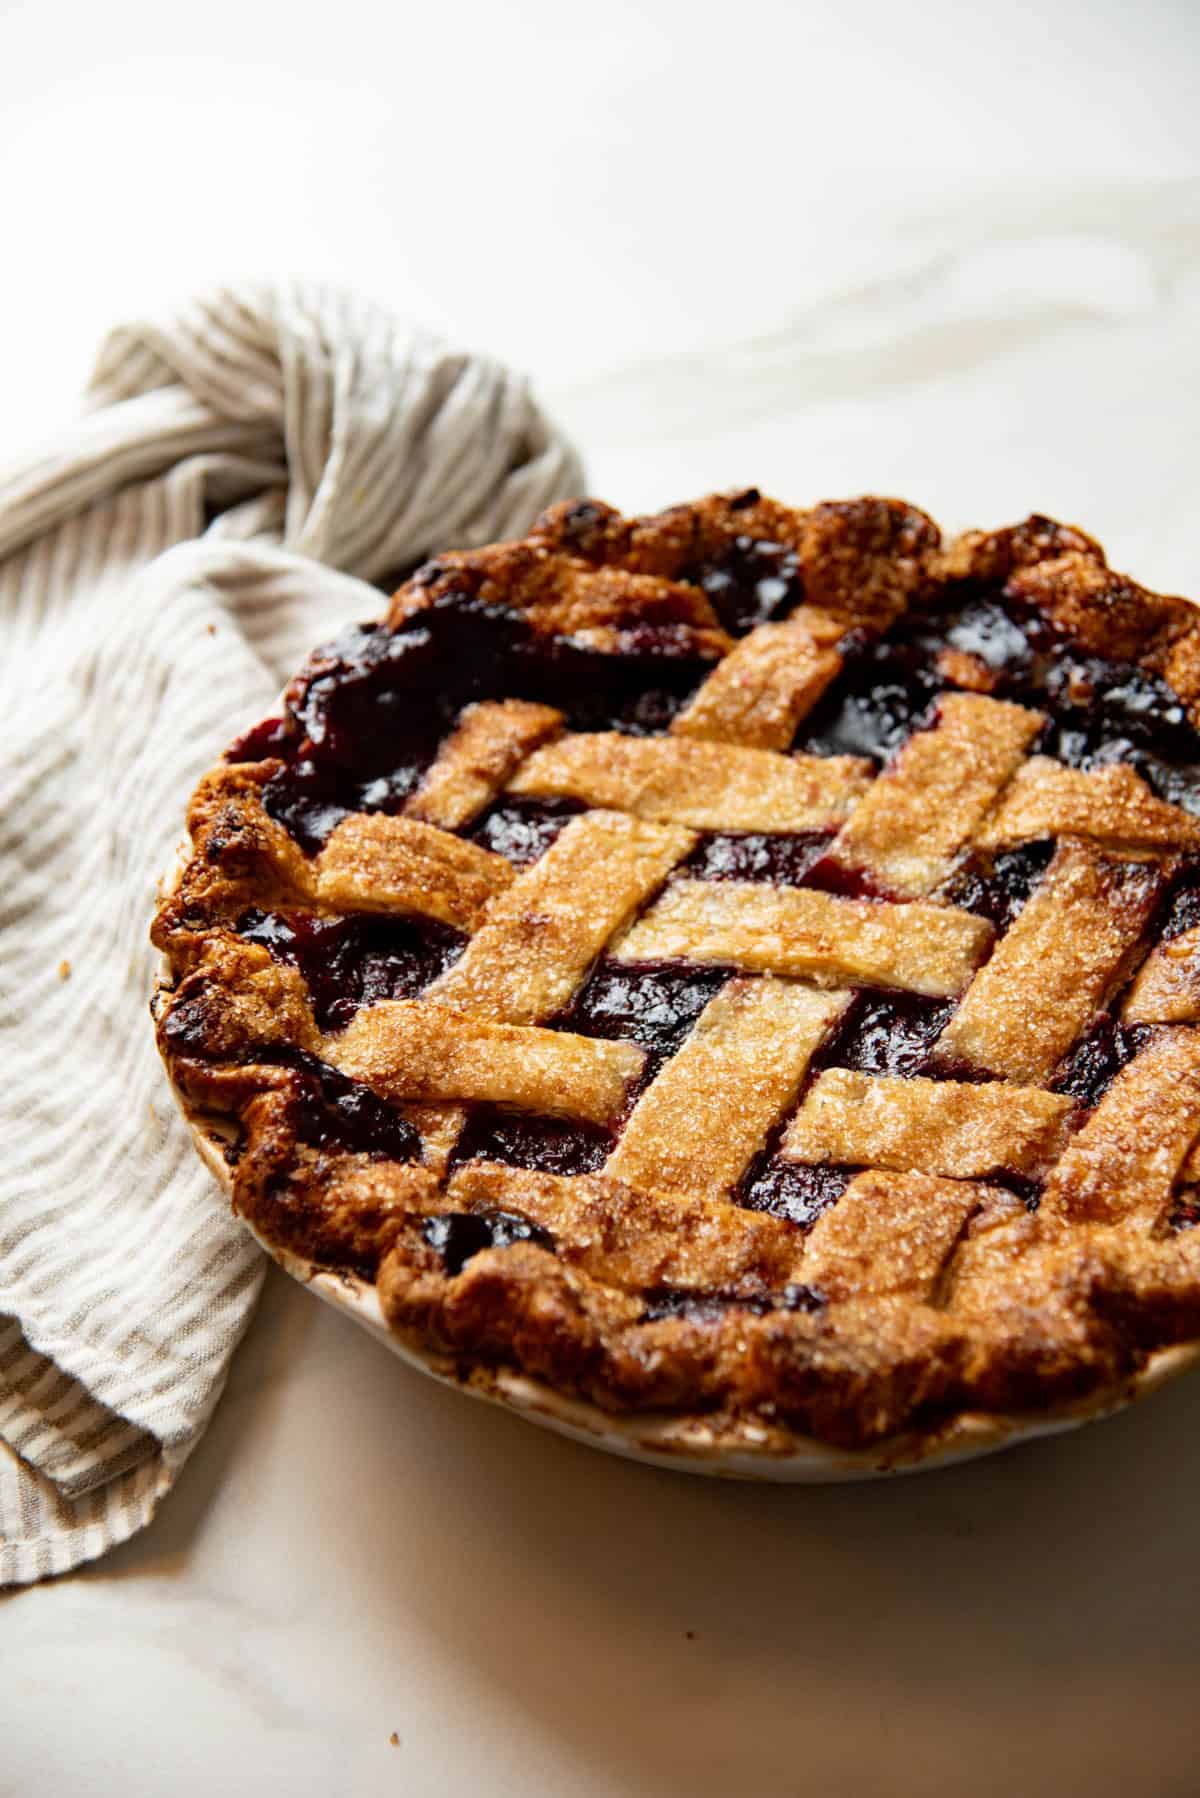
It’s the same for lattice crust pies! But the reward is a flaky, buttery, beautiful pie crust on top as well as on the bottom! Along with a juicy pie filling!

Tips for a perfect lattice crust
- Make sure the pie dough is always chilled when working with it. If the dough is too warm or sticky when handling, the crust can end up rubbery and tough.
- A chilled pie dough will have chilled butter within the dough, and make the pie crust that much flakier and more tender.
- Roll out the dough to ensure that it’s large enough to cover the pie plate you’re using, but also resembles the shape of the dish without being too thin. I.e. square / round vs oval / rectangle.
- Decide on the type of lattice crust design you want, and make sure you have enough dough for the design.
- If the dough strips aren’t placed with any spacing in between, then you will need MORE dough to cover the pie (more than a single pie crust).
- However, if there’s a larger gap between dough strips, then you won’t need extra pie dough.
- A lattice crust is very easy to weave. But if you’re a beginner, it may seem confusing to create the woven pattern. To make it easier, you can create the lattice crust separately and then transfer it onto the pie.
- You can connect two strips to make a longer strip of dough, if you need to. Just slightly overlap the ends and press them together. However, I like to cover the seam when weaving the lattice crust. This way, the seam is hidden under a dough strip and isn’t visible.
- When forming the crust edge with the lattice top crust, I like to roll up the crust edge in a way the lattice strips are secured safely within the bottom crust.
- Chill the pie well before baking, so that the crust can retain its shape better as it bakes.
- To ensure the lattice crusted pie bakes well, treat it like a double crusted pie.
- Preheat the oven to 400°F with a half sheet pan on the lowest rack of the oven.
- Place the pie on this preheated sheet pan in the preheated oven, and bake at a higher temperature for about 5 – 10 minutes first, and then lower the heat and bake the pie the rest of the way at the lower temperature.
- This ensures the pie crust bakes well from the bottom, and the top crust can retain its shape with the higher temperature at the start, and then bake evenly at the lower temperature.
Make ahead and storage tips
You shouldn’t store a pie dough in the fridge for longer than 5 – 6 days, so it’s important to use it within that time frame.
Likewise, you should bake an unbaked lattice pie crust within 5 days of making the pie dough.
However, you can make the pie and freeze it for later! I haven’t tested how long it can be stored in the freezer, but I have stored pies in the freezer for up to 2 months before baking, and have had no issues!
Although, in this case, I would bake the pie in the preheated oven for a little longer, and increase the bake time at the lower temperature for longer too.
Recipe FAQs and troubleshooting
Why is my lattice crust coming apart?
This can happen if you rolled out the pie dough too thinly. The crust can stretch out as it is puffs up during baking, and will tear if it’s too thin.
So make sure the pie dough is thicker. I usually aim for about 3 – 4 mm thick.
Can you make a lattice crust with store-bought pie dough?
Yes! However, some storebought dough isn’t as flaky as homemade dough. The pre-rolled dough can also be quite small, and you will only get just enough to create a spaced lattice crust.
So instead, you can use two pre-rolled pie crusts to ensure you don’t run out of dough for the lattice top.
You can also use store-bought shortcrust dough (or even homemade shortcrust pastry!) to make the lattice crust too. You can also use store-bought puff pastry, but I would roll out the puff pastry a little thin, so it doesn’t puff up too much as it bakes.
Can I add flavor to the lattice crust?
Absolutely! You can add spices and herbs to the pie dough, which will also flavor the final pie crust!
I also make a graham cracker pie crust dough, which will result in a graham cracker flavored lattice pie crust!
My lattice crust isn’t browning in the oven, what can I do?
Because the lattice crust allows more of the liquid to bubble up as the pie bakes, the dough might be covered with the juices and prevent the crust from browning properly.
If your pie crust has juices (or melted butter) pooling on top, place a paper towel on top to absorb the liquid, and return it to the oven. This will help the lattice crust brown better.
My lattice crust shrunk / unraveled in the oven?
If the dough is too tough / handled too much, it can shrink in the oven as it bakes. This can also lead to the crust unraveling as well. The crust can also unravel if the pie filling had too much filling / juices.
Can I use a lattice pie crust cutter instead?
Yes, you can use a lattice pie crust cutter or decorative lattice top cutters for convenience, if you prefer.
These specialty tools are great if you want an easy way to create a lattice crust. They do work differently that woven lattice crusts though, so I recommend following their included instructions to get the correct result.
Recipe
How to Make Lattice Pie Crust
US based cup, teaspoon, tablespoon measurements. Weight measurements are recommended for accurate results whenever available.
Common Measurement ConversionsIngredients:
- 300 g unsalted butter chilled
- 120 mL iced water
- 30 mL chilled vodka or substitute with iced water
- 400 g all purpose flour spooned and leveled when using cup measurements
- 30 g sugar
- ¾ tsp fine sea salt
Egg wash
- 1 large egg I prefer using only the yolk
- 30 mL milk or cream
Instructions:
Make the pie dough
- Make the pie dough following my all butter pie crust recipe.The dough can be made ahead of time, or you can even use frozen, store-bought pie-dough as well.300 g unsalted butter, 120 mL iced water, 30 mL chilled vodka, 400 g all purpose flour, 30 g sugar, ¾ tsp fine sea salt
- Divide the dough into two portions and wrap each in plastic wrap and let the dough chill and rest overnight (you can do this up to 3 days ahead of time).
First dough portion
- Roll out one of the dough portions to line the pie plate. You can find more tips on how to do this correctly without ending up with shrinking dough in my pie dough recipe linked above.
- Fill the pie dough lined plate with your desired pie filling.
Lattice crust
- Start preheating your oven to 400°F / 205°C. Place the oven rack on the bottom position in your oven, and place a half sheet pan on top of this rack. It's important that the oven preheats for at least 45 minutes, so make sure the oven heat is even and isn't fluctuating, and the sheet pan is thoroughly preheated to this temperature as well.
- Roll out the second pie dough portion on a lightly floured surface. Make sure to maintain a circle shape as you roll out the dough for a round pie. If you're making a slab pie, roll out the dough into a rectangular (or wide oval), so that it covers the surface of the pie plate.
- Once the dough is rolled out, use a ruler or a dough spacing stick to cut evenly wide strips. For narrow strips, I cut the strips 1/2 inch wide, and for regular strips, I cut them into 1 inch wide strips. For thicker strips, I do 1.5 – 2 inch wide.
- For a regular pie, cut the dough into at least 11 – 12 dough strips.
- Place 5 – 6 of the strips on your pie in one direction, making sure they are evenly spaced out. The shorter strips are for the edges, and the longer strips should be for the center of the pie.
- Please refer to the images (or recipe video) in the post to follow the instructions for weaving the lattice pattern, because it's easier to follow with photos or video.
- To create the lattice, fold back the strips labeled 1, 3, and 5 (alternating strips). The strips should be folded all the way back OFF the pie surface, but still attached to the bottom crust.
- Place a new dough strip at a 90 degree angle to the first set of strips, close to the edge of the pie plate. This is strip 7. Then fold over the first set of strips on top of the newly placed strip (strip 7).
- Now fold back the other even numbered dough strips (2, 4, and 6), up to strip 7. Place another dough strip, evenly spaced out parallel to strip 7. This is strip 8. Fold over the even numbered strips from the first set so that they lie on top of strip 8.
- Repeat these steps, alternating between odd numbered strips and then even numbered strips, until the lattice crust is complete. You will end up with a total of 11 or 12 strips forming a lattice pie crust.
- Press the dough strips onto the bottom pie crust dough so that they stick together. Then trim off the excess strips to match the overhang from the bottom crust.
- Roll the excess crust up to the edge of the pie plate. You can roll the overhang dough over the crust, OR roll it in under the pie crust to create the pie crust edge. I have tried both, and like both methods.
- Use extra flour if the crust edge gets sticky while shaping it. Make sure the crust edge is evenly thick as well.
- Place the pie in the fridge for at least 30 minutes to chill the crust again, and for it to harden.
Bake the pie
- After the oven has preheated for at least 45 minutes, and the pie crust is chilled, remove the pie from the fridge to prep for baking.
- The crust should be chilled enough to create a fluted edge without becoming too soft or sticky.
- Then whisk an egg yolk and some milk or cream to make an egg wash. Brush this onto the lattice crust using a pastry brush. I like to make sure I get the whole surface as well as the fluted edge. Then sprinkle raw sugar on top (optional), to create an extra crunch.1 large egg, 30 mL milk or cream
- Place the pie plate on the preheated sheet pan. Bake the pie at 400°F / 205°C for about 10 minutes.
- Then reduce the heat to 350°F / 180°C, and bake for a further 50 – 60 minutes, or until the pie filling is bubbling and the pie crust is golden brown and flaky. A deep dish pie will take longer to bake through, than a standard (shallower) pie. If the crust browns too quickly, use a silicone or aluminum foil pie crust shield to cover the crust.
Nutrition Information:
“This website provides approximate nutrition information for convenience and as a courtesy only. Nutrition data is gathered primarily from the USDA Food Composition Database, whenever available, or otherwise other online calculators.”














Leave a Reply