


Here’s ALL you need to know about making foolproof chocolate eclairs at home! Crisp, puffy, perfect choux pastry shells filled with rich, creamy pastry cream!
My choux pastry guide is the most comprehensive, reader-favorite tutorial for making pâte à choux. Here, I share all the troubleshooting tips and recipe pitfalls to help you perfect eclairs as well!

Have you ever wanted to make eclairs at home, but thought they were too intimidating? Or when you did try them, they came out flat or soggy? Or they had a concave-shaped bottom, or a huge crack right down the middle on the bottom?
You’ve probably tried all the recipes that claim to make perfect eclairs, and still ended up with flat, depressing eclairs instead? Well, then you’ve come to the right place! 🙂
Here I’ll show you how to make failproof, perfect classic eclairs – ones that would rival those from French patisseries and pastry chefs!
Why this recipe works
- This is a tried and true recipe for classic eclairs that I’ve been making for over 30 years, and have perfected for home bakers so that anyone can make them!
- I provide all the tips and troubleshooting help to make perfect choux pastry dough, so that your eclairs are not flat and soggy, or do not have a sunken bottom or a crack on top!
- Lots of tips on the best way (and best piping tips) to pipe choux pastry dough for your classic eclairs, so that the end product is consistently perfect.
- I also provide lots of helpful tips on baking these eclairs to ensure perfect results. A lot of these tips can only come from having baked these SO.MANY.TIMES!
- All the tips to make delicious creamy vanilla pastry cream or chocolate pastry cream to fill your éclair shells are also covered, including a variety of options for different flavored and textured fillings.
- I also show you how to perfect the chocolate glaze and how to properly fill the éclair shells.
- There’s also a timeline provided on making eclairs that will be helpful for beginner bakers.
The 3 components of homemade eclairs
- Choux pastry – One of the most well-known classic French pastries used to make everything from cream puffs and profiteroles to choux au craquelin, paris-brest, chouquettes – and of course, eclairs too.
- Custard filling (crème pâtissière)
- Chocolate glaze

Ingredients you’ll need
For choux pastry dough
- Butter
- Water
- Bread flour
- Eggs
- Salt
- Sugar
- Vanilla
Pastry cream
- Milk
- Sugar
- Cornstarch
- Egg yolks
- Butter
- Vanilla
- Salt
Chocolate glaze
- Semisweet chocolate
- Heavy cream
- Butter
- Corn syrup (optional)
- Salt
How to make eclairs (step by step overview)
Recommended tools
- Half sheet baking trays – At least two. I prefer baking one tray at a time for consistent results. If you do want to bake two trays at a time, that is fine too, but remember to NOT open the oven before the 25 minute mark.
- Silpat mats – Highly recommended, especially for classic eclairs (chocolate eclairs). They provide better heat conduction, and help the eclairs rise in an even and stable way. If you don’t have silpat mats, you can use parchment paper, but be mindful of the choux pastry consistency.
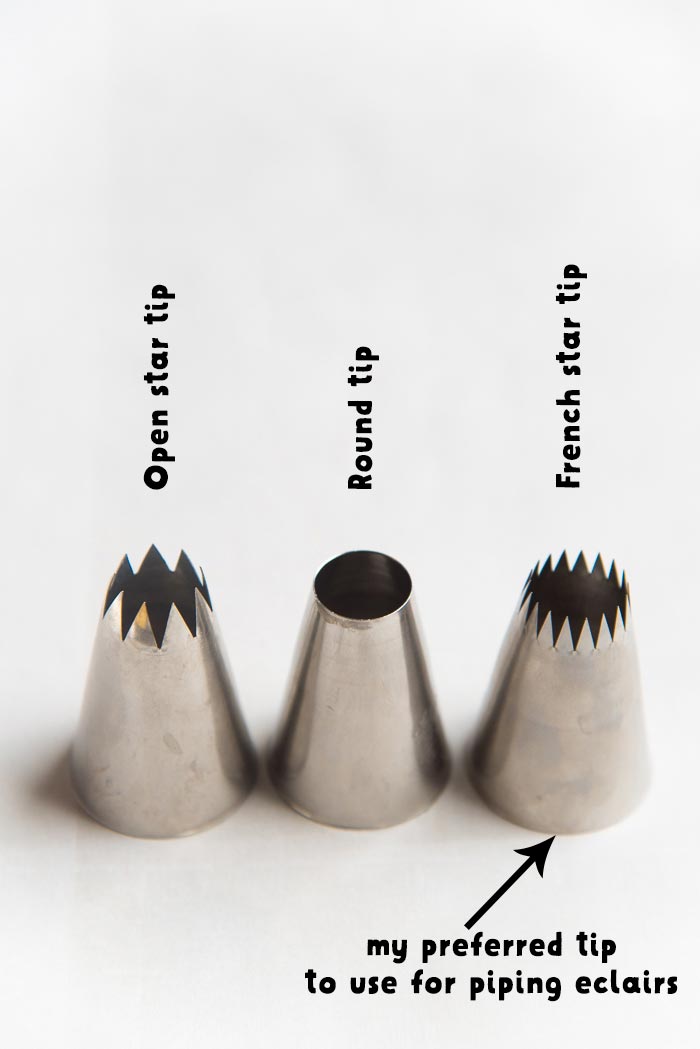
- French star tip (1/2 inch diameter) – The grooves in the star tip create a “raked” dough that prevents the eclair shells from cracking as they expand. You can use a round tip as well, but in that case, use a fork and drag it lightly along the surface of the piped dough to make multiple, long lines (to mimic the pattern that you’d get with a star tip). You can use an open star tip too, but a French star tip is the best option.
Choux pastry dough
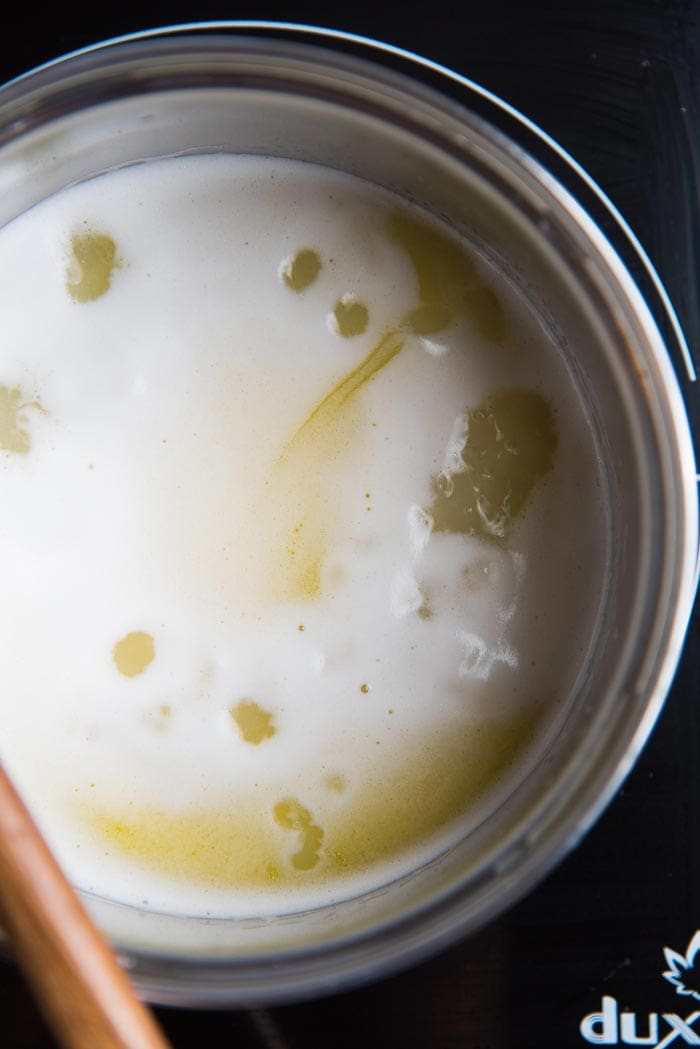
Weigh your ingredients. I use a basic kitchen scale to weigh the wet ingredients as well. I simply place the saucepan on the kitchen scale, and weigh the water, then butter, and then add the salt and sugar.
You can either use just water, or milk, or a mixture of water and milk.
Stir while heating to make sure the salt and sugar dissolve, and the butter dissolves BEFORE the mix comes to a boil.

When the mix comes to a boil, remove the saucepan from the heat and add ALL OF THE sifted flour in one go. Stir to bring it together and form a dough.
Make sure there are no lumps in your dough, and then return the saucepan to the stove and cook the dough for about 2-3 minutes while vigorously mixing.
This is important because you want the excess water to evaporate. You’ll know it’s done when there’s a film of dough forming at the bottom of your saucepan.
Plus, if you stick a spoon in the dough, it should stay upright (see pictures below for reference).


Allow the choux pastry dough to cool down in a large bowl, until the temperature registers at under 160°F.
I spread the choux pastry dough along the wall of the bowl when doing this, so that more steam escapes and the dough cools down faster.

Addition of eggs
This part is important. Add the eggs a little at a time, until your dough just starts to get a glossy sheen. That’s why I like to beat all the eggs first, so that I have better control over achieving the right dough consistency. This means I may end up using all the eggs, or only a portion of it.

I usually end up adding 3 1/2 eggs, or sometimes 4 (if I had to cook the dough longer, which results in a drier dough).

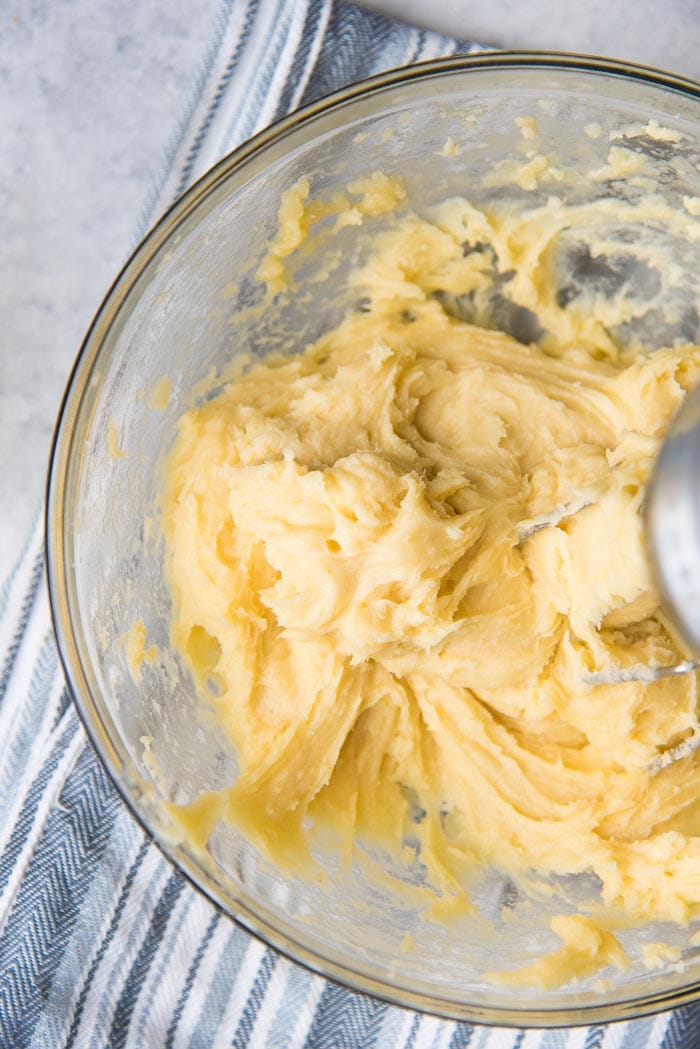
As you mix in the eggs at the beginning, the dough will be a slimy mess, but as you incorporate more eggs, it’ll become smoother, and runnier, and start to get a sheen.

Stop adding eggs as soon as the dough reaches this point where it gets a sheen (or looks a little glossy), and isn’t too runny.
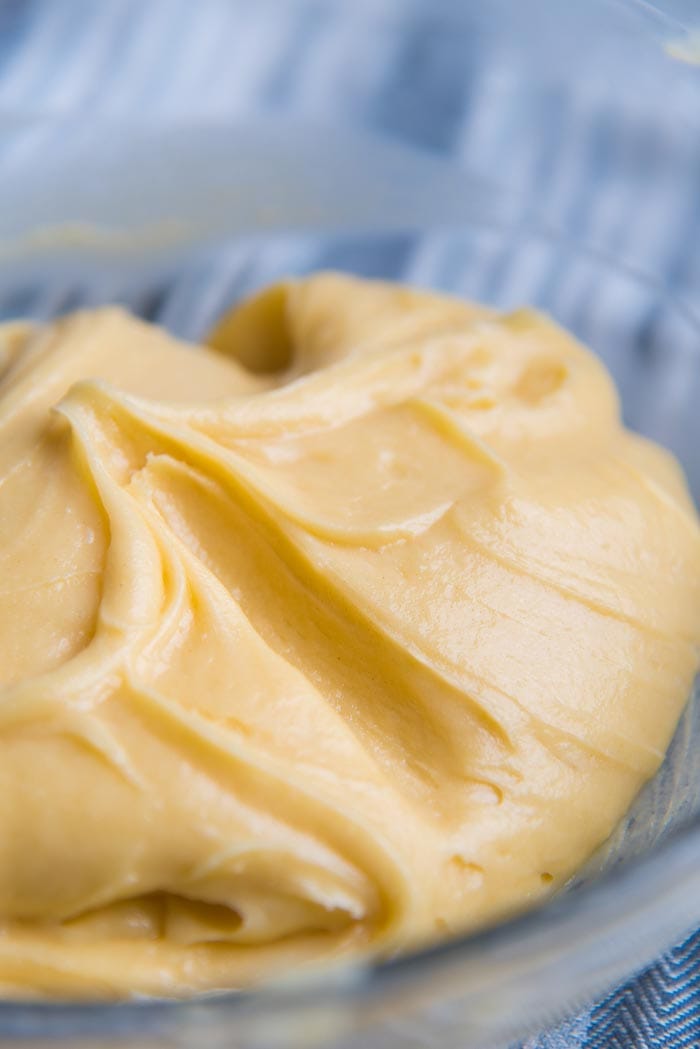
How to check correct dough consistency
There are 2 ways to check for the right consistency of your glossy choux pastry dough.
- Drag your finger along the surface of the choux pastry dough to create a trough. The sides of this trough should stay upright and not collapse into the dough. If they do, it’s because the dough is too runny.
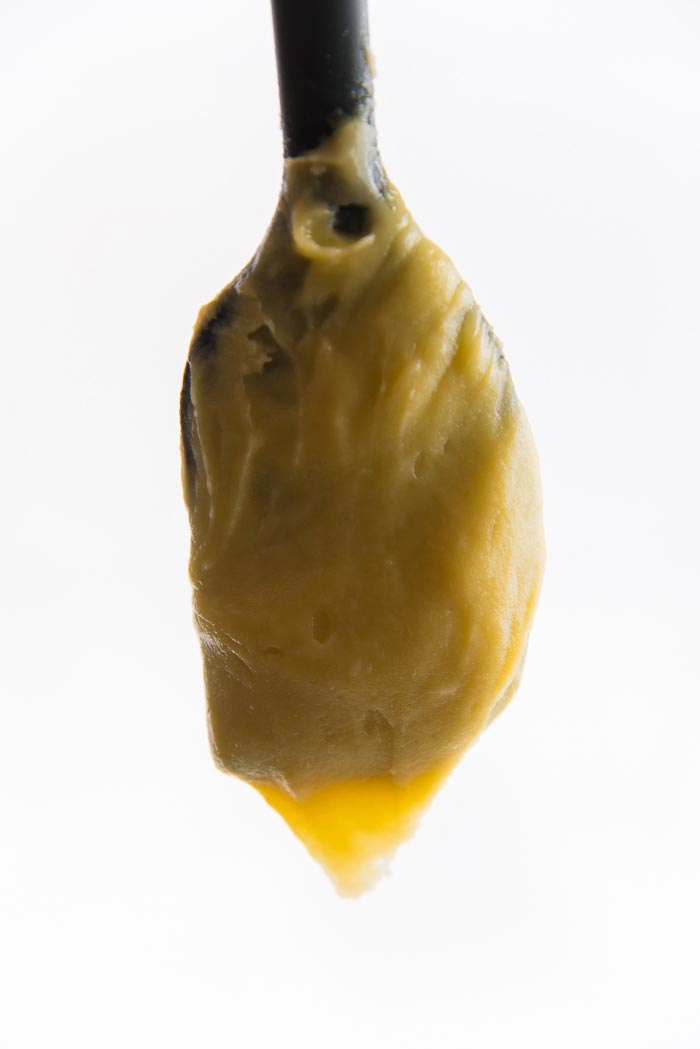
- Place a rubber spatula or wooden spoon in the dough, upright, and then stir the dough with it a little, and slowly lift the spatula, straight up. If the dough forms a V shape at the end of the spatula (as shown in the picture below), then it’s also the correct consistency.
Personally, I prefer the first method, but either method is effective.
Piping choux pastry dough
When the choux pastry dough is ready, transfer it into a large pastry bag (I use a 16 inch pastry bag), with a 1/2 inch wide French star tip.
If it’s easier, you can cut a 4-5 inch piece of cardboard or a wooden skewer and use that as a guide to pipe eclairs of equal length. Or you can simply eye ball it too.
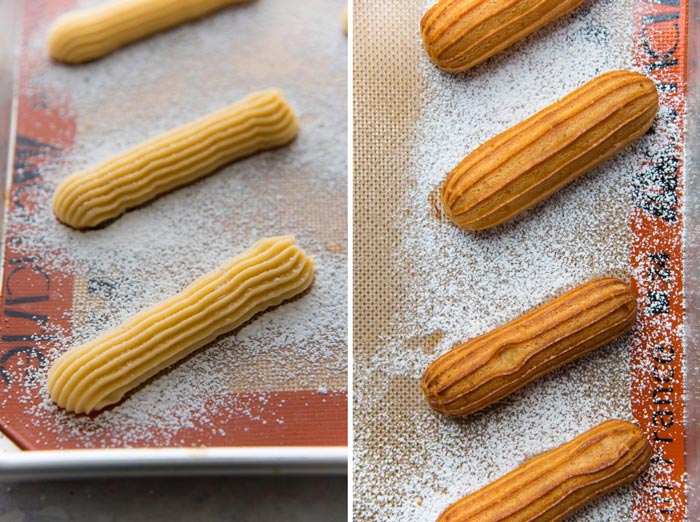
Pipe 4-5 inch long choux pastry cases on the prepared baking tray (with a silpat mat), leaving 2 inches of space between each.
I pipe about 8-10 eclairs on each half sheet baking tray. Remember to keep the piping bag at a 45° angle as discusses above, and maintain consistent piping pressure. Make the ends of your piped choux cases slightly larger than in the middle.
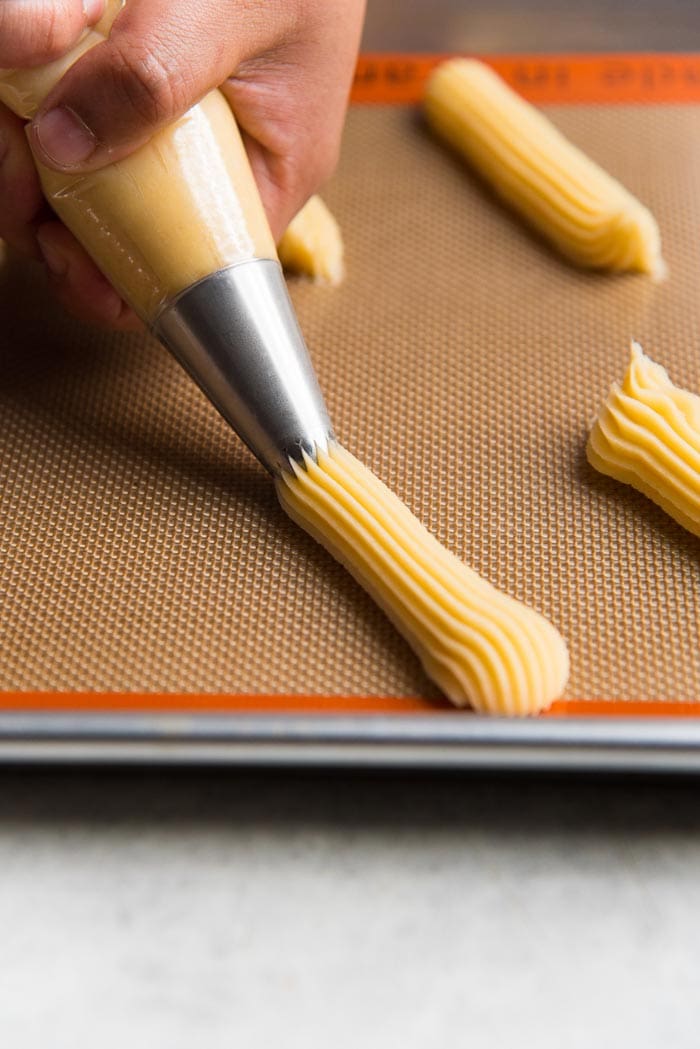
Finish off each piped case by gently twisting the piping tip. This helps prevent the entire piped choux case lifting up along with the piping tip.
This will also create a pointed or jagged end. So using a damp finger, pat down those pointed ends of your choux cases.
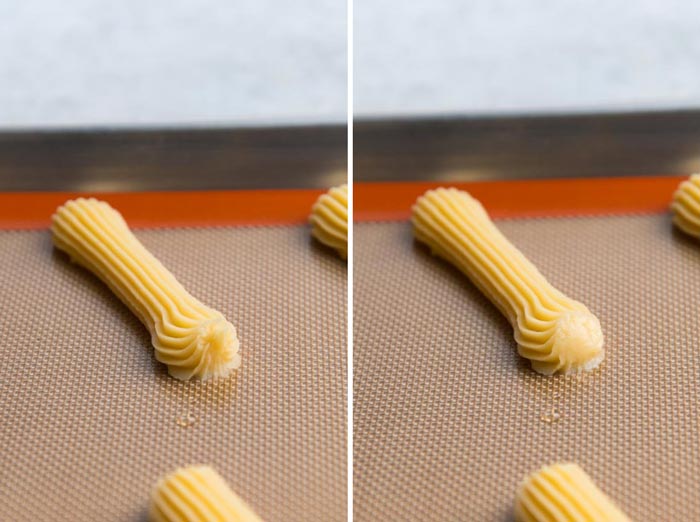
Dust each eclair case with confectioner’s sugar. This creates a slightly caramelized exterior that not only adds a slight sweetness, but also a delightful crunch.

Baking eclairs
Bake in a preheated oven for 25-30 minutes, until the choux cases have turned light brown in color. Then quickly open the oven door, and carefully prick each eclair case on one end with a toothpick to release the air inside.
The eclairs should have formed a brown crust by this point. This is important, because if you prick them before the crust has formed, the choux cases will collapse.
Close the oven door and bake for a further 5-10 minutes (I usually bake for a further 8 minutes), until the cases have turned darker brown in color (but not burnt!).

Remove from the oven and prick the other end of your choux cases, and let them cool down completely in a draft free area.
I keep it on top of the oven or near the oven, where it’s a little warmer and draft-free. This way there’s no risk of the choux cases cooling down too fast and collapsing.
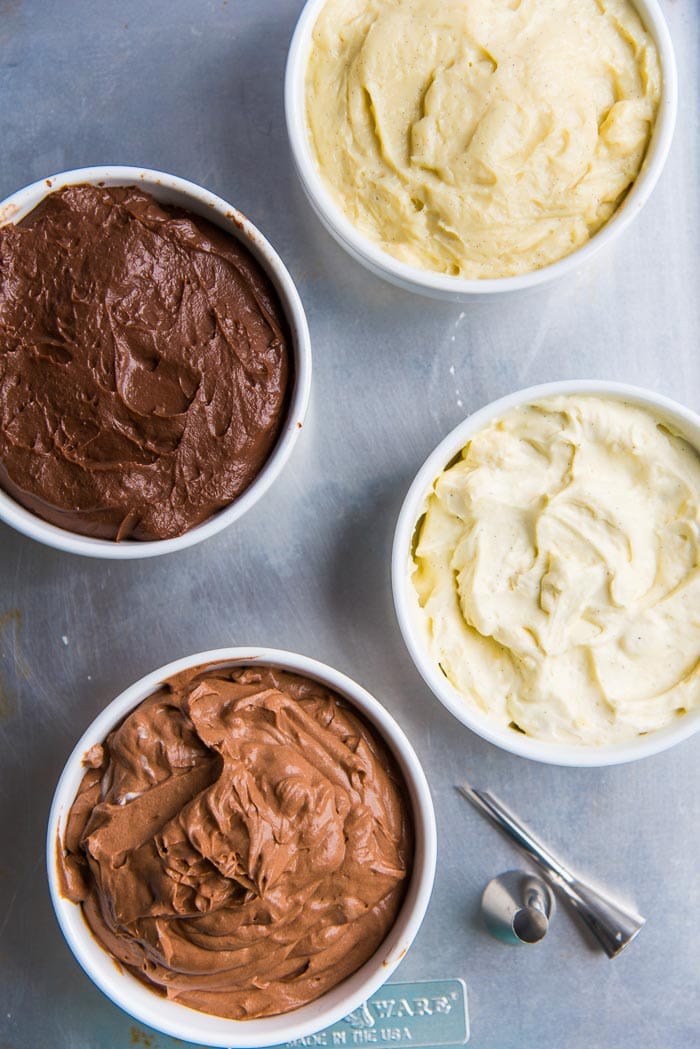
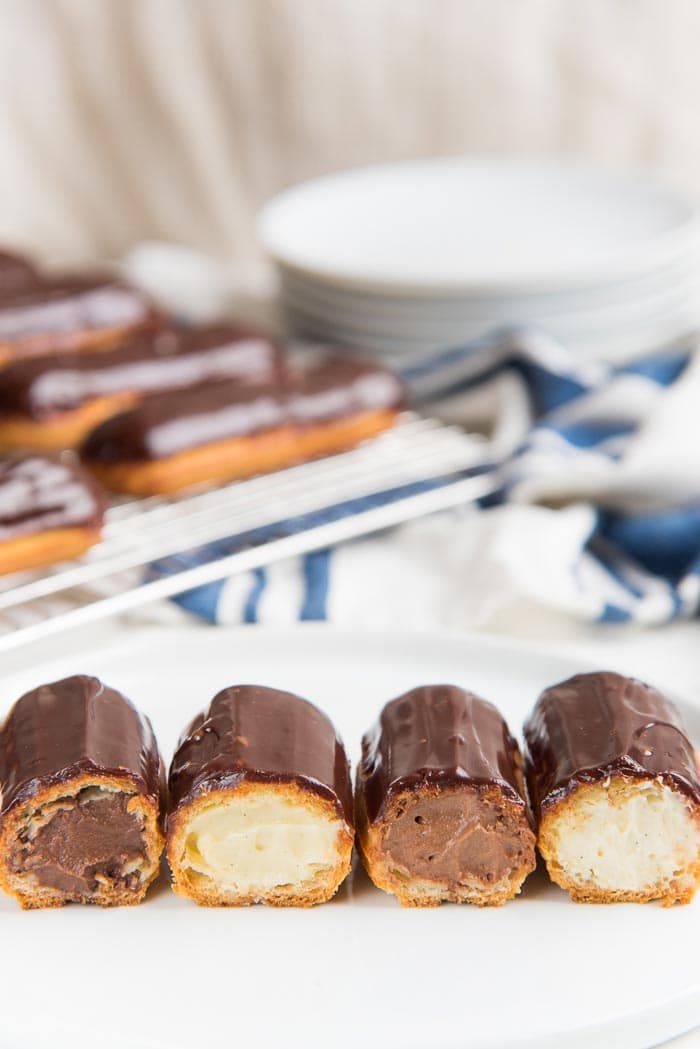
When the eclairs have cooled down, they are ready to be filled with your choice of filling. I typically use vanilla pastry cream, or mousseline cream, or chocolate pastry cream, or even cream diplomat for a lighter option.
Custard filling for eclairs
Type of filling
There are several options!
- Vanilla pastry cream – This is the classic option. This pastry cream is almost like a vanilla pudding, with a prominent vanilla flavor, and not too sweet.
- Classic mousseline cream (pastry cream + whipped butter that make for a rich, buttery, silky smooth filling).
- Vanilla diplomat cream (pastry cream + stabilized whipped cream for a lighter filling for your eclairs).
- Chocolate cremeux – Personally, I’d say this is too rich and heavy as a filling for eclairs, however it’ll work very well as a luscious topping!
- Cream chantilly (sweetened whipped cream).
Here, I made FOUR different fillings for my classic chocolate eclairs.
- Vanilla pastry cream
- Chocolate pastry cream
- Vanilla diplomat cream (vanilla pastry cream + cream chantilly). This tastes like a melt in your mouth vanilla ice cream but lighter and not cold.
- Chocolate diplomat cream (chocolate pastry cream + cream chantilly). This tastes like a light, melt in your mouth chocolate ice cream, but not cold.
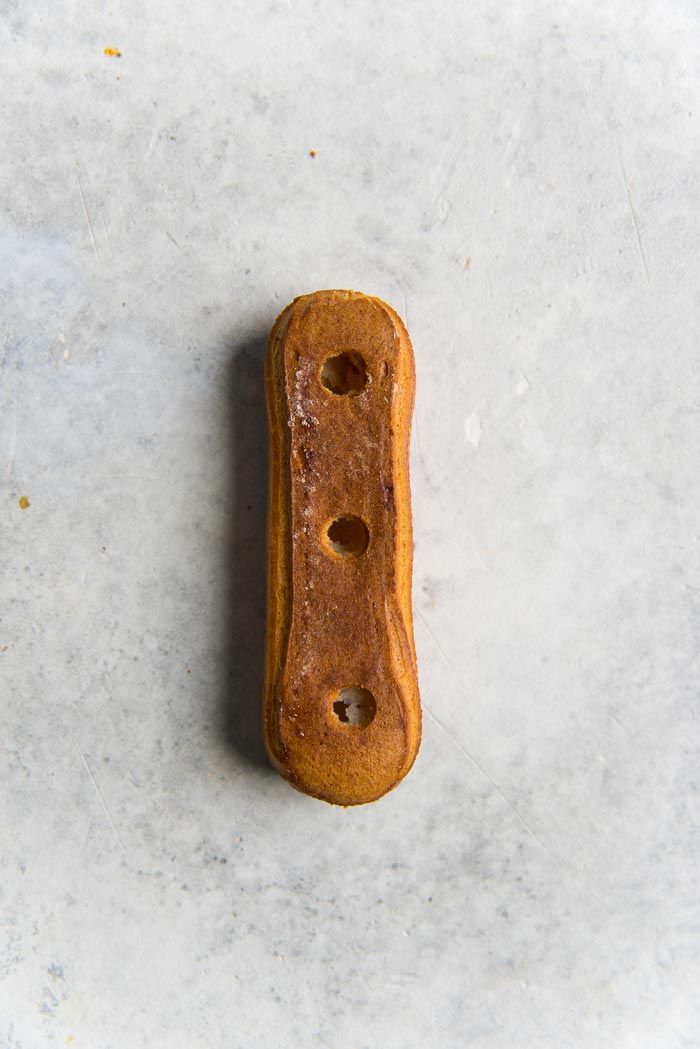
How to fill the eclairs
You have 2 ways of filling these classic eclairs.
- With a bismarck tip. Insert the tip from the ends of the eclair and fill it from both ends. Once filled, wipe the ends to remove excess filling.
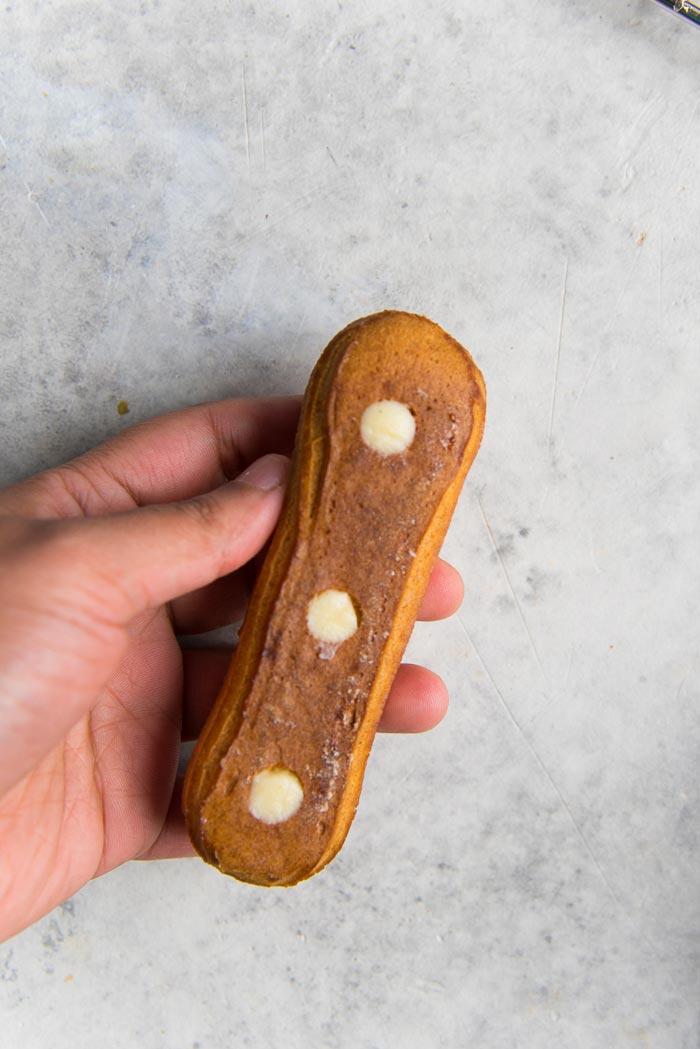
- Use a star tip (small opening) and make 3 holes on the bottom of the eclair shell. Use the same small tip (or a round tip), to fill the eclair from the bottom. Wipe to remove any excess filling.
The second method is my favorite, even though I do own a bismarck tip as well.


How far in advance can you fill an éclair?
I would only fill an eclair with filling just a couple of hours before serving. This ensures the best flavor and texture.
For best results, serve these chocolate eclairs at room temp, or chilled, right away OR within 12 hours of filling.
Choux pastry is only super crisp straight out of the oven. They soften very quickly. But a well-made eclair shell that’s baked until deep golden brown in color will form a sturdy shell that doesn’t get soggy by the filling.
But the longer you go after filling your eclairs, the softer the shells will get (but they shouldn’t get soggy even after 24 hours).
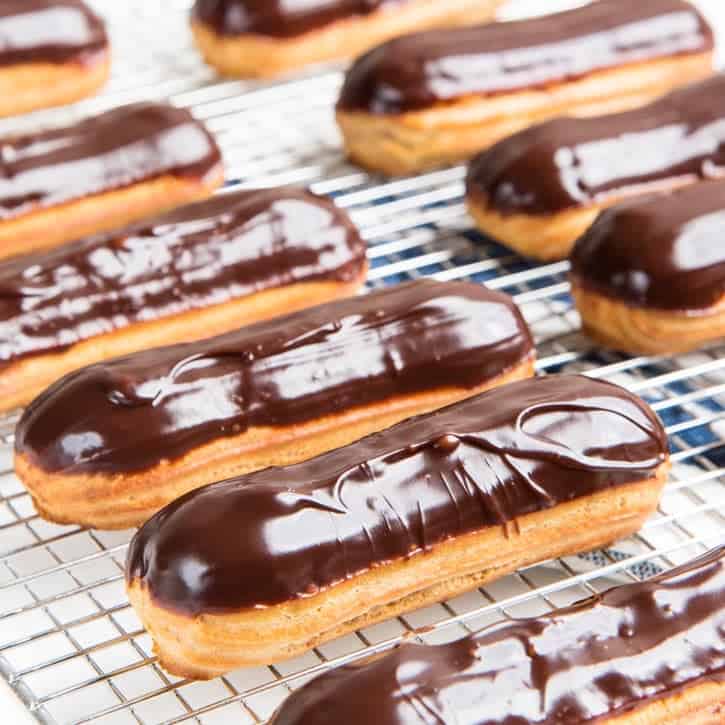
Chocolate glaze
The chocolate glaze is very easy to make, and super delicious on its own. It’s just a mixture of chocolate, cream, butter, and a touch of corn syrup.

The simple trick to getting beautifully glazed chocolate eclairs is to DIP them in the glaze, rather than pouring the glaze over the eclairs.
Carefully and evenly dip each eclair in the warm chocolate glaze. Then gently turn it in the glaze to get an even coating.
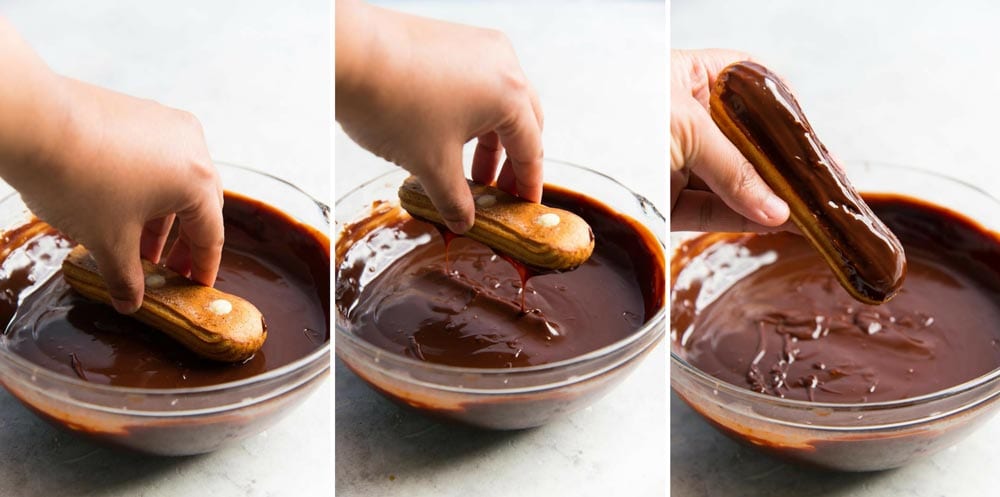
Once coated, gently shake it to allow excess chocolate glaze to drip down into the bowl again.
Using a paper towel or toothpick, wipe off any excess chocolate glaze along the edges of your chocolate eclair. Then place it on a wire rack and allow the glaze to set.
You can also skip the glaze and do a simple egg wash instead, if you’d like to serve them with just a filling.

Pro tips and troubleshooting for eclairs
In this section, I share all of my tips and break down all the common recipe pitfalls and the precise ways to fix them.
Best tips for making choux pastry
- The consistency of your choux pastry dough is key! Always WEIGH your ingredients, rather than relying on cup / volume measurements for guaranteed, consistent results.
- If you do use cups however, pay extra attention to the consistency of the dough at each step to make sure you’re on the right track.
- There are key signs to look for at each step of making choux pastry, before you proceed to the next step. The more you make choux pastry, the more you will be able to “read” your dough and follow these signs intuitively.
- You can check out my detailed recipe and guide on making choux pastry dough for all the instructions and recipe video as well.
- But if you’re brand new to making choux pastry, then how about starting with chocolate profiteroles or cream puffs first? These are easier and more forgiving than classic eclairs.
Having said that, in this chocolate eclair recipe, I share all my tips on making PERFECT eclairs that are nice and puffy, with a beautiful shell and with no cracks.
This will help you make foolproof eclairs that look like they came from a high-end pastry shop! 🙂 So let’s get to it.

Why are my eclairs flat and soggy?
This happens if your choux pastry dough is too runny (with too much water, eggs, or both).
Or you opened the oven too early while baking, causing steam to escape, which makes the eclair shells collapse.
Or you didn’t bake them long enough.
Solution
- Keep an eye on the dough, and make sure you don’t add too many eggs.
- Never open the oven door before the 25 minute mark, to avoid letting out steam from the oven.
- Prick or cut the shell towards the end of the baking time (or soon after they are baked) to let steam escape as the pastry cools down.
Never add raw flour to your choux pastry to “fix” runny dough. See my how to make choux pastry post to find out how to fix runny choux pastry dough.
Why do my eclairs have large cracks on top?
This often happens when the dough isn’t prepared properly, and you have undissolved salt or sugar in it.
Another reason is baking it in a high temperature oven.
You also tend to get more cracks if you pipe with a round tip instead of a star tip. This is likely because of the increased surface area that you get when piped with a star tip, which gives the choux pastry more leeway to expand.
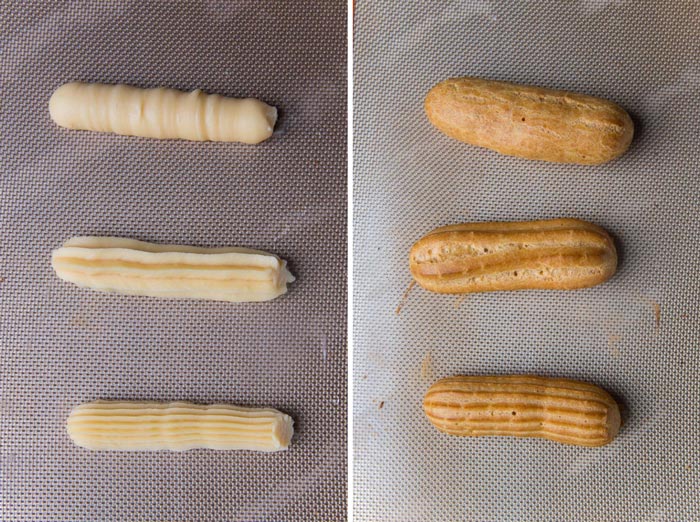
See below for differences between eclairs piped with a round tip, open star tip, and a French star tip. You can see that the French star tip yields the neatest eclair pastry shell, and the round tip eclair has an uneven shape with more cracks.
Solution
- Use a French star tip (instead of a round tip). If you only have a round tip, then you can use a fork to gently scrape/mark lines on the top of your piped dough to increase the surface area.
- Make sure the sugar and salt are completely dissolved in the water.
- Do not add raw flour to the dough.
- Lower the oven temperature (if you’re baking at 400°F or higher), and bake for longer at a lower oven temperature (375°F) instead.
My eclairs have a sunken bottom, and sometimes a large crack on the bottom too
This happens due to a combination of the reasons stated above. But in addition, your chocolate eclairs can also sink in at the bottom if the pastry case isn’t sturdy enough to hold its shape.
This is not so much of an issue with profiteroles. This is because the shape of a profiterole is inherently sturdier than that of eclairs.
For profiteroles, the contact point of the pastry with the baking sheet is wider, so it has a more stable base to bake on and rise to form a nice, airy pastry shell. There’s less risk of collapsed pastry shells here.
For eclairs, the contact point with the baking sheet is less (in terms of the width of the pastry shell).
So, as the pastry shell expands when baking, it becomes less stable/sturdy and tends to collapse around the base, causing your eclair shells to have a concave-shaped collapsed bottom.
Solution
- Use a silpat instead of parchment paper (explained in detail below).
- Pipe at a 45° angle, while exerting constant pressure, when you’re piping the middle of the eclair.
- Make sure the middle of your piped eclair is NOT thicker than the two ends (i.e. a little extra thickness at the ends, or it should be dog bone-shaped).
Should I use parchment paper or Silpat?
I came about this little discovery quite by accident.
I’m not entirely sure what it is about a silpat (besides it having something to do with heat conduction), but eclairs baked on a silpat are always more stable and neat than those baked on parchment paper.
If you don’t have a silpat, that is OK, you can still use parchment paper. But I usually add fewer eggs to my choux pastry dough if I know I’m baking chocolate eclairs on parchment paper.

Choux pastry dough piping angle
Pipe at a 45 degree angle, on the silpat mat. This is the best angle to pipe your choux pastry at constant pressure, with minimal distortions on the piped choux.
If you pipe from the top (like with profiteroles), it puts too much pressure on the choux, pushing/crushing it against the tray, and this may cause your eclairs to puff up horizontally, rather than vertically.
I also like to make sure the piping tip makes contact with the silpat (at a 45° angle), as I pipe the choux.
It helps to form a stable base for the eclairs, while also giving you some stability to pipe evenly, with consistent pressure.

Consistent piping pressure and shape
Inconsistent or varying piping pressure will result in lumpy eclairs that aren’t as clean or professional-looking as you’d like.
This is especially more problematic if you pipe extra dough in the middle compared to the ends.
The middle will then puff up more, and you’ll end up with oval-shaped eclairs that are more inclined to collapse as well.
This is why it’s good to pipe just a little extra dough at the ends (i.e. dog bone-shaped). You can also pipe them nice and straight, where the ends are only slightly larger than the middle.
Either way, you will end up with beautiful, even, and incredibly delicious classic eclair shells, that are guaranteed to never collapse or flatten!
Why do my eclairs taste eggy?
Actually, it is in fact not that your eclairs “taste” eggy, but that your dough smells eggy.
If your eggs are not of good quality, then the smell of eggs can be strong even after baking.
Another reason is that you added the eggs while the dough was too warm, causing your eggs to slightly cook as you mix it.
If you’re ever in doubt about how fresh your eggs are, you can always do a quick egg float test to determine their freshness.
Storage instructions
What’s the best way to store eclairs?
The best way to store eclairs is to freeze unfilled choux pastry shells in an air-tight container. The fillings will make the crust soft.
Eclair shells will become stale when stored at room temperature or the fridge for longer than a day. Freezing unfilled eclair shells will help retain the flavor.
Can I store filled eclairs?
You can, but it’s not ideal. You made eclairs and have leftovers and you want to know how to store them right?
Keep these filled eclairs on a parchment paper lined tray, in a single layer. Do not stack them.
Let them freeze for about one hour. Once frozen, place them in an airtight container, in layers if needed, separating each layer with parchment paper.
Then put them back in the freezer. Filled eclair can be kept for about 4 days like this. But they do lose their freshness with time.
To defrost, keep the eclairs at room temp. for about 1 hour until they thaw out, and then they are ready to be served. The pastry will be soft as they lose the texture of the crust after being filled.
Can I make eclairs ahead of time?
You can make the shells, filling, and glaze separately, and store them separately until needed. The best way to store eclairs is as unfilled shells.
Unfilled baked eclair shells can be stored in an air-tight container for up to 1 month in the freezer.
When you’re ready, simply thaw them out at room temp, fill, glaze, and they are ready to be devoured!
For better results, reheat the pastry shells in the oven for a few minutes so they have a similar texture to freshly baked pastries before filling.
- Unfilled eclair shells – Can be frozen in an air-tight container for up to 1 month.
- Pastry cream – Can be refrigerated for up to 3 days. Make sure it’s in an air-tight container, with a plastic wrap touching the surface of the pastry cream.
- Chocolate glaze – Can be stored for up to 1 week in the fridge.
- Filled and glazed eclairs – For up to 4 days in the freezer (maybe even longer, but the eclairs will continue to lose freshness with time).
Timeline for making eclairs
The day before
Make 1 ½ batches of the vanilla pastry cream or chocolate pastry cream. OR make 1 batch of each, if you’d like a mix of vanilla and chocolate.
You can also make the choux pastry dough on the day before, and store it in a pastry bag, inside an air-tight plastic container.
On the day you’re serving the chocolate eclairs
Let the choux pastry dough come to room temperature. Pipe and bake the eclairs (or you can bake them ahead of time and freeze as well).
While the eclairs are cooling, prepare the pastry cream by transferring it into pastry bags. Also, prepare the chocolate glaze and keep it warm.
Fill the eclairs, and dip each one in the chocolate glaze as you go. Let the chocolate glaze set. Chill for a few hours if needed, and serve.
Equipment and tools I use to make eclairs
- Piping bags – 16 inch piping bags for the choux pastry dough.
- French star pastry tip with 1/2 inch opening – to pipe the eclair cases.
- Whisks – a good set of whisks is a must for all of your baking needs.
- Hand mixer or Stand mixer – I currently use KitchenAid.
- 2 x Silpat baking mats – highly recommended for foolproof results.
- 2 x Half sheet pans – while one is baking, the other tray can cool down and be ready to pipe dough on, and then bake as soon as the other tray is out.

Frequently asked questions
What is choux pastry?
A light, airy, crisp, classic French pastry used to make a variety of pastries and desserts such as cream puffs, eclairs, profiteroles, paris brest, croquembouches, gougères, French crullers etc.
Flour, eggs, butter, and water are all the simple ingredients you need to make it, and it doesn’t use a chemical raising agent to rise. Instead, it relies on air and moisture trapped in the dough to rise.
What’s the difference between eclairs and cream puffs and profiteroles?
Eclairs differ from cream puffs and profiteroles mainly in terms of the shape of the piped choux pastry. With eclairs, the choux dough is piped into long shapes that form long, cylindrical baked shells.
Whereas, with cream puffs and profiteroles, the choux pastry is piped into smaller round mounds.
Another difference is that eclairs have a thicker, sturdier shell. They do not necessarily have to puff as much as for a cream puff or profiterole. Cream puffs can also have a thick shell, but can also be much lighter than an eclair.
The difference between cream puffs and profiteroles on the other hand is mainly in the filling. Profiteroles are usually filled with a custard-based creamy filling and have chocolate or other type of glaze on top.
Cream puffs are the simplest variation of choux pastry, with a simple whipped cream filling in the middle, and typically no glaze on top.
What does an éclair look and taste like? How long does it stay crispy?
Many people believe that eclairs are meant to be crispy after being filled. Unfortunately, that’s impossible.
Choux pastry will soften as it cools down from the oven, even without filling. It’s a delicate pastry that is not meant to remain crispy for hours.
An eclair is meant to have a sturdy, fairly thick shell that will hold its shape for hours, with a little crisp-crunchiness similar to some crusty bread crusts.
It should never get soggy and collapse. An eclair is baked till the pastry is puffed up, dried, and well browned. This ensures that the eclair holds its shape well even after being filled.
The inside will have softer webbings of dough, but the outside should be firm, thick, and you should be able to tap it too.
This is what makes a good eclair! This pastry shell will be able to handle being filled with fillings, and not become soggy and collapse.
Can I make different flavors of eclairs?
You can make endless variations! Choux pastry is a blank canvas. By changing the flavor of the filling and the glaze on top, you have an infinite number of flavors to experiment with when creating eclairs!
Check out my earl grey eclairs recipe, mocha eclairs recipe, chocolate choux pastry, salted caramel pastry cream, and different types of custard desserts for some ideas and inspiration.
What’s the difference between eclairs and churros?
Lots of people think that churros are just deep fried eclairs, but that’s not at all the case.
The main difference between an eclair and a churro of course is that an eclair is baked, and a churro is fried. The other main difference is how the dough is made, and the consistency of the dough.
An eclair is made with choux pastry that’s enriched with butter and eggs. A baked eclair pastry can then be filled with all kinds of fillings.
Churros however do not contain a lot of fat (only a little oil or butter), and traditionally do not use any eggs either (although some regional recipes do add some egg).
Classic churros are also not filled with any fillings either, since they are not hollow in the middle. Instead, they are typically served with something like a dulce de leche sauce.
Recipe
Perfect Chocolate Eclairs
US based cup, teaspoon, tablespoon measurements. Weight measurements are recommended for accurate results whenever available.
Common Measurement ConversionsEquipment:
- See the post for a list of recommended tools & equipment
Ingredients:
Choux pastry
- 240 mL water 1 cup
- 115 g unsalted butter 1 stick / ½ cup
- ½ tsp kosher salt use less, if you’re using fine salt or table salt
- 1 tbsp granulated white sugar
- 145 g bread flour 1 ⅛, spoon and leveled. Sifted
- 1 tsp vanilla extract optional
- 226 g large eggs (measured with the shell on) about 4 large eggs
Filling
Chocolate glaze
- 340 g semisweet chocolate
- 180 mL whipping cream / heavy cream ¾ cup
- Generous pinch of kosher salt
- 28 g unsalted butter 2 tbsp
- 2 tbsp corn syrup optional
Instructions:
Choux pastry
- Preheat oven to 375°F.
- Place the water, butter, salt and sugar in a medium-sized saucepan and heat over medium heat while stirring occasionally. Add vanilla if you like as well. (Make sure the salt and sugar dissolve completely in the warm water, and the butter melts BEFORE the water comes to a boil).240 mL water, 115 g unsalted butter, ½ tsp kosher salt, 1 tbsp granulated white sugar, 1 tsp vanilla extract
- As soon as the water comes to a boil (with a few bubbles breaking through the surface), move the pot away from the stove and add all of the sifted flour into the boiling liquid. Using a wooden spoon or a heat-proof silicone spatula, stir the mixture vigorously to allow the flour to absorb all the water and form a ball of dough, and remove any flour clumps in the dough.145 g bread flour
- After about 45 – 60 seconds of mixing, return the saucepan to the stove (with medium heat), and let the dough cook for a further 2 – 3 minutes while stirring and mixing. Do this until you see a film of dough forming on the bottom of your saucepan (please note that this only occurs with stainless steel saucepans, not in non-stick saucepans).
- Remove the saucepan from the heat and transfer the dough into a large mixing bowl. Mix the dough gently, for about 2 – 3 minutes, to release the steam and to let it cool down (lower than 160°F). Alternatively, you can flatten the dough along the wall of the mixing bowl and let it cool down for a few minutes.
- Crack all the eggs into a jug and whisk well to combine.226 g large eggs (measured with the shell on)
- When the dough has cooled down, mix in the vanilla (I don’t use vanilla, but you can if you like). Next add the eggs in 5 – 6 additions, mixing each addition well into the dough before adding more. You can use a stand mixer or a spatula to mix in the eggs. Stop adding eggs when the dough starts to get a sheen, and looks glossy. Please read the post for more details. Then check for the right dough consistency with the choux pastry test (detailed in the post).
- Place the dough in a 16 inch pastry bag and secure the bag opening, and set it aside until you get the baking trays ready. Line a baking tray with a silpat mat. Also have a bowl of water and a bowl of confectioner’s sugar with a small mesh strainer ready as well.
- Fit a different pastry bag with a ½ inch French star tip. Then snip the end off of the choux pastry bag from the previous step, and place that in the bag with the French star tip.
- Hold the pastry bag at a 45° angle, with the French star tip touching the silpat. Pipe 8 – 10 eclairs (4 – 5 inches in length) on the silpat lined baking tray. When piping, make sure the ends are a little larger than the middle portion of the eclairs. Twist the piping tip at the end so that you end with a slightly pointed/jagged end.
- Dip your finger in water and pat the ends of the eclairs to flatten the pointed ends. Sift some confectioner’s sugar over the eclairs.
- Place the baking tray in the middle rack of your oven, and set the timer to 25 minutes. After 25 minutes, check if the eclairs have turned golden brown. If they have, then open the oven door and quickly prick each of the eclairs with a sharp toothpick or skewer on one end.
- Close the oven door and let the eclairs bake for a further 5 – 10 minutes until they turn a darker golden color. You want the eclairs to be baked a little longer so that they hold their shape better.
- Remove them from the oven, and immediately prick the eclair cases on the other end. Let them cool down for about 10 minutes on the baking tray and then transfer them onto a wire rack.
- Pipe more eclairs on the second silpat lined baking tray and bake. Repeat until you have used up all of your choux pastry.
- Once the eclairs have cooled down, they are ready to be filled. If you’re filling them later, place the unfilled shells in an air-tight container and freeze for later.
Filling
- Make vanilla pastry cream or chocolate pastry cream according to the linked recipes, the day before, and let it chill in the fridge overnight.1 ½ batches of Vanilla Pastry Cream, 1 ½ batches of Chocolate Pastry Cream, OR
- Place the filling of your choice in a 16 inch pastry bag, with a small round tip (5 – 10mm in diameter).
- Use a French star tip or the round tip to carefully make 3 holes on the bottom of your eclair shells. Fill the eclair shells with with pastry cream through these holes.
- Wipe off any excess pastry cream. Repeat with all the eclair shells.
Chocolate glaze
- Place the chocolate chips in a large, microwave-safe bowl.340 g semisweet chocolate
- Heat the cream and salt in a separate bowl in the microwave or a saucepan. When the cream starts to simmer, immediately pour it over the chocolate chips. Add the corn syrup and butter. Stir the chocolate chips until they have completely melted and you have a glossy chocolate glaze. If the chocolate isn’t completely melted after stirring, microwave for 10 – 20 second bursts to melt the chocolate completely.180 mL whipping cream / heavy cream, Generous pinch of kosher salt, 28 g unsalted butter, 2 tbsp corn syrup
- Dip each filled eclair in the chocolate glaze (read the post for more details on how to cleanly glaze your chocolate eclairs).
- Place the glazed eclairs on a wire rack and allow the chocolate glaze to set.
- Serve at room temperature, or chilled.
Recipe Notes
How to store leftover eclairs
If you have any leftover filled eclairs, place them on a baking tray in a single layer and freeze. Once frozen, you can keep them in an air-tight container, with parchment paper between each layer. Then return them to the freezer. Defrost frozen eclairs by keeping them at room temp. for about 1 hour. Please read the post for more details.How to make and store eclairs ahead of time
I recommend storing unfilled pastry shells in the freezer, to keep them fresh. Then thaw out the frozen shells overnight, and you can warm them in the oven for a few minutes to make them crisp again (optional). Then let them cool down and fill with your desired filling. Make sure to fill thawed shells just before serving.Other choux pastry related recipes
Classic choux pastry, Perfect cream puffs recipe, Perfect chocolate profiteroles, Chouquettes (French sugar puffs), Choux au craquelin, Chocolate choux pastry, Earl grey eclairs, Chicken bouchees (chicken puffs), Paris-brestNutrition Information:
“This website provides approximate nutrition information for convenience and as a courtesy only. Nutrition data is gathered primarily from the USDA Food Composition Database, whenever available, or otherwise other online calculators.”


Leave a Reply