


Let’s talk Choux Pastry. Also known as Pâte à Choux. This is the most comprehensive choux pastry recipe on the internet, with all the tips to make absolutely perfect cream puffs, profiteroles, eclairs, choux au craquelin, chouquettes, paris brest, chicken puffs etc.
I share all the tips and tricks to make foolproof, failproof, light, airy, puffy, crisp choux pastry (Pâte à Choux)!

- What is choux pastry (also known as Pâte à Choux)?
- Why is homemade choux pastry simply better?
- Most common issues with pâte à choux
- Choux pastry troubleshooting
- How to make choux pastry (what yields the most consistent results)
- How to store choux pastry
- Frequently asked questions
- Watch me make perfect choux pastry (recipe video)
What is choux pastry (also known as Pâte à Choux)?
Pronounced shoe pastry, this is one of the most well-known, classic French pastries. While the direct translation from French is cabbage pastry, rest assured that no cabbages are used in the making of choux!
It’s a light, airy, crisp pastry used to make chouquettes, cream puffs, eclairs, profiteroles, choux au craquelin, paris brest, chicken bouchees, croquembouches, gougères, French crullers and more. And you could even make chocolate choux pastry as a variation.
Flour, eggs, butter and water are all you need to make it. And depending on who you ask, choux pastry is either super easy or insanely difficult to make. What’s up with that? Let’s find out.
I used to eat a lot of eclairs and cream puffs when I was little, so choux pastry has a special place in my heart. And I find it pretty ingenious that choux pastry doesn’t use a chemical raising agent to rise.
Instead it uses air and moisture trapped in the dough to rise (water and eggs).

I had maintained for quite some time that I was a choux pastry whiz, because this classic French pastry dough was one of the first pastry recipes I learned how to make and I had been making it for well over 25 years by that point. But, one day, I just couldn’t get it right! And I couldn’t figure out what I was doing wrong.
So I started testing different ways of making it, until I finally understood what made it work. If your choux pastry recipe doesn’t always work, then THIS foolproof perfect choux pastry guide is for you.
This post will help you understand WHY and HOW choux pastry works, with ALL the troubleshooting tips that cover every conceivable mistake.
Why is homemade choux pastry simply better?
Store-bought choux pastry cases are almost always dry and tasteless. This is true for store-bought cream puff shells as well as eclair shells.
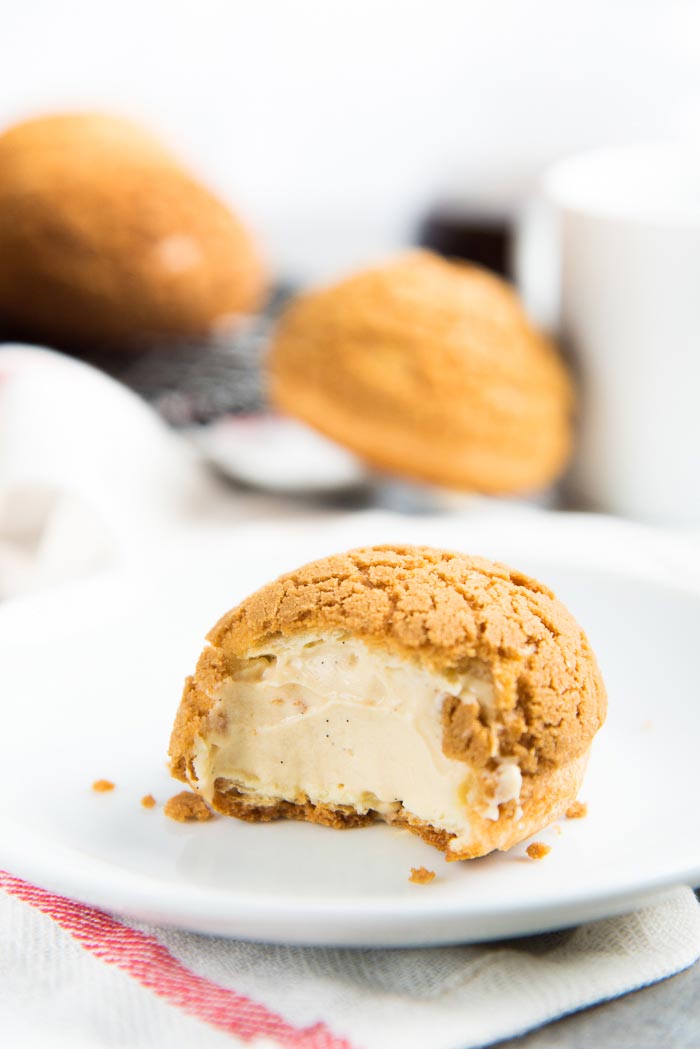
Homemade choux pastry however is the real deal! Crisp on the outside and airy & custard-like on the inside. And when you understand how choux pastry works, and what’s happening in each step, it really is super easy to make.
So let’s find out how to make choux pastry, PERFECTLY, every single time. This is the ultimate guide for making foolproof and failproof choux pastry (pâte à choux), for perfect profiteroles, eclairs, choux au craquelin, paris-brest and other choux pastry based desserts.
It’s a lengthy post, where I cover EVERY aspect of making perfect choux pastry, troubleshooting choux pastry problems, tips for profiteroles and eclairs, as well as variations. So hold on tight! Or you can skip down to the bottom of the post for the full recipe and recipe video.

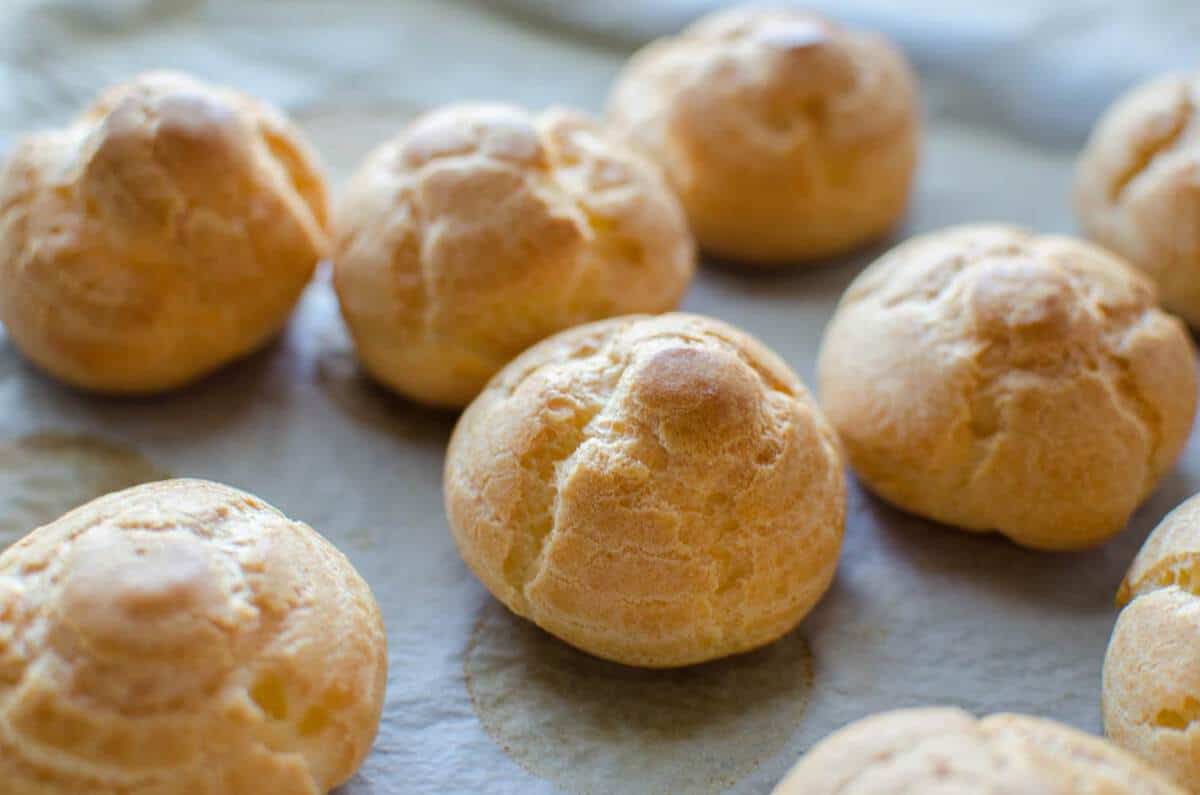
How do you define PERFECT choux pastry (Pâte à Choux)?
A pastry with a light and crisp outer shell, and a delicious, soft, creamy, custard-like inside. And it’s airy with large air pockets inside as well, perfect to be filled with a sweet filling. A few cracks will be visible on the outside, but it still retains the shape it was piped in.
It can be round for profiteroles, cream puffs and craquelins, or elongated for eclairs.
Personally, I like my profiteroles to be a little softer, and for my eclairs to have a firmer shell. This is because the elongated shape of eclairs hold up well, and are more stable if they are made to have a firmer shell.
Profiteroles are more forgiving and foolproof than eclairs, because of their round shape, and as such I like to keep them a little softer. Choux buns (profiteroles, cream puffs), are less likely to collapse compared to eclairs.
BUT, a few things can go wrong when you’re trying to bake perfect choux pastry.
Most common issues with pâte à choux
- Profiteroles or eclairs have collapsed. They are flat, or look deflated. The eclairs look like they have a concave bottom, or there’s a crack on the bottom.
- Choux pastry is too soft and soggy. Usually profiteroles or eclair shells have a crisp shell. The crispness doesn’t last long when it’s exposed to air or filled with pastry cream. However, they should never ever be soggy.
- Profiteroles or eclair shells have a lot of cracks on top. They have risen irregularly, with lots of cracks, and kind of look like an ugly ass flower.
- Choux pastry shell is too dry, doughy or crumbly.
Now let’s see why these things happen.

Choux pastry troubleshooting
My pastry shells are flat, soft, and soggy
Have your profiterole shells collapsed? Do your eclairs have sunken concave bottoms? They’re not the, round, hollow, perfect choux pastry shells you see in bakeries?
So what causes this?
Reason 1
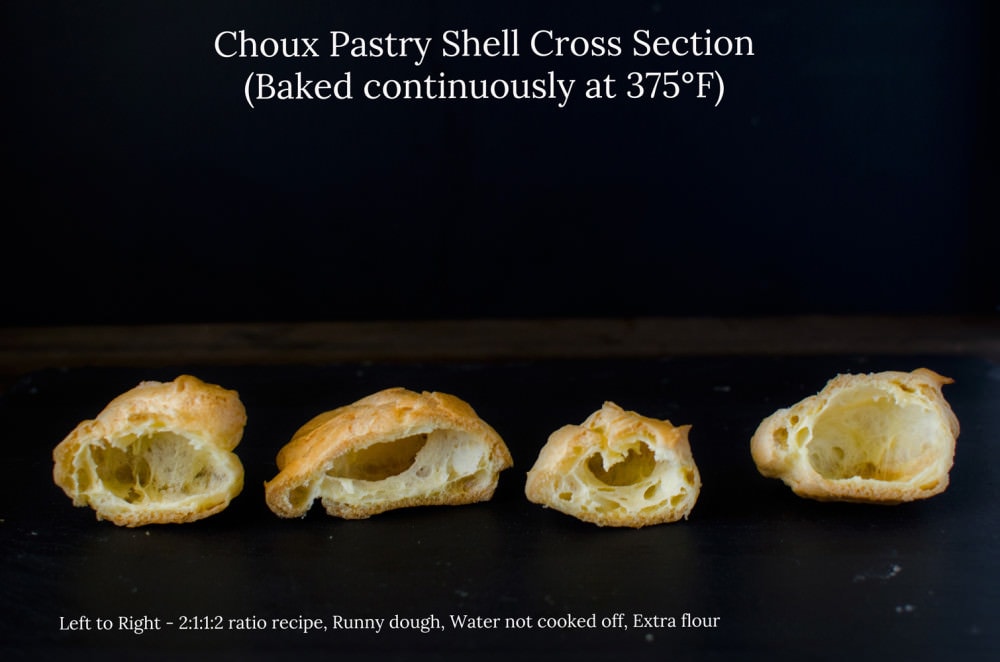
Chances are the dough was too wet and runny. When you pipe out the batter, it probably didn’t hold its shape (see the picture above – the runny batter kind of spreads out). That means it has too little flour, or too much liquid in the form of water, eggs and/or butter.
Reason 2
Removing the choux pastry from the oven too early is another reason why your choux shells will be flat. If they were soggy to start with, then they will not rise properly. But even if they do rise, they will deflate when they cool down, due to too much moisture inside the shell, especially if you take them out of the oven too soon. The shells didn’t have enough time to form a stable crust, so they collapse as they cool down.
Reason 3
You need to prick the shells towards the end of the baking time (and/or after), to allow the shells to dry out. If you don’t, the hot humid air will collapse the soft shell as it cools down.
How to fix pâte à choux that is too runny
This happens if you added too much eggs, OR you didn’t cook the dough long enough, and have too much water in your dough.
Whatever you do, NEVER ADD EXTRA FLOUR! NEVER! Repeat after me – I will never add raw flour to a runny choux pastry dough. I see some recipes online suggesting this, and that is just a recipe for disaster.
So then what do you do?
Make another half batch of the cooked dough with water, salt, butter and flour (with no eggs!). Once you’ve made that part of the dough by cooking it in a saucepan and you have the right consistency, let it cool down (covered).
Add the cooled down dough to the runny dough a bit at a time, mixing it into the dough well, until you get the right, pipeable consistency. It always works like a charm!
Removed them from the oven too early, or too much moisture in the shells?
If that is the case, leave them in the oven longer (until the shell is a darker brown in color). If you baked them at 350°F or lower, then increase the oven temperature.
And ALWAYS remember to prick your baked choux pastry shells (profiteroles or eclairs) with a skewer or a sharp knife and let the moisture inside the cases escape while drying out the shells.
This helps prevent collapsed shells, so you can get perfect choux pastry shells. I also like to prick the shells during the last few minutes of the baking time to help with drying out the pastry shells.
Some recipes call for letting the choux pastry shells dry out in the oven, with the door half open. You can do that too, but if you have another batch of choux pastry to bake, this can be cumbersome.
So let the choux pastry cool down in a warm, draft-free area. I prefer keeping them in the kitchen (which is already warm because the oven’s been doing its thing).
For more information about eclairs, check out my perfect chocolate eclairs recipe here.
My choux pastry shells have too many cracks or they look irregular
So you pipe the pâte à choux nice and smooth, but when it comes out of the oven, it looks all kinds of weird.
Reason 1
Pâte à choux dough has undissolved solids or is not smooth. The salt or sugar hasn’t dissolved properly. The dough isn’t smooth because of flour lumps that haven’t been mixed properly, or you added raw flour to the dough after adding eggs.
Chances are there’s stuff in your pastry batter that shouldn’t be in there. Things like flour that has not been sifted or salt that was not melted. This can interfere with the smoothness of the pastry.
Reason 2
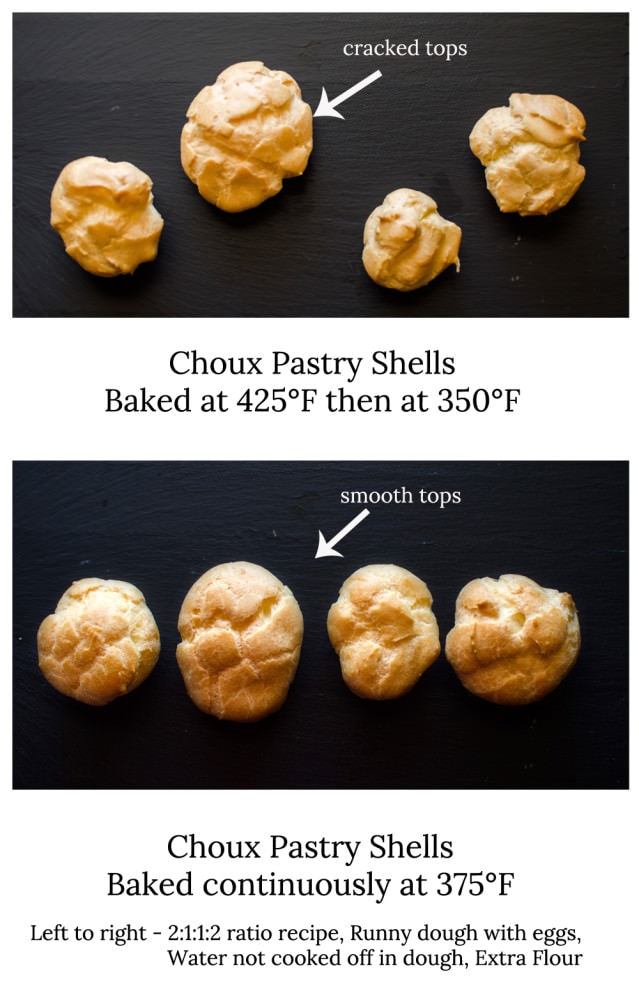
Choux pastry was baked at too high of a temperature. The rapid rise of the dough at high temperatures can cause it to crack as well.
Many recipes call for pâte à choux to be baked at two different temperatures. First at a higher temperature for a few minutes, and then finish off at a lower temperature. The reasoning behind this is that the higher temp. facilitates the rise of the pastry because the high heat causes the water to evaporate faster, thereby raising the pastry faster and higher. Then the temperature is lowered and the pastry is allowed to dry out and bake properly.
Reason 3
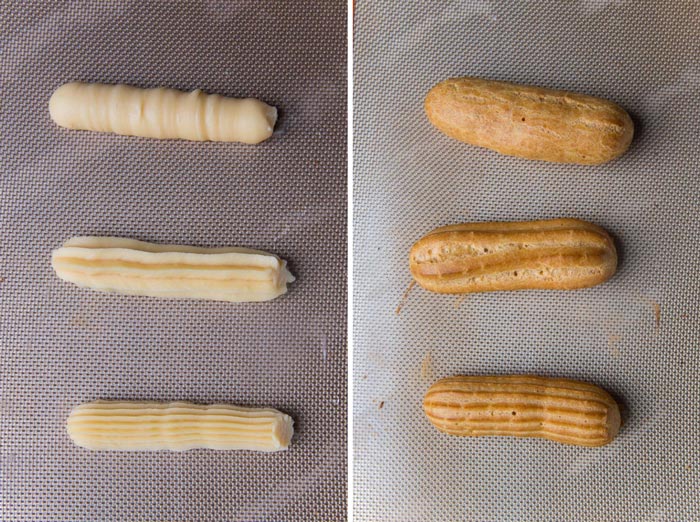
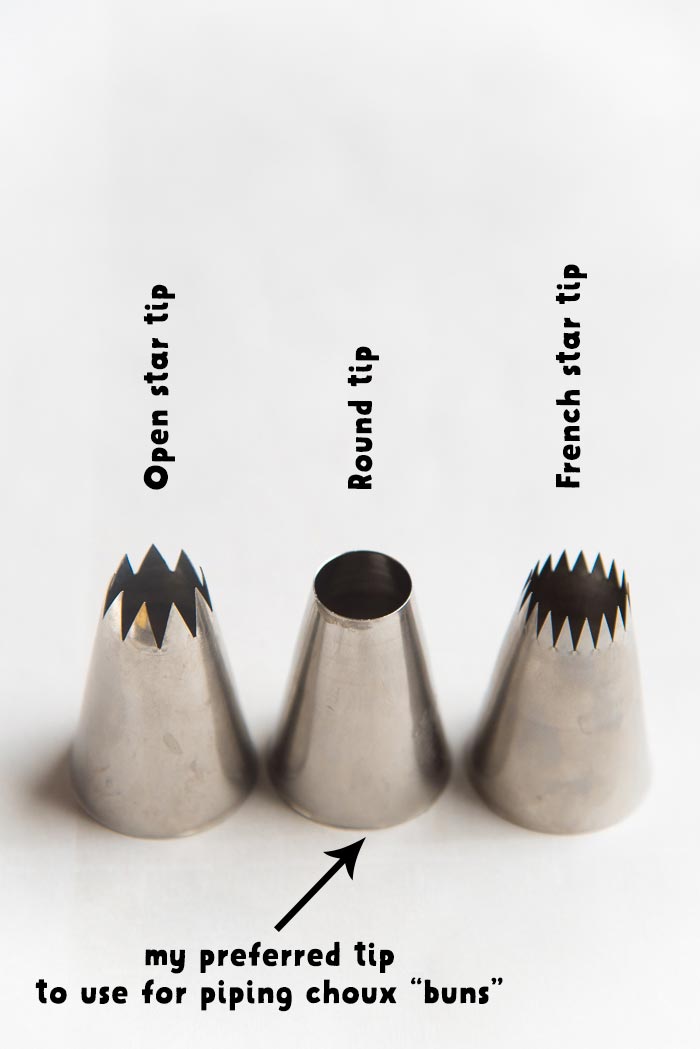
The piping method can cause cracks as well. This includes the piping consistency as well as the shape of the piping tip (nozzle). If you’re piping eclairs or profiteroles, you need to make sure to pipe consistently and smoothly.
Ripples in the dough will give rise to cracks. This is especially true for profiteroles. So make sure the tip is always touching the surface of the dough when you’re piping, and you’re applying smooth and consistent pressure, without causing ripples.
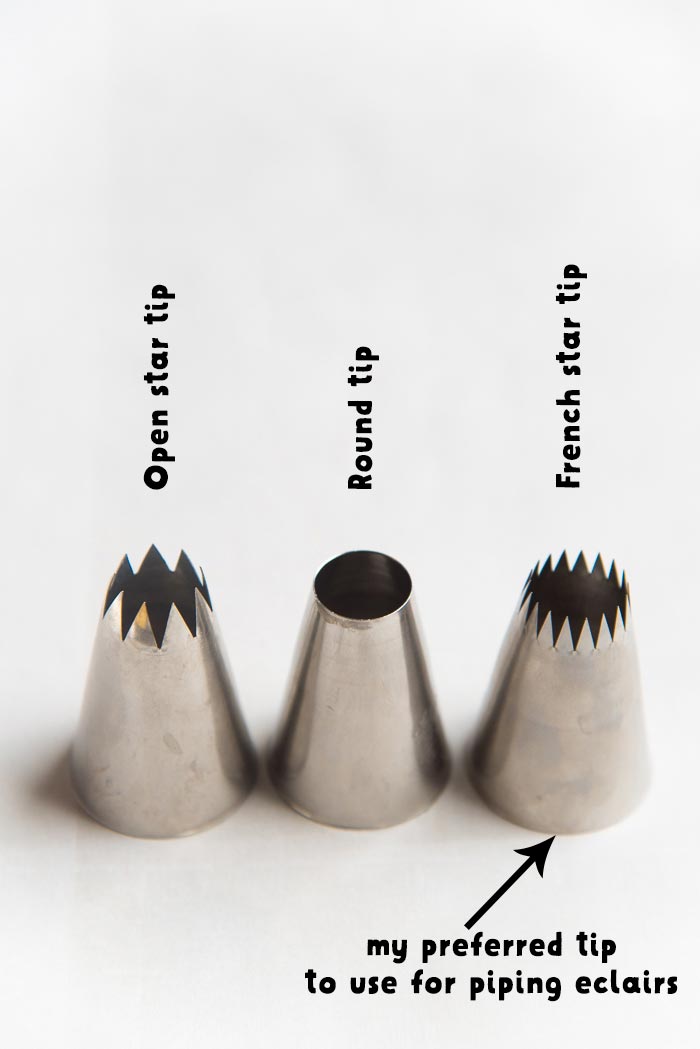
While the shape of the piping tip doesn’t really matter when it comes to profiteroles, this can cause irregularities with eclairs. Eclairs piped with a round tip can cause more cracks on the surface, compared to a French star tip that has “finer teeth”.
These lines or marks in the piped dough increase the surface area and allow the eclair shell to expand without causing unsightly cracks. You can check out my comprehensive classic eclairs recipe post on making eclairs for more details.
How to ensure your pastry cases are not crackly or irregular
Make sure all the sugar and salt are dissolved BEFORE letting the water come to a boil.
I’ve read that the addition of completely dissolved salt apparently helps prevent cracks from being formed on the shell, although I’m not sure why. I didn’t test it without salt to see if that’s indeed the case.
You need to add a bit of salt to the dough anyway, because it really enhances the flavor of the choux pastry, so there’s really no reason to go without salt.
Just make sure to stir the water-butter mixture frequently to make sure the salt and sugar dissolve well before the water comes to a boil.
Make sure the flour is fine and there are no flour lumps in the dough.
So sift the flour before you add it into the boiling water. This will make sure there are no lumps in the flour to begin with, and that the flour is nice and light. Mix the flour into the water off the heat, so you can really make sure the water is being absorbed by the flour and there are no lumps.
I like to use a flexible silicone spatula to do this, and mix the dough by flattening any lumps I see with the spatula as I go. Then I return it back to the heat and mix it further to cook off the extra water.
Cook the choux pastry at a lower temperature throughout the baking time, rather than switching between a high temperature and a lower temperature.
The theory of baking choux at two different temperatures may work for some. And if it does for you, you can keep doing that. However, I find that cooking choux pastry at one set temperature the whole way through, produced more consistent results with a smooth top and minimal cracks. Plus it’s more convenient of course.
I’ve found that the high temperature that most recipes call for, makes the choux pastry expand and rise rapidly, almost chaotically, causing the pastry to split and look ugly.
Piping consistency
Make sure the piping tip is always touching the dough, and not causing ripples in the dough. Also make sure there are no air bubbles in the pastry bag (piping bag) too.
Piping nozzle
If you’re making eclairs, I highly recommend a French star tip. This will also minimize ugly cracks in the eclair shells and help keep the shape of your eclairs.
My pastries are too dry, doughy or crumbly
You do get a nice crisp shell, but when you crack it open, it’s not as deliciously “custardy” or soft on the inside. Or even worse, it hasn’t risen at all and tastes like egg bread. Whoopsie!
Reason 1
You added too much flour, or not enough eggs. Not getting a glossy sheen on your dough is a good sign that your pâte à choux is going to be dense and dry.
Or if you added raw flour to your dough because it’s too runny, it can mess with the final consistency too.
Reason 2
You baked it too long, and the shells are almost burnt, and it’s very obviously going to be too dry. Another reason is because you let the choux pastry dry out too much – especially if you let the choux pastry cool in the oven, and you forget to take it out.
This can also happen if you let the choux pastry stand outside uncovered, for hours, after they’ve been cooled. You CAN leave the choux pastry covered in an airtight container though!
How to fix dry pâte à choux shells
Baking time
If you baked it too long the first time, simply reduce the time in the oven by a few minutes next time. Every oven is slightly different depending on how hot it actually is, and also the hot and cold spots you get in every oven.
Dough consistency
Make sure to check the consistency of the dough, and not add raw flour to fix runny dough.
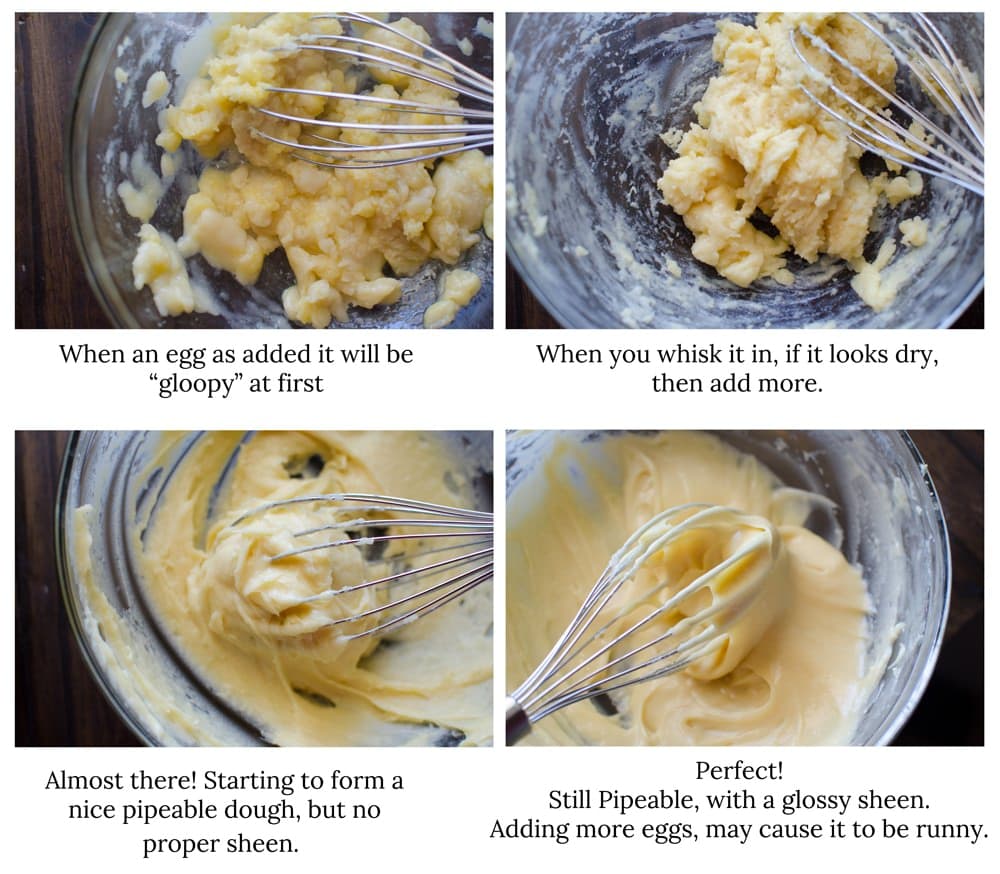
If your dough doesn’t have a sheen even after adding all the eggs, don’t worry! Just add extra eggs until you get that right consistency.
Chances are you may have cooked the dough too long and too much water evaporated, but it can easily be fixed by adding extra eggs. Just make sure to add a little at a time, rather than a whole egg at once.
How to make choux pastry (what yields the most consistent results)
Making the dough
Weigh the ingredients. Each one of them.
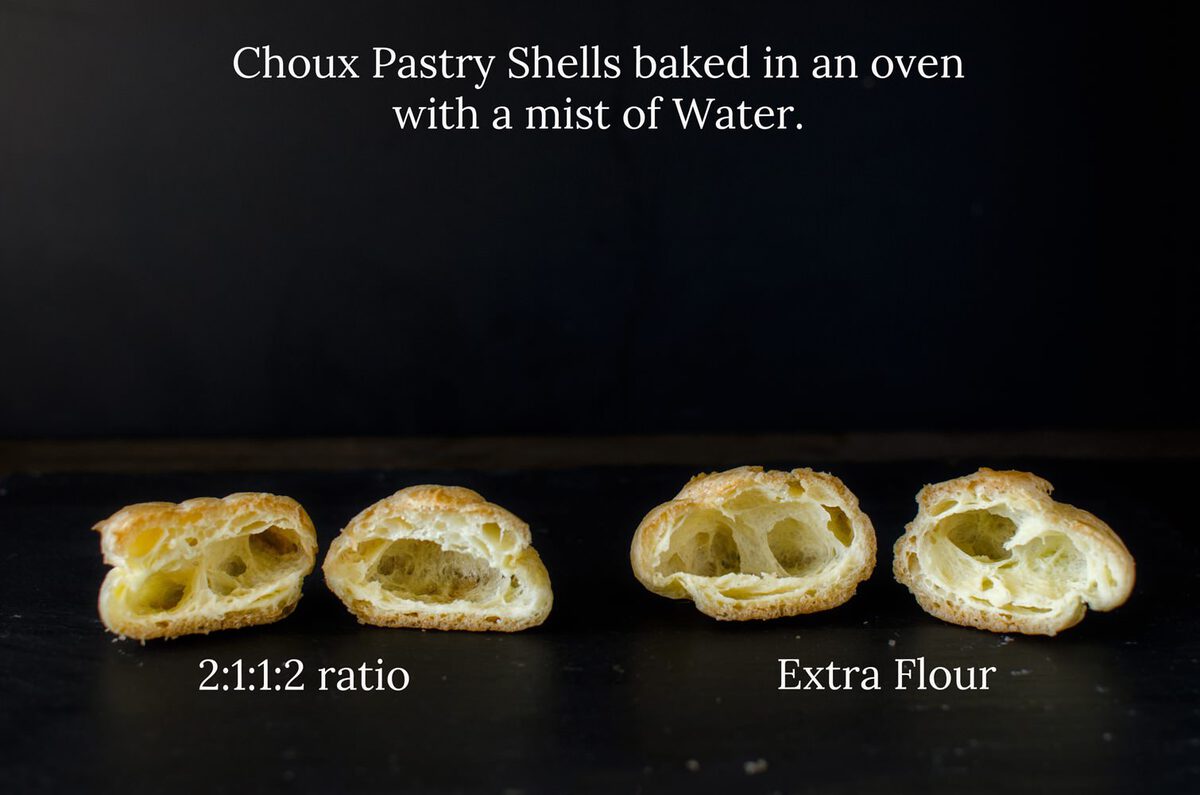
Michael Ruhlman’s ratio by weight for choux pastry is 2:1:1:2 of water, butter, flour and eggs. While this works well, I find that adding a little extra flour helps make perfect choux pastry that is crisp and stable. The pastries keep its shape as it bakes – a very desirable result.
Whenever you can, ALWAYS measure ingredients by weight, not by volume. This is true for any kind of baking. While I don’t have a problem measuring by volume for some recipes, I always prefer to use weight because that gives more consistent results.
Here’s a good inexpensive kitchen scale that you can use.
With eggs, I like to crack them into a jug, and whisk them before adding to the dough.
Cook the dough first
Choux pastry or pâte à choux, is very unique in that for perfect results, it requires the dough to be cooked first! This unique step results in a really sturdy pastry shell that also has a custard-like texture on the inside.
Always start with cold water (or milk). Add the salt and the sugar to the water. Cut the butter into pats (or smaller), to ensure that it melts BEFORE the water comes to a boil. You don’t want to keep stirring boiling water to melt the butter. Stirring the water frequently while it warms up ensures that the salt, sugar and butter melt before the water comes to a boil.

As soon as the water mix comes to a boil, remove it from the heat (but don’t turn off the stove) and add ALL THE FLOUR IN ONE GO. Mix immediately for about 45 seconds, to make sure there are absolutely no lumps.
This is important because you need to mix in the flour well (flour needs to absorb all the moisture of the butter-water mix), and having a smooth dough means that you won’t have cracked shells later.

Then cook the dough further on the stove so that enough moisture evaporates to get a good dough. A lot of recipes will talk of different signs to look for when cooking the dough – from the dough pulling away from the sides of the pan, to the dough looking like mashed potatoes, or leaving a film of dough on the bottom of the pan.
Heating the dough for too long can cause the butter to split from the dough as well. So make sure you don’t do this.
Here’s what I look for
- The dough leaving a film on the bottom of the saucepan (if you’re using a stainless steel pan).
- Oil droplets forming on the bottom of the pan (if you’re using non-stick pans).
- The dough comes together to form a cohesive dough, that pulls away very cleanly from the sides of the saucepan.
- Absolutely no flour clumps in the dough.
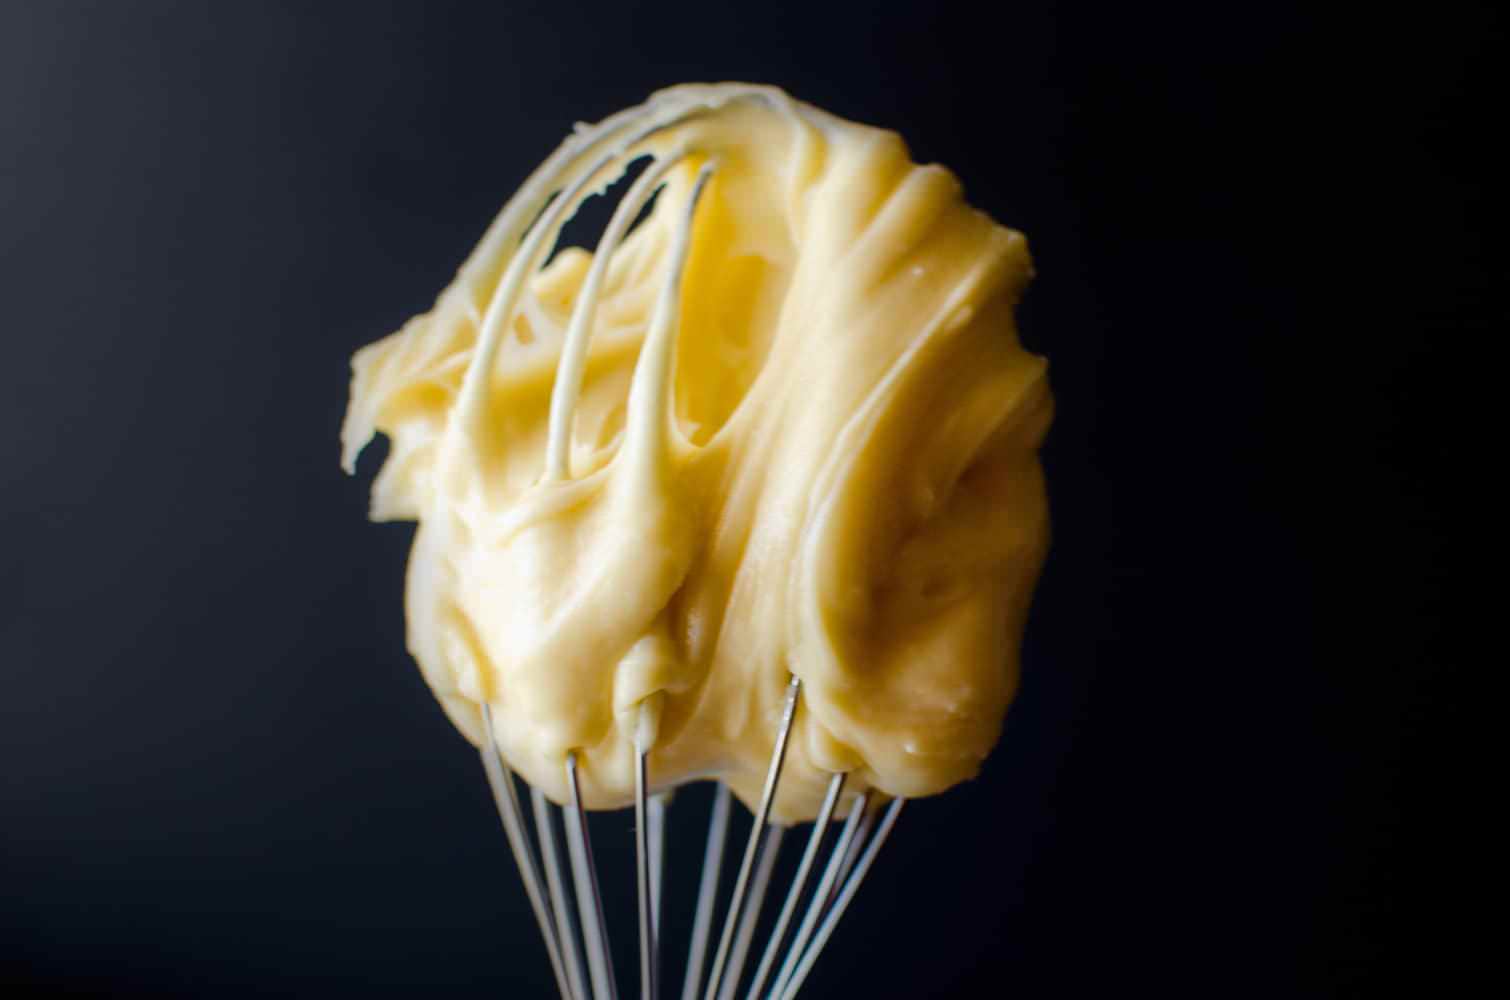
- If I stick a tablespoon in the ball of dough, it’ll stay upright without falling (as shown in the picture below). This is called…. the “spoon test”. If the spoon falls over, that’s a clear indication that there’s still too much liquid/moisture in the dough.

Next step is cooling down the dough
This is important because you don’t want to add the eggs while the dough is too hot. This can cook the eggs, and even give your choux an eggy taste. So you need to wait for the dough to cool down at least to 160°F.
The way I prefer to cool down my dough is to place the dough in a bowl, and then flatten the dough along the sides of the bowl. This increases the surface area, so it cools down faster, plus more water evaporates as you do this.
Some recipes call for mixing the dough in a stand mixer for a couple of minutes. This is fine too, but make sure you’re only mixing it on low speed and no longer than 2 – 3 minutes.
Agitating the dough too much can cause the butter to split from the dough, and then you’ll get a really oily looking dough.

Adding eggs
The amount of eggs added is variable. Usually it’s 4, which is 8 oz in weight for this recipe (because 1 egg is considered 2 oz, but that obviously depends on the size of the eggs).
As mentioned earlier, I like to have all the eggs whisked well in a jug first, before adding it to the dough. This is because I can add a little at a time until I get the consistency I like.
Whisking them beforehand ensures that you get an even mix of egg white and yolks being added to the dough at all times.

If you’d like to, you can add one egg at a time too. Just make sure that the last egg (4th), is whisked in a small bowl and it’s added only a little at a time to prevent the dough from being too runny.
Mix in each addition of eggs before you add the next. You can check the consistency of the dough as you go and make sure you don’t add too much egg. At the beginning you can add about 1/4 cup (or 1 egg) of eggs at a time, but then add the last bit in small increments.


What you’re looking for here is a dough that looks glossy, but still thick, can hold its shape and is pipeable. Sometimes I only need to add 3 1/2 eggs before I get the right consistency, and if I added all of the 4th egg, then my dough would lose the stiffness I need.
If that happens, the dough won’t hold its shape when piped, leading to flat choux pastry. Not good.

Why is there variability in amount of eggs added?
This is a crucial point that other recipes don’t mention.
Because when you added water to cook the dough previously, how much water gets evaporated during the cooking process can vary a lot. How you measured the water, what saucepan you used to cook the dough, how long you cooked the dough can all have an impact on how much water is left in the dough.
- Less water in the dough – more eggs you will need to add.
- More water in the dough – less eggs you will need to add.
The type of flour can also have an impact on how much eggs to add.
- Pastry flour needs less eggs than if you used AP flour.
- Bread flour needs more eggs than if you used AP flour.
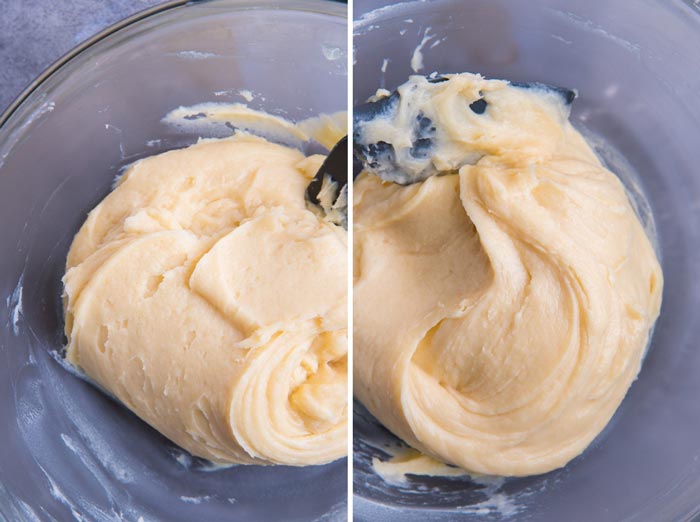
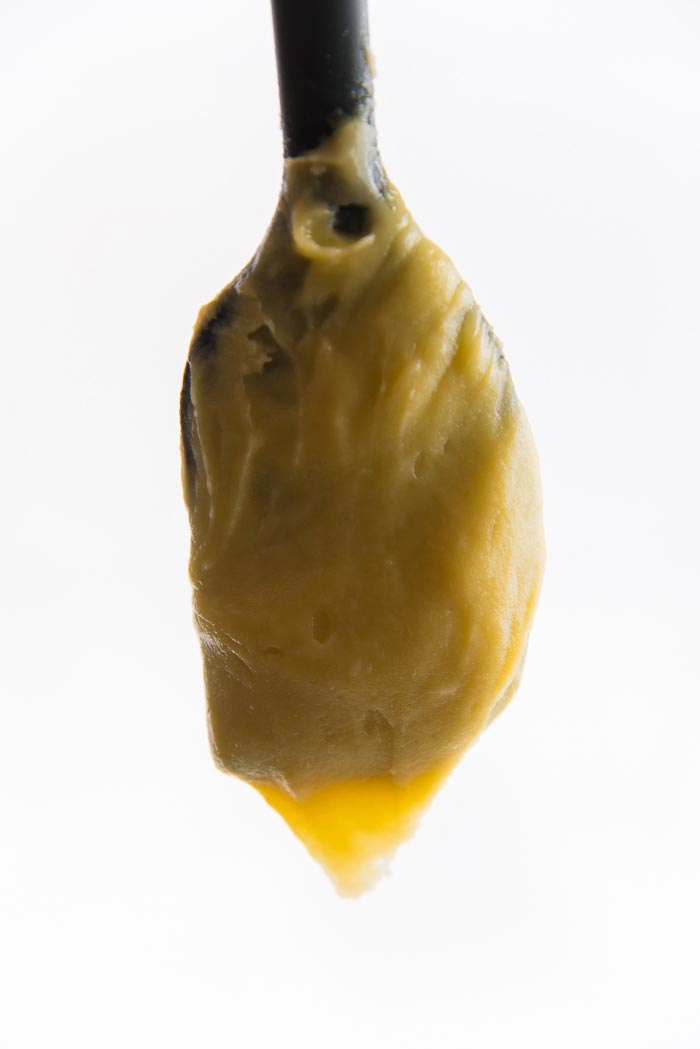
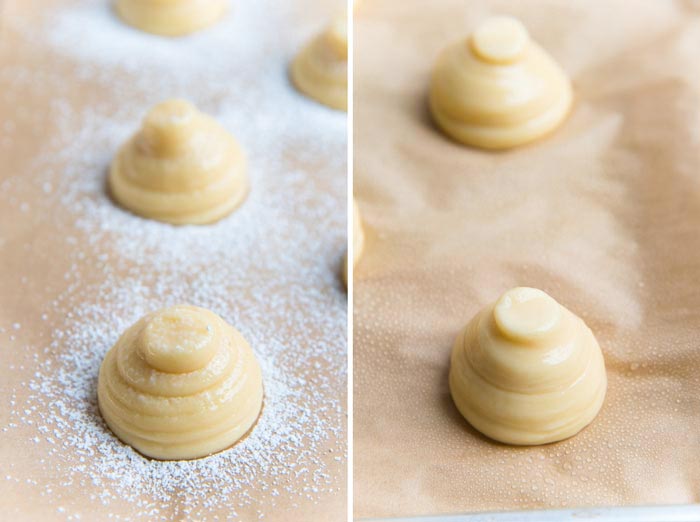
This image shows the subtle difference in choux pastry dough consistencies. On left, the dough has almost enough eggs. On the right, the perfect amount of eggs, where the choux pastry dough is smoother, and has a glossy sheen.
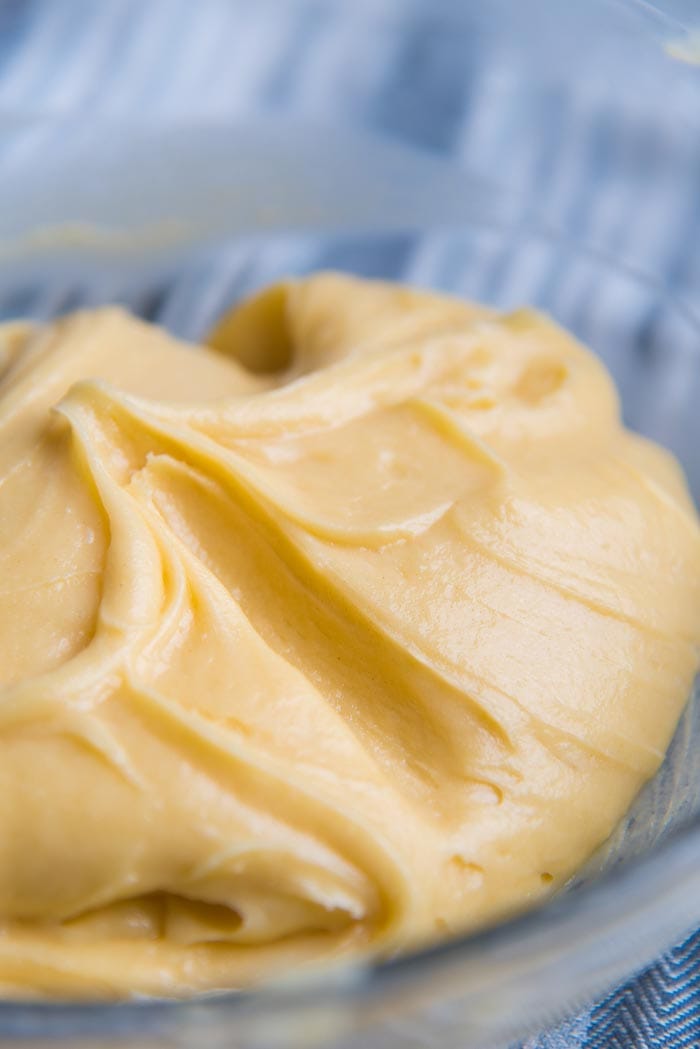
Here are some signs to look for in your choux pastry dough, when checking for the right consistency.
- The finger test – Drag your finger along the surface of the choux pastry dough to create a trough. The sides of this trough should stay upright and not collapse into the dough. If they do, it’s because the dough is too runny. If the sides of the trough stay up, then it’s the right consistency. Make sure the dough has a nice sheen when you do this test too.
- The V test – Place a rubber spatula or wooden spoon in the dough, upright, and then stir the dough with it a little, and slowly lift the spatula, straight up. The dough should form a V shape at the end of the spatula (as shown in the picture in the post), if it’s the right consistency.
I use a combination of both tests to check the consistency of the dough. I prefer the finger test over the V test. However, I would recommend using both at the beginning.
Piping the dough
Tips for profiteroles
Make sure the piping tip is just touching the surface of the piped dough, and move up as you go. This will help create less ripples and folds. This way you will have less cracks in your shell.
Alternatively, you can use a spoon or a mini cookie scoop to spoon the dough on to a baking sheet as well.
I do recommend piping though. Also remember to hold the pastry bag (and tip) upright when you’re piping profiteroles, and you’re not doing it at an angle. This way your choux pastry will rise perfectly upwards, and not be lopsided.
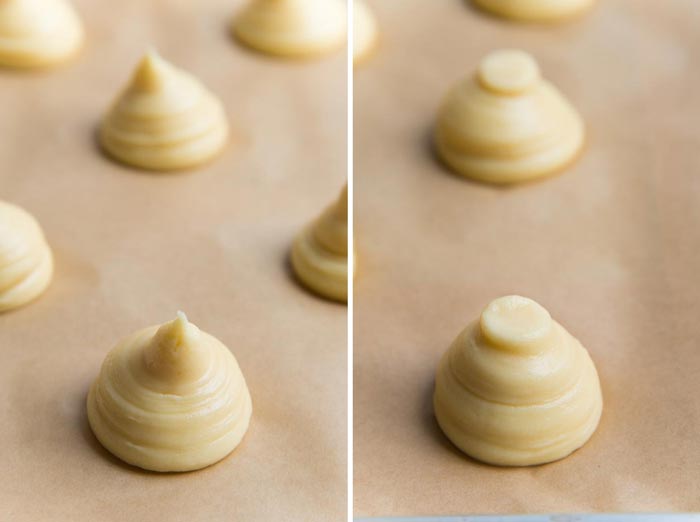
Remember to use a damp finger to flatten the apex or any points, otherwise these points will burn when you bake the profiterole shells. However, if you’re topping the choux pastry with craquelin, then you don’t have to do this.
Once you have piped choux dough on one tray, keep the remaining dough in the pastry bag until you’re ready to bake the next batch. The dough will even keep well in the fridge as long as it’s wrapped inside a pastry bag, or an airtight container.
I use either the Wilton 1A Round Tip or Wilton 2A Round Tip for my profiterole pastries and I LOVE my 16 inch disposable pastry bags because they are sturdy, and hold more of the dough. Any 1/2 inch round tip (or similar sized tip) is good for regular profiteroles or cream puffs.
Spraying the baking tray with water or dusting them with sugar
Another trick I use to get the choux pastry shells to expand even more is to spray the baking tray with some water. It’s simple, yet works brilliantly.
As the water on the baking tray evaporates from around the dough, it helps “raise” the dough from the outside while the moisture IN the dough, helps raise it from the inside.
However, if you want crispness over volume, then sift some confectioner’s sugar on top before baking.
Tips for piping perfect eclairs
For more in-depth details and pictures, check out my chocolate eclairs post.
Eclairs are a bit trickier than profiteroles when it comes to maintaining their shape. But I’ve discussed all the tips and tricks in my eclairs post, so that you too can make perfect chocolate eclairs, every single time!
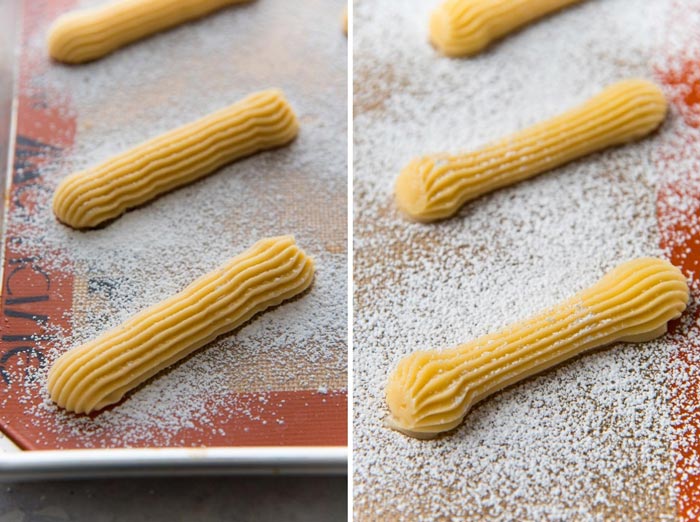
When piping for eclairs, pipe the dough at an 45° angle and be consistent with the pressure. To maintain the right shape, pipe a tad extra dough at the two ends, so that your eclairs don’t end up oval shaped.
With eclairs, I also prefer to use a French star tip over a round tip. This really helps with maintaining the eclair shell shape. I use a 1/2 inch French star tip from the Ateco French star tip set. I also prefer to use bread flour, so that the dough will be more sturdy (than with AP flour).
Silpat vs parchment paper
Another crucial point I figured out through lots of experimentation. Eclairs bake better on silpat than on parchment paper! Who would’ve thought? It’s to do with the heat conduction from bottom, and this ensures smooth, evenly baked eclair shells without cracks or collapsing.
Since I also don’t want my eclairs to puff up too much, I like to dust the eclairs with confectioner’s sugar instead of water. Confectioner’s sugar slightly caramelizes on the shells, giving them a little extra sweetness and a delightful crunch.
For more details, check out my chocolate eclairs post for tips on how to pipe eclairs and make classic chocolate eclairs.
Baking the choux pastry
Baking temperature
Some recipes call for choux pastry to be baked at two different temperatures. If this works for you, go ahead. As I mentioned earlier, I find that the high temperature makes the shells expand too much, causing cracks.
Plus, after I bake one tray of choux pastry, I don’t want to wait for the temperature to rise back up before baking the next tray. So I bake choux pastry at one constant temperature – 375°F, for 35 – 45 minutes, for perfect choux pastries, every single time.

Don’t open the oven door until your choux pastry shells have set properly
Since choux pastry relies on steam to expand while baking, it’s VERY important to not open the oven door until the choux pastry shells have set properly.
This means you should never open the door during the first 25-30 minutes of baking (for standard-sized choux pastry; the time goes down for smaller shells and up for larger ones).
I wait till the shells are golden colored before opening the door. This prevents steam from escaping too early, which will cause the shells to collapse.
Because of this, I only bake one tray at a time because it’s hard to switch the trays halfway through the bake time.

Pricking choux pastry shells
I used to prick each choux pastry shell with a toothpick as soon as they came out of the oven and were cooling down, in order to dry out the shells.
But now I’ve found that pricking the shells during the last 5-10 minutes of baking helps dry out the shells more, and keep them crisp and sturdy.
So now I open the oven door at the 25-30 minute mark, prick each shell with a toothpick or skewer during that last 5-10 mins of baking, and allow the steam inside the shells to escape. Use a sharp toothpick to pierce the casings.
For larger pate a choux pastries (more than 2.5 inches in diameter) and eclair shells, I prick them one more time when the choux pastry comes out of the oven (after being baked to a nice, slightly darker golden brown color and crisp shell).
Allow them to cool down in a warm, draft-free place (I usually do this near or on top of the oven), so that a sudden temperature change won’t cause them to collapse either.

Filling pate a choux shells (choux pastry)
Once you know how to make perfect choux pastry, you can get creative with filling them! There are many different types of filling that you can use to fill profiteroles or eclairs.
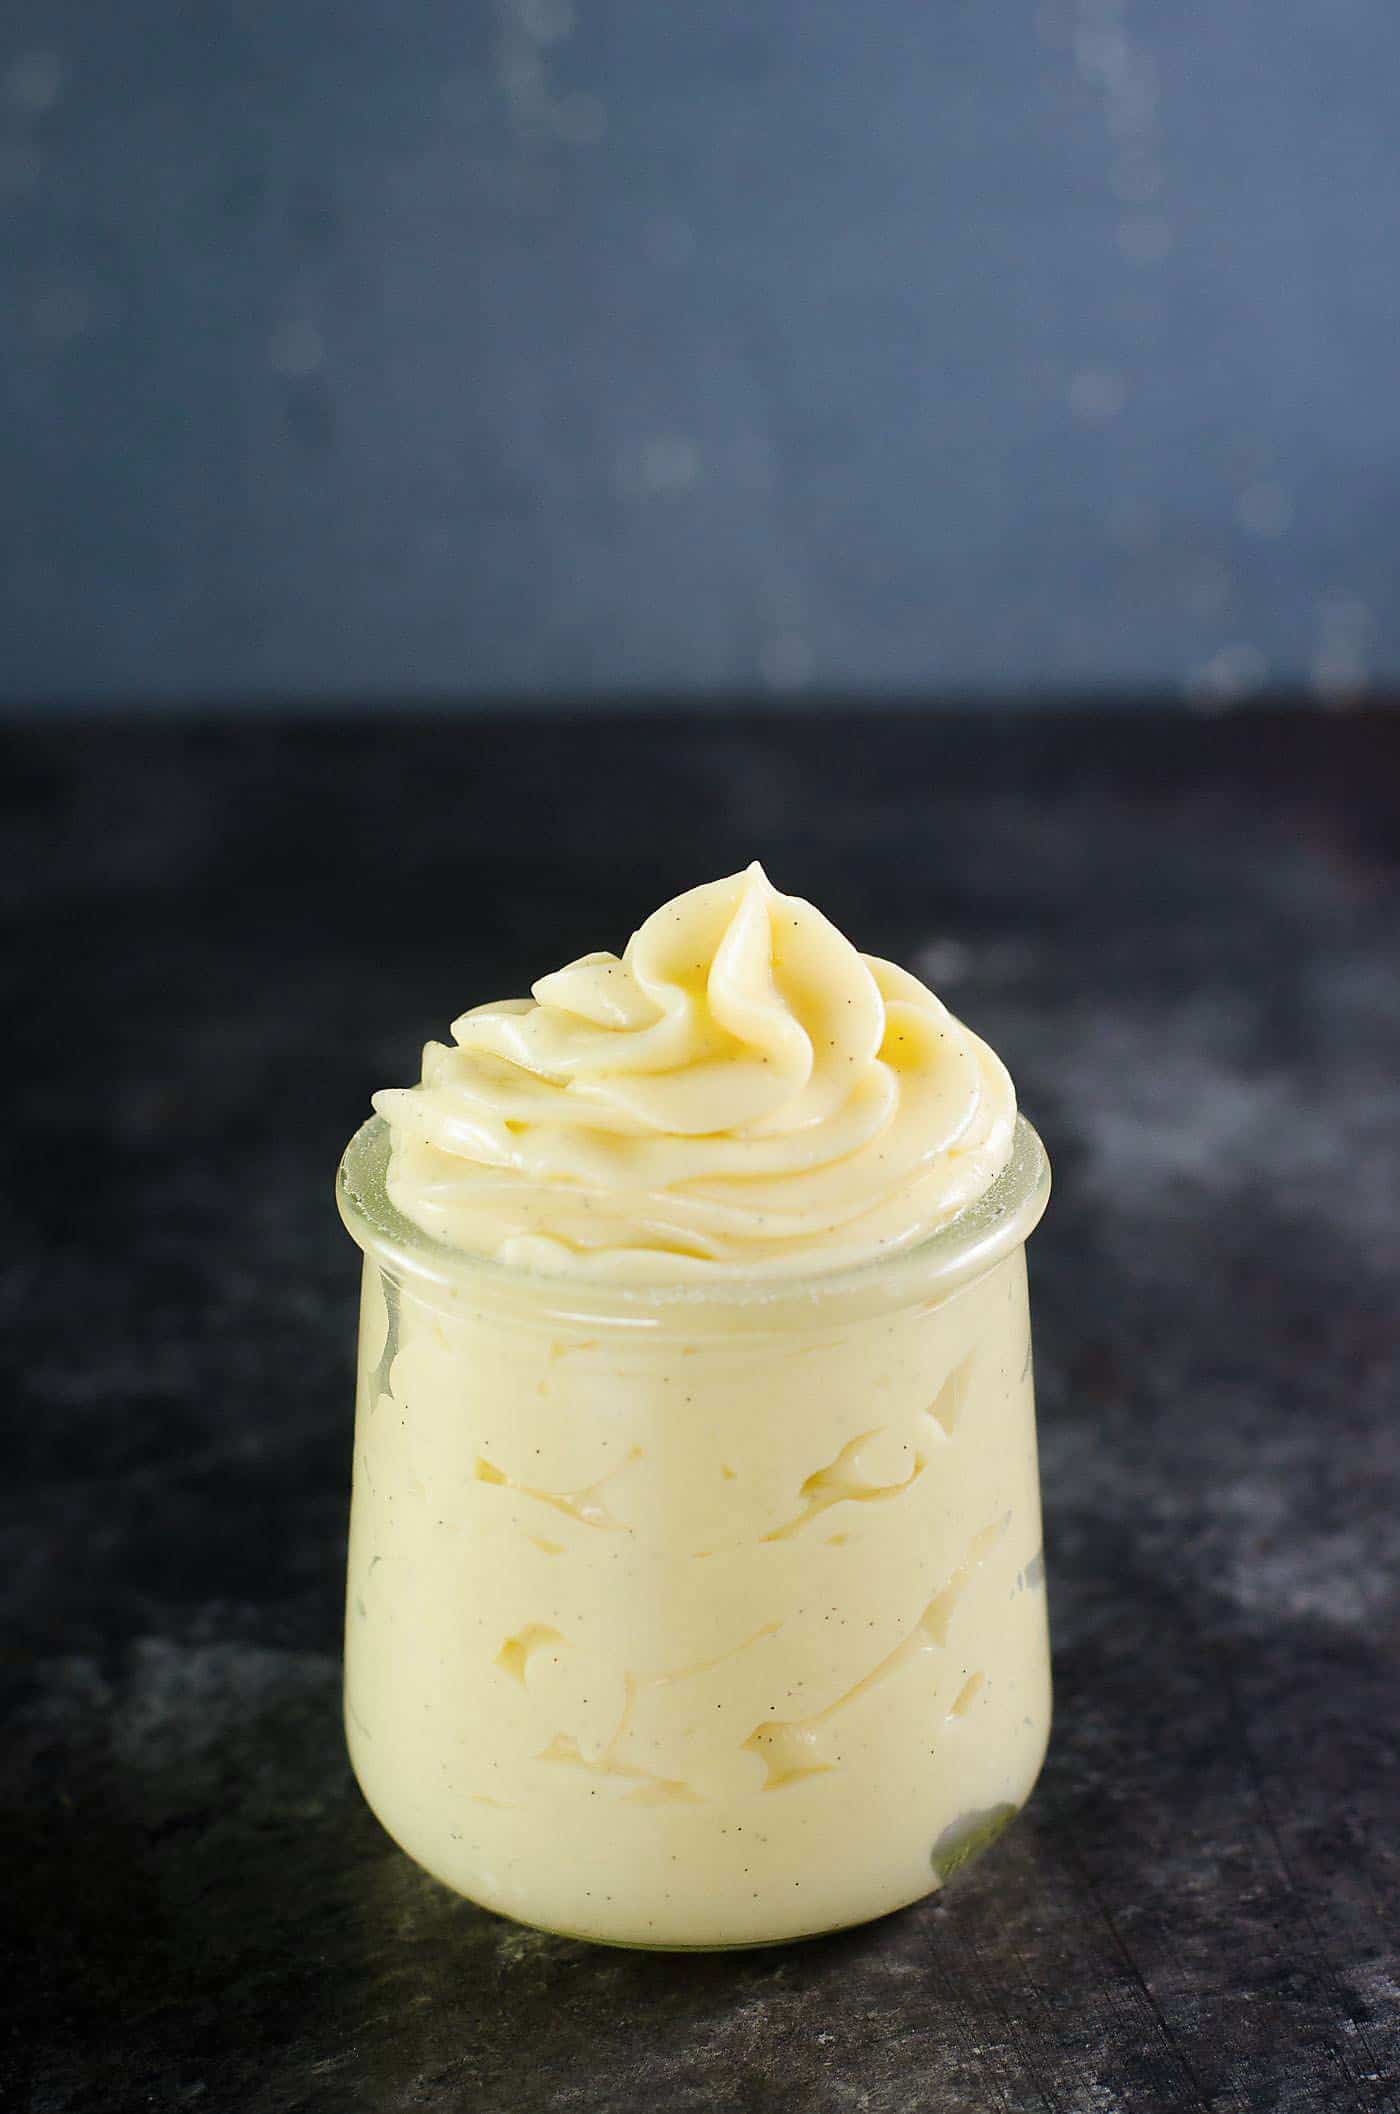
- The most popular filling is vanilla pastry cream, which is also known as creme patissiere. You can get the recipe here for vanilla pastry cream.
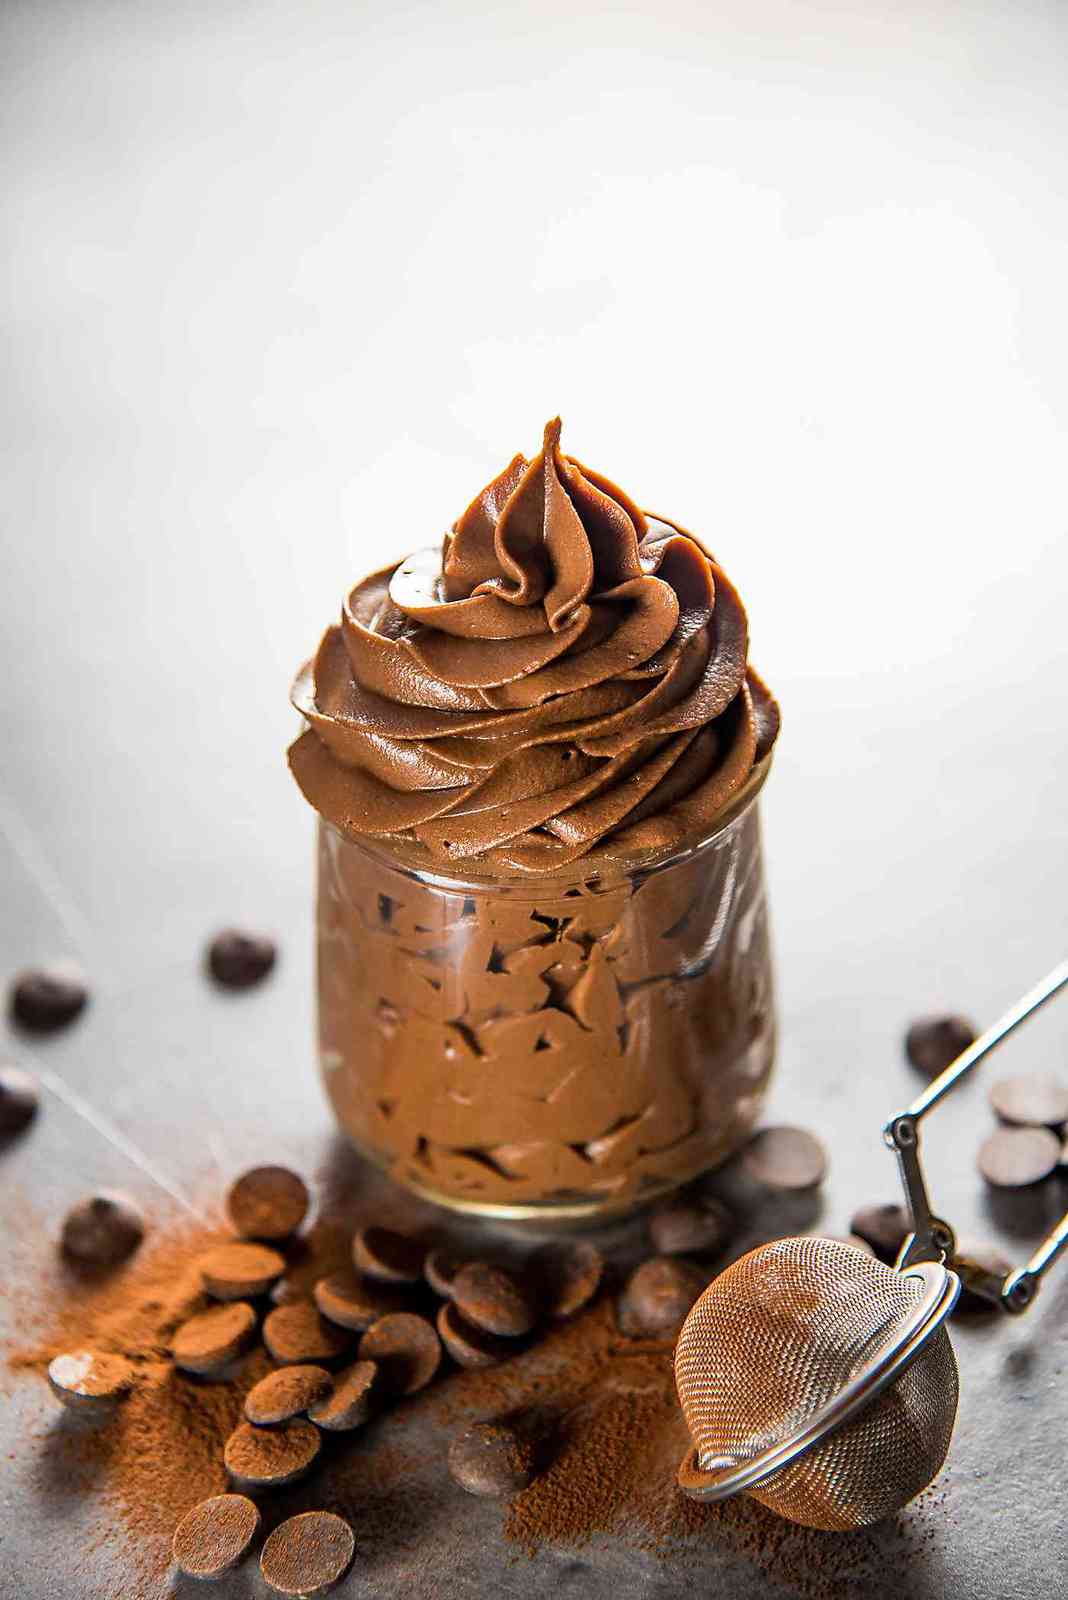
- OR if you prefer chocolate creme patissiere (chocolate pastry cream) instead, get the recipe here for chocolate pastry cream.
- You can get the recipe for salted caramel diplomat cream in the recipe for choux au craquelin.
- Some serve choux pastry with a vanilla ice cream filling, although I’ve never personally been a fan of that.
How to store choux pastry
Unbaked choux pastry dough can be stored in an airtight container, and in the fridge for up to 2 days. I place the dough in a pastry bag (piping bag) and seal the bag so that the dough has zero contact with air. You can also place the dough in a bowl, and then cover the whole surface with plastic wrap.
You can also pipe the choux pastry into the shape you like and freeze as quickly as possible. As soon as the choux pastry is frozen, you can place them in ziploc bags. I personally haven’t tried this, but there are bakeries that do this and still get good results. The most important thing is to prevent freezer burn.
Baked choux pastry can be stored in an air tight container, at room temperature for 24 hours (unfilled). They do lose their crispness, so you may want to reheat them at 300 F, just until they’re warmed through and crisp.
Unfilled cases can also be frozen in airtight container for longer. But will need to be warmed in the oven before being filled.
Frequently asked questions
I’ve never made choux pastry before. What advice do you have for a beginner?
Just go for it! 🙂 Even if you get it wrong, they are still going to taste delicious! It’s really quite easy to get PERFECT results even on your first try. Just read the 100s of comments I’ve received below from my readers who tried it for the first time and nailed it. 🙂
The issue with most recipes out there is that they don’t tell you what signs to look for, to help you get the choux pastry dough perfect. But I’ve taken care of that with this choux recipe!
If you’re a beginner, start with chocolate profiteroles (with a chocolate sauce) or cream puffs or chocolate choux pastry. They are easier and more forgiving to make.
Then you can graduate to eclairs, and then even try your hand at these addictively delicious choux au craquelin or my paris-brest recipe!
Can I use pastry flour or bread flour instead of AP flour?
Bread flour has a higher gluten content than all purpose flour. Using bread flour can produce pâte à choux that has a thicker shell, and will rise less than choux pastry made with AP flour.
Bread flour does result in profiteroles and eclair shells that are more sturdy, and hold their shape better. So for that reason I prefer using bread flour to make my eclairs.
Pastry flour has less gluten than AP flour. This will result in a lighter pastry case, that rises more. These are great if you want “lighter than air” profiteroles, or maybe if you want to combine it with craquelin. I don’t generally like using pastry flour for my filled choux pastry though – just my personal preference.
What recipe variations can I try with choux pastry dough?
Milk vs water – You can use 1/2 milk and 1/2 water instead of using all water (4 fl oz each of water and milk). This will give you a softer shell, but it will have more flavor because of the milk.
AP flour vs bread flour vs pastry flour – You can also use bread flour or pastry flour instead of AP flour. I prefer bread flour to make eclairs, and AP flour for profiteroles. But you can try either of these and see which you like better. Make sure to adjust the amount of eggs you’re adding to get the right consistency too.
Chocolate choux pastry – You can make chocolate choux pastry (chocolate cream puffs), using dutch cocoa powder.
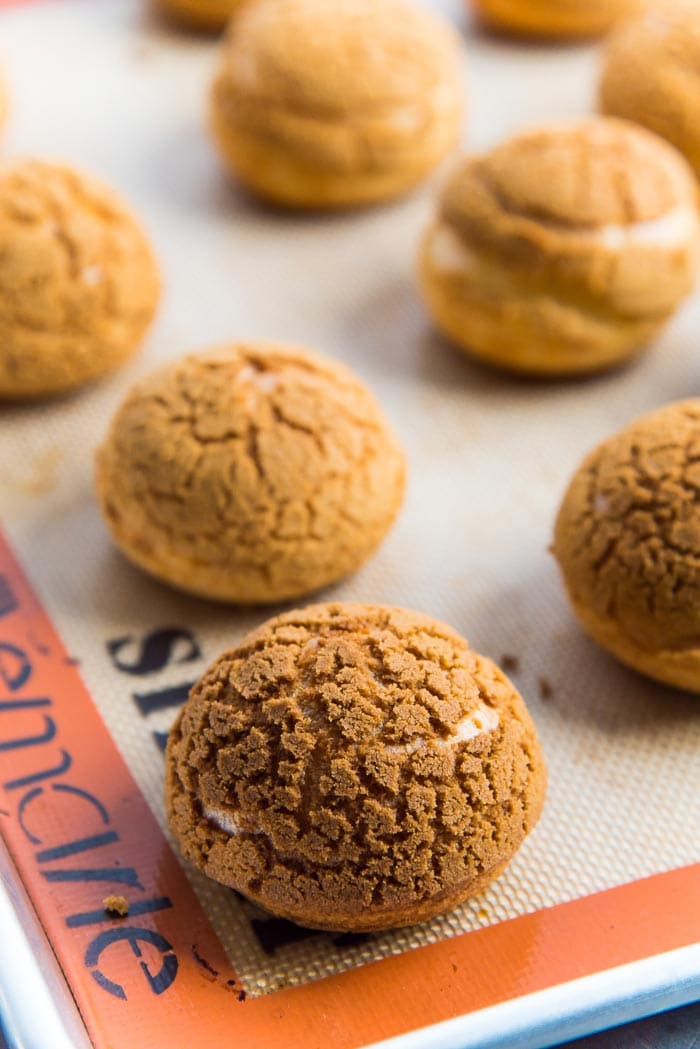
Toppings – You can also make little cookie discs (craquelin) to place on top of the profiteroles, for a crunchy version of choux pastry buns. This version of choux pastries are called Choux au Craquelin. A different flavor variation of that would be these strawberry cream puffs. Or you can top with Swedish pearl sugar to make chouquettes (French sugar puffs). As you can see, this is a very versatile pastry dough.
Equipment and tools I use for this recipe
Watch me make perfect choux pastry (recipe video)
Recipe
Basic Choux Pastry (and Troubleshooting Guide)
US based cup, teaspoon, tablespoon measurements. Weight measurements are recommended for accurate results whenever available.
Common Measurement ConversionsIngredients:
- 240 mL water 1 cup
- 115 g unsalted butter 4 oz / 1 stick, cubed and at room temp.
- 133 g AP flour, sifted 4.7 oz / 1⅛ cup (spooned and leveled). Use 5 oz / 145 g for a firmer shell (such as for eclairs)
- 226 g eggs weighed with the shell, about 4 large eggs
- ½ tsp sea salt use less if using table salt, or fine salt
- 1 tbsp white sugar optional
- ½ tsp vanilla extract optional
Instructions:
- Preheat oven to 375°F.
- Place salt, water, sugar and vanilla (if using) and butter in a saucepan and heat over medium heat, stirring occasionally. When the water is starting to boil (butter should be melted at this point), add the flour in one go (do this with the saucepan away from the stove/heat) and vigorously mix the flour in, so that it absorbs all of the water (use a wooden spoon or spatula to do this). When the flour has absorbed the water and it's forming a dough, return the pan to the stove (medium heat).240 mL water, 133 g AP flour, sifted, ½ tsp sea salt, 1 tbsp white sugar, ½ tsp vanilla extract, 115 g unsalted butter
- Cook the dough for 1 – 3 minutes (over medium heat) while you mix and move it around in the pan until you get a dough that pulls away from the sides of the pan, forms a film or oil droplets on the bottom of the pan, and when you stick a regular tablespoon in the dough, it stays upright. (The cook time will vary depending on your stove top).
- Transfer the dough to a bowl, and let it cool down slightly for a few minutes. With a hand-held mixer (or whisk), mix the dough while adding the eggs one at a time, mixing well after each addition. Make sure the eggs are lightly beaten so that you can stop adding eggs immediately, when you reach the right consistency (i.e. a dough with a glossy sheen with pipeable consistency. You may or may not use up all the eggs, please see the post for details).226 g eggs
- Prepare a baking tray with parchment paper and mist the surface with water (either using a mister or lightly sprinkle water with your hands – this is an optional step).
- Pipe the desired shape on to the baking sheet – either using a piping bag fitted with a large tip (I use Wilton 1A or 2A tip, or you can cut the pastry bag opening instead), or spoon it on to the tray, using a teaspoon. Then with a damp finger, flatten the apex and any points.
- Bake in preheated oven for 30 – 40 minutes in the center of the oven, or until the choux pastry shells puff up and are golden brown on top. Do not open the oven door, at least until you have reached the 25 minute mark. Importantly, baking time depends on the size of your pastry shell. If you prefer a drier shell, bake for a couple of minutes longer.
- During the last 5 – 10 minutes of baking, prick each shell with a skewer or toothpick and let them dry out in the oven while baking.
- Remove from the oven, and let the choux pastry cases cool completely in a draft-free area. Preferably in a place that is not cold. (Letting them cool in an open but turned off oven is even better, but not necessary).
- Fill with a sweet or savory filling and serve immediately. Or you can store cooled choux pastry shells in an air-tight container for up to one day. To store them for longer, keep them in the freezer in an air-tight container.
Recipe Notes
- These instructions are for smaller pastry cases (1 1/2 – 2 inches in diameter when piped). If you’re making larger profiteroles, you can bake the cases at 420°F for 10 minutes, and then at 350°F for 20-30 minutes until golden brown and puffed up. It may take longer, so keep an eye on the pastry. Bake until they are dark golden color to ensure that they don’t collapse when cooling down. Or you can bake them at 375°F for a longer time as well.
- You can substitute bread flour for AP flour if you’d like thicker choux pastry that holds its shape better.
- Substitute half of the water with milk for softer choux pastry cases with more flavor.
Other choux pastry related recipes
Chocolate choux pastry, Perfect cream puffs recipe, Perfect chocolate profiteroles, Chouquettes (French sugar puffs), Choux au craquelin, Classic chocolate eclairs, Earl grey eclairs, Chicken bouchees (chicken puffs) See here for a list of French pastries and desserts.Nutrition Information:
“This website provides approximate nutrition information for convenience and as a courtesy only. Nutrition data is gathered primarily from the USDA Food Composition Database, whenever available, or otherwise other online calculators.”


Leave a Reply