

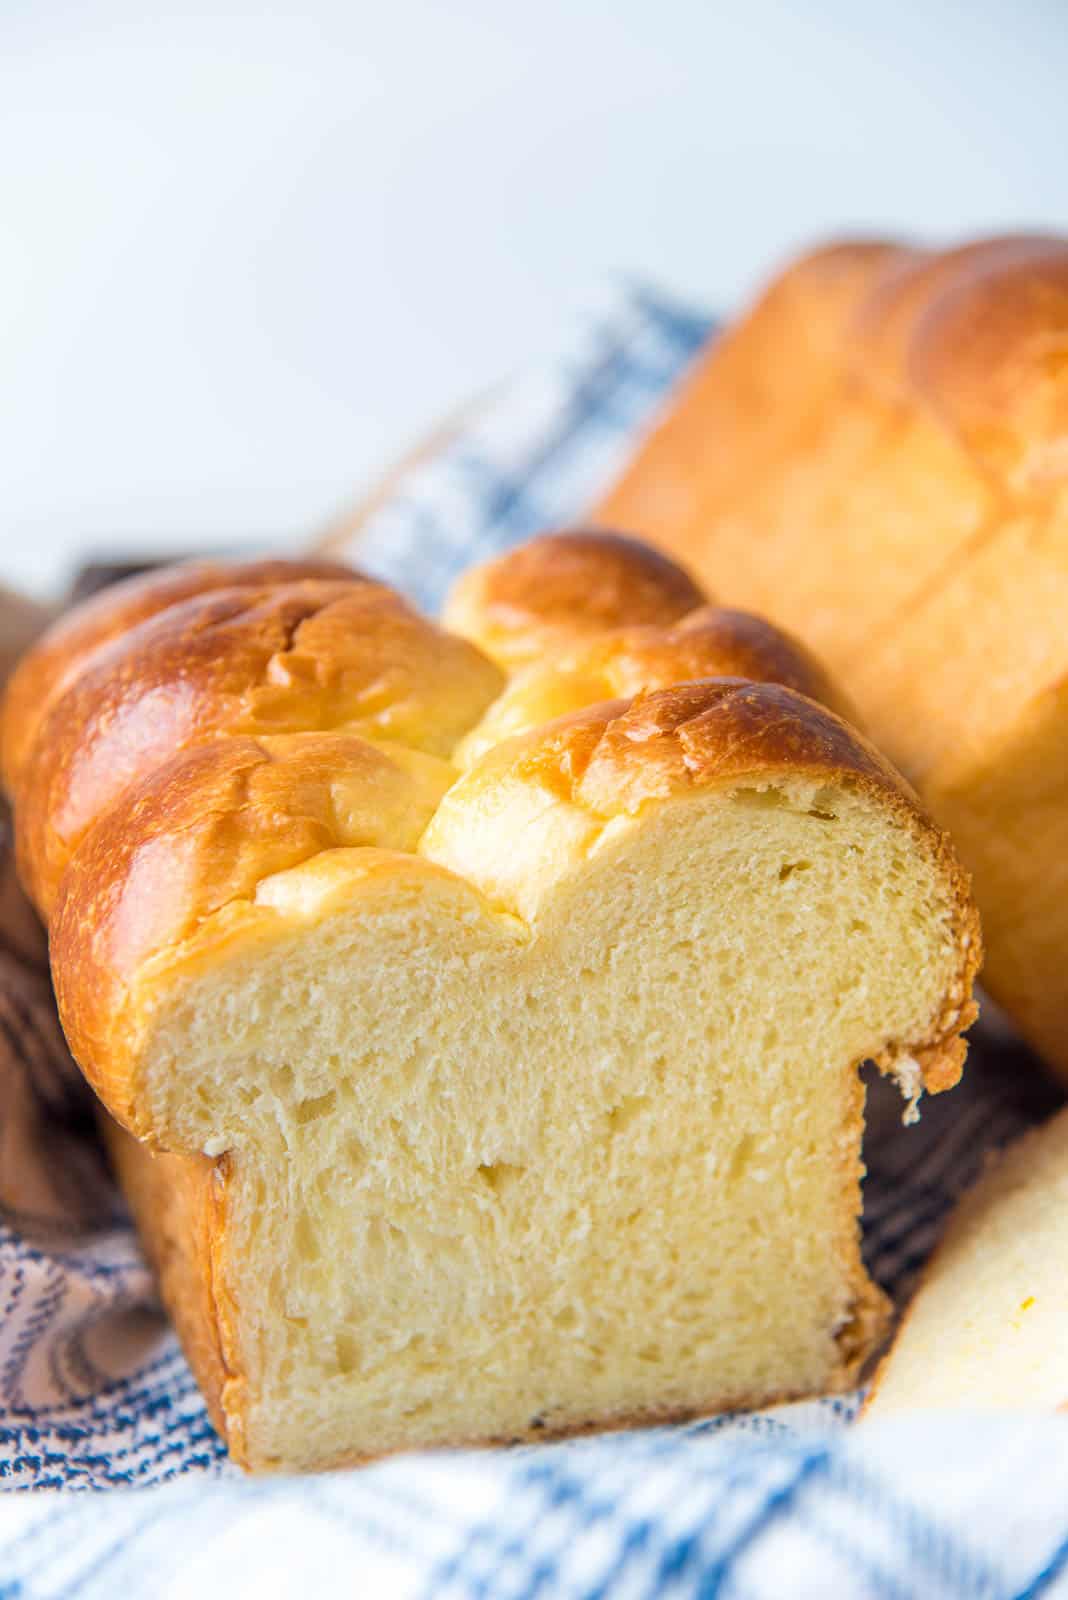
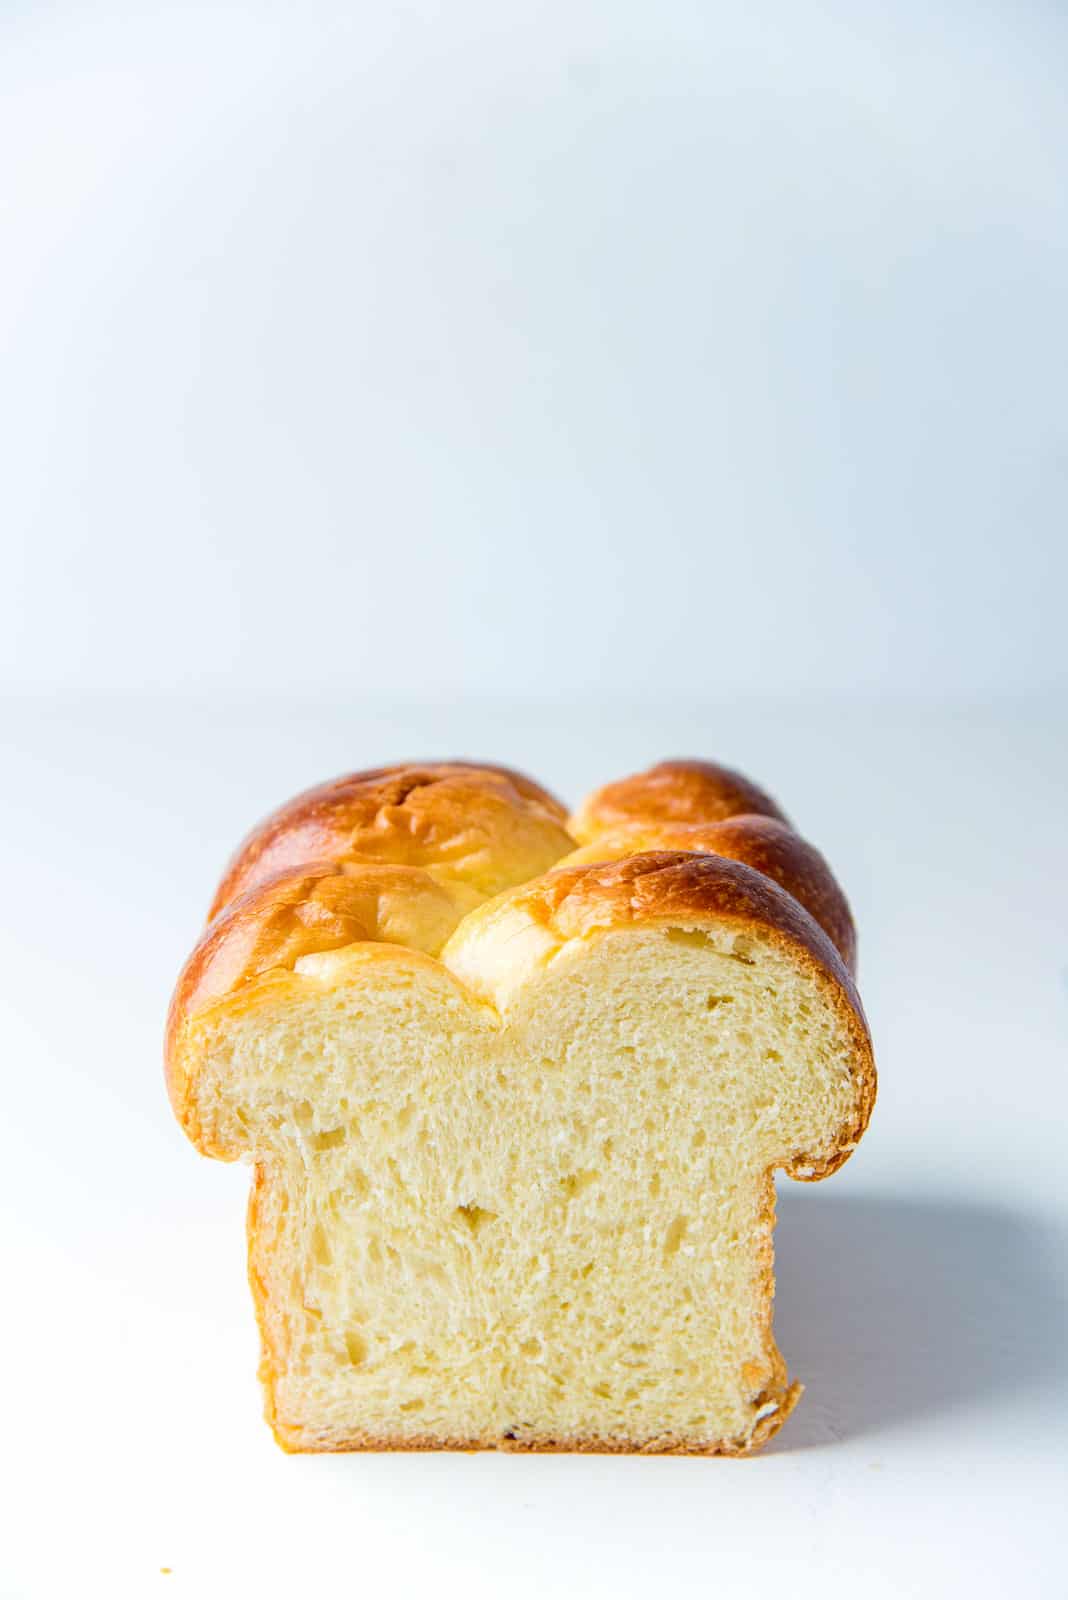
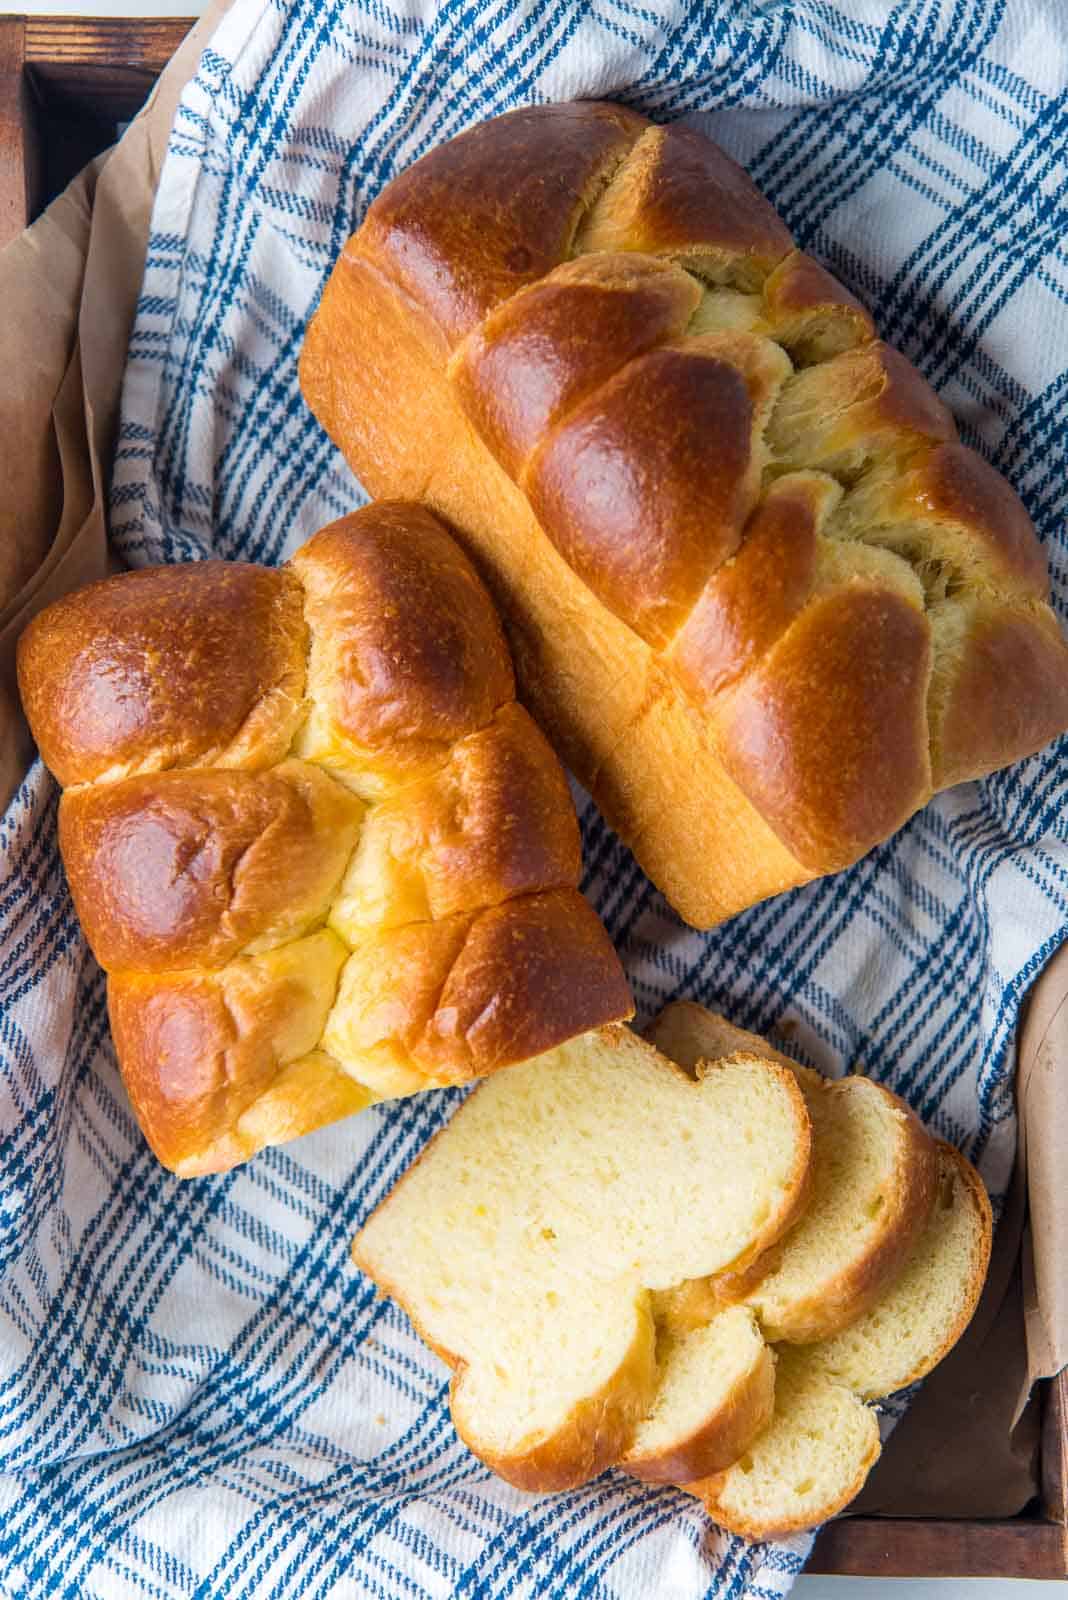
This brioche bread is ultra soft, rich, and buttery! Not only delicious to eat, but easy to make too! Perfect for sandwiches, French toast and just to eat on its own.
Learn how to make authentic brioche bread with this step by step recipe. Plus, now you can make Brioche Burger Buns or Brioche Cinnamon Rolls too!

A few weeks ago, I was able to live one of my life-long dreams! Granted, it’s only a small part of my dream, but it was still an amazing, fun experience!
A short course in Viennoiseries at Le Cordon Bleu was everything I dreamed it would be, and more!
JUMP TO RECIPE
Living a dream
Going to Le Cordon Bleu had been a dream since I realized there was a profession called “pastry chef”. After I completed my bachelors, I was itching to enroll at Le Cordon Bleu in Sydney, Australia for a grand diploma, but had to change my plans because my parents didn’t approve of that career path. I should’ve stuck to my guns in hindsight, but hindsight is 20/20 as they say.
So I chose my next love for grad school – science. I still have regrets about not living out that dream, but there still may be an opportunity on the horizon for me. Especially, if I get chances to do short courses like this at the Le Cordon Bleu in Ottawa from time to time! 🙂
So if you’re reading this, and contemplating about your dreams, it’s never too late, and don’t compromise on a dream that you’re passionate about.
Learning the techniques, tips and tricks for making viennoiseries was a fantastic experience! And today, I’ll be sharing all of that with you, so you can make the best brioche bread at home too!

What is brioche?
Brioche bread is a French bread, and a cross between a pastry and bread.
This is because the bread is enriched with butter and eggs. It belongs to the family of viennoisseries (think croissants, pain au chocolat, bostock pastry, Danish pastries, sweet rolls etc.).
It’s a very buttery, soft and delicious bread and can be made into sweet brioche or savory brioche.
Why this is the best brioche bread recipe
- This is a tried and true brioche dough recipe from Le Cordon Bleu, but adapted it for home bakers.
- I’ll be sharing step by step instructions, so you know what to look for at each step.
- Details on how to tell when the brioche is ready after kneading and proofing, so you won’t get gluey and under-baked brioche, or dry and crumbly brioche.
- Three shaping techniques for your brioche loaf are also included here.
Professional recipe vs my brioche recipe
Here, I’ll be sharing my recipe for making amazing brioche dough at home! I had to make some changes to the recipe I tried at Le Cordon Bleu, in order to make it more accessible and convenient for home bakers, but still maintain the authentic richness and taste of classic brioche dough.
The biggest challenge was that the orignal recipe didn’t use any water or milk, and used fresh yeast. Here’s the problem with that,
- While fresh yeast doesn’t need liquid to dissolve, fresh yeast also isn’t very accessible to a home baker.
- And to use any other kind of yeast, the dough will need liquid to dissolve the yeast, and that has a big impact on the recipe too.
So to fix this issue, we will be,
- Using active dry yeast instead of fresh yeast – since active dry yeast is concentrated, you will only have to use about 1/2 the amount by weight. Active dry yeast will require liquid to be activated and dissolved in.
- Substituting some of the egg with milk. Eggs play a big role in adding richness to brioche – especially egg yolks. So, instead of removing a whole egg, I’m removing ONE EGG WHITE, and substituting it with warm milk instead. This will allow the yeast to properly dissolve, while still keeping the richness of the dough.

Understanding dough
- Gluten and yeast are what make bread. Gluten gives bread the structure it needs. The gluten in the flour develops in the presence of a liquid like water, and that gluten development is faster when the dough is kneaded. The yeast in the dough will emit CO2 as it multiplies, and the gluten matrix will in turn expand as it traps more and more CO2.
- Gluten develops well in water, but fat hinders gluten development. With an enriched dough like brioche, all the fat from the yolks and butter works against its gluten development. However, it also keeps the dough super soft and rich in flavor giving it an almost cake-like texture!
- That is why brioche dough needs to be kneaded for much longer for good gluten development. Since the dough will be quite slack and sticky, a stand mixer is highly recommended to knead the dough until smooth and velvety.
Can I make brioche bread without a stand mixer?
The brioche dough is generally harder to work with due to the soft consistency, so a stand mixer is highly recommended. However, you can knead the dough by hand, but you will need a very clean working surface and patience to really work the sticky, wet dough until you get the right consistency. Do NOT use a hand mixer with the dough hook – it will be too much of a strain on the motor.
So let’s make brioche
Prep the ingredients
First, have all the ingredients measured and ready to go.
Almost all of the ingredients should be at room temperature. The exception is milk, where we want it to be very slightly warm (like tepid water – about 100°F). You can use warm water instead if you want, but milk adds more richness.
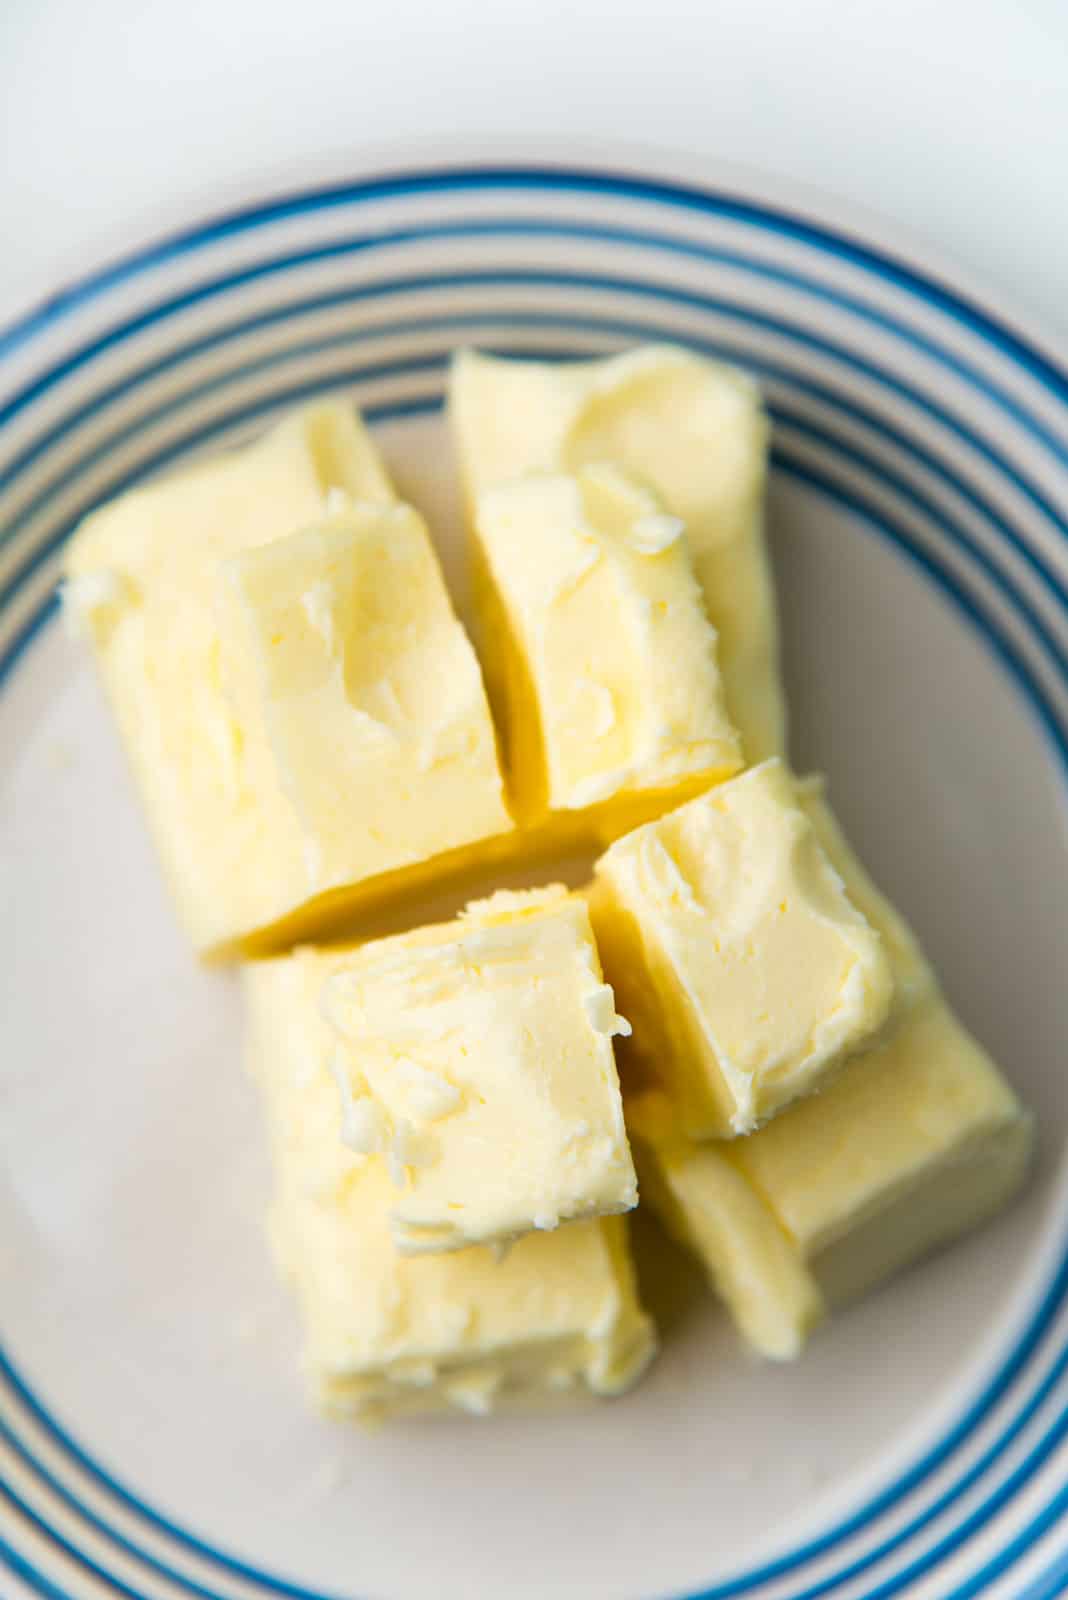
Make sure to use softened butter. The consistency of the butter is really important, so that it incorporates into the dough quickly and well. On a winter day, you may need to keep it somewhere warm to give the butter a chance to really soften (to 73 – 75°F).
If you press the butter with your finger, you would easily be able to leave a mark, with no resistance. But the butter has NOT melted. This is the consistency you want with your butter.

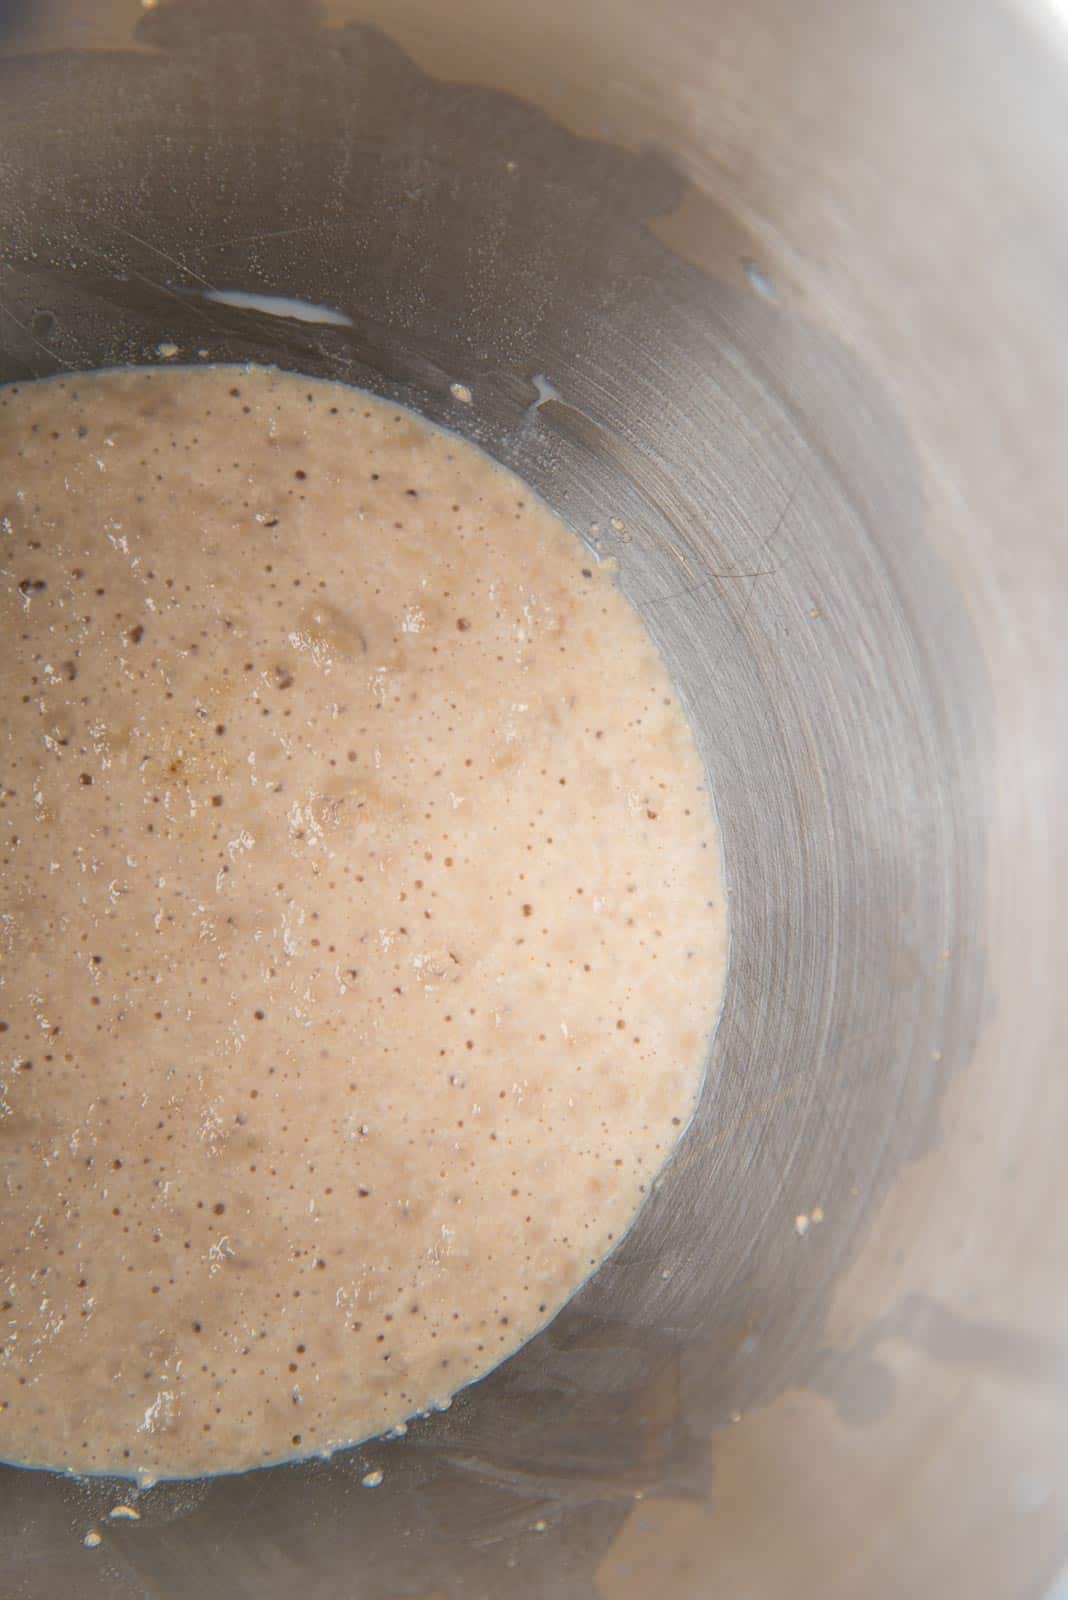
Activate the yeast
First, activate the yeast. Since we’re using active dry yeast, the yeast needs to be dissolved and activated. This will ensure the yeast incorporates evenly into the dough. Place the milk and honey in the mixer bowl and sprinkle the yeast on top. Gently whisk to mix the yeast, and let it sit for about 15 minutes. In that time the yeast should become frothy and bubbly.
Make the base dough
Add the vanilla, sugar, large eggs and egg yolk, and just break up the yolks.
Add the flour, and finally, add the salt over the flour (this is important! Do NOT add the salt directly to the yeast mix).
Using the hook of your mixer, or a dough whisk, mix all the ingredients in the mixing bowl to form a scraggly dough.
Place the bowl on your mixer with the dough hook attached. Start kneading the dough on speed 2 – 3 (low – medium low speed) for about 1 minute.


Adding the butter
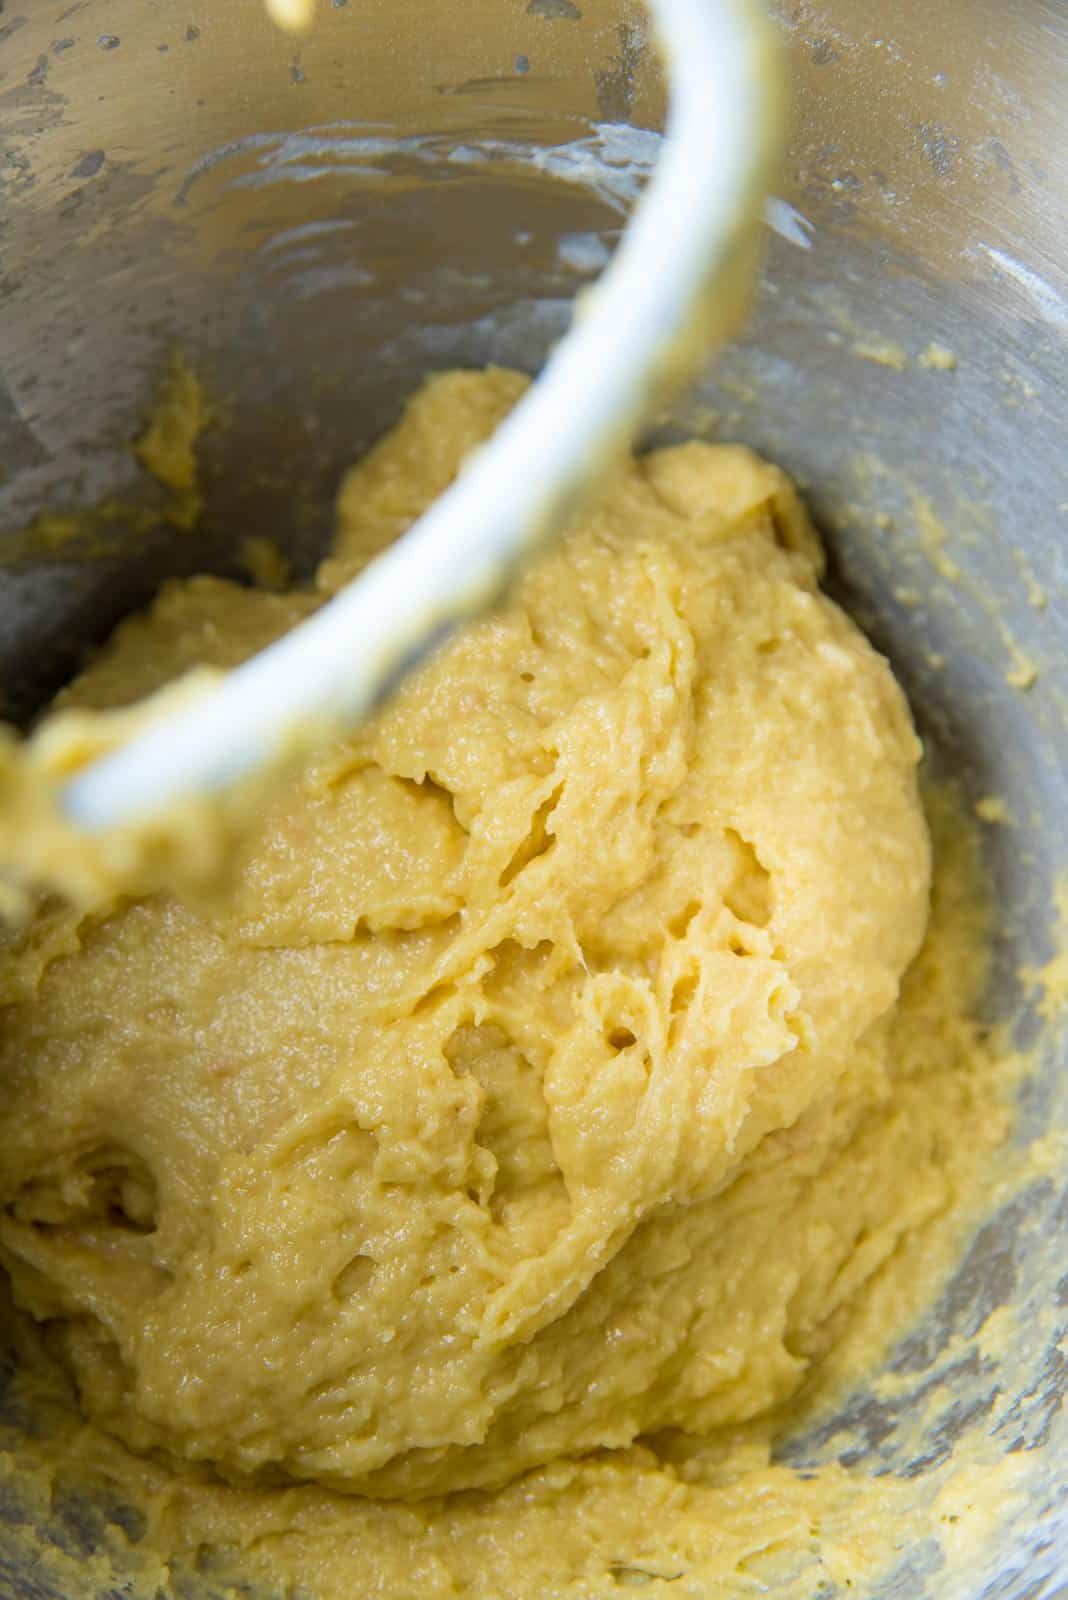
Then add the butter in four additions, with about 2 minutes of mixing time between each addition. Each portion is added one tablespoon at a time, to make sure the butter is completely incorporated every time. Make sure to use a dough scraper (or bowl scraper) to scrape the sides as you go.
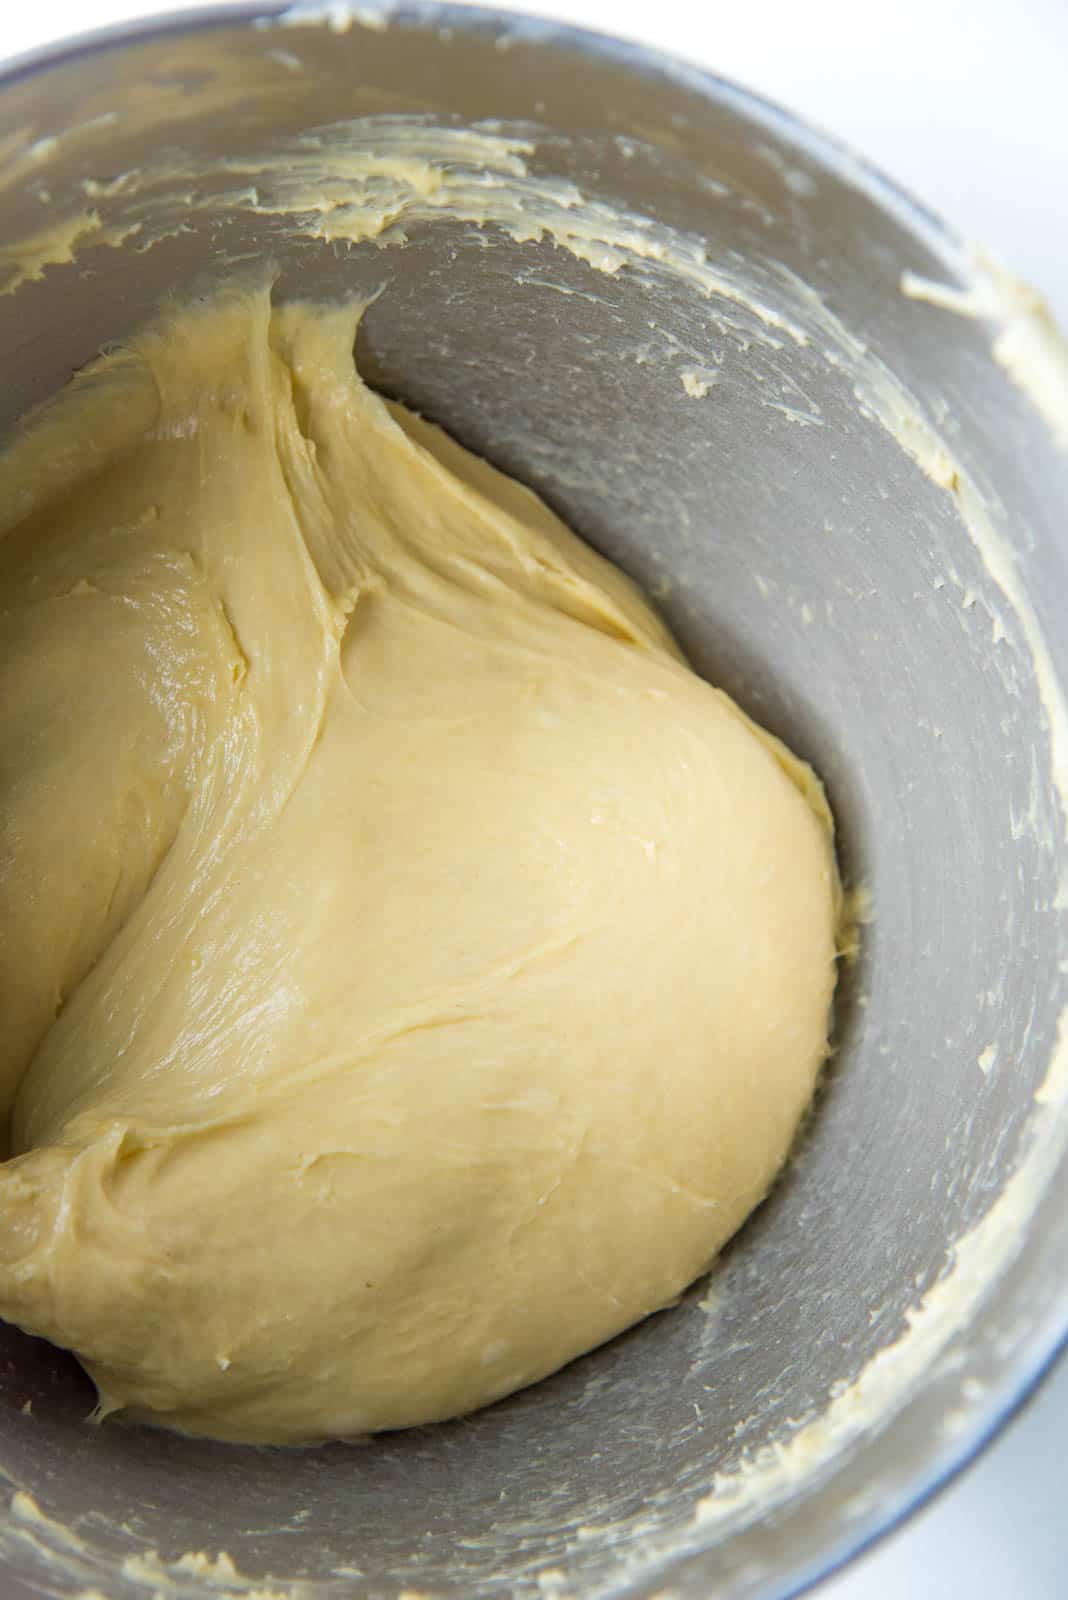
The dough will be very slack and sticky after the butter is added. However, as you knead the dough, it will turn into a smooth, shiny dough that’s a little tacky, but doesn’t stick to the sides of the bowl.

Developing the gluten
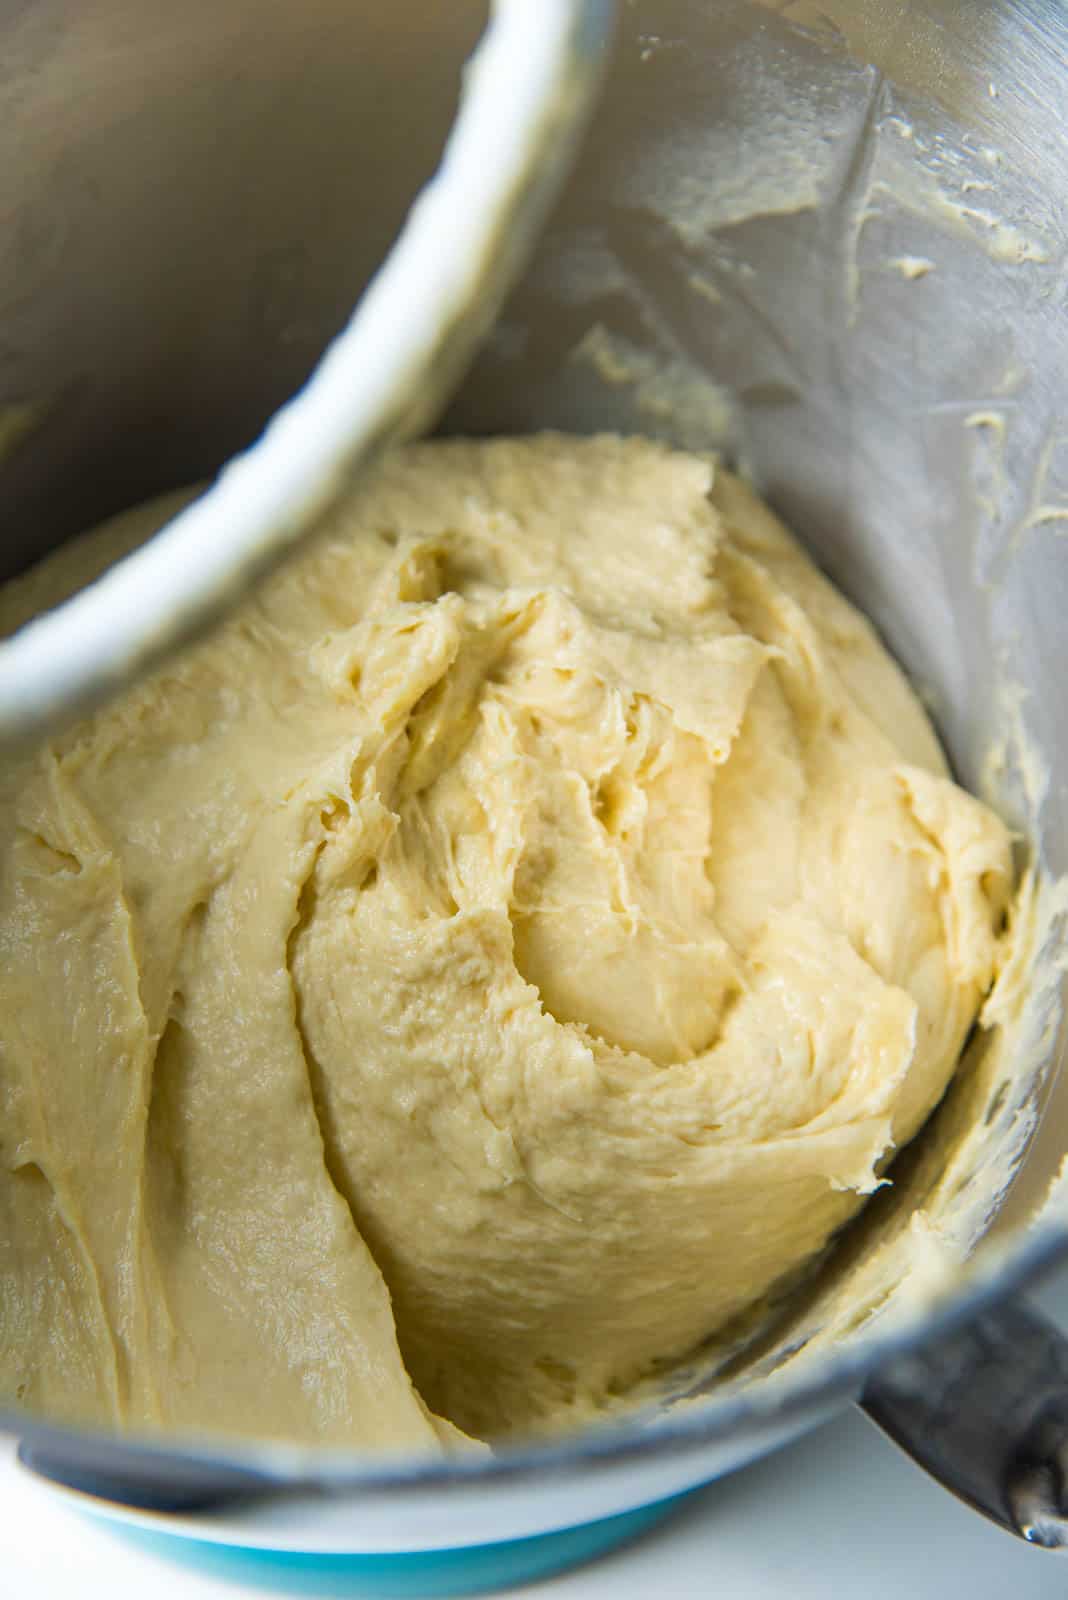
Once the butter is added (a total of about 8 – 10 minutes), increase the speed to 5 – 6 (medium speed). Knead the dough for a further 10 minutes or so, until you get the right consistency.
This is where the gluten development occurs. As the gluten matrix forms in the dough, it will become satiny and smooth. It will stick less to the sides of the mixer bowl. And if you use the dough hook to lift the dough from the bowl, it should lift cleanly from the bowl, while still being really soft.
The time it takes for the dough to be properly kneaded will vary. It can take as little as 8 minutes or as much as 15 minutes. It depends on the speed of the mixer, the type of mixer and other environmental factors too. Look for the signs to make sure it’s done. The whole mixing time from start to finish can be between 20 – 30 minutes.
First proofing
This first proofing is very important. As the yeast multiplies and emits CO2, the dough will expand, further developing the gluten matrix.
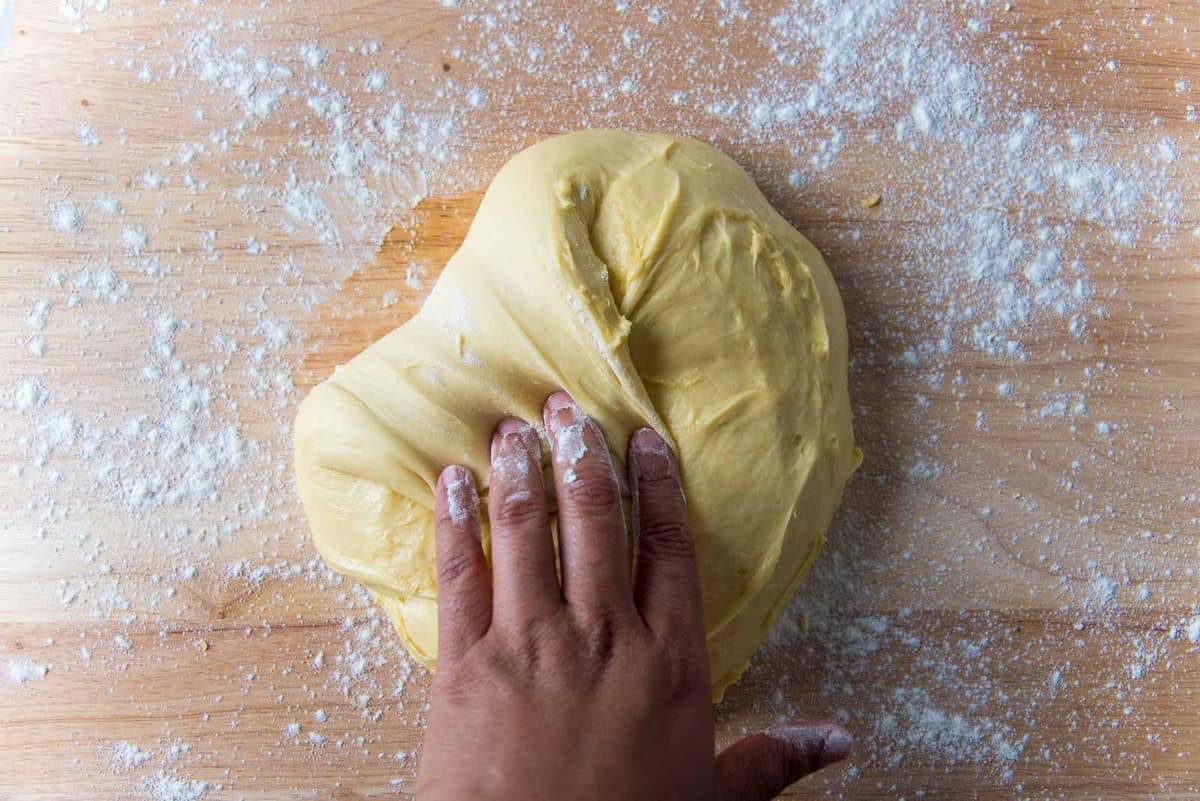
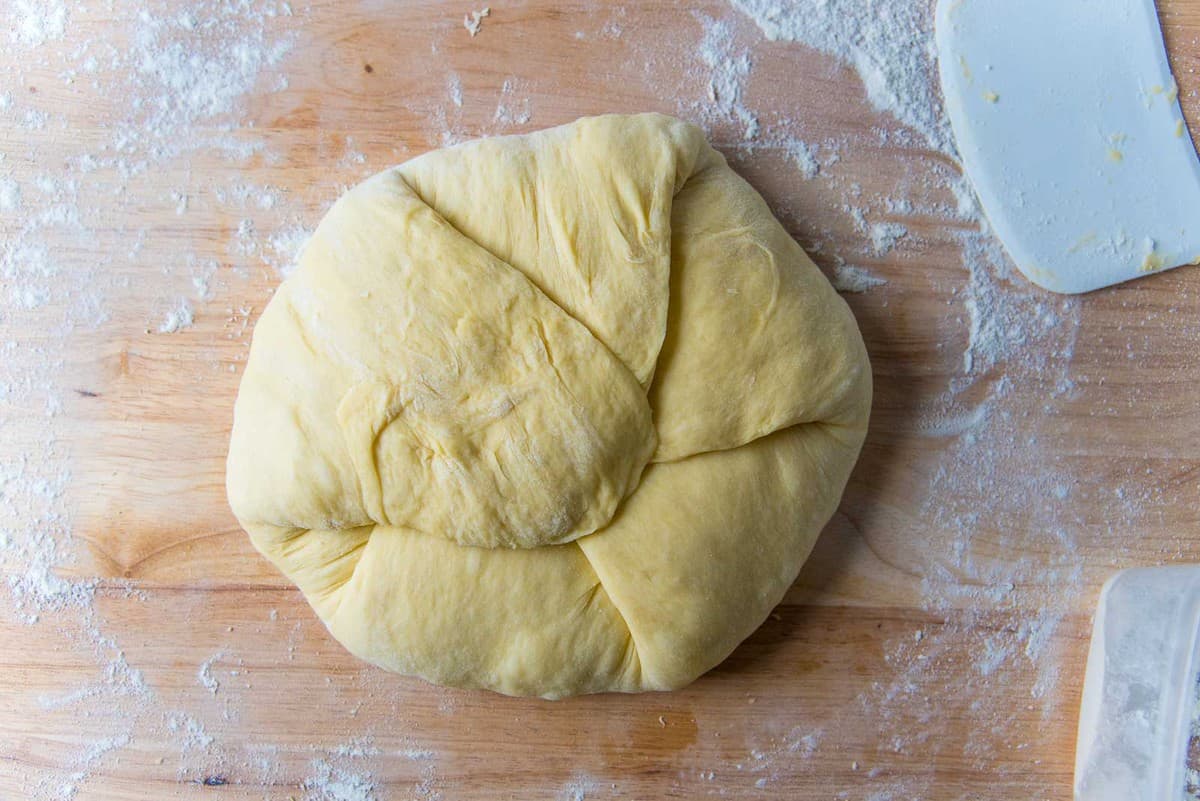
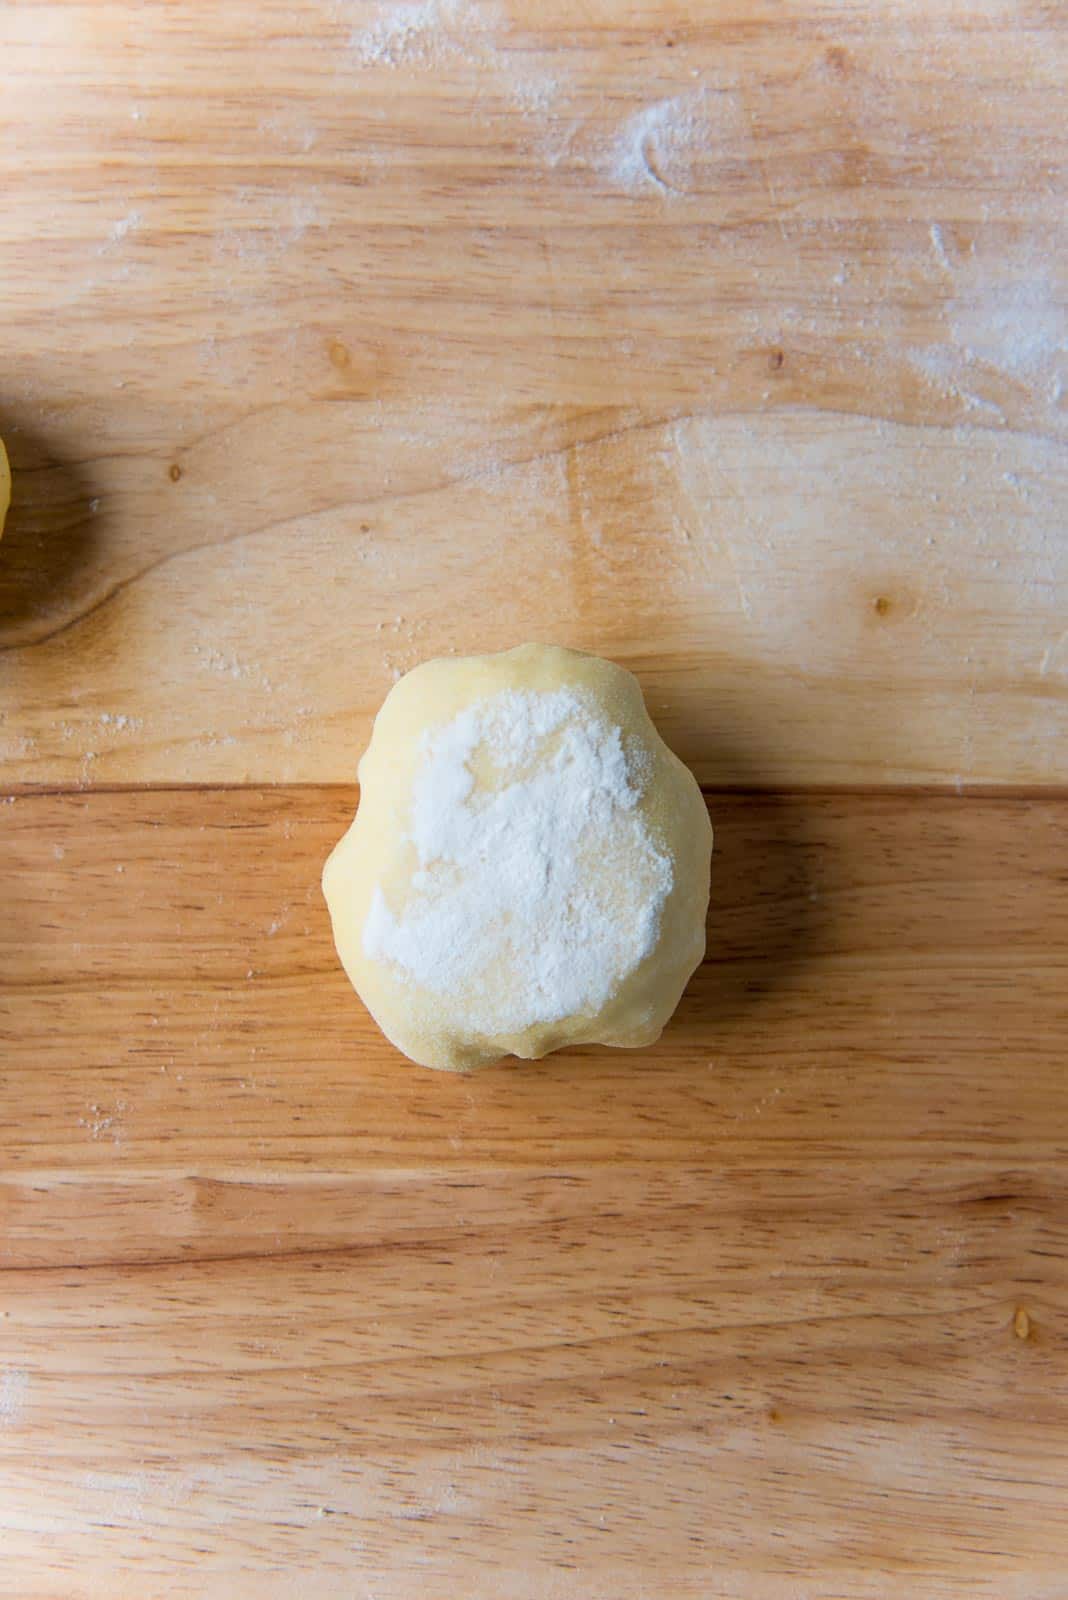
Turn the dough out onto a floured work surface and shape the dough into a smooth ball of dough. Since the dough will be really soft, make sure your hands are lightly floured too.


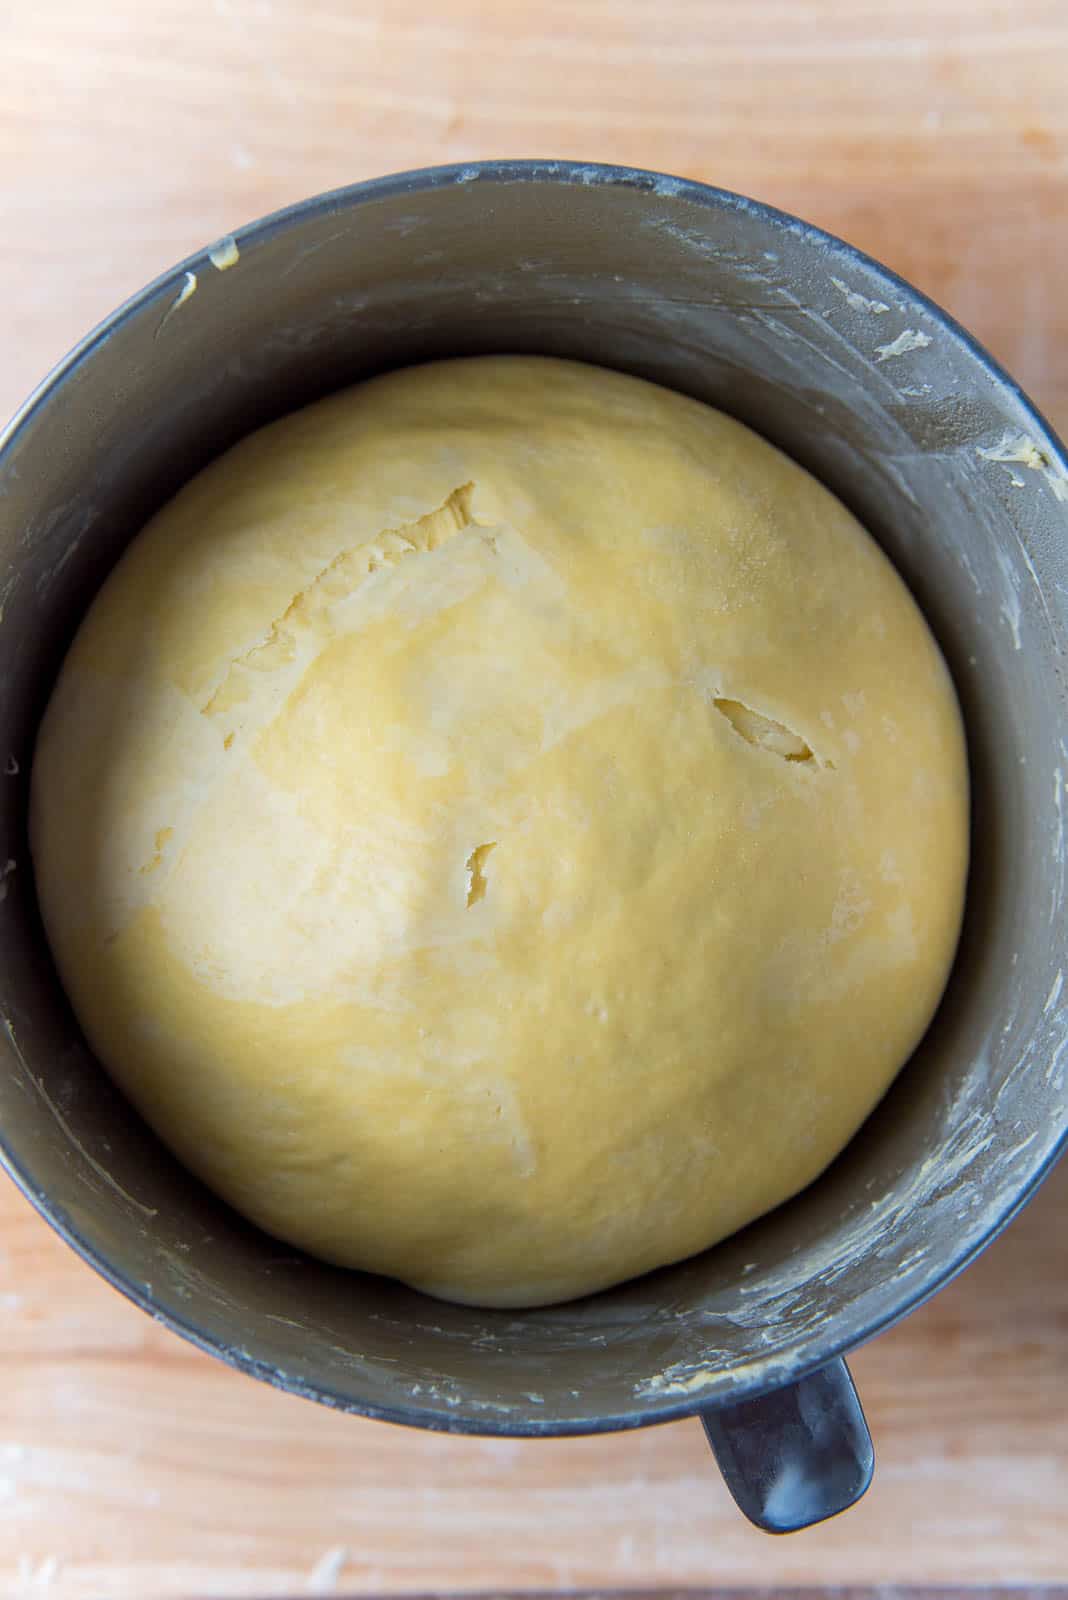
Place the shaped dough back in the bowl or a different large bowl (you don’t have to butter it, since brioche is so rich it shouldn’t stick to the bowl). Cover with plastic wrap and let the dough at least double in size in a warm place.
If you’re living in a colder climate like me, it’d be hard to find a place that’s warm enough in the kitchen in winter. So what I do is, I turn the light on in my oven, and keep the bowl in the oven. The oven warms up when I cook on the stove too, so it helps the dough proof.
Depending on the temperature, the brioche dough will proof in 1 hour, but it can take up to 2 – 2.5 hours too.
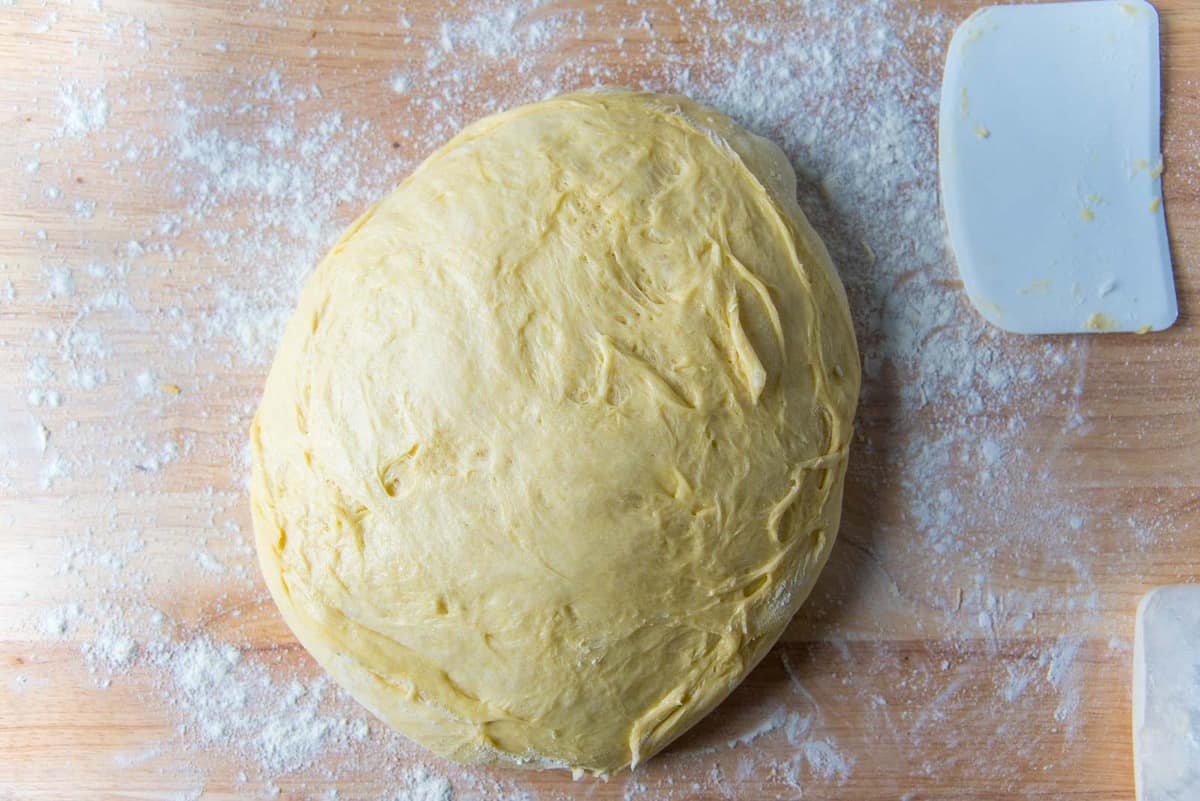
The first proofing is complete when the dough has AT LEAST doubled in size, or even tripled!


Retard proofing the dough
This is the name for letting the dough proof in the fridge. This low temperature proofing is a much longer process, and helps develop the flavor of the dough. In a more practical sense, it makes the dough far easier to handle when it’s time to shape the loaves, plus it allows the dough to rest.
After the first proof, turn the dough out onto a lightly floured surface. With lightly floured hands, shape the dough again, and form a dough ball with a smooth, taut surface. Transfer the dough back into the bowl, cover with plastic wrap and place it in the fridge.
This dough can be stored in the fridge for up to 24 hours (maybe even 48 for a stronger flavor).


Shaping the bread loaves
When the dough is nice and chilled, it can be divided and shaped. You can either bake them in a loaf pan, or even a cake pan. In the case of the braided loaf, you can bake that on a baking tray too.

With this recipe, you can make TWO bread loaves. You can shape them in one of three ways (there are more ways, but I’m only going to talk about 3 here).
Turn the dough out onto a lightly floured surface and gently flatten the dough into a circle. This will also help release any gas in the dough. Weigh and divide the dough into two portions.
Simple loaf – easiest way to shape the dough
This is the easiest way to shape the loaf. It’s a standard loaf shape with no patterns.
This is very similar to how I shaped my white bread loaf which you can find here.
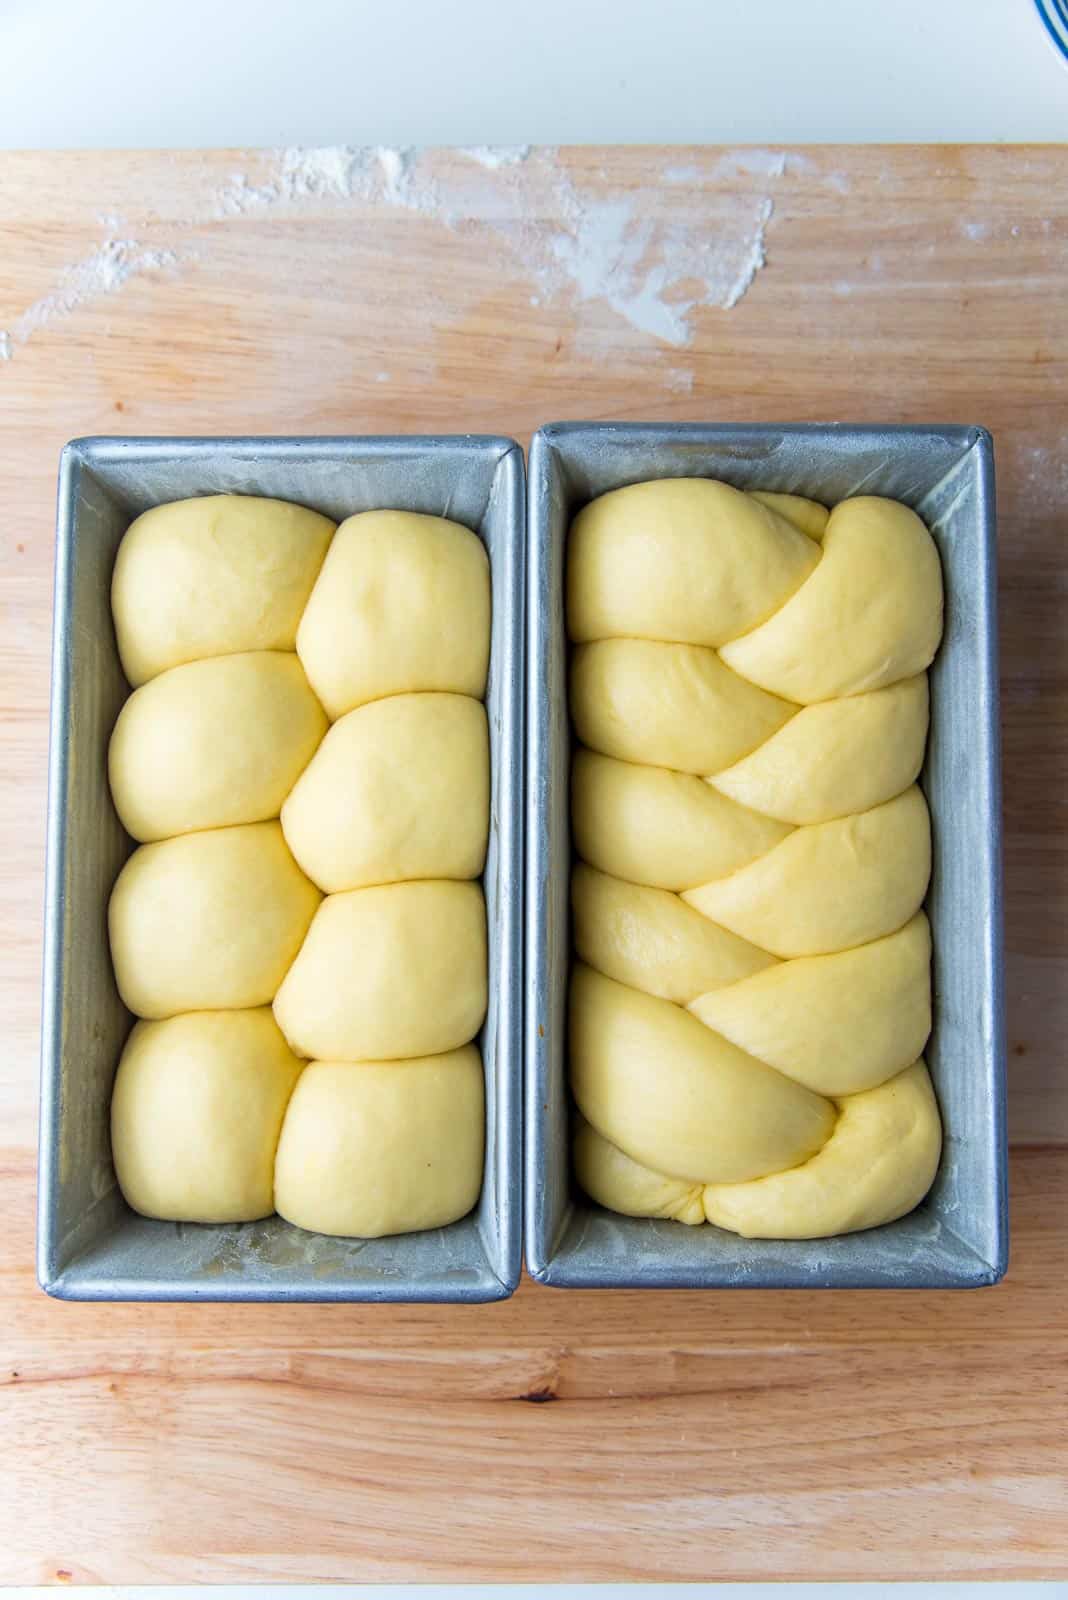
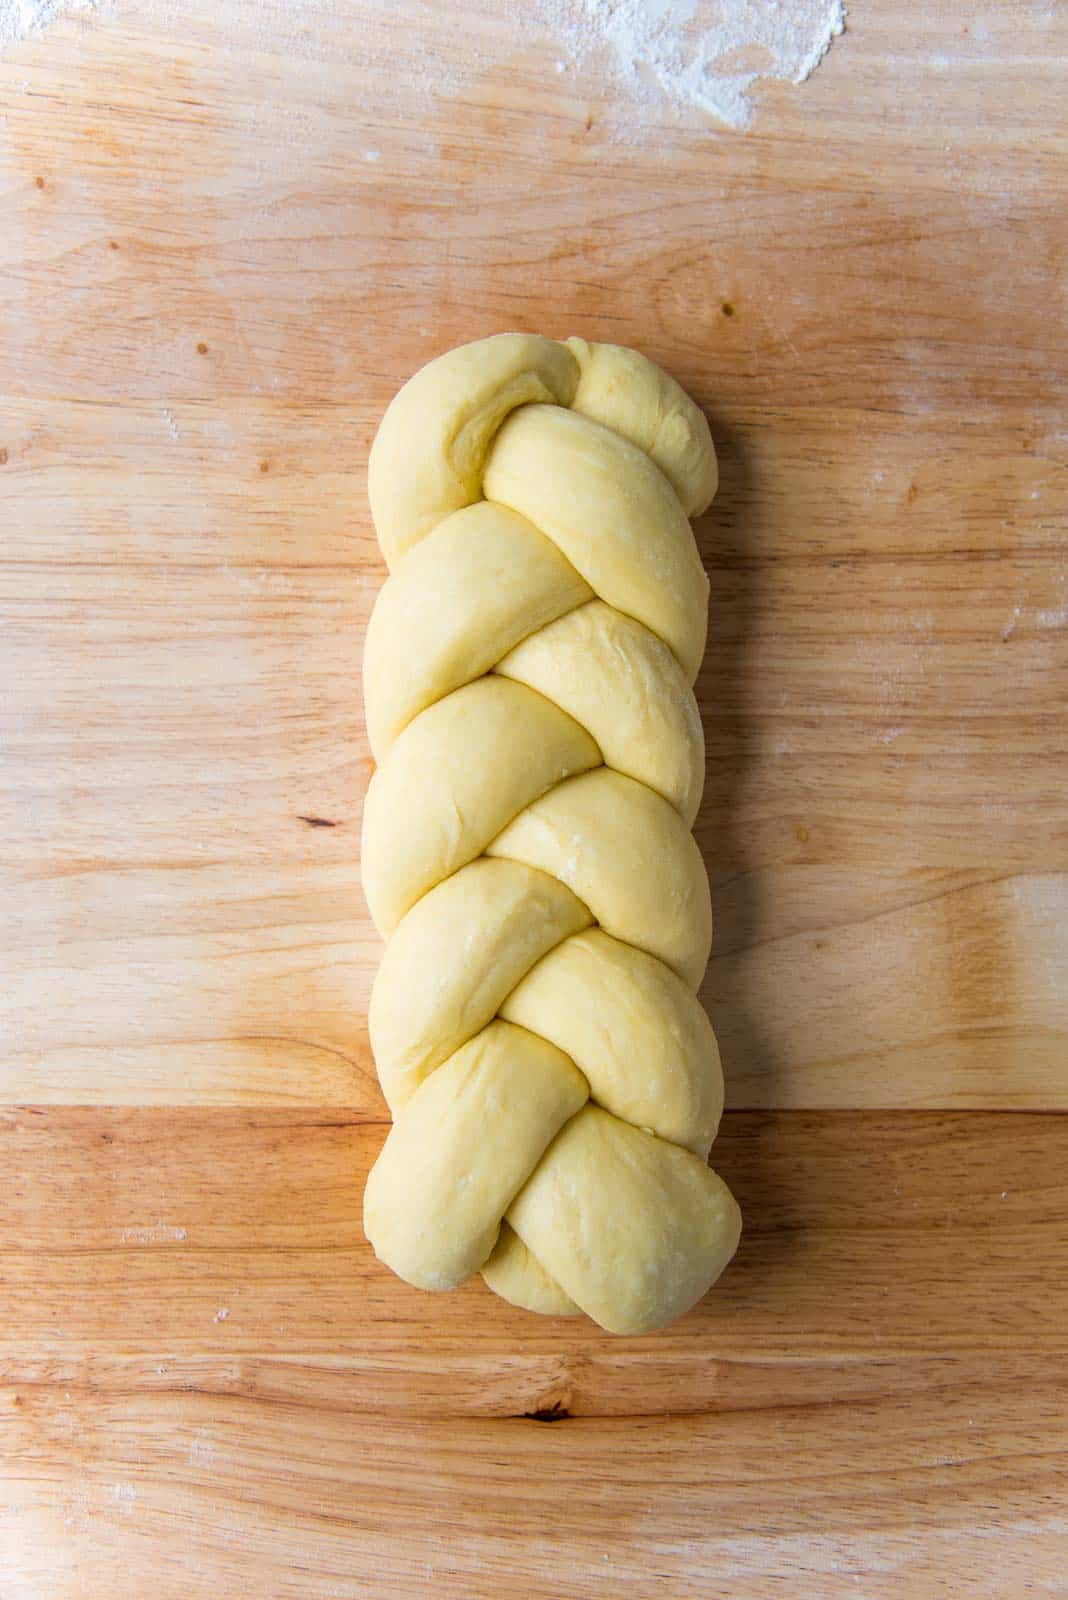
Braided brioche loaf
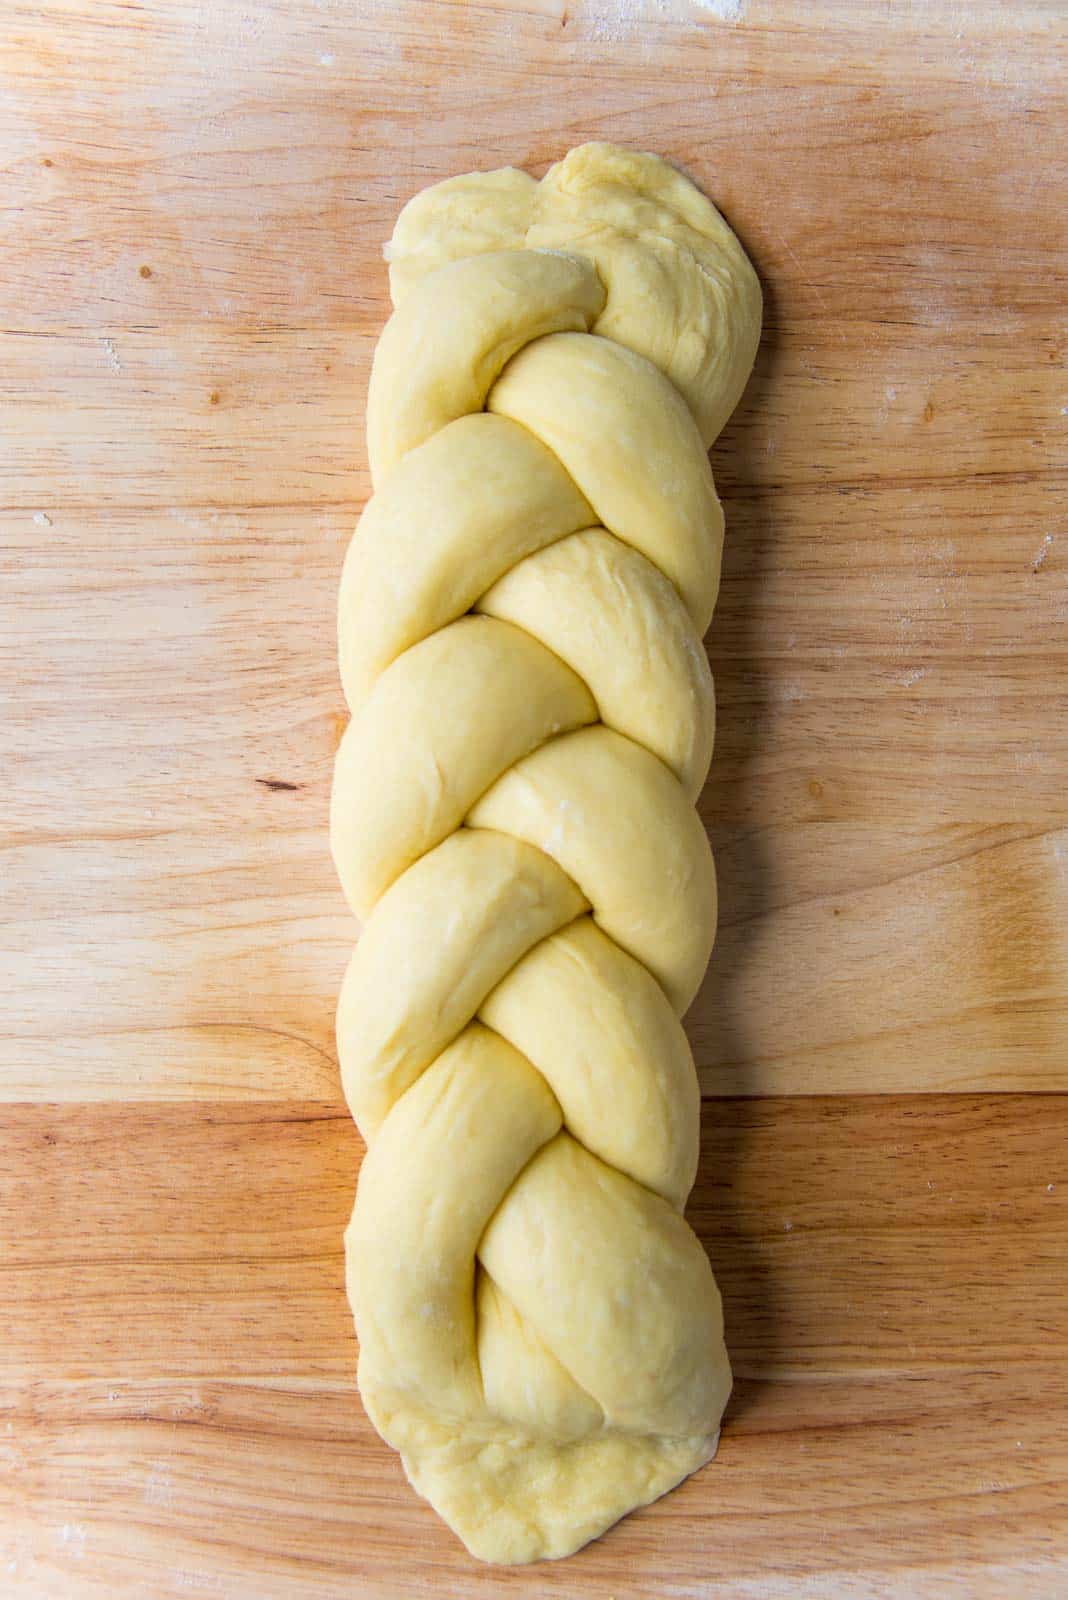
This is a classic braided loaf that can be either baked in the loaf pan, OR baked as is on a baking tray.
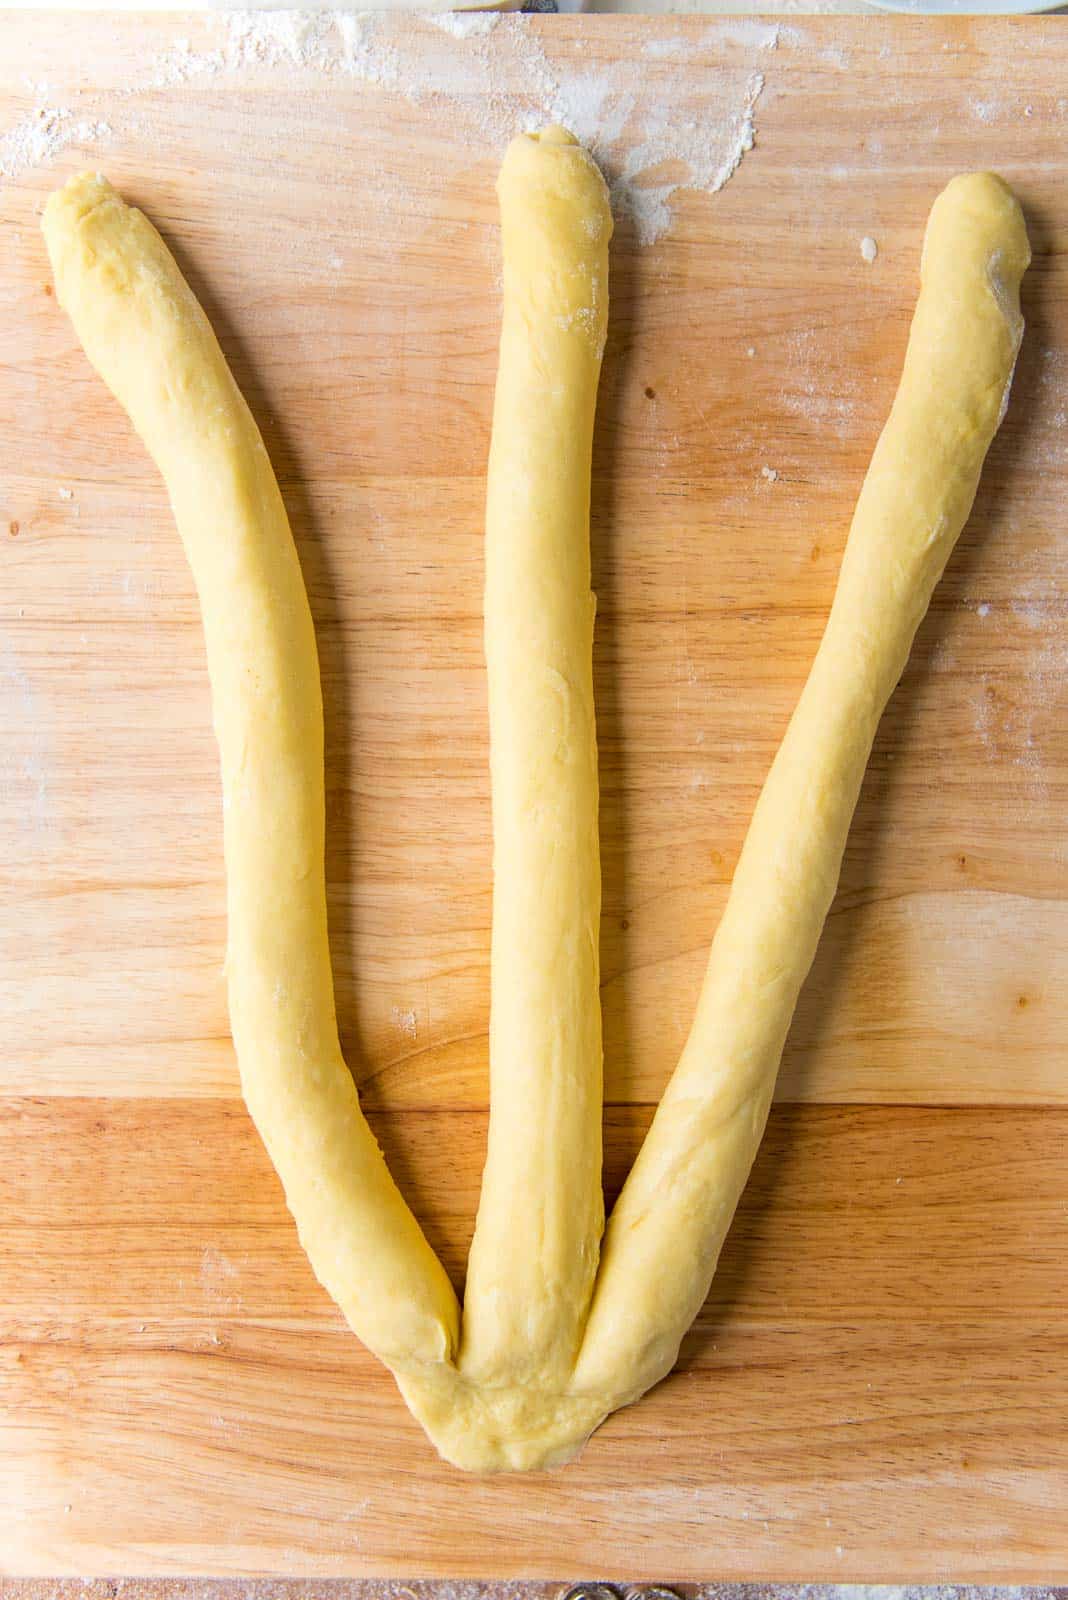
This is made by dividing the dough into 3 equal portions, then shaping each portion into a long “rope”, then forming a braid with the 3 “ropes”.


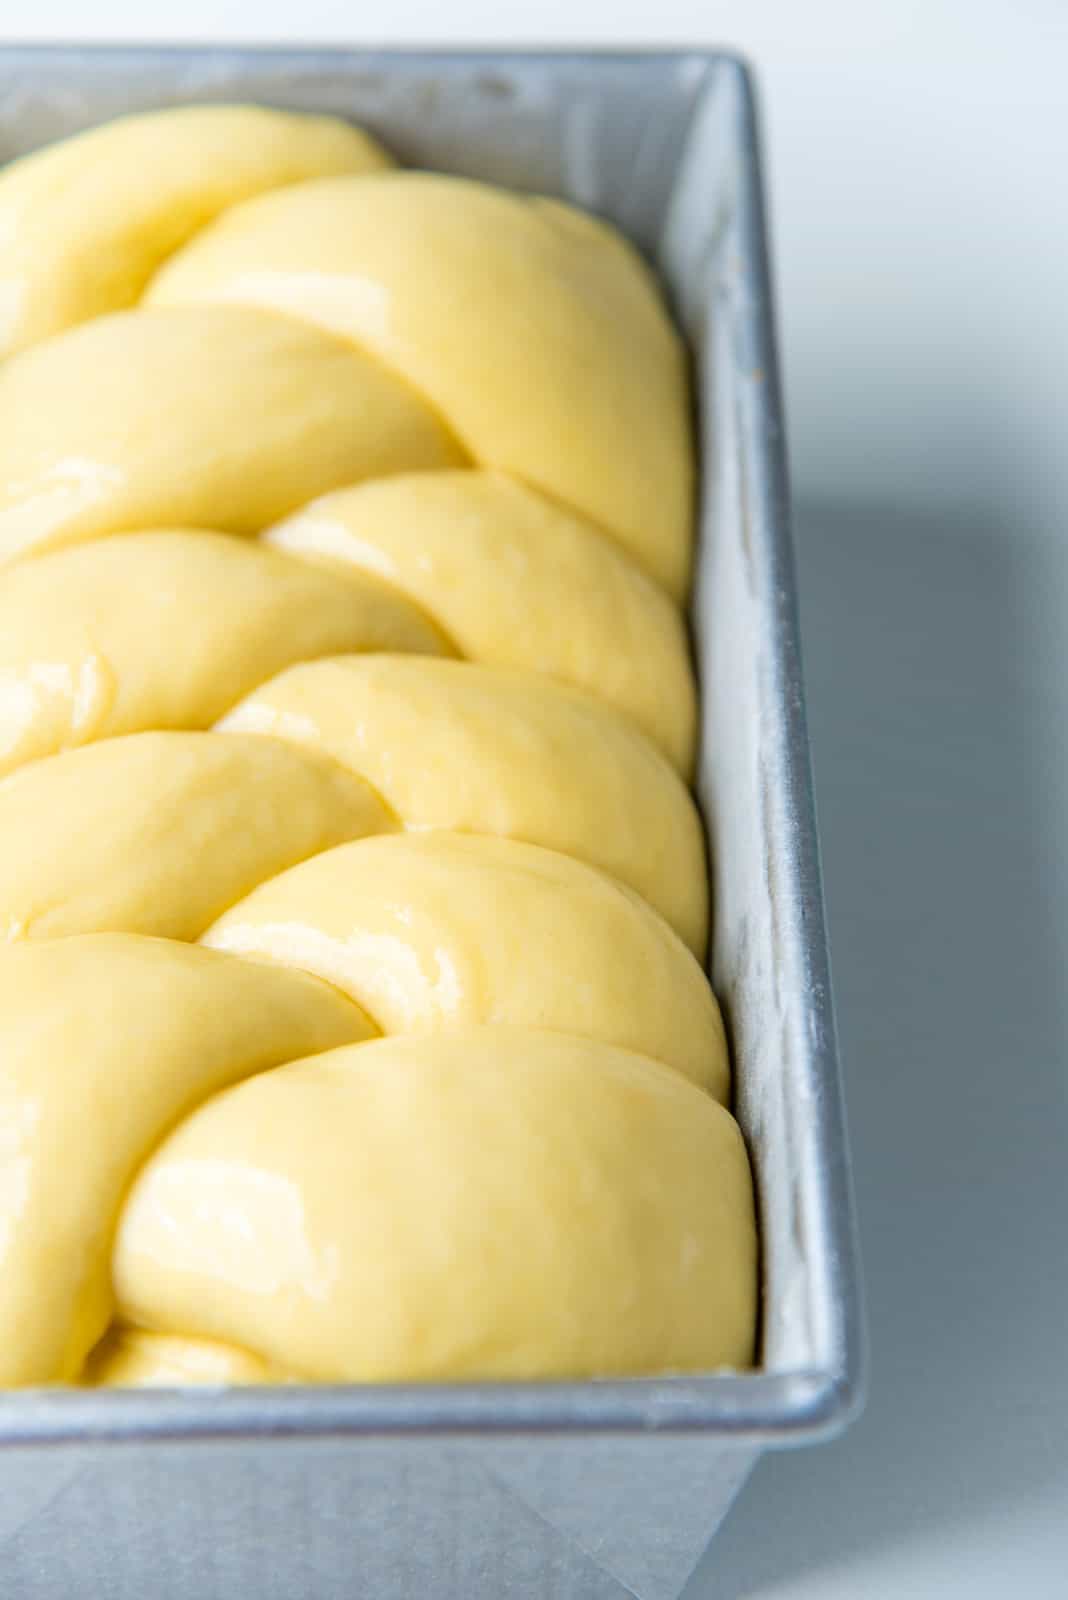
Nantaise brioche loaf
This is also a very classic way of shaping brioche dough. I call it a faux-braided loaf, because it looks braided, but it’s not. The dough balls can also be cleanly pulled apart from the dough with this loaf.
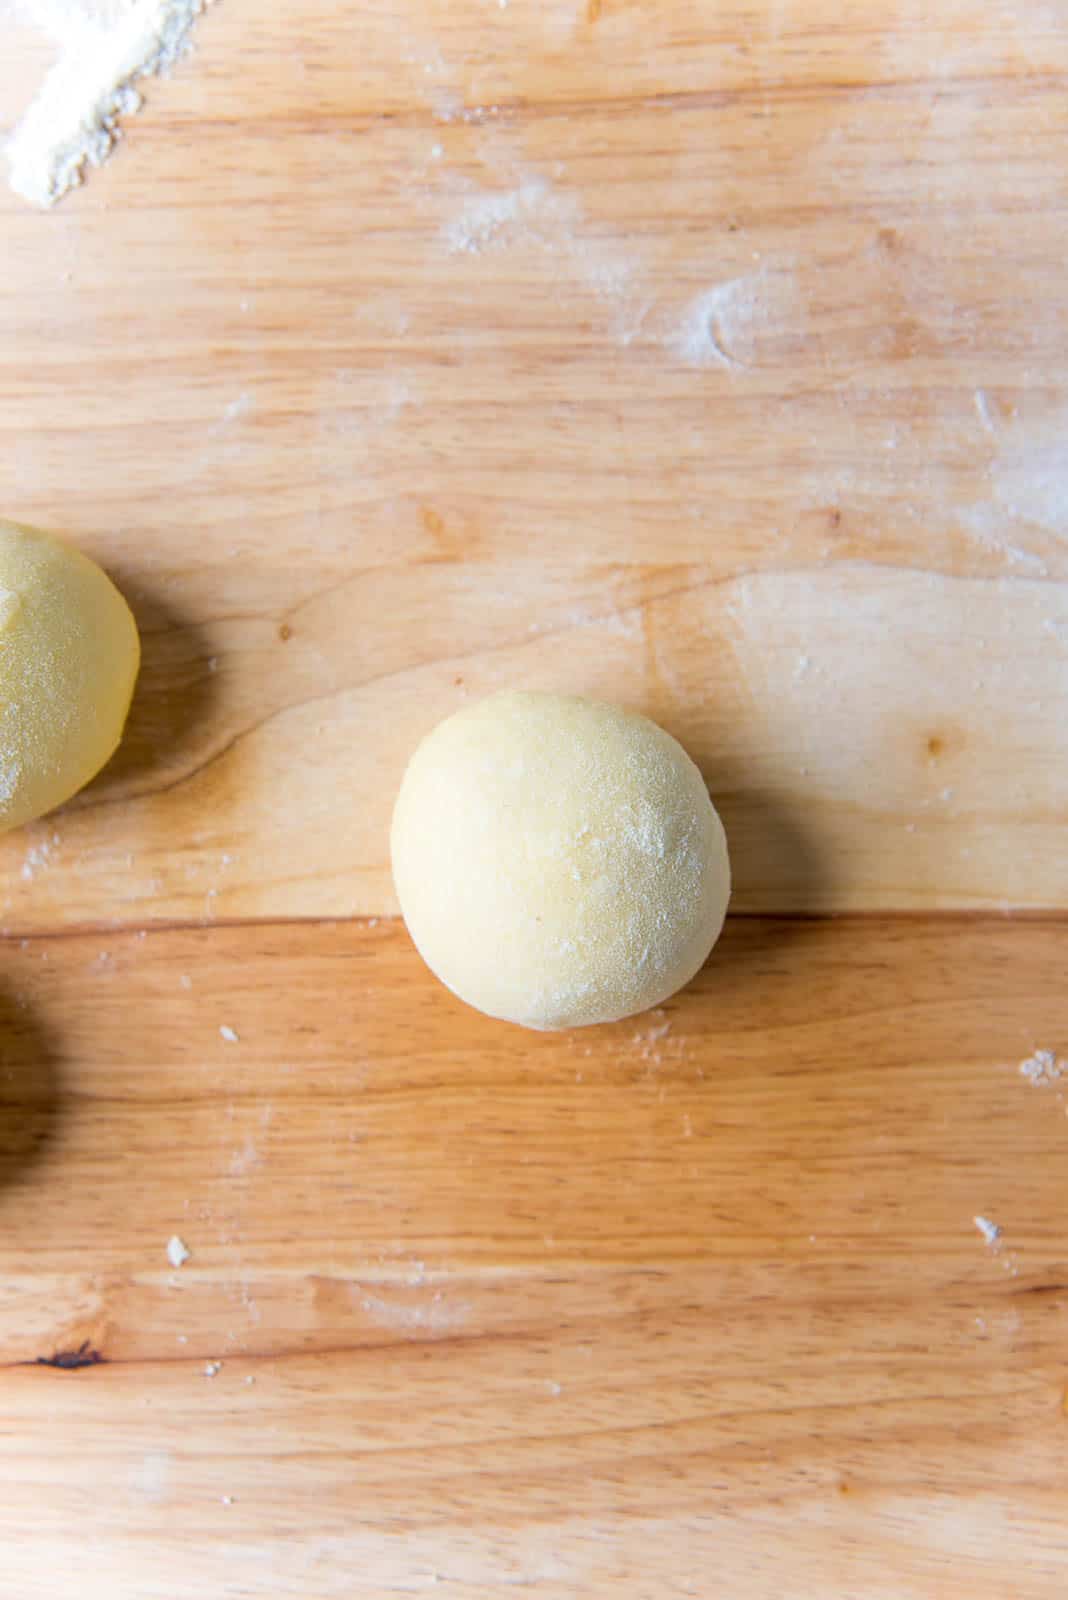
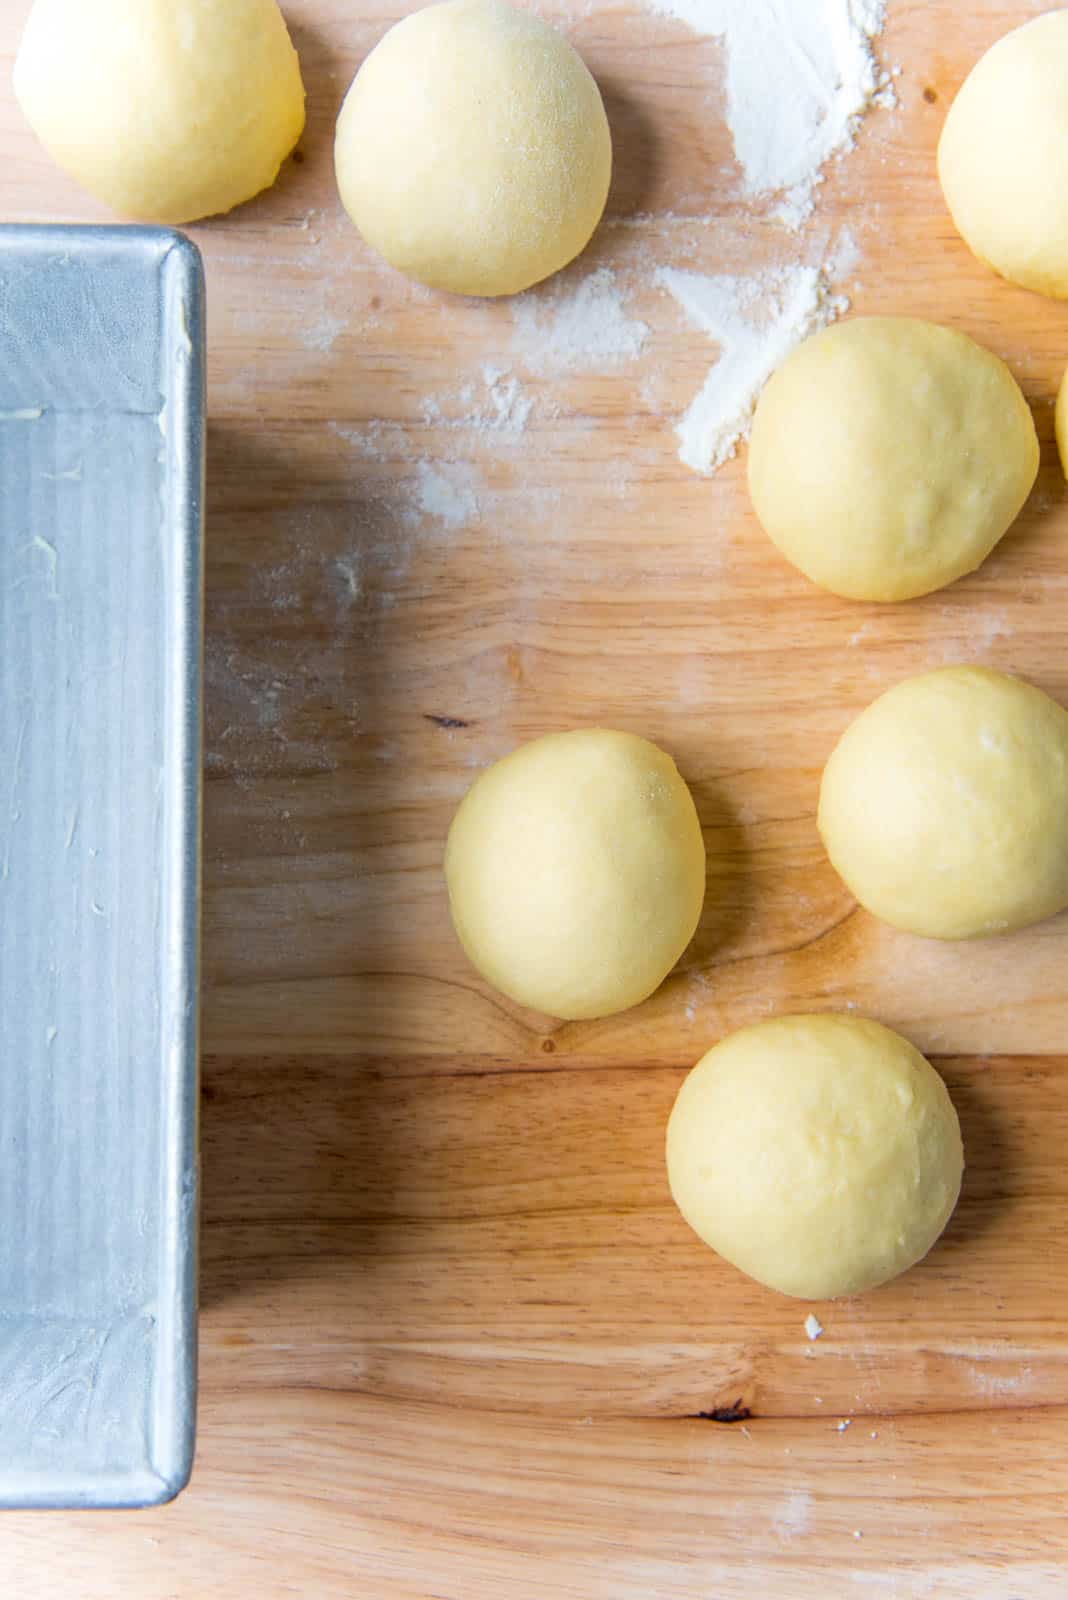
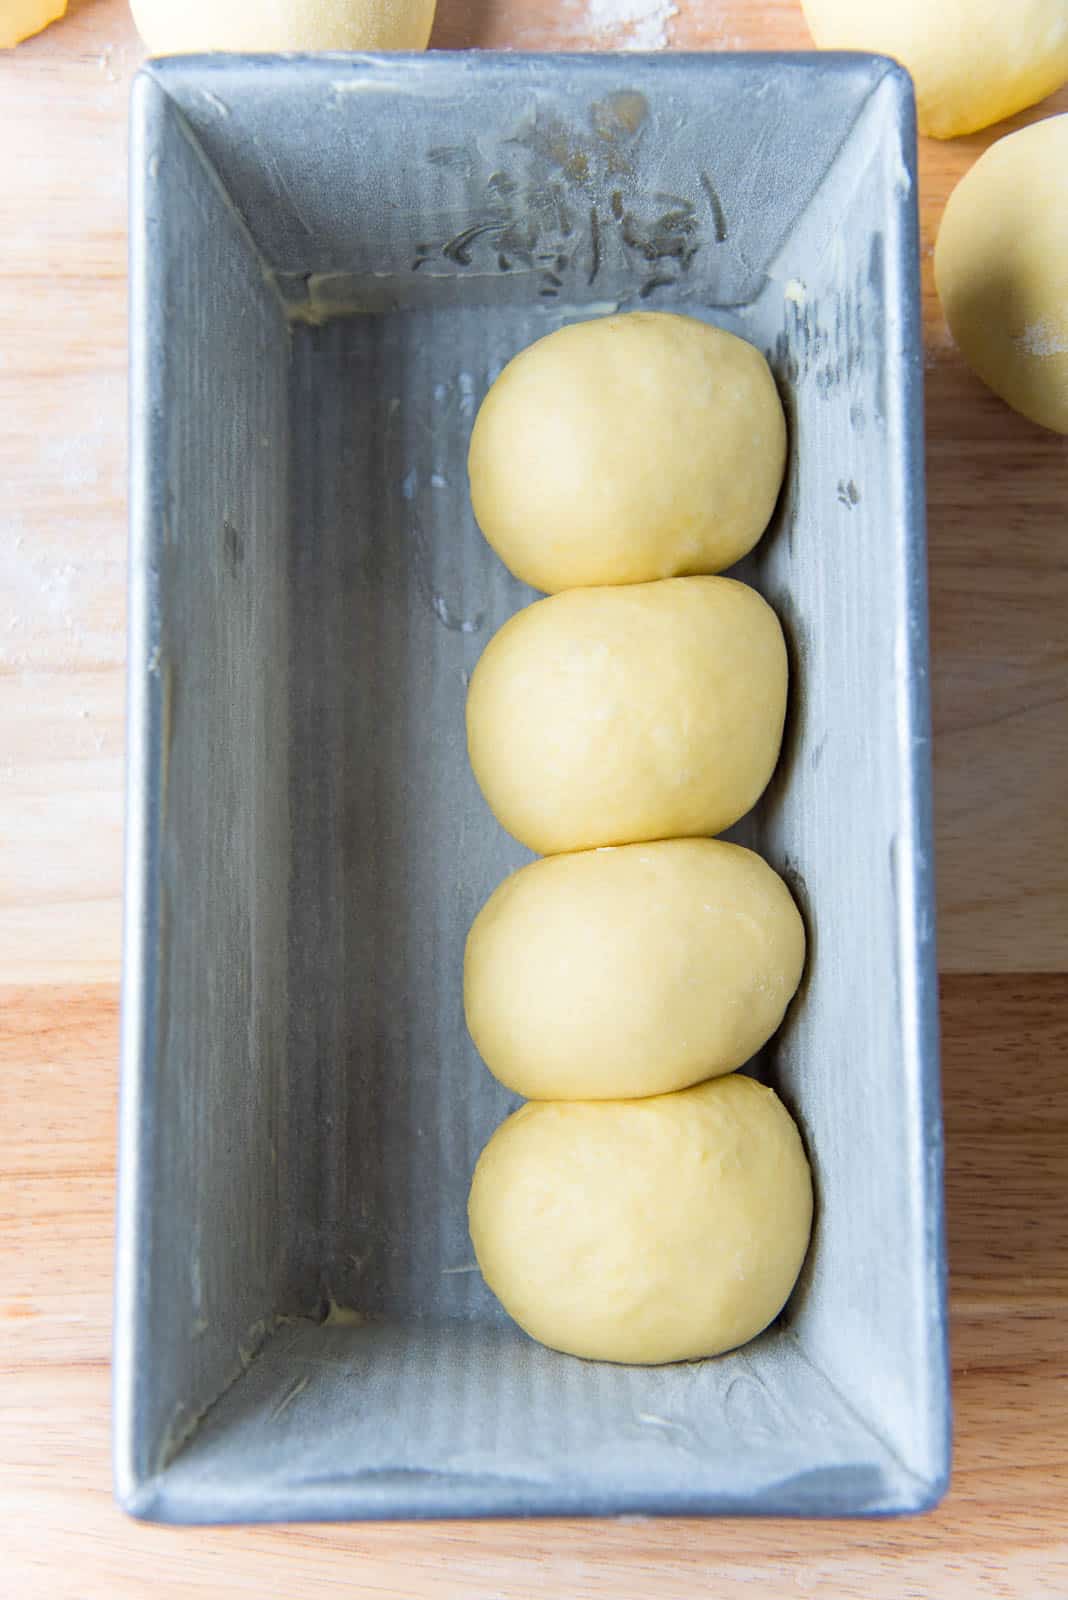
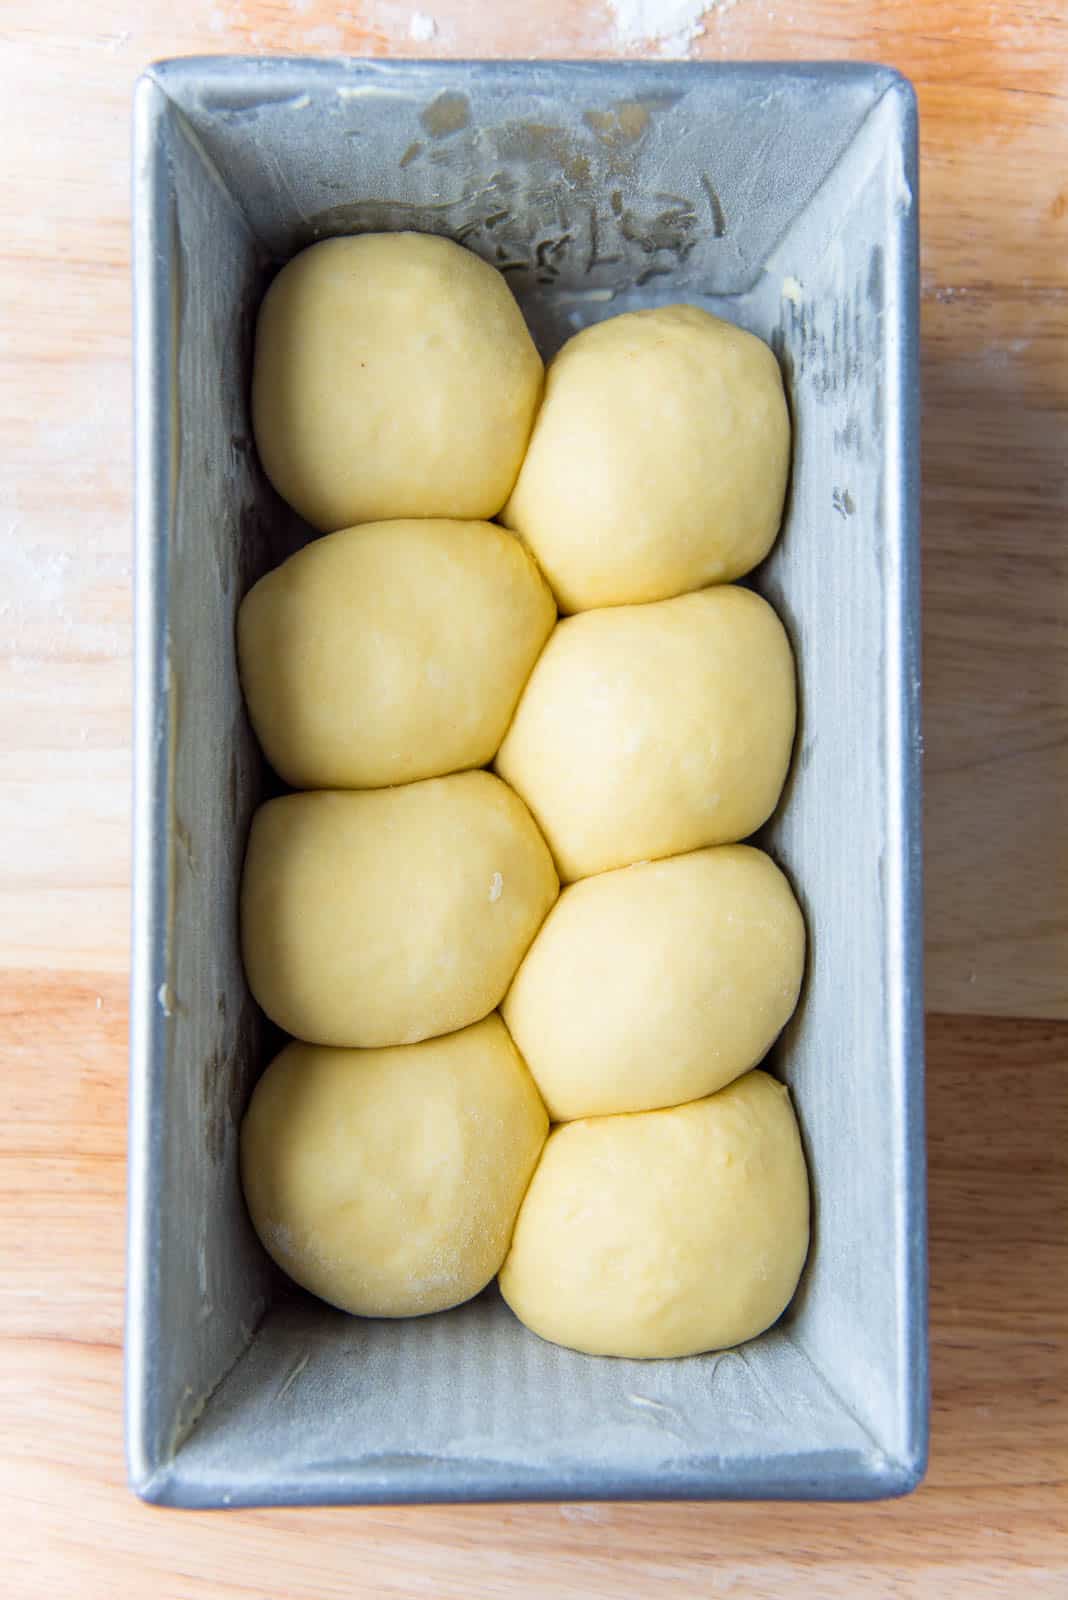
The dough is divided into 8 equal pieces, and each portion is shaped into a small, smooth ball. The balls are then placed in a zig-zag pattern in the loaf pan as shown below.


Final proofing and baking
Cover the shaped dough in loaf pans with plastic wrap and allow it to double in size before baking. This will be the final proof. This proofing can also take 2 hours at cooler room temperature, so make sure to keep it in the oven with the light on, or the warmest place in your house.
When the dough doubles in size and reaches the top of the loaf pan, it should be properly proofed. Do the finger test to find out if the dough is properly proofed. To do this, gently press the side of the loaf with your lightly floured finger. This leaves an indentation. If this indentation remains, OR if it bounces back halfway, then the loaf is ready to be baked.
If the indentation bounces back completely, then it’s under-proofed and needs more time to proof.

What to do if your brioche was over-proofed?
If the indentation causes the loaf to deflate, that means it was over-proofed!
If your loaf deflates after proofing, then you have to reshape the dough and start again. Otherwise, baking an over-proofed dough can cause the loaf to overflow, or deflate once baked. So make sure to check on the dough periodically, especially when it has nearly doubled in size.
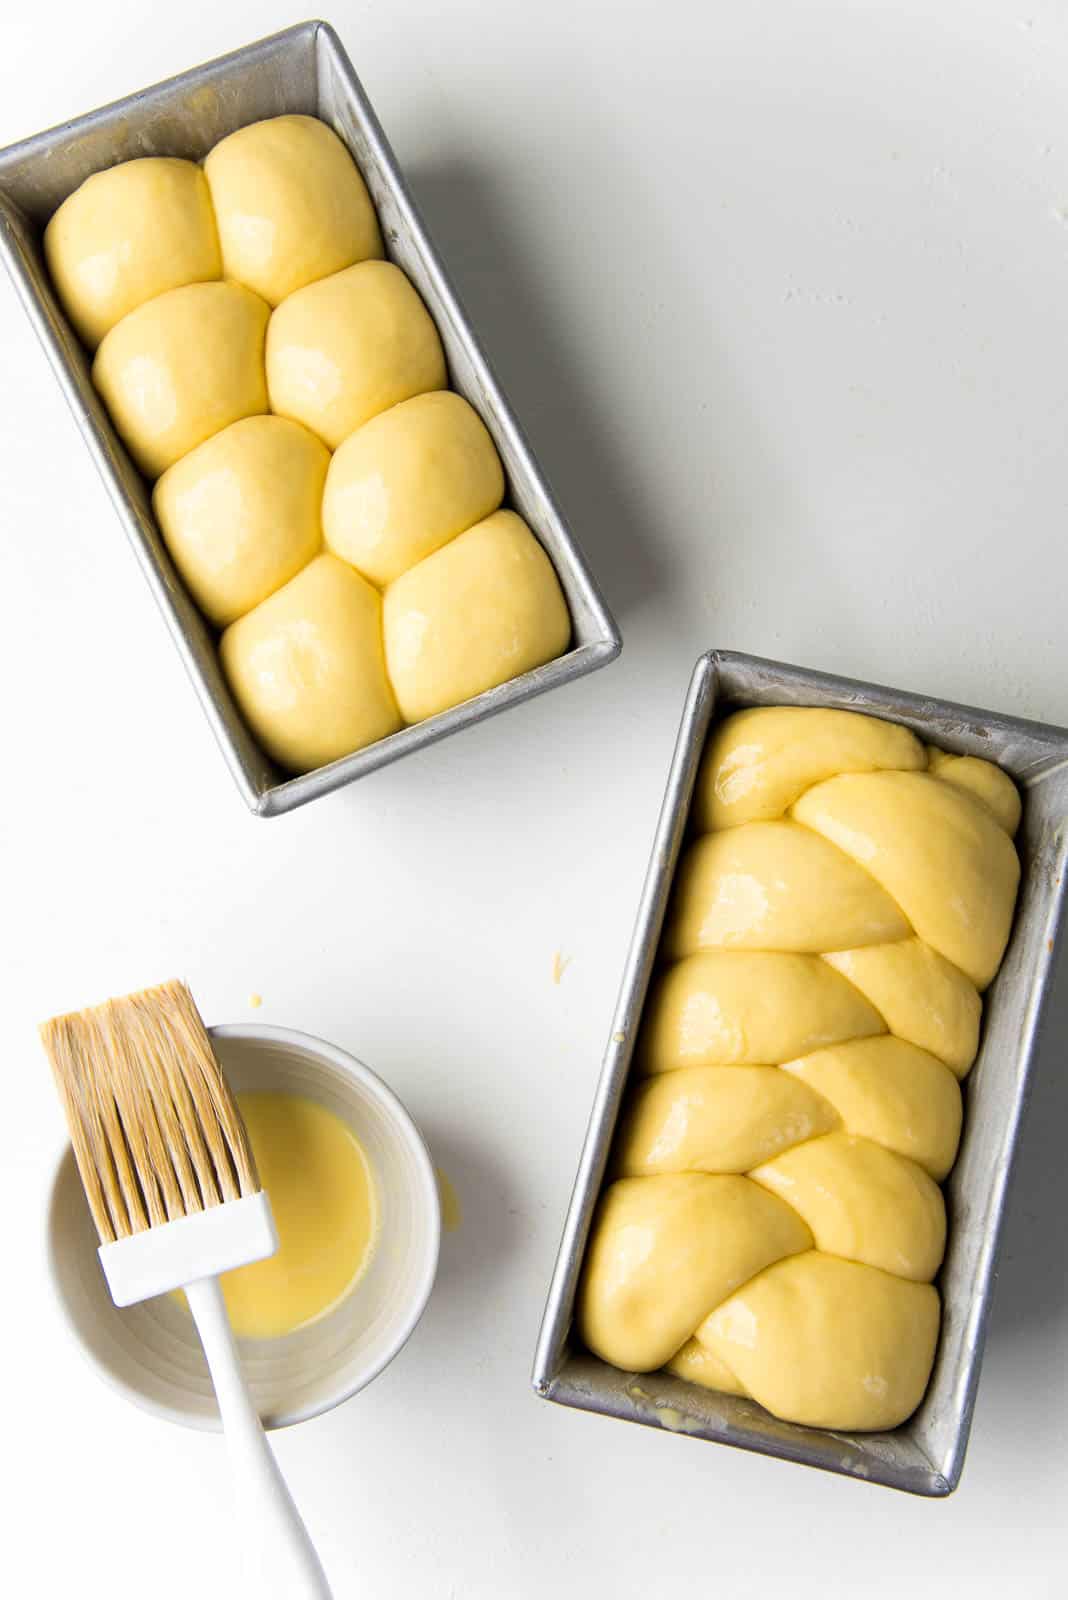
Egg wash or not?
I prefer an egg wash on my plain brioche bread loaves. It gives it a beautiful, shiny crust!
You can alternatively brush the loaf with simple syrup once out of the oven too. But I prefer this option for sweeter brioche bread recipes (like cinnamon rolls or babka).
Brush the surface well with an egg wash. You can sprinkle the top with small pearl sugar (Swedish pearl sugar, not the Belgian kind) if you like, for that extra crunch!
Preheat the oven while you prep the loaves for baking. Bake the loaves in the preheated oven until the loaf is a beautiful deep golden brown in color, and the internal temperature is about 180° – 190°F when checked with an instant read thermometer. Because this dough is enriched, it doesn’t need to reach 205°F like other types of lean dough.
Once baked, turn the loaf out onto a wire rack and allow it to cool completely.

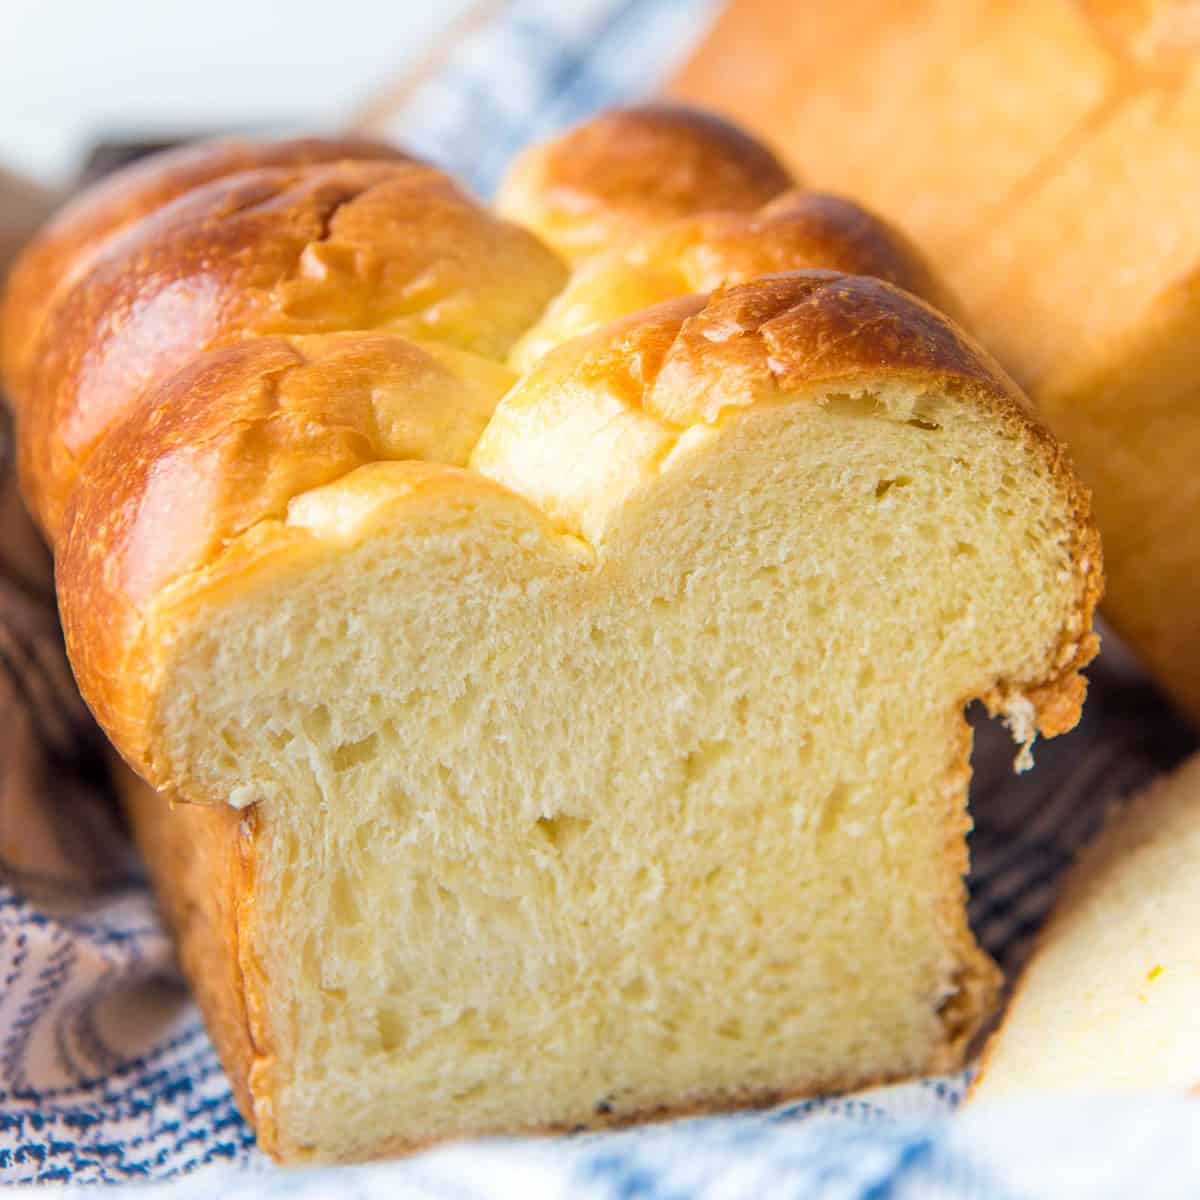
How to enjoy brioche bread
- Brioche toast is an incredibly delicious way to enjoy brioche bread. It doesn’t even need any butter because of how rich it is (but it won’t hurt of course!).
- And brioche makes the absolute best French toast! Brioche French toast, brioche French toast casserole, brioche French toast sticks, honey butter toast are all made possible with this brioche bread.
- Slather some jam on your brioche bread, or any kind of spread – like my fig jam, strawberry jam, grape jelly, or spiced plum jam).
- Make cinnamon toast with the brioche bread. The caramelized crunchy cinnamon on top is a great textural contrast with the soft bread.
- You can slice the brioche loaf while it’s still a little warm. A freshly baked, warm piece of brioche dough is one of life’s simple pleasures, indeed! 🙂
- You can use the brioche dough to make brioche burger buns, or large cinnamon rolls too!
What to do with leftover brioche?
- French toast
- Bread pudding
- Croutons
- Bread crumbs
- Bostock
- Stuffing
Brioche; Frequently Asked Questions
I don’t have AP flour. Can I make brioche with bread flour instead?
AP flour has protein content of about 10%, while bread flour has 12%. So bread flour will develop more gluten due to the extra protein, which will result in a chewier bread.
So you can use bread flour, but just keep in mind that the texture might be different. It’ll still be soft, buttery and delicious though.
Can I use salted butter?
I wouldn’t recommend it. Salted butter has more water than unsalted butter, and of course, it has salt too. Even if you remove the extra salt in the recipe, you might end up with a salty bread loaf because of the large amount of butter you’re adding in this recipe.
The extra salt may inhibit yeast growth too.
Can I make this brioche bread sweeter?
Yes, you can. However, the more sugar you add, the more slack the dough will be. For every 50 g of sugar added, remove an equal amount of egg whites. I wouldn’t recommend adding more than 120 – 150 g sugar.
I don’t have a mixer, can I make it by hand?
Ooh boy. It is do-able, especially if you like a good arm workout.
Hand kneading generally takes about twice as long. However with brioche, it might take even longer because you have to incorporate the butter in small additions.
I recommend only making ONE loaf (half the recipe), and expect a really good upper body workout. You’re welcome!
Can I make this dough in a bread machine?
Since I don’t own a bread machine, I can’t be sure how well it would work. This dough is very soft (starts of like a cake batter), and needs to be kneaded for at least 20 minutes (at medium and medium high speed). I am not sure a bread machine will be able to handle such a soft dough. One of my readers did try this, and confirmed that the dough was too soft and it was harder to knead especially when adding the butter.
If you do decide to try it, please remember to halve this recipe, as this is for TWO loaves, and usually bread machines can only knead enough for 1 loaf.
There are recipes that can be made in a bread machine, but these bread machine brioche recipes have less butter and eggs and therefore is less rich and buttery than classic brioche recipes like this.
Can I make one loaf?
Personally, I don’t like making just one loaf in my KitchenAid artisan mixer. This dough is wet, and the kneading hook will have trouble grabbing the dough as well as it should. This can lead to a much longer kneading time.
But you can manually make one brioche loaf with hand kneading if you prefer (see FAQ above).
Can I freeze brioche? How do I store this long term?
Yes, you can freeze brioche. With two loaves, you can easily freeze one for later. I have frozen whole loaves and sliced loaves with equal success.
Store in an air-tight container, OR wrap it well with plastic wrap and foil to avoid freezer burn.
Then let it thaw out at room temperature, or toast while frozen.
Why is my dough so sticky and wet? My other bread doughs aren’t so sticky.
It’s meant to be. This is an ENRICHED dough. It has A LOT of butter and eggs that make the dough VERY soft. The consistency of this dough after you add the butter will be similar to CAKE BATTER. You have to keep kneading it to help the gluten develop. This can take as little as 15 minutes, but with temperature / humidity changes, it can take as long as 30 minutes as well.
How can I tell that the dough is done?
What should the kneaded dough feel like?
What should the kneaded dough feel like?
When you try to lift the dough from the bowl with the dough hook, the entire dough should come off the bowl WITHOUT breaking. It will be VERY wet and droop down, but it should come off cleanly from the bottom of the bowl.
The dough should also be shiny and smooth. And when you try to form it into a ball, it will feel more like a water balloon (think high hydration dough), than a taught, firm dough.
My dough is very soft, can I add more flour?
Have you been kneading the dough for at least 30 minutes, and the dough doesn’t look shiny and smooth?
I don’t personally like to add more flour, because the more flour you add the less soft the dough is going to be. But if you absolutely must, add just a little bit of flour. But MAKE SURE YOU KNEAD until the gluten has developed; or you will end up with a crumbly brioche dough.
If the kitchen is very hot, or you live in a hot climate, you may have to chill the dough halfway through the kneading process. This is because the butter is too oily and isn’t mixing in the with the dough properly.
What kind of mixer do you use?
I use a KitchenAid artisan mixer. I use speed 5 – 6. It might seem like this would strain your mixer, but I make this dough very regularly. I also like to keep my hand on top of my KitchenAid head during the kneading process.
Can I skip the overnight proof?
The overnight proof develops more flavor, and also chills the dough so that it’s easier to handle and shape it the next day.
IF you have done the room temperature proof, then you can skip the overnight proof in theory. However you still need to chill the dough so that you can shape it.
Flatten and place the dough on a baking sheet pan (lined with silpat or parchment paper), and wrap it with plastic wrap. Place the pan in the freezer for a few hours to chill the dough quicker. Then you can shape and bake the bread according to the recipe.
Can I skip the first proof at room temperature?
I like doing the first proof at room temperature because it helps with gluten development as well as flavor. However, if you forget and put it in the fridge instead, you may need to proof it longer before baking.
I also prefer to let the dough proof in the fridge longer. If I knew I wanted to keep the dough in the fridge for 48 hours, then I would skip the room temperature proof.
Why is my brioche dough so oily, even after kneading it for so long?
If you live in a high humidity, high temperature area, this can happen. Brioche is like a croissant dough because of the large amount of butter in it. When the dough reaches a temperature of 30°C / 86°F the butter will be too soft and will separate into oils. This will make your brioche oily as the butterfat seeps out of the dough (just like with croissants).
So if you live in a hot tropical climate or your kitchen is very warm, then you may need to chill the dough between kneading to make sure the dough is at least below 30°C / 86°F.
Why does my brioche taste so yeasty?
Brioche SHOULD have a lovely depth of flavor if you proofed it overnight.
However, if you over-proof the dough (the first or last proofing), the bread will have an unpleasant beer-like taste.
So make sure to only proof the dough until needed; so don’t necessarily go by time, go by the appearance of the dough.
Can I make brioche buns instead of loaves?
Yes you can! I’ve shared a recipe specifically for brioche buns. The recipe is the same, but the dough shaping technique is different. Plus, I’ve included different weight variations for different sizes of burgers. From large buns to regular buns, and even slider buns too.
Recipe
Brioche Bread Recipe
US based cup, teaspoon, tablespoon measurements. Weight measurements are recommended for accurate results whenever available.
Common Measurement ConversionsVideo
Ingredients:
- 120 mL warm milk
- 9 g active dry yeast about 9 g
- 10 mL honey
- 5 large eggs You can also use 4 large eggs
- 1 large yolk from a large egg. Use 2 egg yolks if using 4 large eggs.
- 10 mL vanilla
- 60 g granulated white sugar 5 tbsp
- 500 g AP flour 4 cups + 2 tbsp (measured by spoon and level method)
- 1 ½ tsp sea salt fine grind
- 250 g unsalted butter very soft, roughly divided into four portions (1 cup + 2 tbsp)
Instructions:
DAY ONE
Making the dough
- Measure all the ingredients and have them ready.
- Add the milk, yeast and honey into the mixing bowl and whisk gently to combine. Set aside for 10 minutes to allow the yeast to activate.120 mL warm milk, 9 g active dry yeast, 10 mL honey
- Add the eggs and yolks, and whisk gently to break the egg yolks.5 large eggs, 1 large yolk
- Add the vanilla, sugar, flour and sea salt, and mix to form a scraggly dough.10 mL vanilla, 60 g granulated white sugar, 500 g AP flour, 1 ½ tsp sea salt
- With the dough hook attachment, knead the dough on speed 2 or 3 for about 3 – 5 minutes.
- Divide the butter into roughly 4 portions. Add the first portion of butter, in increments, after the first 5 minutes of kneading. Allow the butter to be mixed well into the dough. This should take about 2 minutes.250 g unsalted butter
- Repeat with the other 3 portions of butter, kneading the dough for about 2 -3 minutes after each addition. Make sure to stop the mixer to scrape down the sides of the bowl (and the bottom if needed) between kneading as well. You will have incorporated all the butter in about 9 – 12 minutes of kneading time.250 g unsalted butter
- Once all the butter is incorporated, scrape down the sides of the bowl (and bottom if needed), and knead the dough for a further 5 – 15 minutes on speed 5 or 6. This could take up to 20 – 30 minutes if your mixer is on low speed.
- The dough will have been kneaded enough when it can be lifted fairly cleanly off the bottom of the bowl when picked up with the dough hook. It will be very soft and tacky to the touch, but shouldn’t stick to your fingertips. Rather than strictly going by time, knead the dough until you have reached this consistency.
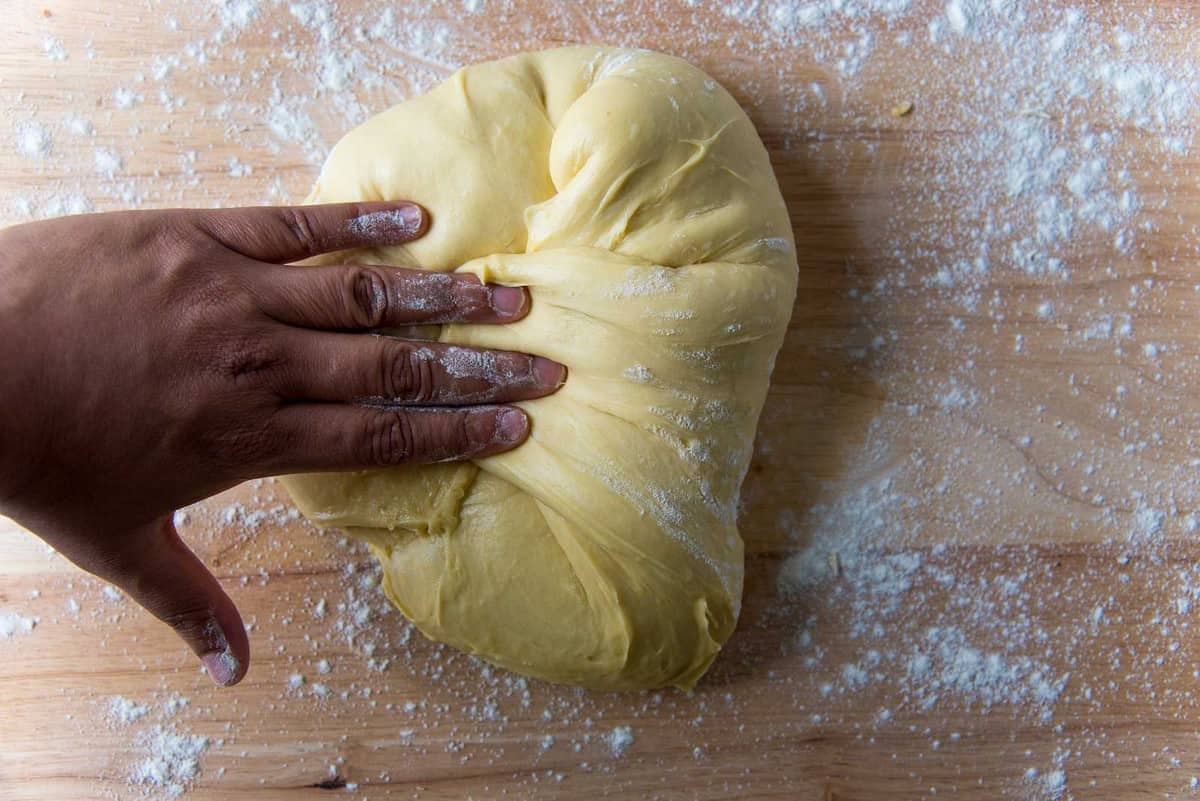
- Flour your work surface, and turn the dough out onto the floured surface. Lightly flour your hands and the surface of the dough to prevent the dough from sticking to your palms.
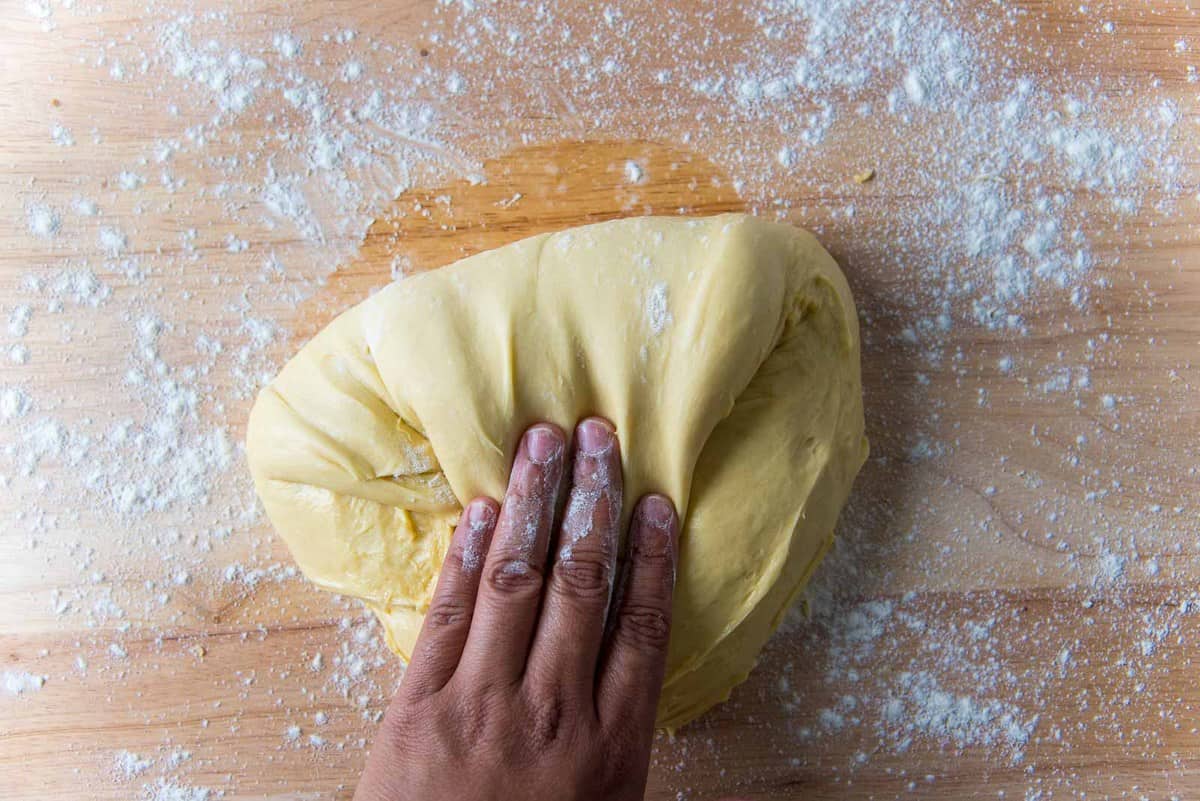
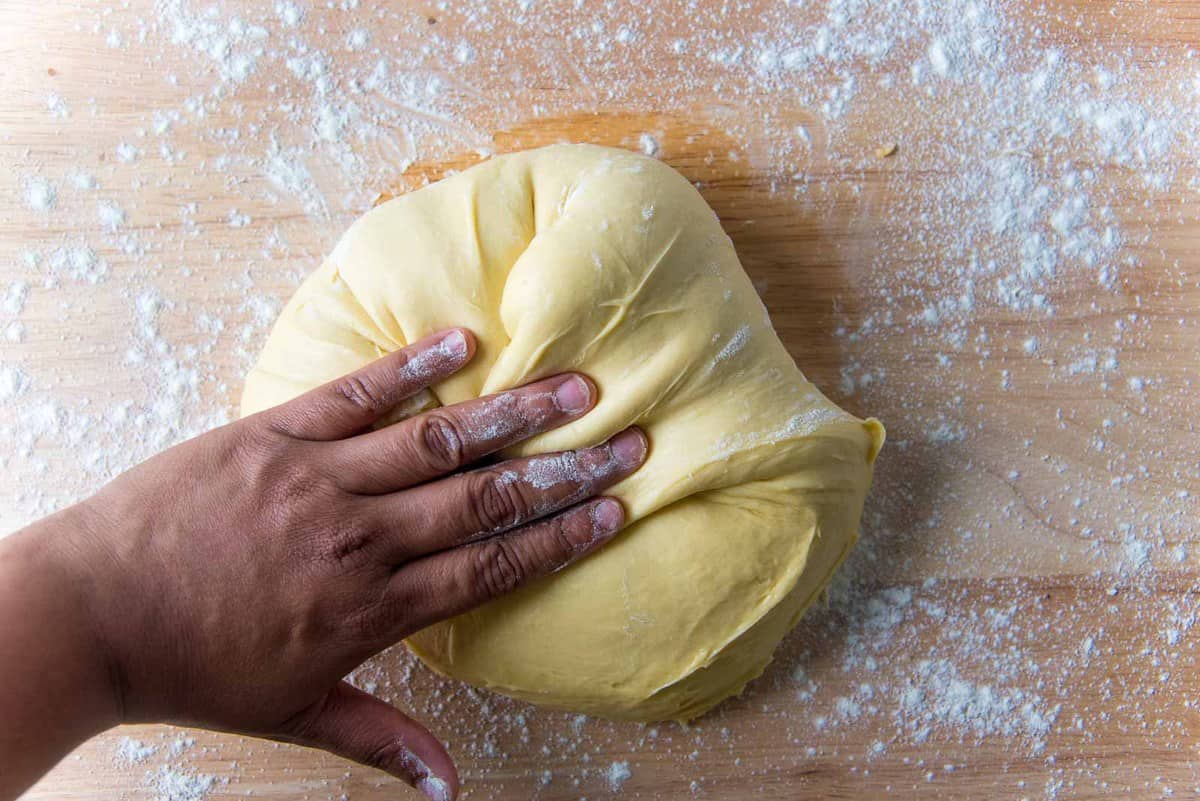
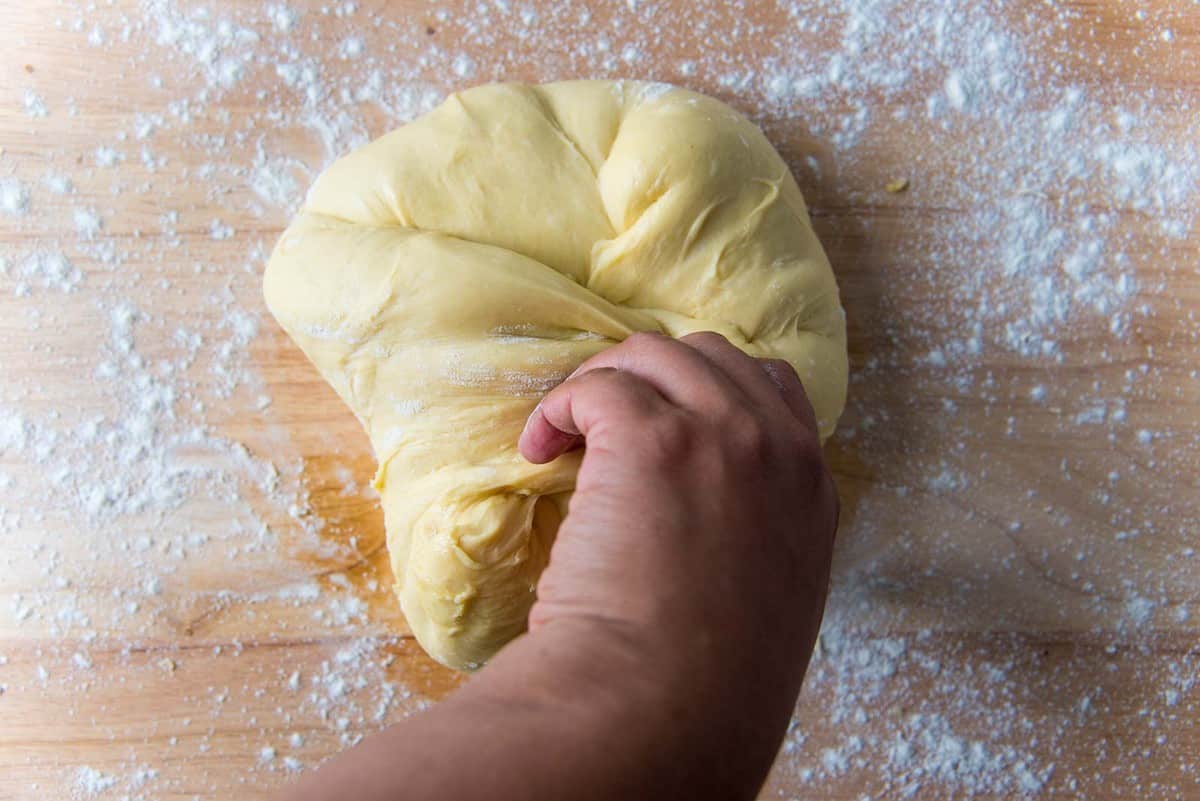
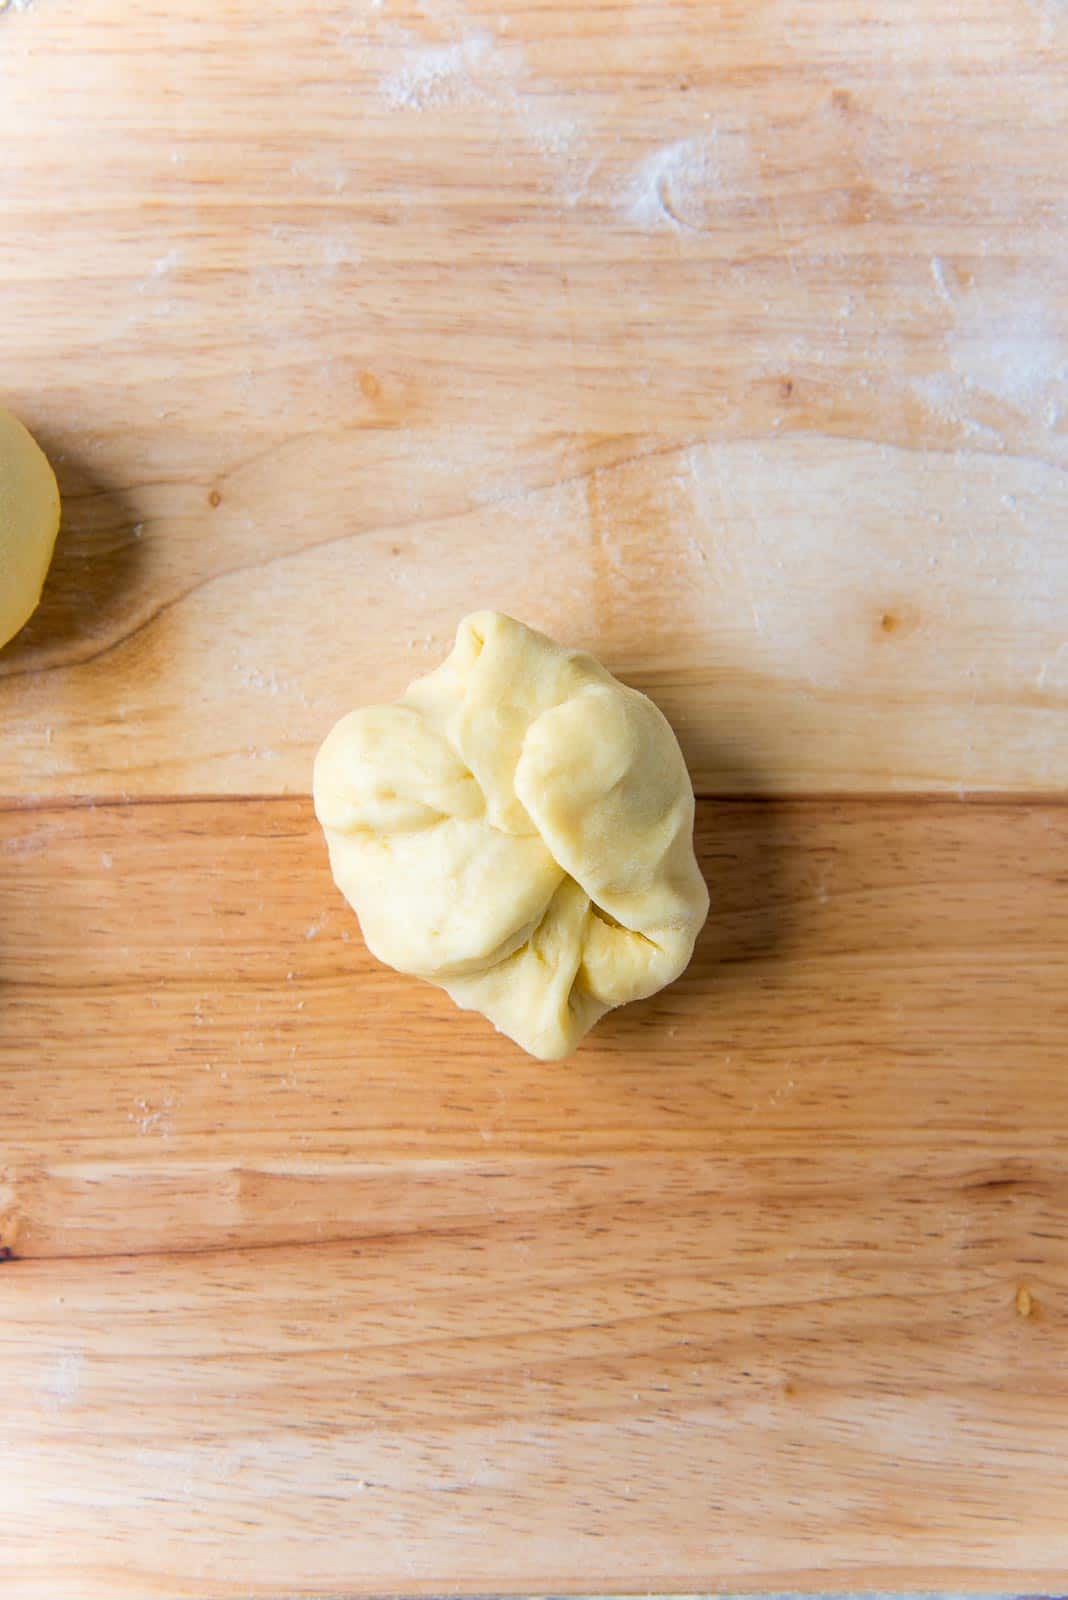
- Fold in the edges of the dough towards the middle and gently press them into the dough (see pictures in the post for more information). Carefully flip the dough over, and then with the heel of your palms, shape the dough to form a tight ball.
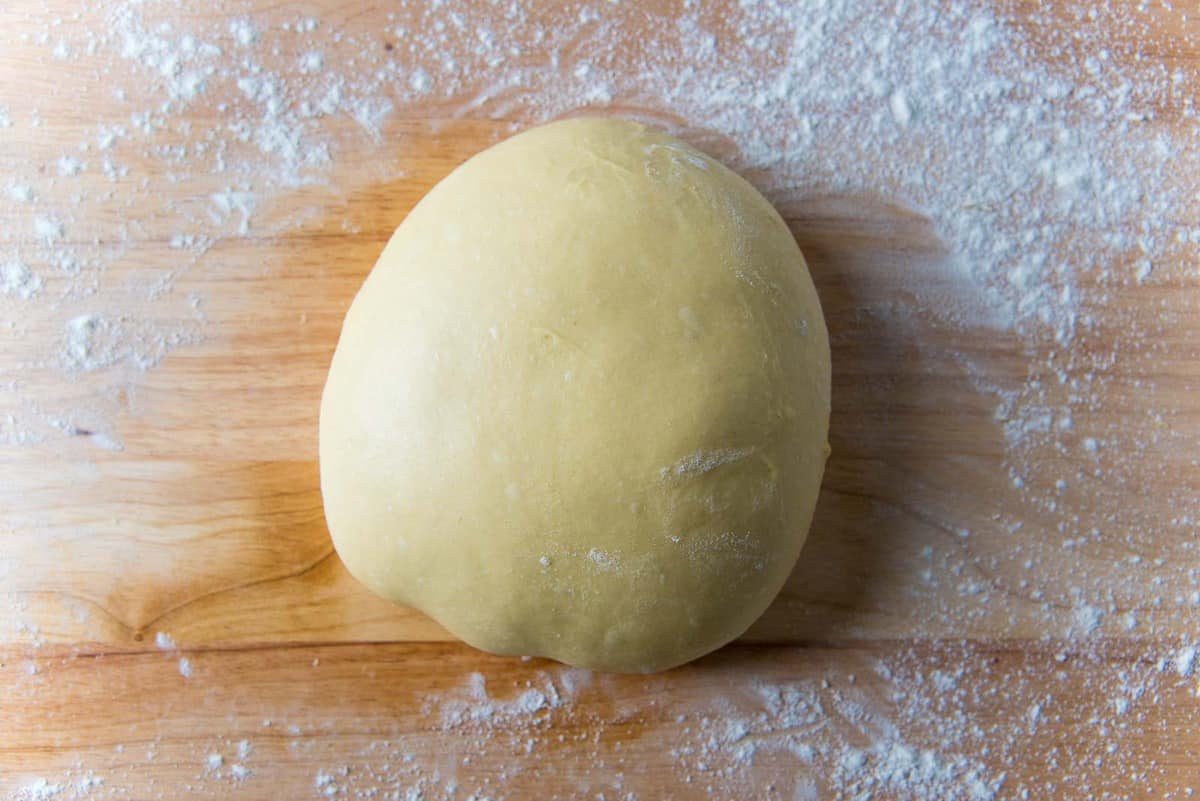
- Carefully pick up the dough ball and place it back in the mixer bowl (or another large bowl).
- Let it rise until it has doubled in size, in a warm place (72°F), for about 1 hour.
- Turn the dough out onto a lightly floured surface, and press down gently to deflate the dough with your hands. Fold in the edges again as before towards the middle and press them in. Carefully flip the dough over (seam side down now). Tighten the dough into a ball with a smooth, taut surface (using the edges of your palms). Transfer the dough into the mixer bowl again.
- Cover and let it chill in the fridge for at least 8 hours, or up to 24 hours.
DAY TWO
Shaping and baking the bread
- Remove the chilled dough from the fridge. The dough will be much easier to work with now.
- Butter and dust two 8.5 x 4 inch, standard loaf pans with flour. (You can also use 9 x 5 inch loaf pans).
- Keep a bowl of flour, a pastry brush and a dough scraper/cutter ready as well.
- Turn the dough out onto a lightly floured surface. Deflate the dough by flattening it lightly. Measure the weight of the dough, and then divide it into two EQUAL portions, using the dough cutter or a sharp knife.
- Now you've got two dough portions to make two brioche bread loaves.
Shaping the loaves
Nantaise brioche loaf
- Weigh one portion of the loaf and divide it into 8 equal portions.
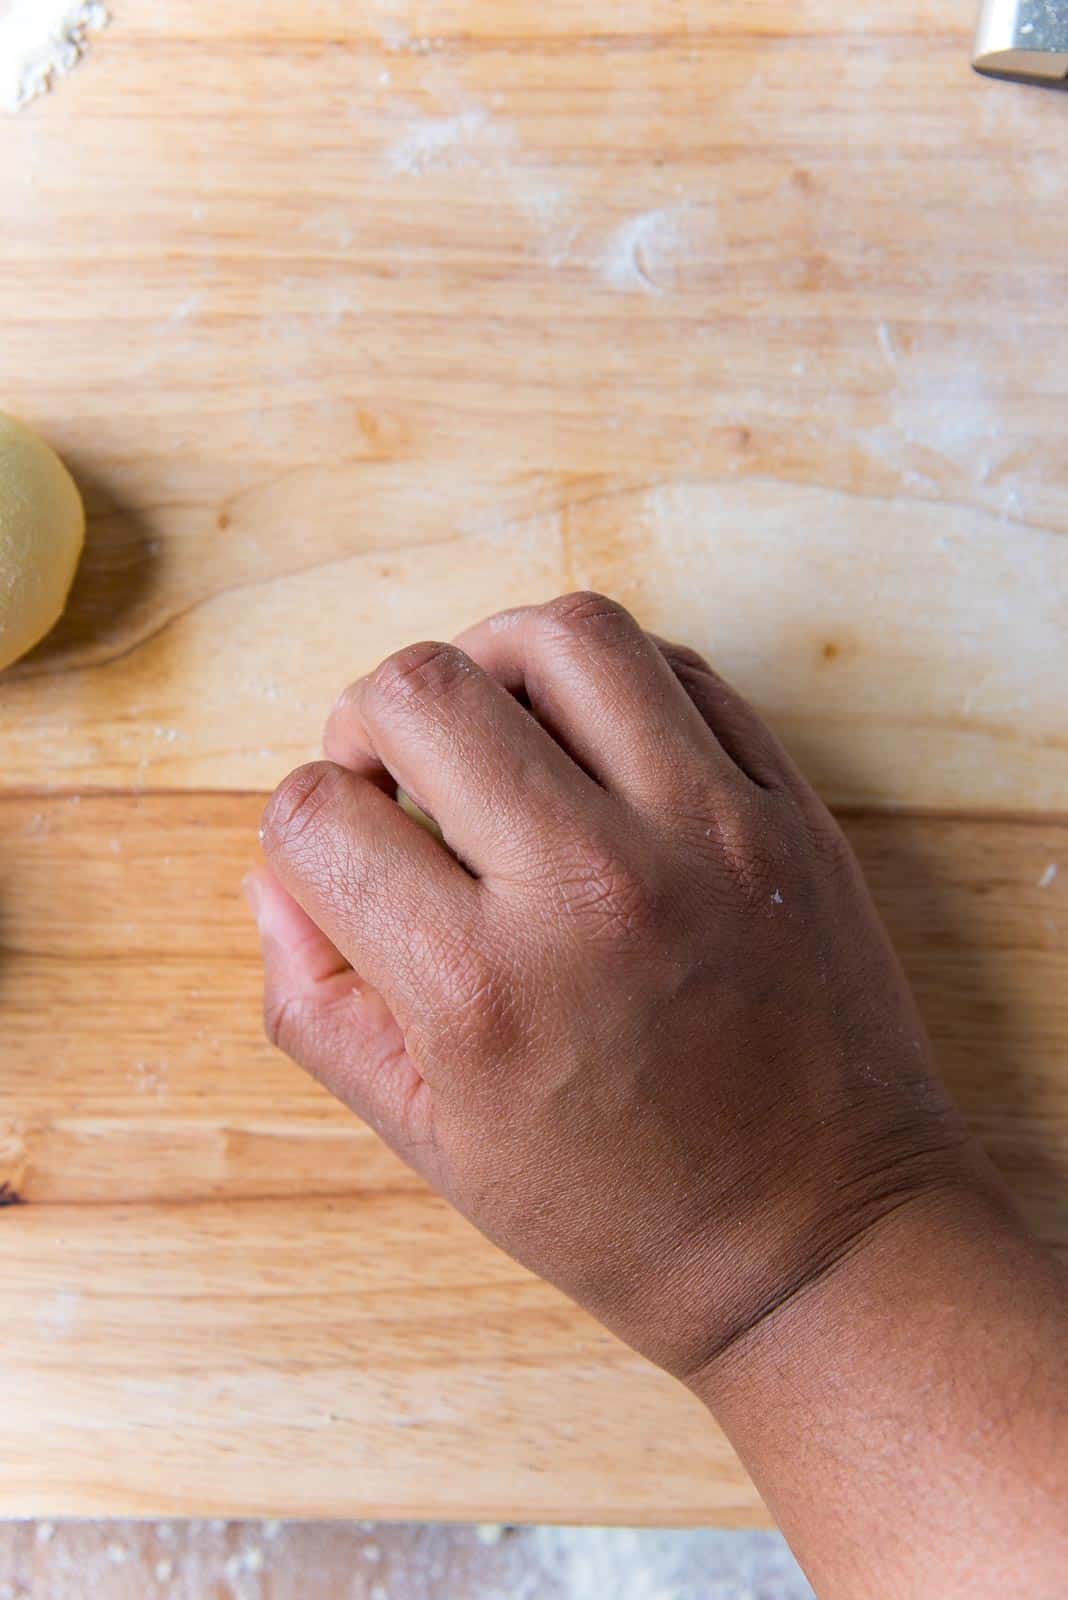
- For each portion (with the smooth side down), fold in the edges towards the middle as before. Carefully flip the dough over, and using a cupped palm, roll the dough portion on your work surface until you have a smooth dough ball (see pictures in the post for more details). Repeat with the other dough portions to get 8 smooth dough balls.
- Place the dough balls in the loaf pan in a zig-zag manner. This will likely be a fairly snug fit.
- After arranging the dough balls in the loaf pan, flatten them slightly. Then cover the pan with plastic wrap and set aside.
Braided brioche loaf
- Divide one portion of the dough into 3 equal portions.
- Flatten each portion into a small rectangle. Then tightly roll up the rectangle to form a tube. Using your palms, and a back and forth motion, roll out the dough into a 14 inch long bread rope. Apply light but even pressure to get a bread rope with even width.
- Repeat with the other two portions.
- Now you have three 14 inch long bread ropes. Bring the ends of the three ropes together and pinch to seal. Braid the dough, while being careful to avoid any loose folds and to not stretch the dough ropes at the same time. Once braided, the bread loaf should be a little longer than the length of the pan (about 9 – 10 inches).
- Pinch to seal the other end. Using your palms, press down the ends of the bread to flatten them against the work surface. Tuck the flattened ends to get a lovely, rounded loaf.
- Carefully transfer this to the buttered and floured bread pan. Flatten slightly to fit the loaf pan.
- Cover with plastic wrap and set aside.
Regular bread loaf
- Follow the same shaping instructions as for my white bread loaf in this recipe to form a regular bread loaf shape.
Proofing the bread before baking
- Proof the bread in the covered loaf pans for about 2 hours at room temperature, or until doubled in size, and almost reaching the top of the pan. Preheat the oven to 325°F/163°C before baking the loaves.
- Once doubled in size, brush the tops with an egg wash. Optionally, you can also sprinkle some Swedish sugar pearls on top for a sweet crunch.
- Bake in preheated oven until golden brown on top and the internal temperature registers 190°F/88°C. This can take about 35 – 45 minutes.
- Remove from the oven and let the bread loaf cool slightly – about 5 minutes.
- Carefully flip the bread loaf out of the pan, onto a cooling rack. Let it cool completely. Store in an air-tight container.
Recipe Notes
Note on the dough
This dough is very soft and wet. Make sure you read the FAQ section and the post for information on the dough consistency, and how it changes after kneading. If you can’t find an answer in the post or FAQ section, let me know. Please take your time kneading the dough while adding the butter (as recommended in the recipe). See the video in the recipe card that will show you the consistency of the brioche dough. https://www.youtube.com/watch?v=cv_eo4boM6UNote on yeast
- If you have access to fresh yeast, use 18 g of fresh yeast.
- If you have access to instant yeast, use 4.5 g of instant yeast.
Note on proofing
In winter, or if you don’t have a warm place to proof the dough in your house, turn on the oven light, and keep the bowl inside the oven. The heat from the light will warm the oven sufficiently to help with the proofing. Use a metal bowl to make this proofing process go faster. Proofing times will vary depending on the temperature of the dough, environment and the type of yeast you use. So rather than going by time, go by sight and feel.- If you make a small indentation in the dough with your fingertip and it bounces back slightly, then it’s ready to be baked.
- If the indentation stays, it’s starting to over-proof, so bake it as soon as possible.
- If the bread deflates when poked with a finger, then it has over-proofed.
Note on halving the recipe
If you’re halving the recipe, use 2 LARGE EGGS + 1 EGG YOLK.Notes on making this brioche in a hot kitchen / hot climate
Use cold butter instead of room temperature butter. You may also have to chill the dough halfway through kneading. This will help chill the dough so that the butter will incorporate better and the gluten can be developed.Other recipe variations and homemade breads
Brioche buns Hawaiian dinner rolls Brioche cinnamon rolls French toast Honey butter toast Bostock pastry White bread (sandwich bread) Focaccia Hokkaido milk breadNutrition Information:
“This website provides approximate nutrition information for convenience and as a courtesy only. Nutrition data is gathered primarily from the USDA Food Composition Database, whenever available, or otherwise other online calculators.”


Leave a Reply