


How to make Bûche de Noël (Yule Log Cake) that is delicious and spectacular! With this perfect step by step guide, you can make a classic chocolate yule log that’ll be the star of your Christmas party!
A gorgeous Buche de Noel cake made with my chocolate roll cake recipe, perfect for the holiday season. If you’re looking for something more fun and challenging than a pound cake, or chocolate cake, or butter cake for the holidays, then try this masterpiece!
This yule log recipe is the most comprehensive guide to making this classic Christmas treat. Here, you’ll learn how to make,
- the perfect chocolate swiss roll cake (or even a vanilla swiss roll cake),
- the perfect, light filling that will satisfy your sweet tooth, while not being too rich,
- two types of yule log – a buche de noel cake with “branches”, or just a straight single cake,
- meringue mushrooms for decoration,
- chocolate bark shards, for a realistic tree look,
- a delicious and simple chocolate frosting, and make it look like a tree on the cake.
Yule log cakes (bûche de noël cake) are a beautiful, sought after Christmas dessert. It’s a classic French dessert, and is now popular in many European countries, and other parts of the world.
I’m not gonna lie, a homemade buche de noel is a labor of love. You can tell that from the looks of it. But it’s more than likely to be the centerpiece of your Christmas party spread. You can make the easy version or the hard version, or anything in between, depending on time and your comfort level.
Easy version
Chocolate swiss roll cake (single log), filled with chocolate whipped cream frosting, and frosted with a whipped chocolate ganache.
Hard version
Chocolate swiss roll cake with branches (two cake rolls), filled with chocolate whipped cream (or chocolate buttercream; either American chocolate buttercream or chocolate Swiss meringue buttercream), and covered with chocolate ganache and tempered chocolate shards.
Making the chocolate swiss roll cake for the buche de noel cake
Check out my comprehensive post on making perfect chocolate swiss roll cake.
But here’s a quick overview of how the swiss roll cakes are made and how to make that process easy.
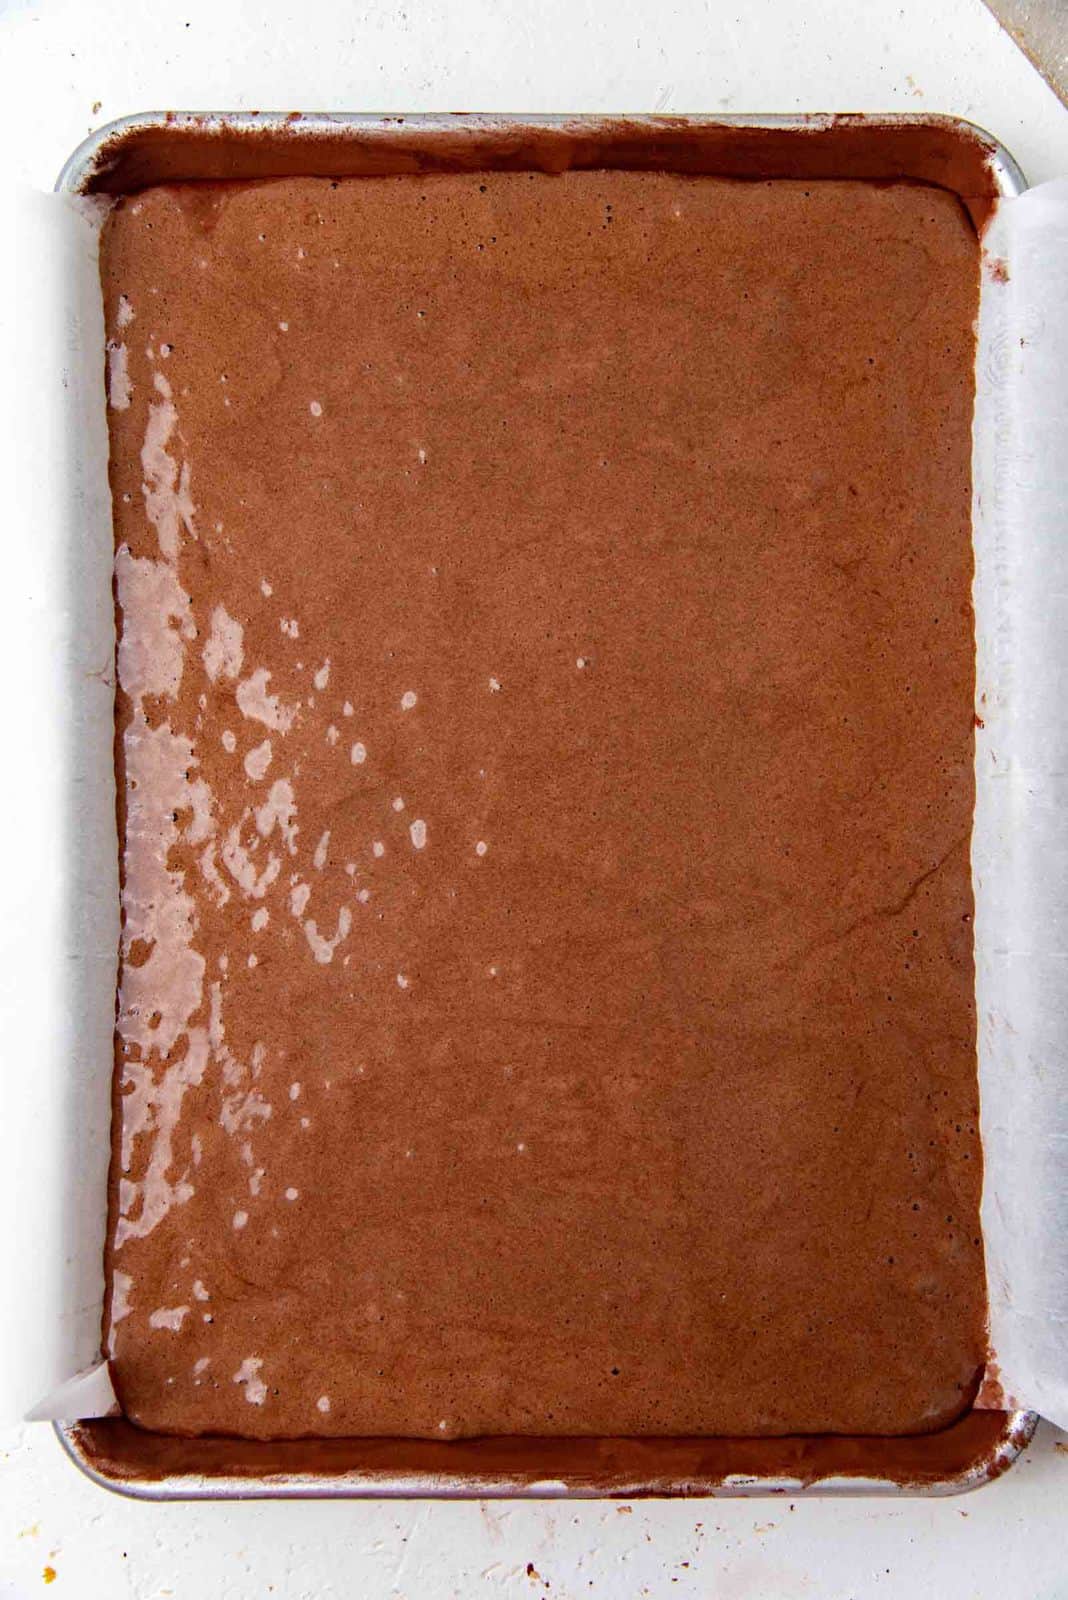
- Prep the jelly roll pan – Butter and line a 10 x 15 inch pan with parchment paper. For a branched buche de noel, you may need to prepare two pans, and make this recipe twice for two chocolate swiss rolls.
- Get all the ingredients ready – Read the full recipe first and measure all the ingredients and have them ready to go.
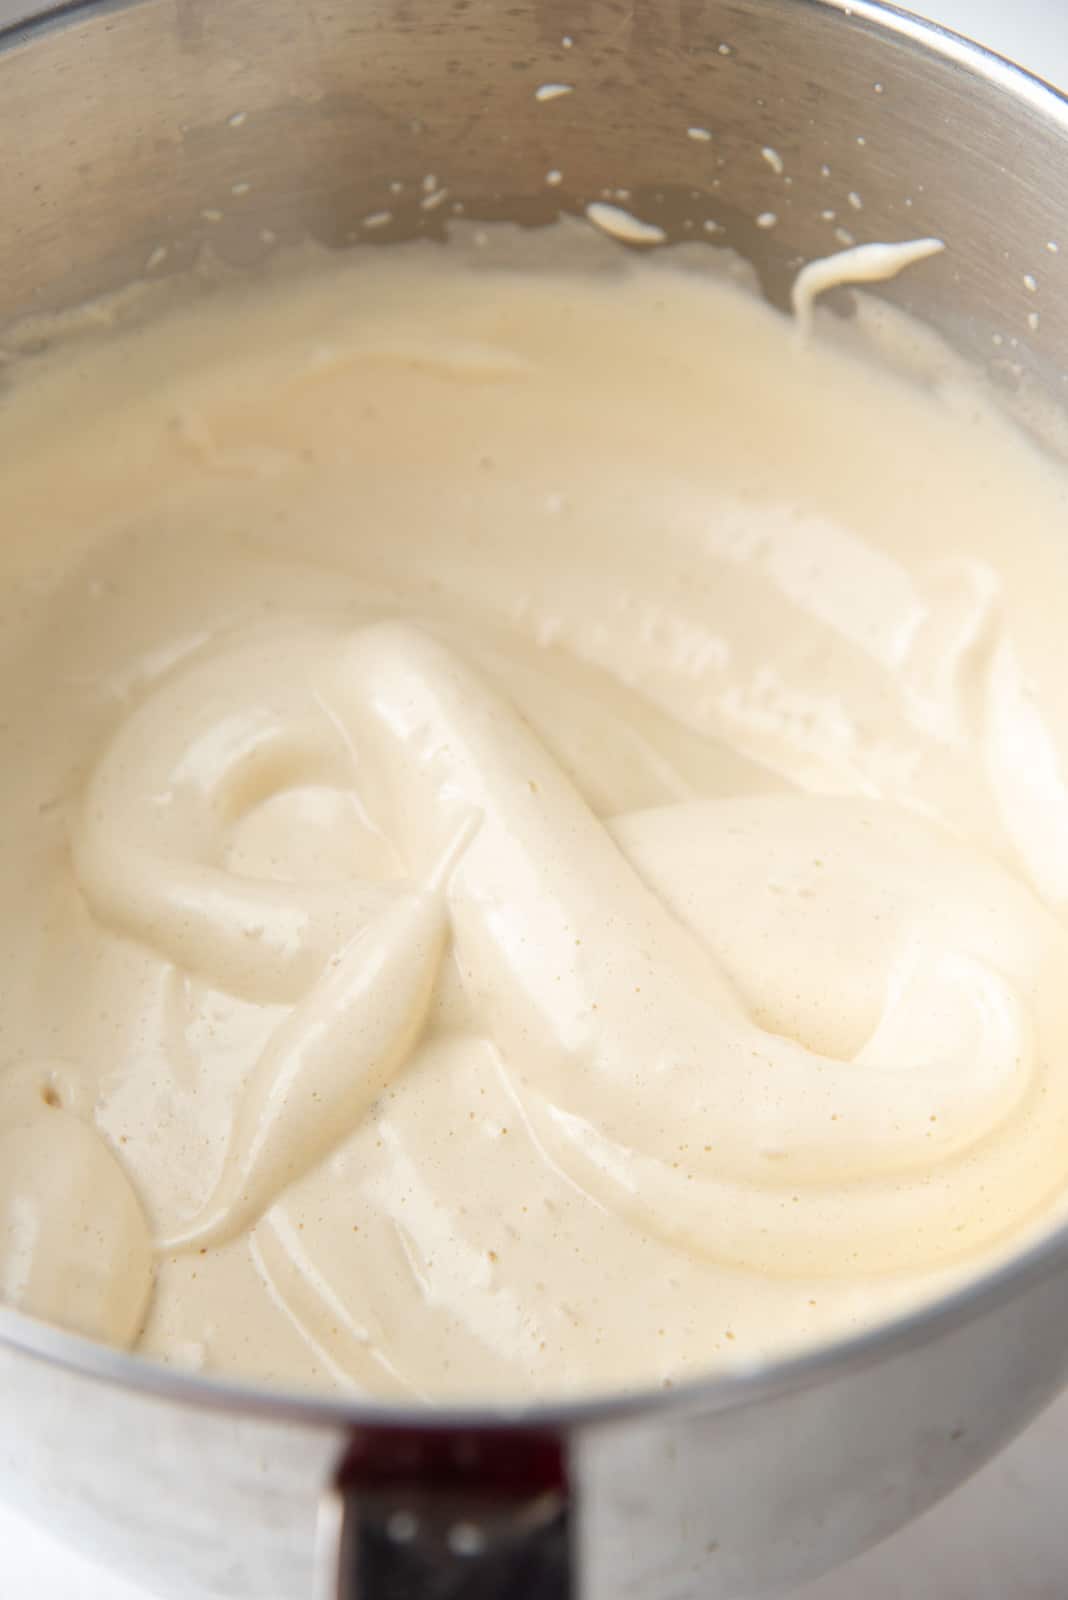
- Heat the eggs and sugar, and whisk to form a stable egg foam. This egg foam is the base for the sponge cake that will make the swiss roll. Heat the eggs and sugar over a double boiler until warm, and then whisk until tripled in size.
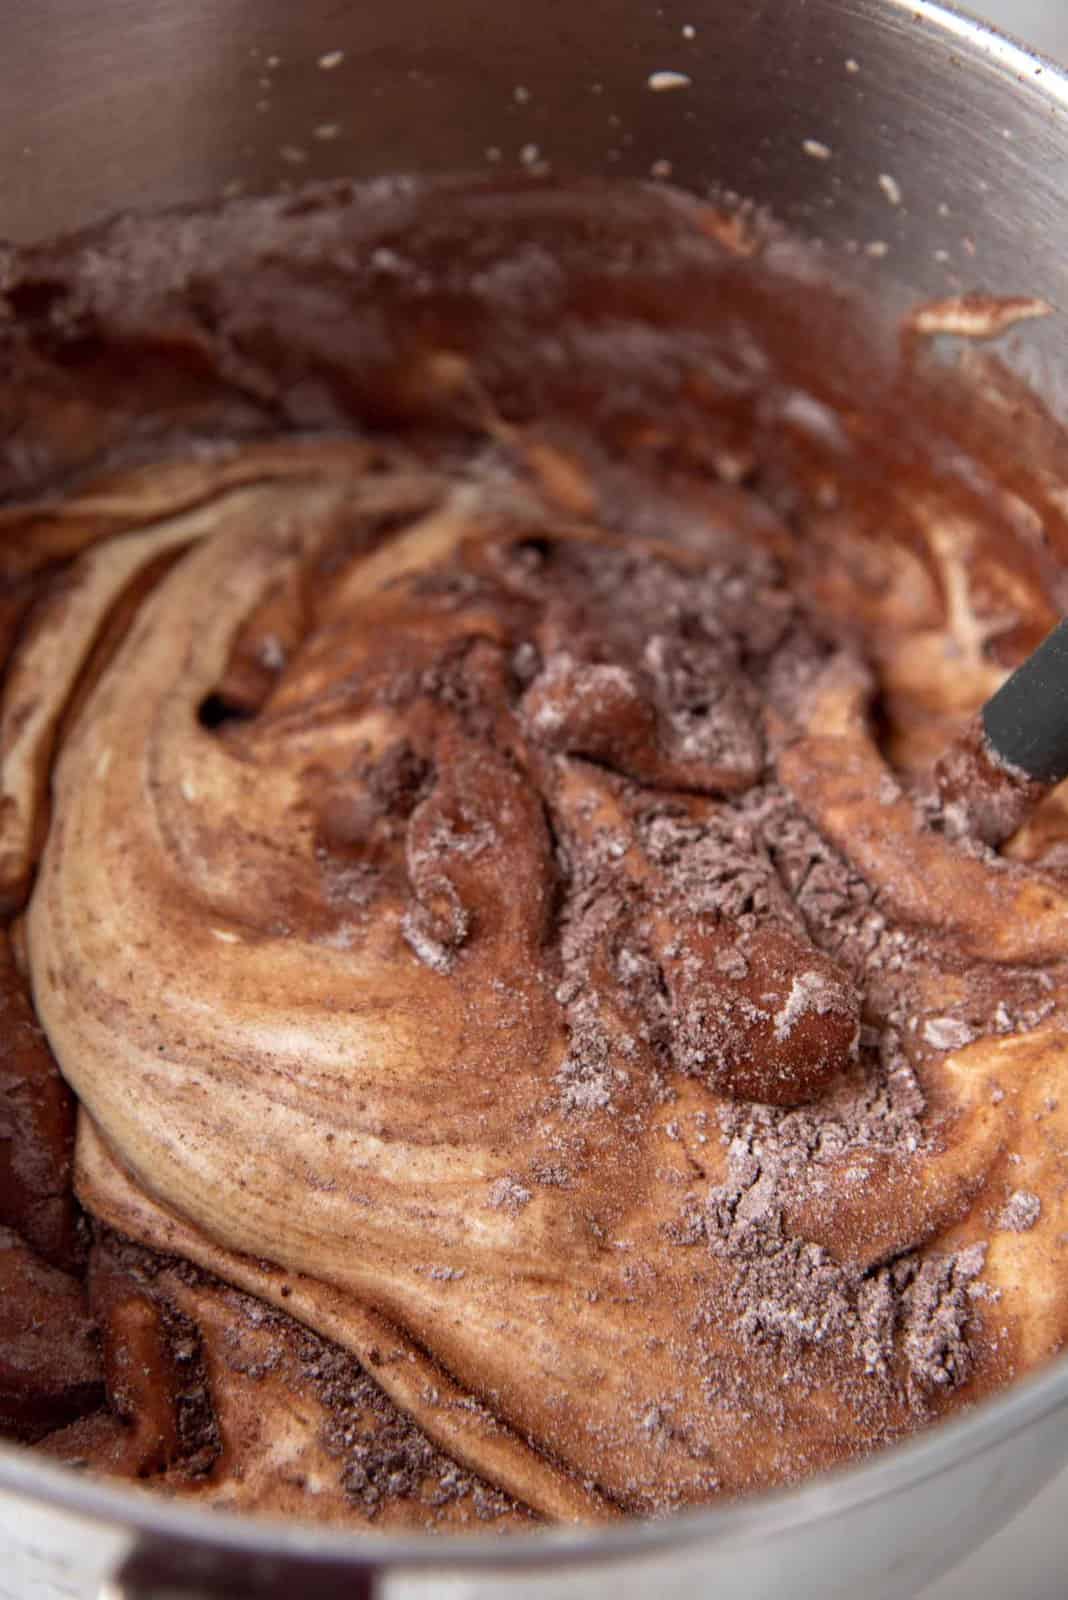
- Sift the dry ingredients (flour cocoa, and baking powder), and gently fold them in. Take care not to deflate the batter while you fold in the dry ingredients! Make sure that there are no pockets of dry ingredients. Otherwise you will end up with flour clumps in your final cake.
- Emulsify the clarified butter / melted butter. Add some of the cake batter to the butter and mix until the butter has completely mixed in with the batter.
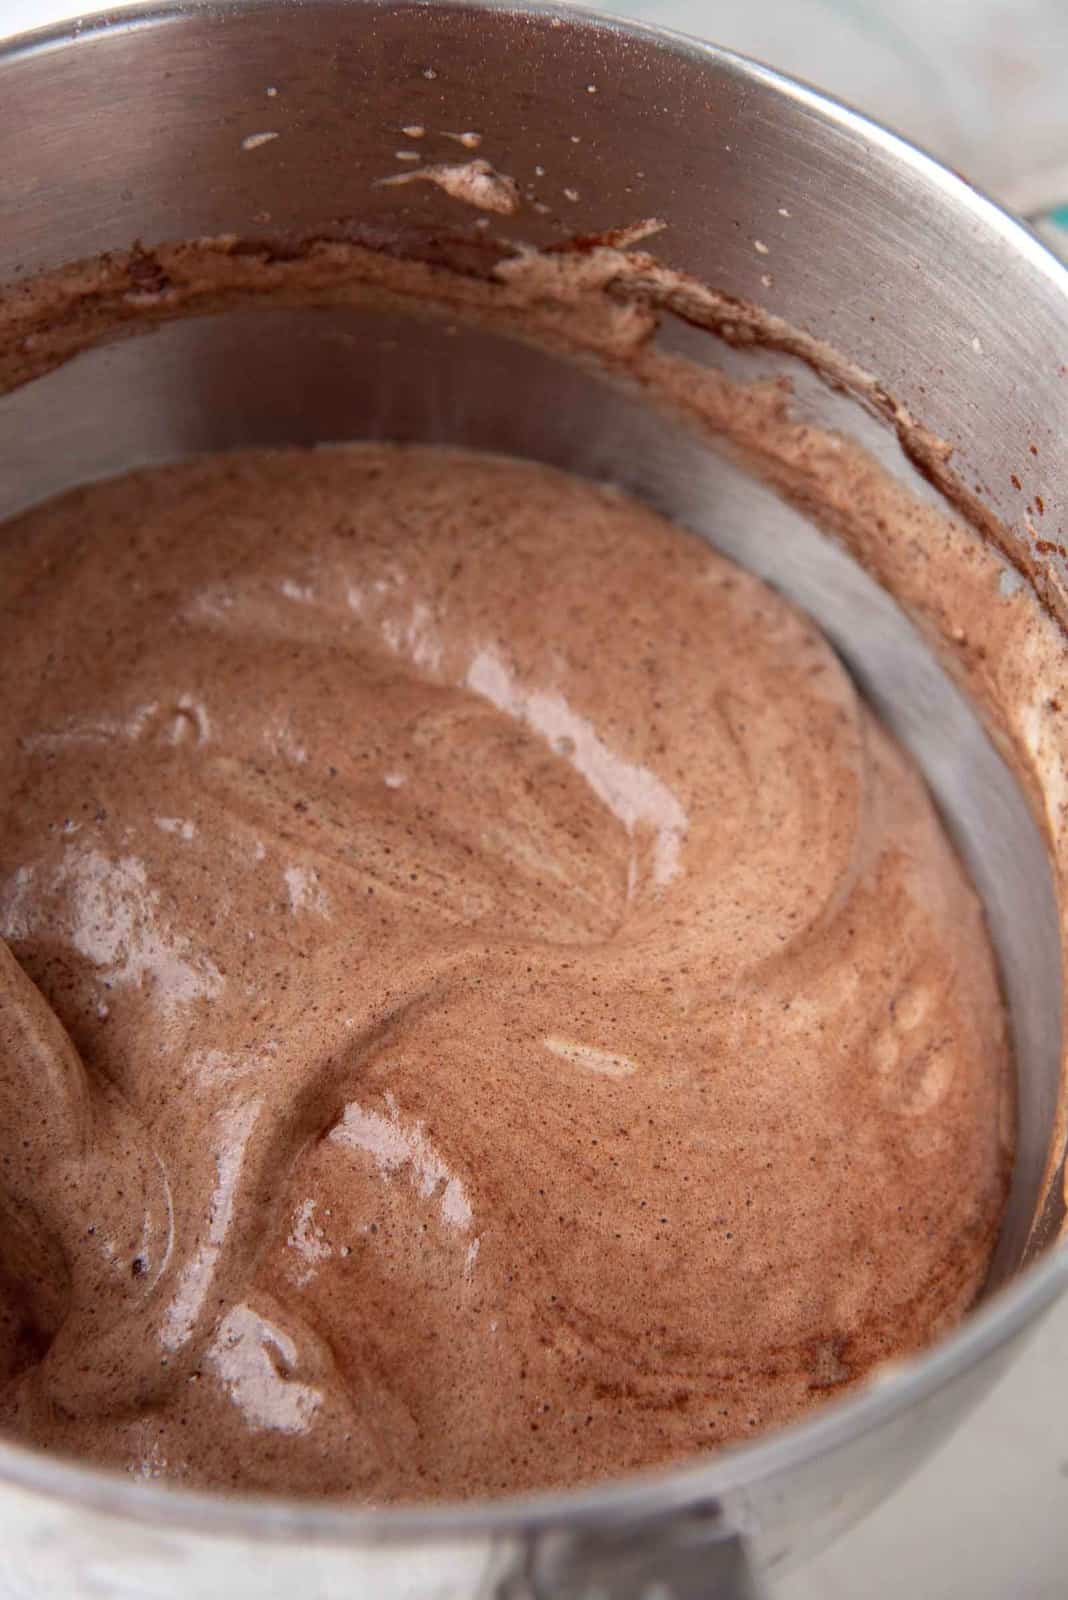
- Fold in the butter mixture through the cake batter. Evenly pour the emulsified butter mixture over the surface of the remaining batter in the bowl. Then carefully fold it in to mix, without deflating the batter.


Baking and shaping the cake
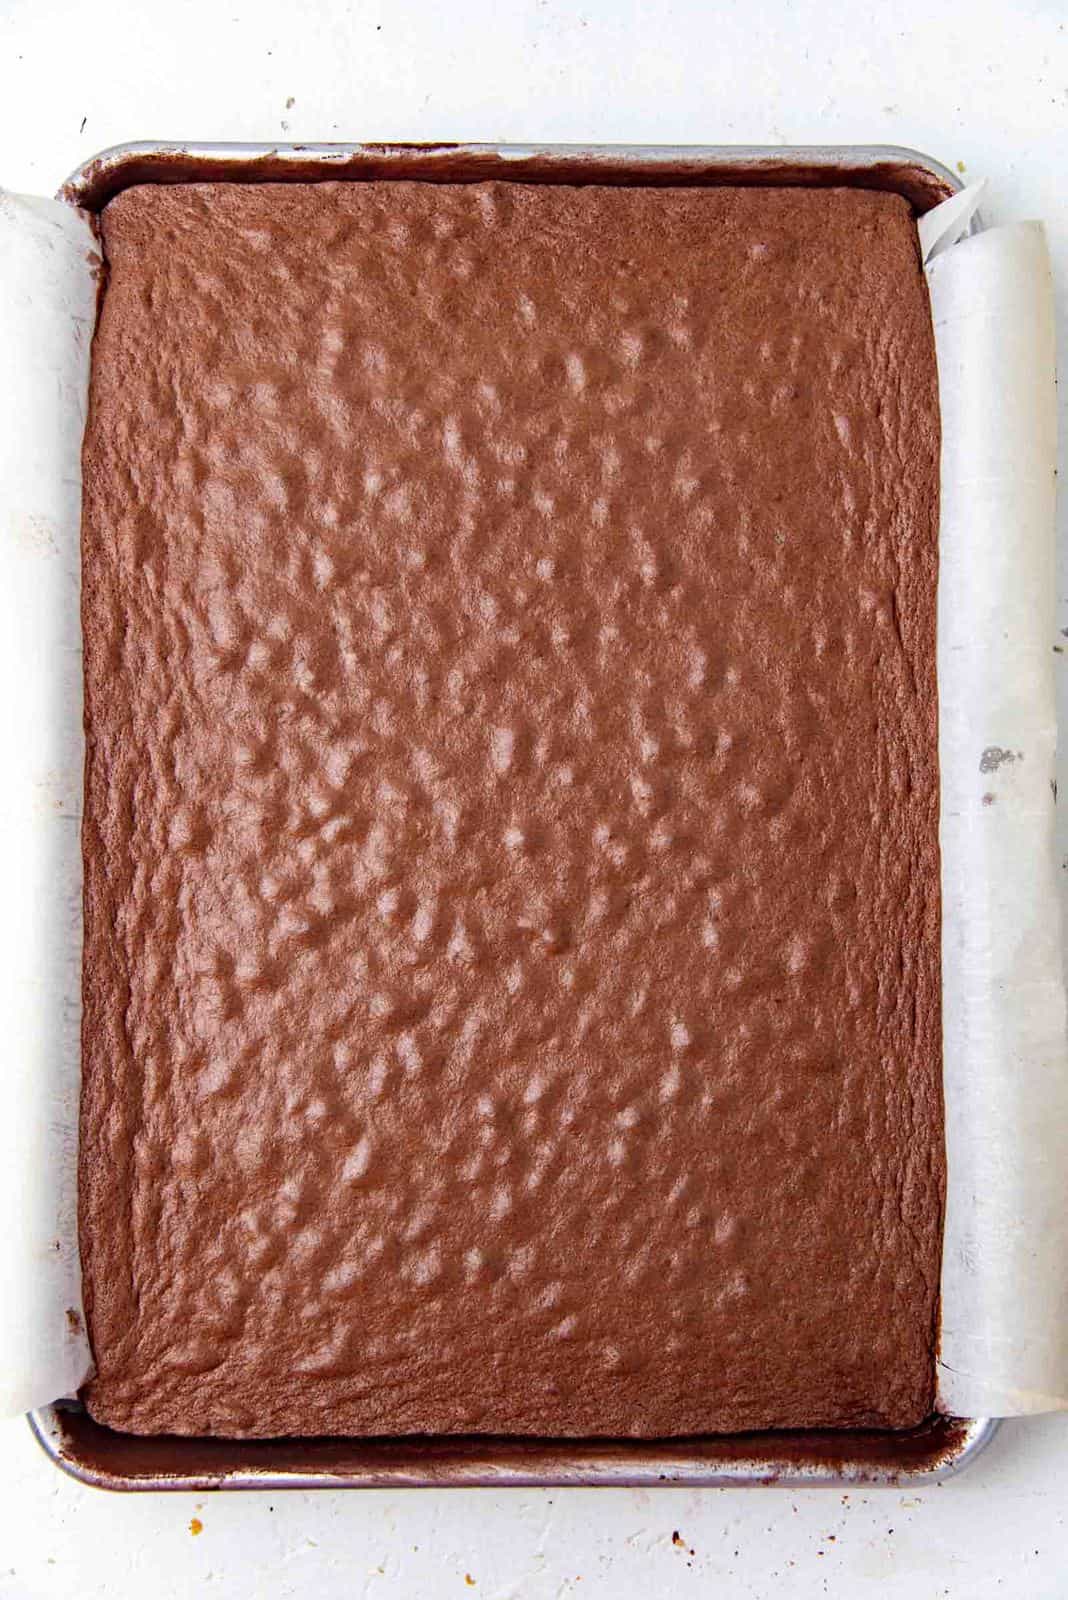
- Bake the cake. Pour the batter into the prepared pan and bake in an oven preheated to 350 F / 180 C.
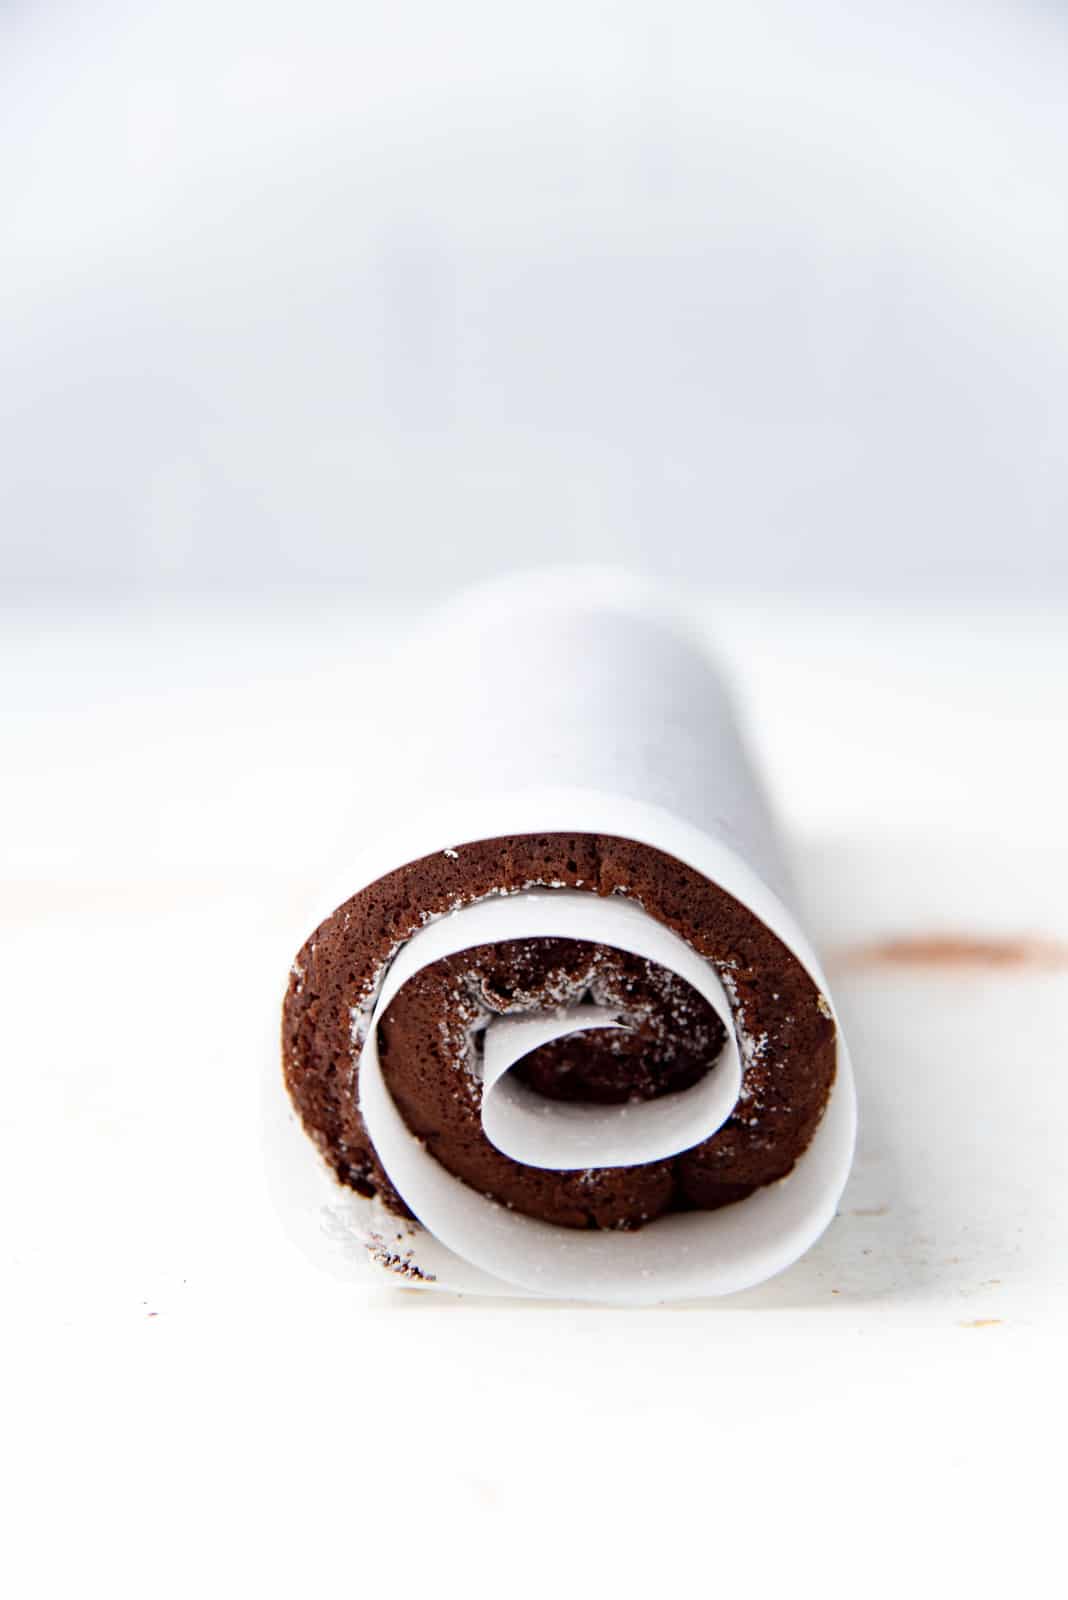
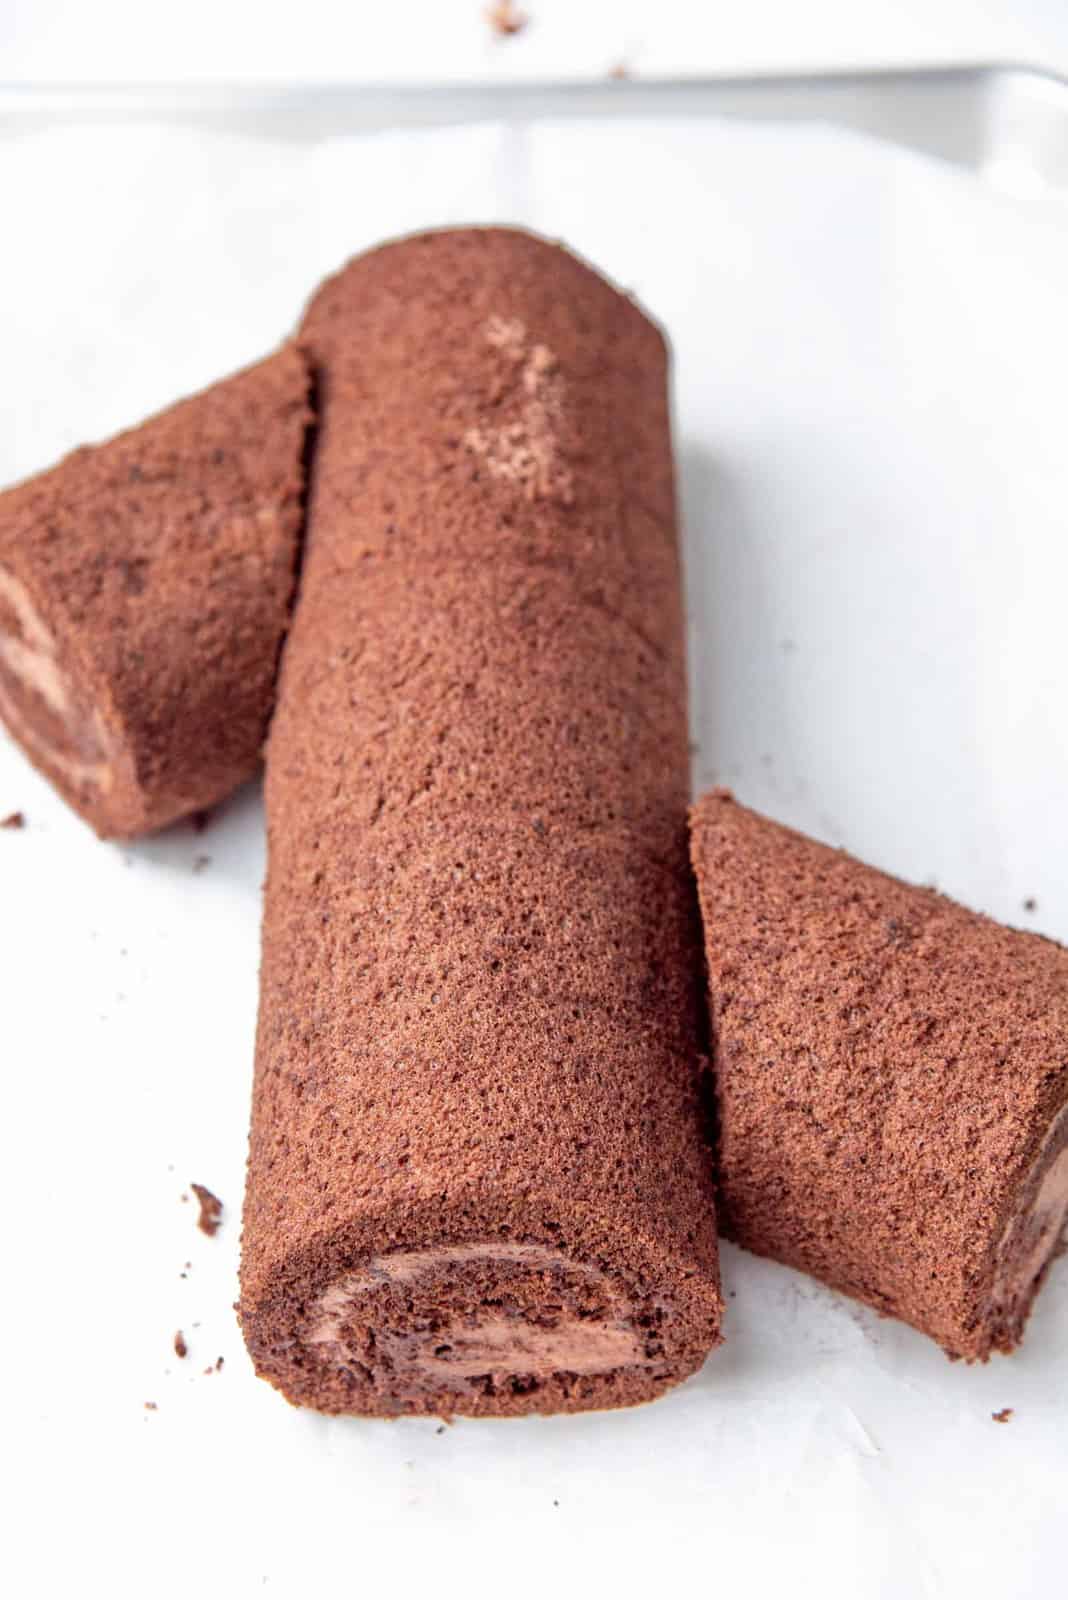
- Roll up the warm cake to help maintain its shape. Remove the baked cake from the oven, then roll it up, and let it cool while wrapped in parchment paper. You can find all the tips on how to do this in my chocolate roll cake post.
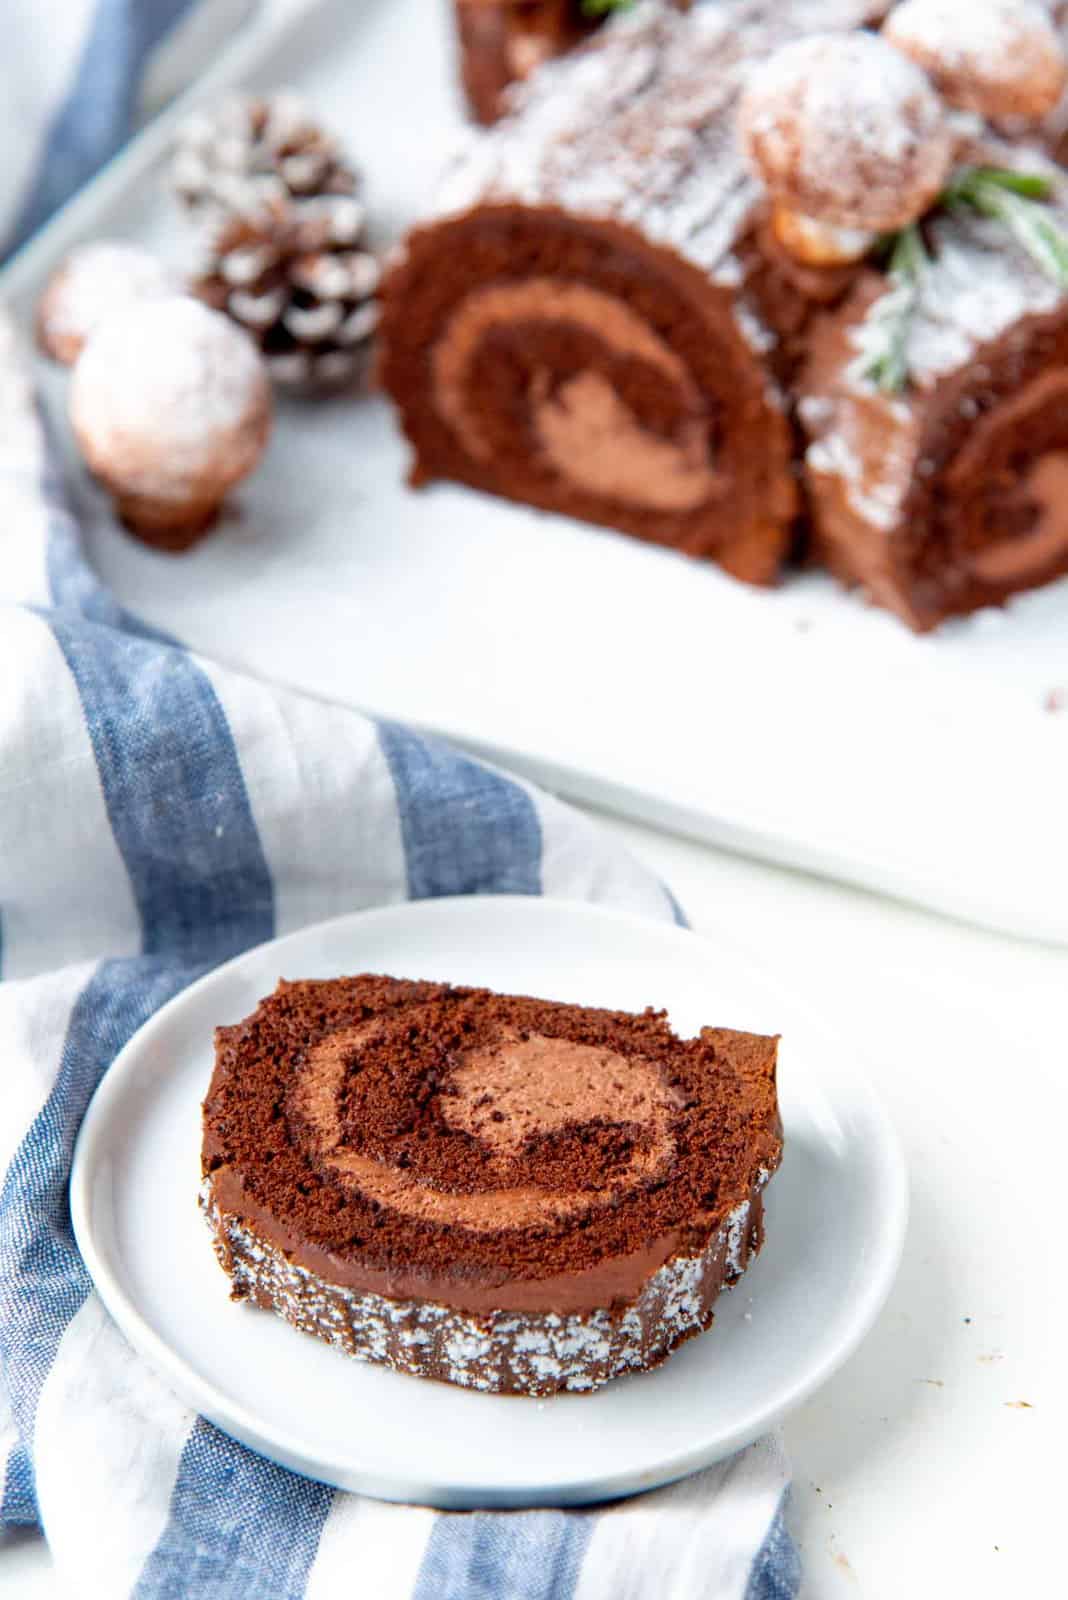
- Unroll and fill the cake. Let the swiss roll cake cool completely. Then carefully unroll the cake. Spread chocolate whipped cream in an even layer on the unrolled cake. Roll up the cake again (without the parchment paper this time) and let it set in the fridge, covered in plastic wrap.

Now your chocolate yule cake base is ready!
If you’d like to make your buche de noel cake with a vanilla swiss roll cake instead, you can totally do that too! Just follow my vanilla swiss roll cake recipe here.
How to make the chocolate whipped cream filling
I can pretty much eat this on its own. It’s that good! This chocolate whipped cream is light, deeply chocolatey, and it’s the perfect filling for your chocolate buche de noel.
This is a stabilized whipped cream flavored with cocoa powder.
The gelatin is bloomed in a small bowl, and then microwaved for a few seconds to dissolve.
CHILLED heavy cream is mixed with powdered sugar (confectioner’s sugar), cocoa powder, and vanilla.
While whisking the cream on high speed, the melted gelatin is added. Then reduce the speed and continue to whisk the cream until you have a beautifully whipped chocolate whipped cream. The peaks will be between soft peaks and stiff peaks (mid peak).
Make this while your cake is cooling, or just before you’re ready to unroll and fill your chocolate yule log cake.
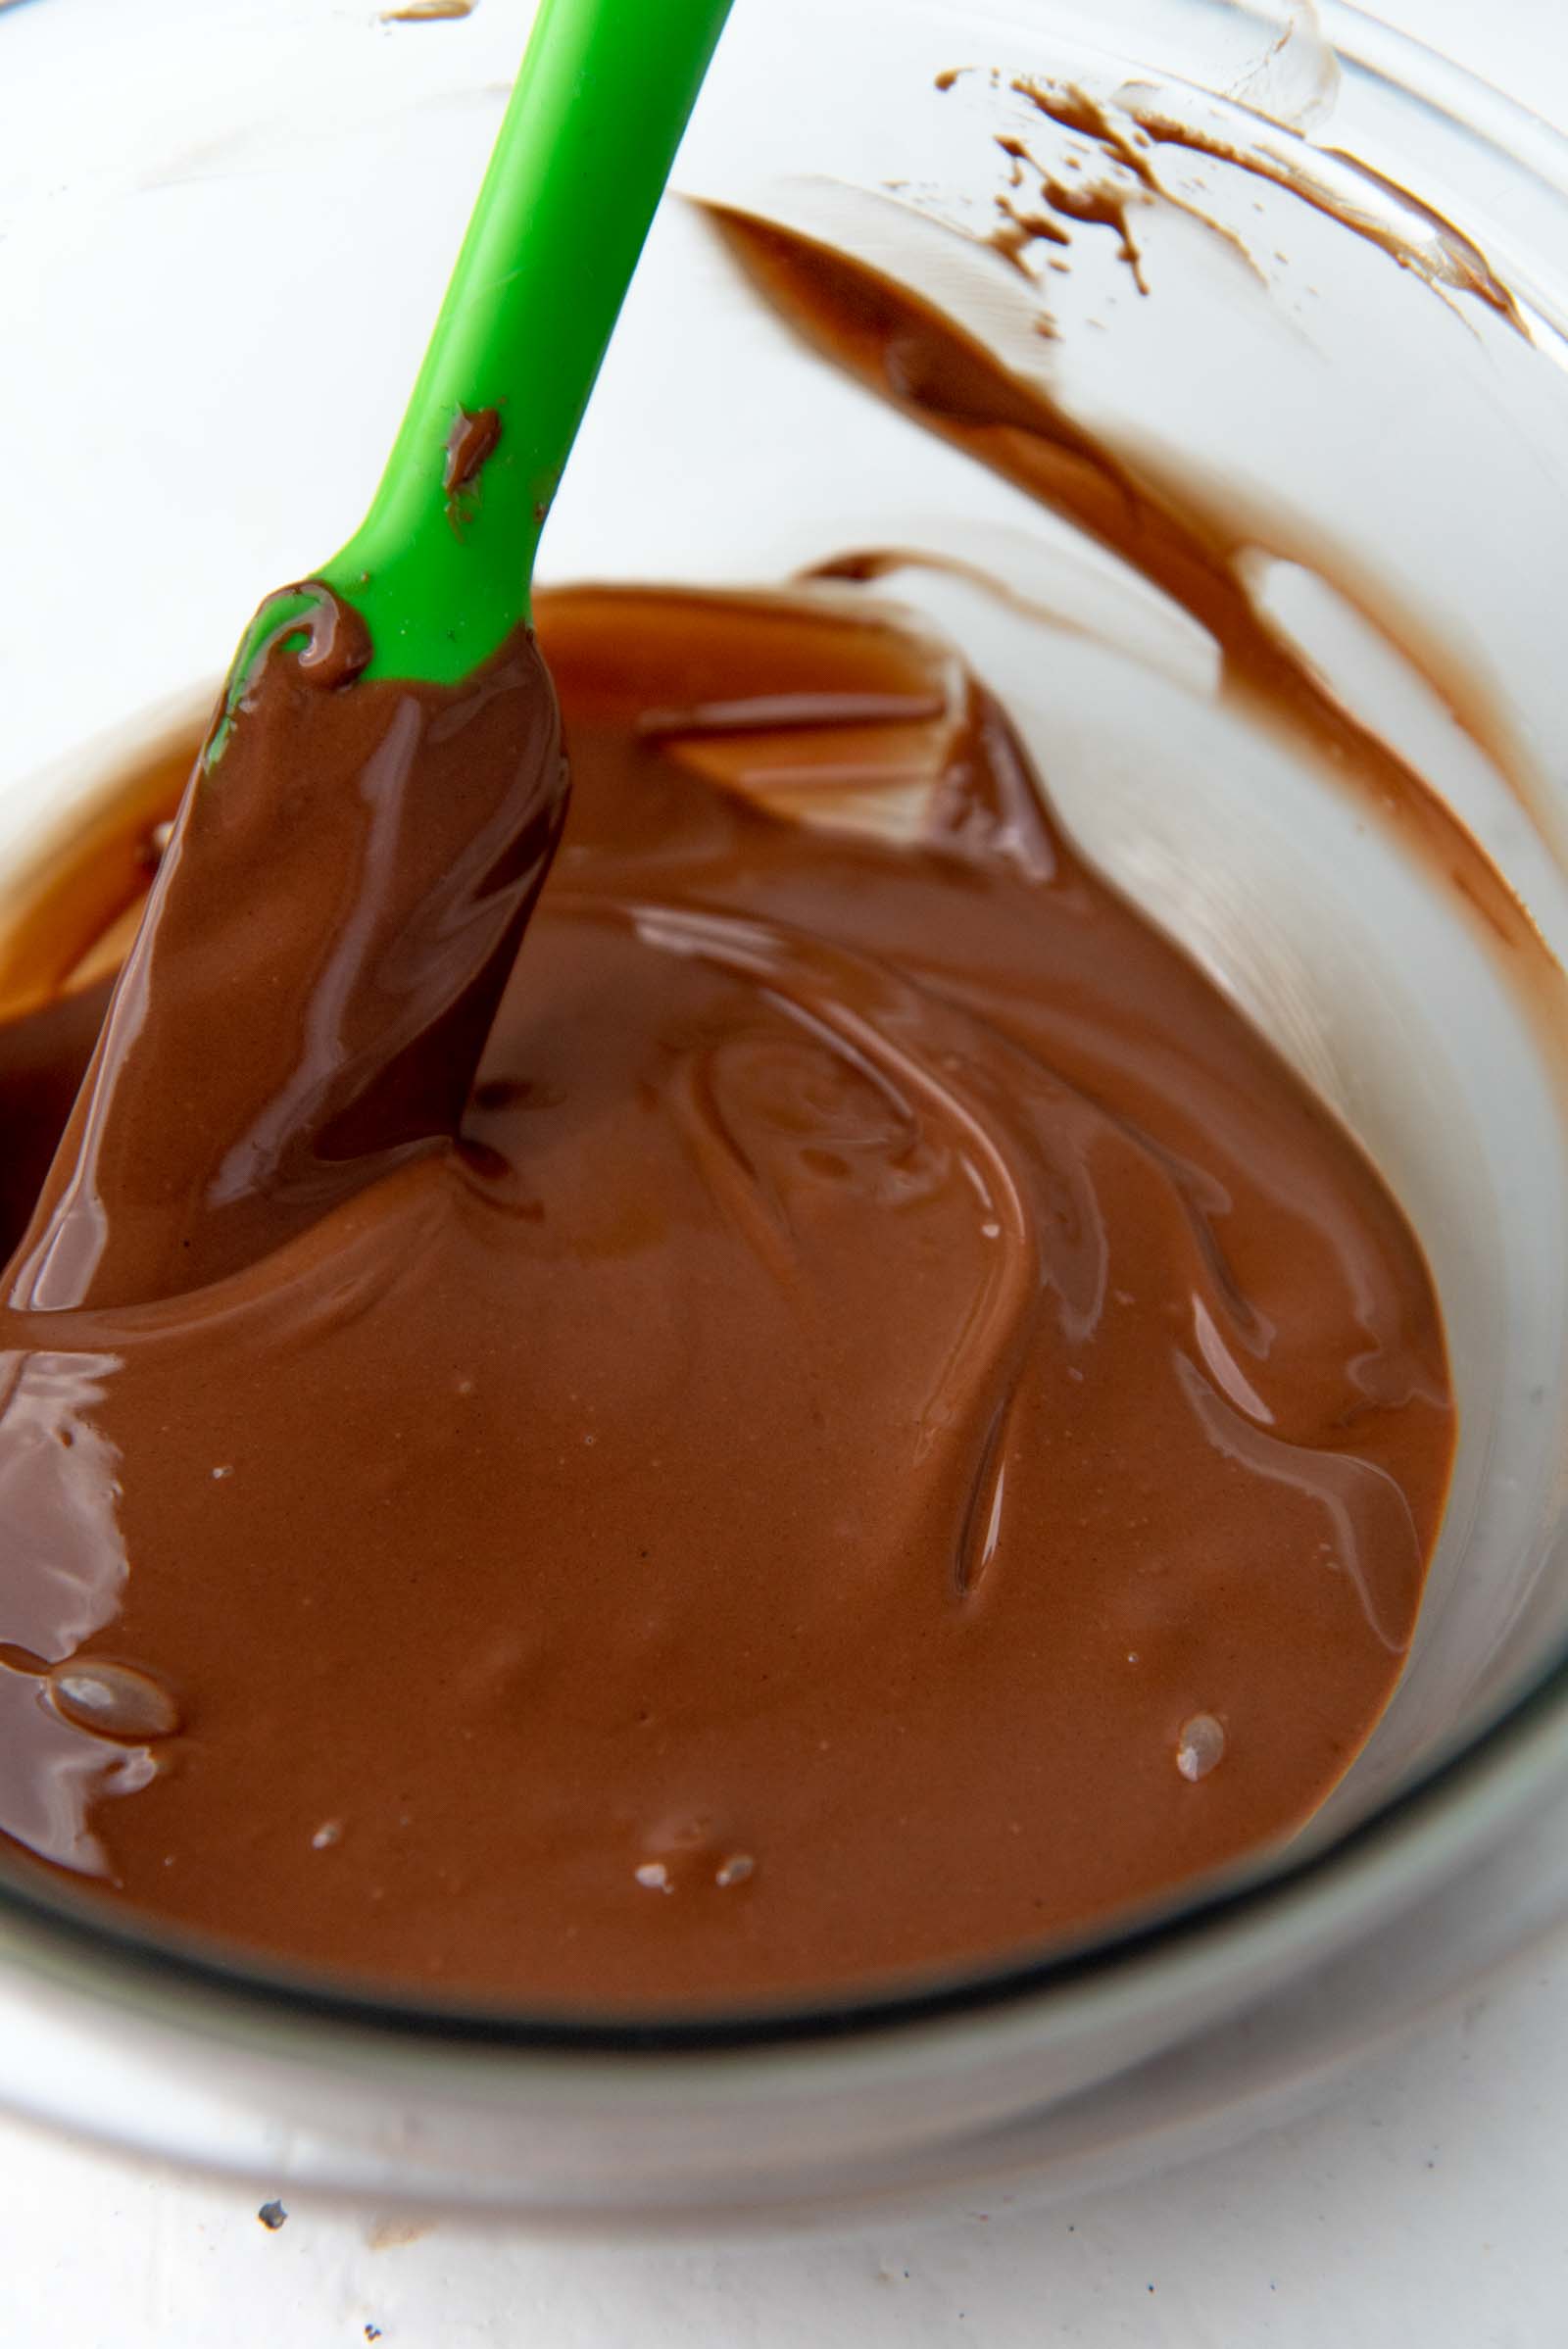
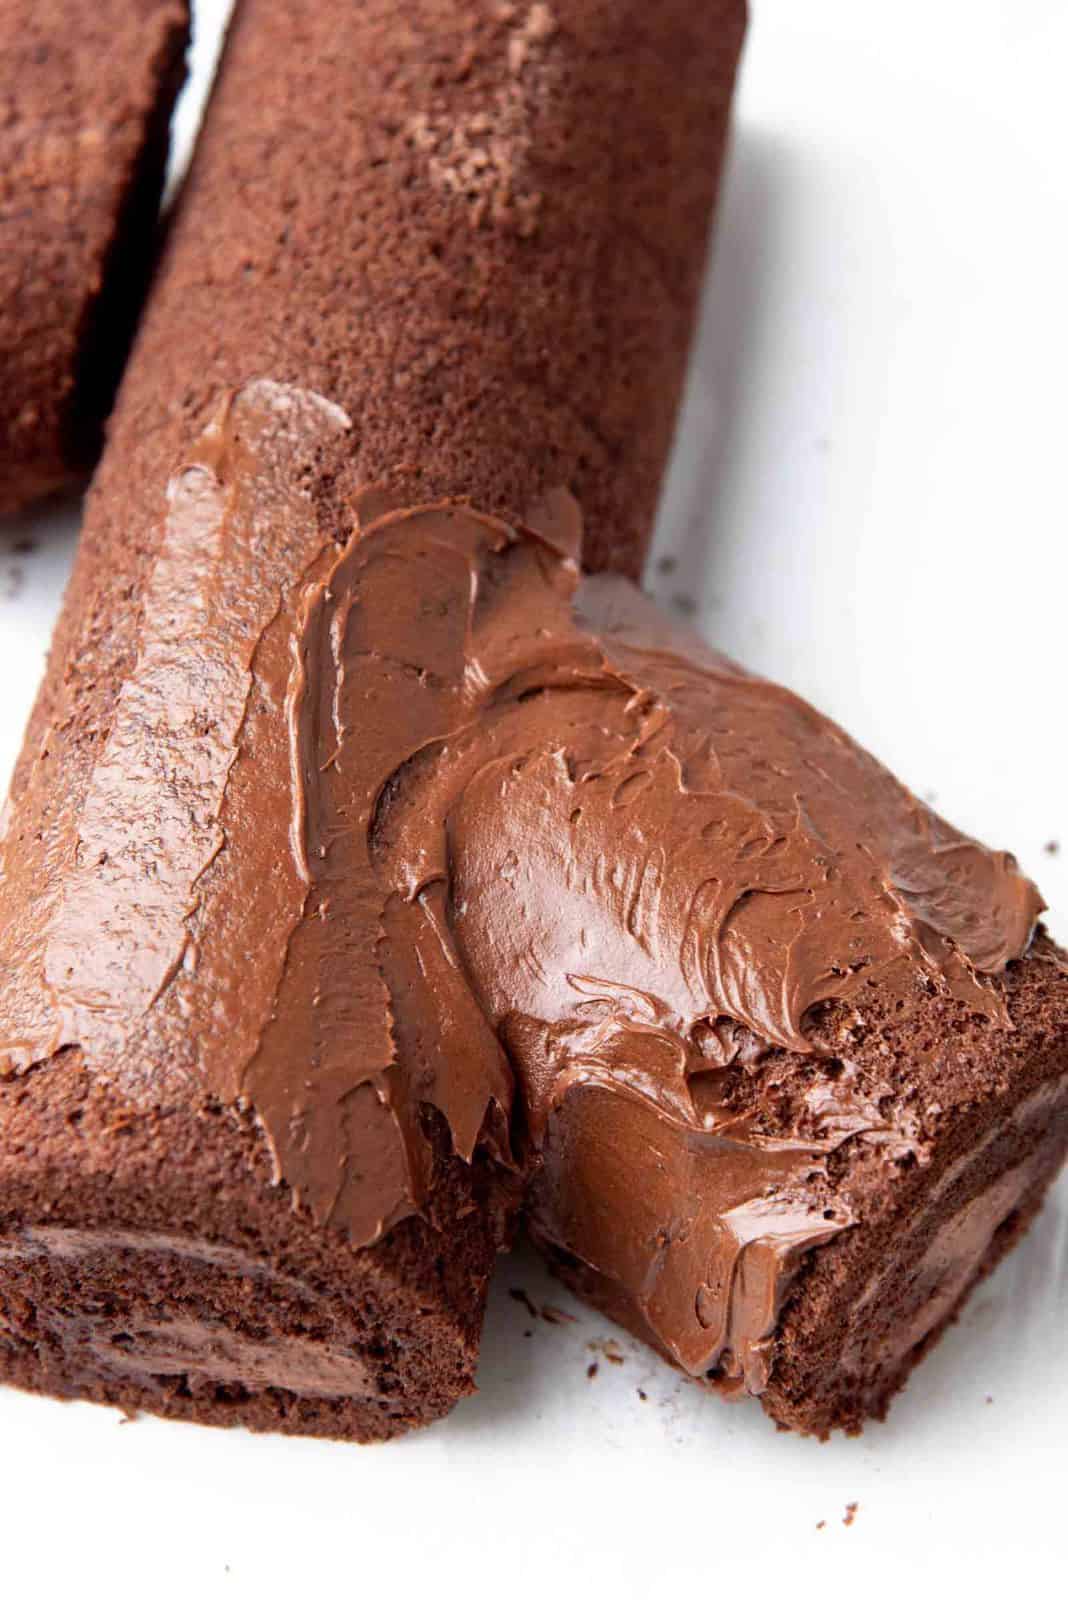
Whipped chocolate ganache frosting
This frosting couldn’t be any easier to make. It’s the perfect way to top your beautiful buche de noel. It’s also perfect to be used as the “glue” to stick the chocolate shards.
I used an offset spatula to create the bark-like effect by dragging it along the surface of the buttercream. You can also use a fork to create that bark-like texture.
This frosting is simply a 1 : 1 ratio of semisweet chocolate and heavy whipping cream, plus a pinch of salt. That’s it.


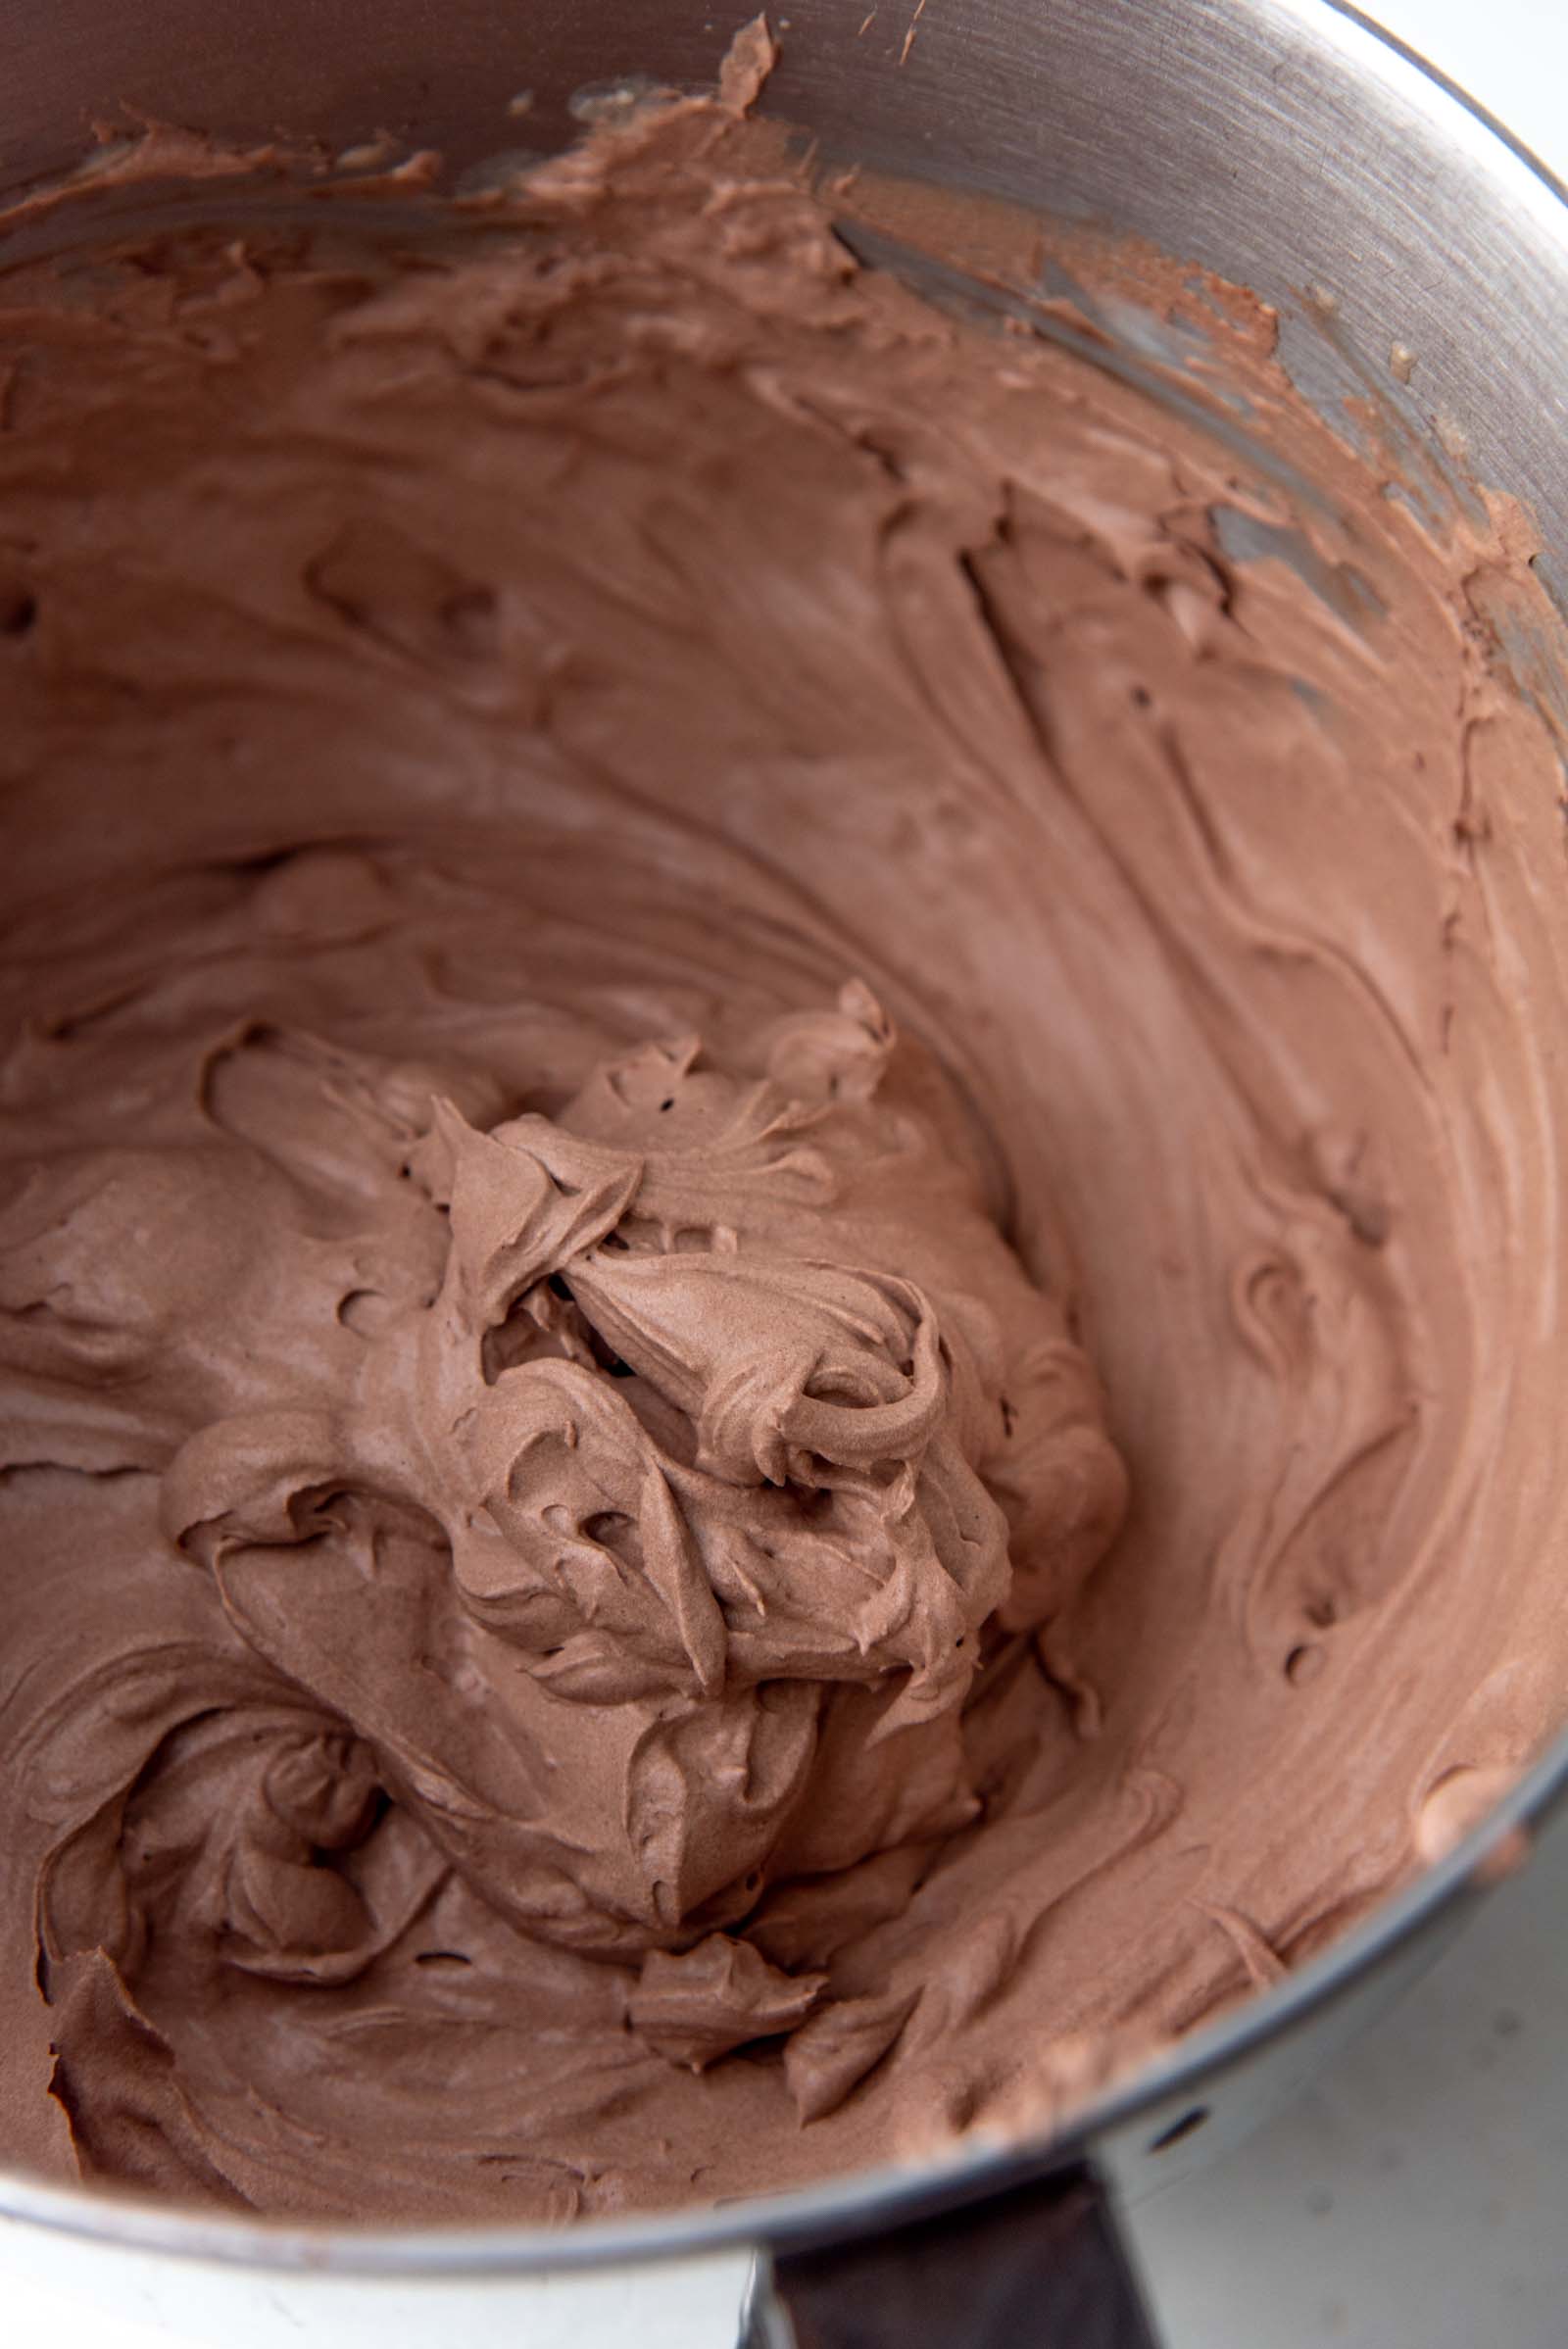
For the frosting, let the chocolate ganache cool down to room temperature (about 72 F), and whisk it on high speed with the whisk attachment in your electric mixer or stand mixer for 2 – 3 minutes. The frosting will turn a bit lighter in color and look fluffier. It’s now ready to be used as frosting.
If you’re covering your cake with the shards instead, then you can also just use the ganache once thickened, WITHOUT whipping it. Either way works.
Optional cake decorations
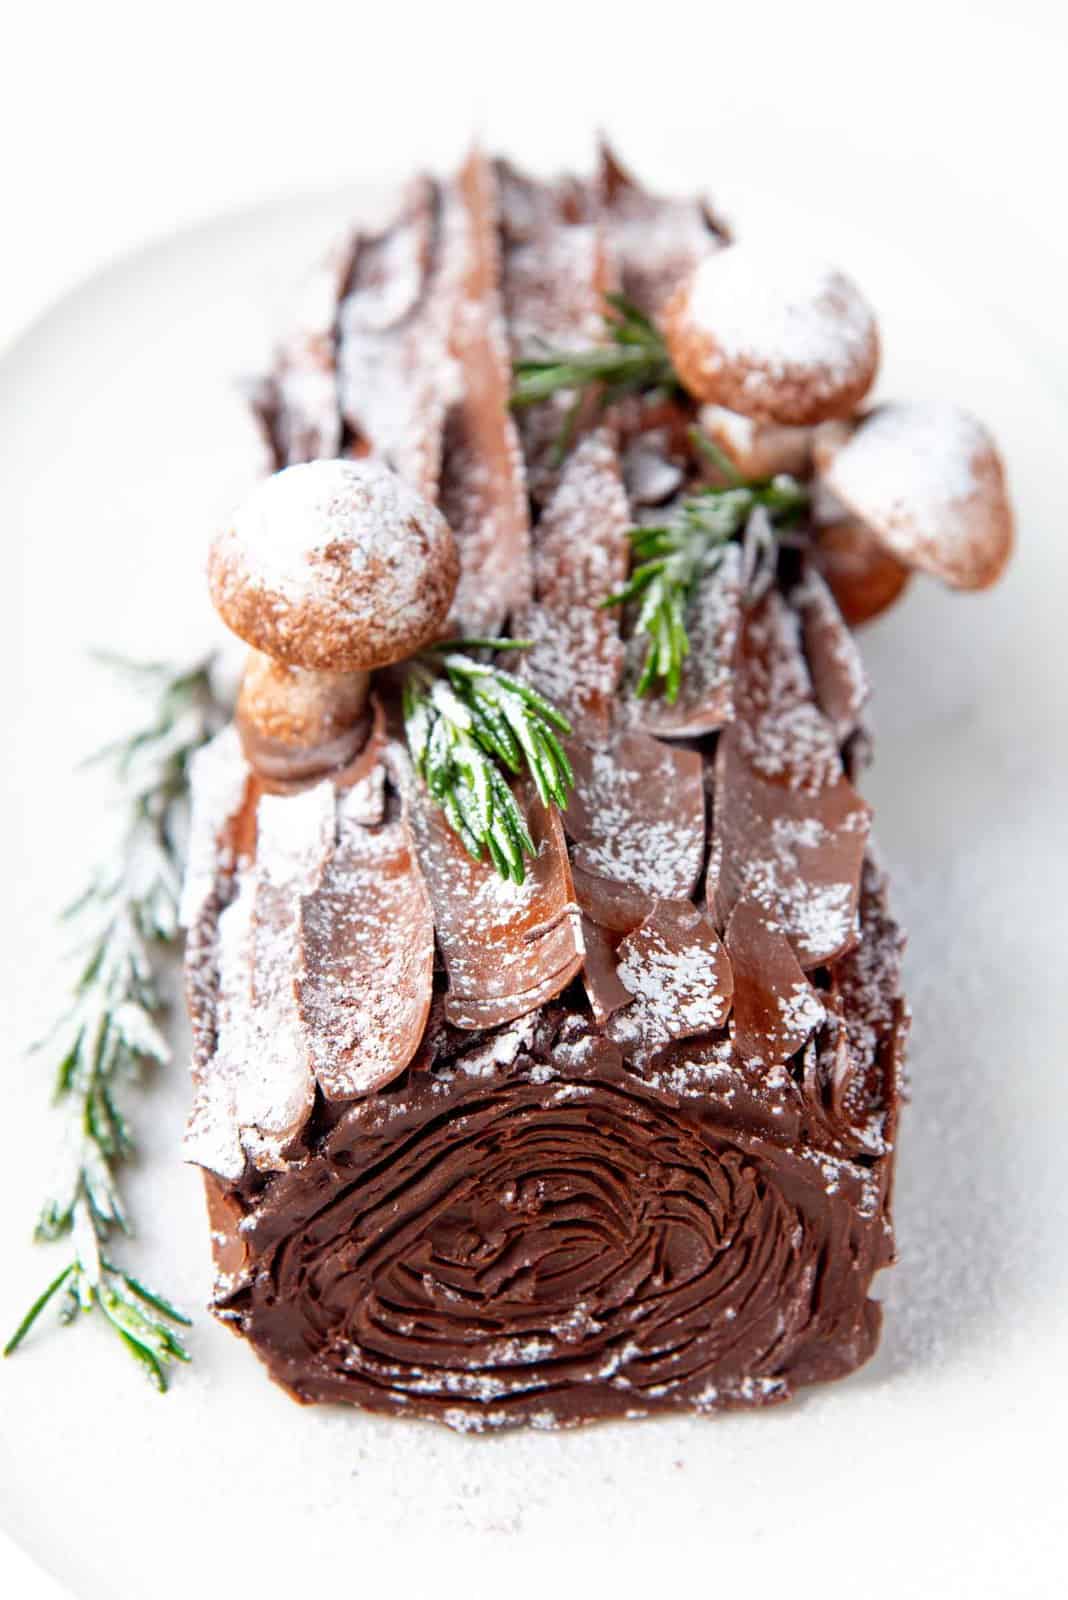
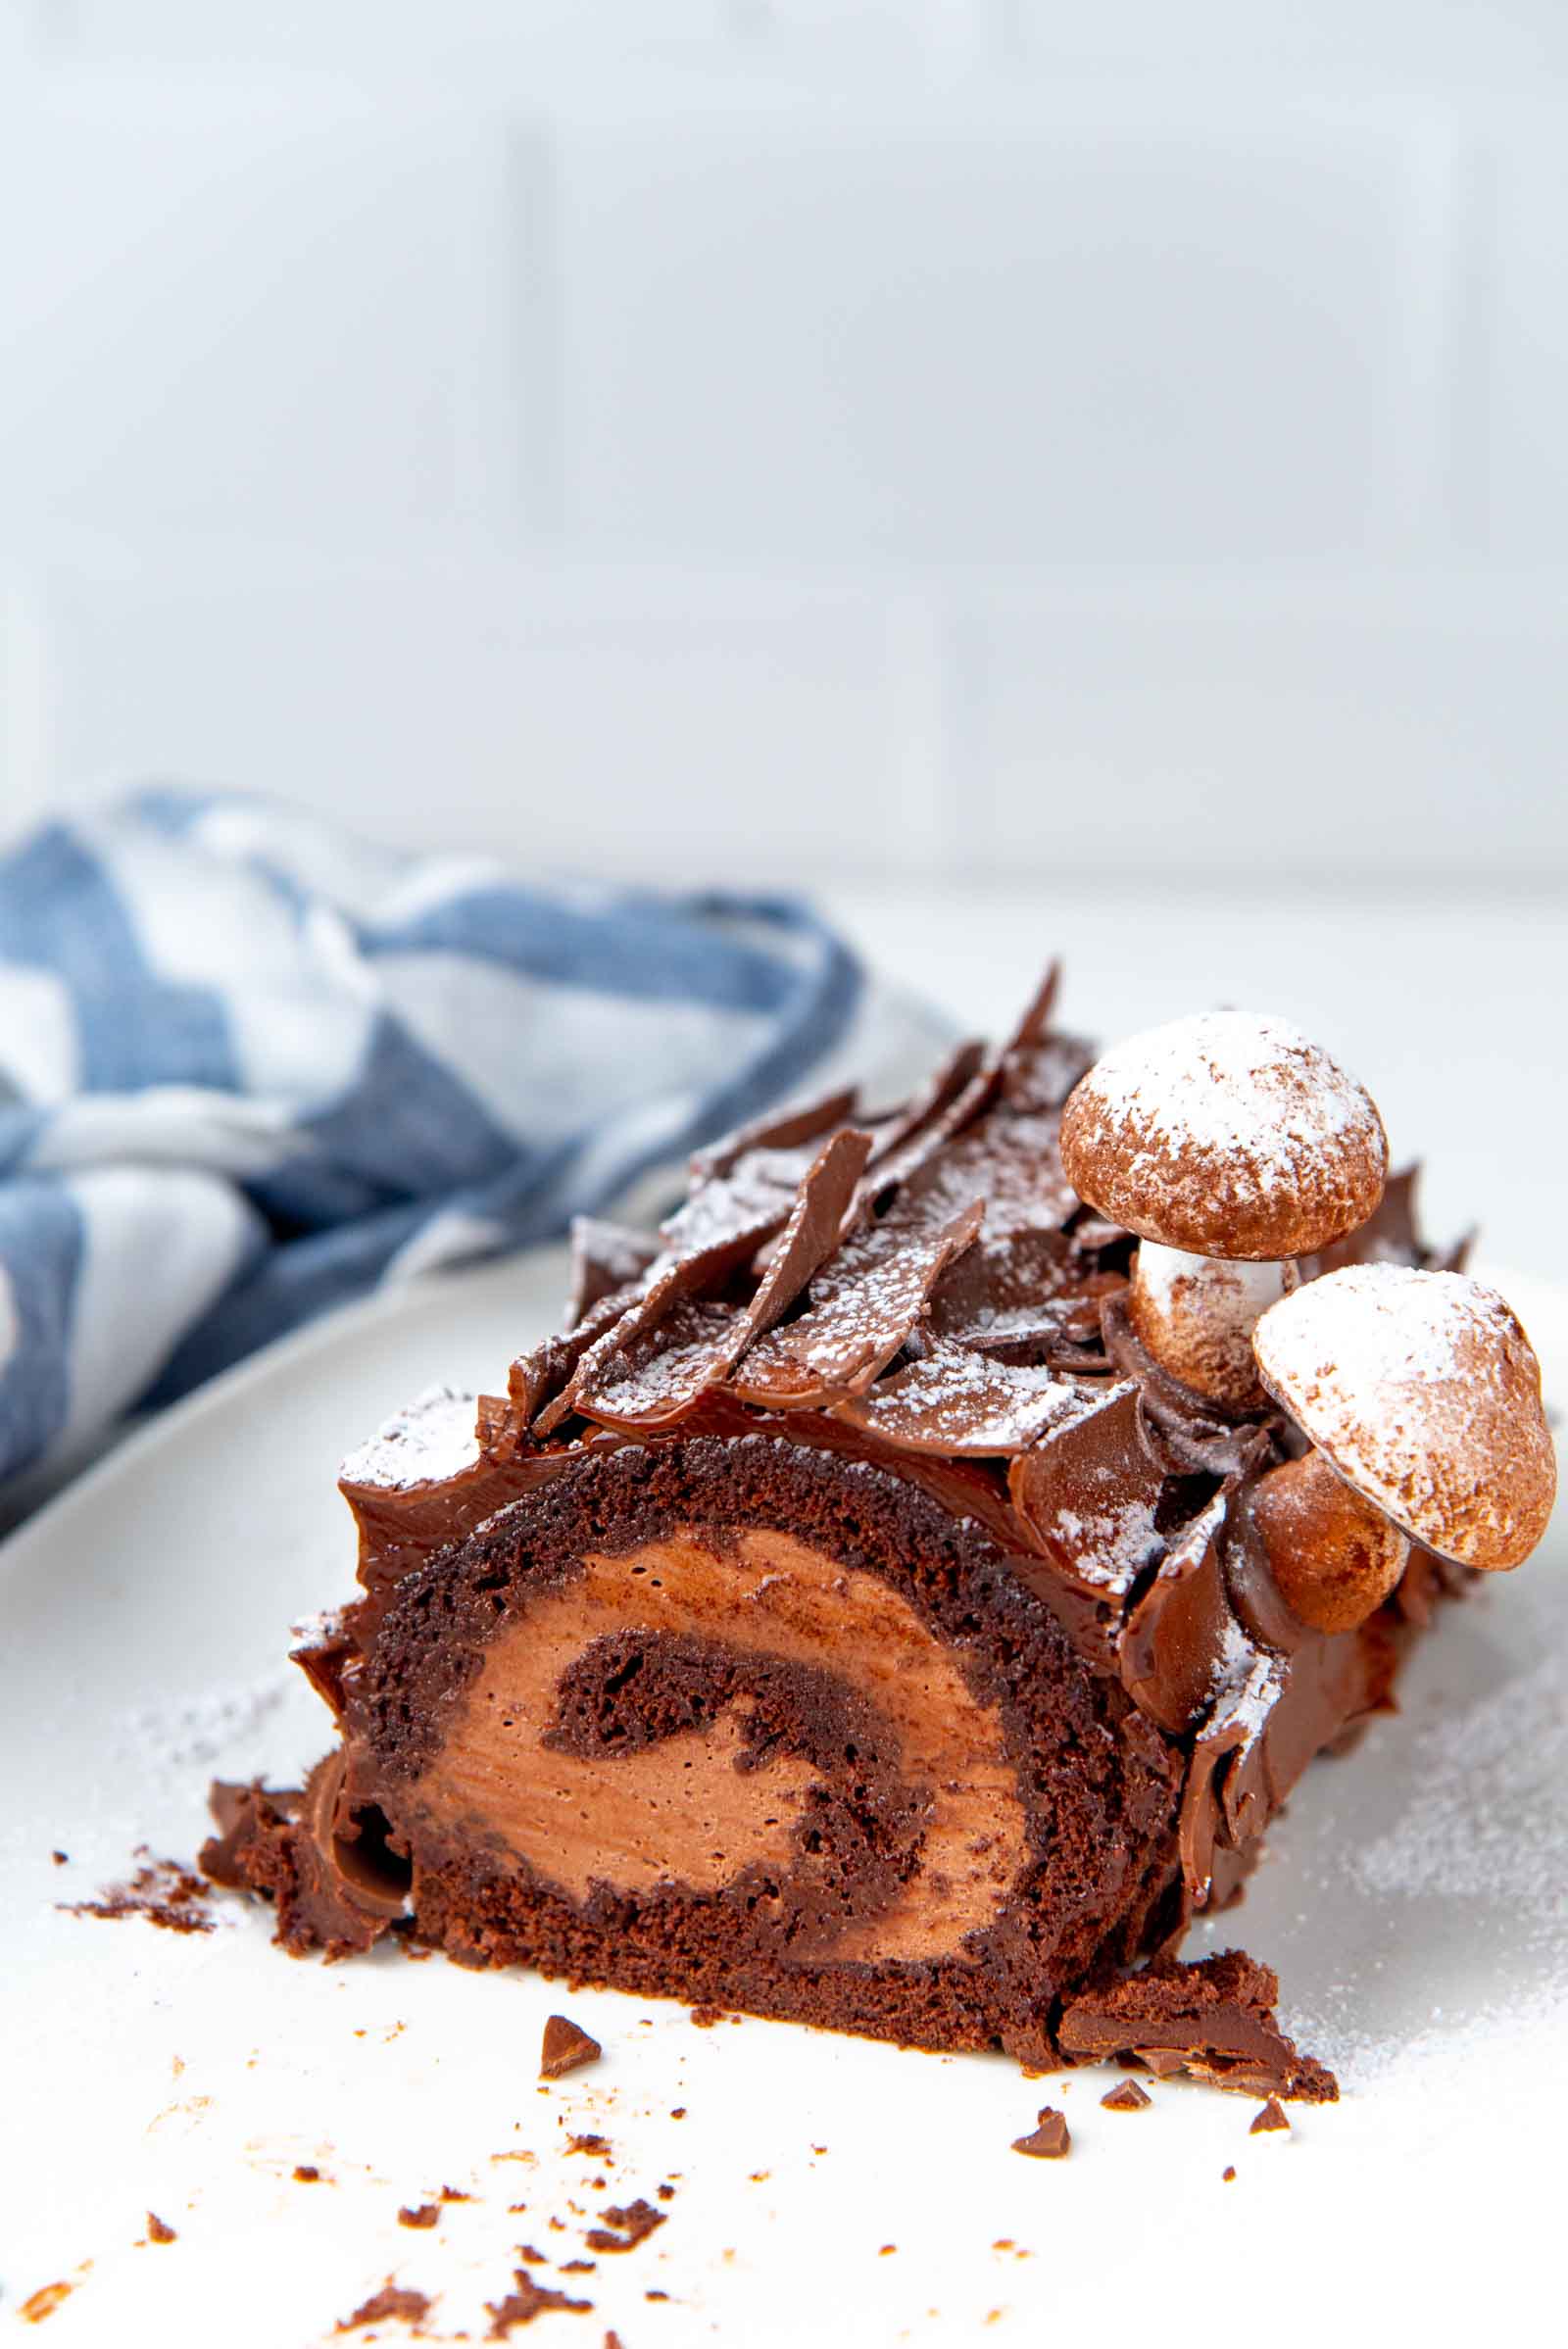
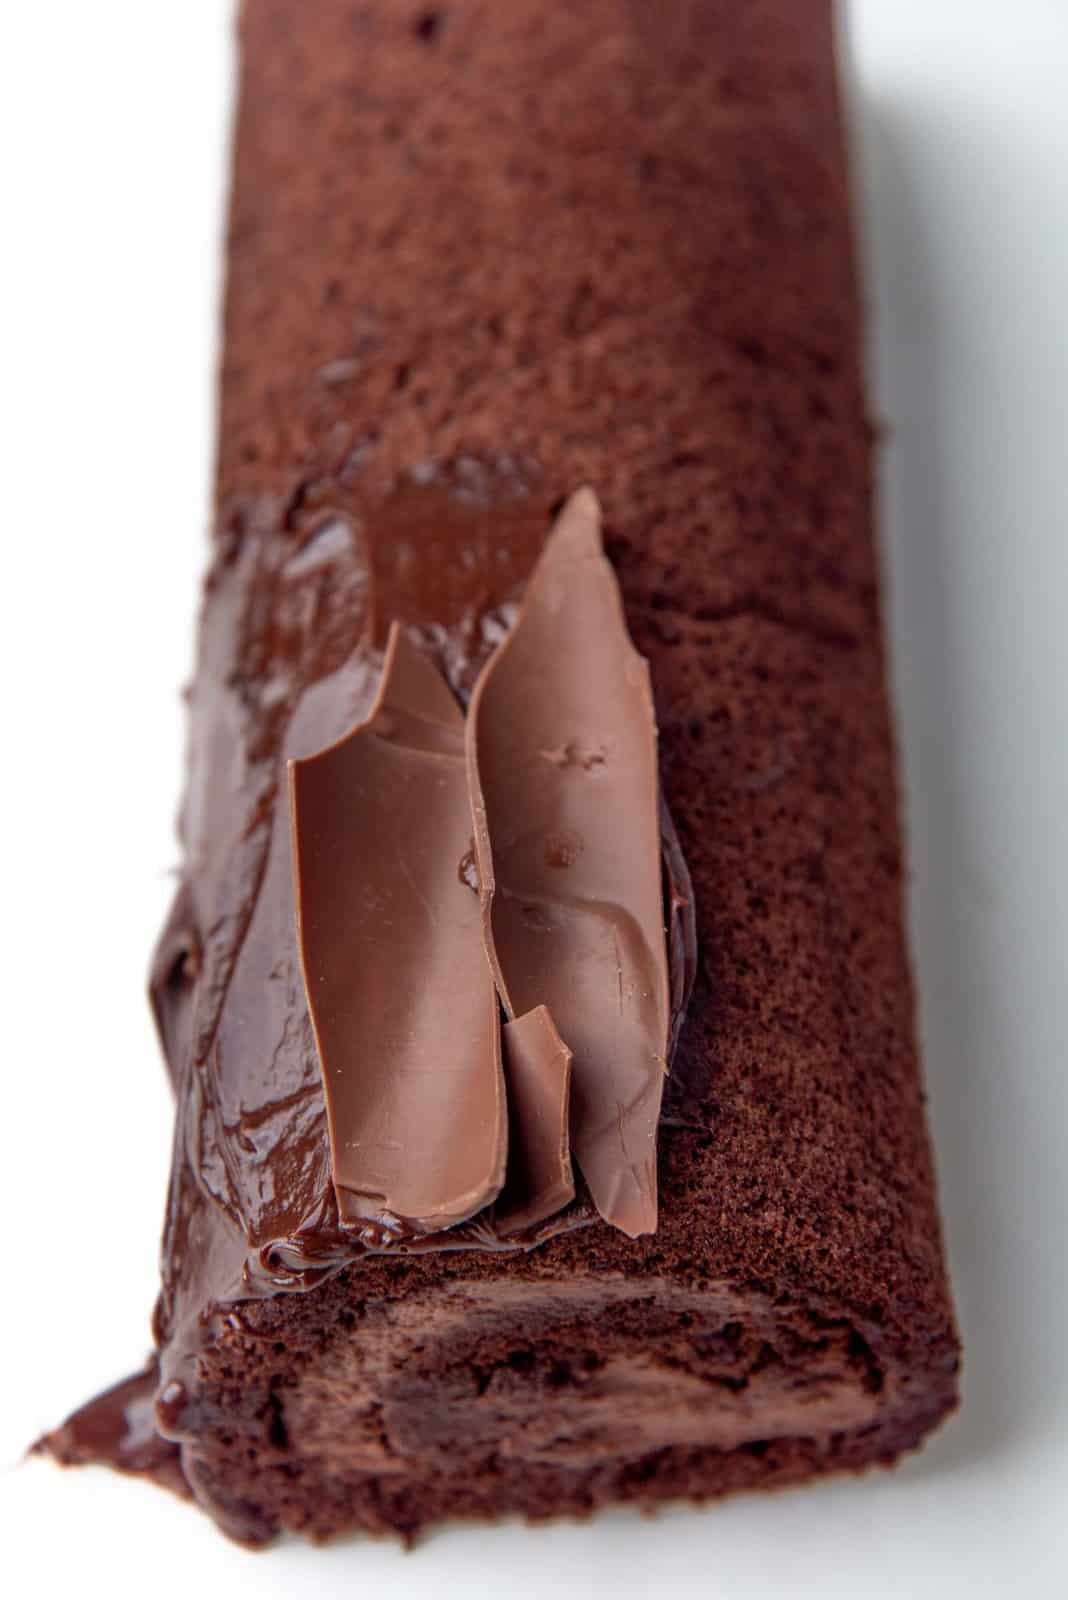
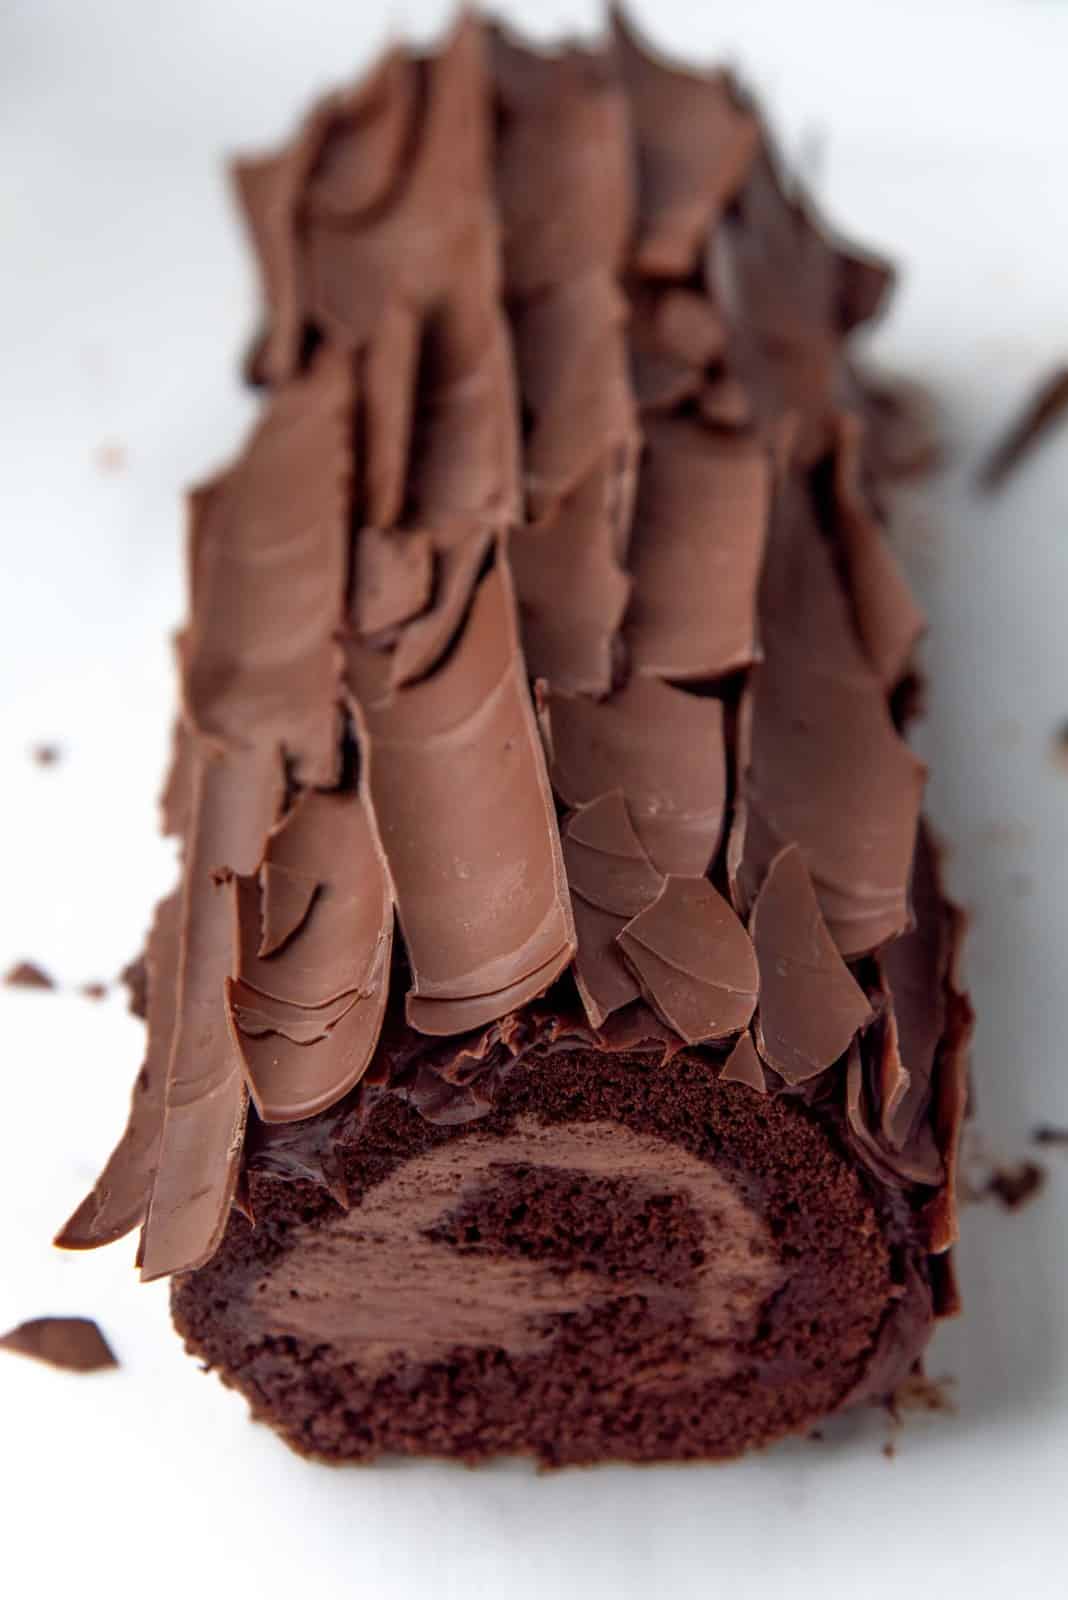
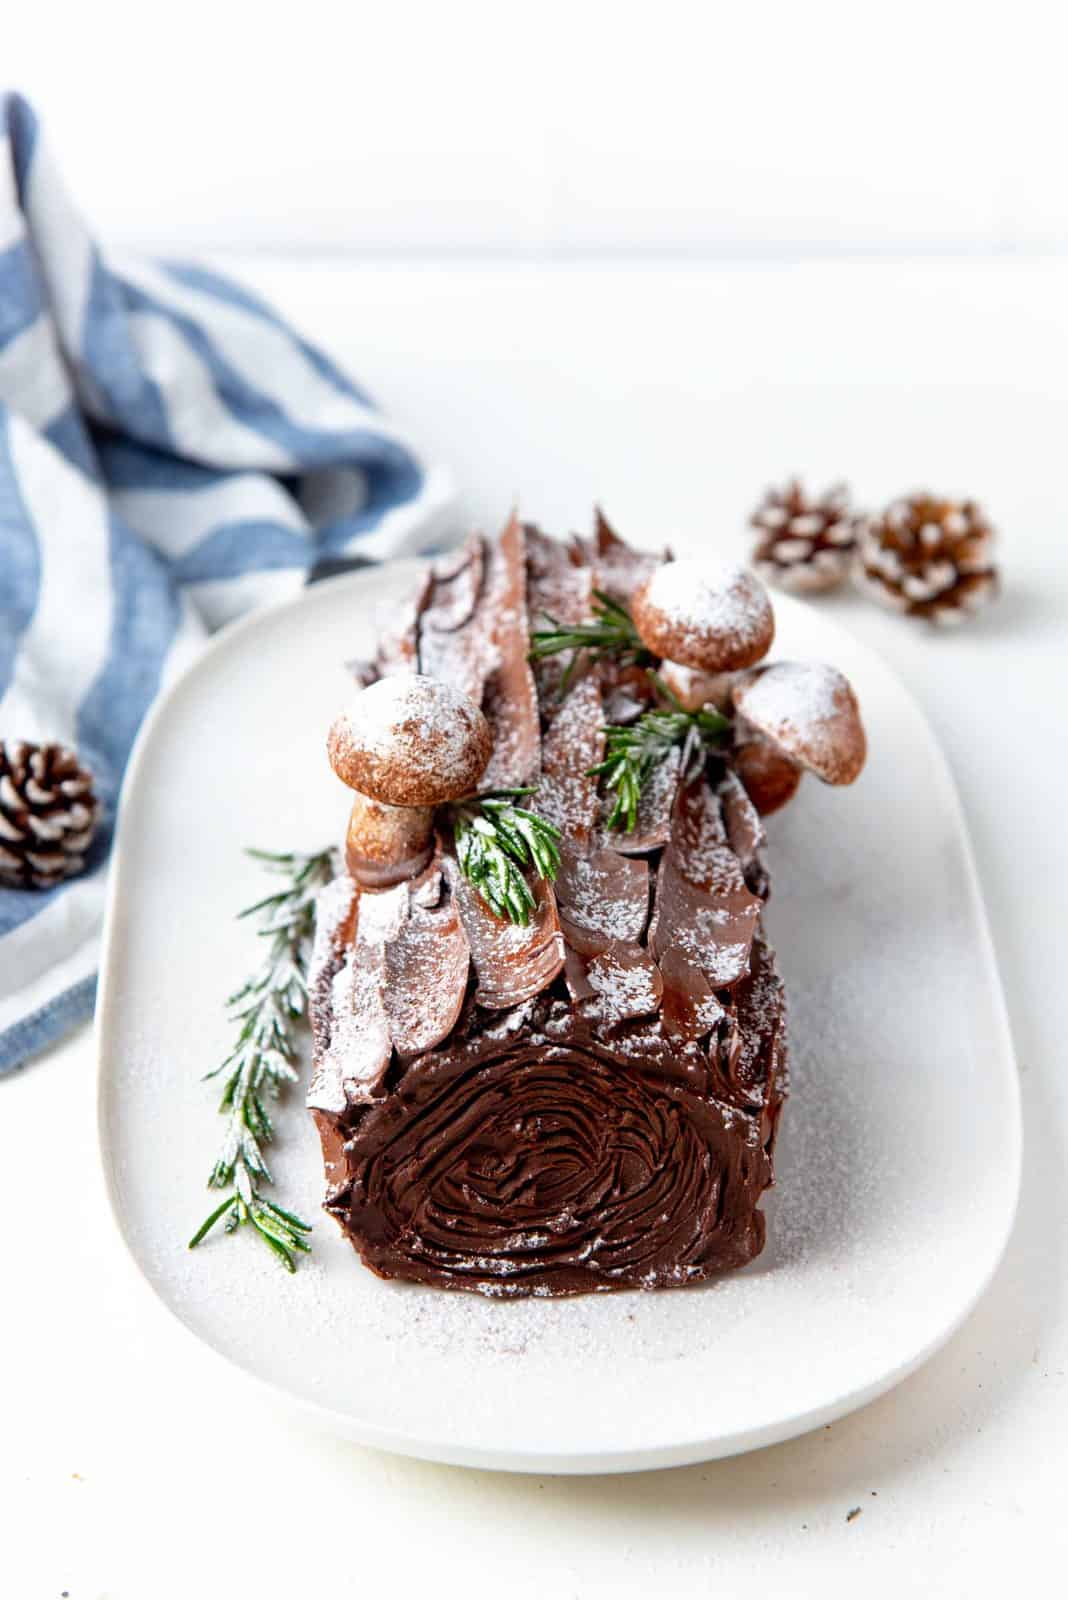
How to make chocolate shards for the chocolate bark
This is an optional decoration idea for your Bûche de Noël. It gives the cake a more realistic bark-like look, but there’s work involved with this process.
I recommend doing this IF you are comfortable tempering chocolate and working with chocolate.
How to temper chocolate
This is a quick guide on how to temper chocolate, but I’ll be sharing a more in depth article on this soon.
Measure out the chocolate first. Make sure it’s couverture chocolate.
Chop the chocolate into smaller pieces (if you’re using a block). Take 25% of the chocolate that you will be using, and chop that into finer pieces (even if you’re using wafers or couverture chips).
Place the other 75% of the chocolate in a heat-proof bowl and melt it over a bain marie (double boiler). Do NOT exceed 118 F (I used milk chocolate here).
Once the chocolate is melted, remove it from the heat and immediately add the previous 25% of the chocolate that was chopped. Stir until dissolved. The temperature should go down to about 86 – 87 F.
If the temperature is still warmer than this, then add more chopped up chocolate (a little at a time), and stir it in until it melts and the chocolate cools down to the right temperature. Keep stirring and agitating the chocolate to melt the added chocolate. The chocolate will thicken as it gets closer to being tempered.
Once tempered (between 86 – 87 F), it’s ready to be used.
To make chocolate shards
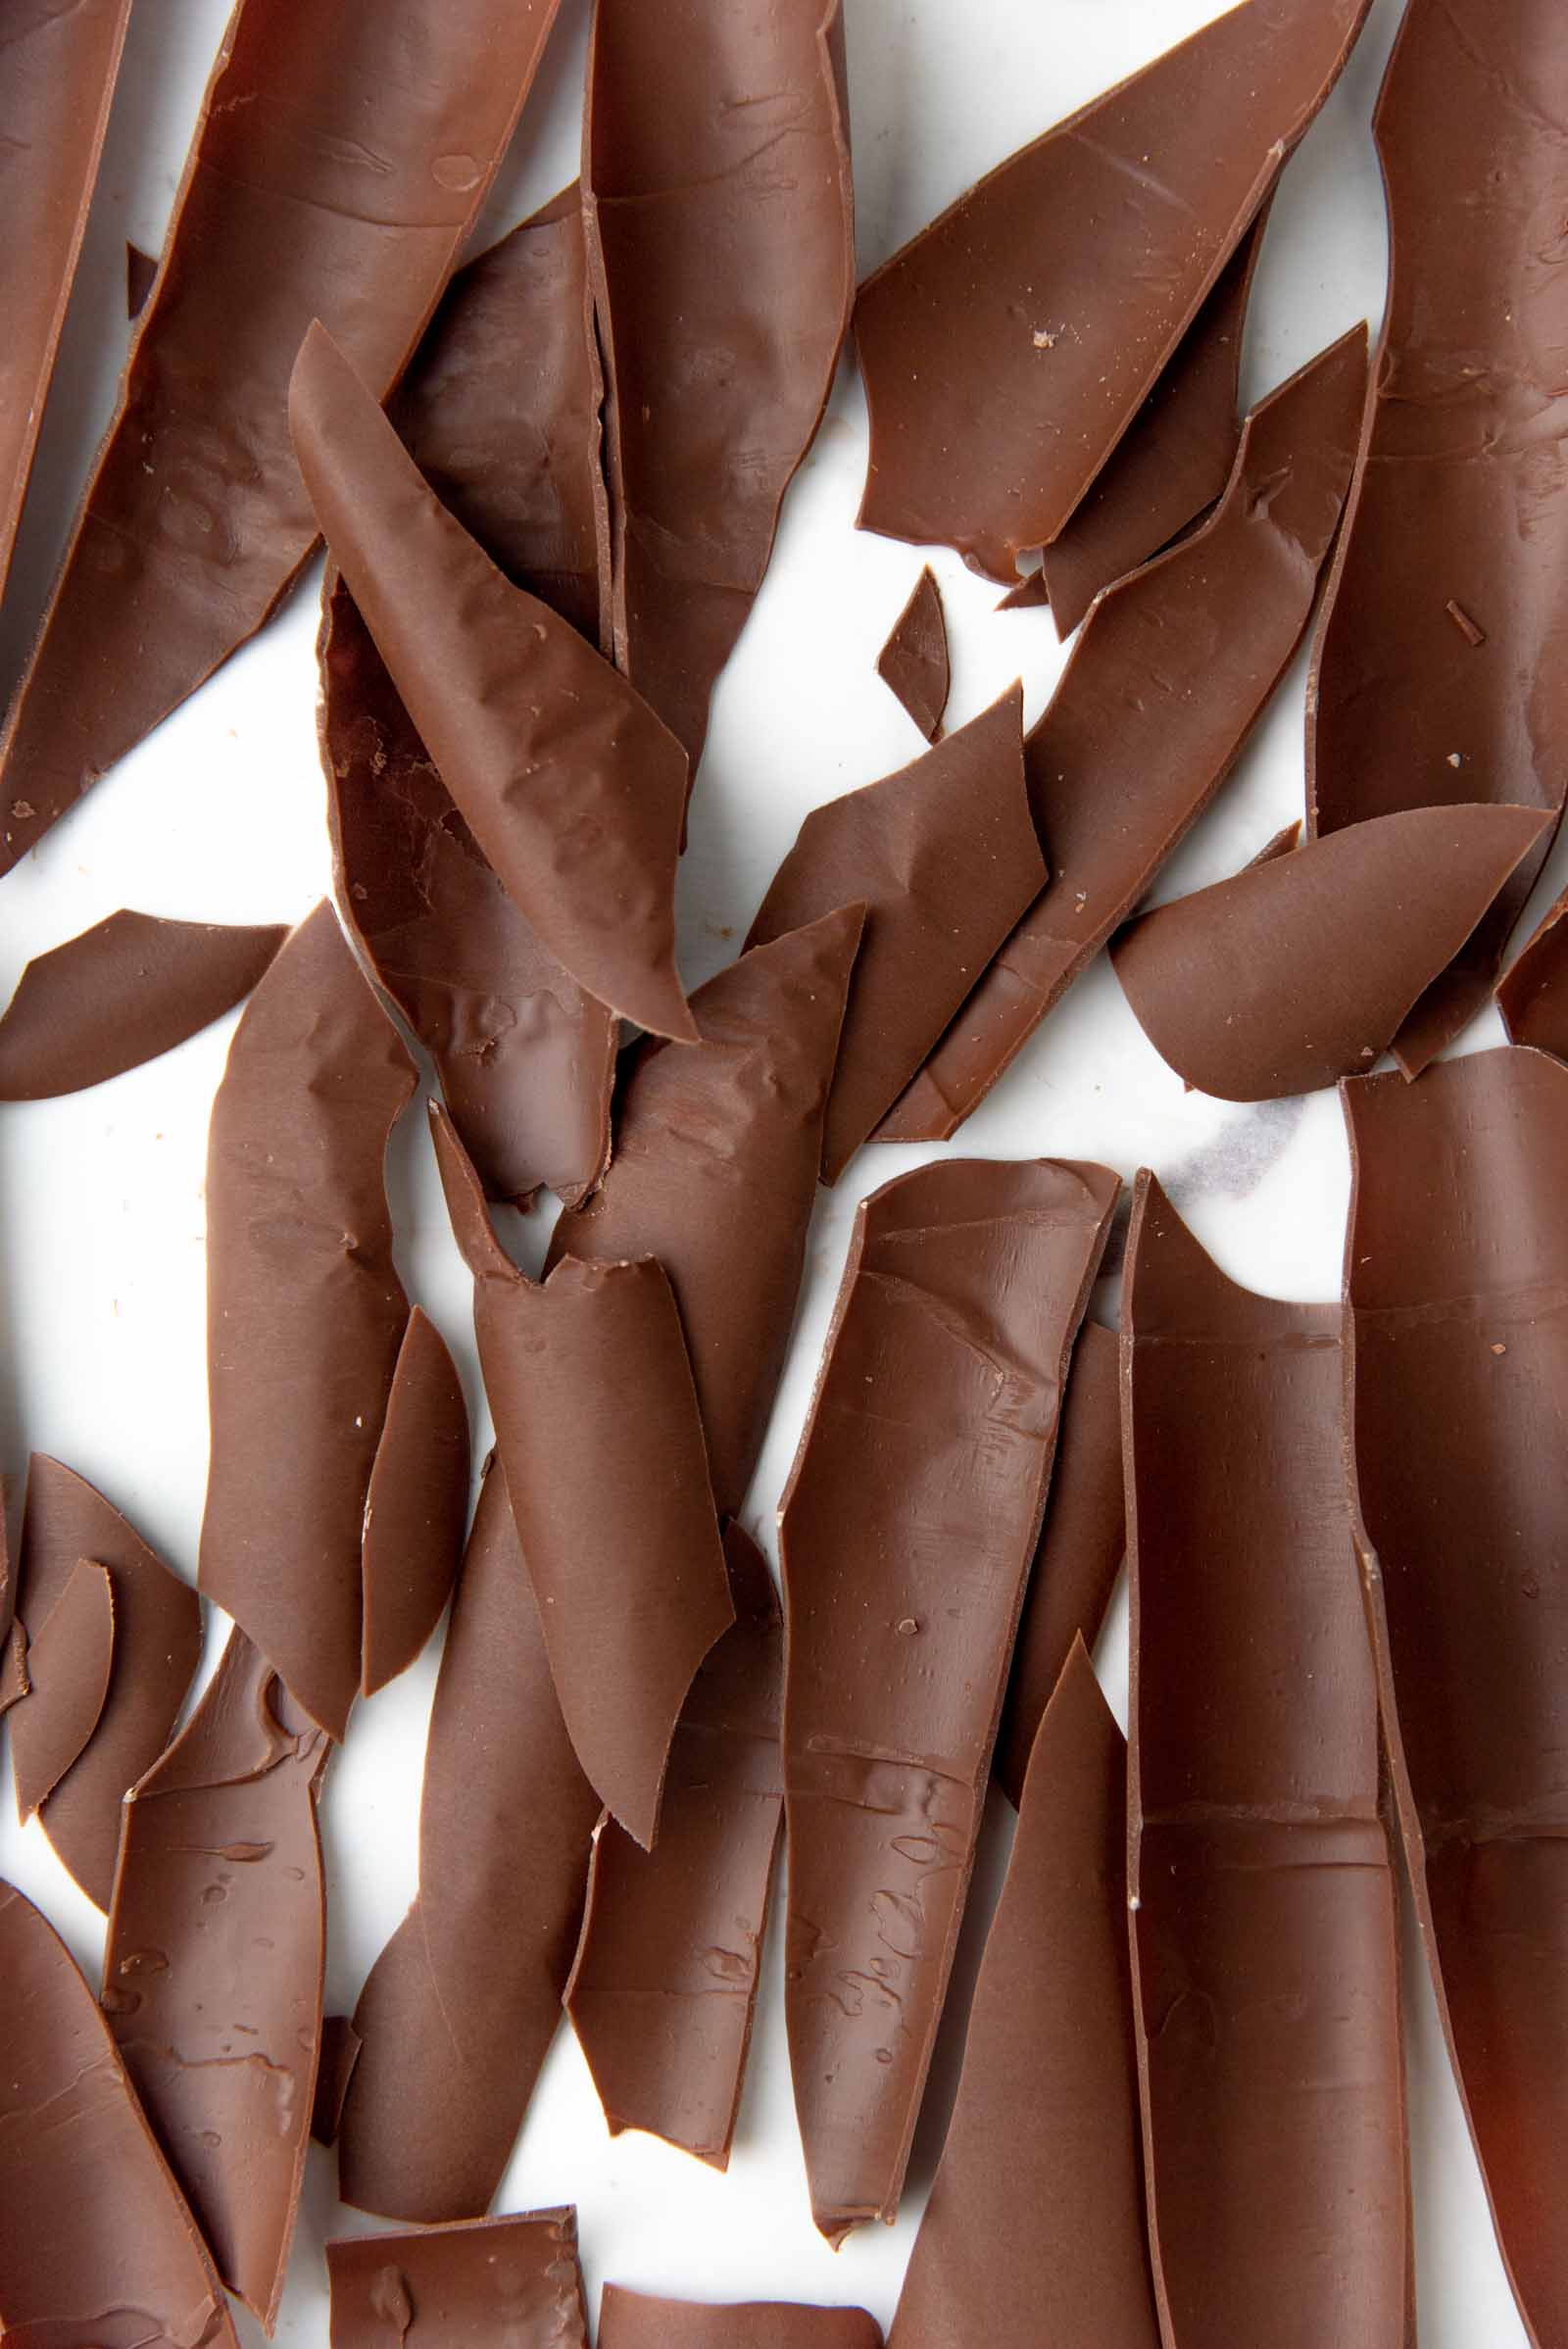
Place a long parchment paper on your work surface. Pool the chocolate at one end, then thinly spread the chocolate on the parchment paper with an offset spatula.
Once spread, start rolling up the parchment paper along with the chocolate. The chocolate should not be set at this point, so it should be easy to roll up the parchment paper to form a tube. You want the tube to be fairly narrow, so that the shards will also be narrow and curved.

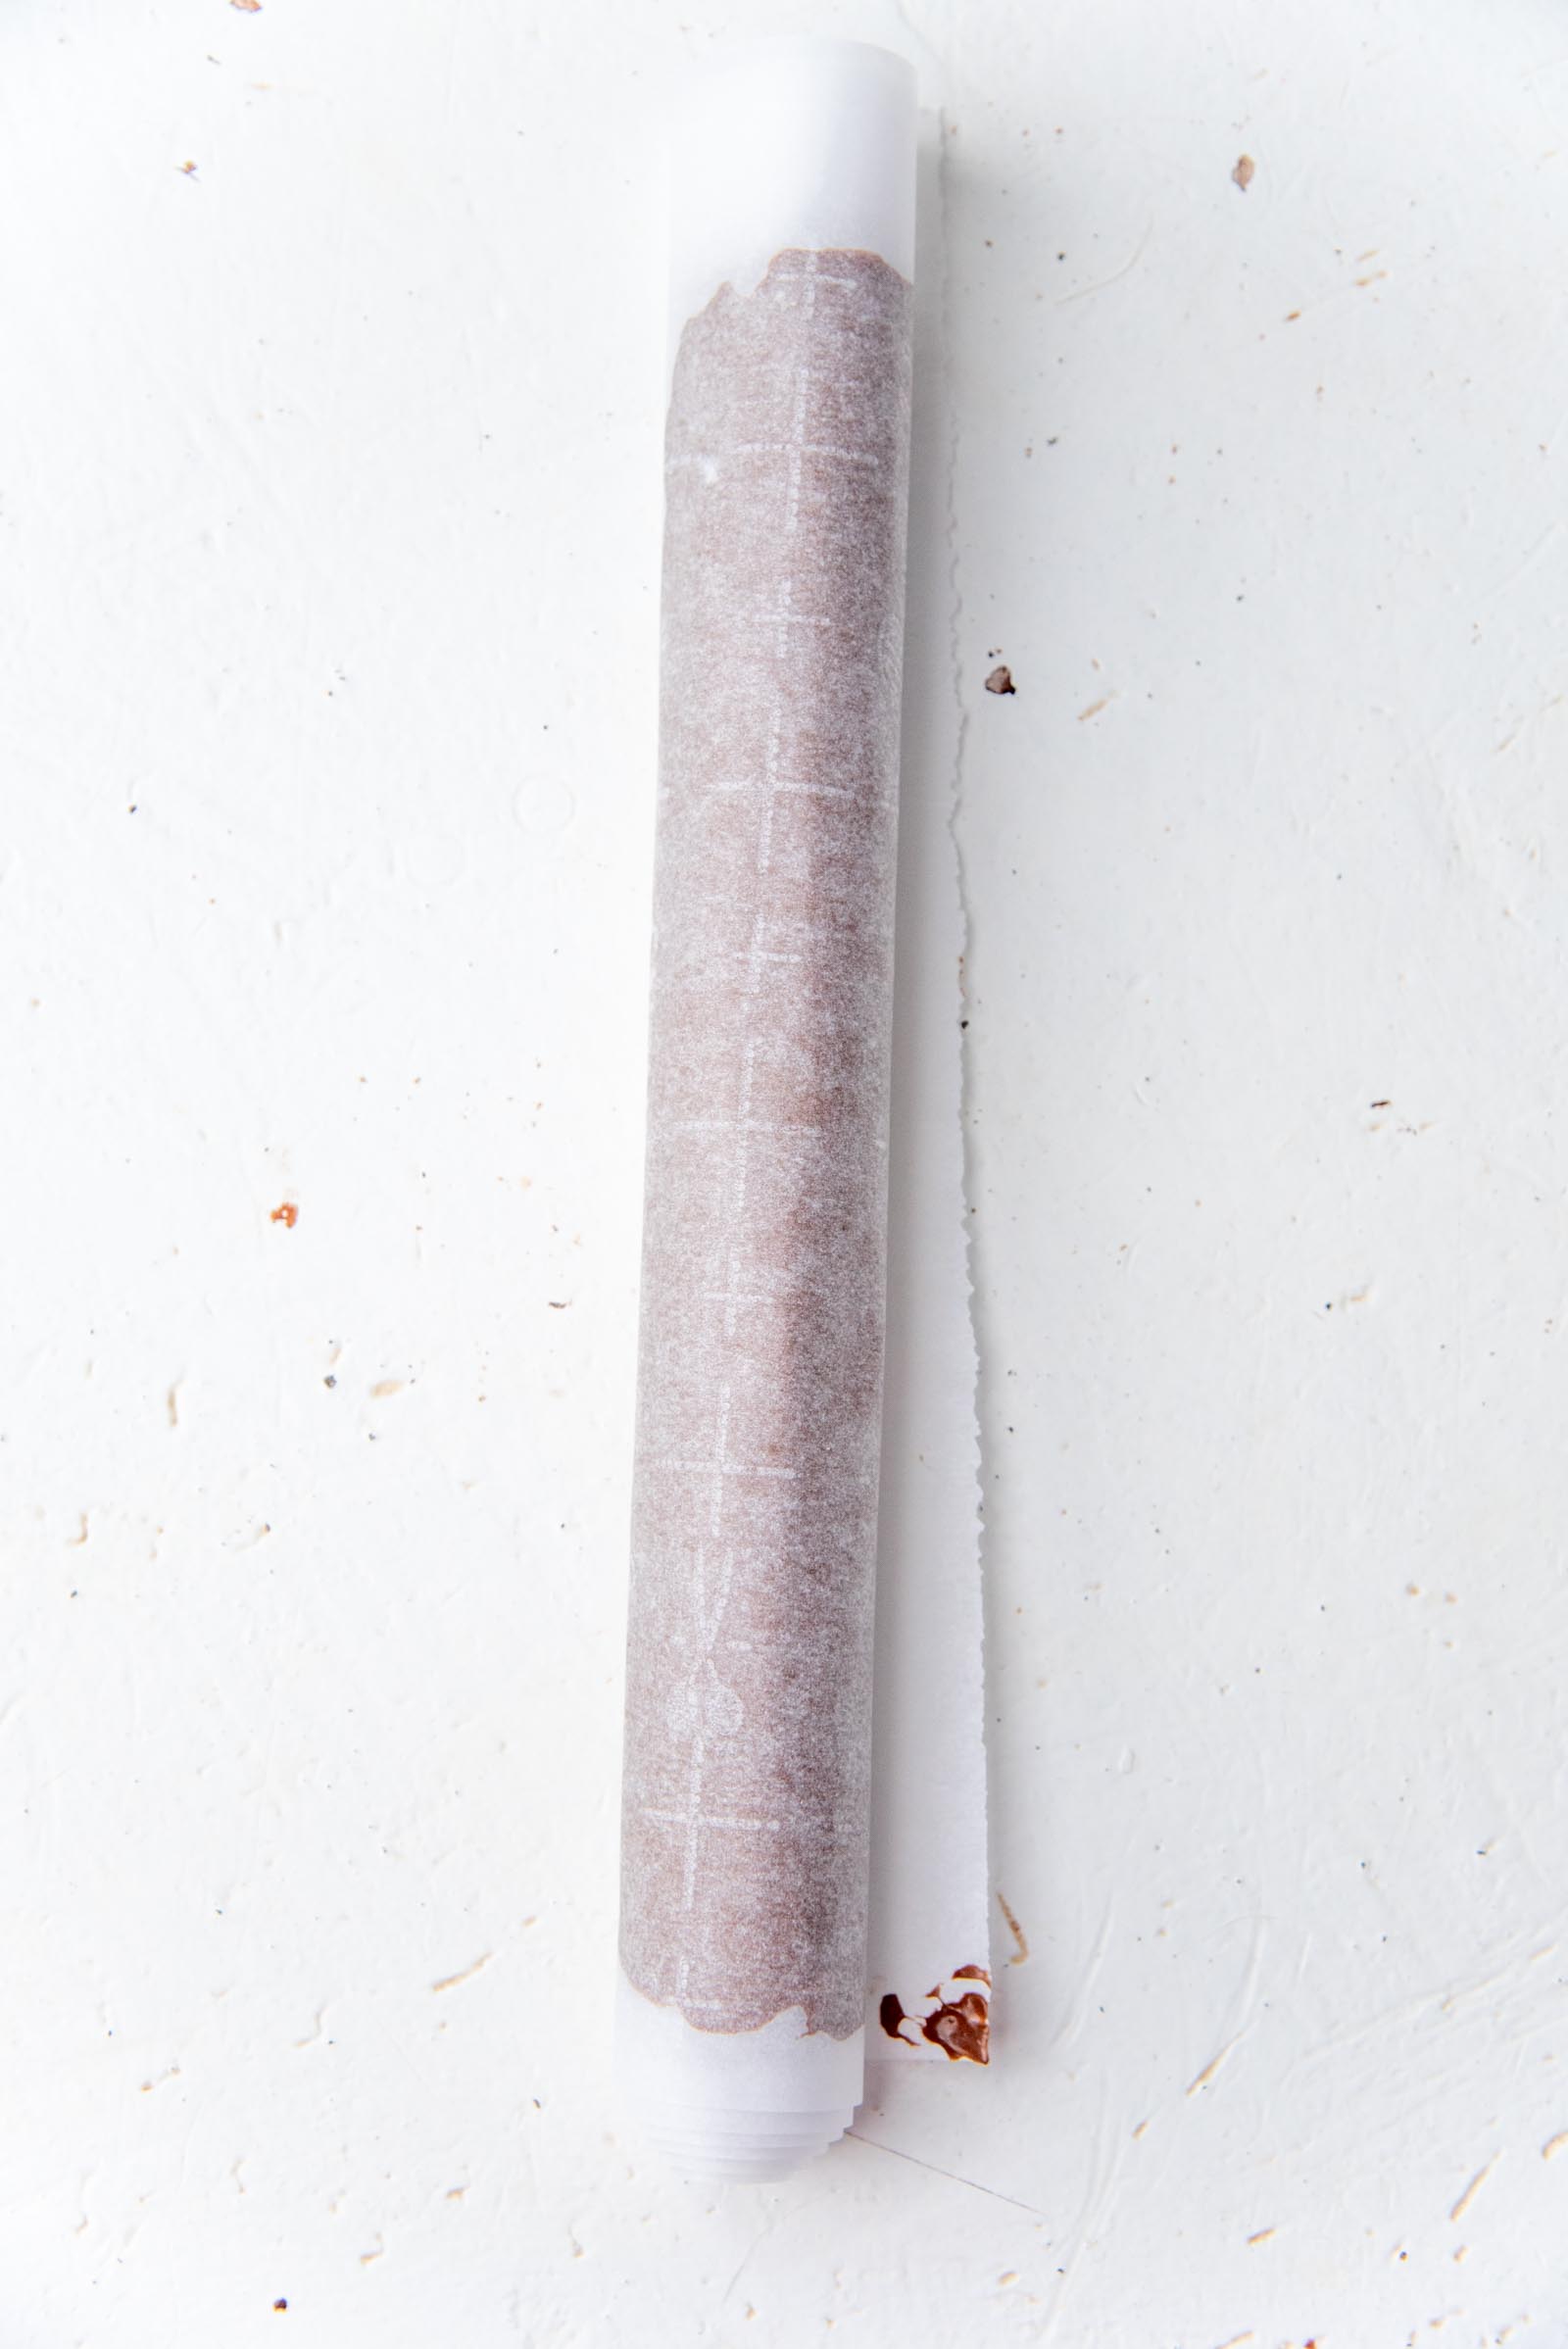
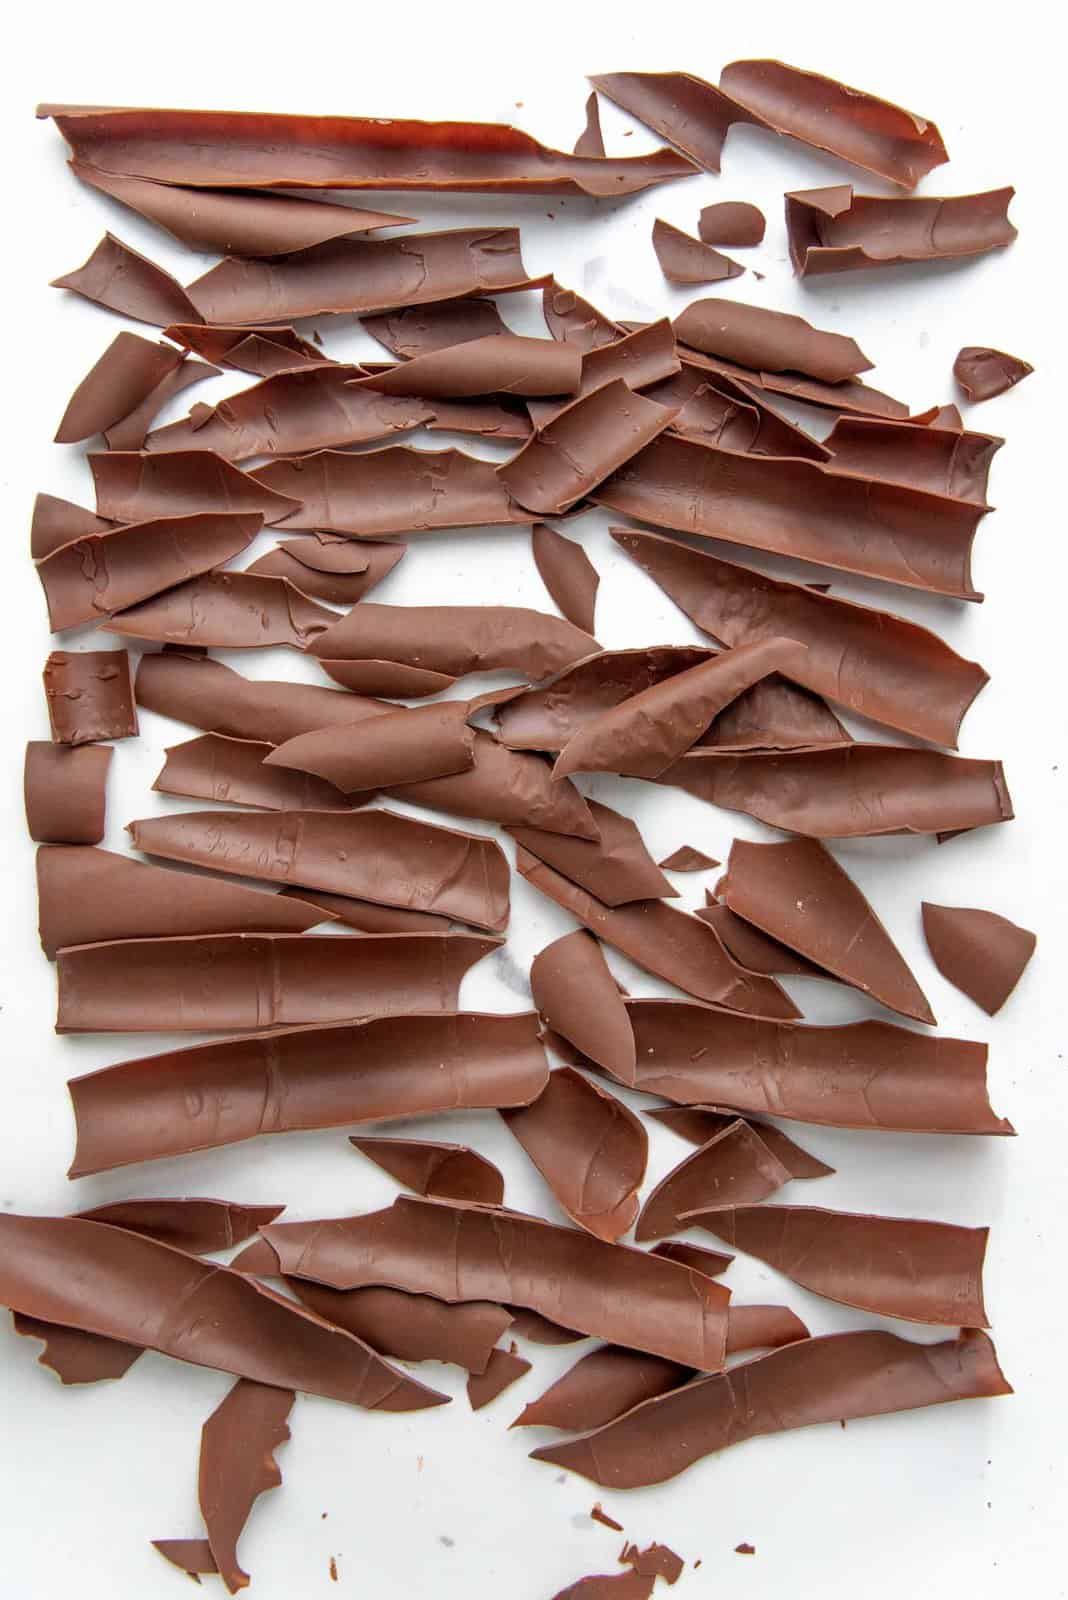
Refrigerate and let the chocolate set for at least 1 – 2 hours. When you unroll the parchment paper, the set chocolate will break into long, slightly curved shards. These shards can then be used to decorate your cake.
If your chocolate didn’t temper properly, and has white streaks on them, don’t worry! You’ll be dusting the cake with confectioner’s sugar, so no one’s going to know. 😉
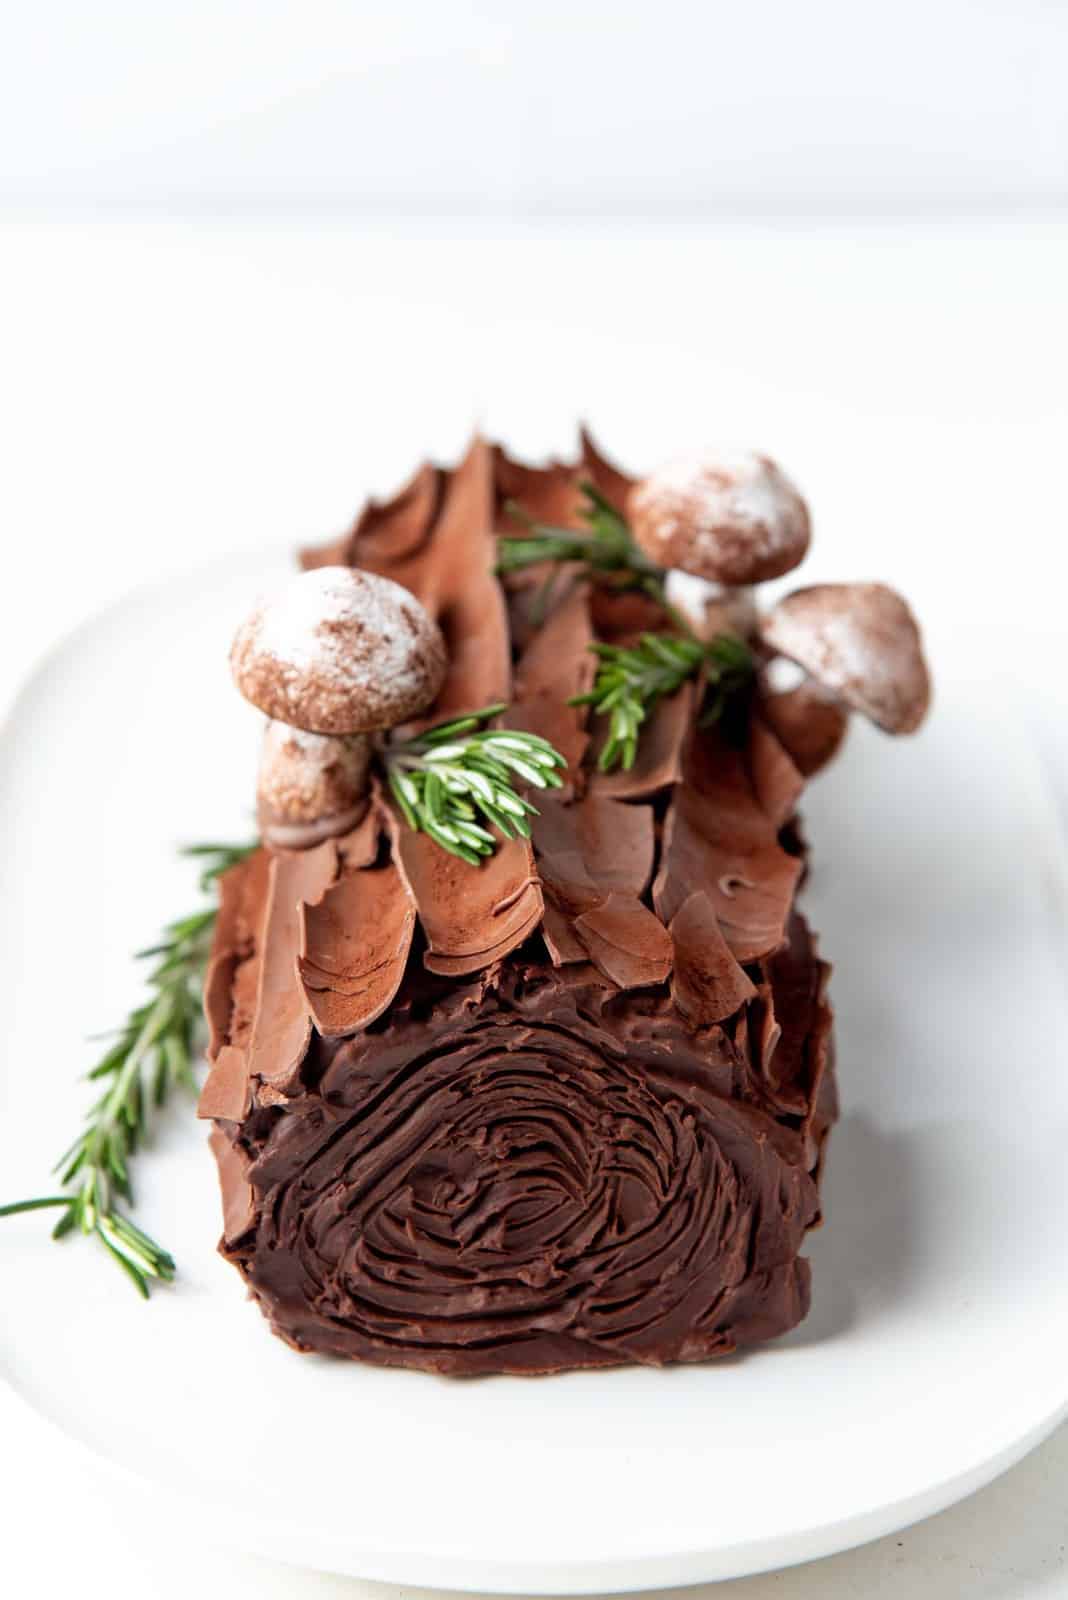
How to make meringue mushrooms
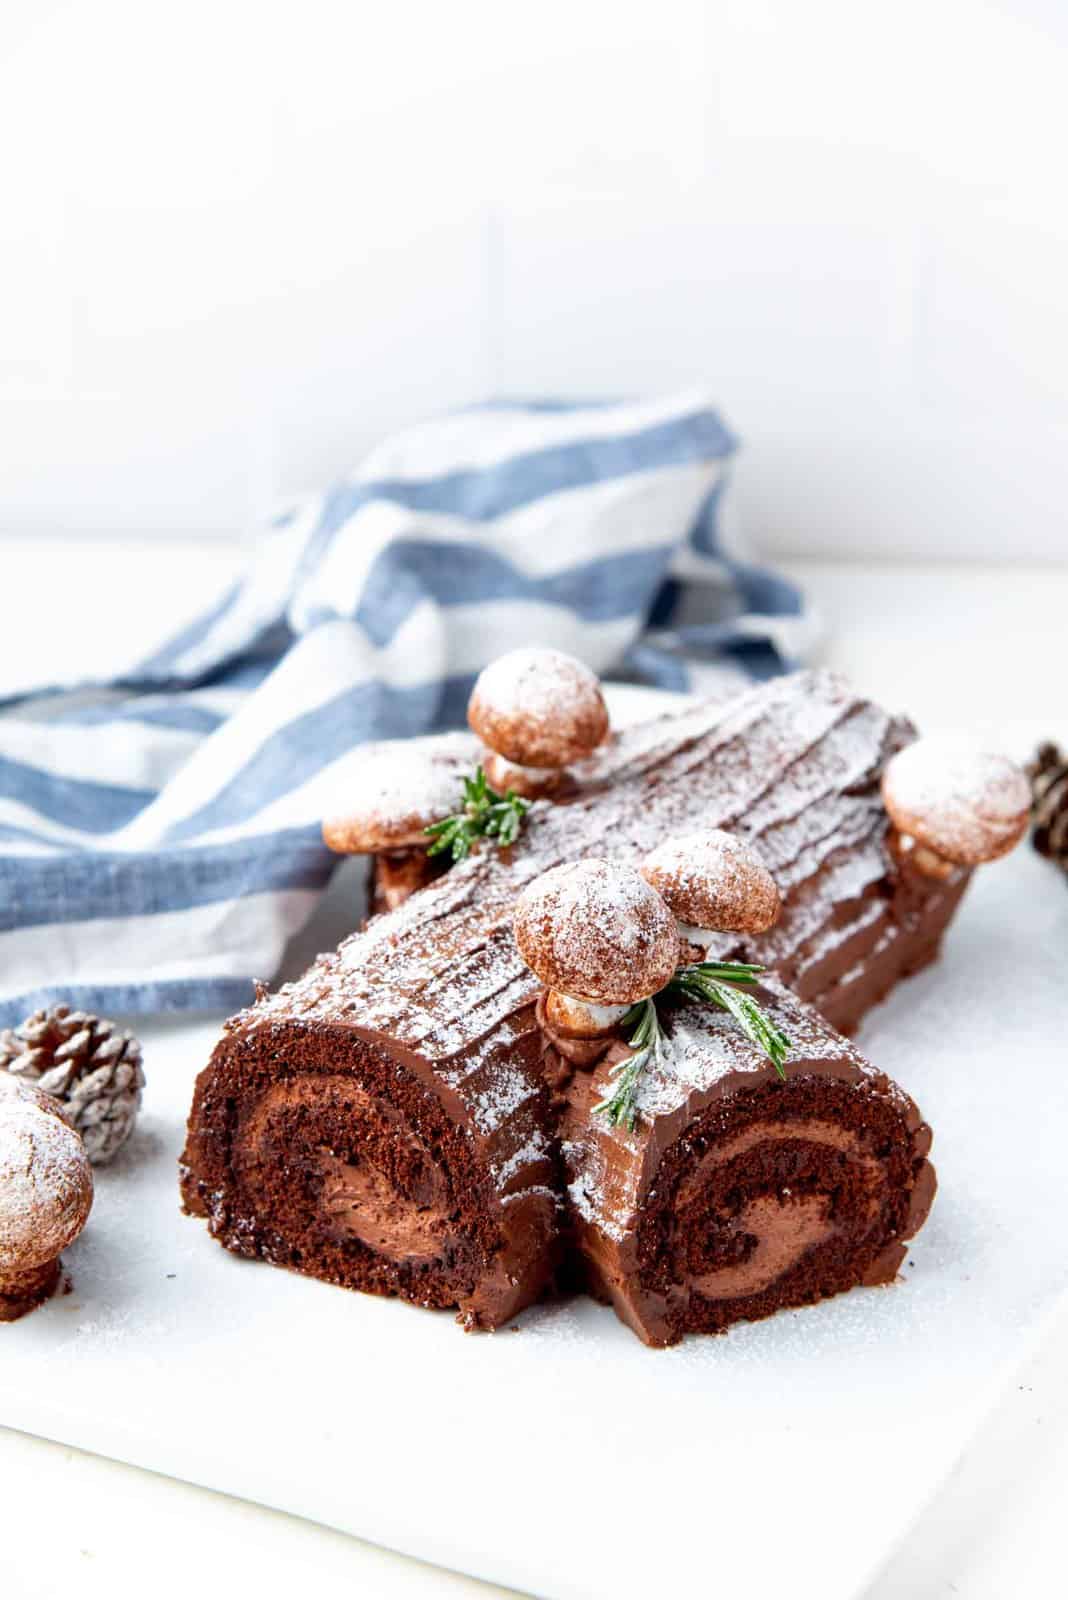
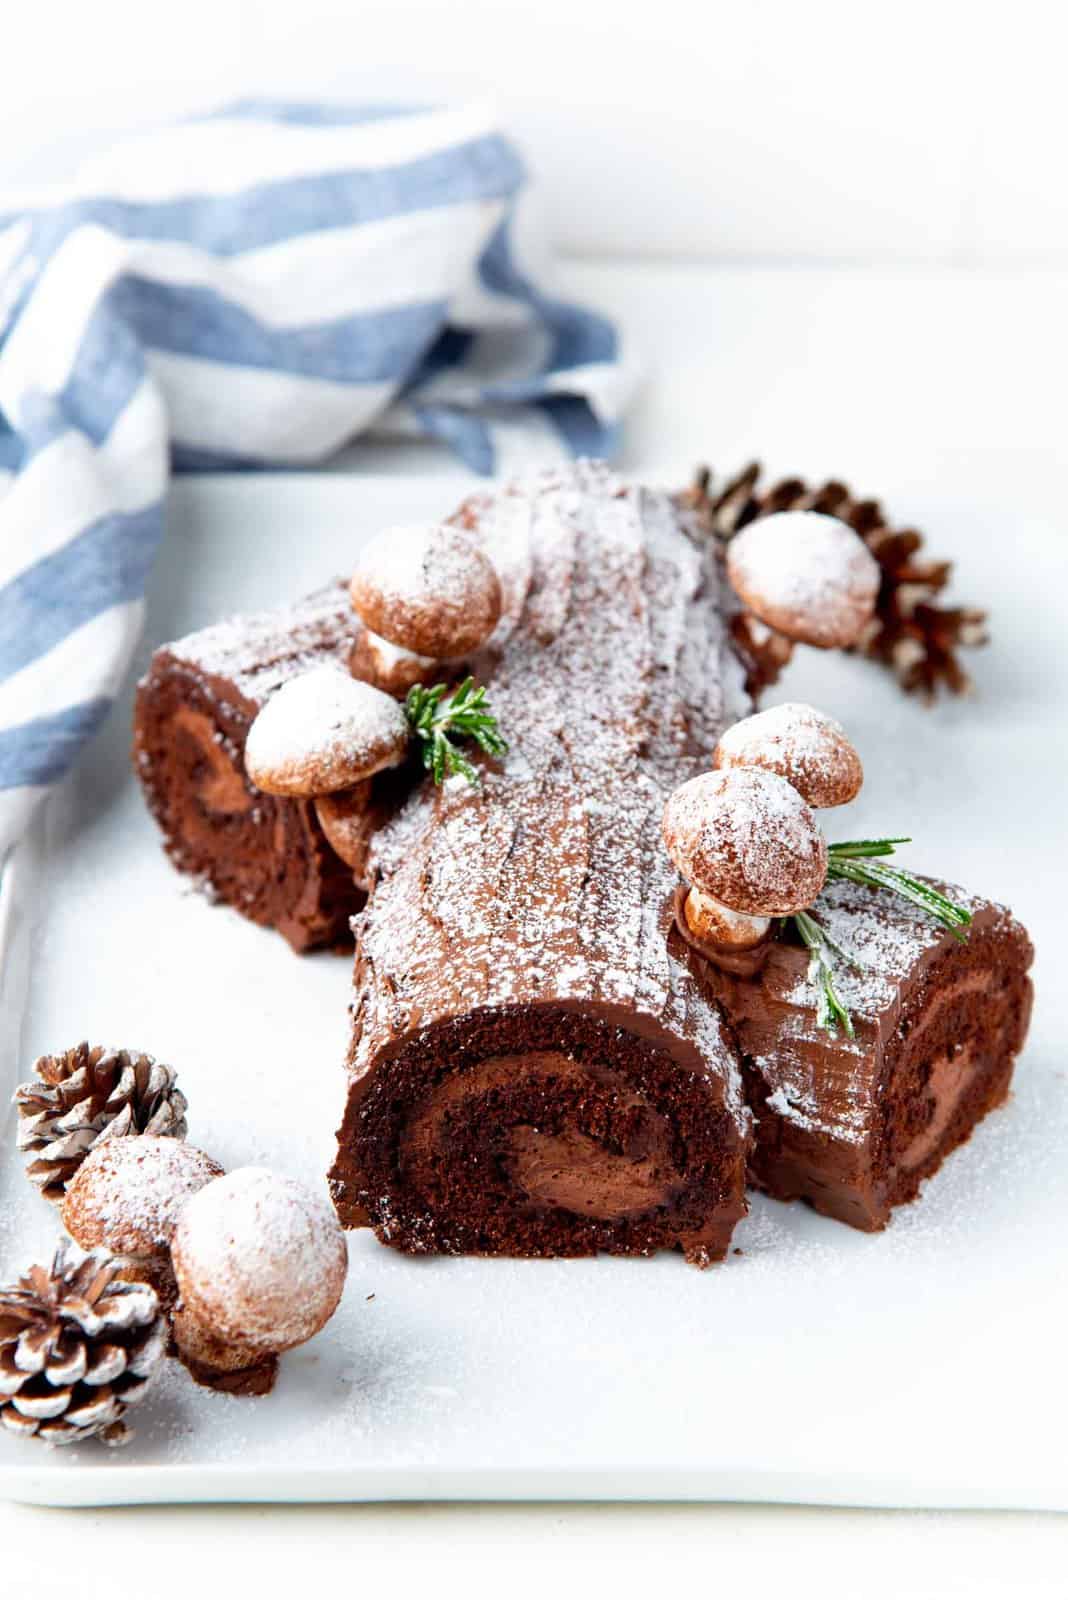
Meringue mushrooms are very easy to make, but takes a little time. And as you can see in the pictures, they add a lovely natural look to your yule log cake.
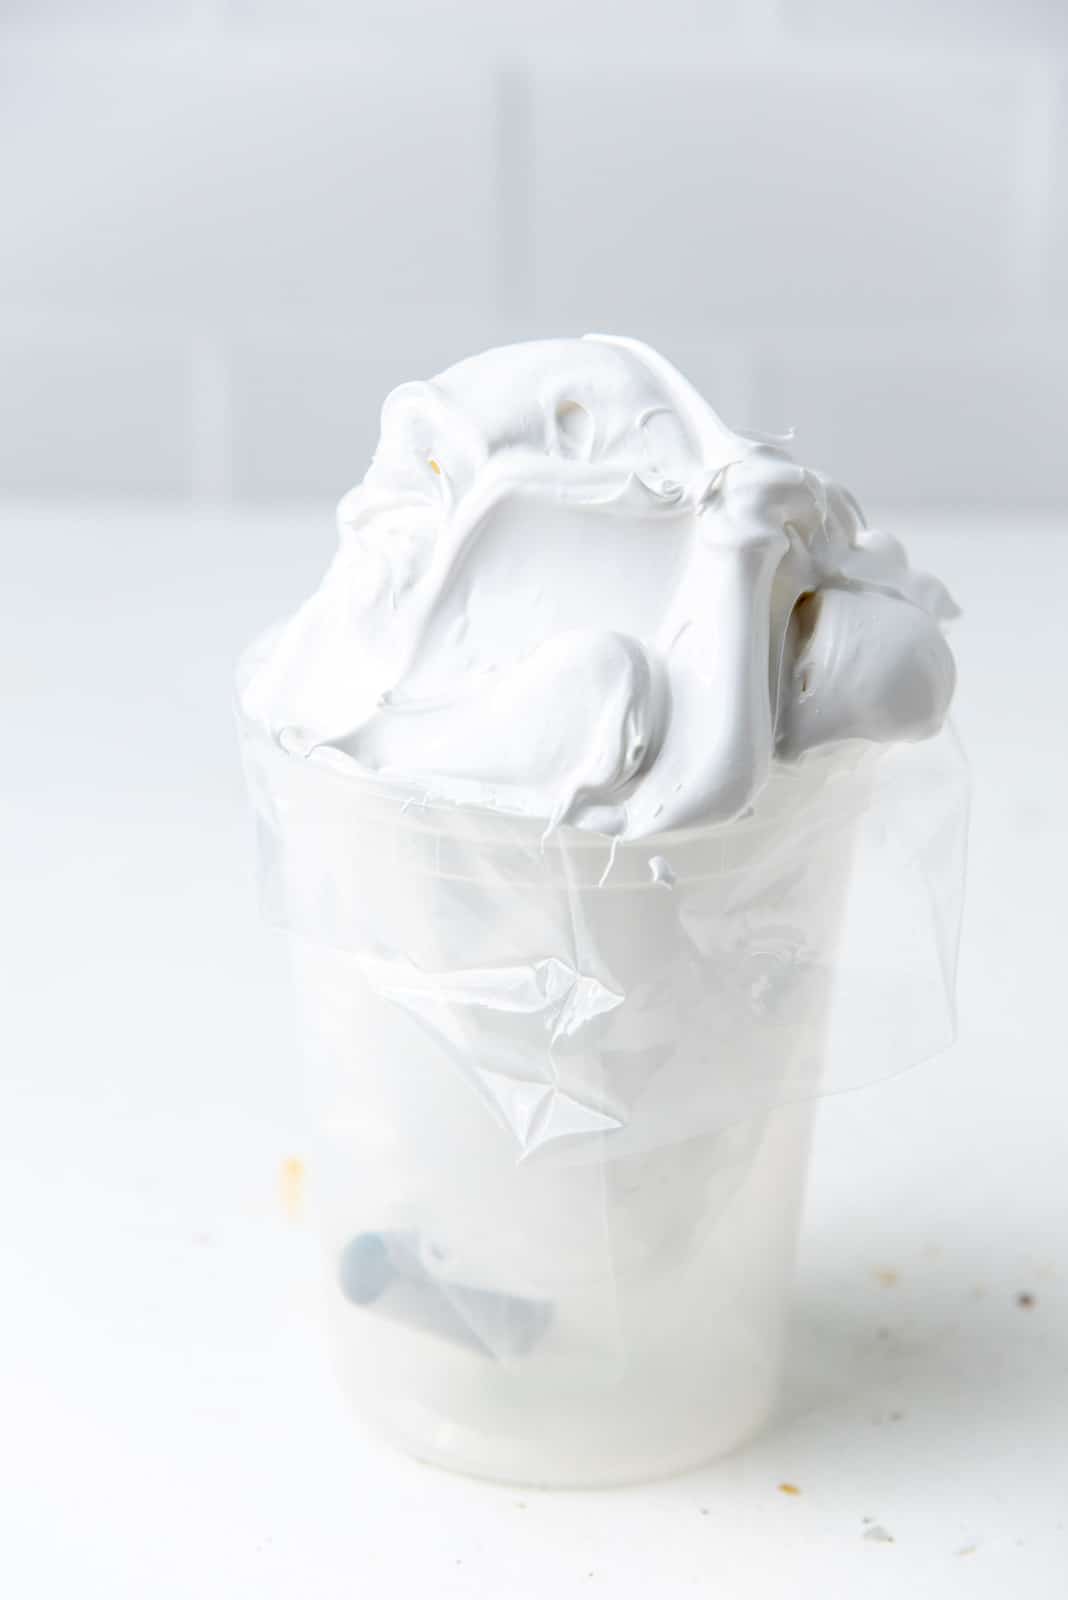
Egg whites are whisked in a large bowl at high speed, with sugar, salt, and cream of tartar. When the egg whites reach stiff peaks, and the sugar is dissolved, transfer the mix into a piping bag.
Pipe mushroom shapes on a parchment paper lined baking sheet. Pipe rounded mushroom caps that are about 1 inch in diameter, and pointed mushroom bases. Bake in a preheated oven until dried out, without caramelization.

Let them cool completely. The meringue mushrooms will become crisp as they cool.
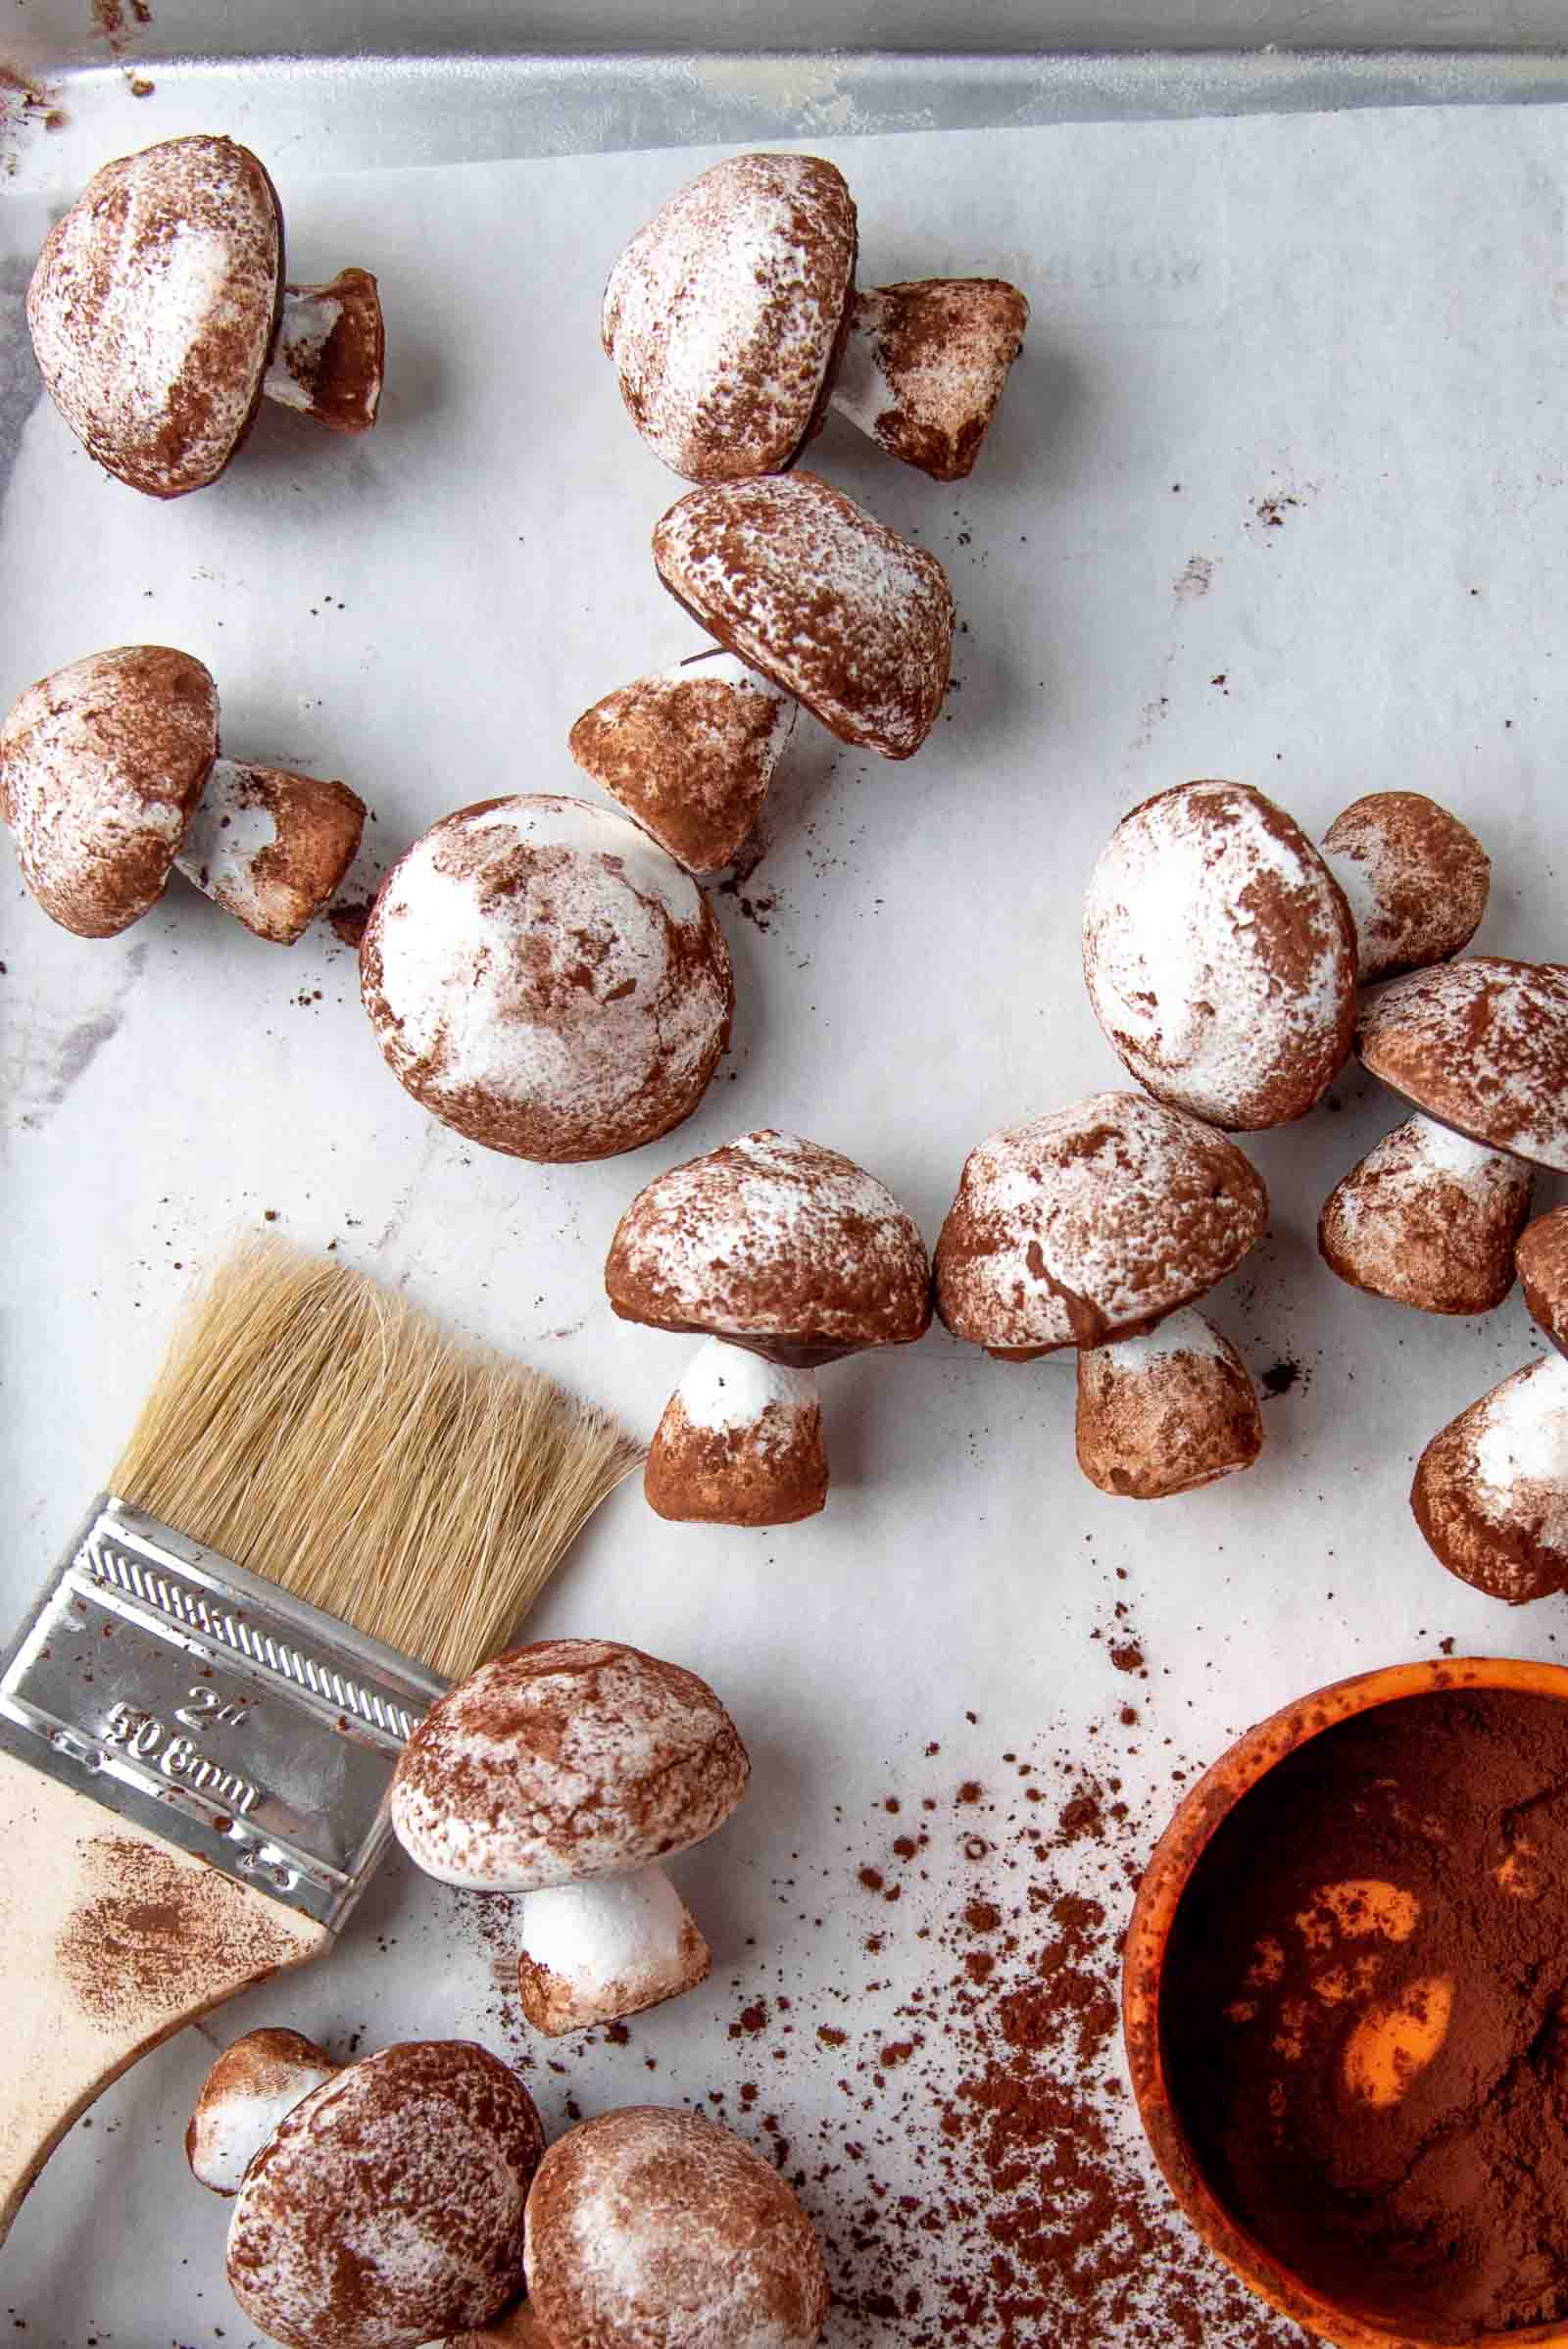
Apply a thin layer of melted chocolate on the bottom of the mushroom caps and stick them on top of the pointed mushroom bases.

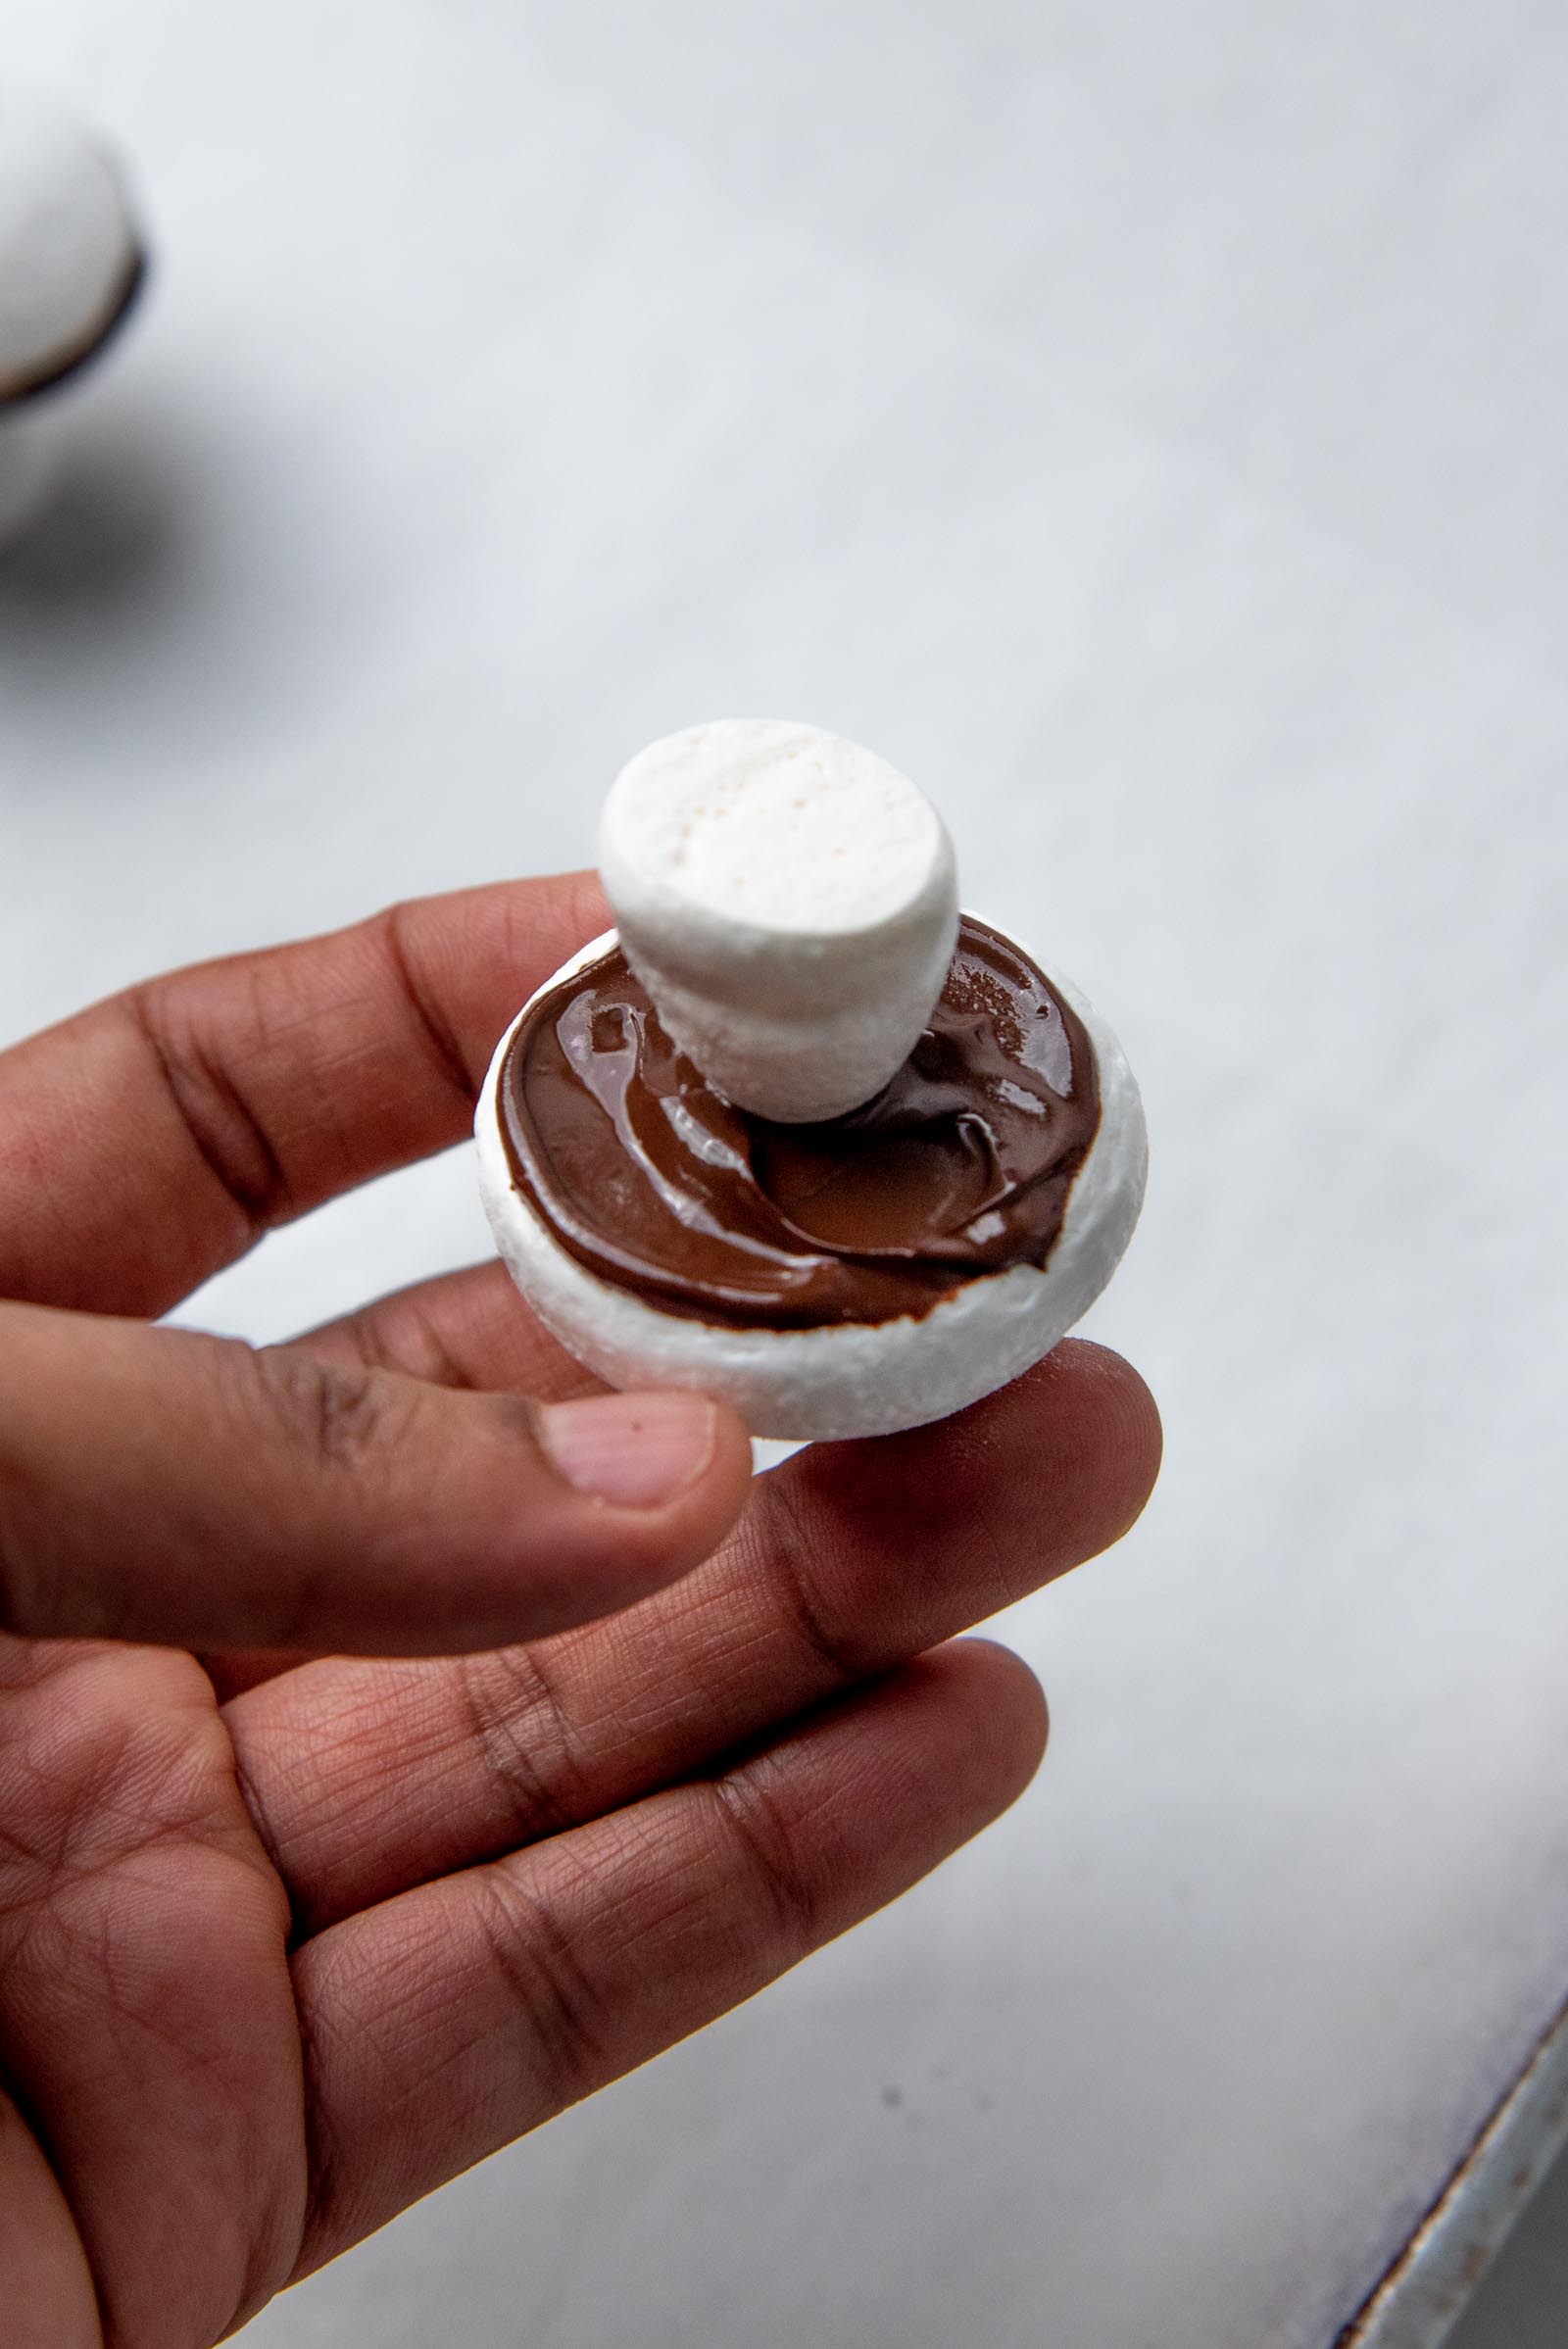
Brush the tops of the meringue mushroom with cocoa powder which will give it a more natural look. And there you have it. Meringue mushrooms for your chocolate yule log are done.
Now you can stick these on your buche de noel cake using melted chocolate, or whipped chocolate ganache.
How to assemble your buche de noel cake
Now let’s make that gorgeous chocolate yule log cake.
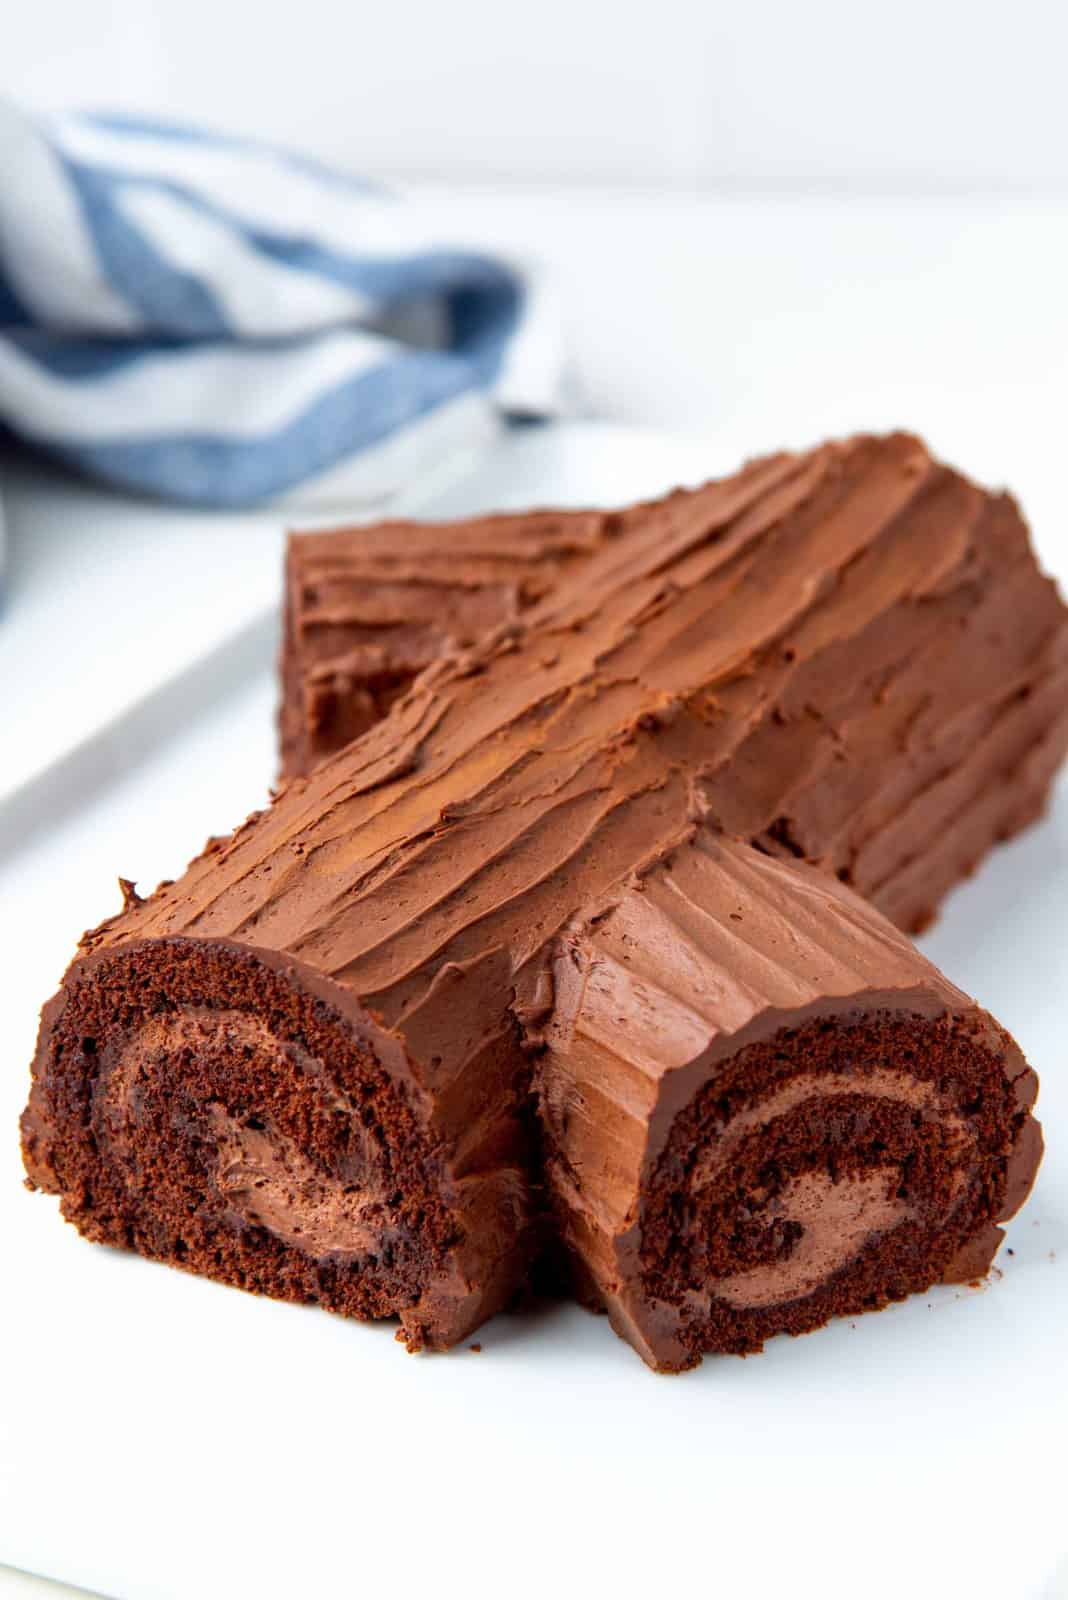
To make a branched yule log cake
Make two chocolate swiss rolls. Cut one swiss roll into two portions at an angle, so that the two angled portions will attach to the sides of the first swiss roll to look like branches. You can choose to make two branches like I’ve done in the pictures here or just one. You can also choose to have one on top, and one on the side.

Use the whipped chocolate ganache to stick these portions onto your first swiss roll cake. You may need a thick layer to fill in the gaps and make the surface smooth. A small offset spatula is your friend here.
Once the cake is shaped, it’s time to frost it.
Frosting your yule log cake
For chocolate shards
Spread a thin layer of the cooled, thickened chocolate ganache on just a portion of your cake, and stick the chocolate shards while the ganache is still soft. Repeat until the whole cake is covered.

Plain frosted
For the frosted version, you only need to spread an even layer of whipped chocolate ganache on the cake and then drag the tip of your small spatula along the cake to create a bark like texture. You can use a fork instead too.
As the frosting sets on the chilled cake, the ganache will harden. This is normal.

If you don’t want to use whipped chocolate ganache, and prefer to have a frosting that will remain soft at room temperature, you can use this recipe for American chocolate buttercream instead.
Once you’ve frosted the cake, dust it with some confectioner’s sugar (powdered sugar). Now it’s ready to be served!
Alternatively, you can decorate it with some meringue mushrooms as well if you like. If you have chocolate shards, you can stick the mushrooms with melted chocolate on them. Or if you simply covered the cake with buttercream or whipped ganache, you can use the same to stick the mushrooms on as well.
Storing the buche de noel cake
A frosted cake will keep for about 4 – 5 days in an air-tight container in the fridge. The meringue mushrooms should ONLY be added before serving, because they will soften very quickly.
Let the cake thaw out at room temperature before serving though. The cake and the filling will be softer and more delicious that way.
Serving instructions
This cake is one of my favorite Christmas recipes, because it’s so light, fluffy, delicious, and a great centerpiece for your Christmas spread.
Or if you’re feeling particularly generous, it’s a great edible gift during the holidays too.
To serve the buche de noel, make sure to cut the cake with a warm, sharp knife. This helps with getting nice, clean slices. A warm knife will help cut through the ganache and/or the chocolate shards as well.
Recipe

Buche de Noel (Yule Log Cake)
US based cup, teaspoon, tablespoon measurements. Weight measurements are recommended for accurate results whenever available.
Common Measurement ConversionsIngredients:
Chocolate swiss roll cake (for 1 cake)
- 45 g warm clarified butter 3 tbsp, substitute with same amount of warm olive oil, vegetable oil, or vegan butter
- 2 tsp vanilla
- ½ tsp instant coffee powder
- 50 g AP flour about 6 tbsp
- 30 g dutch cocoa powder
- ½ tsp baking powder
- 4 large eggs
- 1 egg yolk from a large egg
- 120 g white sugar ½ cup + 1 ½ tbsp
- Generous ¼ tsp salt
Chocolate whipped cream filling (enough for 1 cake + a little extra)
- 1 tsp powdered gelatin about 3 g
- 1 ½ tbsp water 22.5 mL
- 1 ½ cups heavy cream 360 mL (35% fat)
- 28.5 g dutch cocoa powder ¼ cup
- 57 g confectioner's sugar sifted, ½ cup
- Pinch of salt
Whipped chocolate ganache (enough for 1 cake)
- 240 g semisweet chocolate preferably a good quality chocolate
- 240 g heavy cream 1 cup / 240 mL
- ¼ tsp fine sea salt
Optional decorations (make these decorations one day ahead of time)
Tempered chocolate bark
- 250 g semisweet chocolate or milk chocolate
- A little extra chocolate if needed
Meringue mushrooms
- 2 egg whites free of any yolks
- 100 g caster sugar about ½ cup
- ⅛ tsp cream of tartar
- ⅛ tsp salt
- Cocoa powder
- Some melted chocolate
Instructions:
Chocolate swiss rolls
- Prep and measure all the ingredients.
- Make the chocolate swiss roll cake according to this chocolate roll cake recipe. Follow that recipe until you have rolled up the warm cake, and it has cooled down to room temperature. You can let the cake cool down overnight.45 g warm clarified butter, 2 tsp vanilla, ½ tsp instant coffee powder, 50 g AP flour, 30 g dutch cocoa powder, ½ tsp baking powder, 4 large eggs, 1 egg yolk from a large egg, 120 g white sugar, Generous ¼ tsp salt
- When the cake has cooled down, you can proceed with the rest of the recipe with the rolled up cake.
Chocolate whipped cream filling (make this when you’re ready to fill the swiss roll cake)
- Place the water in a small microwave safe bowl. Sprinkle the gelatin over the water and mix to saturate. Allow the gelatin to absorb all the water and bloom, for at least 10 minutes.1 tsp powdered gelatin, 1 ½ tbsp water
- After blooming, microwave the gelatin for 10 – 20 seconds, until it’s melted but NOT boiling.
- Add about ½ – 1 tbsp of cream to the gelatin mix while stirring to slightly lower the temperature of the gelatin mixture.
- Place the cream, cocoa powder, confectioner’s sugar, vanilla, and salt in a large mixer bowl. Whisk briefly to only combine the ingredients.1 ½ cups heavy cream, 28.5 g dutch cocoa powder, 57 g confectioner's sugar, Pinch of salt
- With the whisk attachment, increase the mixer speed to high, and add the gelatin mixture directly into the cream while the mixer is running.
- Once the gelatin is added, reduce the mixer to a medium speed and whisk until you have soft peaks (thickened, but unable to hold a proper peak).
- Next, either lower the mixer speed a little more, or manually whisk the whipped cream until it reaches mid peaks (thick mixture, and can hold somewhat of a peak, but the mixture isn’t dry).
- The chocolate whipped filling is now ready – use immediately.
Whipped chocolate ganache (make this while the filled buche de noel cake is chilling in the fridge, or when you’re ready to frost the cake)
- Place the chocolate in a bowl. Also have a plate available that can cover the surface of the bowl.
- Heat the cream and salt in a saucepan over medium high heat, stirring occasionally.240 g heavy cream, ¼ tsp fine sea salt
- Heat the cream until it starts to simmer. Do NOT let it boil.
- When the cream is starting to simmer, pour it over the chocolate in the bowl. Cover the bowl for about 30 sec – 1 minute with the plate.240 g semisweet chocolate
- Whisk the chocolate and cream mixture with a whisk until the chocolate has melted and is emulsified to form a smooth ganache.
- Let the ganache cool to about 70 – 72°F. Whisk regularly while the ganache is cooling, OR place a plastic wrap over the surface of the ganache (touching the surface) to prevent a skin from forming.
- When the ganache has thickened a little after it has cooled, it's ready to be whipped.
- Using a hand mixer or your stand mixer, whisk the ganache until it’s a shade lighter and looks a little fluffier (see photos in the post for reference). This will only take a few minutes depending on the speed of your mixer.
- The whipped ganache is now ready to be used as frosting.
Assembling the cake
- Carefully unroll the cooled swiss roll cake.
- Spread an even layer of the chocolate whipped cream filling, leaving a ¾ inch – 1 inch border at the short end with the diagonal cut.
- Now roll up the cake again, but make sure to loosen the parchment paper from the cake as you go. Make sure the cake is firmly rolled up, while maintaining its shape, and the filling isn't squeezed out much.
- Wrap the cake well with parchment paper and/or a cloth napkin so that the cake doesn't lose its shape. You can use the parchment paper to shape the cake if the roll seems loose. Let the cake chill in the fridge for at least 2 hours.
- While the cake is chilling in the fridge, you can prepare the whipped chocolate ganache (recipe above), or chocolate buttercream (chocolate buttercream recipe).
Ganache frosted yule log cake
- Remove the cake from the fridge and place it on a parchment paper lined tray to frost it. Trim the edges with a sharp, warm knife.
- OPTIONAL – If you’re making a branched yule log cake, cut the second swiss roll cake into two portions at an angle, and use the whipped chocolate ganache to attach one portion ("branch") to the main swiss roll cake. See pictures in the post for reference.
- Coat the entire cake with a layer of the whipped ganache. Work quickly to prevent the ganache from setting too much.
- Using either a spatula or a fork, create a tree bark-like texture on the cake. Optionally, you can coat/cover the ends of the cake with whipped ganache (as shown in the pictures in the post) to resemble a log.
- Cover the cake and refrigerate until you’re ready to serve.
Chocolate shards yule log cake
- You can use a branched yule log cake for this as well.
- Apply a thin layer of the ganache on a section of the cake and attach the chocolate shards on top as shown in the pictures in the post. Repeat until the whole cake is covered.
- Cover the cake (being careful not to damage the chocolate shards), and refrigerate until you’re ready to serve.
Optional decorations
Chocolate shards
- You will need a long piece of parchment paper to spread the chocolate, and a clean kitchen thermometer.
- Make sure all the bowls and spatulas are free of water, as any moisture will cause the chocolate to seize.
- Divide the chocolate into two portions – 75% (in weight) in one portion, and the rest of the 25% in another portion.250 g semisweet chocolate
- Make sure both portions of chocolate are chopped into fairly small pieces, but especially make sure the 25% portion is cut even finer so it melts more easily.
- Bring some water to a simmer in a saucepan (about 2 inches of water).
- Place the 75% chocolate portion in a heat-proof bowl (glass or metal), and place it over the saucepan with simmering water. Stir to melt the chocolate, while making sure the mix doesn’t exceed 130°F (for dark chocolate) or 118°F (for milk chocolate).
- Remove the chocolate from the heat, and stir for a couple of minutes to cool it down.
- Add the chopped 25% portion and continue to stir and agitate the mix until the chocolate melts.
- The chocolate should cool down to 88 – 89°F (for dark chocolate) or 86 – 87°F (for milk chocolate).
- If the chocolate is still too warm after it has melted, add a little more chopped chocolate and stir to melt it in and cool down the mix further. Repeat until the chocolate has cooled down to the right temperature.A little extra chocolate if needed
- The melted chocolate should have thickened by the time it's at the right temperature and is tempered, i.e. 88 – 89°F (for dark chocolate) or 86 – 87°F (for milk chocolate).
- Pour the tempered chocolate onto the parchment paper, and spread it as evenly as possible with an offset spatula, in a thin layer, on the parchment paper.
- Once the chocolate is spread, start rolling up the parchment paper before the chocolate starts to set.
- Allow the chocolate to set in the rolled up parchment paper (either a few hours at room temperature or a couple of hours in the fridge).
- When the chocolate is completely set, carefully unroll the rolled up parchment paper, while making sure the chocolate shards are breaking in long, large pieces.
- The chocolate shards are now ready. Store in an airtight container until needed.
Meringue mushrooms
- Preheat oven to 200°F and line a half sheet baking tray with parchment paper. Set aside.
- Place the egg whites in a clean, dry metal mixing bowl. Add the salt and cream of tartar.2 egg whites, ⅛ tsp cream of tartar, ⅛ tsp salt
- Whisk on medium high speed until the egg whites become frothy and start to form soft peaks.
- Add the sugar in a slow stream (or 1 spoon at a time) while whisking.100 g caster sugar
- Whisk until all the sugar is dissolved, and you have a thick, glossy meringue that is at stiff peaks.
- Place the meringue mixture in a piping bag, with a ½ inch round tip attached (or cut a similar sized hole).
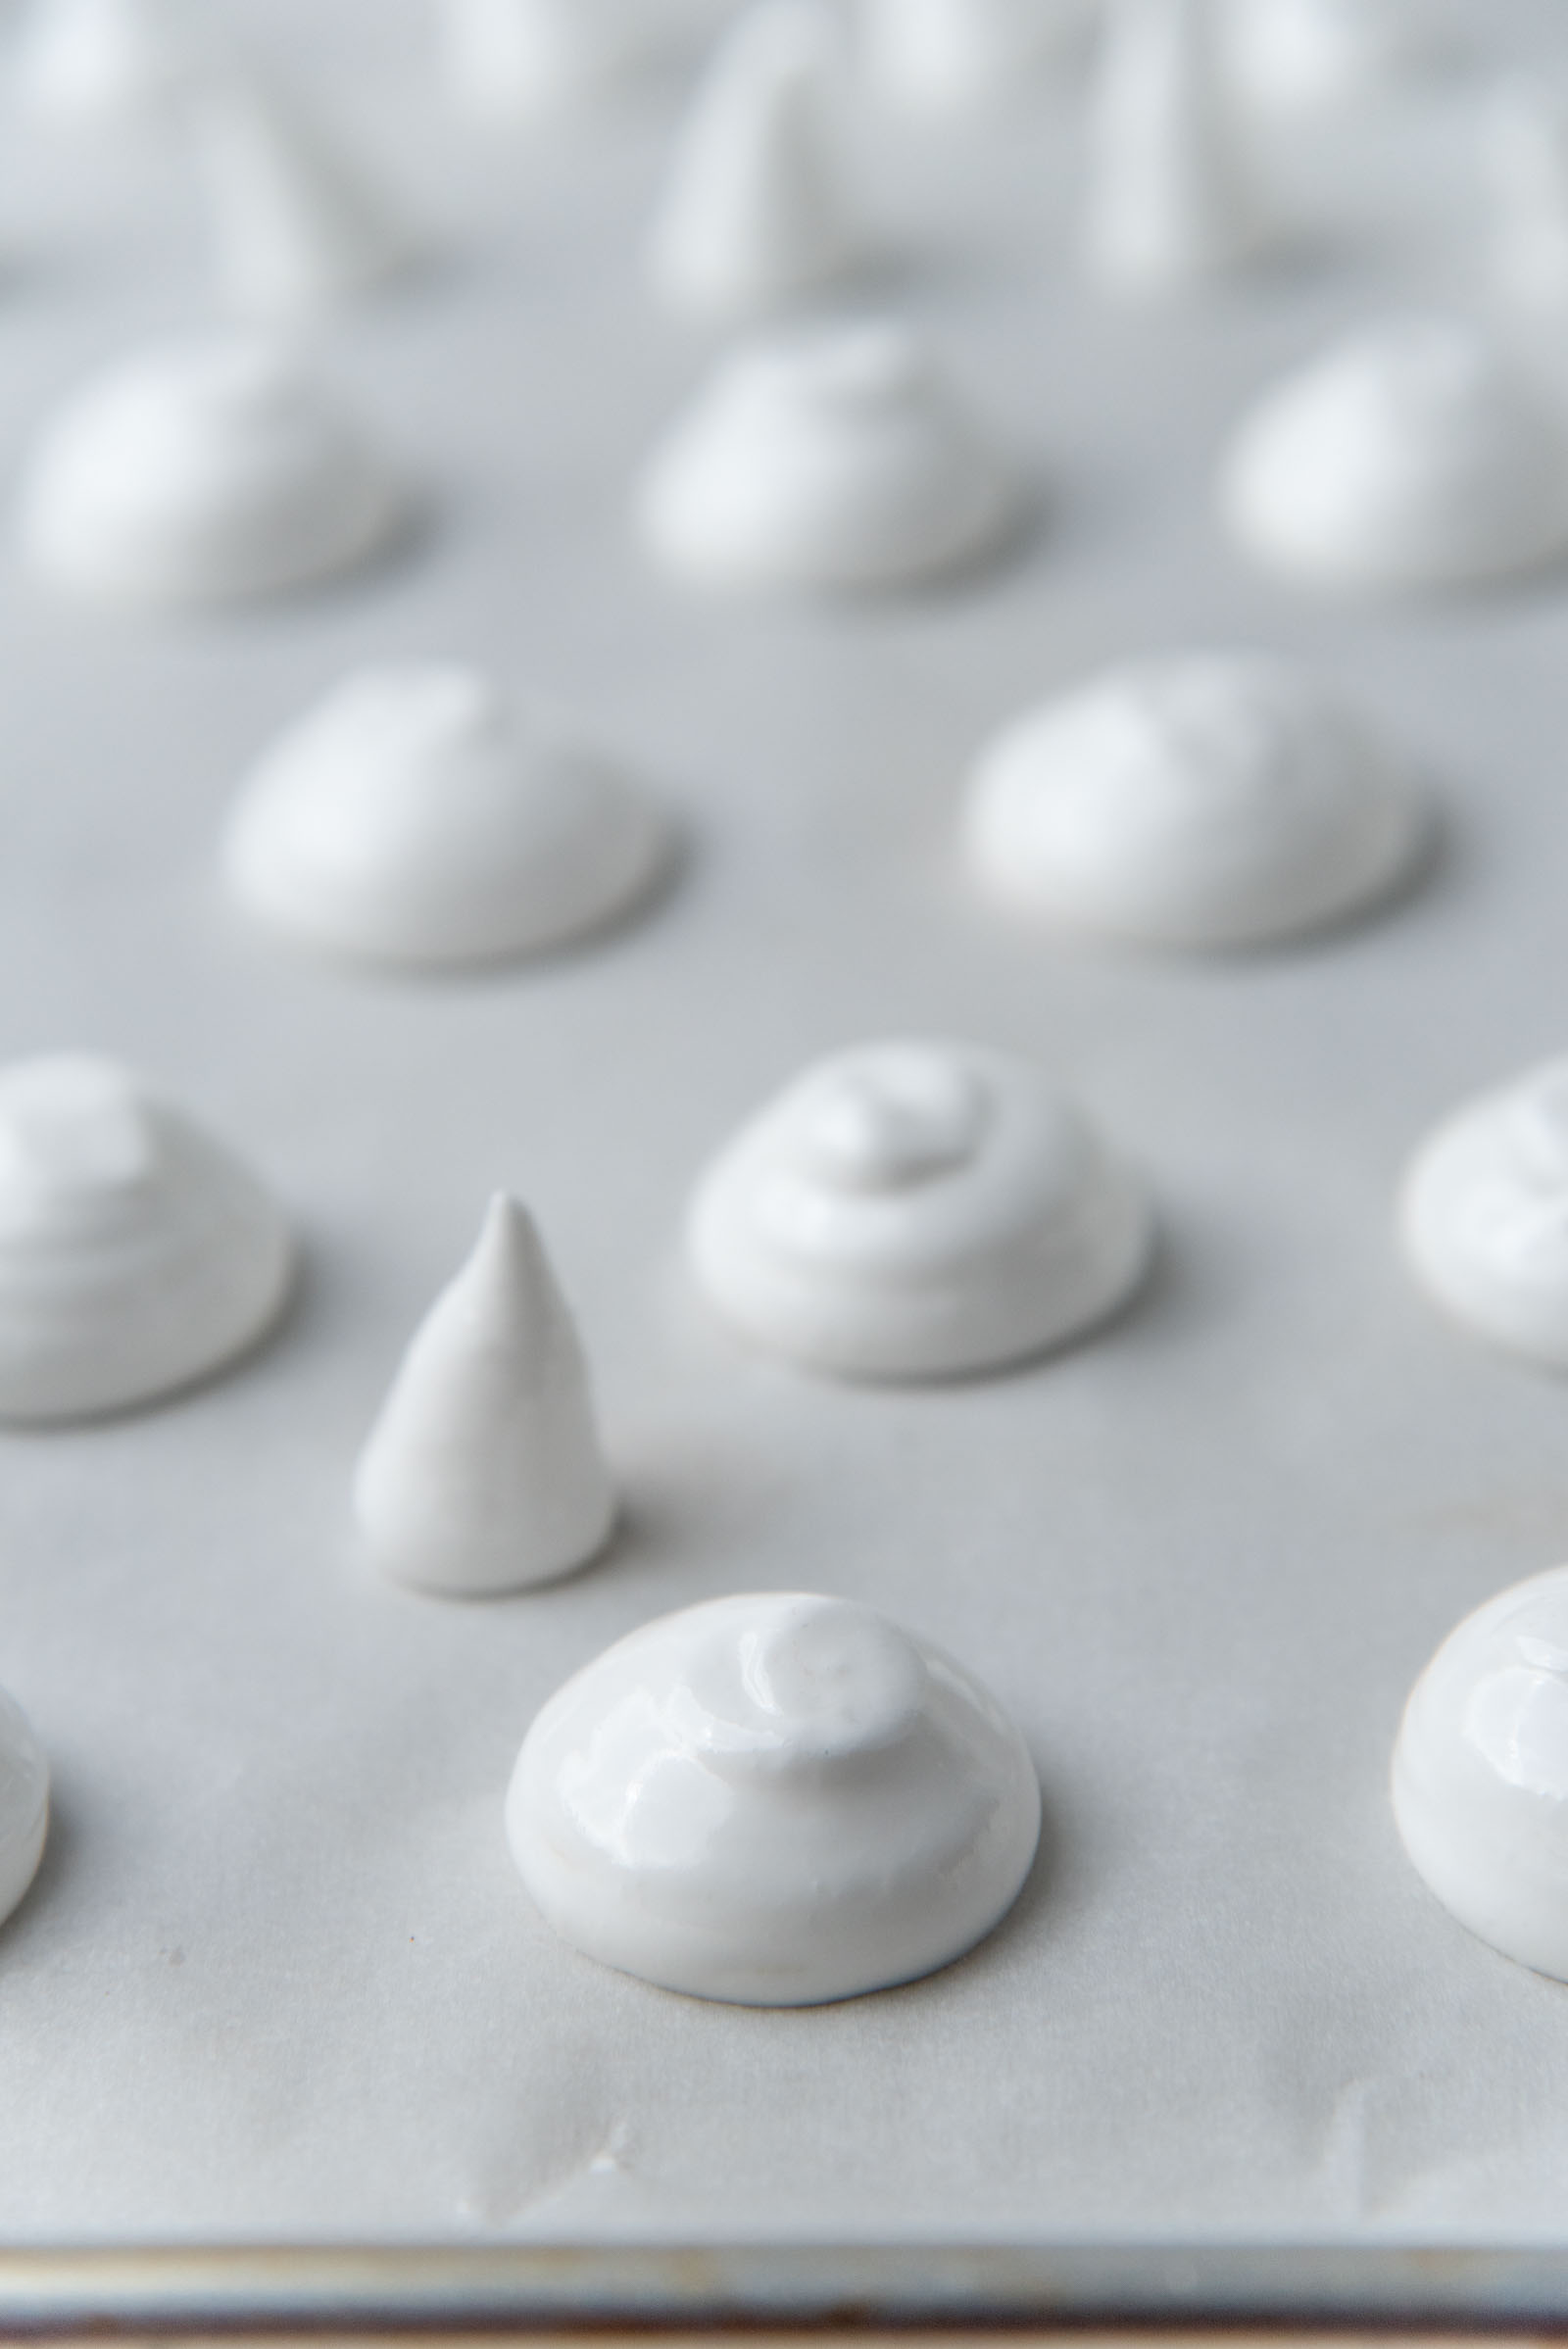
- Pipe the meringue on the baking sheets, in two types of shapes, as described below.
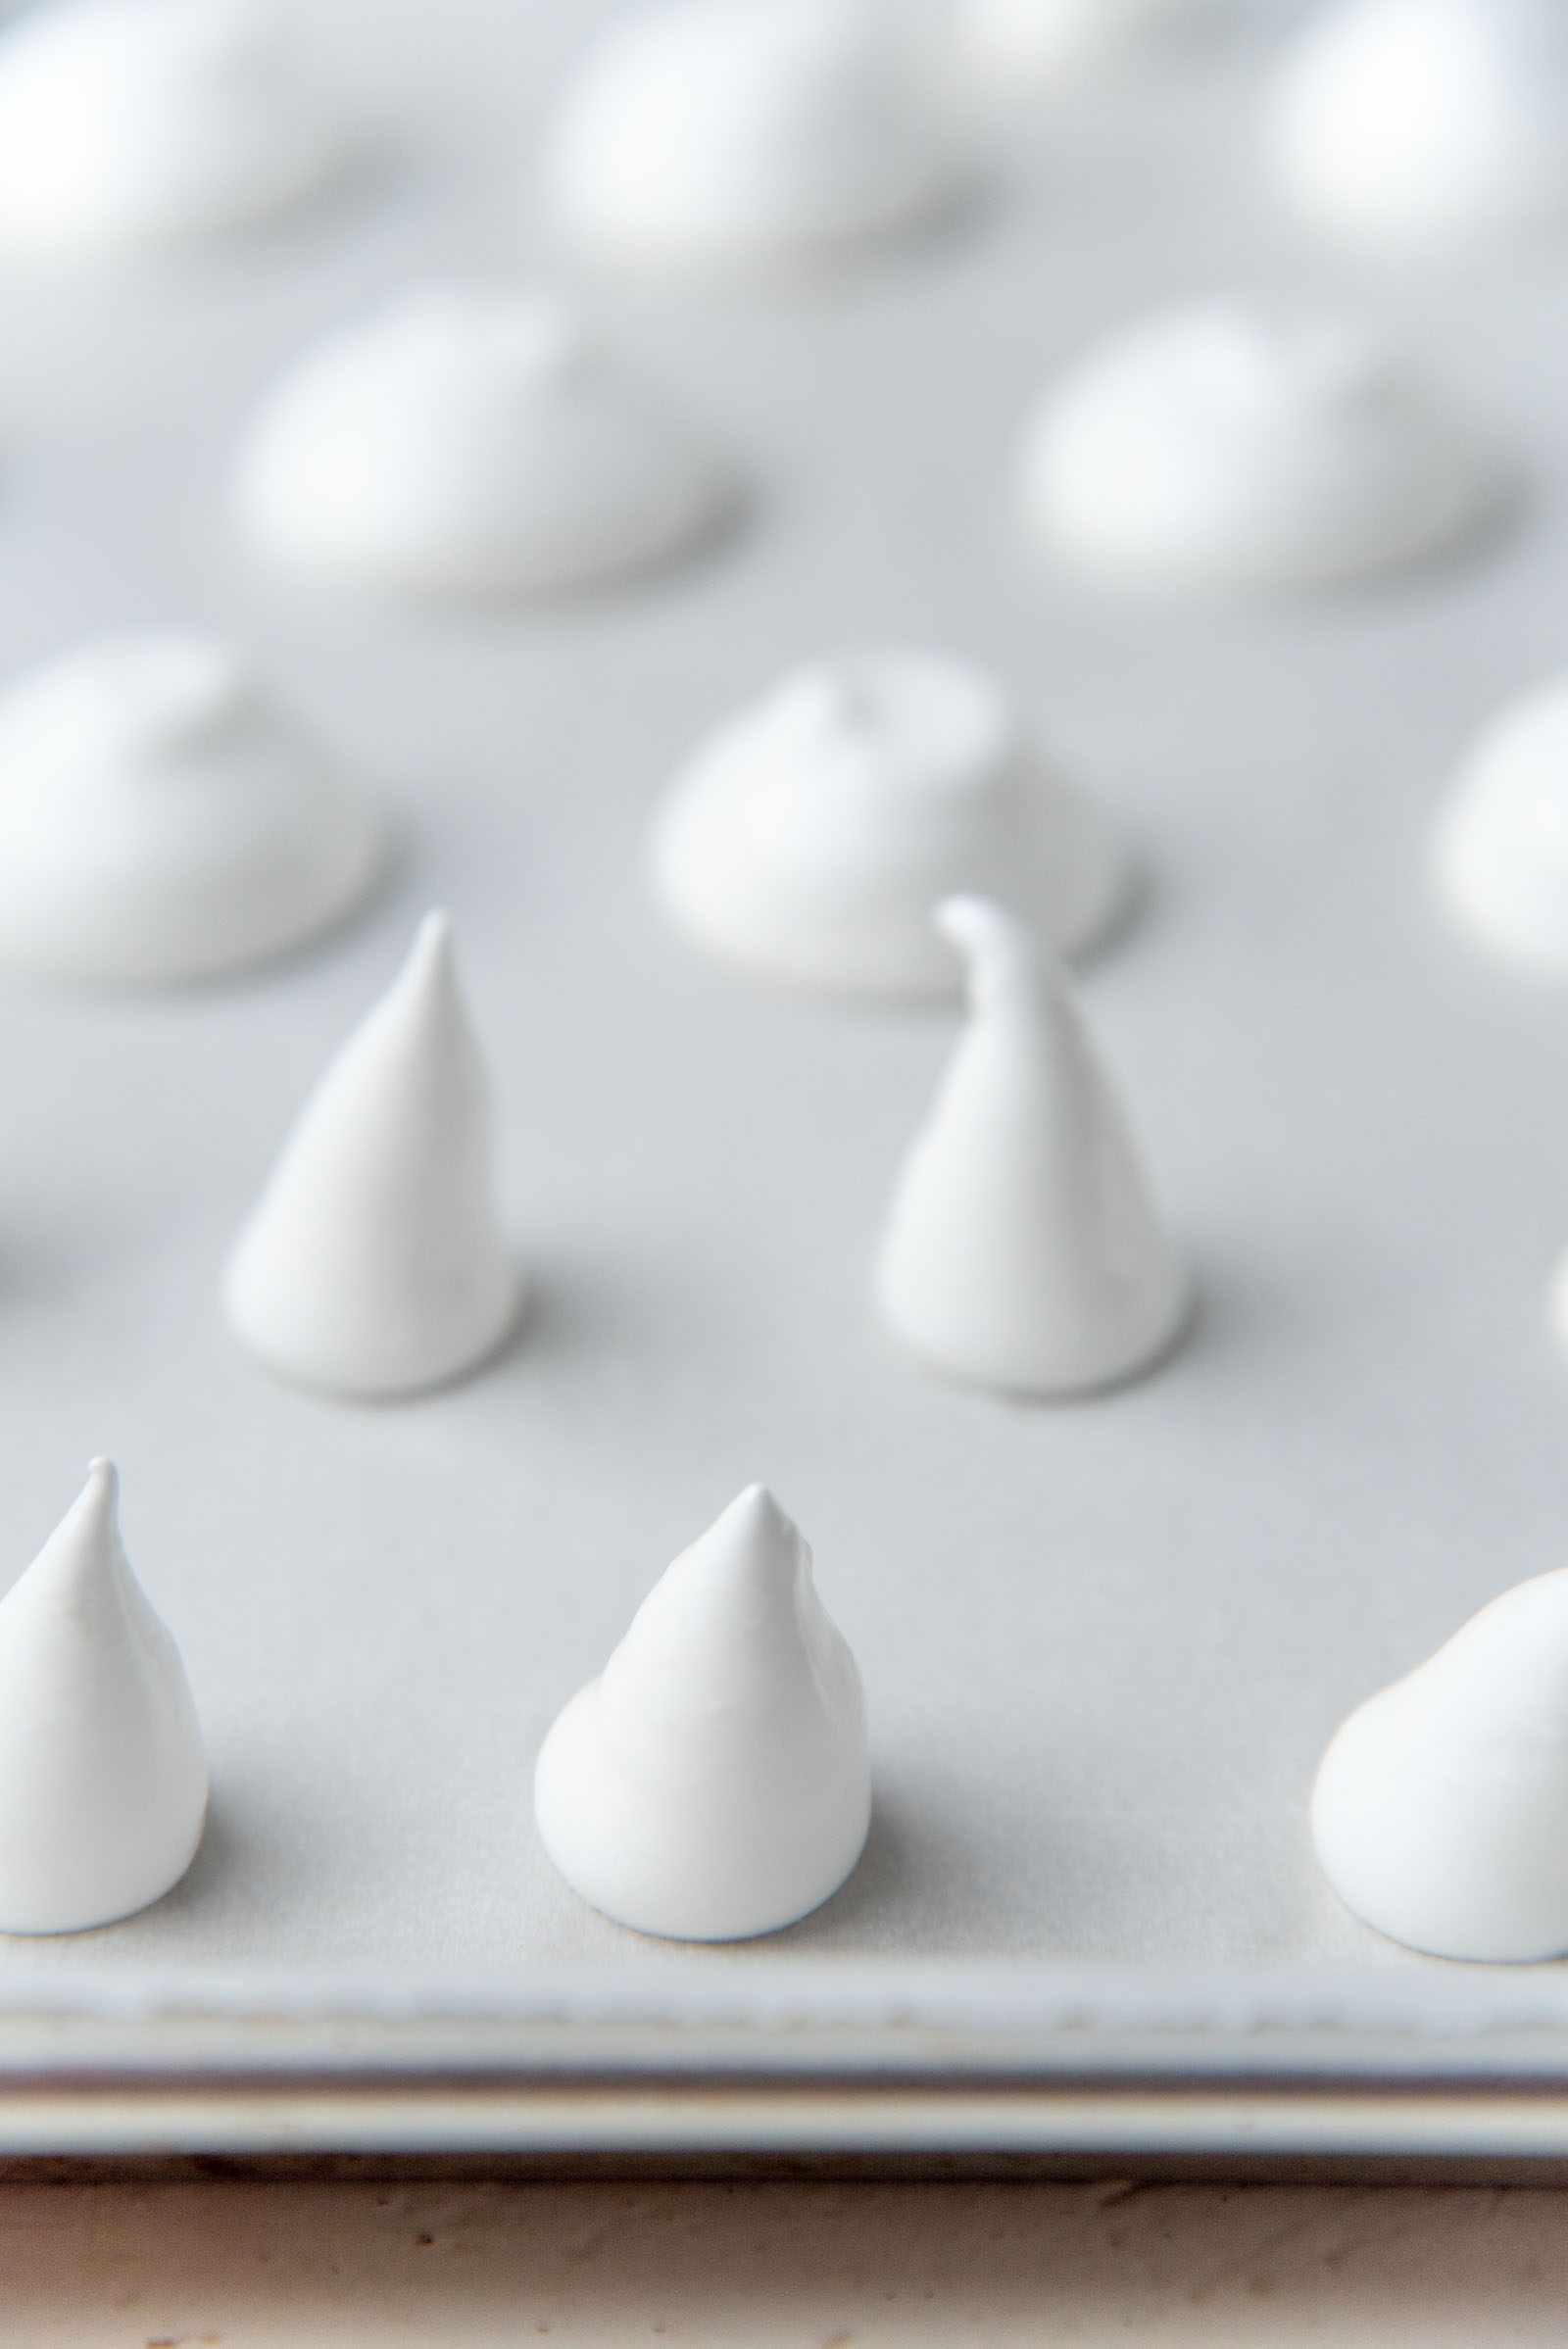
- 1 . Small, round mushroom caps, that are about 1 inch in diameter. Squeeze out a smooth blob of meringue until you get a rounded cap. Then stop squeezing, and in a circular motion, swirl the tip away from the meringue blob to create a smooth surface.
- 2 . Small mushroom stumps with pointed tips. Slowly pipe the meringue onto the baking tray, but pull the tip up as you go to create a tall “stem” (about 1 inch tall). Stop piping as you pull the tip away to create a pointed end.
- Bake the piped meringue in the preheated oven for about 1 hour and 15 minutes, OR until the meringue pieces can be EASILY peeled off of the parchment paper. The length of time is very dependent on the oven, so check after about 60 – 70 minutes.
- Once the meringue is baked, turn off the oven, and let the meringue cool down in the oven with the oven door ajar.
- When they have cooled down completely, transfer them to an airtight container until needed.
To assemble (do this just before you attach the meringue mushrooms on the cake for decoration)
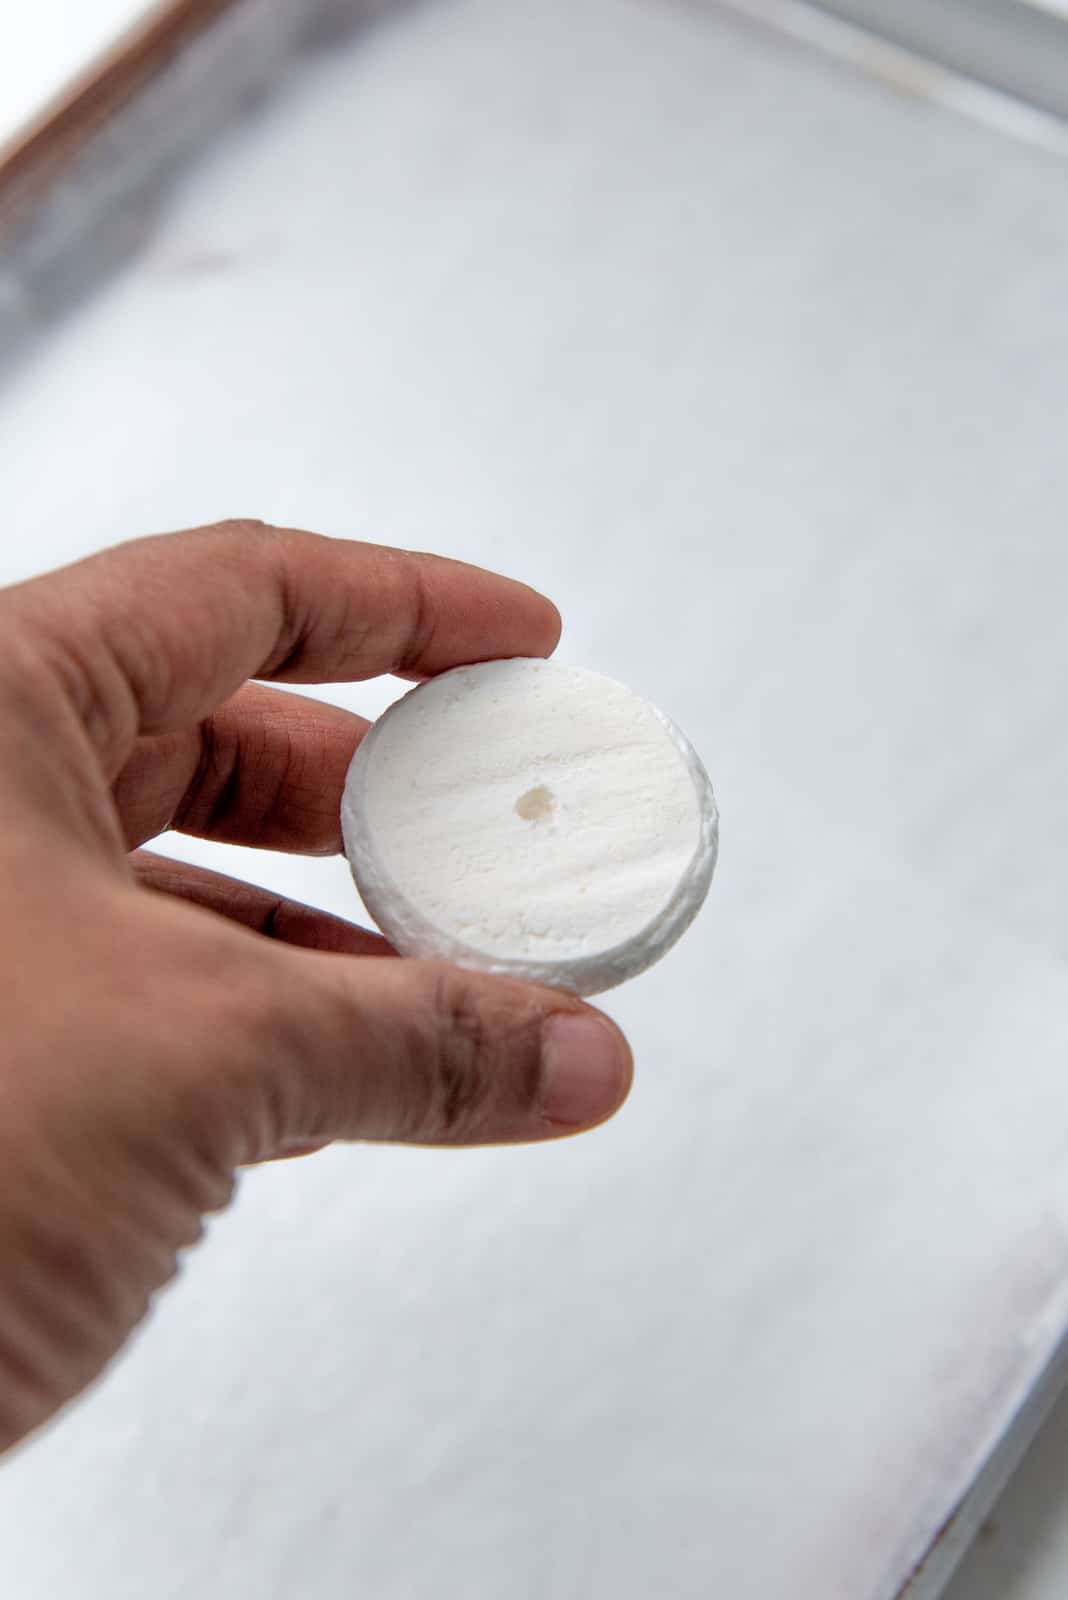
- Using a toothpick, poke holes at the bottom of the mushroom caps.
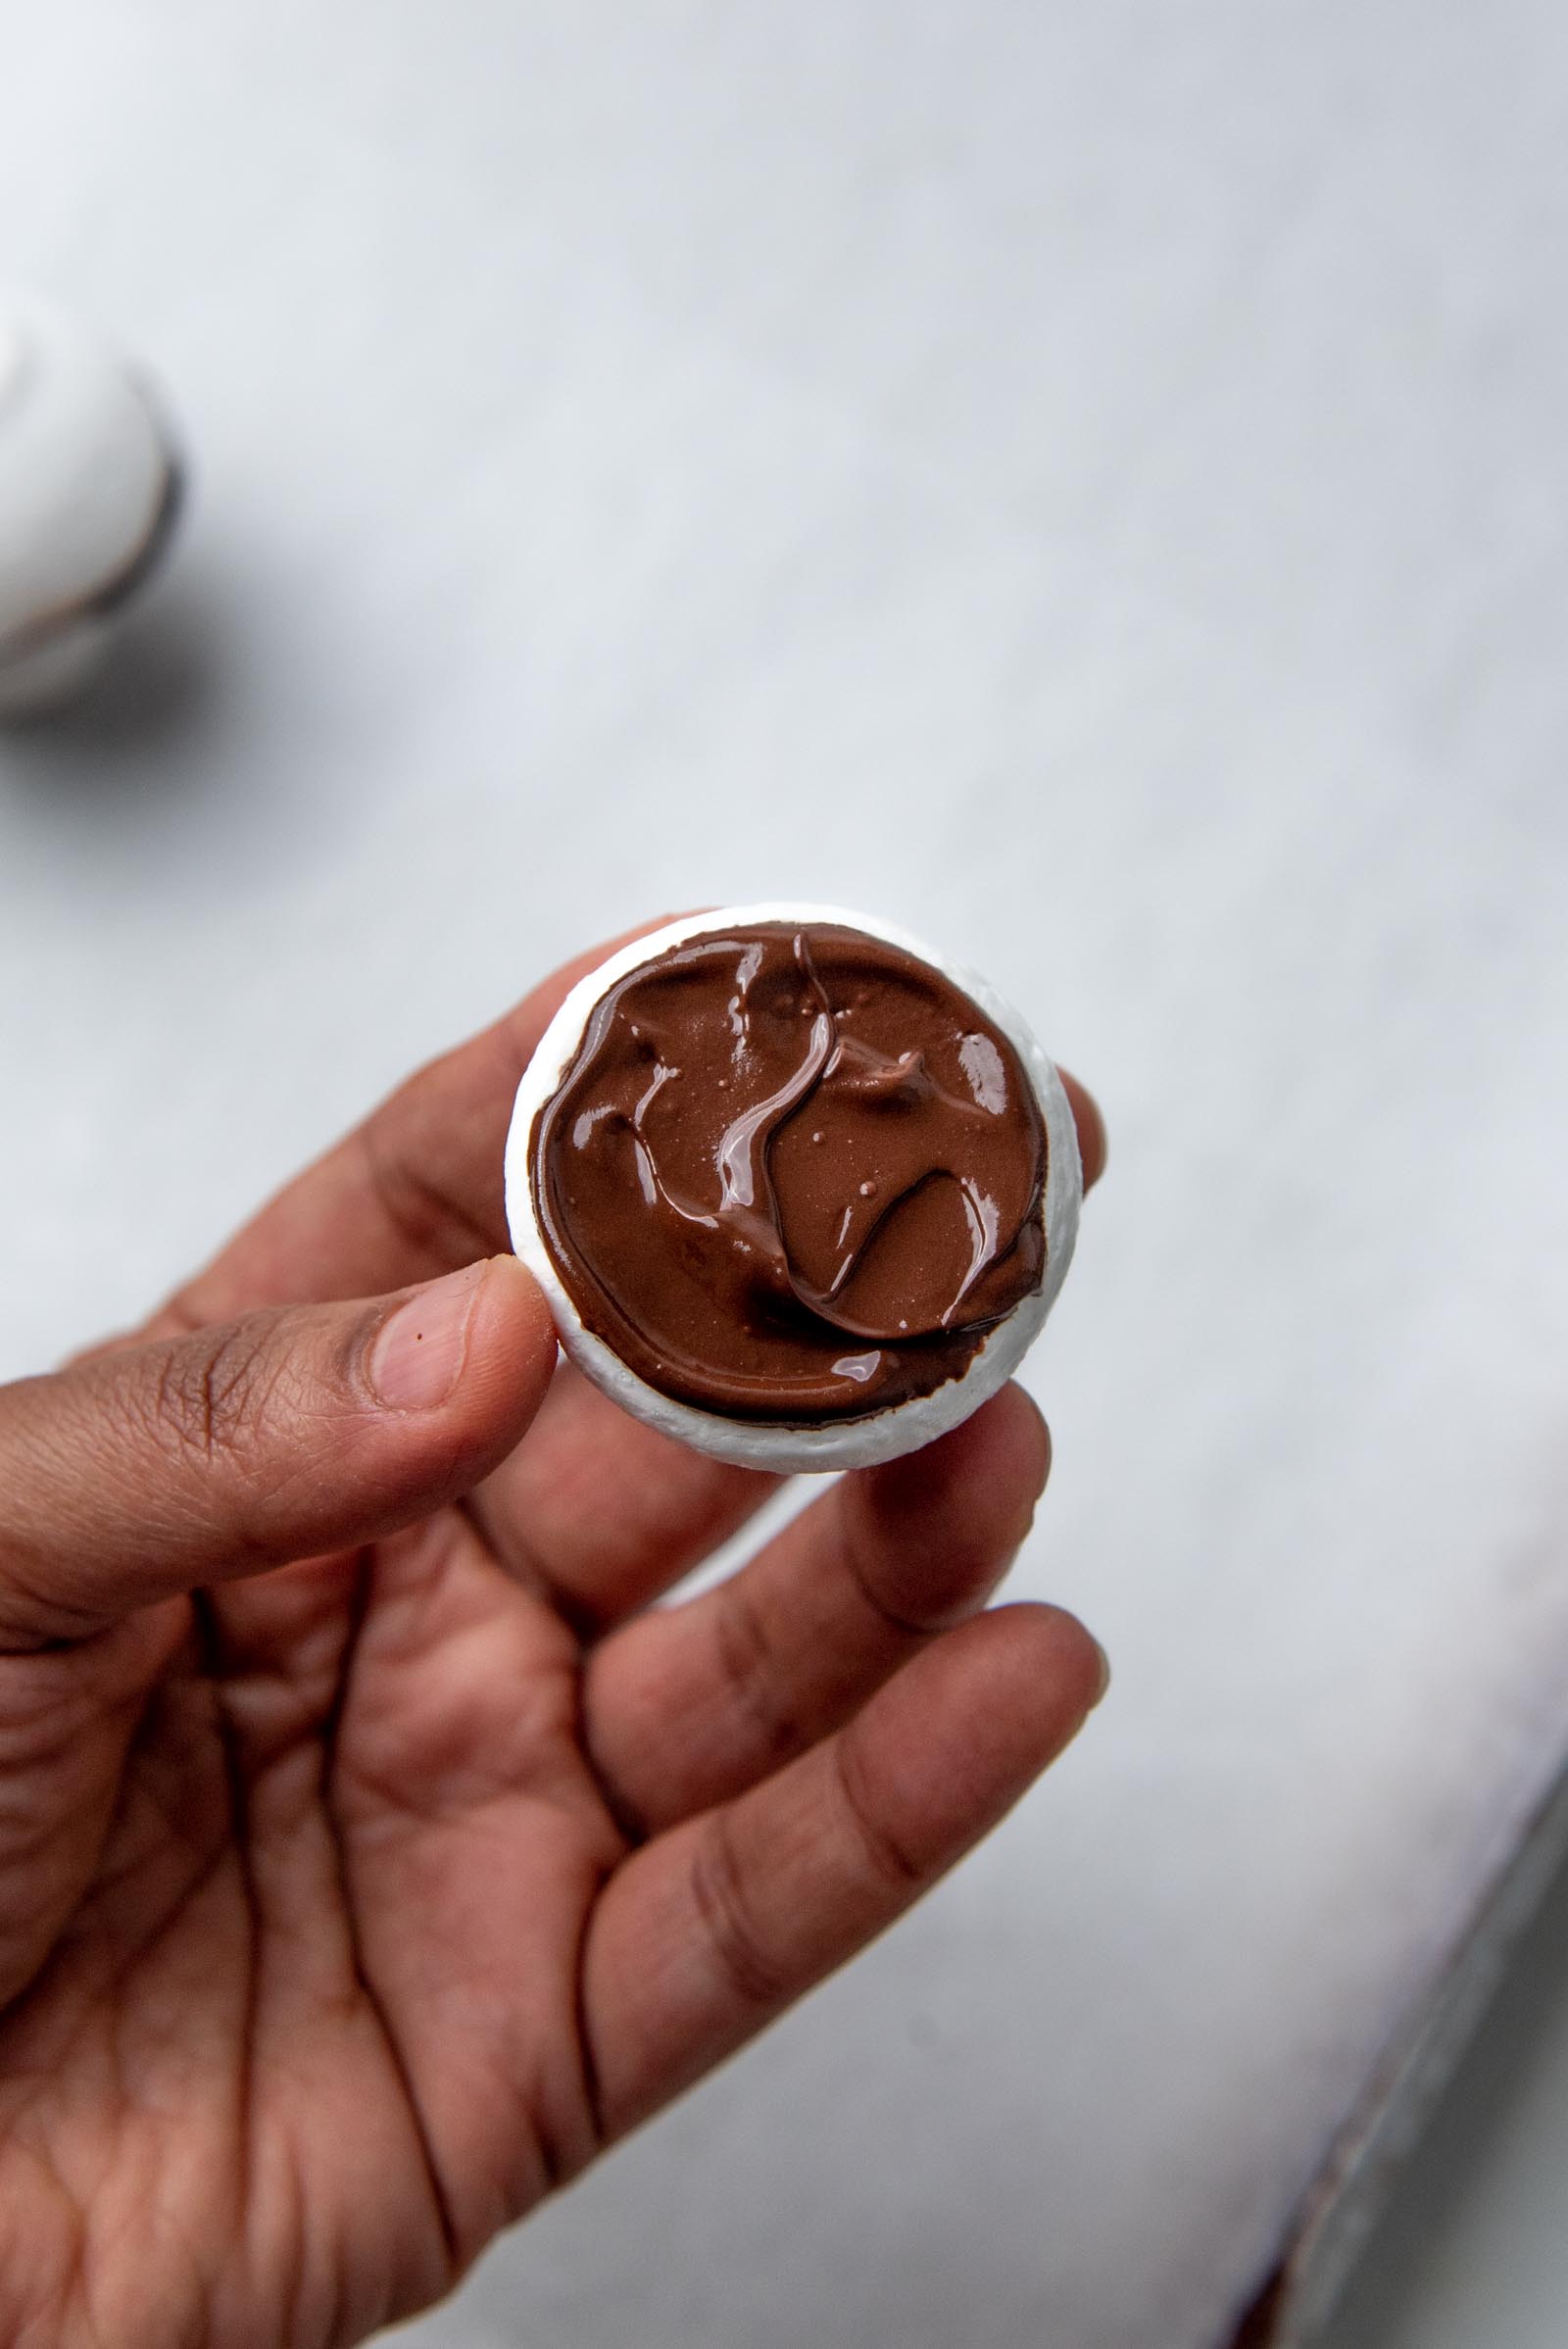
- Spread a very thin layer of melted chocolate on the bottom of the mushroom caps.Some melted chocolate
- Dip the pointed end of a mushroom stem in melted chocolate, and attach it to the bottom of the mushroom cap, slightly pushing it against the hole you made with the toothpick. Place this on a tray and allow the chocolate to set.
- Once the chocolate is set, dust the meringue mushrooms with cocoa powder to make them look more realistic.Cocoa powder
Attaching them to the cake
- Attach these JUST before you serve, as the meringue will get soft quickly when exposed.
- If you already have chocolate shards on your cake, then use melted chocolate to stick the mushrooms onto the cake.
- Or use whipped chocolate ganache to stick them onto the cake, if your cake is simply covered with ganache.
- Serve with a dusting of confectioner's sugar on top.
Recipe Notes
Notes on the chocolate swiss roll cake
Here’s my full post on how to make the chocolate swiss roll cake. It’s a detailed post on how to perfect your swiss roll cake. If you prefer a vanilla swiss roll cake, you can get that vanilla roll cake recipe here.Frosting the cake
You can frost the cake with the whipped ganache recipe provided here. OR you can make a chocolate American buttercream instead. You can find that creamy chocolate buttercream frosting recipe here.Decorating the cake
The chocolate shards and meringue mushrooms are completely optional. You can also make Oreo truffle pine cones. Find that Christmas Oreo balls tutorial here. For easier decoration options, you can decorate the cake with rosemary sprigs and red currants (or cranberries).Nutrition Information:
“This website provides approximate nutrition information for convenience and as a courtesy only. Nutrition data is gathered primarily from the USDA Food Composition Database, whenever available, or otherwise other online calculators.”


Leave a Reply