

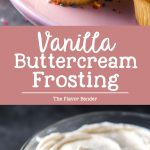
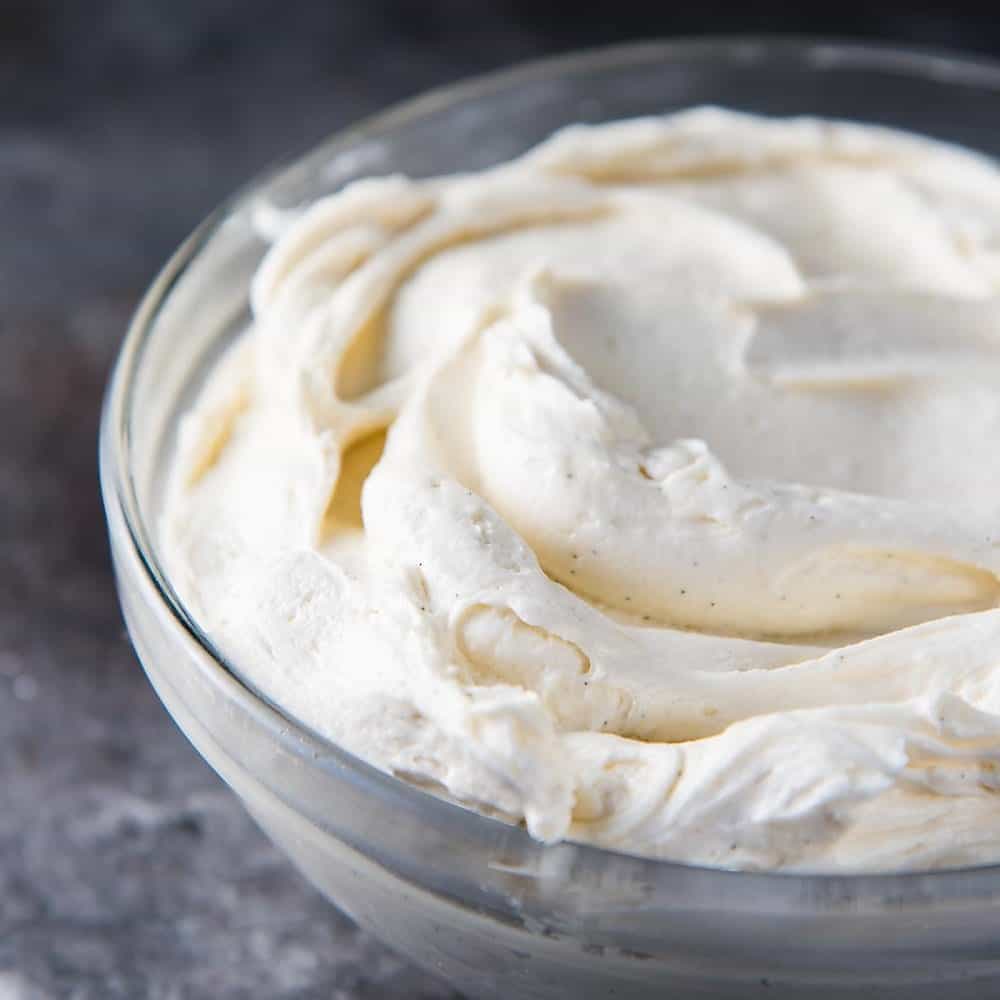
This Easy Vanilla Buttercream Frosting is creamy, fluffy, melt-in-your-mouth soft, packed with vanilla flavor, and NOT overly sweet! The only buttercream you’ll need for all your cakes and cupcakes!
I also share all my tips and tricks for making consistently great vanilla frosting. For other great buttercream frosting options, you can also check out my chocolate buttercream frosting, classic vanilla Swiss meringue buttercream frosting, and my easy vanilla Swiss meringue buttercream frosting (cheat’s recipe).
- Why you’ll love this recipe
- What is buttercream frosting?
- Ingredients to make vanilla buttercream frosting
- How to make perfect fluffy vanilla buttercream frosting (step by step instructions)
- My best tips for making perfect vanilla buttercream frosting
- Important recipe notes
- How to use this fluffy buttercream frosting
- Storage instructions
- Frequently asked questions
This American Buttercream Frosting is deceptively simple! Here I share all the tips and tricks I use to make consistently AMAZING vanilla frosting.
It’s only my second favorite of all frosting recipes (everything comes second to chocolate buttercream!).
But I make it all the time, and I’m not at all shy when it comes to slathering this all over any cake (like this vanilla cake, vanilla cupcakes, classic white cake, white coconut cake, and even chocolate cupcakes and chocolate cake with vanilla frosting!).
Why you’ll love this recipe
Everyone needs a good vanilla buttercream frosting recipe for their cakes and cupcakes! This frosting is also known as American buttercream frosting.
- Unlike most American buttercream frostings, my recipe isn’t too sweet! This is a buttercream that isn’t cloyingly sweet, and is still perfectly stable, buttery, and delicious.
- I show you how to get a lovely fluffy, creamy, velvety texture in your buttercream.
- I even share tips on how to get the smoothest frosting without air bubbles.
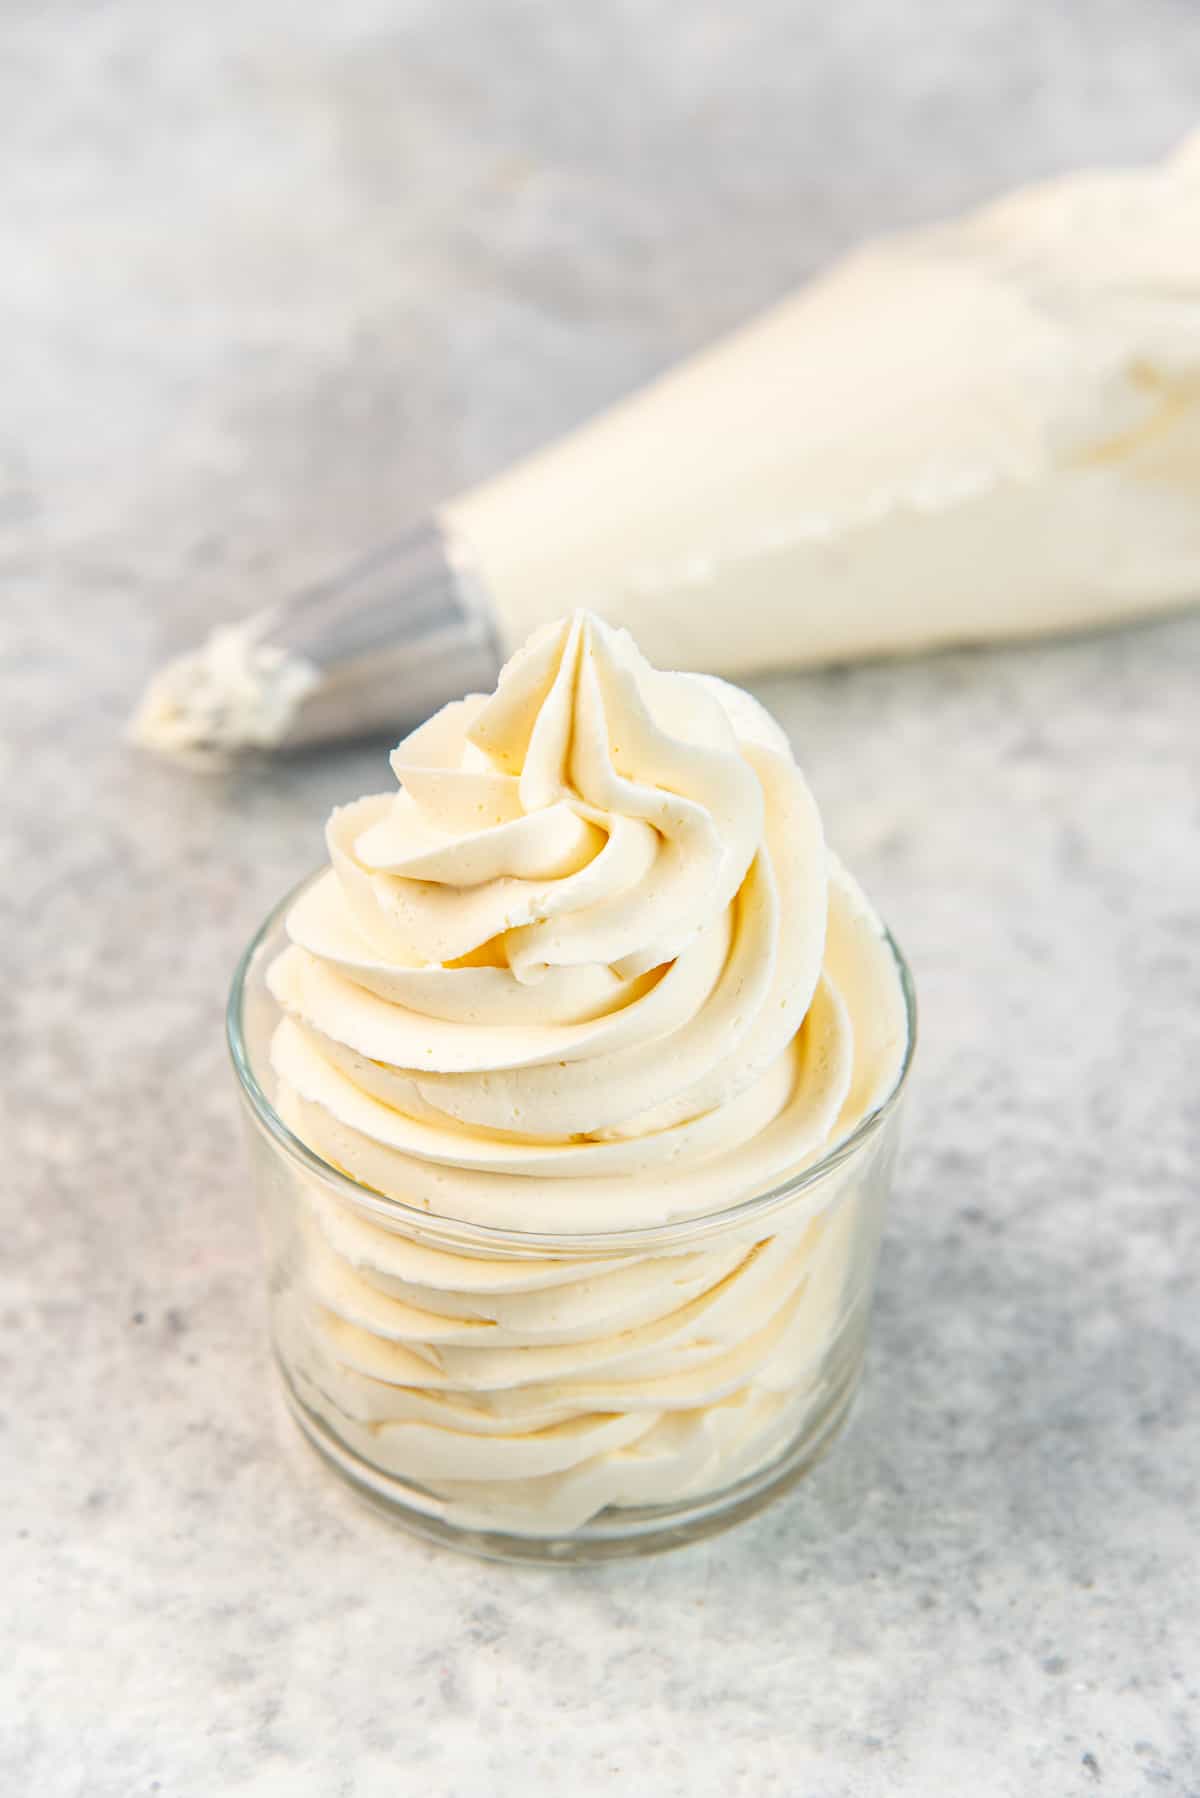
- This classic vanilla buttercream is perfect to pipe, as it holds its shape beautifully, but is still soft and creamy too.
- I also talk about vanilla extract and how to get the most flavor in your vanilla flavored American buttercream.
- Super easy to make, and easy to fix if something goes wrong.
- This recipe also shows you how to get the whitest buttercream! I use two methods, and you can choose which is better for you to make pure white buttercream frosting.
What is buttercream frosting?
Buttercream frosting is frosting made with butter. There are many types of buttercream frosting that are used to fill and coat cakes.
- American buttercream – Classic butter and confectioners sugar frosting.
- Swiss meringue buttercream – Sugar and egg white meringue mixed with butter (like this vanilla Swiss meringue buttercream and chocolate Swiss meringue buttercream).
- Italian buttercream – Sugar syrup and egg white meringue mixed with butter.
- German buttercream – Custard and butter frosting.
- French buttercream – Egg yolk, sugar, and butter frosting.
- Ermine frosting / flour buttercream – Boiled flour and butter frosting.
Each of these buttercream frostings has pros and cons, and are all delicious in their own way! Arguably, American buttercream is the easiest to make. However, most recipes online make American buttercream that is way too sweet, because traditionally 2 parts of confectioner’s sugar are used for every 1 part of butter.
However my recipe only uses 1 part confectioner’s sugar to 1 part butter! This results in a buttercream that is still sweet, but not too sweet. You can still taste the creamy butter AND the vanilla too.
Ingredients to make vanilla buttercream frosting
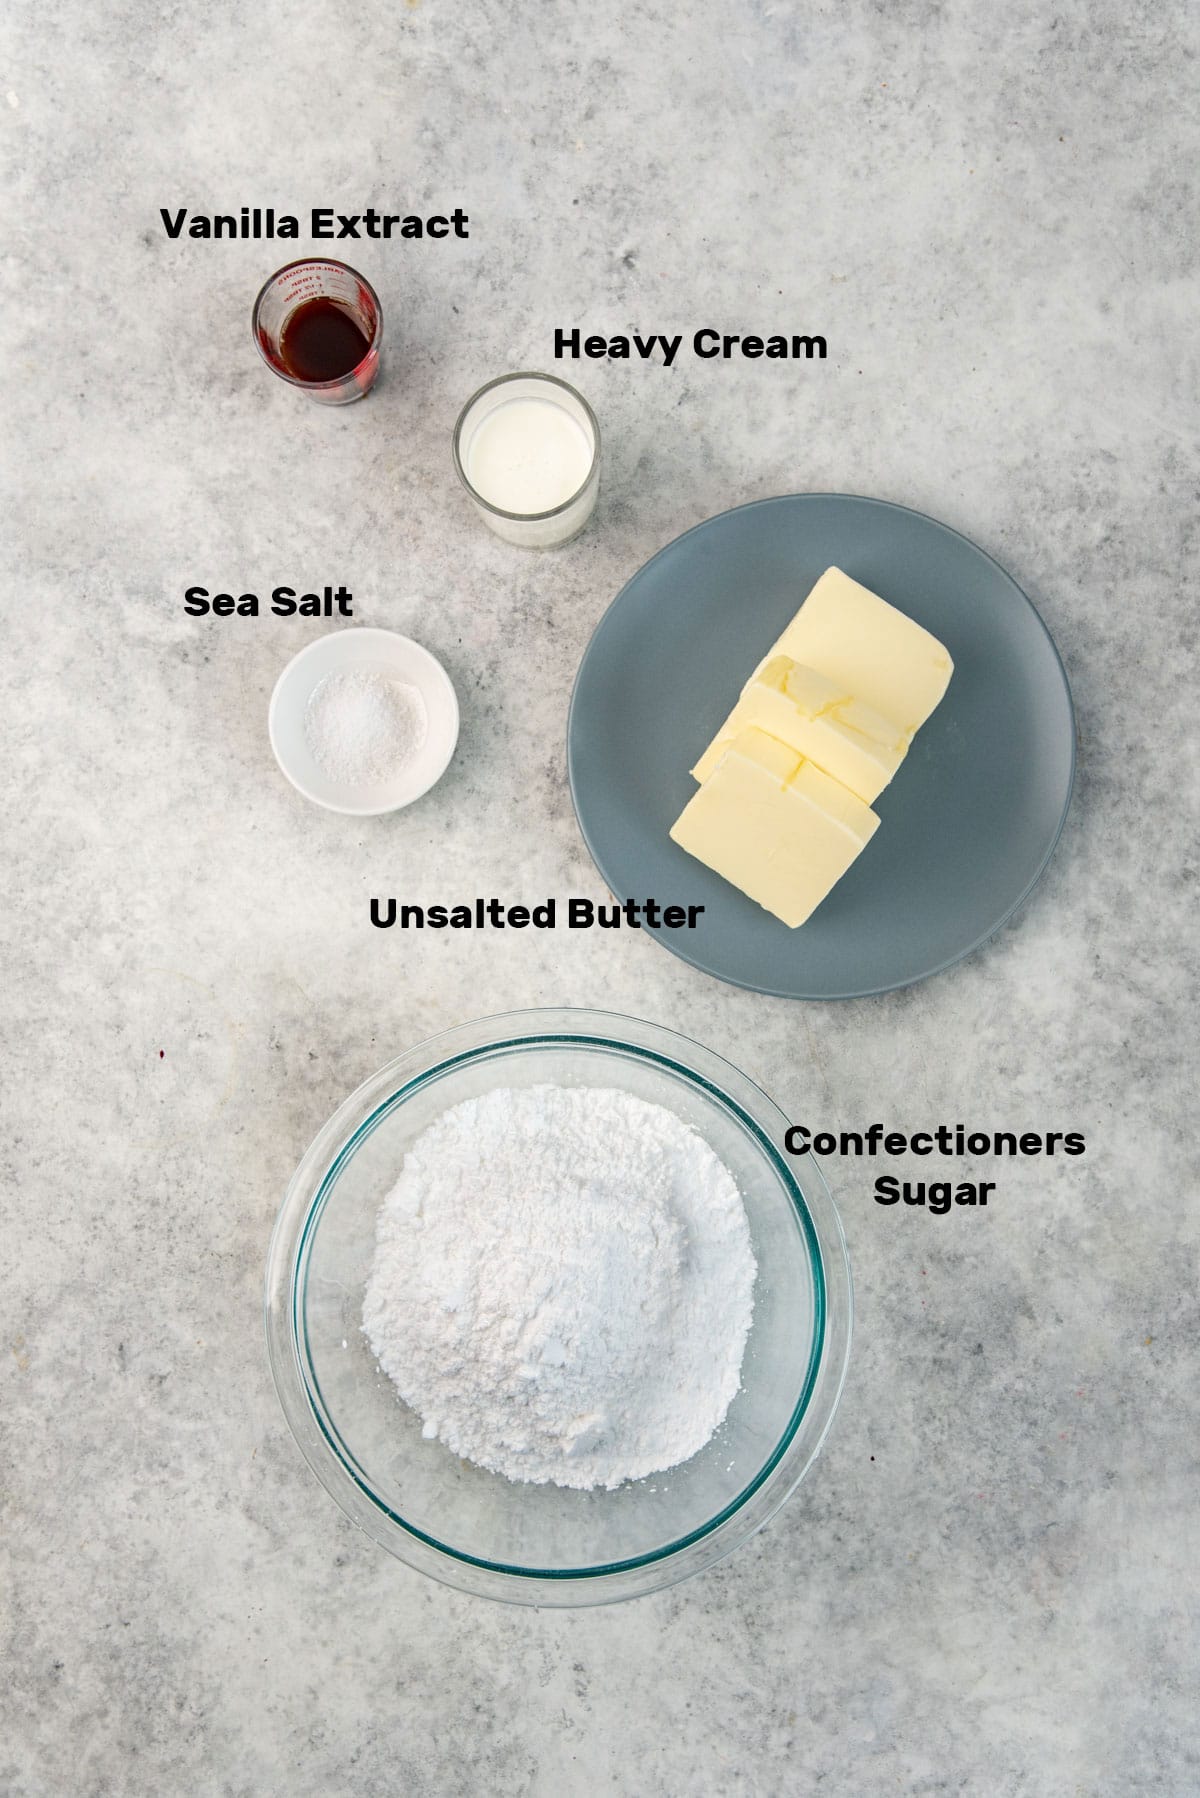
Unsalted butter
I like to use unsalted butter. This way I can control how much salt to add to the recipe to enhance the flavor. You can also use salted buttercream, but different brands of butter will contain different amounts of salt. So, you will need to adjust the salt amount depending on the flavor of the buttercream.
Heavy cream
Ideally, use heavy cream that has at least 35% fat. If you can use double cream (over 45% fat), that’s even better! Heavy cream helps to make the buttercream soft and creamy.
But here’s a caveat. If you’re in a colder climate, you can use ALL the heavy cream recommended in the recipe. However, if the ambient temperature is over 77 F / 25 C, then use less cream. If the ambient temperature if over 85 F / 30 C, then skip the cream altogether.
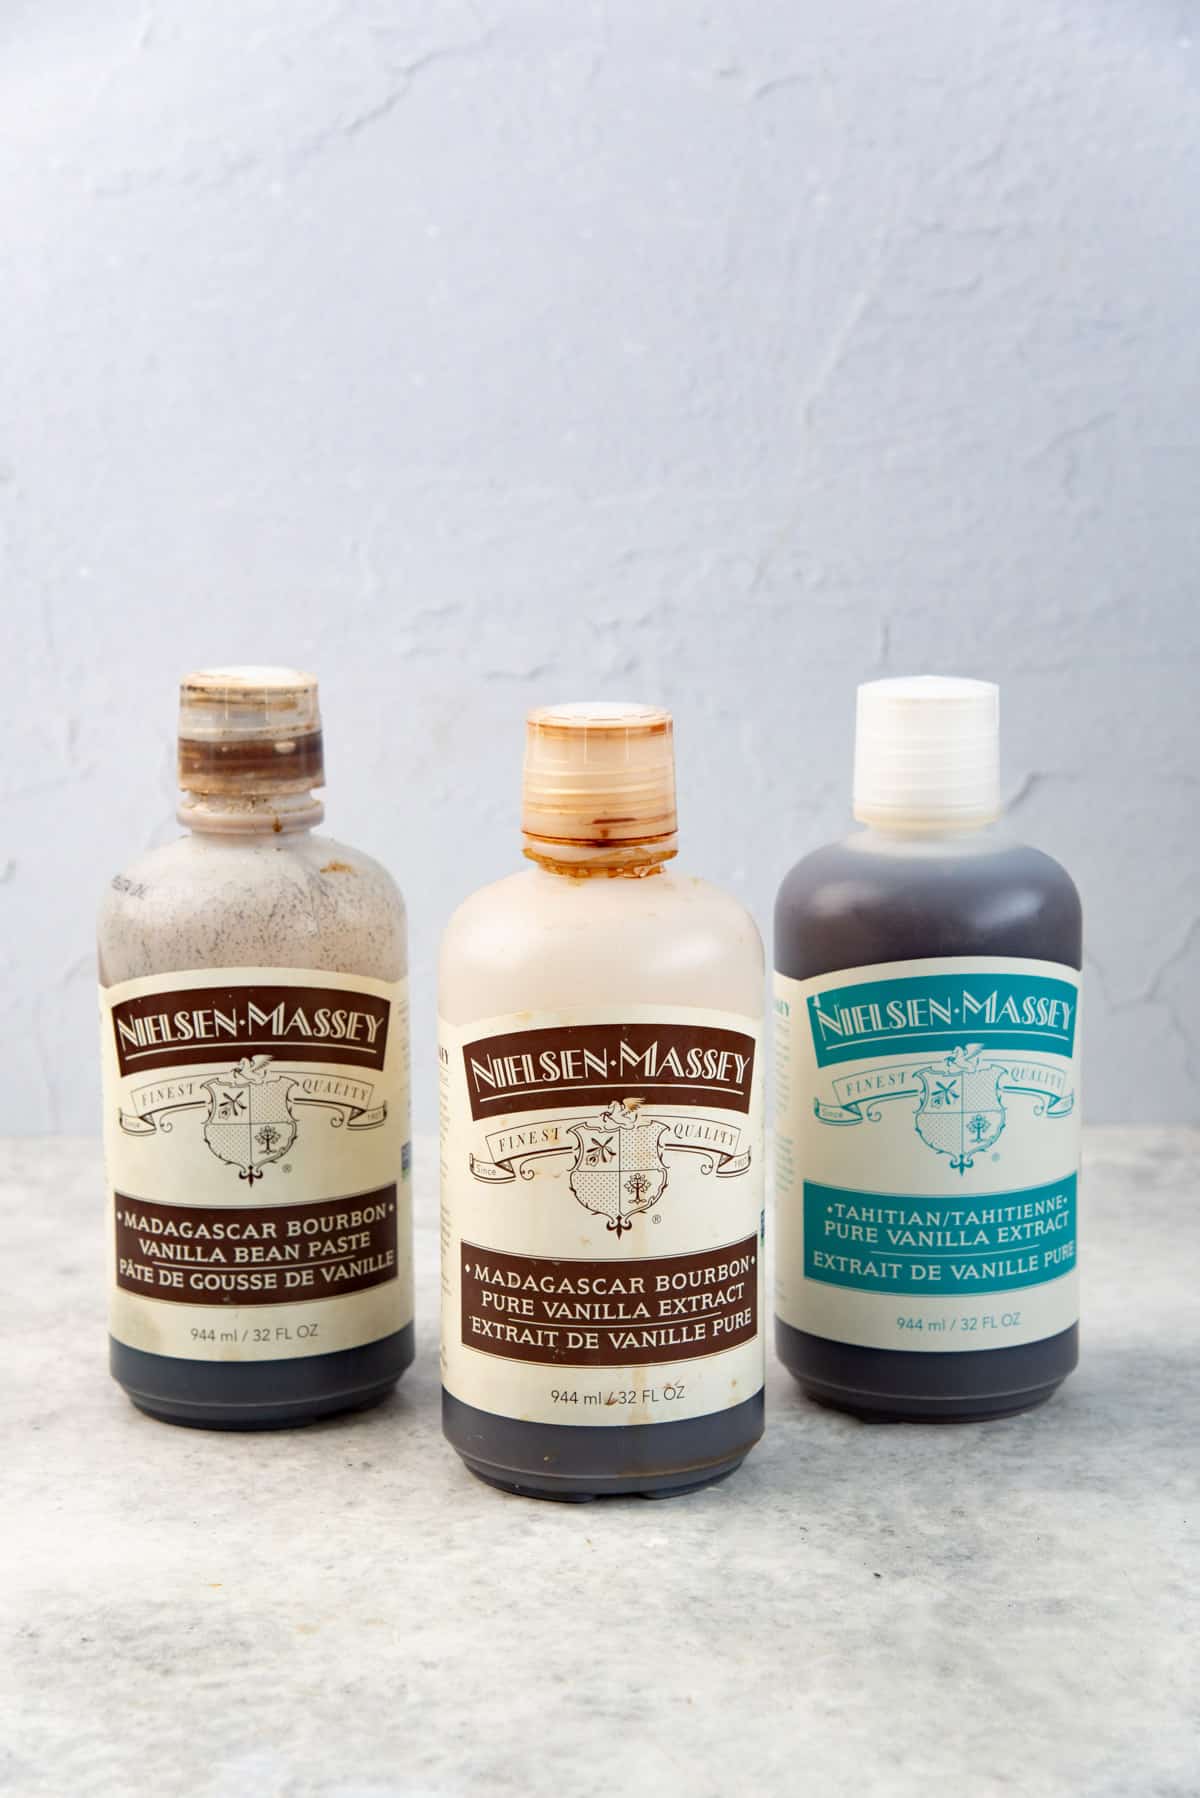
Vanilla extract
Vanilla extract is essential for a vanilla buttercream, of course. Obviously, a good quality vanilla extract will provide more flavor, but you can also use store-bought vanilla essence. However, if you’re using vanilla essence, make sure to use a little at a time. There is a tendency for vanilla essence to taste bitter if too much is used.
The difference between vanilla extract and vanilla essence is that,
- Vanilla extract is made with real vanilla beans, and the vanillin flavor molecules “extracted” are natural. As a result, it’s more expensive.
- Vanilla essence is synthetic. The vanillin molecules that provide flavor here are manufactured. This is why it’s also called “imitation vanilla”. It’s not as strong as vanilla extract, so more is required to get the same vanilla flavor, but if you add too much it can also become bitter (depending on the brand).
To add even more flavor, you can add a mixture of different types of vanilla too. I like to use Madagascar bourbon vanilla for the classic vanilla flavor, and then I add a little bit of Tahitian vanilla for a sweet vanilla fragrance. This is completely optional though.
Salt
If your buttercream frosting tastes too sweet and too bland, then salt is likely the missing component! Salt is absolutely necessary to enhance the flavor in your buttercream.
The salt balances the sweetness and brings out the flavors of the vanilla. You can add just a little to enhance the flavor, but I like to add a little extra to actually taste the salt.
The slightly salty and sweet vanilla buttercream frosting tastes more luxurious! But you can adjust the amount of salt to YOUR preference.
Confectioner’s sugar
Confectioner’s sugar is also known as powdered sugar. This is finely ground sugar that looks like a powder. Please note, that you absolutely cannot use regular sugar here! See my guide to types of sugar in baking for more information.
Powdered sugar will dissolve in the buttercream much more easily, resulting in a smooth buttercream. The more confectioners sugar you add to your buttercream, the stiffer it will become. So you can adjust the texture of the frosting with sugar. However, this will also make the buttercream super sweet.
Tools you will need to make buttercream
- Stand mixer with mixing bowl
- Balloon whisk and a paddle attachment for stand mixer.
- Flexible spatula (I use a silicone spatula)
- Weighing scale
- Microwave-safe bowl
- Bowls and plates to measure ingredients
- Sieves
How to make perfect fluffy vanilla buttercream frosting (step by step instructions)
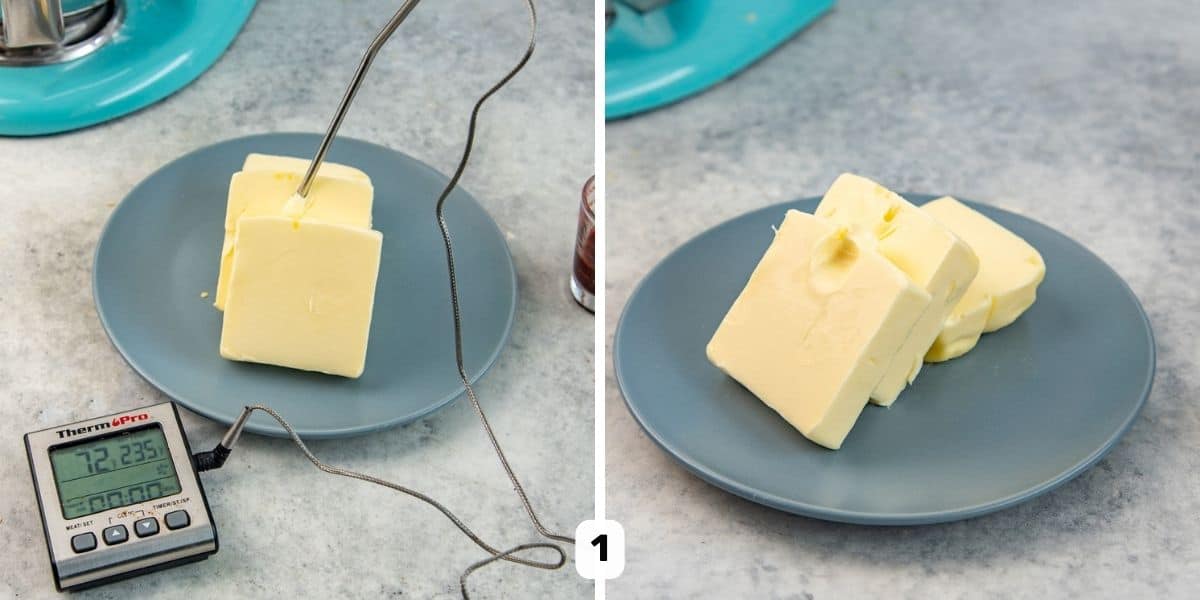
Step one – Make sure the butter is at the correct consistency
The melting point of butter is between 90 – 95 F / 32 – 35 C. The closer the butter is to this temperature, the softer it’ll be. However, if the butter is too warm, the buttercream will be too thin and unable to hold its shape.
So, it’s important to start with butter that is between 70 – 75 F / 21 – 25 C. Start with 70 F / 21 C, if you’re making buttercream in the summer (or in a hot kitchen). The butter can be a little warmer if your kitchen is cooler or if it’s winter.
If you press into the butter firmly, it should create an indentation without disrupting the butter in the surrounding area.
In the summer, I remove the butter from the fridge and let it rest for a little while until it’s slightly soft, but cool to the touch. This could take up to about 30 minutes.
IF it’s an exceptionally hot day, and the butter softens too much – you can put it back in the fridge for a few minutes to make it harden a little.
In the winter, I keep the butter out overnight because it’s cooler inside the house (regardless of your thermostat, it’s still cooler inside the house in the winter due to things like heat radiation and the dry air), so the butter stays nice, cool, and perfectly soft until the next day.
If you have a sugar thermometer, you can actually measure the butter temp., and you need it to be at about 70°F (21°C). This is optional though, so as long as the butter feels cool and slightly soft to the touch, it should be good.
If the butter is too cold, microwave a glass bowl with some water (or fill the bowl with boiling water). When the bowl is fairly warm, remove the water and place the bowl over the butter like a cloche. The warmth of the bowl should soften the butter in a few minutes. Cut the butter into smaller pieces to expedite this process. Be careful not to let the butter soften too much though.
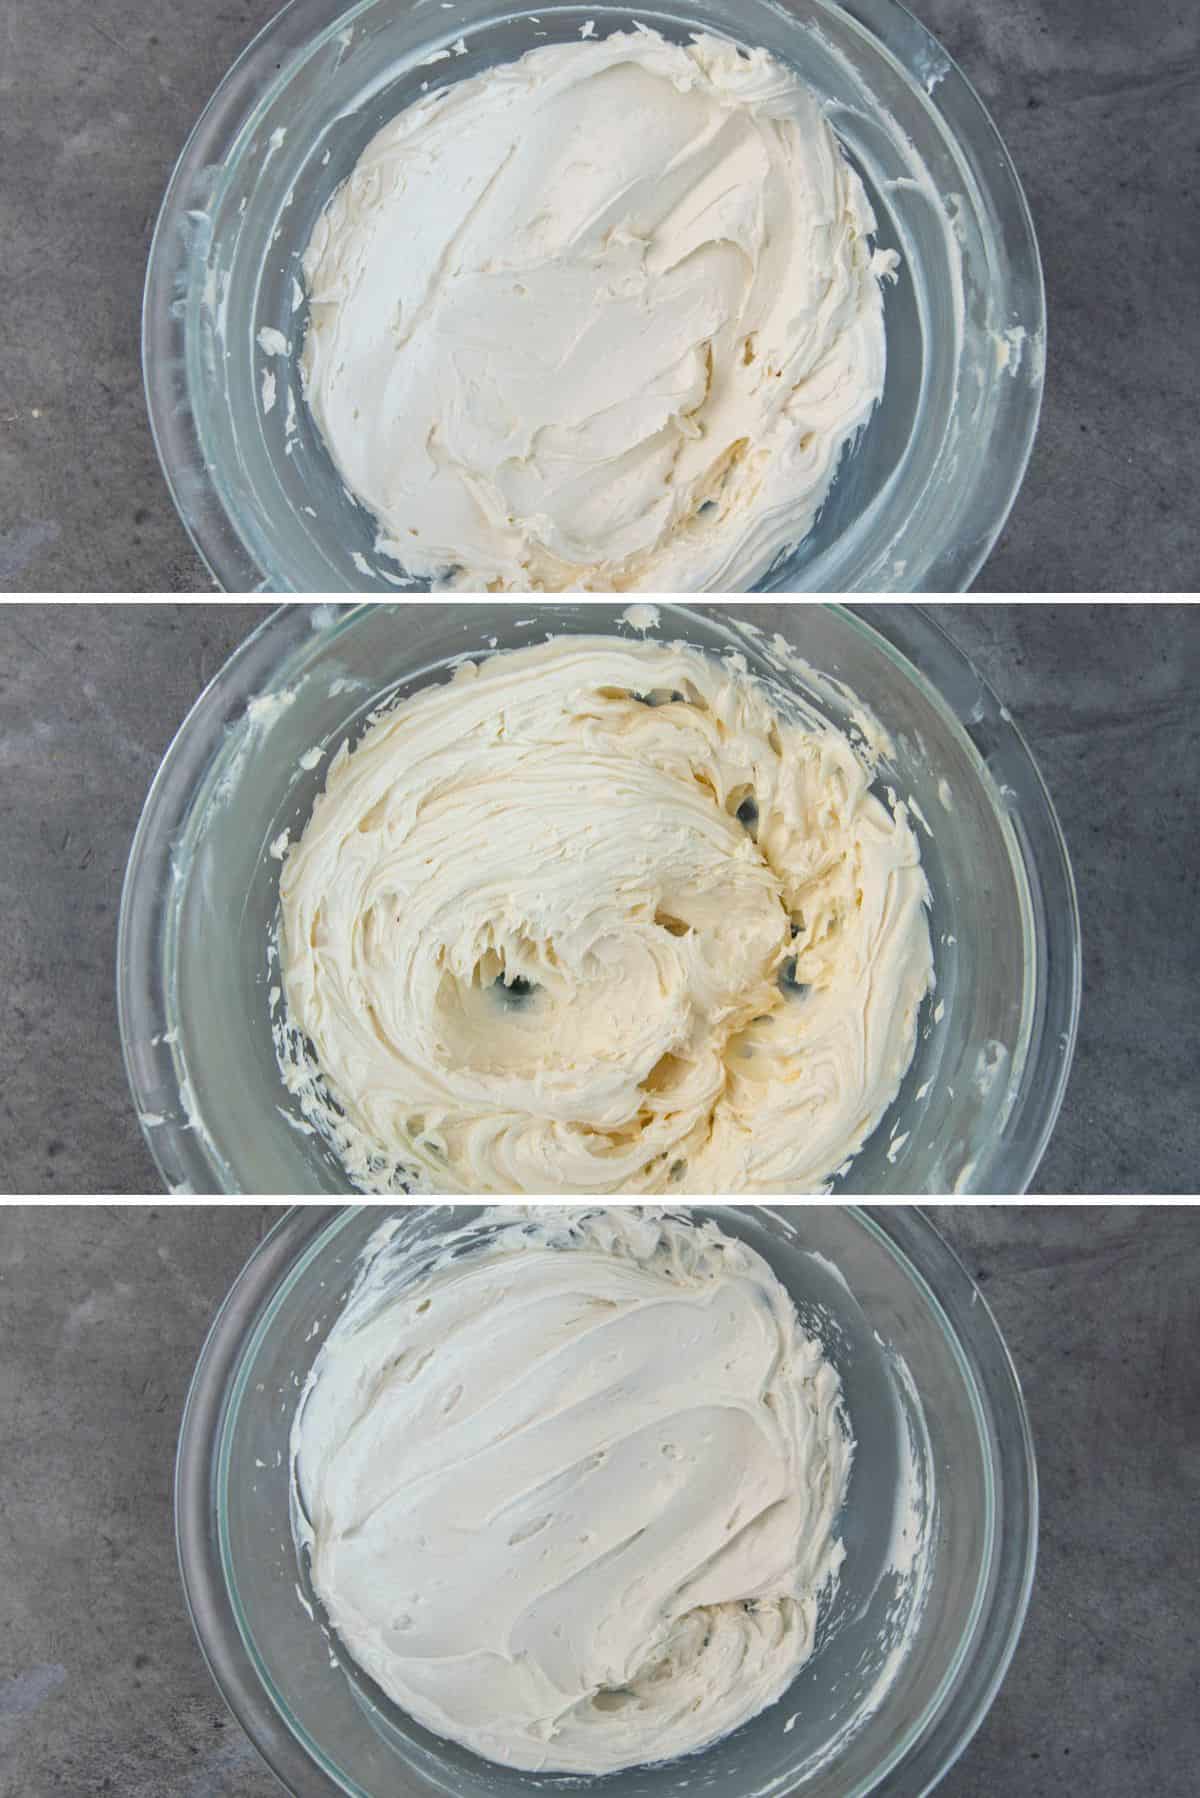
Step two – Cream the butter
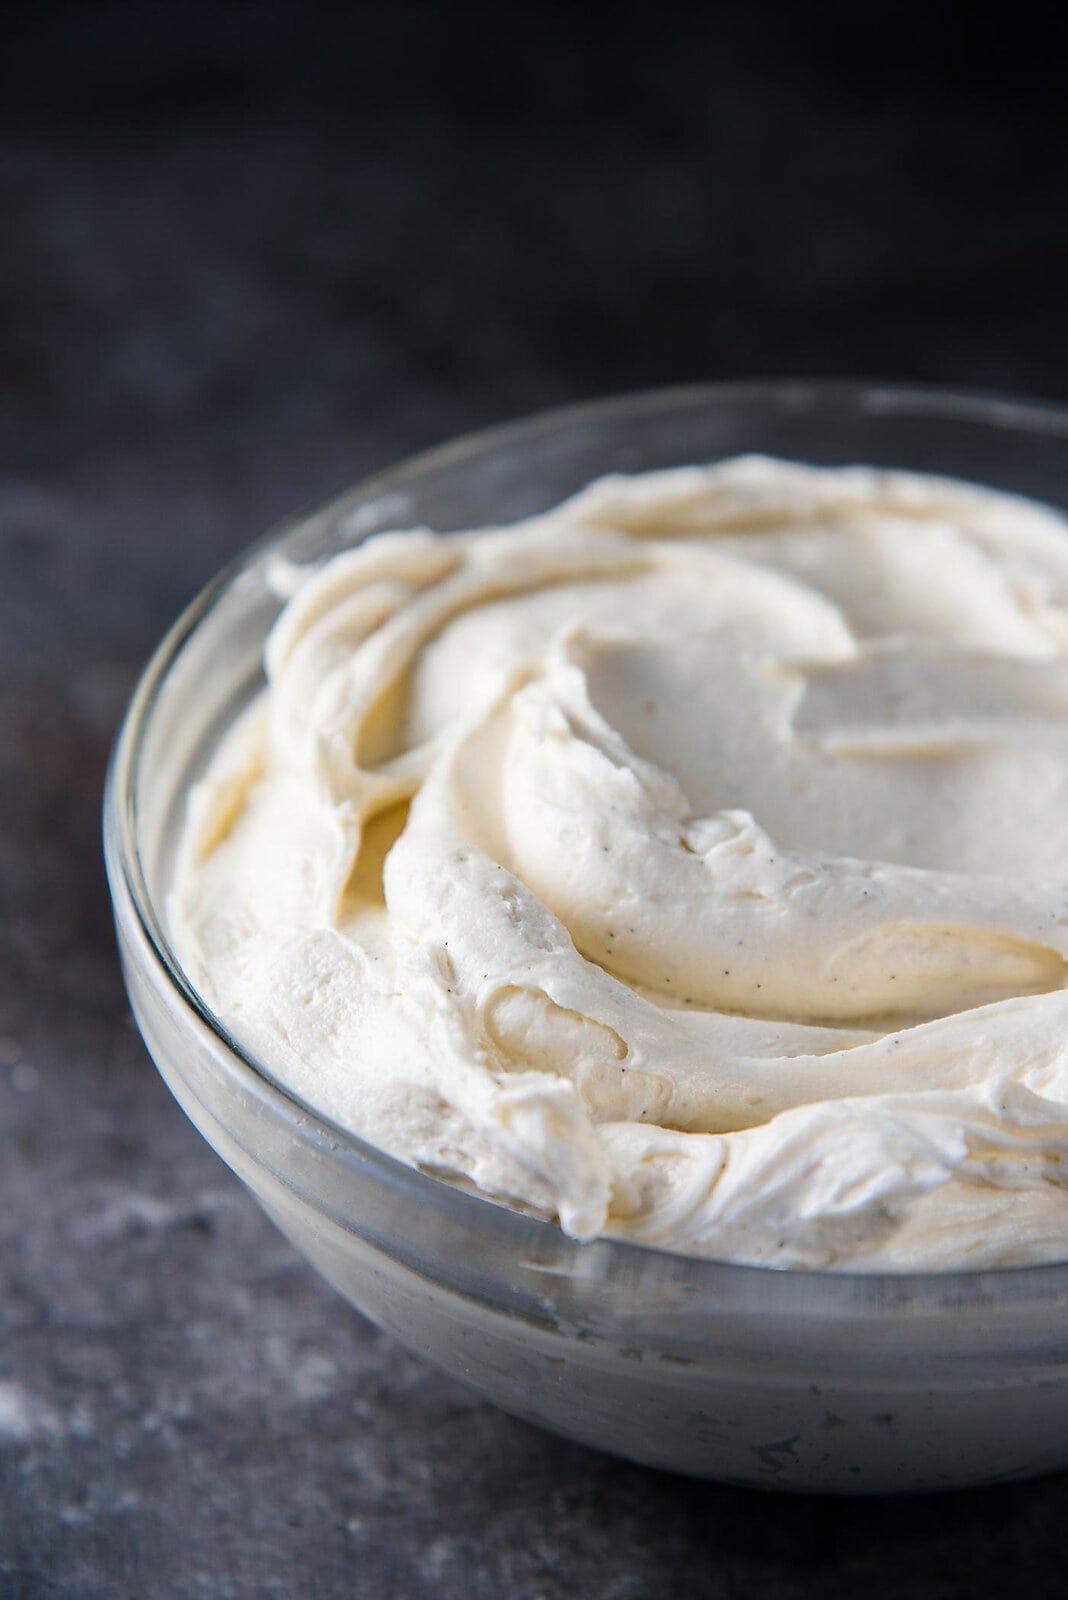
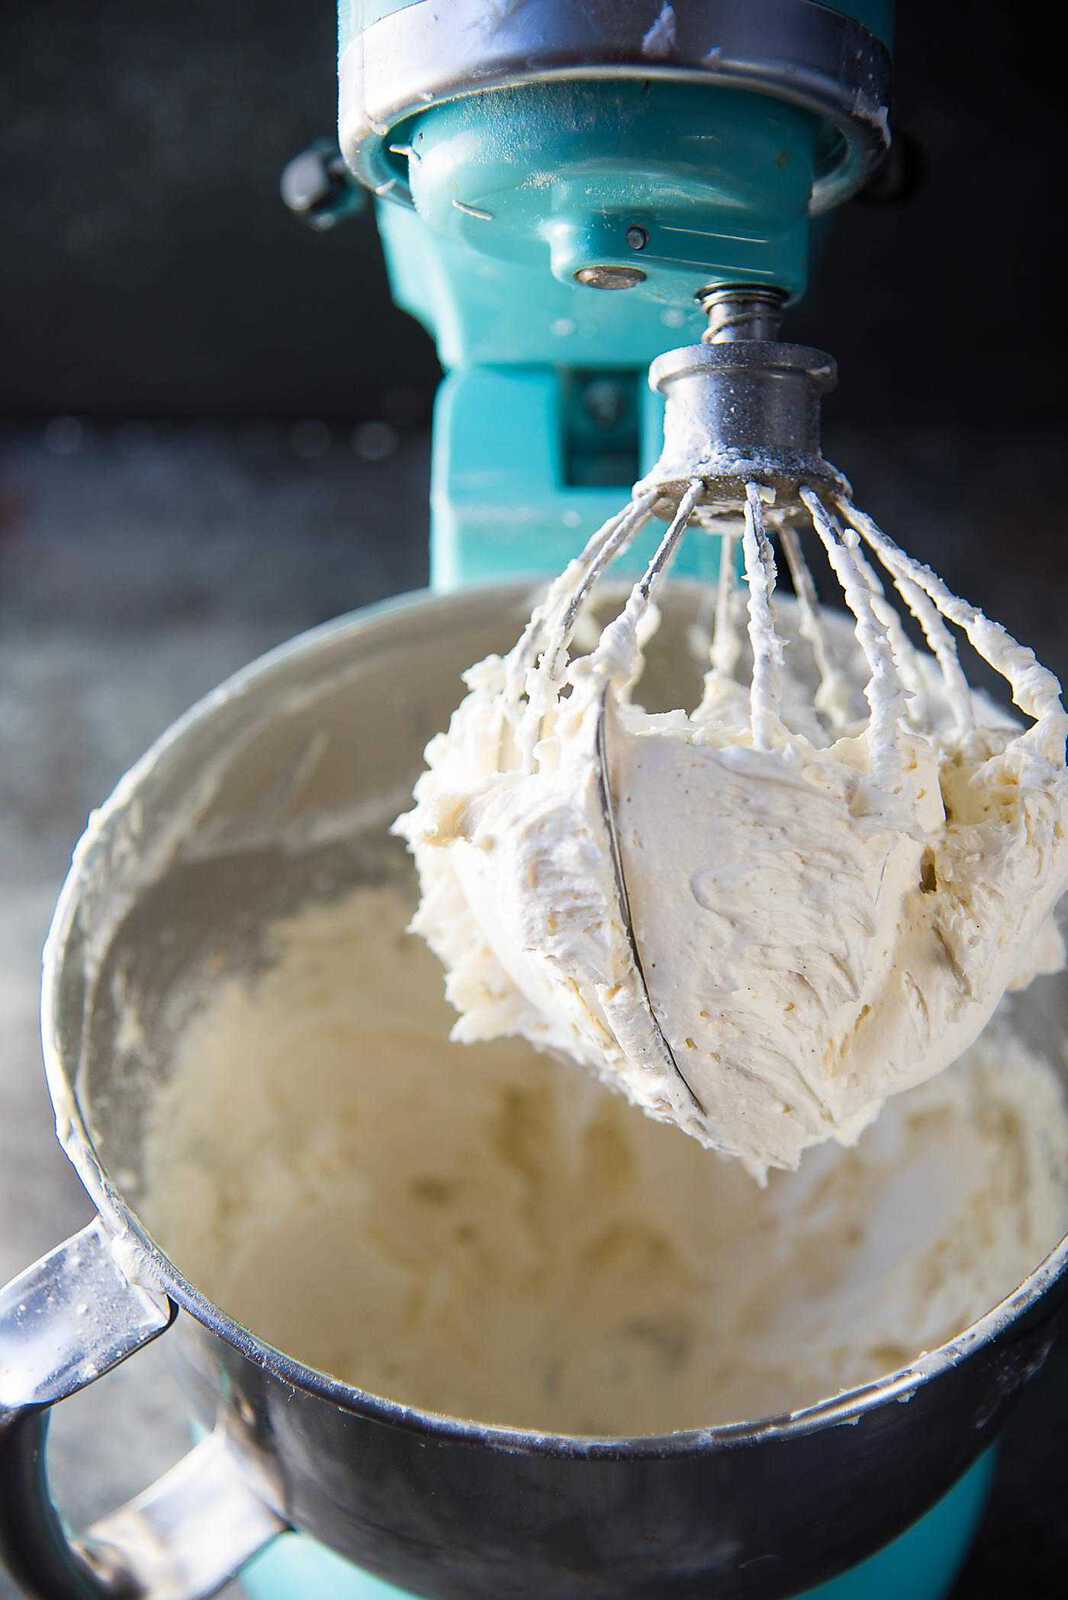
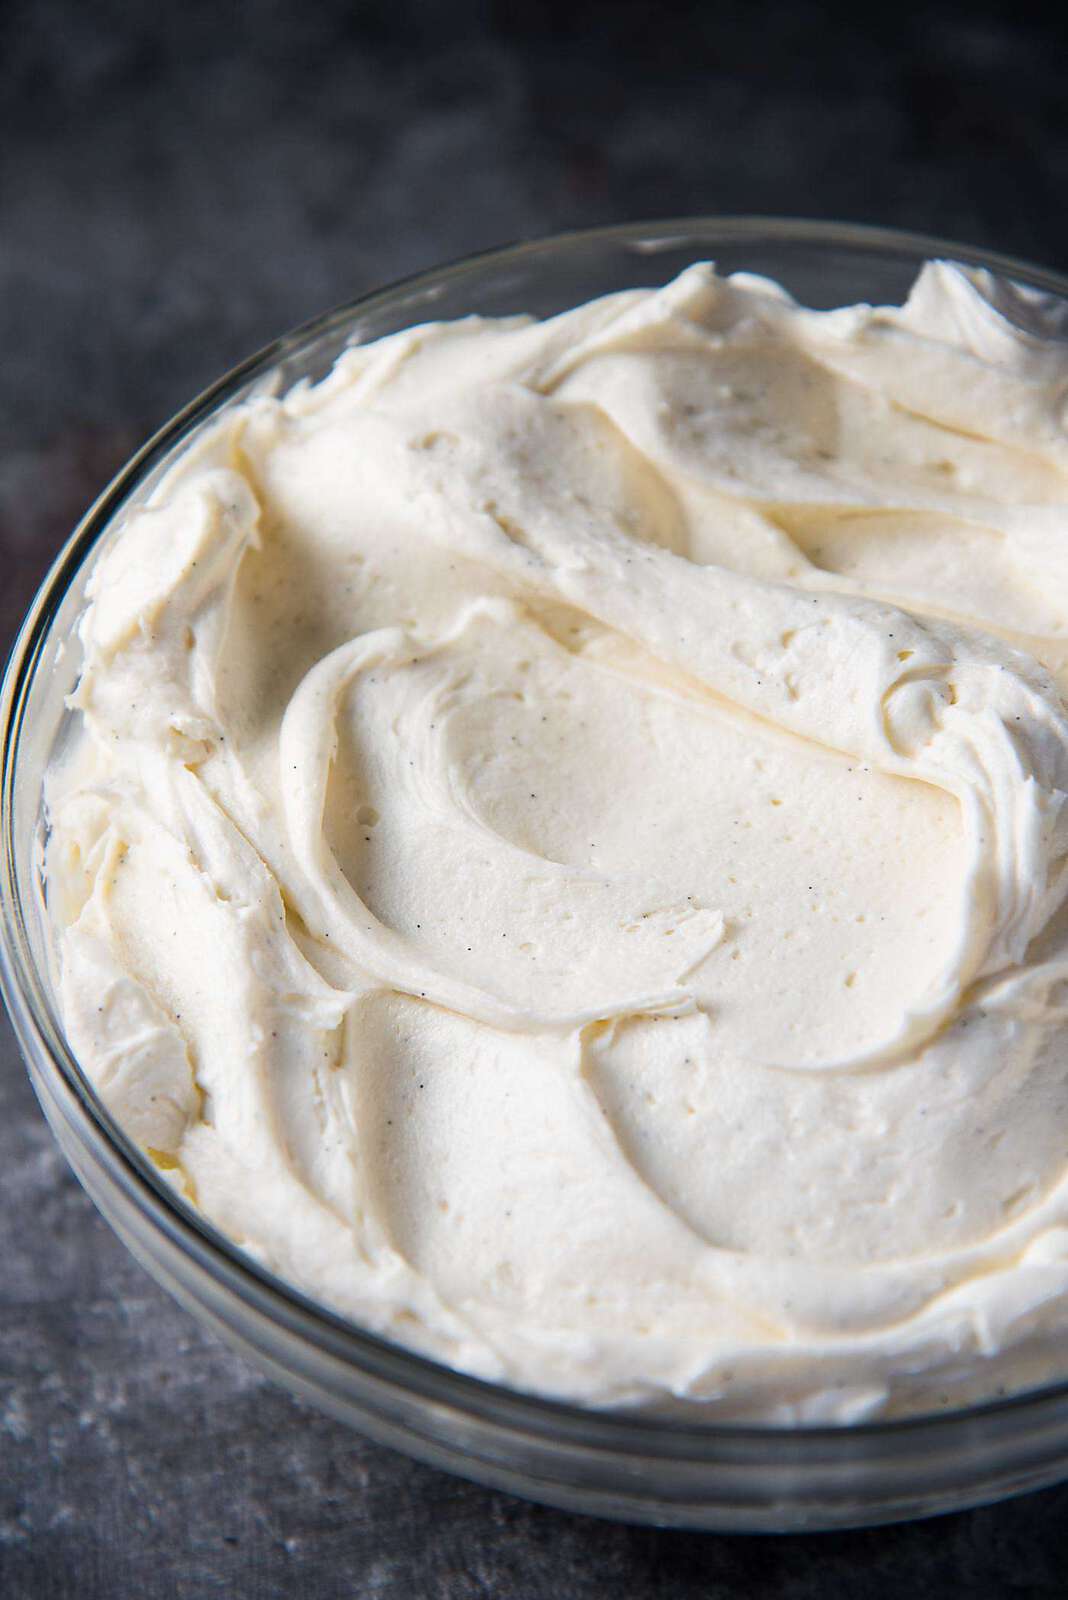
Place the butter in a mixing bowl. Using the whisk attachment or paddle attachment, cream the butter until it looks fluffy and creamy. This can take anywhere from 5 – 10 minutes. Do not skip this step!
You must whisk the butter until it’s light and fluffy and almost white in color. If you use the paddle attachment, it’ll take longer to achieve this consistency. But there will be fewer bubbles in the final buttercream.
When the butter is fluffy and creamy, add half of the heavy cream, vanilla, and salt, and whisk again. Scrape the sides AND the bottom of the bowl to ensure all the butter is mixed well. Make sure everything is mixed through and the butter is fluffy and creamy and light.
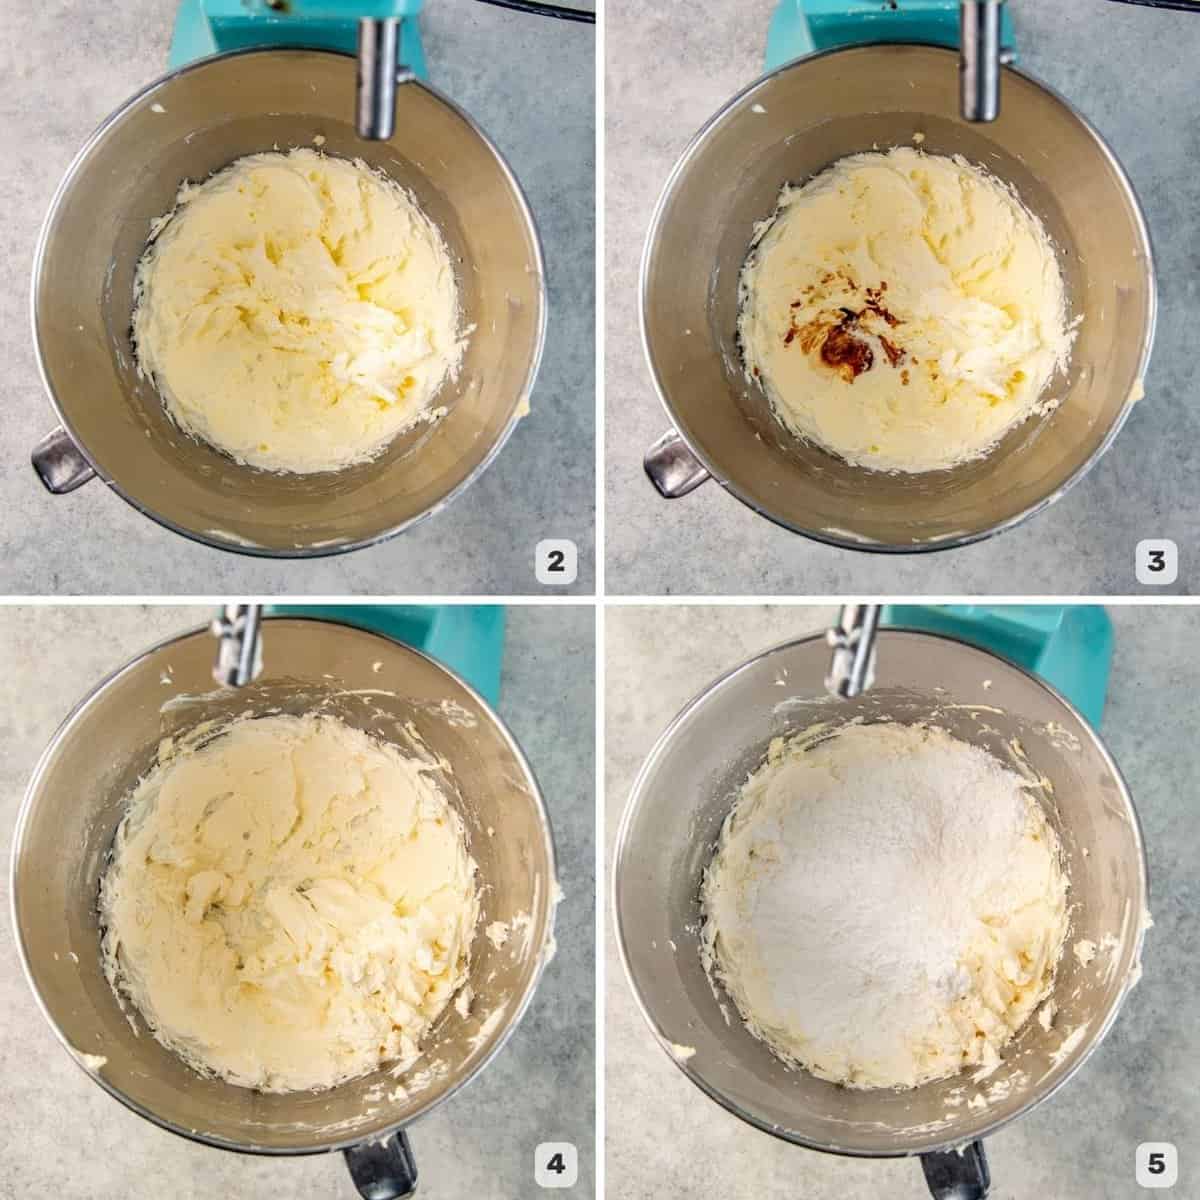
Step three – Add the confectioner’s sugar
In North America, confectioners sugar is usually pre-sifted and there are no lumps. BUT I know from experience that in other countries, confectioners sugar can contain lumps that may not disappear in the frosting.
So it’s important to sift the confectioners sugar to make sure there are no lumps before adding it to the creamed butter.
To prevent the confectioner’s sugar from flying all over the place, add it in a few additions. Smaller quantities can be added in 1 – 2 batches, but larger quantities may need to be added in 2 – 4 additions. Also, pulse the mixer to blend the sugar and butter initially too.
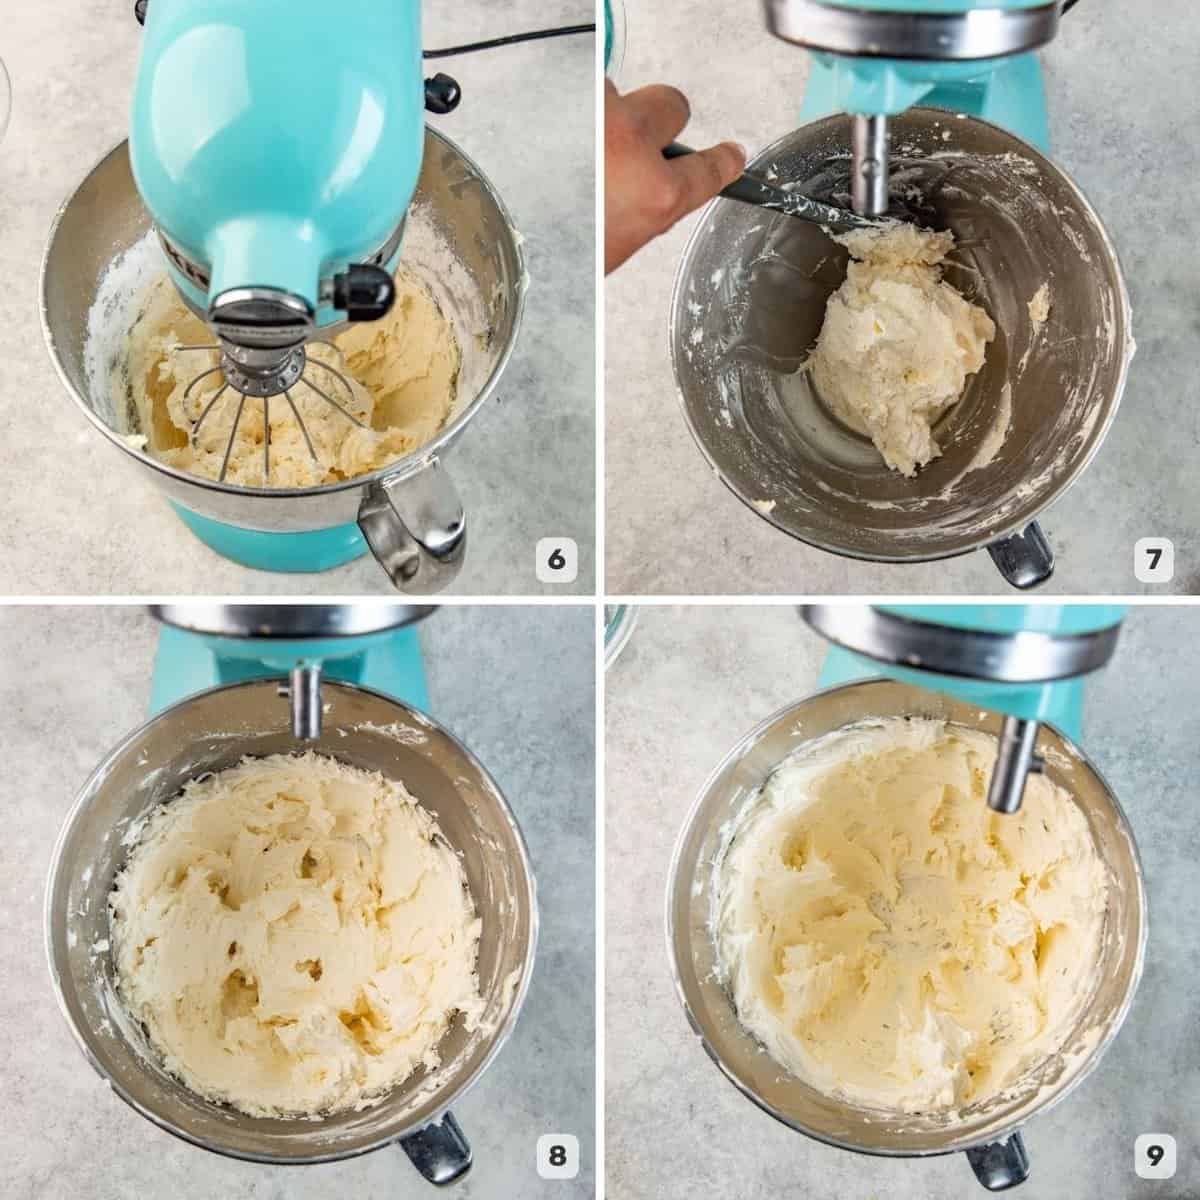
When all the sugar has been mixed in, whip for a few minutes until the buttercream is the correct consistency. If you like, you can add the rest of the heavy cream too. This will make the buttercream a little softer and more loose (I do not recommend this for hot climates).
Step four – Adding coloring or other flavors (optional)
This step is optional. You can add coloring and flavors to your buttercream at this stage. I recommend gel food coloring. They are nice and concentrated, so you only need a few drops to get a deep color.
Water-based food coloring would be OK if you want lighter shades though. The more water based liquid you add, the more liquid-like your buttercream becomes.
You can also add other flavor extracts! I do not recommend adding flavors with lots of water – such as fruit puree. This will make the buttercream more liquidy, and even cause the frosting to curdle. Instead, I use extracts or freeze-dried powders.
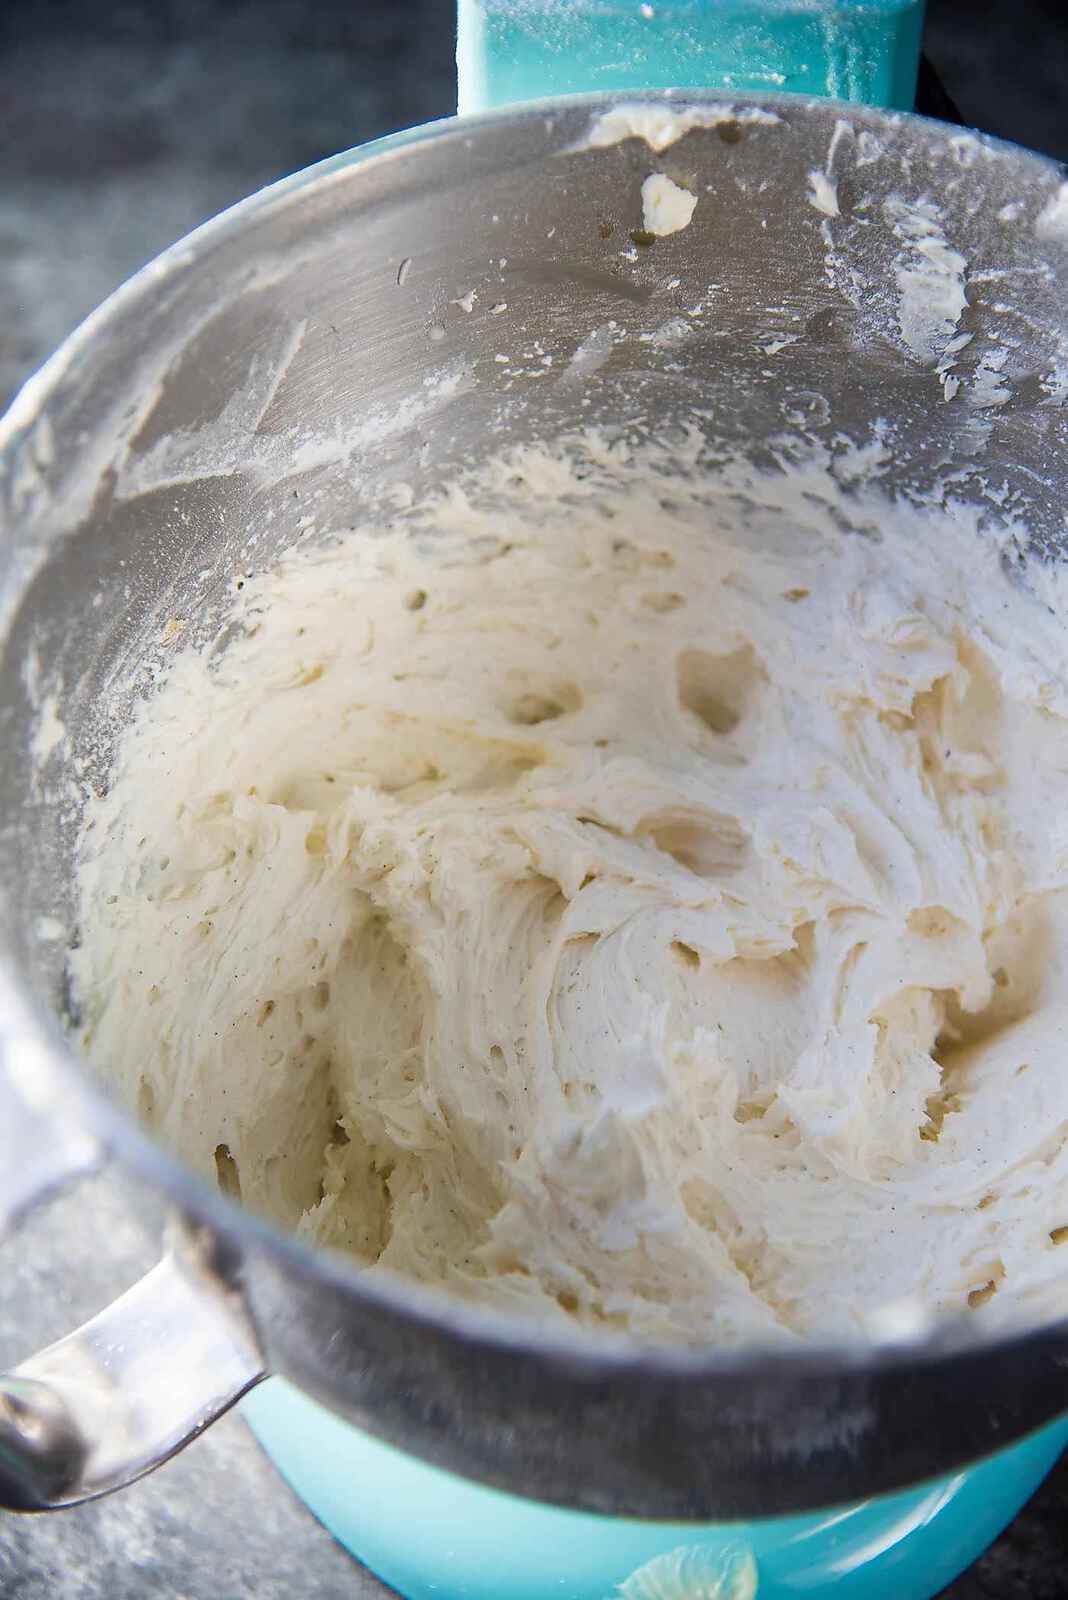
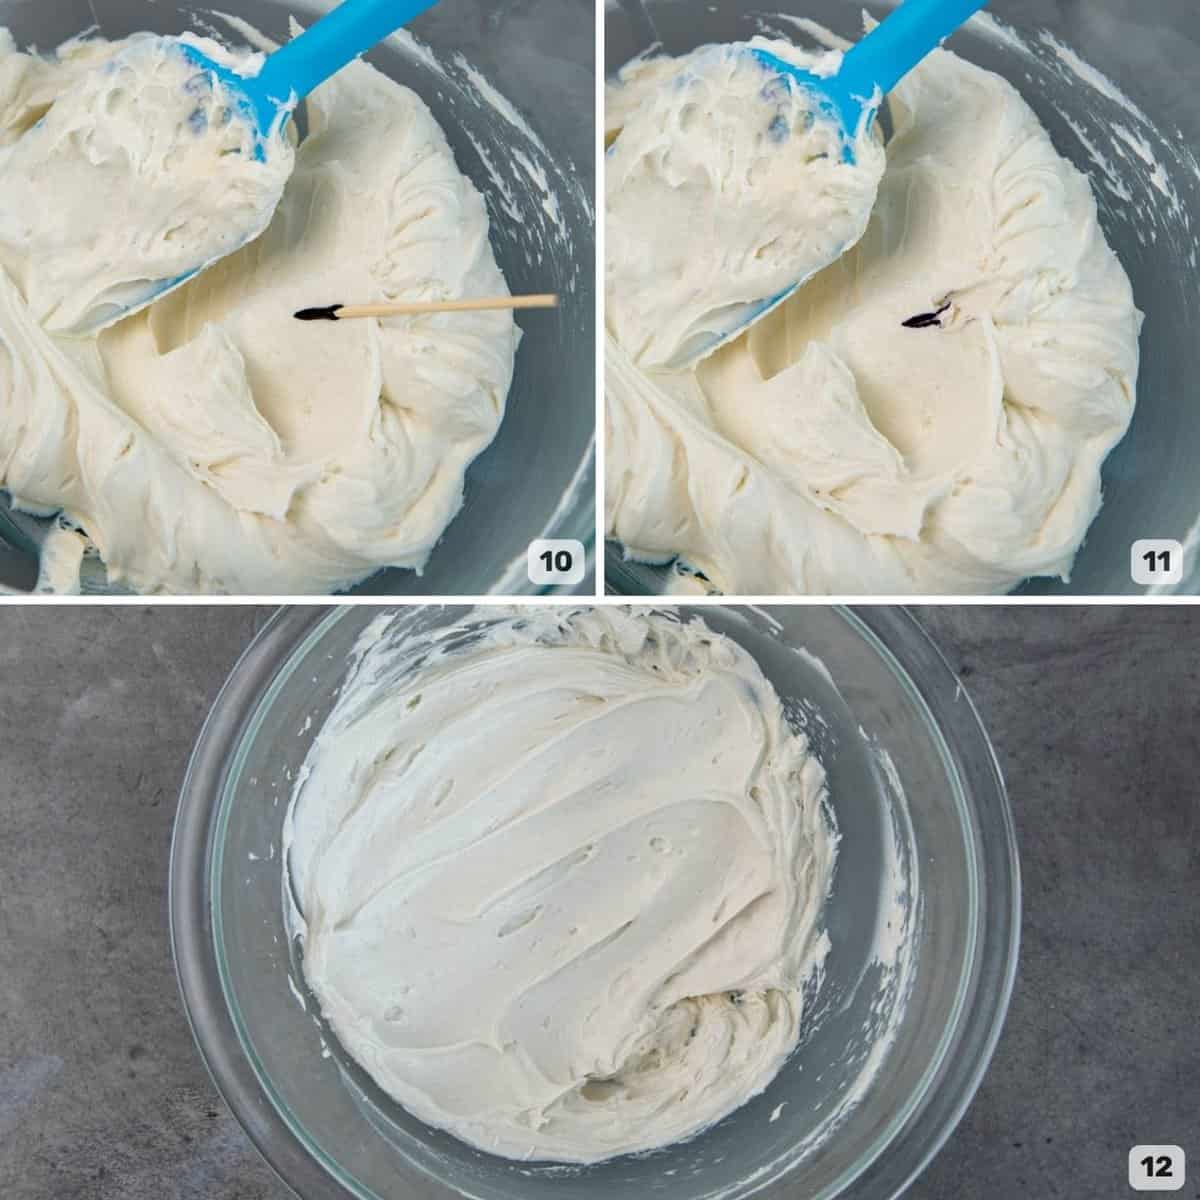
Step five – Removing air bubbles (optional)
Since buttercream is usually made with a whisk attachment, a lot of air is incorporated into the buttercream. This results in bubbles in the frosting when you try to smooth it out. There are a couple of ways to make the frosting smoother, with less air bubbles while still maintaining the creamy texture!
First method – Paddle mix
Instead of a whisk attachment, use a paddle attachment to make the frosting! This will reduce the amount of bubbles in the frosting. However, it will make the frosting less fluffy and more creamy. The butter must be creamed until light and fluffy at the start, which can take longer than with a whisk attachment.
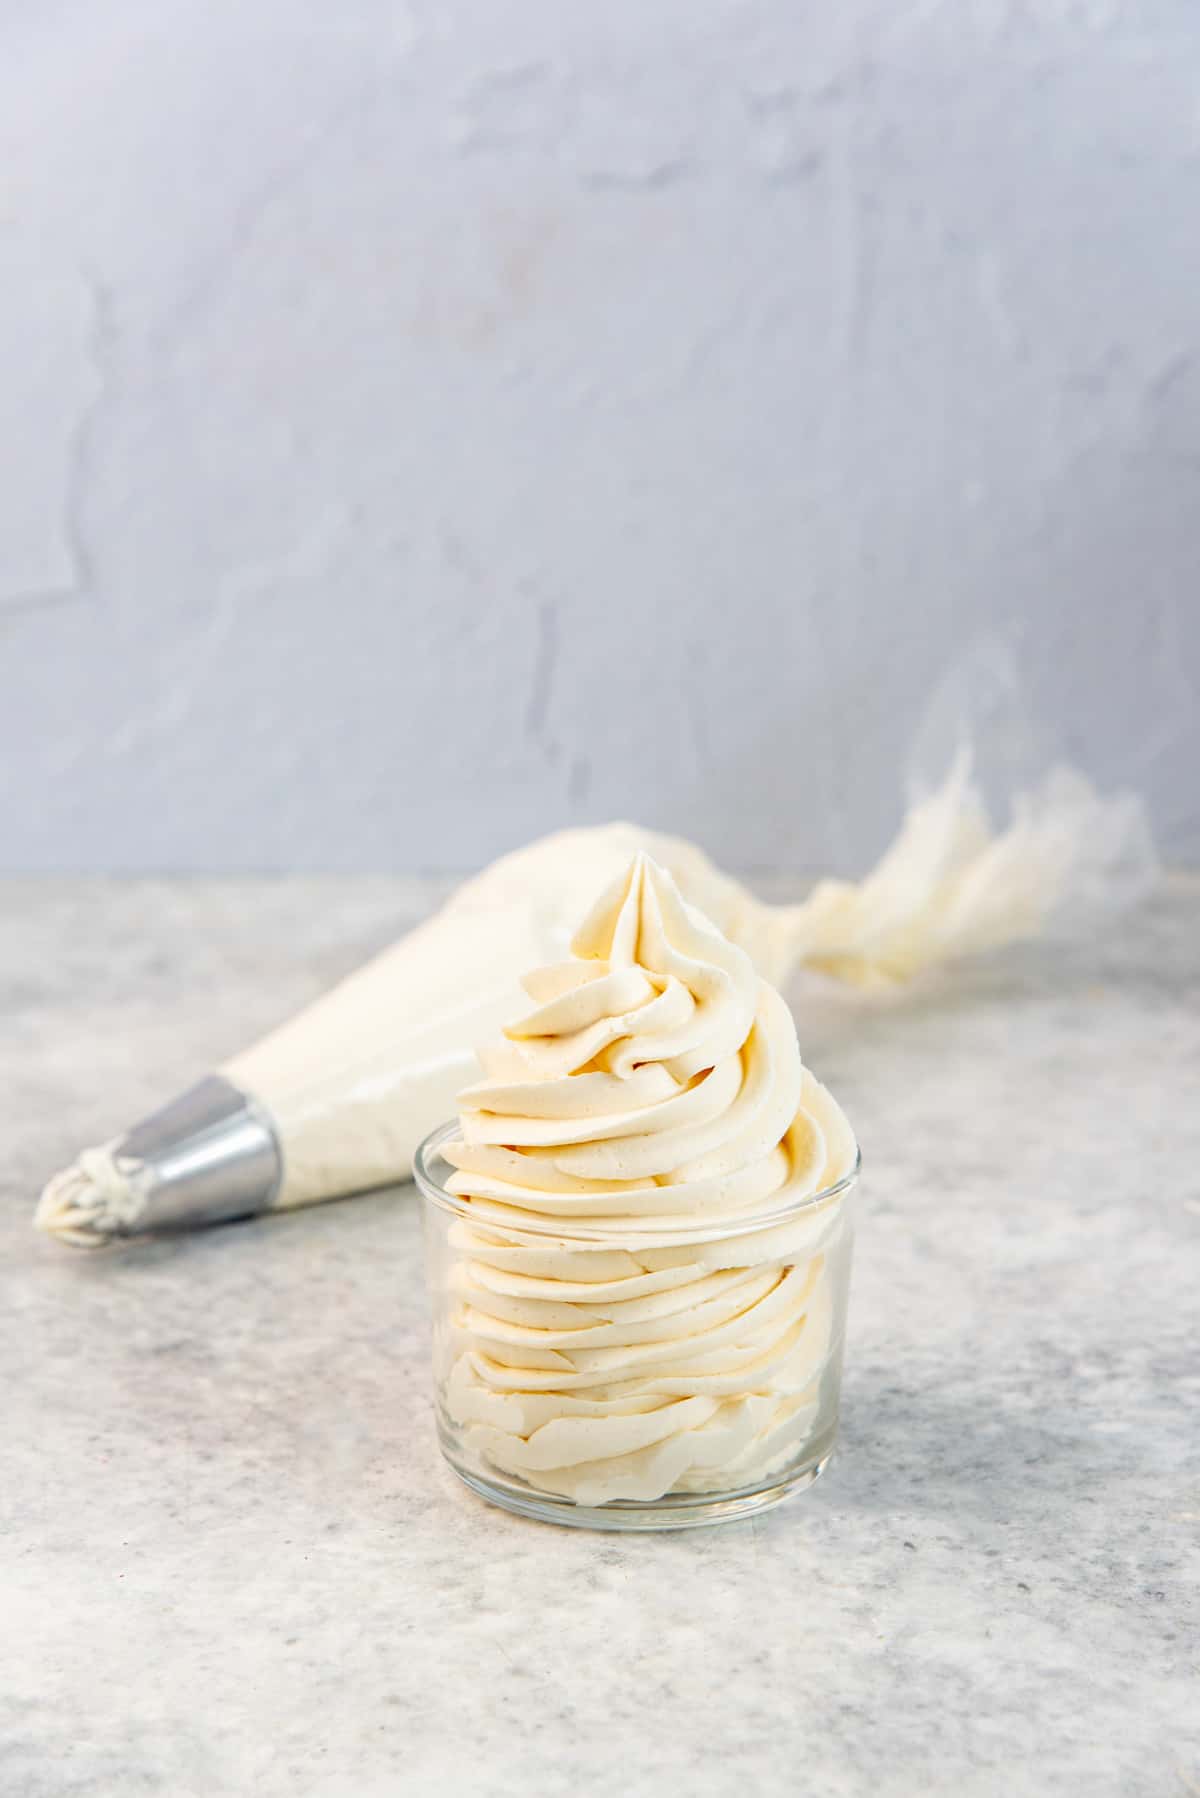
You can also switch to a paddle attachment and mix the buttercream on low speed for a few minutes at the end. I would go between 2 – 5 minutes depending on how much frosting you have. This method knocks out some of the excess air, but not all (Image 9).
Second method – Heat and mix method
This method is definitely more effective, but tricky. So I recommend trying it out a few times in your kitchen to get the hang of it. This is especially tricky in summer, but it’s possible with the help of your fridge.
Make sure the buttercream temperature is around 70 – 72 F. Take a little bit of the buttercream and place it in a microwave-safe bowl. Then heat the small portion of buttercream until it’s just melted. For this batch of frosting, I melted about 1/3 of a cup of frosting (approximately).
Then place the melted buttercream with the rest of the buttercream and mix it in using a paddle attachment. The buttercream will deflate a little bit, but still be creamy and pipeable! If it’s too loose, then place it in the fridge to cool down a smidge and then re-mix the buttercream with a paddle attachment.
Here’s an image of the buttercream after whisking with a balloon whisk, and then after re-mixing with melted buttercream. See how many fewer bubbles you get?
My best tips for making perfect vanilla buttercream frosting
- Cool butter. I don’t mean that your butter needs to have swag. Just that you need to start with butter that’s cool to the touch and very slightly softened. This way you’ll have to whisk it longer to make it creamier, BUT it will hold its shape a lot better than when making frosting with butter that’s warmer and too soft.
- Use a 1:1 ratio (weight-wise) of butter and confectioner’s sugar. This gives me the best level of sweetness. Some recipes call for 1:2 ratio of butter to sugar, but I find that to be way too sweet! But if you do like a sweeter vanilla frosting, you can add UP TO twice the amount of confectioner’s sugar as butter, if you like.
- Sift the confectioners sugar to prevent any lumps in your buttercream.
- Cold heavy cream. Cold, heavy cream not only adds a creaminess to the frosting, but it also helps regulate the temperature of the frosting. The cream whips along with the butter, making the buttercream lighter, fluffier, and creamier. Make sure the fat content is above 35%.
- Use good quality vanilla if you can. I use Madagascar bourbon vanilla in my frosting, but I LOVE using vanilla bean paste too. There’s just something more delectable about seeing those flecks of vanilla bean caviar in the vanilla frosting. Most recipes add vanilla extract at the end of the recipe. There’s no reason for this. You can add vanilla at the beginning AFTER the butter has been whipped if you want. The only reason I would add it at the end is so that I can taste the buttercream and add more if I want to.
- Don’t skip the salt!
- Use a paddle attachment to make the buttercream. This will make the buttercream smoother, and have less air bubbles. (Use the melt and mix method above for even better results!).
- To make thicker buttercream – Add more confectioners sugar. This will make the buttercream stiffer. But it’ll make the buttercream sweeter as well. You can also place the buttercream in the fridge to cool down a little which will also “harden” and thicken the buttercream. But if you keep it in the fridge for too long, the buttercream will harden!
- For softer and thinner buttercream – You might be tempted to add more heavy cream to make the frosting thinner. But do NOT do that! This might lead to the buttercream splitting and having a lumpy look. Instead, gently heat a little bit of the buttercream and re-mix it. The warmer frosting will soften the buttercream overall, making it softer and easier to spread, and give you a satiny-smooth texture too. Plus, it’ll harden again if your room temperature is cold enough.
Important recipe notes
Can I make this frosting less sweet?
I’m sure you’d like to be able to make frosting with even less sugar. But unfortunately, this is the minimum amount of confectioners sugar that should be added to American buttercream frosting. If you add any less, the taste of the butter will be too much and the frosting will be too soft.
However, if you’re looking to make a frosting that is less sweet, then I recommend making Swiss meringue buttercream or ermine frosting. If you do not want to spend all the time making swiss meringue BC, then use my cheat’s easy swiss meringue buttercream recipe instead!
How do I add flavors to this frosting?
I would avoid adding flavors that are mostly water-based. Adding liquids will cause the frosting to become more liquid and even cause the frosting to split.
Split buttercream will look grainy and lumpy and will not pipe smoothly. So adding fruit purees to this recipe is not recommended. But I do recommend using flavor extracts, or oil-based flavors or freeze-dried powders. Here are some examples,
- Lemon buttercream – Add lemon extract, as well as finely grated lemon zest. Orange or lime buttercream can also be made this way. You can also add a dollop of lemon curd, though too much will make the frosting too loose.
- Berry flavored buttercream – For strawberry buttercream or raspberry buttercream, add freeze-dried fruit powder.
- Coffee buttercream – Dissolve some instant coffee powder with the vanilla extract and add it to the buttercream. You can also dissolve the instant coffee in the smallest amount of cream and add that. Check out my coffee layer cake with coffee buttercream.
- Chocolate buttercream – Add cocoa powder or melted bittersweet chocolate (American chocolate buttercream).
- Peanut butter buttercream – Replace some of the butter with 100% peanut butter (not the sweetened peanut butter).
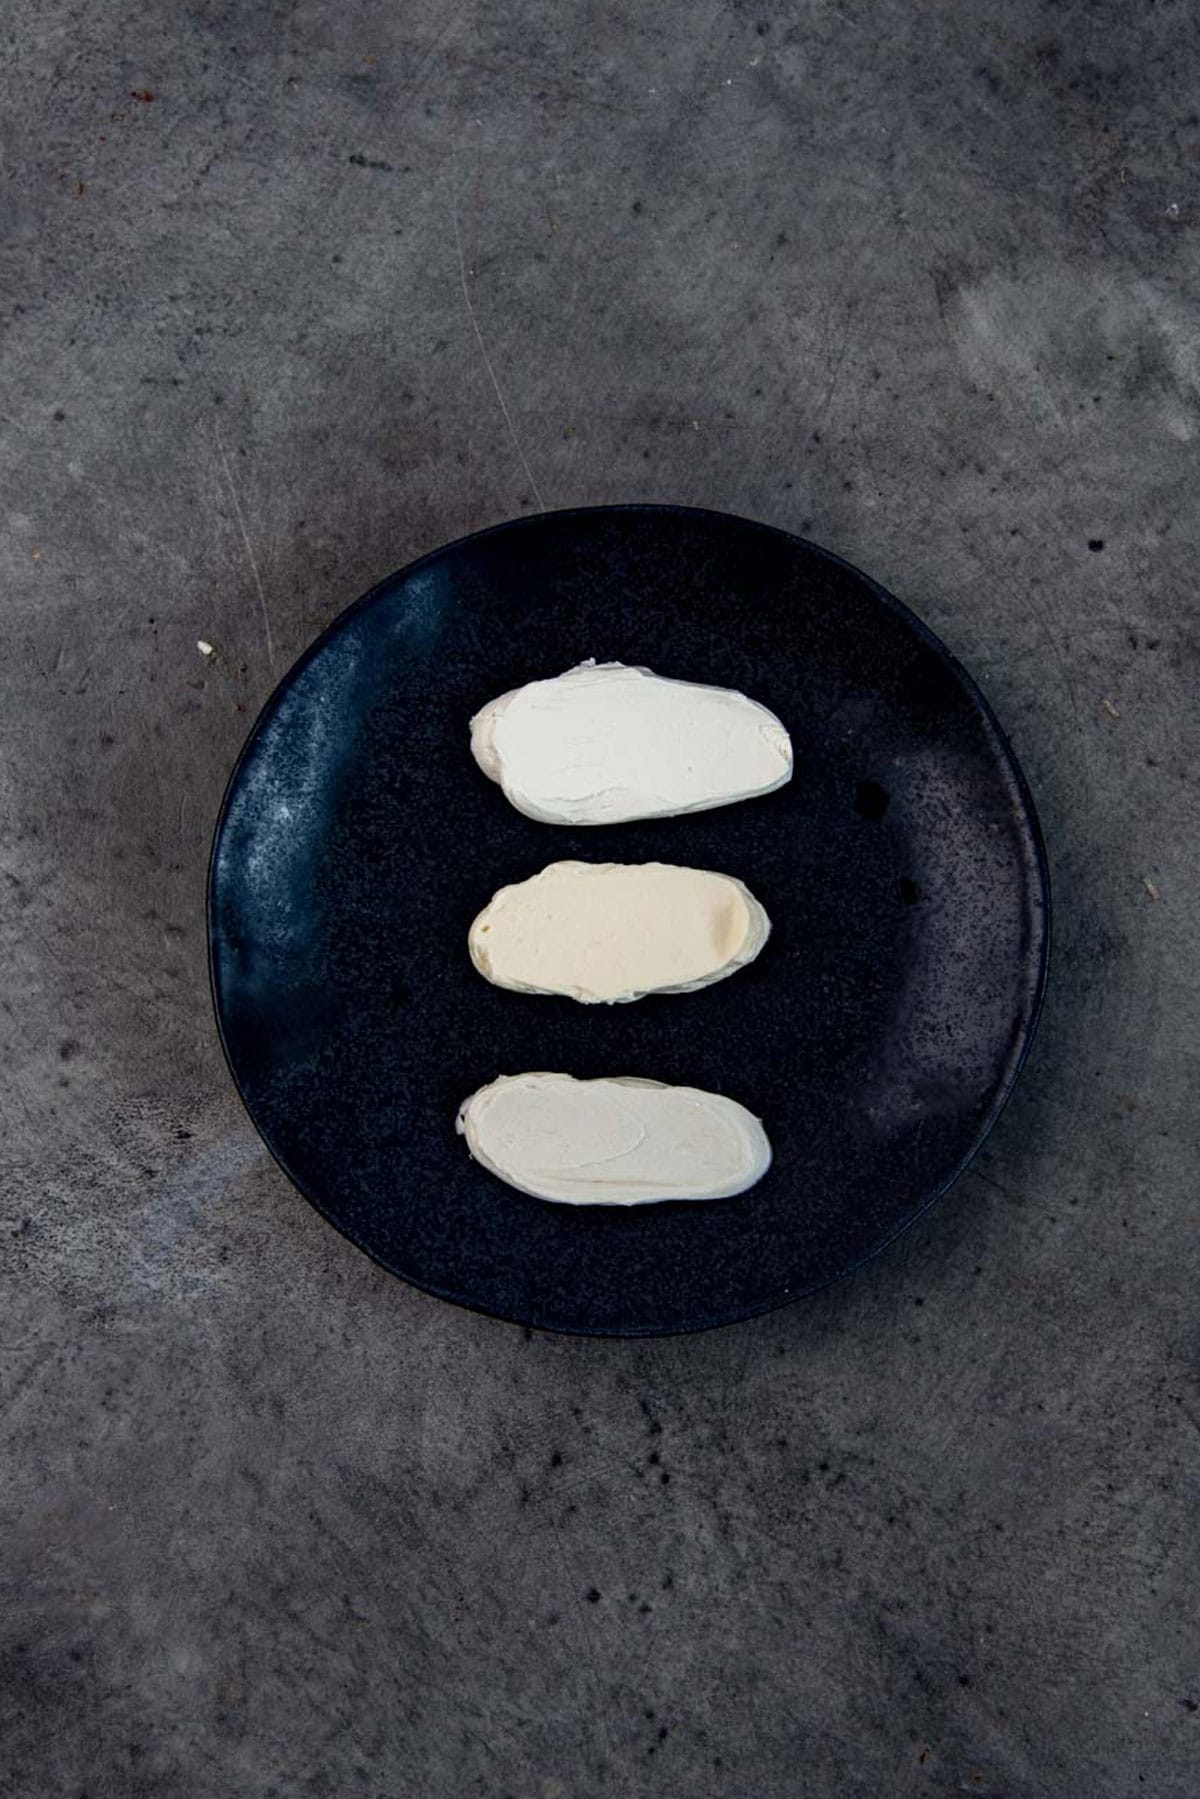
Is it possible to make this vanilla buttercream frosting pure white in color?
First method – Whipping the butter
This is the most recommended method. By whipping the butter very well, you can lighten the color of butter. It will go from a light yellow color to an almost warm white. However, there are two problems with this. The buttercream will never be pure white, and if you use a good quality butter that is very yellow – this method will be even less effective.
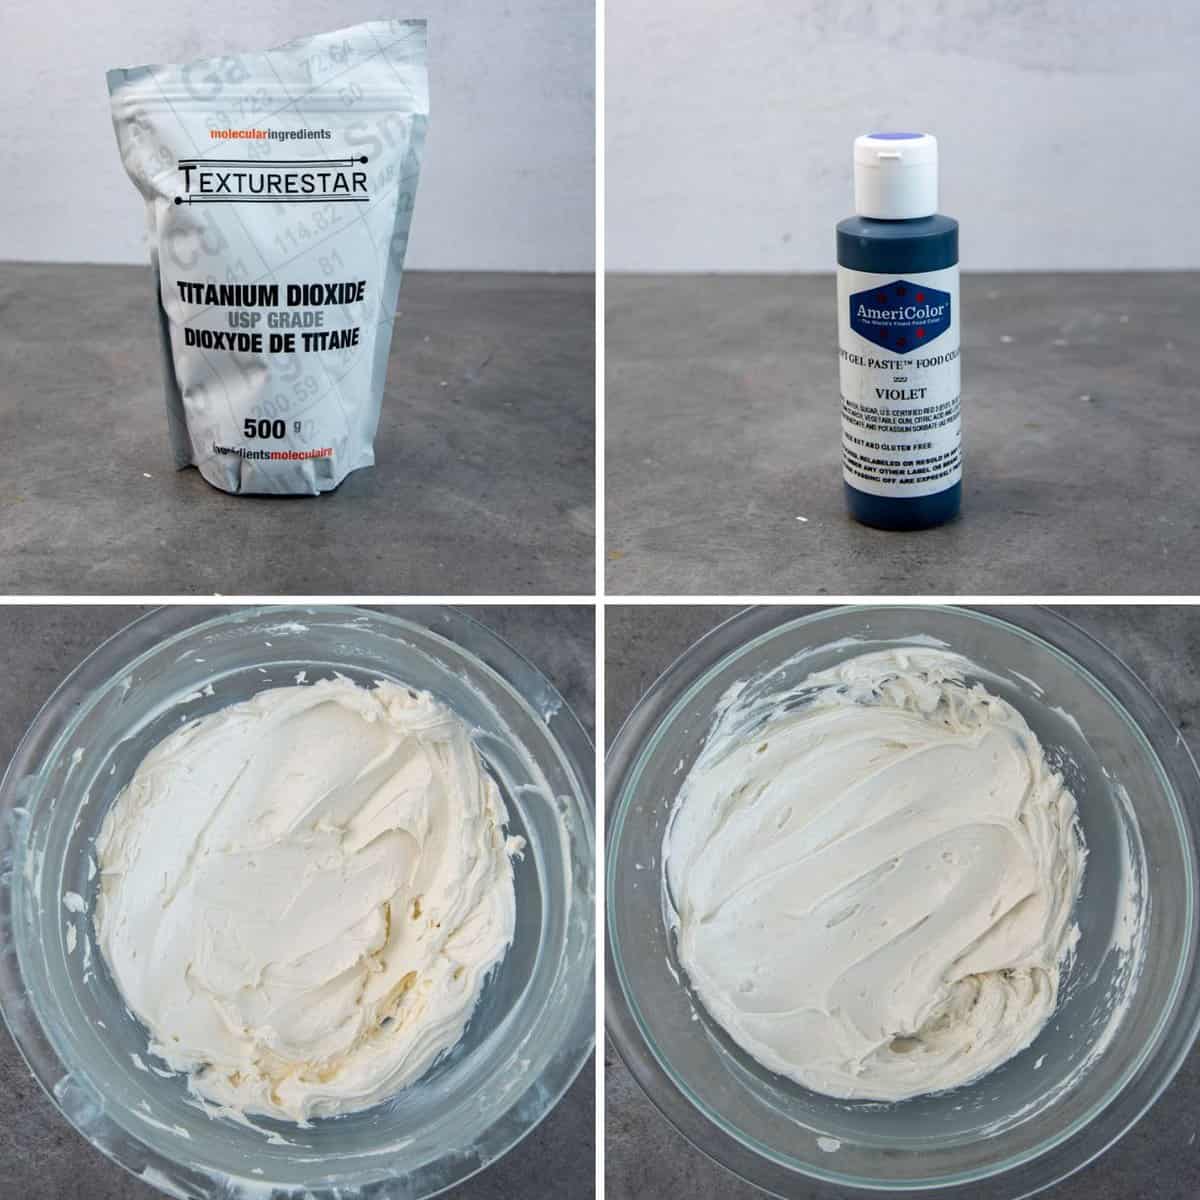
Second method – Using violet gel food coloring
This method is very effective and easily accessible for many bakers.
If you look at the color wheel, the color yellow is directly opposite violet (i.e. they are complementary or opposite colors). So you can use the color violet to “cancel out” yellow hues to achieve white!
But be careful, because you only should use a little at a time. If you use even a little too much, the buttercream will start to look more violet in color instead. I like to use a toothpick and just add just the smallest bit at a time until I get the desired white hue.
Third method – Using titanium dioxide
This is a harmless inorganic compound that is used in many food items and cosmetics, mainly as a whitener. It’s a super white powder that is used in cosmetic pigments as well as food coloring. It also makes colors more vibrant, acts as a anti-caking agent, and is used to make food thicker and keep food fresher for longer.
So adding titanium dioxide to buttercream can also help to whiten the buttercream. Just make sure to sift the titanium dioxide before adding it to the buttercream to prevent clumping.
Results
You can see that the buttercream does have a slight yellow tinge. But the buttercream that was whitened with titanium dioxide shows a very bright white hue. The buttercream with added violet gel food coloring is also more white in color, but it’s slightly duller than the white you get with titanium dioxide.
However, the texture of the buttercream with the violet food coloring remains unchanged, while the titanium oxide buttercream frosting does become a little thicker. But the taste remains the same.
How do I add color to this frosting?
There are many ways to color buttercream.
- Water-based food coloring (widely available in supermarkets).
- Gel food coloring – concentrated and highly pigmented.
- Powdered food color – harder to find, but does not contain any liquid.
- Oil-based food coloring – great for buttercreams with high fat content.
Of all these methods, my favorite method to color American buttercream is gel food coloring. A small amount goes a long way, and provides a lovely saturated color. Plus, the color deepens as the buttercream stands as well.
Just add a drop of food coloring and mix it into the buttercream, and add more as you need. Remember the color will be more saturated after resting.
Water-based food coloring, while easy to find, is only good if you want to add a few drops. For a stronger color, you may need to add more. Since water and fat don’t mix well, the food coloring might split the frosting. Instead of having a smooth, uniformly colored frosting, it will look splotchy.
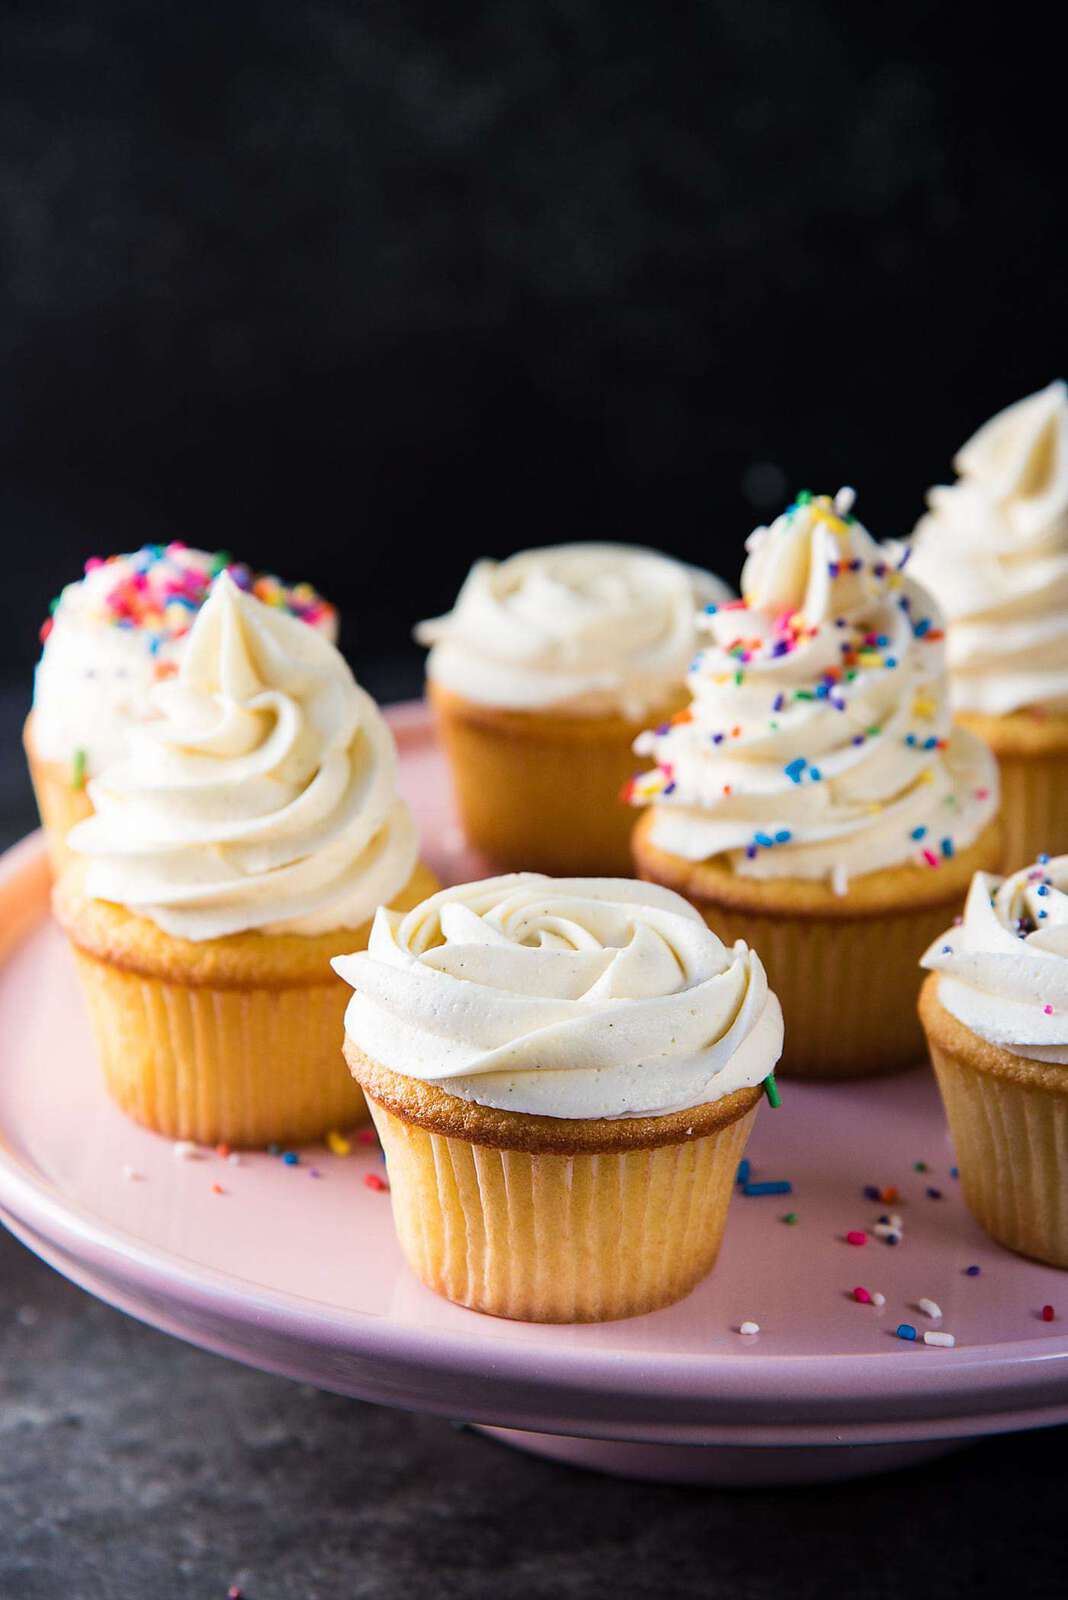
How to use this fluffy buttercream frosting
This vanilla buttercream is super versatile and can be used in many ways.
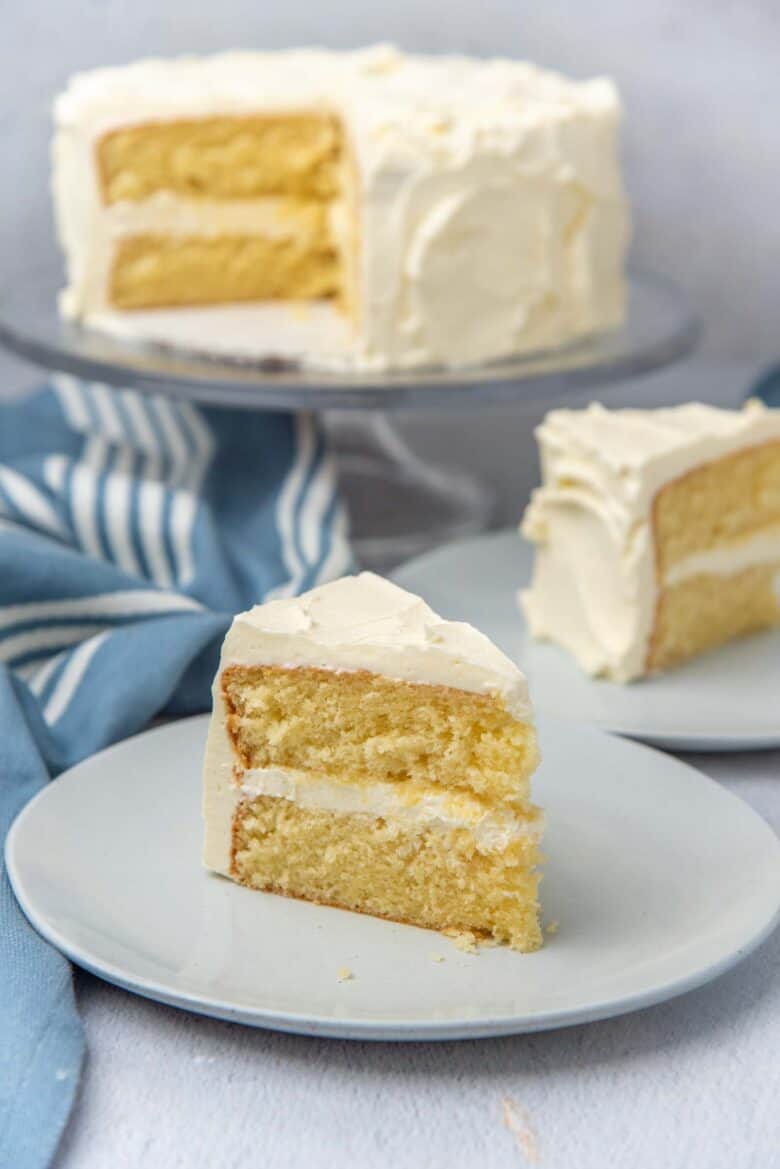
Frost and fill cakes – Obviously this is the most common way to use buttercream. Just slather it on with an offset spatula. While the buttercream is still creamy and soft, use a bench scraper to scrape the sides and top of the cake to make it super smooth.
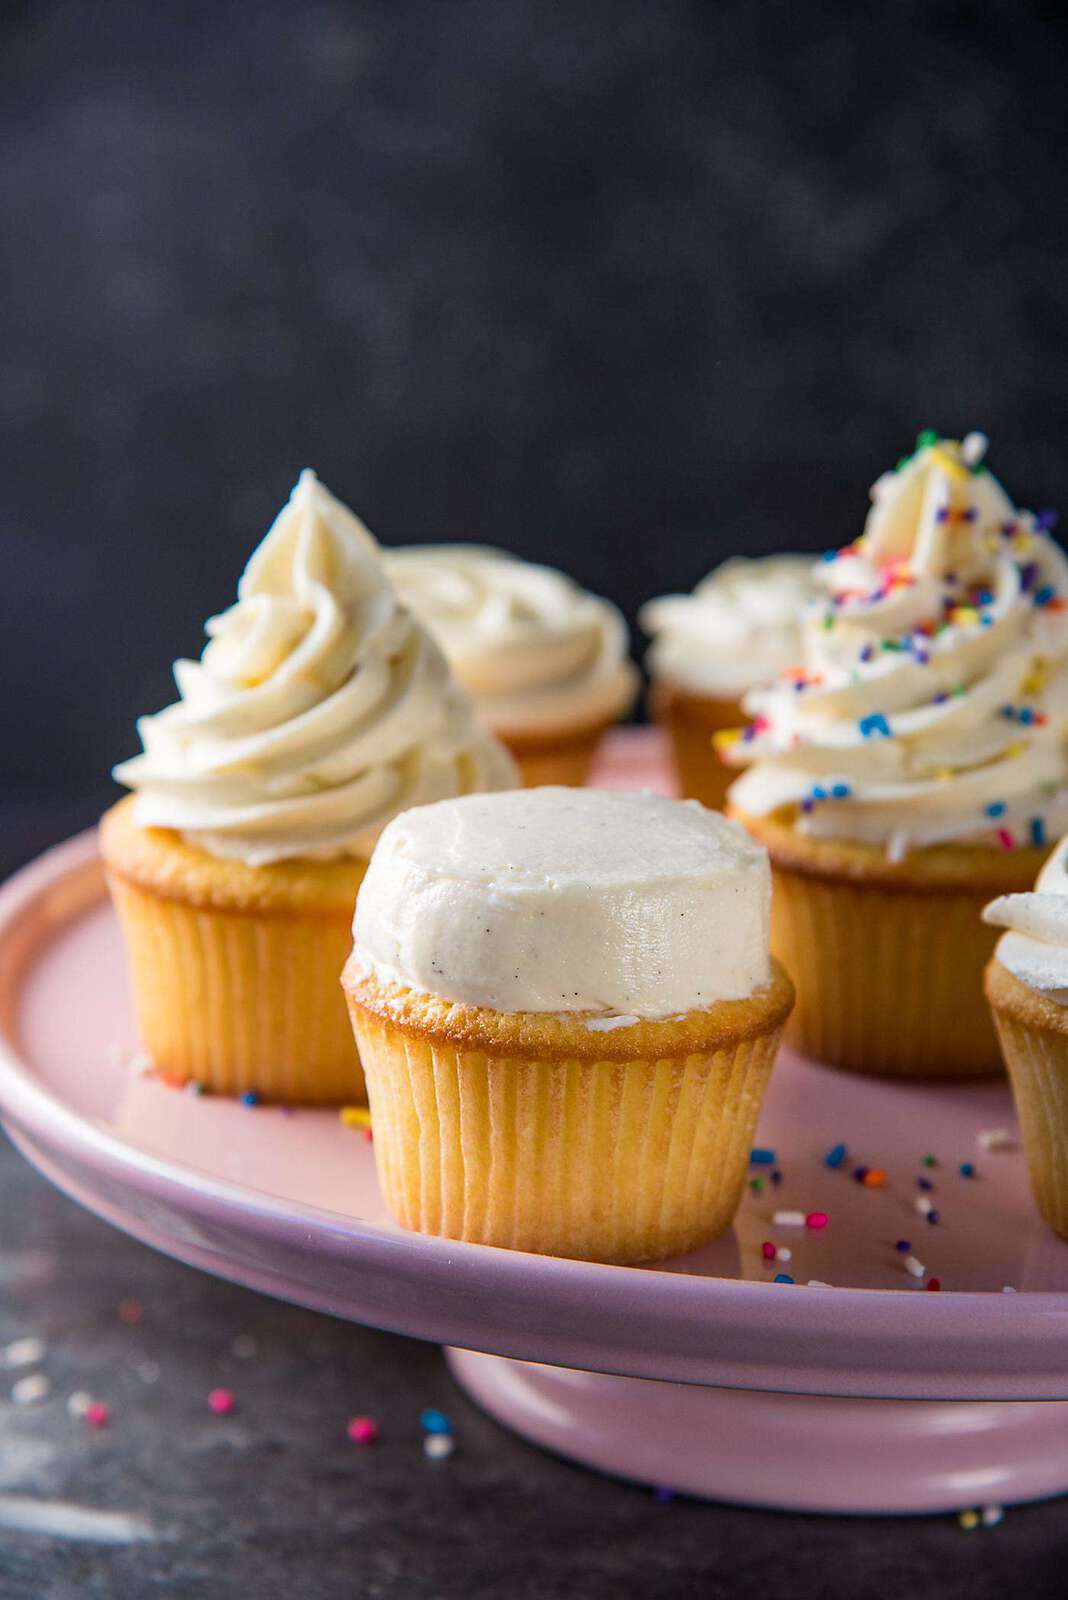
Frost cupcakes – Another lovely way to use buttercream. You can use an ice cream scoop to place the buttercream and then use a spatula to smooth it out. For a thinner layer of buttercream, just take some of the frosting with the spatula and spread it on top. You can also use piping tips to pipe this on top of cupcakes, which will definitely be more decorative.
Decorative piping – For cakes and cupcakes. There are many frosting tips that you can use too.
- Round tip
- Closed star tip
- Open star tip
- Open French star tip
- And many more
As a filling – Did you know that you can even use buttercream as a filling for layer cake and desserts? I grew up eating cream puffs and profiteroles that were filled with buttercream instead of whipped cream or pastry cream. You can also fill doughnuts with buttercream.


Storage instructions
Unlike other buttercreams that contain egg, this buttercream can last at room temperature for a longer time. American buttercream can be stored at room temperature for up to 2 – 3 days! Of course, this is only if the butter that you used is good as well.
So make sure to inspect the butter before making buttercream with it. This vanilla buttercream can also be stored in the fridge for about a week.
The buttercream will harden in cold temperatures, so you must re-whip it to make it creamy and spreadable again.
How to re-whip cold buttercream
- If the American buttercream is chilled, let it come to room temperature first, OR
- Take a portion of the buttercream and heat it gently until it’s just melted. Add that to the buttercream and re-whip with a paddle attachment to get the correct consistency.
Frequently asked questions
Does buttercream frosting need to be refrigerated?
American buttercream can be stored at room temperature for a few days unlike meringue based buttercreams.
However, the buttercream will last longer in the fridge. It can even be frozen for about 2 – 3 months if you accidentally make too much!
How to remove air bubbles from my buttercream
Instead of the whisk attachment, you can use the paddle attachment to cream the butter and make the buttercream. This will reduce the amount of bubbles, but will also take longer to get to a creamy smooth consistency.
You can also use the melt and mix method to further reduce air bubbles in the buttercream. Just melt a small portion of the buttercream and re-mix it in with buttercream using the paddle attachment.
Why is my buttercream grainy?
If your buttercream feels grainy, that is usually because the confectioners sugar has not melted in with the butter. This can happen if the butter is too cold and hasn’t been properly creamed, OR if you add too much confectioners sugar.
A grainy American buttercream can also happen if you use caster sugar or blended sugar instead of confectioners sugar. If the sugar has any granules (even small ones), this can lead to a grainy texture.
Why does my buttercream look curdled?
If you added too much liquid to your buttercream, this can lead to a curdled buttercream. This is because water and fat cannot emulsify properly if there is too much water in the buttercream.
The liquid can be milk, too much heavy cream, fruit purees, or too much water-based food coloring, or a combination of all of these.
My buttercream is too stiff and thick
There are two reasons why a buttercream would be too stiff.
1) Too much confectioners sugar was added. The more confectioners sugar you add, the stiffer and thicker the buttercream will be. To fix this, cream some butter separately and once it’s light and super creamy (and almost white in color), add it back to the thick frosting to make it less thick. If it’s only a little too thick, a couple tablespoons of heavy cream can work too.
2) The butter is too cold / hasn’t been properly creamed. When the butter is very cold, the buttercream can become very stiff! This is especially a problem during winter here in Canada. If cold butter isn’t whipped properly, this can also lead to a thick, stiff buttercream.
My buttercream is too thin
If the butter was too warm, or the temperature of your kitchen is too warm, this can lead to a thin buttercream. Refrigerate your buttercream to cool down the butter a little and re-whip. This will help thicken the frosting.
Can I make this vanilla buttercream frosting ahead of time?
Absolutely! This buttercream can be stored in the fridge for up to 7 days, and in the freezer for 1 – 2 months! Just make sure to store it in an airtight container.
Let the frosting come to room temperature and re-whip with a paddle attachment or whisk attachment to get the right consistency again.
You can also melt a portion of the buttercream and mix it in with the cold buttercream to get it back to a smooth, spreadable consistency.
Can I double this recipe?
Absolutely! As long as your mixer can easily whip the butter to a creamy, fluffy consistency, you can double the recipe. The only limitation is the size of your mixer.
Is this a crusting buttercream frosting?
This recipe is not a crusting buttercream frosting. However, you can easily transform this into a crusting buttercream recipe. Simply substitute half (or up to all) of the butter with shortening. Shortening is the component that helps a buttercream crust.
The downside to using shortening is that it doesn’t taste as good as butter, and also has a different mouthfeel. To keep as much of the flavor and mouthfeel, only substitute half of the butter with shortening.
Can I use milk to make buttercream instead of heavy cream?
Unfortunately, you cannot. Milk has a lower fat content and a higher water content.
While you could probably add a few teaspoons, adding too much can result in the frosting splitting or curdling.
Recipe
Easy, Fluffy Vanilla Buttercream Frosting
US based cup, teaspoon, tablespoon measurements. Weight measurements are recommended for accurate results whenever available.
Common Measurement ConversionsIngredients:
- 226 g unsalted butter 8 oz / 2 sticks (cool, soft butter at around 70 – 75°F)
- ½ tsp salt
- 30 -60 mL chilled heavy cream 2 – 4 tbsp (at least 35% fat content)
- 1½ tsp good quality vanilla extract Madagascar bourbon vanilla
- ½ tsp Mexican vanilla extract optional
- 226 – 300 g confectioner’s sugar (in weight) 8 – 10 oz / 2 – 2 ½ cups (spooned and leveled)
Instructions:
- Place the butter in the bowl of a stand mixer. With a whisk attachment, whip the butter until creamy and white in color – about 10 minutes on high speed. You can also do this step with a paddle attachment for fewer air bubbles, but it must be creamed for longer and the volume of the buttercream will then be less (less air).226 g unsalted butter
- The butter must be fluffy, creamy, and be a very light, almost white in color at this stage. If not whip the butter longer. Make sure to scrape the bottom AND sides of the bowl so that there are no butter lumps.
- Add the salt, vanilla, and about 30 mL / 2 tbsp of the cream (or slightly more for double batches), and whisk further until the butter-cream mix has mixed in very well and is light and fluffy. Again, make sure there are no butter lumps in the mixture.½ tsp salt, 1½ tsp good quality vanilla extract, ½ tsp Mexican vanilla extract, 30 -60 mL chilled heavy cream
- Lower the speed and add 226 g / 8 oz of the confectioner's sugar (same amount as the butter) – a little at a time, and incorporate all of the sugar into the butter. Make sure to scrape the sides and bottom of the bowl as you go.226 – 300 g confectioner’s sugar (in weight)
- Once the sugar is incorporated into the butter, increase the speed and whisk on high for a few minutes.
- Taste and add the rest of the confectioner's sugar if needed. Whisk for a further 2 – 3 minutes until you have a light, fluffy, soft, spreadable buttercream.
- If the frosting is too stiff, you can add up to 2 more tbsp of heavy cream to get an even softer buttercream. Skip this step if you live in a very hot climate though.
For a smoother buttercream with fewer air bubbles
- The less air that is incorporated into the buttercream, the fewer bubbles will be present in it. This can be achieved by using a paddle mix to make the buttercream, but the process will be slightly longer then.
- Another method (heat and mix method) is to take a small portion of the buttercream and heat it in the microwave until it has JUST melted. Mix this portion in with the rest of the buttercream in the bowl using the paddle attachment. The buttercream mix will deflate very slightly, but this is expected.
Recipe Notes
STORAGE
American buttercream frosting can be stored at room temperature for about 2 – 3 days. OR for 7 days in the fridge (in an airtight container). OR for about 1 – 2 months in the freezer (in an airtight container). Note – When re-whisking refrigerated frosting, let it soften a little first, and then use a flat beater / paddle attachment (instead of your whisk attachment) to whisk the frosting. This will prevent extra air bubbles from forming, and ensure a smooth frosting. You can also gently melt a small portion of the buttercream and mix it in with the rest of the buttercream using a paddle attachment.How many cupcakes will this recipe frost?
It’s hard to say how many cupcakes can be frosted with this buttercream recipe. It entirely depends on how much frosting you will be adding on top of each cupcake. If you’re using only a small amount of buttercream – like 2 tbsp of buttercream per cupcake, then you can frost 24 cupcakes. If you want big swirls of frosting, assuming each swirl is be about 1/4 cup – you can frost about 12 cupcakes.How to whiten the buttercream
If you’d like your buttercream to have a bright white color (pure white), follow one of these two methods. Violet gel food coloring – Use a toothpick to take a very small amount of the violet gel coloring and smear it on the buttercream. Then mix the gel coloring into the buttercream. Mix in only a small amount at a time, until the yellow color is neutralized. The buttercream will turn a cold white, and then violet if you add too much of it. Titanium dioxide – For every 250 g of buttercream, add about ¼ – ½ tsp of titanium dioxide. Make sure to sift the powder into the buttercream and mix it in well. Again, only add a little at a time. If needed, you can add a small amount of heavy cream as well.Nutrition Information:
“This website provides approximate nutrition information for convenience and as a courtesy only. Nutrition data is gathered primarily from the USDA Food Composition Database, whenever available, or otherwise other online calculators.”


Leave a Reply