About
My Cookbooks
Work With Me
Contact
  • Facebook
  • Instagram
  • Pinterest
  • X
  • YouTube
The Flavor Bender

Master the Science of Delicious

  • Recipe Index
    • All Recipes
    • Desserts
      • Cakes & Cupcakes
      • Candy & Bite Sizes
      • Chocolate
      • Cookies, Brownies & Bars
      • Frozen Desserts
      • Fruit Desserts
      • Puddings & Custards
      • Dessert drinks
      • No Bake
      • Pastries & Breads
      • Sweet Syrups & Spreads
      • Tarts & Pies
      • Cheesecakes
      • Healthy sweets
    • Breakfasts
      • Tarts, Quiches, & Pies
      • Waffles, Pancakes & Crepes
      • Quick Breads, Scones & Muffins
      • Breakfast Sandwiches
      • Breakfast Pastries
      • Eggs
      • Breakfast & Brunch Drinks
      • Make Ahead Breakfasts
      • Healthy Breakfasts
      • Coffee and Tea drinks
      • Breakfast Smoothies & Juices
      • Breakfast Sides
      • Casseroles
      • Jams & Spreads
    • Courses
      • Main Meals
        • Bread, Sandwiches & Burgers
        • Curries
        • Salads
        • Roasts & BBQ
        • Soups & Stews
        • Casseroles
      • Bread
      • Lunch
      • Beverages
      • Appetizers & Tapas
      • Sides
      • Dips & Condiments
      • Tea Time & Snacks
      • Desserts
      • Meal Prep
      • Cocktails
      • Pet Friendly Recipes
    • Cuisines
      • American
      • European
      • Australasian
      • Sri Lankan
      • East Asian
      • Mexican
      • Middle Eastern
      • South Asian
    • Sri Lankan
      • Main Meals
      • Drinks
      • Desserts
      • Breakfasts
      • Snacks
    • Skill Level
      • Easy
        • Easy Desserts
        • Easy Cooking
        • Easy Breads
        • Easy Breakfasts
        • Easy Dinners
      • Intermediate
        • Intermediate Desserts
        • Intermediate Cooking
        • Intermediate Breads
        • Intermediate Breakfasts
        • Intermediate Dinners
      • Advanced
        • Advanced Desserts
        • Advanced Cooking
    • Recipes by Season
      • Christmas
      • Fall & Winter
      • Halloween
      • Spring & Summer
      • Thanksgiving
      • Valentines Day
    • Recipes by Diet
      • Dairy Free
      • Eggless
      • Gluten Free
      • Paleo
      • Vegan & Vegetarian
    • Recipe Basics
      • Baking Basics
      • Cooking Basics
      • Baking & Cooking 101
  • New? Start Here
  • Measurement Conversions
  • How-To Posts
  • About
  • My Cookbooks
  • Work With Me
  • Contact
The Flavor Bender   ›   Recipes   ›   Delicious Desserts   ›   Cakes and Cupcakes   ›   The Best Classic Chocolate Cake

The Best Classic Chocolate Cake

Author:

Dini Kodippili


Jump to Recipe


Updated: 7/17/2023
Total Time1 hour hr 30 minutes mins
Quick and Easy Recipes
Cakes and Cupcakes
This Classic Chocolate Cake is the only and best chocolate cake recipe you will ever need! It has layers of soft, airy chocolate cake layers, with a creamy, buttery, melt in your mouth Chocolate buttercream frosting. Perfect cake for Birthday cake, or any occasion. 

This is my easy and foolproof Classic Chocolate Cake recipe, not too fudgy, perfectly moist, light and fluffy with a close, soft and sturdy crumb.

Slathered in a creamy, melt-in-your-mouth chocolate buttercream frosting, this is my most requested chocolate cake recipe! And for its vanilla counterpart, see here for my perfect vanilla cake recipe.

Slice of chocolate cake on a plate, with the rest of the chocolate cake in the background.

Are you looking for the Best Classic Chocolate Cake recipe? A delicious, chocolate layer cake with tall, light, fluffy layers? And slathered with a creamy chocolate buttercream frosting to die for? Then that’s exactly what you’ve found right here! 🙂

Just like my extra fudgy one bowl chocolate cake, flourless chocolate torte, chocolate bundt cake, devil’s food cake, and molten chocolate lava cake, this classic chocolate cake is one of my often-requested, family and crowd-favorite chocolate desserts!

Why this is the BEST chocolate cake recipe

A great majority of chocolate cake recipes on the internet are based on the classic Hershey’s chocolate cake. Now don’t get me wrong, I love this chocolate cake and I’ve made it countless times.

But the Hershey’s chocolate cake is really fudgy, rich and moist due to the large amount of moisture in the cake. The crumb is wet and more open, resulting in the cake having a very fudgy mouthfeel.

Not that there’s anything wrong with it, I love an insanely fudgy, moist chocolate cake sometimes. So much so that, I even shared a recipe for an extra fudgy chocolate cake, which took the Hershey’s chocolate cake even further by adding cream cheese to make it even more dense and fudgy.

Frosted classic chocolate cake on a white cake stand.

But to me that is not a classic chocolate cake. To me, a classic chocolate cake is not so deeply fudgy.

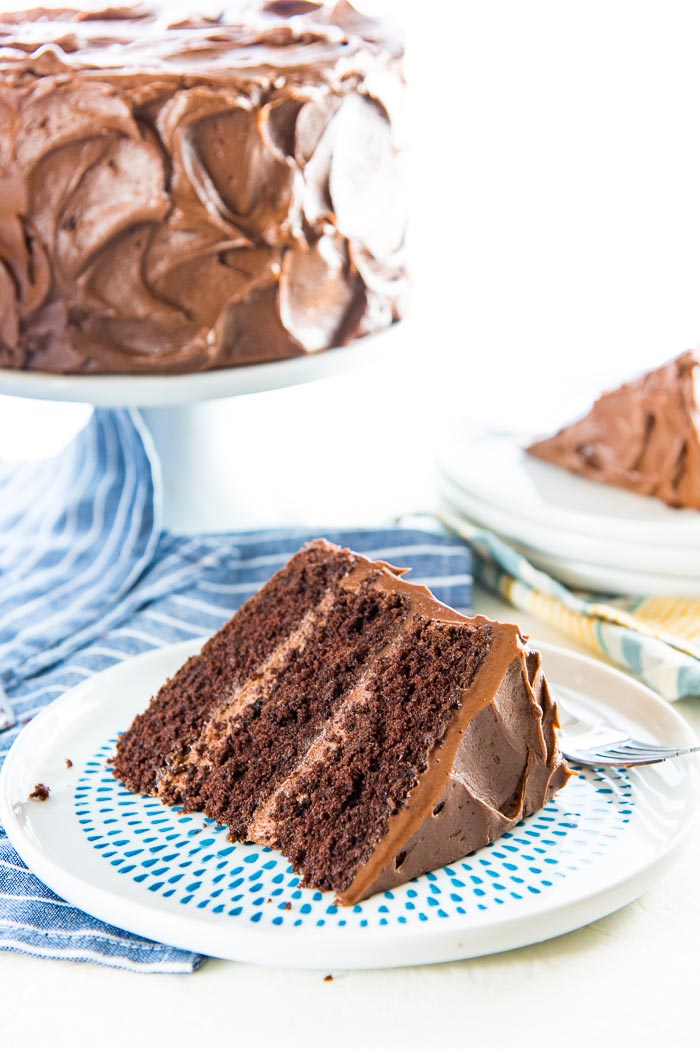
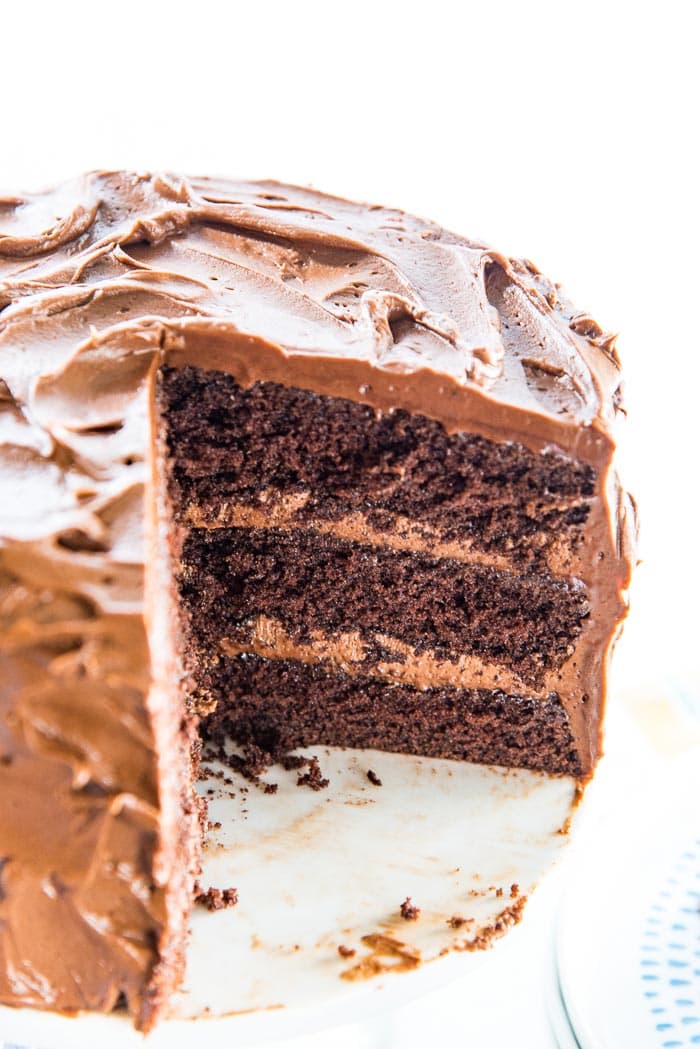
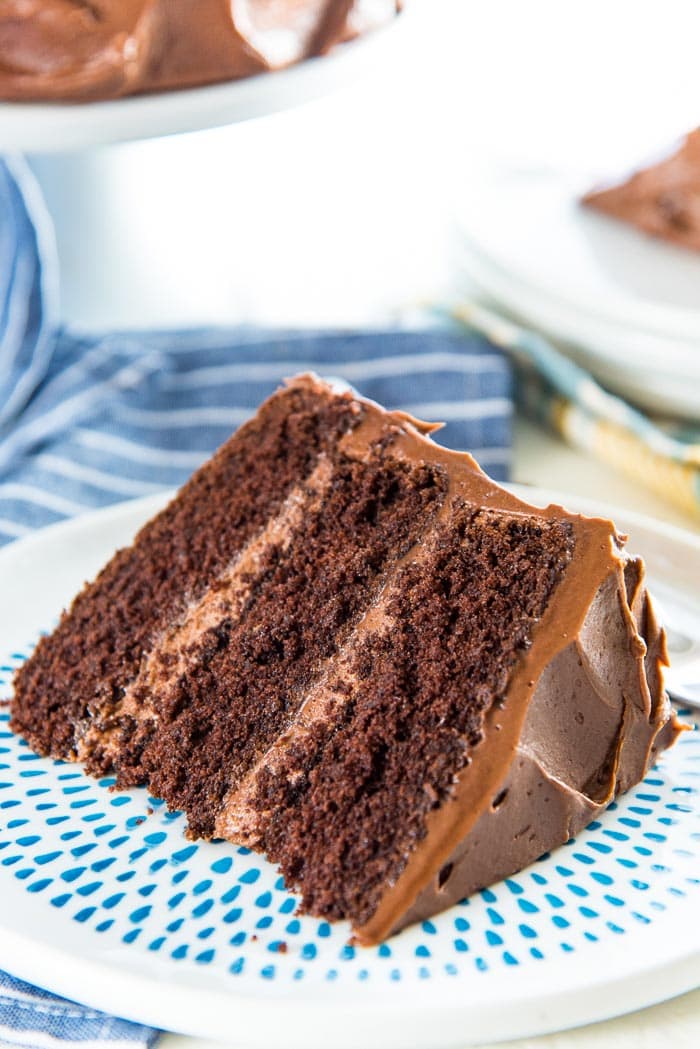
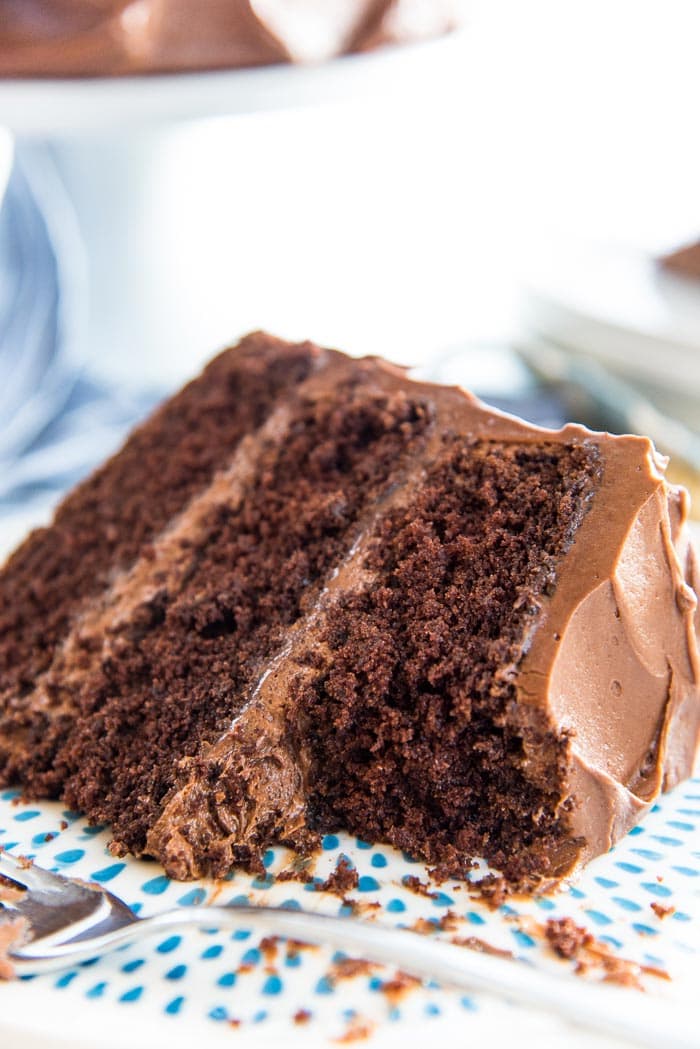
It should have a close, soft but sturdy crumb that’s just perfectly moist, light and fluffy, with layers that rise high as the cake is being baked, and tastes super chocolatey.

So if that’s the kind of classic chocolate cake that you’re looking for, then I’ve got you covered with this foolproof chocolate cake recipe!

Removing a slice of chocolate cake from the rest of the cake with a cake server.

I’ve tried dozens upon dozens of variations of chocolate cake recipes in my life, and this is the one that I ALWAYS keep coming back to for a classic chocolate layer cake. It’s the chocolate cake that reminds me of my childhood, of birthdays, and celebrations.

Since I’ve gotten a lot of great feedback on my vanilla cake recipe, I decided to share my tried and true, best chocolate cake recipe with you guys today! 🙂

Why you’ll love this chocolate cake recipe

  • It’s a delightfully light and airy cake
  • With a soft, close crumb
  • It’s got tall cake layers
  • With a creamy, fluffy, melt-in-your-mouth soft chocolate buttercream frosting
  • And overall the cake is soft, creamy and tastes super chocolatey.
Classic chocolate cake with a piece taken out to show the soft, airy cake layers and creamy frosting.

Expert tips for the perfect chocolate cake

  • It’s made with Dutch cocoa powder.
  • The cake is moist but airy because of the “chocolate milk slurry” (explained below).
  • I talk about how to prepare the cake pans.
  • And preventing over-mixing of the cake batter.
  • Tips on how to get tall, perfect cake layers.
  • Tips on how to make a perfect, creamy, melt-in-your-mouth soft chocolate buttercream.
  • Tips on how to frost the cake perfectly (or imperfectly!).
  • How to get perfect cake slices with clean cuts.

Alright, so let’s get to it!

Close up of a fluffy chocolate cake slice showing the 3 cake layers and creamy chocolate frosting layers.

How to make classic chocolate cake

Using Dutch cocoa powder instead of natural cocoa powder

Using Dutch cocoa powder for the cake as well as the buttercream, ensures that this chocolate cake has a fantastic depth of chocolate flavor.

The alkaline processed Dutch cocoa powder has a deeper chocolate flavor than natural cocoa powder (as explained in my baking basics article on Dutch process vs natural cocoa powder).

But since this cocoa powder isn’t acidic, I use buttermilk and vinegar in this chocolate layer cake recipe so that there’s an acid component to react with the basic raising agents like baking powder and baking soda (you can also read more about that in my baking basics article on baking soda vs baking powder). Otherwise, the cake wouldn’t rise as much as I would like it to.

Hot water and vanilla in a jug, and cocoa powder and buttermilk in separate bowls.

Using a chocolate milk slurry

Another secret to making this classic chocolate cake moist but airy, is to make a “chocolate pudding base”. That is not to say that I’m adding chocolate pudding to the cake, but rather, I create a thick chocolate milk base that acts like a pudding!

I melt the cocoa powder with hot water to make a thick paste and then whisk in the cold buttermilk. This mixture does a great job of holding on to moisture inside the cake while baking.

Cocoa powder dissolved in hot water and mixed with buttermilk in a measuring jug.

How to prep the cake pans for baking

To make life easy, I make this chocolate cake in three 8 inch pans for a 3-layer chocolate cake. You can make this in three 9 inch pans as well. See my cake pan conversion chart for more information.

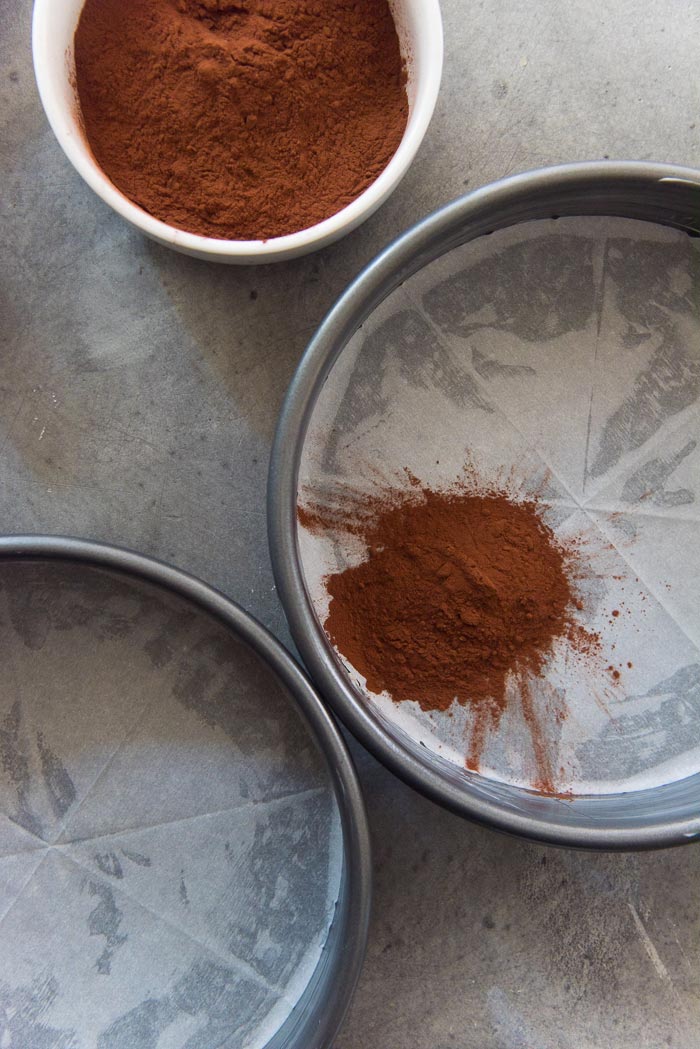
I line the bottom of the pans with parchment paper, and then for the sides, I butter and dust with cocoa powder. However, you can get away with not using parchment paper for the bottom, and simply butter and dust the whole pan with cocoa powder. The parchment paper on the bottom just makes it easier to flip the cake out when it’s done baking.

By dusting the pan with cocoa powder instead of white flour, you ensure that the baked layers have a similar, even color on the outside when it comes out of the pan. Dusting with white flour will give the cake layers a slightly yellowy, white flour crust on the outside, which looks a bit unsightly.

Cake pans lined with parchment paper on the bottom and dusted with cocoa powder.

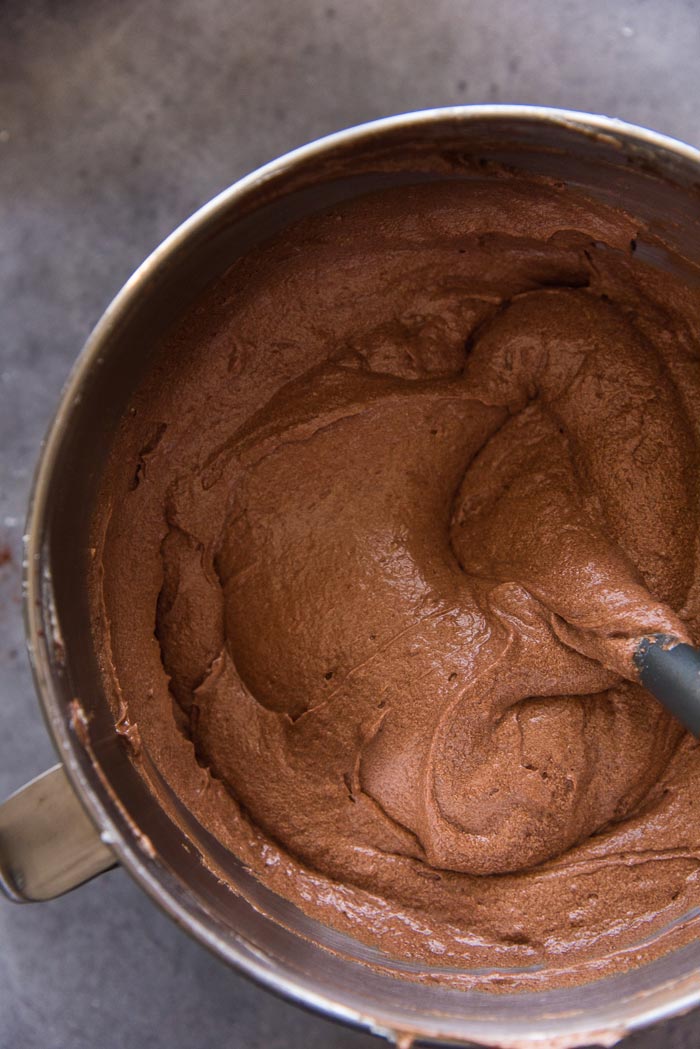
Tips on how to prevent overmixing the cake batter

Over-mixing the cake batter (after adding the flour) is the number one reason for failed cakes. Over-mixing results in very “holey” chocolate cake layers with big air bubbles or tunnels of air. The cake layers will feel tough or even rubbery in extreme cases. That’s because of the over-developing of the gluten by over-mixing. So preventing over-mixing is really crucial.

This is why I prefer to fold in the flour and chocolate milk BY HAND, instead of using a stand-mixer. Using a spatula to fold in the flour and milk by hand will prevent the flour from developing too much gluten.

Butter and sugar creamed together in a mixer bowl, with chocolate milk and sifter flour in separate bowls.

ALWAYS sift the flour. I sift it thoroughly, even double or triple sift it. With no lumps, the flour blends into the batter quicker. 

When I add the flour into the batter (in 3 additions), I don’t always thoroughly mix in the flour before adding the milk. In fact I add the milk when there’s still a few white flour streaks in the batter.

However, I do make sure that all the flour is mixed in well after the final addition. Reducing the mixing/folding action this way, still ensures that all the flour and milk are mixed through, while reducing the likelihood of developing too much gluten.

Halfway through folding in flour and chocolate milk with the cake batter in the mixer bowl.

You can still use your stand-mixer if you must, BUT you should have it at the lowest mixing speed possible, and mix in the flour using the shortest amount of time. Apply the same principle that I mentioned above, and don’t wait for the flour to completely mix in before adding milk during the mixing process. But DO make sure that it’s all mixed in and smooth after the final flour addition.

You can use CAKE FLOUR as well which has less gluten than AP flour. Remember to WEIGH an equal amount of cake flour as AP flour. If you go by volume and use cup measurements, this will result in the addition of LESS cake flour, which may make the cake collapse after baking (due to too little flour).

Chocolate cake batter with no lumps in a mixer bowl, with a rubber spatula.

How to get PERFECT and even cake layers

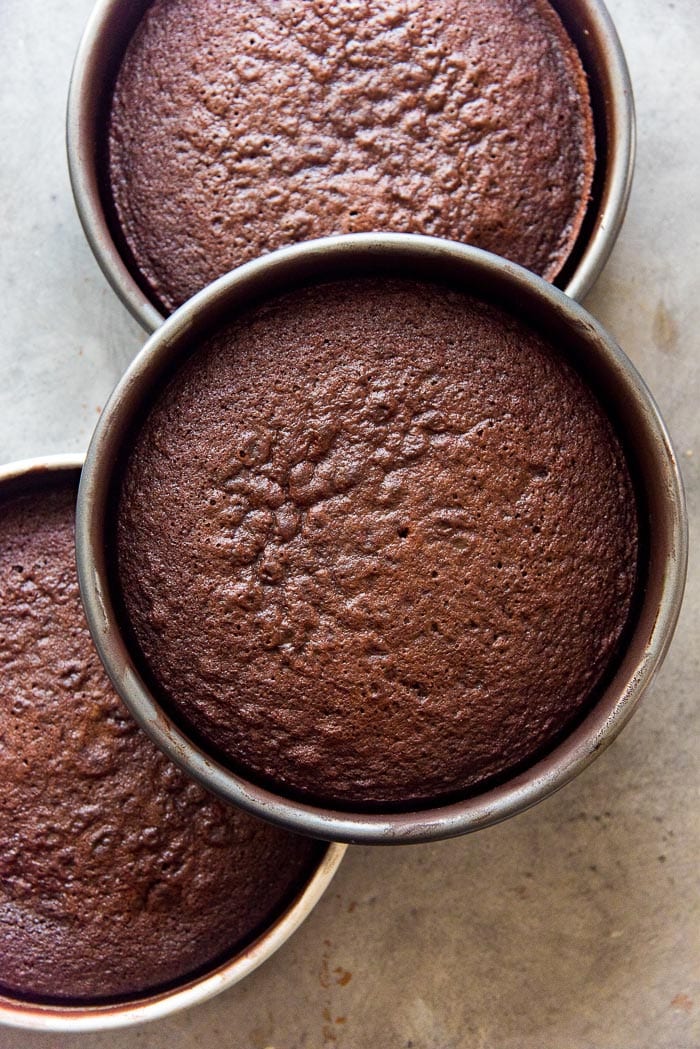
Unlike the Hershey’s chocolate cake where the cake batter is thin and watery, this classic chocolate cake has a batter that is thick and rich. Measure it out evenly into each pan, so that you get even, equal-sized cake layers. I like to use a weighing scale, and I consistently add 18.7 oz per cake pan (530 g). 

The cake layers will have sides that are slightly slanted. This is quite normal. If the cake layers shrink too much from the sides, then I recommend reducing the baking time and then removing the pans from the oven as soon as the center is baked through and the cake layers are JUST starting to shrink from the sides. The longer you keep it in the oven, the more it will shrink from the sides.

Chocolate cake batter divided into the prepared cake pans.

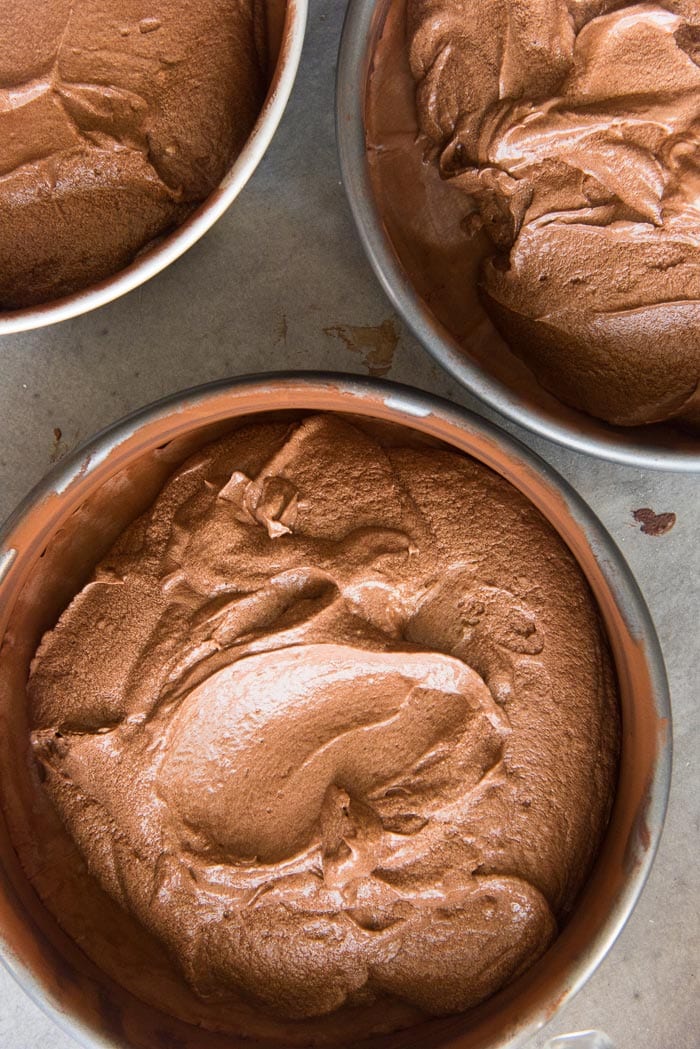
Another technique is to use cake baking strips. These are large strips of fabric that you soak in water and wrap around a filled cake pan before going in the oven. The wet baking strips act like a mini water bath and help regulate the temperature of the cake batter from the sides. This will also result in cake layers that are nice and flat on top, and have more straight edges and sides as well.

It’s also important to allow the cake to cool ONLY for about 10-15 minutes before removing it from the pan. The longer you let the baked cake sit in the pan, the more it will shrink (because of residual heat), and even worse, you may cause the cake to soak up too much moisture on the bottom as the water condenses. This will make the cake sticky and harder to manage.

Freshly baked classic chocolate cake layers in cake pans.

Tips on how to make the perfect, creamy, soft chocolate buttercream

When it comes to frosting a cake, patience is key. Allow the cake to cool completely, before getting that frosting anywhere close to it! If the cake is warm (even if it’s only in the center), the frosting will start to melt and slide right off. Not good.

The secret to a perfectly soft and creamy chocolate frosting is to start with COOL butter. Not cold or chilled butter, just cool butter. Butter at room temperature is OK, as long as the room temperature is somewhat cool, about 65-70°F (18-21°C).

In the summer months or in a tropical climate, this ambient temp. is too warm and the butter will soon become too soft. The solution is to either put soft butter in the freezer for about 5-10 minutes to cool it down slightly, OR to remove the butter from the fridge about 20-30 minutes before you start making the buttercream frosting.

Creamy Chocolate Buttercream Frosting - fluffy, creamy, melt in your mouth soft chocolate buttercream with deep chocolate flavor! Plus it's super easy to make!

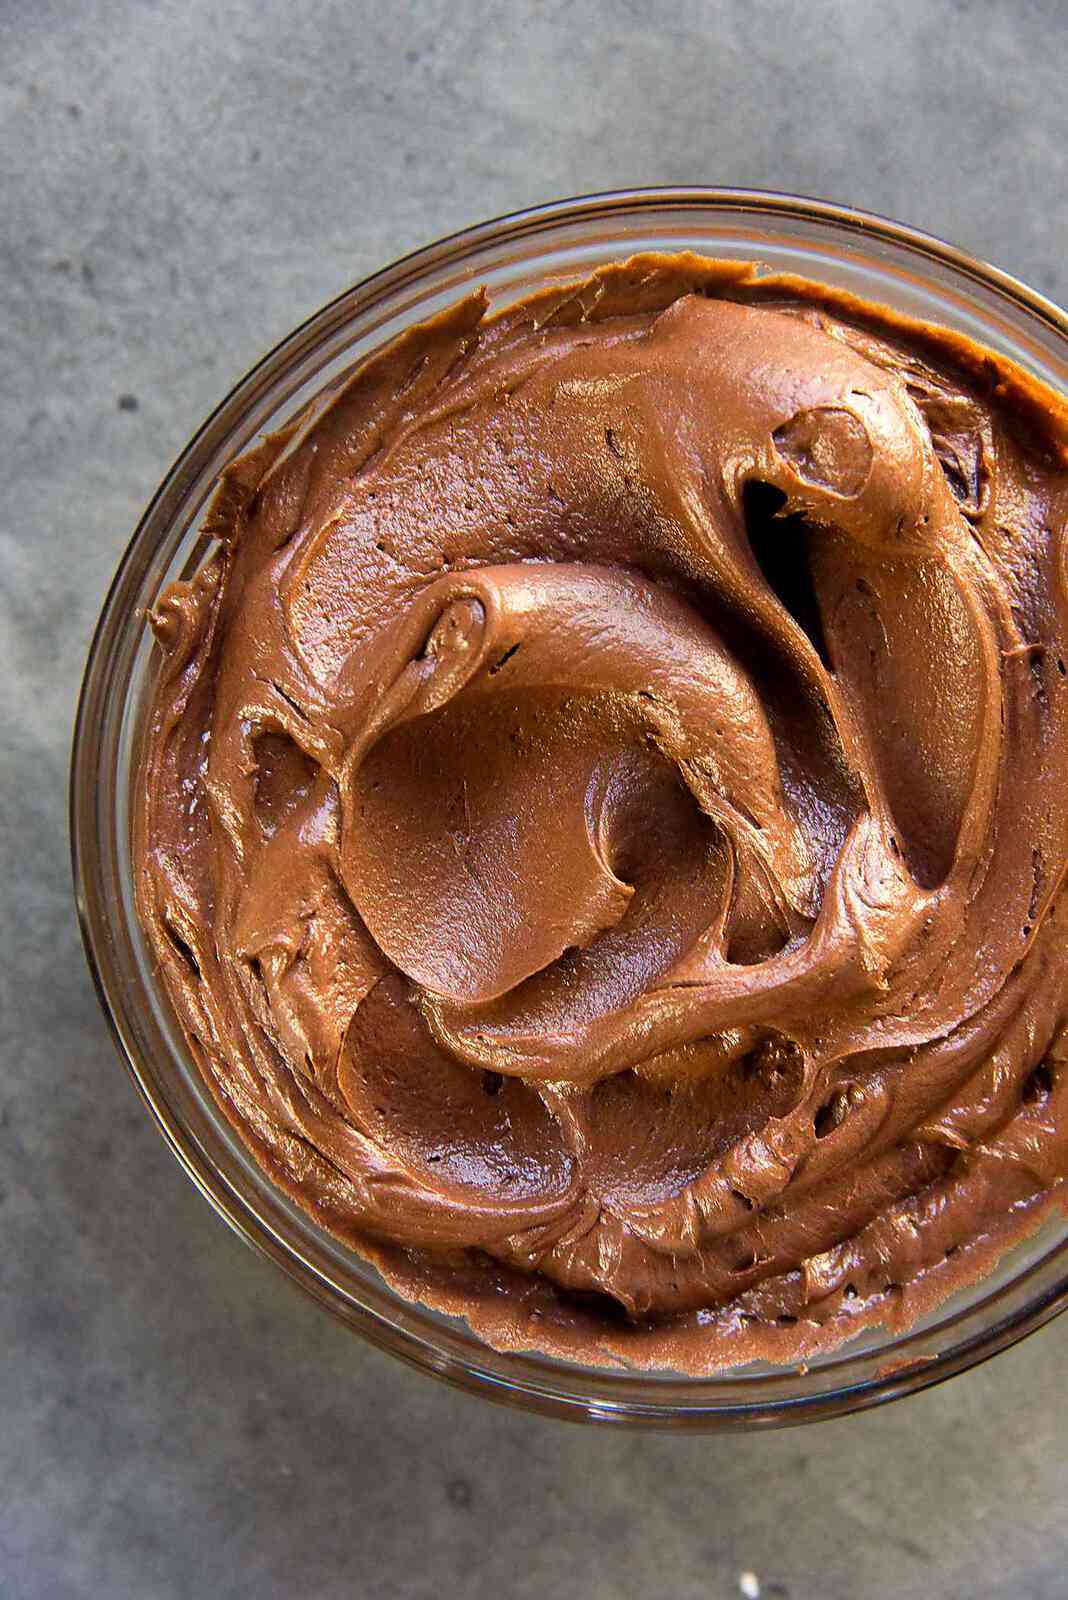
If you use butter that’s too soft, the whisking action will cause the butter to split. Not good. It’ll look terrible, and the split buttercream will cause excess moisture to seep into the cake as well.

Buttercream made with cool butter, will results in a creamy, chocolatey, melt-in-your-mouth soft buttercream that does not split. Please see my easy chocolate buttercream frosting post for more details.

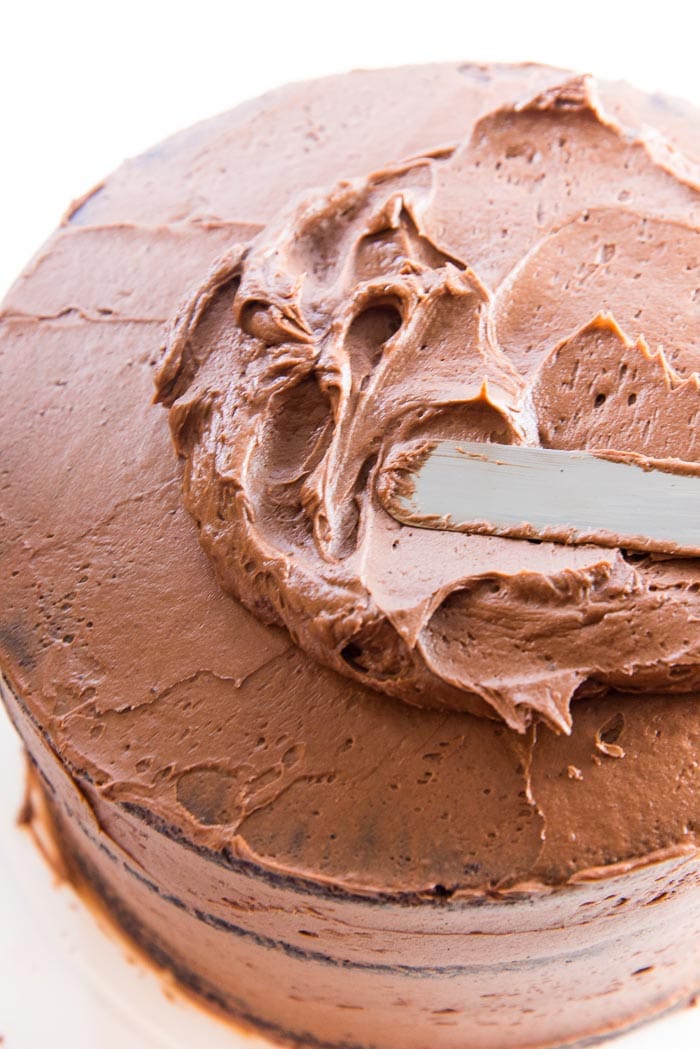
Ideas on how to perfectly frost this classic chocolate cake

If you’re making this chocolate cake for your family, and they couldn’t give two hoots about how clean or pretty it looks, then just go ahead and slather that damn fine chocolate frosting all over the cake, however you want!

Scoops of American chocolate buttercream on a layer of chocolate cake placed on a cake stand.
Chocolate cake layer on a cake stand with a layer of smoothened chocolate buttercream on top.
Second layer of chocolate cake placed on top of the first cake layer and frosting layer.
Third cake layer placed on top of two layers of chocolate cake and chocolate buttercream.

But if you’re going for that perfect “messy looking” cake, or you want a sleek looking cake with smooth edges, then you can follow these steps.

  • Use about 3/4 –  1 cup of chocolate buttercream to sandwich each cake layer. This will make sure you have an even amount of frosting between each layer.
  • DO NOT spread frosting right to the edge of the cake layer. I leave about a 1/2 an inch gap at the edges. This is because I FILL THE EDGES later with more frosting when I’m crumb coating the cake (see below).
  • Check each layer as you go to make sure the cake is even. I move the cake layers around, until they all look as even as possible, and then gently press down the cake layers. If you do this as you go, you won’t end up with a wonky cake. But if you do, it’s still fixable!
  • CRUMB COATING – crumb coat the classic chocolate cake with your creamy chocolate buttercream frosting. I start off by filling the edges of the cake layers (that 1/2 inch gap from the earlier step above), and then apply a thin chocolate buttercream layer to get even and smooth edges.
  • Check once more time to make sure the cake is straight. Press down and/or gently shift the cake layers around if one side is higher than the rest of the cake. Crumb coat to keep the cake together.
  • Next, it’s absolutely important to let the cake rest and set (in the fridge) for at least 1 hour (or until the frosting is set).

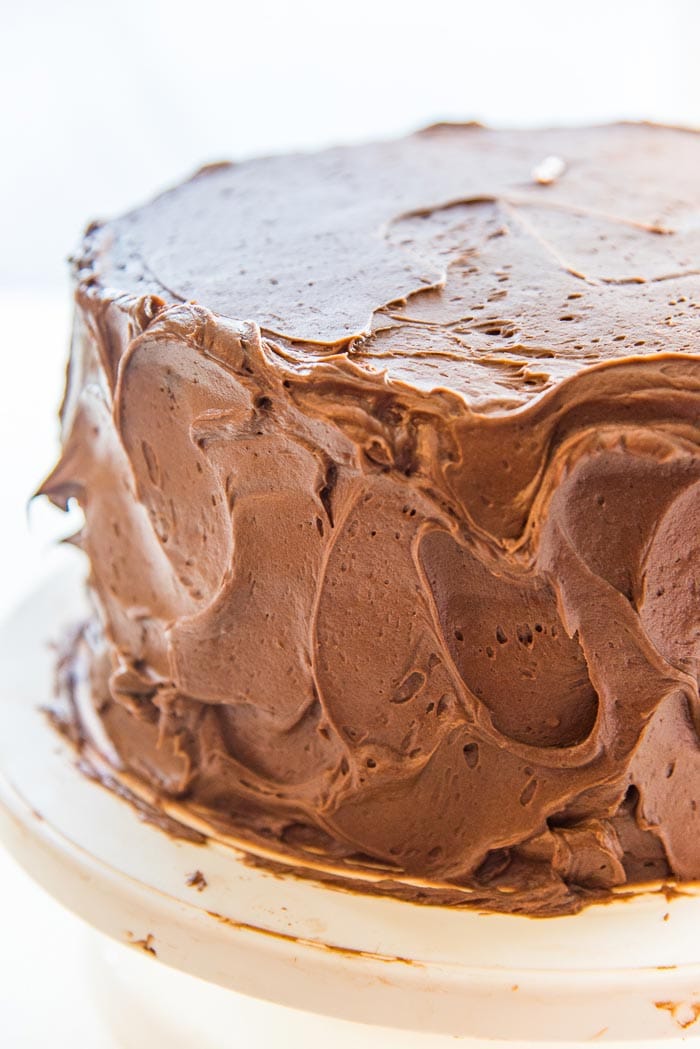
How you frost the cake after this is totally up to you!

Tiered chocolate cake crumb coated with fluffy chocolate buttercream frosting on a cake stand.

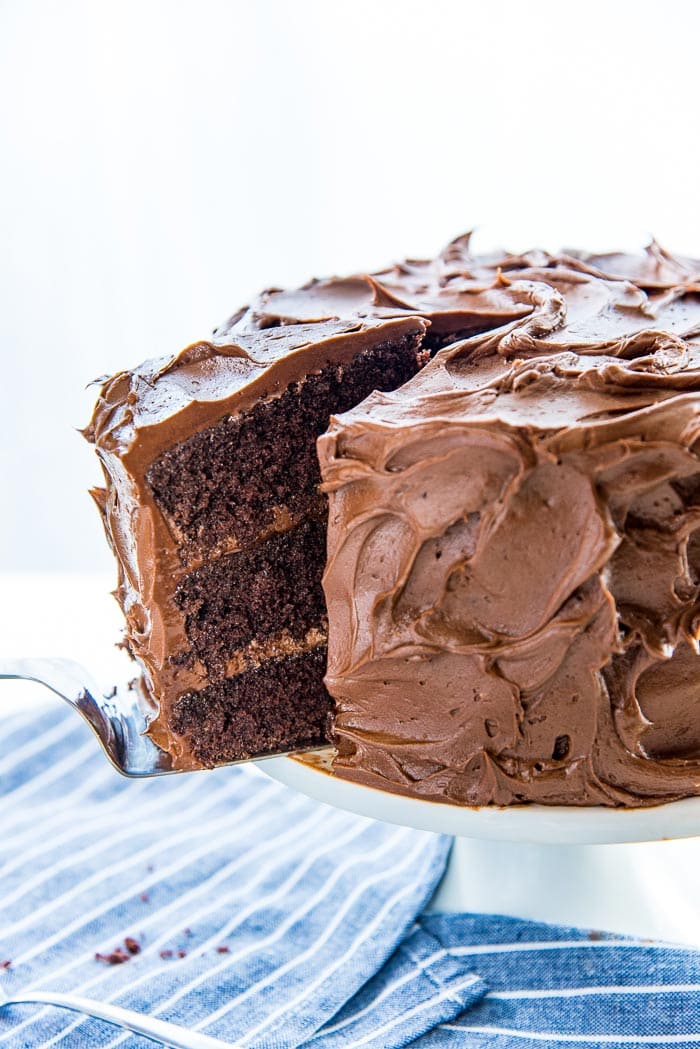
Want swirly buttercream the way I’ve frosted the chocolate cake in these pictures? Go for it!

Want smooth, straight edges instead? Use a cake scraper to get those straight edges. You can even use a decorative icing nozzle to decorate the cake.

Then cover it with chocolate shavings, sprinkles, nuts, or nothing at all.

Swirling chocolate buttercream on top of the chocolate layer cake with an offset spatula.
Close up of the chocolate buttercream swirls on the sides of the layered chocolate cake.

How to get perfect cake slices with clean cuts

Warm a sharp knife or serrated knife using hot water. Wipe the blade dry, and cut through the cake cleanly. I prefer to warm and wipe the blade for each cut, so I keep a jug of hot water near me to dip the knife in after each cut.

This cake defines a classic chocolate cake for me! Not too decadent, just perfectly fudgy and soft, and super chocolatey. Airy, but not dry at all. With a creamy, melt-in-your-mouth soft buttercream frosting. You simply can’t go wrong with this best chocolate cake recipe! 🙂

Close up of the swirled, fluffy chocolate buttercream frosting covering the whole cake.

If you liked this classic chocolate cake recipe, don’t forget to subscribe for new (and free) recipes by entering your email address on the side bar (and get all these recipes delivered straight to your inbox), so you don’t miss out on a thing. You can find me on FACEBOOK, INSTAGRAM,  PINTEREST, YOU TUBE and GOOGLE-PLUS too.

Close up of a chocolate cake slice with a bite taken out to show the soft, airy cake crumb.

Other cake recipes you’ll love

  • Classic vanilla cake
  • Glazed chocolate bundt cake
  • Lemon raspberry cake
  • Sri Lankan butter cake
  • Banana layer cake
  • Mulled wine cake (sponge cake)
  • Ginger cardamom cake (magnolia cake)
  • Coffee layer cake (espresso cake)
  • Chocolate roll cake
  • Yule log cake
  • Vanilla roll cake
  • Devil’s food cake
  • Classic white cake
  • Extra fudgy one bowl chocolate cake
  • Classic pound cake
  • Bourbon butter pecan cake

Recipe

Slice of layered chocolate cake with chocolate buttercream frosting on a plate.
5 from 36 votes

The Best Classic Chocolate Cake

Author: Dini Kodippili
Cuisine: American
This Classic Chocolate Cake is the only and best chocolate cake recipe you will ever need! It has layers of soft, airy chocolate cake layers, with a creamy, buttery, melt in your mouth Chocolate buttercream frosting. Perfect cake for Birthday cake, or any occasion. 

 Difficulty: 

Easy
This classic chocolate cake is the best and the only chocolate cake recipe you'll ever need! It has tall layers of soft, airy chocolate cake, with a creamy, buttery, melt in your mouth soft chocolate buttercream frosting. It's the perfect cake for birthdays, celebrations or any occasion. 
US based cup, teaspoon, tablespoon measurements. Common Measurement Conversions. 
Weight measurements are recommended for accurate results. Use the toggle button below the ingredient list to switch between volume and metric measurements.
This cake is a 3 layer cake, and if you want to make a 2 layer cake, switch the "servings" to 8 slices.

US based cup, teaspoon, tablespoon measurements. Weight‌ ‌measurements‌ ‌are‌ ‌recommended‌ ‌for‌ ‌accurate‌ ‌results whenever available.

Common Measurement Conversions
Prep: 1 hour hr
Cook: 30 minutes mins
Cooling Down: 4 hours hrs
Total Time: 1 hour hr 30 minutes mins
Print Recipe Rate SaveSaved!
Makes: 12 slices

Ingredients:
 

  • Extra butter and cocoa powder and parchment paper for the pans
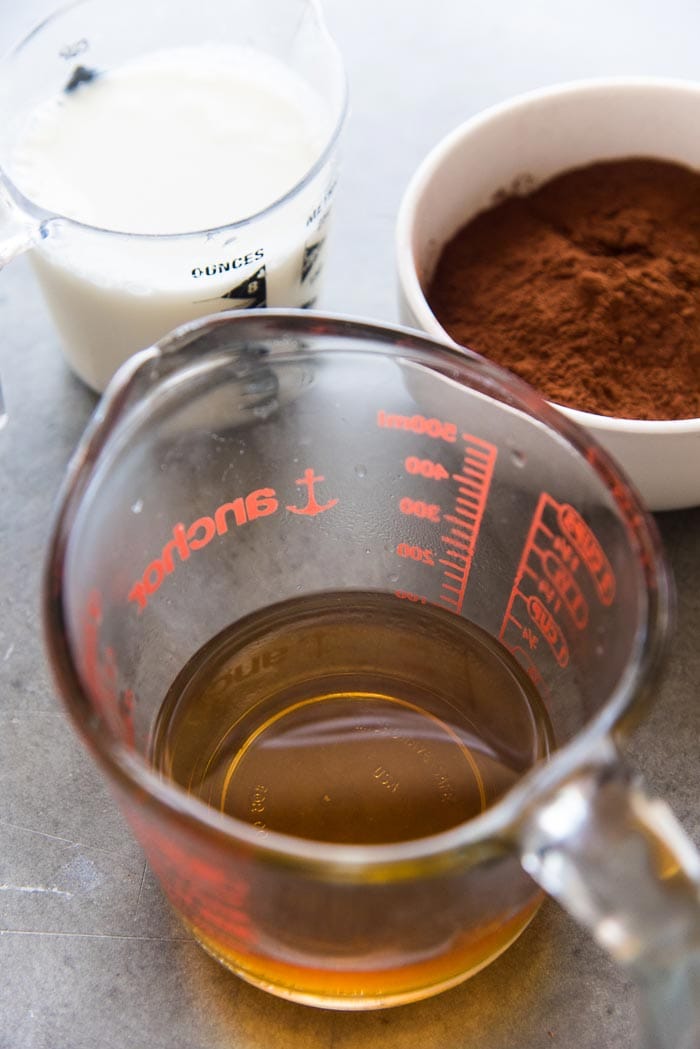
  • 120 mL boiling water ½ cup
  • 75 g Dutch cocoa powder ¾ cup, spoon and leveled
  • 240 mL chilled buttermilk 1 cup
  • 10 mL white vinegar 2 tsp
  • 15 mL vanilla extract 1 tbsp
  • 300 g AP flour 2 ½ cup AP flour, spoon and leveled
  • 1 tsp baking powder
  • 1 tsp baking soda
  • 285 g unsalted butter 2 ½ sticks, softened
  • 450 g white sugar 2 ¼ cups
  • ½ tsp sea salt
  • 4 large eggs
Creamy Chocolate Buttercream
  • 2 batches Chocolate Buttercream see recipe notes

Instructions:
 

  • Line the bottom of three 8 inch cake pans with parchment paper (using some butter to stick the paper to the bottom). Brush/rub the sides of the pan with butter as well. Dust the sides of the cake pans with Dutch cocoa powder as well. Set aside.
  • Preheat the oven to 325°F (160-165°C).
  • Have all the ingredients measured and ready to go.
  • Place the hot water and cocoa powder in a jug and whisk to dissolve the cocoa powder in the water. You should have a thick and smooth paste. Stir in the buttermilk, vinegar and vanilla, and set aside.
  • Sift the flour, baking powder and baking soda together into a bowl. Set aside.
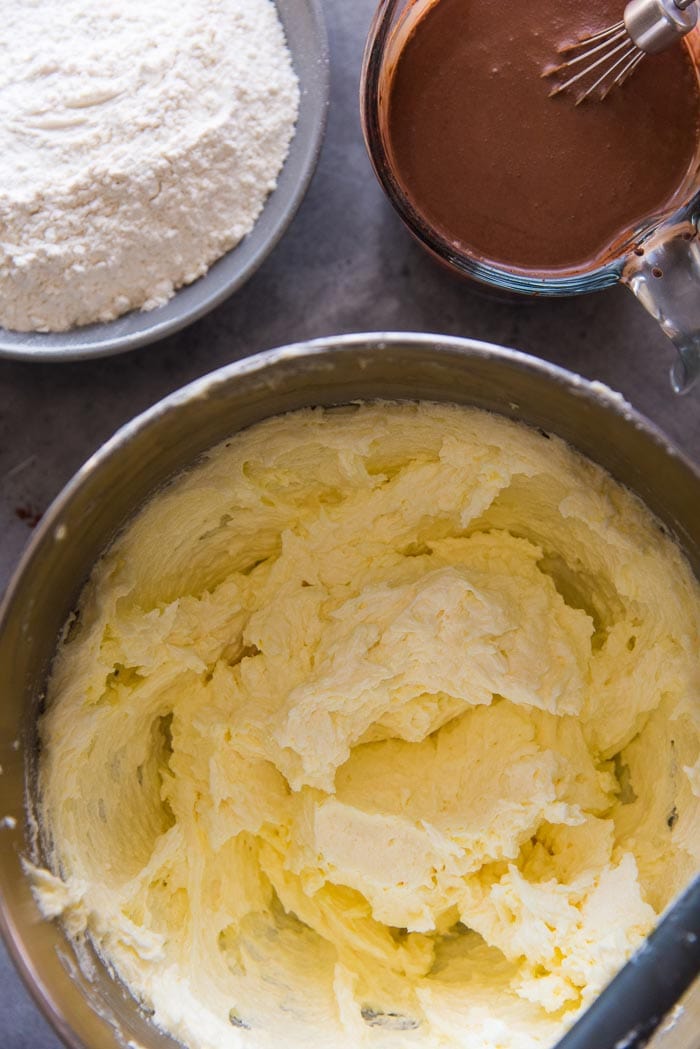
  • Place the butter in the bowl of your mixer. Using the paddle attachment, beat the butter until it’s light and fluffy, at medium speed for about 2 – 3 minutes.
  • Add the sugar and salt into the mix, and mix for a further 4 – 5 minutes until light and fluffy. Remember to scrape down the sides and the bottom to make sure that the sugar is well incorporated. Beat the butter and sugar mix further if needed (until light and fluffy).
  • Mix in the eggs, one at a time, about 20 – 30 seconds per egg. After adding 2 eggs, stop the mixer and scrape down the sides and bottom. Start the mixer again and add the final 2 eggs. Once the final egg has been whisked well into the batter, stop the mixer and remove the bowl.
  • The chocolate milk and flour will be mixed in by hand with a spatula, but can be done in the mixer as well (see recipe notes).
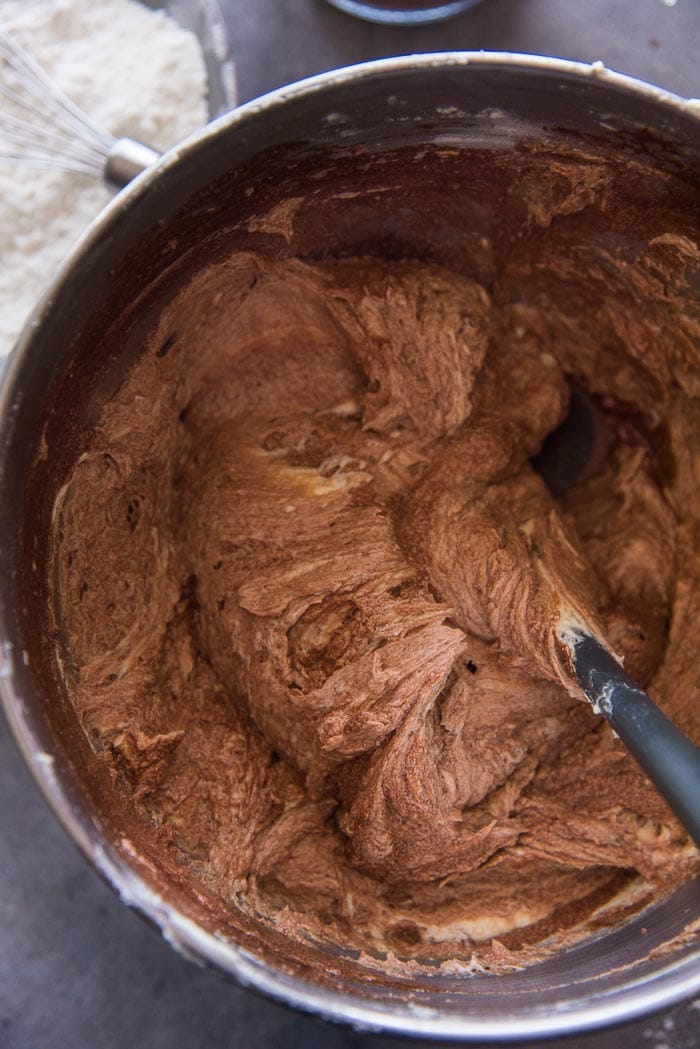
  • Add a generous ⅓ of the flour mix and fold it into the batter using a spatula. When the flour is mixed in half way (with some white streaks visible in the batter), add ½ of the chocolate milk mixture into the batter.
  • Using a spatula, fold in the chocolate mixture until it’s mixed in half way (with dark chocolate streaks now visible in the batter).
  • Next, add another generous ⅓ of the flour mix and fold it into the batter using the spatula.
  • When the flour is almost completely mixed in (some white streaks are OK at this stage), add the final bit of the chocolate milk. Fold in until almost fully mixed in (some dark chocolate streaks are also OK at this stage).
  • Add the final bit of flour, and fold it into the batter until it’s all FULLY incorporated. You should now have a smooth chocolate cake batter, free of lumps and white flour streaks.
  • Pour the batter into the prepared cake pans – about 18.7 oz (530 g) per pan. Mix and fold the batter before measuring it into each pan.
  • Transfer the pans into the preheated oven. Make sure the pans are not touching each other in the oven if possible (see recipe notes).
  • The total bake time for the cakes is between 25 – 30 minutes, but make sure to rotate the cake pan once, half way through. The cakes will be done when they are springy to the touch in the center, and the sides are just starting to pull away from the sides of the pan. A clean toothpick inserted into the middle of the cake should come out clean at this point.
  • Remove the cake pans from the oven and allow them to cool for about 10-15 minutes, until the cake pans can be handled.
  • Carefully flip the cakes out of the pan, and place them on a cooling rack (parchment side down), until they’re completely cooled down. If you won’t be frosting the cake immediately, cover the cake layers with plastic wrap and store in the fridge.
Frosting the Chocolate Cake
  • On the day you're frosting the cake, make a double batch of this chocolate buttercream frosting recipe. Remember to only add cold whipping cream to get the desired fluffiness.
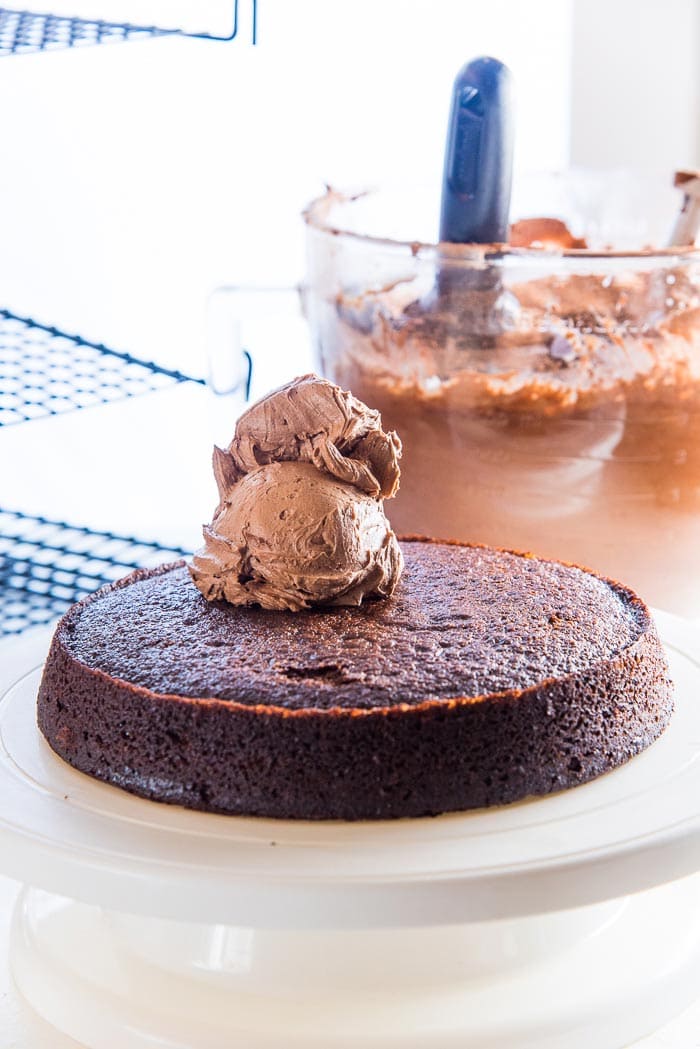
  • Place one layer of the chocolate cake on a cake decorating plate or board.
  • Using a large ice cream scoop (¼ cup capacity), add 3 – 4 scoops of buttercream on top (about ¾ – 1 cup).
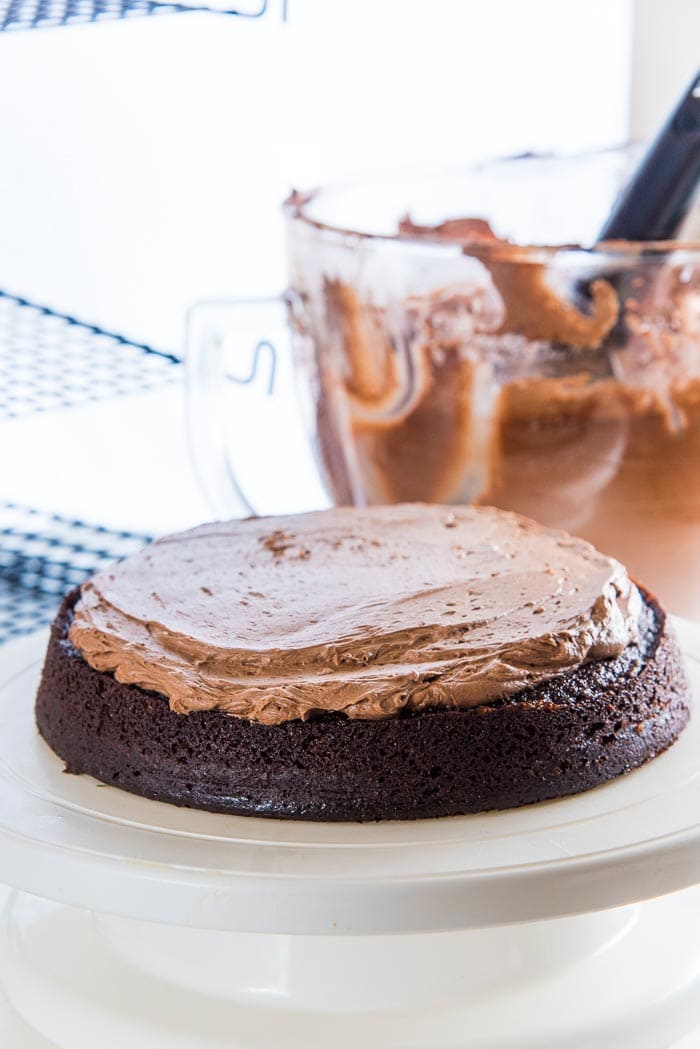
  • Evenly spread the buttercream using an offset spatula, leaving about a ½ inch gap at the edges (see pictures and post for more details).
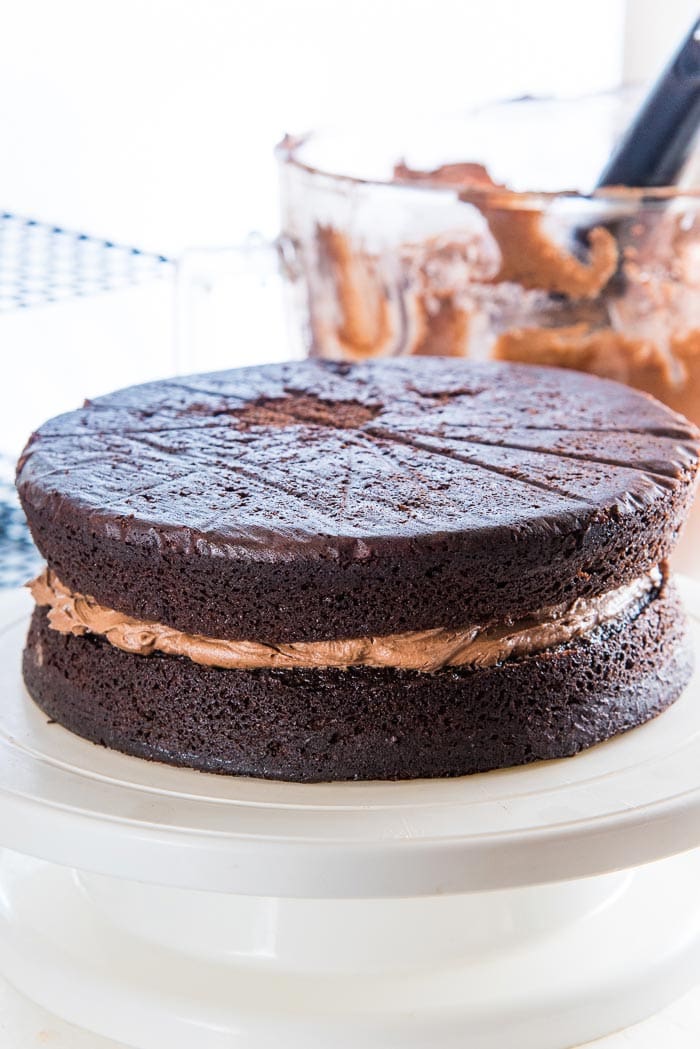
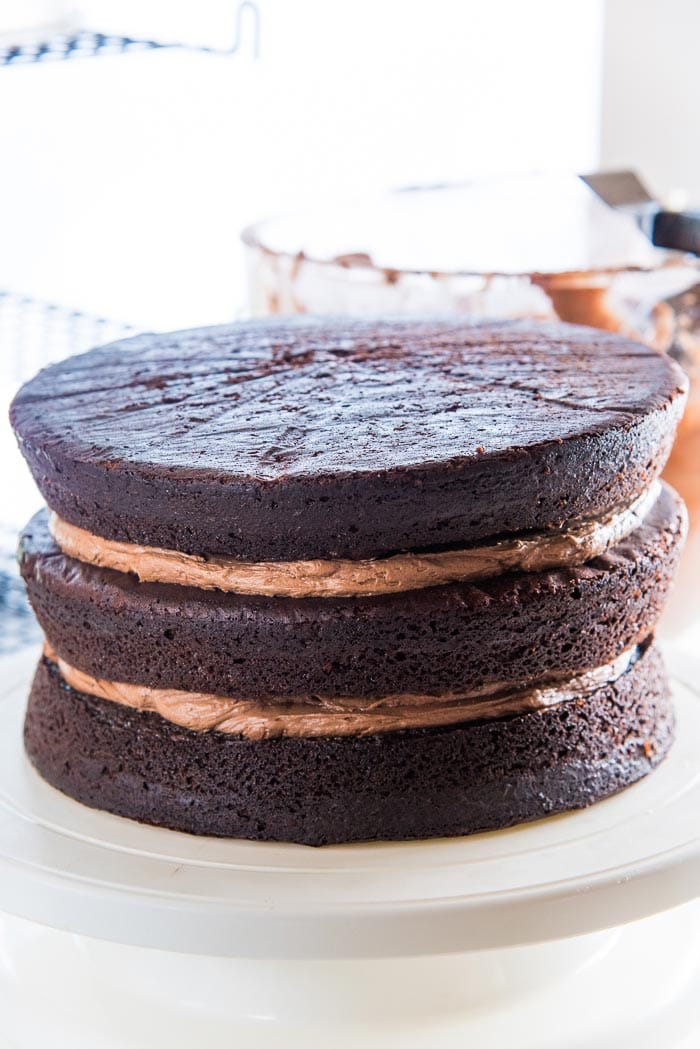
  • Place the second cake layer on top, and gently press down. Repeat with the buttercream, followed by the final cake layer (making sure the flat side of the final cake layer is facing up). Gently press this cake layer into the buttercream below and make sure all the sides and surface are level and straight.
  • Apply a thin crumb coating on the cake. Make sure to fill the gaps at the edges of the cake layers to make the sides straight and smooth. Add the crumb coating to the top of the cake as well. Refrigerate the cake for about 30 mins – 1 hour (or more) until the crumb coating is set. If you’d like to leave the cake in the fridge for longer at this stage, make sure to loosely cover it with plastic wrap.
  • When the crumb coating has set, coat the cake with the rest of the buttercream. Free style the frosting pattern, or use a cake scraper to get nice, smooth, straight edges. Use icing/pastry tips, or chocolate shavings/sprinkles to decorate. Serve.

Recipe Notes

Volume measurements are approximations only. For accurate and consistent results, use a kitchen scale to measure ingredients. 

Notes on mixing the cake batter with a stand-mixer for the final step

You can mix the chocolate milk and flour into the batter using the STIR setting (or the lowest speed) on your stand mixer. If you do use the stand mixer, make sure to mix the batter for as little as possible, because you can easily end up over-mixing the batter.

Notes on baking the cake layers

To get more even, equal-sized cake layers, you can use baking strips to wrap around the cake pans (this is optional).

Notes on the Chocolate Buttercream Recipe

You can choose between a dark chocolate buttercream or a sweeter chocolate buttercream following the recipe in the link above. I prefer to use the sweeter buttercream for this classic chocolate cake. 

Notes on cutting the cake

Use a warm, dry knife to get clean cut lines for the cake. I dip the cake in hot water and wipe the blade before cutting into the cake. I do this for every cut I make to prevent messy looking cake slices (so I keep a jug of hot water near by to dip the knife in).

Nutrition Information:

Calories: 686kcal (34%) Carbohydrates: 82g (27%) Protein: 6g (12%) Fat: 42g (65%) Saturated Fat: 13g (81%) Cholesterol: 159mg (53%) Sodium: 422mg (18%) Potassium: 199mg (6%) Fiber: 2g (8%) Sugar: 63g (70%) Vitamin A: 670IU (13%) Vitamin C: 0.2mg Calcium: 69mg (7%) Iron: 2mg (11%)

“This website provides approximate nutrition information for convenience and as a courtesy only. Nutrition data is gathered primarily from the USDA Food Composition Database, whenever available, or otherwise other online calculators.”

Tag me on Instagram!I love seeing what you’ve made! Tag me on Instagram at @TheFlavorBender or leave me a comment & rating below.
Dini Kodippili Avatar

About

Dini Kodippili

Dini Kodippili is a professional food writer, recipe developer, food photographer, cookbook author, and baker. Dini has been featured on HuffPost, Cosmopolitan, Forbes, Delish, Food & Wine and more. Learn More

I love hearing from you! Submit your question or recipe review here.

4.98 from 36 votes (4 ratings without comment)

Leave a Reply Cancel reply

Your email address will not be published. Required fields are marked *

Made this? Rate this recipe:


This site uses Akismet to reduce spam. Learn how your comment data is processed.

148 responses

  1. Beryl G
    May 1, 2020

    I tried this cake today! And can I say, it’s a game changer! I loveeeeeddd it! My whole family loved it!
    I used cake strip to try to make it moist on the sides and not so dry! Also I made this in an aluminium pot on the stove (Indian hack for a oven)
    This is the best chocolate cake recipe ever.

    Reply
    1. Dini
      May 2, 2020

      Thank you so much Beryl! 🙂 I’m so glad your family enoyed the cake, it’s one of my favorites too!

      Reply
  2. Navida
    April 26, 2020

    Hi,I baked the cake but when I wanted to take it out of the cake mold it got split in half. What do you suggest I do so that it doesn’t happen?

    Reply
    1. Dini
      April 26, 2020

      Hi Navida
      Can I know whether you buttered and floured the cake pans, and/or lined the pan with parchment paper?
      Usually a cake will break in half if it sticks to the pan and breaks in the process of coming out of the pan. If the cake seems to be a little stuck on the sides of the pan, then you can run a knife along the side of the cake pan to release it with more ease. With a buttered and floured and parchment paper lined pan, this much less likely to happen.
      I hope that helps!

      Reply
      1. Navida
        April 27, 2020

        I used release agent spary and about 20gr turkish power caco.
        I can’t use buttermilk because I can’t find it in Iran, that’s why I have to make it myself. I added a spoon of vinegar in my milk. Can this be the problem?

        Reply
        1. Dini
          April 27, 2020

          Hi Navida
          The buttermilk replacement isn’t the problem as I have done this too and got great results. I’m not sure what kind of release agent spray you used, but in my experience some cake release sprays don’t need any extra flour/cocoa powder to dust the sides. This can dry up the the sides too. Also I personally don’t like to use sprays on my cake pans because they can be hit or miss. the release spray is more likely to be the culprit.
          I recommend using some butter to butter the whole pan (if you’re not lining the bottom with parchment paper), and follow it with a dusting of cocoa powder before adding the batter. Also, run a knife along the sides of the cake pan before flipping over to make sure the sides are released properly.
          I hope that helps!

          Reply
  3. IHEANACHO IFEOMA
    April 8, 2020

    I LOVE THIS RECIPE SO MUCH

    Reply
  4. Jessica Kalule
    April 7, 2020

    I love your recipes, tried Vanilla and Chocolate and forever these will be my recipes. Do you have a recipe for Red Velvet cake?

    Reply
  5. Emily
    January 12, 2020

    In other recipes I’ve read that you should use 1tsp of baking powder to 1 cup of flour. Why do you use less? I live in the uk – could I just use self-raising flour?

    Reply
    1. Dini
      January 13, 2020

      Hi Emily
      Not all recipes will use the same ratio of baking powder to flour to achieve different textures in the cake crumb. However, this cake uses baking powder and baking soda as leavening agents, and baking soda is more active compared to baking powder. I wouldn’t recommend using self raising flour as it can alter the cake crumb.
      I hope that helps!

      Reply
  6. Sherry
    December 30, 2019

    5 stars
    WELCOME TO CANADA DINI!!! I LOVE your recipes….love love love this cake and frosting even though up until now….i’ve never been a chocolate fan, despite loving chocolate. because I could never find a chocolate cake recipe that baked up everything I wanted and expected in a cake…Until NOW! Yours is to die for! THANKYOU

    Reply
    1. Sherry
      December 30, 2019

      That was suppose to say…I’ve never been a chocolate CAKE fan, despite loving chocolate

      Reply
    2. Dini
      December 31, 2019

      Thank you so much for your lovely words Sherry, and we are thrilled to be here in Canada too! 🙂 I’m so glad you enjoyed the chocolate cake recipe. Happy new year to you and your family! 🙂

      Reply
  7. Heather
    December 15, 2019

    I never leave reviews for anything however I made this cake for my daughter’s 18th Birthday, and it was amazing! I’m not a great baker but always make birthday cakes and this has been the best and one of the easiest recipes to follow (I’m in the UK so some things were slightly different). I substituted the buttercream for black cherries and fresh cream for the filling. This will be the only chocolate cake I will make in the future. Thank you for the recipe.

    Reply
    1. Dini
      December 15, 2019

      Thank you so much for letting me know Heather! That’s fantastic, I’m so happy to hear you enjoyed the cake. And happy birthday to your daughter too! 🙂

      Reply
  8. Gandhi
    December 6, 2019

    Any replacements for eggs?

    Reply
    1. Dini
      December 6, 2019

      Hi Gandhi
      Unfortunately I have not tried to make this cake with egg substitutes. So I wouldn’t be able to tell you how to replace the eggs, without impacting the flavor and texture of the cake. Sorry about that.

      Reply
    2. Jessica Kalule
      March 20, 2020

      I wish to try this out but just wondering if i can use any cocoa as long as it’s dark

      Reply
      1. Dini
        March 20, 2020

        Hi Jessica!
        Yes you can use natural cocoa powder in place of dutch processed cocoa. Just make sure to measure it by weight, not by cups, because natural cocoa powder packs more tightly in measuring cups than dutch cocoa powder. Hope that helps!

        Reply
        1. Kalule Jessica
          March 21, 2020

          Thank you so much, i love the quick response. I can’t wait to try this out tomorrow with my cake eaters. My kids love cake. But kindly convert for me 3/4 cup of Cocoa to grams

          Reply
          1. Dini
            March 21, 2020

            Hi Jessica, it’ll be 75g of cocoa powder. There’s a toggle button called “Metric” in the recipe card below the ingredient list, and if you click this you’ll get unit conversions for weight. Good luck, I hope you enjoy the recipe! 🙂

          2. Jessica Kalule
            March 22, 2020

            Dini Dini Dini how many times have i called you? Not sure which words to use but thank you so much for this recipe, the cake is very nice. I managed to try again the Vanilla cake and made a few changes like adding the egg yolks first one at a time added 2 extra then whisk the egg whites and added them last. I love the results, sponge is soft n lovely. But now when i taste the chocolate i don’t want to eat Vanilla and vice versa. Both cakes are lovely. Will try out other recipes am very grateful, my passion for baking is growing stronger each time i visit your page.

          3. Dini
            March 23, 2020

            Thank you so much for letting me know Jessica, I’m really happy to hear that! 🙂 So glad you enjoyed both cake recipes!

  9. Pamela
    May 15, 2019

    Help! I’m baking this cake right now for my daughters birthday tonight and re-reading it says you used vinegar but none is listed in the ingredients?? Thanks!!

    Reply
    1. Dini
      May 15, 2019

      Hi Pamela!
      The recipe is fixed! The vinegar had disappeared from the ingredient list, and it’s included again! The cake will still come out delicious without it, but vinegar also helps bring out the chocolate flavor more. Thank you for letting me know!

      Reply
    2. Joana
      October 5, 2019

      5 stars
      Chocolate cake just on point! Dense-melting in your mouth, not fudgy, not fluffy, moist, rich chocolate flavour but not bitter. I added 1.5cup of sugar and it was just in balance. My middle layer were praline with crushed cookies+white chocolate ganache, on top chocolate cream cheese ganache. I baked it in 28cm dia pan as one cake (about 40-45 minutes I guess). I layered it one day after and, chilled for 6h and served that baby 36 hours after baking, it was perfect! Straight from the fridge the next day it was still delicious. I was searching for a perfect recipe for a week. Thanks for this one!

      Reply
      1. Dini
        October 6, 2019

        Hi Joana, thank you so much for letting me know. So glad you liked the recipe, and it was what you were looking for! 🙂

        Reply
  10. Ritasharma
    April 23, 2019

    5 stars
    This is my first review of a recipe but I had to comment on how great this cake turned out. It was so moist and the frosting recipe in the link goes great with this cake. I divided the cake batter into three pans and had a triple layer cake. I baked it for a get together and everyone loved it. I saw people closing their eyes in pleasure – haha. They made comments like “incredible “ , “ wonderful”, “ sooo good”.

    It was my first from scratch chocolate cake I ever made so I made it a couple of times to practice. I was curious how changing the recipe to cake flour instead of all purpose would impact the cake. I liked the cake made with all purpose flour better. The batter made with the cake flour was too thin and actually bubbled in the oven as it cooked. The texture turned out ok – it was a finer crumb but Iwouldnt say that it was a better crumb. Also, the cake made using cake flour was not nearly as moist as the cake made with all purpose flour. This was quite a surprise to me since it was such a wet thin batter.

    Thank you for such a great recipe. I wouldn’t change anything about the recipe.

    Reply
  11. Heather Vess
    March 26, 2019

    Can you bake this in a 9×13 pan?

    Reply
    1. Dini
      March 26, 2019

      Hi Heather!
      I haven’t baked this in a 9 x 13 cake pan, so I can’t be certain. But there’s really no reason why it wouldn’t work. However, this will result in extra batter, and you could make cupcakes with the excess cake batter if you like. The cake pan should only be filled about 2/3 of the way. You will have to keep an eye on the cake and take it out of the oven when a cake tester/toothpick comes out clean.
      I do have an one bowl chocolate cake that is baked in a 9 x 13 pan, but it is fudgier than this cake.
      Hope that helps!

      Reply
  12. surangi
    March 26, 2019

    5 stars
    Amazing cake!
    I made this for my nephew’s 12th Birthday. Fortnite themed cake.
    Fluffy, moist, balance of all the flavors. All the guests loved it. I was born in Sri Lanka and lived in London for most of my life.
    This by far the best chocolate cake I ever made. Frosting was also so so tasty.

    Reply
    1. Dini
      March 26, 2019

      So glad you liked the recipe Surangi! Thank you so much for letting me know! And Happy Birthday to your nephew! 🙂

      Reply
  13. Luka
    March 17, 2019

    Weirdly, my cake didn’t raise! I followed exactly. The batter looked like yours. But… Nothing =/ what did I do wrong?

    Reply
    1. Dini
      March 17, 2019

      Hi Luka
      It very much sounds to me like the chemical leaveners weren’t fresh. Both the baking powder and baking soda need to be fresh for the cake to rise. You can check the freshness by mixing some of the baking soda with 1/2 cup white vinegar to see if there is a reaction (lots of bubbling and frothing). To check the freshness of baking powder, add some baking powder to a 1/2 cup of boiling water, and you should see the water bubbling and frothing if it’s fresh. I hope that helps!

      Reply
      1. Luka
        March 17, 2019

        Thank you, I’ll give it a try!!

        Reply
  14. Madiha
    February 28, 2019

    I only have 2 cake pans. They are 8 inches. Can I just transfer batter in two? Will it affect baking time? Or can I leave the batter out and wait for first two cakes to be done and then stick the third layer in the oven?

    Reply
    1. Dini
      February 28, 2019

      Hi Madiha!
      I would recommend baking 2 layers first, and then baking the third layer. And make sure to divide the batter evenly so that the layers will be equal in height (you may have to weigh the total amount of batter and divide that in 3).
      Also make sure to tightly cover the bowl with the remaining batter (for the third layer) with plastic wrap to keep it as fresh as possible, and bake that layer as soon as you’re able to. Hope that helps!
      Cheers,
      Dini

      Reply
      1. Madiha
        March 1, 2019

        Can I put the remaining covered batter in the fridge to keep it fresh? Or I can leave it out while the other cakes bake?

        Reply
        1. Dini
          March 1, 2019

          You can leave it in the fridge, or on the counter (if it’s not a particularly hot day). The cake may need a little extra time to bake if the batter is cold. However, still make sure you bake it as soon as the other pan is ready 🙂

          Reply
          1. Madiha
            March 6, 2019

            Thank you so much for all your help!! This recipe is amazing!! The cakes turned out just like your photo! I am so proud of myself. This recipe is definitely a keeper!

          2. Dini
            March 6, 2019

            Yay, that’s great Madiha! I’m so glad you liked the chocolate cake recipe. Thank you so much for letting me know! 🙂

  15. Ani
    January 21, 2019

    5 stars
    Can I completely substitute with oil instead of butter?

    Reply
    1. Dini
      January 21, 2019

      Hi Ani
      I haven’t made this cake with oil before, so I’m not sure how it will turn out then.
      If you do decide to try the cake with oil, I wouldn’t recommend substituting the butter with an equal amount of oil because it can make the cake too oily. Instead you could try making the cake with about 8 oz (in weight) of oil. I’d love to know how it turns out, if you do try it!

      Reply
  16. Joy
    December 14, 2018

    5 stars
    I made this chocolate cake and it was soooo yummy. Despite being new at baking this recipe made it so easy. Even a hard to please neighbor said it was the best chocolate cake he had ever had. Thanks. Sticking with you for all things cake

    Reply
    1. Dini
      December 14, 2018

      Yay! That’s great Joy, thank you so much for letting me know! I’m really happy to hear that you enjoyed the chocolate cake. 🙂

      Reply
      1. Elly
        January 3, 2021

        Hi Dini, can I make this cake using 3 pans that are 9 inches each? Instead of the 3 …8 inch ones? Will the cake still be light and fluffy? Please and thanks .~ Elly

        Reply
        1. Elly
          January 3, 2021

          Or can I use just 2 …9 inch pans? To make a 2 tier cake? Is the 3 tiers better? ..still using 9 inch pans..that’s all i have at the moment :)thanks ~ Elly

          Reply
        2. Dini
          January 4, 2021

          Hi Elly
          You can make this cake in three 9 inch cake pans. The height of the cake will be less (78% of the original height), and so the bake time will also be less – keep an eye on the cake and check on it earlier to prevent the cake from drying out. The texture shouldn’t change if it’s baked properly.

          If you only want to make 2 layers, you would only be using 85% of the batter to fill the two pans to get the same height as the 8 inch cake pans. The excess batter can be used to make a smaller cake, or used to make cupcakes if you want.
          I hope that helps!

          Reply
          1. Eloy
            January 4, 2021

            Thank you so much sweet Dini and welcome to Canada!

  17. Aimee Shugarman
    November 16, 2018

    5 stars
    The perfect fudgy cake recipe!

    Reply
  18. Renee Goerger
    November 16, 2018

    5 stars
    This truly is the best chocolate cake I’ve ever tasted! The texture and flavor is outstanding!

    Reply
  19. Stef
    September 16, 2018

    5 stars
    Woah!! This sounds so mouthwateringly good! I also love that you have an option for when you want a fudgier kind. I’m in for both!

    Reply
  20. Justine Howell
    September 16, 2018

    5 stars
    Love simple and deep chocolate cakes and this one is just that!

    Reply
    1. Tina
      August 15, 2019

      5 stars
      Hi…this is my first attempt at making chocolate cake.. it tasted really well but was a little crumbly..any advice?

      Reply
      1. Dini
        August 15, 2019

        Hi Tina!
        Thank you so much!
        This cake isn’t fudgy and has a cake crumb that is crumblier than a fudgy cake (or a mud cake). However, it shouldn’t be completely crumbly or dry. Usually that could be because of excess flour, less liquid, or the cake overbaked.
        I would love to help you figure out what might have happened and how I can help with fixing it! Would you be able to let me know if you used a scale to measure the ingredients (grams or ounces in weight), or did you use cup measurements?

        Reply
        1. Tina
          August 17, 2019

          Hi Dini,

          I did use a scale to measure the ingredients and I weighed in grams..it wasn’t dry though..just wasn’t holding its shape too well..I also didn’t have butter milk so I used milk and white vinegar to curdle it though..

          Reply
          1. Kym Kirkley
            February 9, 2020

            Is the recipe correct. 300 grams ap flour plus 2 1/2 cups ap flour? I can’t wait to try this because it looks so good.

          2. Dini
            February 9, 2020

            Hi Kym
            The recipe calls for only 300 g of AP flour. I include the cup measurements for those who prefer to use cup measurements, but I recommend using weight measurements. 300 g of flour is approximately 2 1/2 cups of flour.
            Hope that helps!

          3. Kym Kirkley
            February 9, 2020

            It does. Can’t wait to make it. Thank you, Dini

1 2 3 4
Newer Comments→

Hey There!

Hi! I’m Dini, a third culture kid by upbringing and a food-geek by nature. I was born in Sri Lanka, grew up in New Zealand and lived in Australia, and then the US, before moving to and settling down in Canada. My food is a reflection of those amazing experiences!

Read More
Front cover of the Secret Layer Cakes cookbook by Dini Kodippili.

The Flavor Bender

Cookbook

Buy now on Amazon!

Recipe Basics

  • How To Make Perfect Choux Pastry

    How To Make Perfect Choux Pastry

  • Flaky All Butter Pie Crust Recipe

    Flaky All Butter Pie Crust Recipe

  • How To Make Homemade Marshmallows (Foolproof Guide)

    How To Make Homemade Marshmallows (Foolproof Guide)

  • The Best Homemade Bread (White Bread Recipe)

    The Best Homemade Bread (White Bread Recipe)

  • Homemade French Croissants (Step By Step Recipe)

    Homemade French Croissants (Step By Step Recipe)

  • The BEST Pavlova Recipe (Step by step recipe and video)

    The BEST Pavlova Recipe (Step by step recipe and video)

Featured On

Master the science of baking!

Get my FREE Printable Cake Pan Conversion Chart!

So you’ll know how to substitute cake pans of different shapes, sizes & volumes in a pinch!

A must have resource for all pro bakers, novice bakers, and aspiring bakers alike!

Download now!

Reader Faves

  • How to make the Best Instant Pot Short Ribs

    How to make the Best Instant Pot Short Ribs

  • Perfect Quick and Easy Rough Puff Pastry

    Perfect Quick and Easy Rough Puff Pastry

  • The Best Spicy Sweet Chili Sauce (Easy Recipe!)

    The Best Spicy Sweet Chili Sauce (Easy Recipe!)

  • The Best Homemade Bread (White Bread Recipe)

    The Best Homemade Bread (White Bread Recipe)

The Flavor Bender

I love baking, cooking, experimenting with flavors and ingredients, and passing on all my tips and tricks to you!

Read More

About

Meet Dini
My Book
Work With Me
Contact

Browse

Recipes
Measurement Guide
Baking How-To’s
Shop My Faves
Privacy
Disclosure
Terms

Branding by MRD

Theme by OC

Back to Top
  • Facebook
  • Instagram
  • Pinterest
  • X
  • YouTube
2213 shares

Rate This Recipe

Your vote:


A rating is required
A name is required
An email is required

Recipe Ratings without Comment

Something went wrong. Please try again.